| [ Total Views: 97323 | Total Replies: 299 | Thread Id: 64212 ] |
| Pages: 1 2 3 .. 10 |
|
|
 StenGuns StenGuns
Veteran Volks Folk
    
Posts: 2147
Threads: 236
Registered: March 1st, 2004
Member Is Offline
Location: Sydney, Australia
Theme: UltimaBB Pro Blue ( Default )
|
| posted on August 7th, 2007 at 06:54 PM |
|
|
67 Beetle Resto - 2009 Trophy Winner!!
Well nearly 11 months ago, I started a 67 restoration which at the time, I optimistically thought would take three months.. Finally I'm about to
start the re-build phase..
Rather than add to the old thread, I thought I'd start a fresh one.. Here is the old thread..
http://forums.aussieveedubbers.com/viewtopic.php?tid=56492
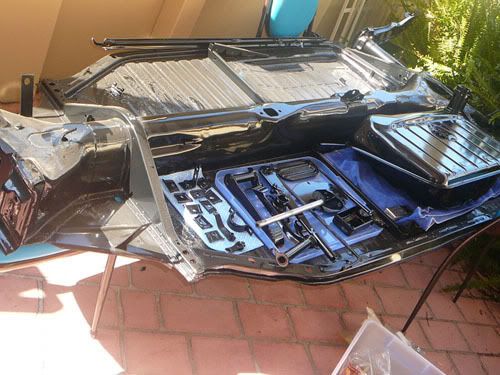
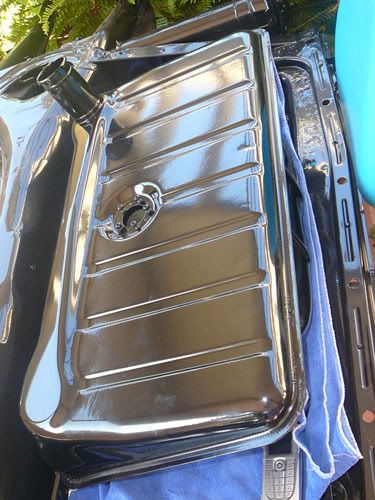
The floor pan... has been ready for months.. (the delay has been in the body restoration).. The pan has been blasted and powder coated in black..
Looks great.. Cost $1200
The body.... The more you chop into a 40 year old car, the more you find needs doing.. I have not cut any corners and the body will be substantially
better than factory condition.. Chris, (the fabricator) is an absolute genius.. He has smoothed seams, replaced sections, fitted and re-fitted
countless times the doors and other parts to get all the gaps correct..
Chris has spent 100's of hours on the body.. He wants to show the car when its finished.. I have to believe him as I've seen some of the hotrod work
he does and there are not enough superlatives for his metal creativity.. I have a dvd video of the work.. I can't work out how to post the stills but
I'll find a way later on..Anycase enough of the body.. Cost to date $8,000..
The front K&L beam is being fitted with wide 5 disc's by Boris at VVD.. All new or refurbished bits on the beam.. Cost $2200
The rear is a created around a re-built gearbox using a 3.88 Ring and Pinion and a .82 4th drive gear..
The gear box will be married to Type 1 axle shafts and type 3 brakes.. I finished stripping these parts today and they are off for media blasting and
powder coating.. The gearbox builder is reknown on this forum.. Cost $2,000
I'm hoping for 17" ESCRA's for wheels. If that doesn't happen, 15" Raders.. Cost (with tyres) $1900
The engine is a 1916 re-built about 18 months ago by another reknown AVD guru.. Built around a sweet counterweighted crank with an engle110 cam.. It
will run either EFI or twin carbs.. Not sure yet.. Finished with a ceramic coated semi merged extractor and exhaust.. Should be good for 80 - 90 hp
which is plenty.. I'm curious to dyno it when ready.. Total setup $6,500
The body will be set off with a blue that I've been told will be like "looking at the blue sky but just blue-er and a bit metallic.. Cost $2,000
The interior will be all new with leather connolly hide in light tan.. Say $5,000
Total Cost Say $30,000 once all the bits are on the car.. About 16 months should do it.. Not for the faint hearted but you get back a car that is
rebuilt and re-fitted, down to the smallest nut and bolt.. Better then when it came off the factory floor
Anycase.. For the moment.. Here are the axle shafts and brakes ready to go to the coater.. I'll post the assembly here as we get into it
[ Edited on 10-9-07 by StenGuns ]
| Error |
| Sorry, you must be a registered user in order to download attachments. |
|
|
|
|
 StenGuns StenGuns
Veteran Volks Folk
    
Posts: 2147
Threads: 236
Registered: March 1st, 2004
Member Is Offline
Location: Sydney, Australia
Theme: UltimaBB Pro Blue ( Default )
|
| posted on August 7th, 2007 at 06:57 PM |
|
|
.
.
[ Edited on 7-8-07 by StenGuns ]
|
|
|
 Sioux Sioux
Seriously Crusin Dubber
 
Posts: 178
Threads: 14
Registered: January 15th, 2007
Member Is Offline
Location: toowoomba, queensland
Theme: UltimaBB Pro Blue ( Default )
|
| posted on August 7th, 2007 at 07:42 PM |
|
|
:o
oh
my
god
the pan alone makes me drool, cant wait to see the body !!!
|
|
|
 vw54 vw54
Super Administrator
Always Waiting 4 Friday
        
Posts: 16723
Threads: 378
Registered: August 26th, 2002
Member Is Offline
Location: Sunny Sydney
Theme: UltimaBB Pro Blue ( Default )
Mood: Oval resto ongoing
|
| posted on August 8th, 2007 at 06:30 AM |
|
|
looking good Rob
|
|
|
 squizy squizy
A.k.a.: Paul
Compulsive Aussie Vee Dubber
Thinking about another dub...maybe
      
Posts: 4082
Threads: 243
Registered: December 17th, 2002
Member Is Offline
Location: Thornleigh
Theme: UltimaBB Pro Blue
|
| posted on August 8th, 2007 at 08:16 AM |
|
|
Shit Rob that's a good start.
|
|
|
 StenGuns StenGuns
Veteran Volks Folk
    
Posts: 2147
Threads: 236
Registered: March 1st, 2004
Member Is Offline
Location: Sydney, Australia
Theme: UltimaBB Pro Blue ( Default )
|
| posted on August 8th, 2007 at 01:13 PM |
|
|
Thanks.. It's been a bloody pain, stripping, collecting and organising the tear down and refurbishment of all the components etc.. A bit like a
project manager as I have minimal time, skills or accessibilty to take on too much myself.. I have therefore tried to find people who are recognised
specialists in their fields to do the hard stuff.. The body re-fabrication being (I believe) the most important part.. The re-assembly of the running
gear and floor pan will be fun.. Then marry the body and face a nightmare getting the wiring, upholstery and shiny bits all located, refurbished or
renewed and installed..
The end result I want is an old skool "rod" look with as many safety refinements (eg Brakes) and modern touches to make it that much safer, go
faster, stop quicker.. Also beautiful from every aspect..
| Quote: | Originally
posted by squizy
Shit Rob that's a good start.
|
|
|
|
 ovalkeith ovalkeith
Seriously Crusin Dubber
 
Posts: 101
Threads: 18
Registered: July 4th, 2007
Member Is Offline
Location: Brisbania
Theme: UltimaBB Pro Blue ( Default )
|
| posted on August 8th, 2007 at 01:57 PM |
|
|
You can't beat a good looking pan. Nice work. Is the cost just for the powder coating or for any repairs aswell? Either way it seems a good price.
|
|
|
 ovalkeith ovalkeith
Seriously Crusin Dubber
 
Posts: 101
Threads: 18
Registered: July 4th, 2007
Member Is Offline
Location: Brisbania
Theme: UltimaBB Pro Blue ( Default )
|
| posted on August 8th, 2007 at 02:13 PM |
|
|
| Quote: | Originally
posted by StenGuns
Minimal rust spots welded in.. The cost is for blasting, etch priming, spot repairs and final coating.. I have another if you want this done..
|
A bit far for me to come unfortunately. I was just curious as to the cost differences between what you guys pay and here in the uk.
It works out about about £400 - If I can get my oval pan done for that price I'll be very happy though it needs a fair bit of welding....damn
British weather!
|
|
|
 bond bond
Veteran Volks Folk
    
Posts: 2456
Threads: 166
Registered: July 11th, 2003
Member Is Offline
Location: brisbane
Theme: UltimaBB Pro Blue ( Default )
|
| posted on August 8th, 2007 at 06:35 PM |
|
|
love the idea of a budget - i did one - then multiplied everything by 2.
pan looks great!
nick
|
|
|
 vw54 vw54
Super Administrator
Always Waiting 4 Friday
        
Posts: 16723
Threads: 378
Registered: August 26th, 2002
Member Is Offline
Location: Sunny Sydney
Theme: UltimaBB Pro Blue ( Default )
Mood: Oval resto ongoing
|
| posted on August 9th, 2007 at 06:44 AM |
|
|
Rob
Let me know when your ready to refit the body
|
|
|
 StenGuns StenGuns
Veteran Volks Folk
    
Posts: 2147
Threads: 236
Registered: March 1st, 2004
Member Is Offline
Location: Sydney, Australia
Theme: UltimaBB Pro Blue ( Default )
|
| posted on August 11th, 2007 at 03:45 PM |
|
|
Collected the Rear Drums and Tubes from the powder coater today.. Unfortunately the backing plates had been missed and won't be ready till next
week..
I need to get the drum internal circumference polished to get rid of some pitting and shit that has collected over the years.. Not sure where to get
this done but will look into next week

|
|
|
 dangerous dangerous
A.k.a.: Dave Butler Muffin Man
23 Windows of Awesome
       
Posts: 5901
Threads: 178
Registered: January 6th, 2005
Member Is Offline
Location: Gold Coast
Theme: UltimaBB Pro Blue ( Default )
Mood: 591
|
| posted on August 31st, 2007 at 08:06 PM |
|
|
Rob has asked me to re-do his tranny.
Since transaxles are all that i think about, day and night, (and sometimes girls),
I jumped at the chance to do this one since it is my hobby.
He had two early swingaxle cores, and considering that ther were at least 40 years old,
we were able to use quite a few of the original parts from inside.
Because of Rob's proposed lower than stock profile tyres,
and his need to cruise on the highway at a respectable speed and RPM,
we have chosen to use the 3.875 diff ratio, and a 0.82 fourth ratio.
(3rd is 1.26, second is 2.06, and first is 3.80).
The crownwheel and pinion came from a late AT tranny core(L Bug),
and the 0.82 fourth ratio is originally from a 1968 bus tranny.
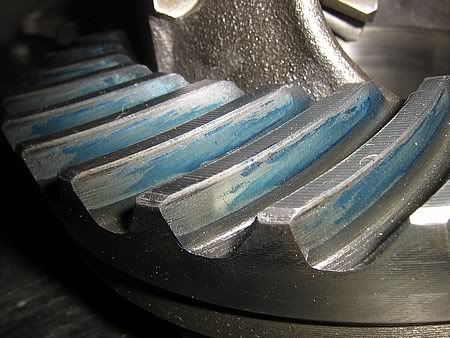
Here is the difference between the original 4.375 diff and the replacement 3.875.
This is believed to be the strongest pinion that VW made for the beetle tranny.
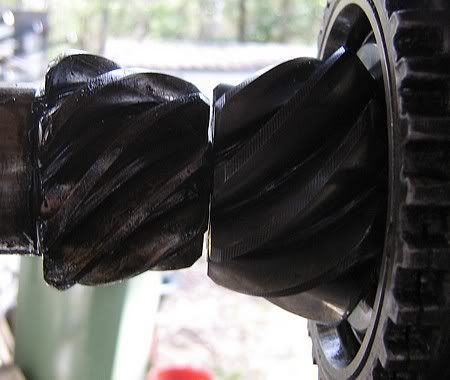
With some swapping and adjusting of the various diff shims
I was able to fit it into a late swingaxle case(from a 1300 twin port car),
and get the pattern to where I wanted it.
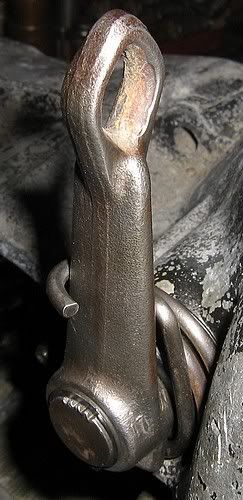
This late case has the larger pinion bearing, a 12 volt bellhousing, and a nice long clutch arm.
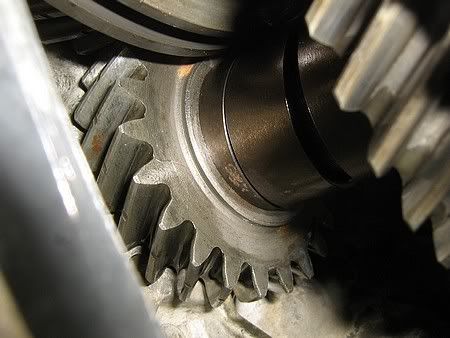
Here is a shot of the .82 fourth gear whilst the gearbox was in the jig
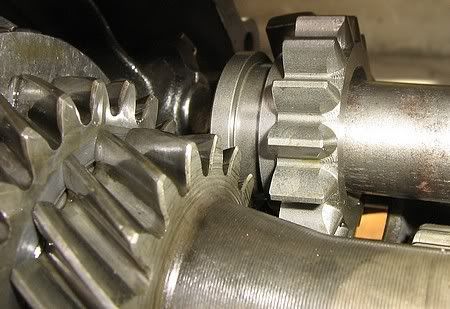
for one of the trial assembly and checking routines.
Because of the additional strength that VW added to the later cases near reverse gear,
this case requires a different reverse idler gear than the ones from early sixties bugs,
so here is a shot of the new gear.
It is very common for the genuine gear to 'lean' the teeth over
and consequently pop out of reverse.
This gear is a special extra strong one I got from the USA
and it is from my secret stash of spiffy stuff I have been hoarding.
I used a new German seal and some Curil T, before fitting the clutch slide tube.
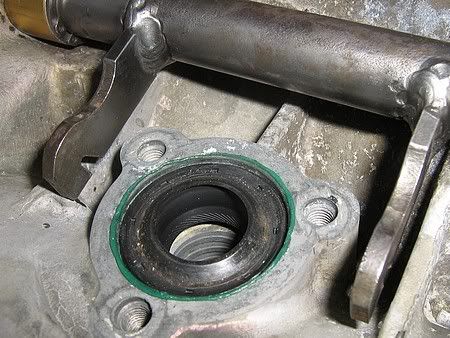
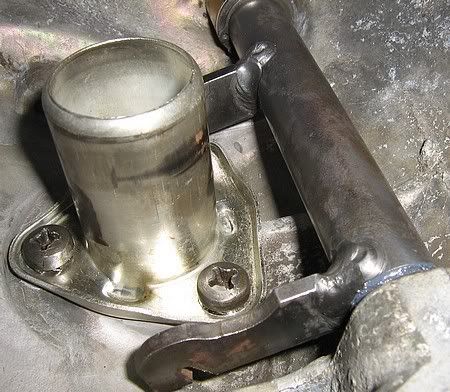
I also welded the clutch fork for additional strength.
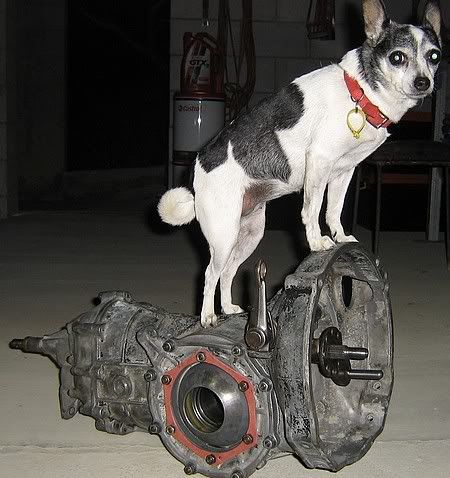
Here is the finished tranny with my helper for the day.
Rob can get it looking all spiffy with paint and polish detail if he so wishes.
Your car should be a pretty sweet ride Rob!
| Quote: | Originally
posted by westi
That's mad Alan.
|
|
|
|
 StenGuns StenGuns
Veteran Volks Folk
    
Posts: 2147
Threads: 236
Registered: March 1st, 2004
Member Is Offline
Location: Sydney, Australia
Theme: UltimaBB Pro Blue ( Default )
|
| posted on September 1st, 2007 at 11:09 AM |
|
|
Front Beam
Awesome Dave!.. I'm totally in your debt for this.. Thanks for the quick turn around!~
Well with the box finished I thought I'd go and collect the front beam from Boris at VVD/Campsie and stop for a talk with Con at VW
Village/Kensington about the next stages.. Con will be looking after the rebuild of the floor pan/ running gear etc.. His son (George) will do the EFI
modification to the 1916..
Next stop is Coventry Fasteners in Alexandria to replace every nut, bolt and screw required for the assembly..
Here is the refurbished adjustable front beam..


Con.. A top bloke!

|
|
|
 bond bond
Veteran Volks Folk
    
Posts: 2456
Threads: 166
Registered: July 11th, 2003
Member Is Offline
Location: brisbane
Theme: UltimaBB Pro Blue ( Default )
|
| posted on September 1st, 2007 at 12:35 PM |
|
|
nice beam rob! very fortunate to have a box built for you by dave!
will have to keep us up to date with the efi mods!
nick
|
|
|
 StenGuns StenGuns
Veteran Volks Folk
    
Posts: 2147
Threads: 236
Registered: March 1st, 2004
Member Is Offline
Location: Sydney, Australia
Theme: UltimaBB Pro Blue ( Default )
|
| posted on September 1st, 2007 at 02:08 PM |
|
|
Brakes Overhauled
Thanks Nick.. Yes, I'm happy the tranny will stand up to the rest of the car..
Rear Type 3 brakes re-build started today.. I stripped the brakes and have had all the components soaking in undiluted de-greaser for 2 weeks.. The
shit comes off no problem with a wire wheel on a drill clamped to my work bench.. Revealing a nicely polished finish for the re-assembly.. I was going
to paint these bits grey but can't see the need really..
Before cleaning

After cleaning

Comparison

FOOTNOTE:
[After all of this cleaning and screwing around, we discovered that the type 3 brakes had been retro fitted with 1500 brake shoes and slave
cylinders.. Also the drums had next to no tolerance left and needed replacing..
Luckily Con had a set of early type 3 shoes and cylinders. We also located a new set up drums from Micks.. Oh the joy of it all]
[ Edited on 10-9-07 by StenGuns ]
|
|
|
 StenGuns StenGuns
Veteran Volks Folk
    
Posts: 2147
Threads: 236
Registered: March 1st, 2004
Member Is Offline
Location: Sydney, Australia
Theme: UltimaBB Pro Blue ( Default )
|
| posted on September 10th, 2007 at 05:21 PM |
|
|
Steering Column
I've located a late bug (74 I think) steering column.. The original reason was to do with safety as the later rods had a collapsible section..
Another advantage is that the late bugs have a much more comprehensive array of switches on the steering column stalks.. So I can wire all my
accessories, Horns, Lights, Blinkers, Dip, Washer through the column..
The steering rods are both the same length however the diameters are different (late one is wider).. The late one fits the foot that attaches to the
steering box so all good there..
The bracket on the column of the late bug is different however this is only a matter of setting new holes and making sure everything lines up
correctly..
I'm well pleased to move on.. The next step is locating all the brightware bits.. Side strips, good quarter windows.. I want all OG stainless in near
perfect condition so this may take a while..
Here's the column pix


|
|
|
 Dasdubber Dasdubber
A.k.a.: Alan Agyik
23 Windows of Awesome
DAS Resto Haus
       
Posts: 5746
Threads: 289
Registered: August 26th, 2002
Member Is Offline
Location: Gold Coast
Theme: UltimaBB Pro Blue
Mood: feeling fine...
|
| posted on September 10th, 2007 at 07:23 PM |
|
|
Nice detail Rob - I saw your tranny in the midst of rebuild at Dave's....he is very meticulous as you are with the rest of the car so it will fit in
well!
Pep the wonder-dog can only lift spanners up to a 13mm though, any bigger and she gets too front heavy and topples over!

|
|
|
 barls barls
A.k.a.: Mr indestructible
Super Administrator
Causer of Chaos and Mayhem
        
Posts: 9470
Threads: 296
Registered: June 22nd, 2004
Member Is Offline
Location: cruising in denistone east
Theme: UltimaBB Streamlined2
Mood: indestructible? and listening to the voices
|
| posted on September 10th, 2007 at 07:31 PM |
|
|
good work rob good to see con is still around hes a top bloke helped me out many a time when i was living over there
|
|
|
 barls barls
A.k.a.: Mr indestructible
Super Administrator
Causer of Chaos and Mayhem
        
Posts: 9470
Threads: 296
Registered: June 22nd, 2004
Member Is Offline
Location: cruising in denistone east
Theme: UltimaBB Streamlined2
Mood: indestructible? and listening to the voices
|
| posted on September 10th, 2007 at 08:27 PM |
|
|
do you still need that switch ive got in the shed mate
|
|
|
 StenGuns StenGuns
Veteran Volks Folk
    
Posts: 2147
Threads: 236
Registered: March 1st, 2004
Member Is Offline
Location: Sydney, Australia
Theme: UltimaBB Pro Blue ( Default )
|
| posted on September 10th, 2007 at 08:30 PM |
|
|
Woops.. No mate.. Wouldn't mind a 12V wiper assembly though..
|
|
|
 barls barls
A.k.a.: Mr indestructible
Super Administrator
Causer of Chaos and Mayhem
        
Posts: 9470
Threads: 296
Registered: June 22nd, 2004
Member Is Offline
Location: cruising in denistone east
Theme: UltimaBB Streamlined2
Mood: indestructible? and listening to the voices
|
| posted on September 10th, 2007 at 09:14 PM |
|
|
ill have a look later in the week to see if he has one. ill return the switch back to him then
|
|
|
 StenGuns StenGuns
Veteran Volks Folk
    
Posts: 2147
Threads: 236
Registered: March 1st, 2004
Member Is Offline
Location: Sydney, Australia
Theme: UltimaBB Pro Blue ( Default )
|
| posted on September 12th, 2007 at 03:48 PM |
|
|
Gearbox Ready
The gearbox arrived yesterday from Dangerous.. Well packed mate!
I hit it with wire wheels etc and then cleaned it thoroughly with acetone.. Polished up nice..
Then three coats of "Aluminium Color" engine enamel. It looks fantastic!
Tomorrow, down to the shop with the new drums for assembly..


|
|
|
 555bug 555bug
Custom Title Time!
WRX Bug Boy
    
Posts: 1123
Threads: 79
Registered: August 26th, 2002
Member Is Offline
Location: Brisbane
Theme: UltimaBB Vintage
Mood: turbo charged
|
| posted on September 12th, 2007 at 09:46 PM |
|
|
nice work! should be quite the car when it's finished |
|
|
 StenGuns StenGuns
Veteran Volks Folk
    
Posts: 2147
Threads: 236
Registered: March 1st, 2004
Member Is Offline
Location: Sydney, Australia
Theme: UltimaBB Pro Blue ( Default )
|
| posted on September 15th, 2007 at 07:55 PM |
|
|
Column cleaned, stripped and re-painted..
[IMG]
|
|
|
 vw54 vw54
Super Administrator
Always Waiting 4 Friday
        
Posts: 16723
Threads: 378
Registered: August 26th, 2002
Member Is Offline
Location: Sunny Sydney
Theme: UltimaBB Pro Blue ( Default )
Mood: Oval resto ongoing
|
| posted on September 15th, 2007 at 09:35 PM |
|
|
You will have to check the PARK position of the wiper motor before you fit the wipper arms otherwsie you may have to rotate the drive arm 180
degrees to get the arms to park in the correct position etc etc etc
|
|
|
 StenGuns StenGuns
Veteran Volks Folk
    
Posts: 2147
Threads: 236
Registered: March 1st, 2004
Member Is Offline
Location: Sydney, Australia
Theme: UltimaBB Pro Blue ( Default )
|
| posted on September 19th, 2007 at 12:07 PM |
|
|
Assembly Stage 1
Coming together nicely..
All the time cataloging, cleaning, replacing or refurbishing the parts as they were stripped down, is certainly paying off now. All clean and
shiny!


|
|
|
 bond bond
Veteran Volks Folk
    
Posts: 2456
Threads: 166
Registered: July 11th, 2003
Member Is Offline
Location: brisbane
Theme: UltimaBB Pro Blue ( Default )
|
| posted on September 19th, 2007 at 01:08 PM |
|
|
do the dust caps on the vvds kit not fit???
nick
|
|
|
 StenGuns StenGuns
Veteran Volks Folk
    
Posts: 2147
Threads: 236
Registered: March 1st, 2004
Member Is Offline
Location: Sydney, Australia
Theme: UltimaBB Pro Blue ( Default )
|
| posted on September 19th, 2007 at 07:01 PM |
|
|
Lines all plumbed in this afternoon.. Brakes bled.. Sachs shocks bolted on.. Sway bar on.. Rear Bump stops arrive tomorrow.. Forgot camera.. Pix
tomorrow..
[ Edited on 20-9-07 by StenGuns ]
|
|
|
 vw54 vw54
Super Administrator
Always Waiting 4 Friday
        
Posts: 16723
Threads: 378
Registered: August 26th, 2002
Member Is Offline
Location: Sunny Sydney
Theme: UltimaBB Pro Blue ( Default )
Mood: Oval resto ongoing
|
| posted on September 19th, 2007 at 08:34 PM |
|
|
do the dust caps on the vvds kit not fit???
they take the standard origional cap and fit perfectly
the pic is not right
|
|
|
 StenGuns StenGuns
Veteran Volks Folk
    
Posts: 2147
Threads: 236
Registered: March 1st, 2004
Member Is Offline
Location: Sydney, Australia
Theme: UltimaBB Pro Blue ( Default )
|
| posted on October 21st, 2007 at 09:00 AM |
|
|
Headlights
Still waiting on the body to be completed.. A bit frustrating but we had issues with the alignment on the front passenger guard. Also we are recessing
the seatbelt inertia reels into the B pillars (don't want to give too much away).. Whats else?.. Oh, custom running boards, repositioned battery
etc.. All this takes time and patience..
While waiting, I'm slowly collecting all the bits I'll need for the assembly.. I purchased hyperbright LED indicator lights and have finished making
up indicator pods to fit inside the 356 headlight housing.. Here is the unit.

Rear view Installed

Front view Installed.

Another

|
|
|
| Pages: 1 2 3 .. 10 |