| [ Total Views: 32117 | Total Replies: 286 | Thread Id: 31777 ] |
| Pages: 1 .. 6 7 8 9 10 |
|
|
 Turbo54 Turbo54
Veteran Volks Folk
    
Posts: 2220
Threads: 268
Registered: July 13th, 2004
Member Is Offline
Theme: UltimaBB Pro Blue ( Default )
Mood: Boost'n
|
| posted on January 29th, 2008 at 09:05 AM |
|
|
No swapping it over. Yes it is a great colour but I have something else in mind. I have also stripped all the interior out and made it a standard and
scrap all the body shultz off the inside of engine bay, under bonnet, under all four wheelarches and under the every other area so by the time I paint
the inside and all these areas I might as well blow the rest over again.
T54
C'mon kids gather round,
there's a new sensation hitting town,
It's moving straight, low to the ground,
it'll pick you up when your feeling down.
|
|
|
 Turbo54 Turbo54
Veteran Volks Folk
    
Posts: 2220
Threads: 268
Registered: July 13th, 2004
Member Is Offline
Theme: UltimaBB Pro Blue ( Default )
Mood: Boost'n
|
| posted on January 31st, 2008 at 05:00 PM |
|
|
Hi All,
A quick update. The brakes have been started and should move along quite fast as the setup I got of Malcolm on here is awesome. I am so happy that I
got these. I must admit I was a little shady at the start on how easy they would bolt up but they have measured up fantastic. The handbrake will even
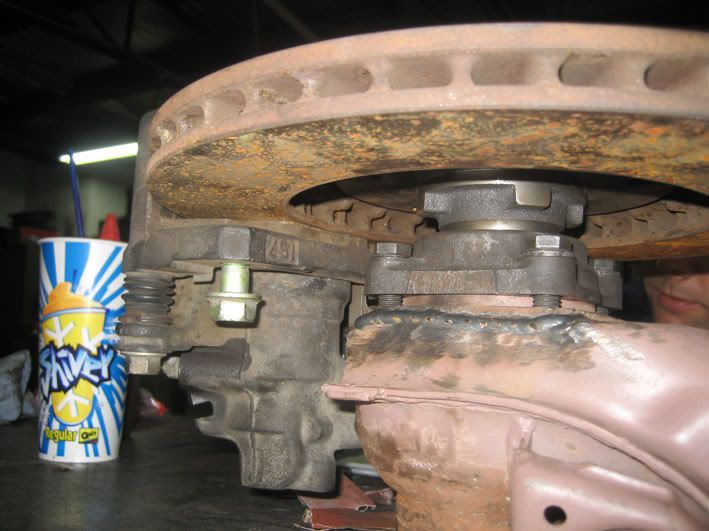
line up, run under the arm and still use the factory mounts. The caliper mounts are almost perfectly inline with the arms 4 bolt flange. These are the
rears as i am now working from the back forward to finish the project. The IRS arms have also been narrowed 23mm on each side to keep the track in.
The brakes are off a Honda NSX and the stubs are off a 181 thing (these are meant to be really strong, we'll soon see) if you haven't read any of
the rest of the thread. I spoke to a guy who owned a twin turbo NSX and asked him how it pulled up.
His answer was "They pull up pretty average between 300 and 200 but under that they are great!". I dont think I am going to have any problems.
Post more soon.
T54
Putting the stubs in the arms with all parts layed on table


Thinking hard about caliper mounting bracket

The perfect lineup
C'mon kids gather round,
there's a new sensation hitting town,
It's moving straight, low to the ground,
it'll pick you up when your feeling down.
|
|
|
 Turbo54 Turbo54
Veteran Volks Folk
    
Posts: 2220
Threads: 268
Registered: July 13th, 2004
Member Is Offline
Theme: UltimaBB Pro Blue ( Default )
Mood: Boost'n
|
| posted on March 7th, 2008 at 04:23 PM |
|
|
Hi All,
More has been happening on the dub in the last few weeks and I am just waiting on a few more bits and pieces. I promise a mega download of a heap of
bits over the next week.
The rear brakes are almost all done, they are n the CNC machine right now having the plates made up for the calipers. Then the rear arms need to be
drilled and sleeved as they distorted a little when they were narrowed. Then it is fit the new bearings and bolt it all on. Then the rear will be
positioned and wheels fitted up properly. Also waiting on a set of 2" widened rears but in the meantime I am borrowing one off another adelaide
enthusiast who is building something a little special 18" porsche wheels etc. and it looks fat.
When I drop it to the wishful height it has that tubbed feel I am looking for. I am really happy about this.
The front brakes are in the works also and I still intend to get it rolling fo the next VW day down the bay. Just looking at ways to get the disk to
bolt to a hub in the right position for the calipers. Malcolm if you read this please shoot me a U2U on how you were thinking of doing it.
The calipers almost line up so the plate wont be very hard just getting the hub right.
Also have got the oberg oil filter mounted directly onto the deep sump under the oil pump and the air intake pipe from the turbo to under the rear
guard. In previous pics you can see it made out of PVC tube which I did a few alts and then got it made out of thin ali. Mounted to the turbo and
airfilter I should get great flow as well as keeping well clear of the exhaust manifold.
I have also started match porting the manifolds to the heads and joins. This is a little tricky but with plenty of patience and going slowly it should
work out fine. I have marked all the areas that need grinding and will start that when it's not 40+ degrees in the shed. The stainless files are
shitty on your skin so you need to wear overalls and that is way too hot.
Hopefully gearbox will be really next week and then can be fitted.
All the paint stripping is done but I am waiting for a few more things before I send it to the strippers. Axles and rear fork bracing is next,
i'll keep you posted.
Have a good one.
T54
C'mon kids gather round,
there's a new sensation hitting town,
It's moving straight, low to the ground,
it'll pick you up when your feeling down.
|
|
|
 Turbo54 Turbo54
Veteran Volks Folk
    
Posts: 2220
Threads: 268
Registered: July 13th, 2004
Member Is Offline
Theme: UltimaBB Pro Blue ( Default )
Mood: Boost'n
|
| posted on March 26th, 2008 at 10:45 AM |
|
|
Hi All,
The car is progressing and here is some of the phtos I have been promising. I will ty to post more tomorrow if possible.
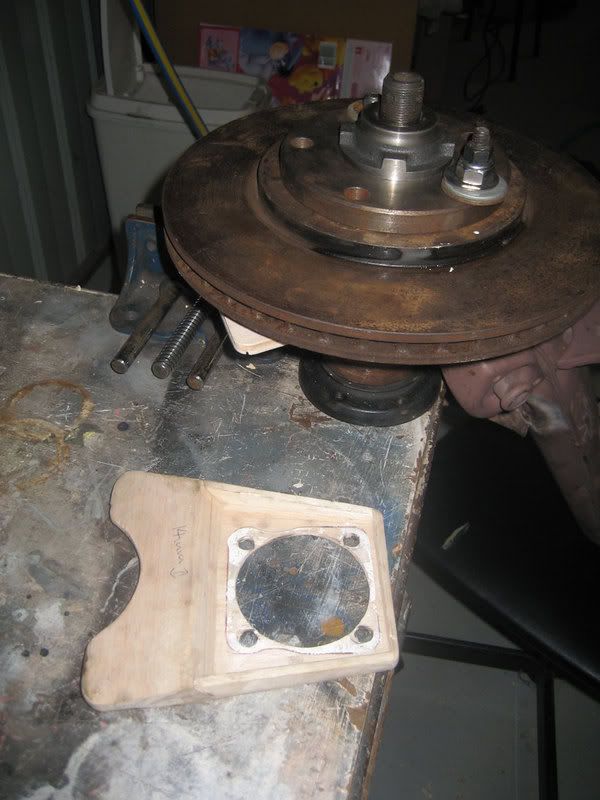
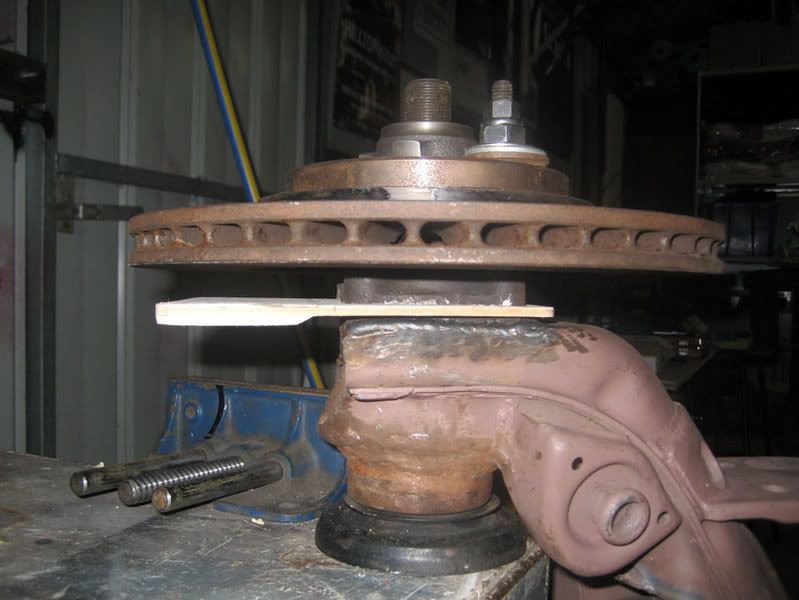
We have had a bit of trouble with the offset of the wheels I have got and the rear calipers fouling on the rim so the plate I have had machined is a
test and is now in the scrap. I have been building lots of different brackets from Balsa and now are getting close. We have had to put the disk on the
rear of the hub and run a 10mm spacer to get it all to clear. This positioned the 8" wheel an inch under the 2" widened guard and will most likely
be more once it is lower and more squat.
This is the original template when the caliper mount is higher than where it bolts to the arm.
This is the new plate where the caliper will be lower than the arm
As the arms have been narrowed it has warped the bearing housing lip slightly and this is going off this week to be bored and sleeved.
I am still aiming for the show but if it doesn't happen it doesn't happen.
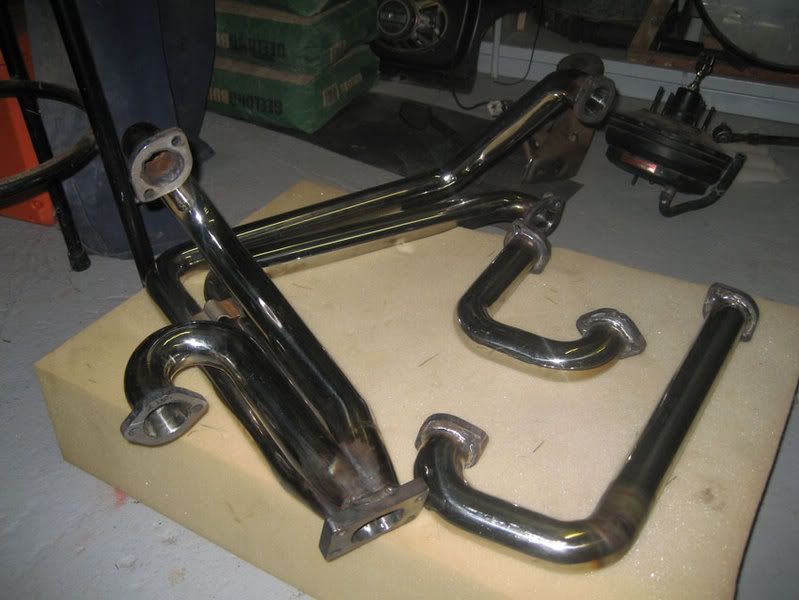
I have almost finished portmatching the turbo manifold. I have spent many hours doing this and it just needs a little finishing but it shouldn't take
too long. I have to go down and get some fine sanding wheels.
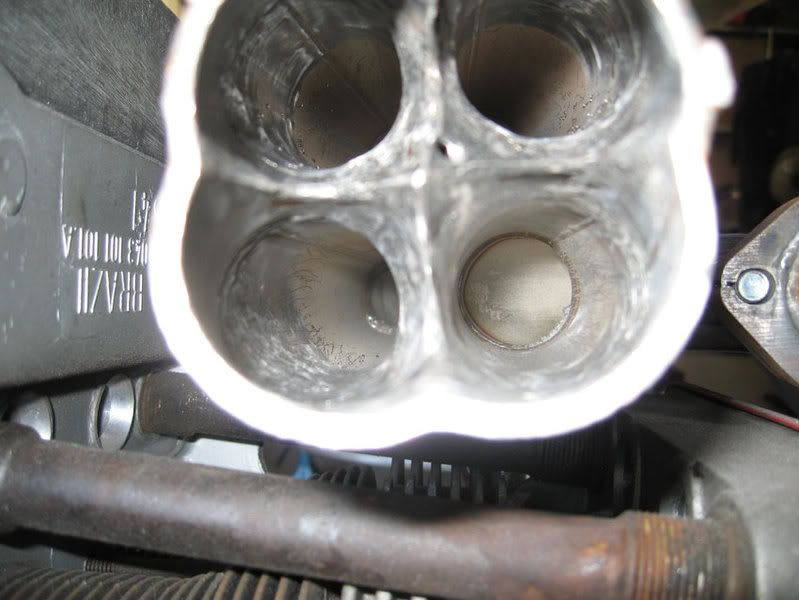
This is before the turbo flange was welded on and the first rough cut of the collector. It took about 2 hours per port to get it too this with
grinding and filling to get the perfect point. You have to be careful if you pick it up from there as I have stabbed myself in the finger a few times.
Sorry for the bad pic.
Then the flange went on and there was more grinding and smoothing. It looks a little rough in the pic but that is just the heated metal where the
welds have penetrated through. It is all nice and smooth.
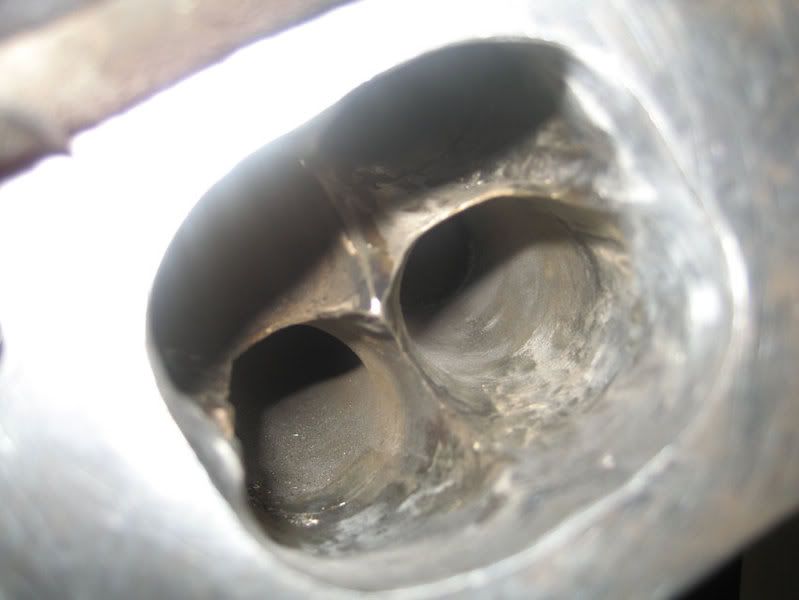
I have then started matching the other ports. As you can see here the one on the right is how it was and the one on the left is done.
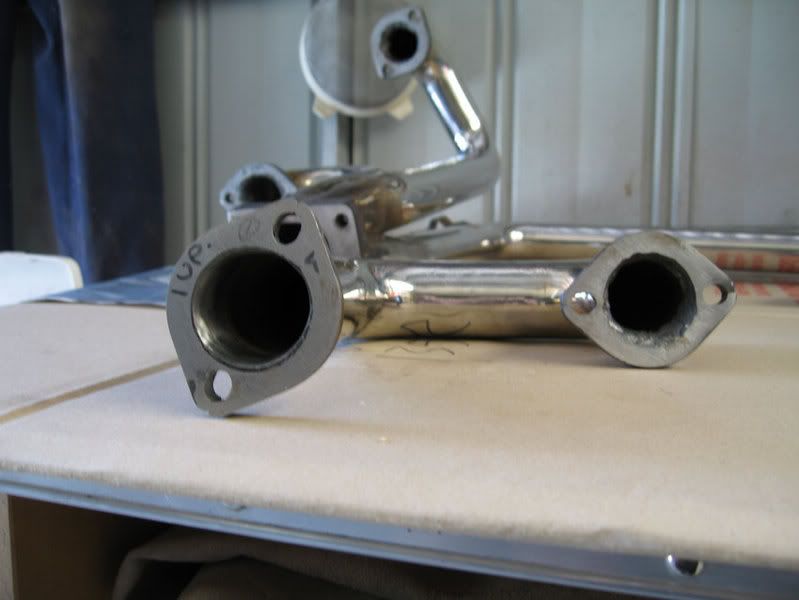
Another one finished, These also took about an hour each and some very sore hands.
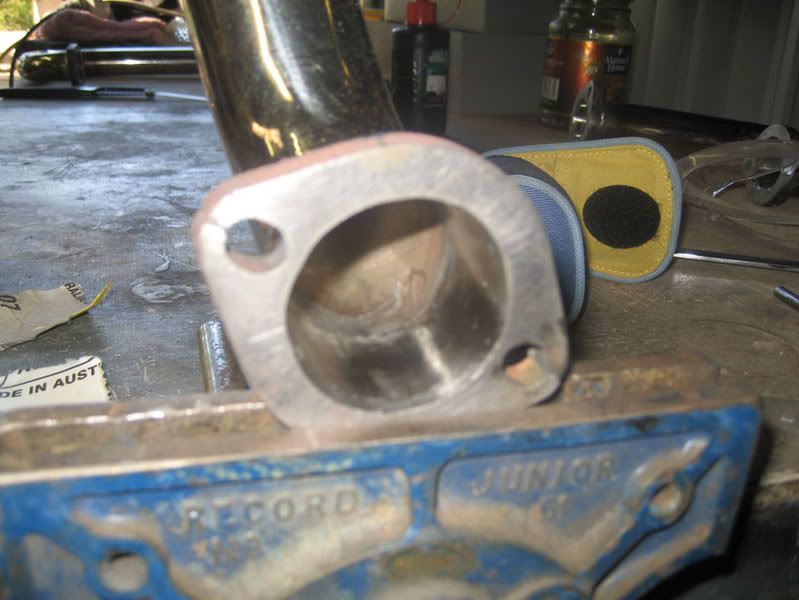
The header with only finishing to go! Yeehaa!
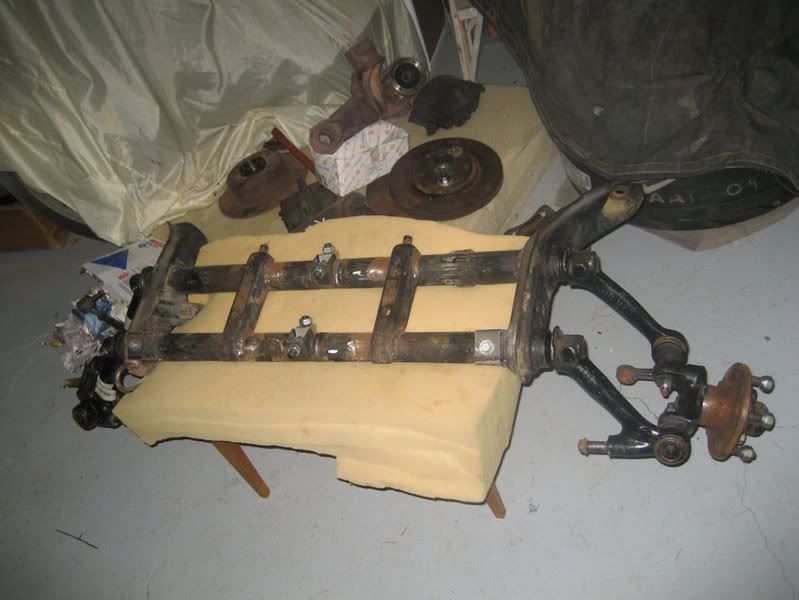
I have also trail fitting my front beam so put it all together and will slide it under the car tonight. Then I can hook up all the steering arms to
check nothing fould on the EFI tanks, pumps and filters under the fuel tank.
It has been narrowed by 2.5" and have adjusters welded in. I also have placed on a set of hubs that will allow me to fit up the rather large ford
disks. Thanks Glen.
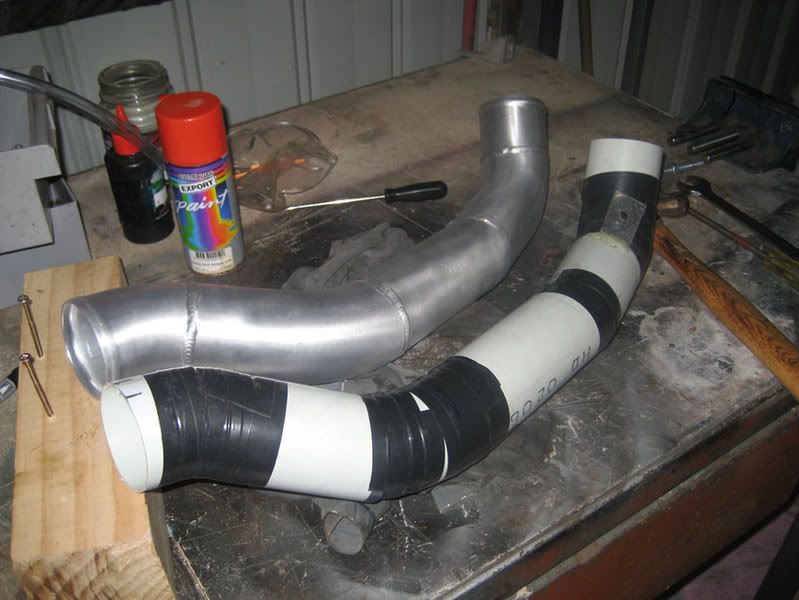
Also got my air intake tube back from the welders. Once again a great job on the welds. You may remember this from back in the post somewhere. I have
a template made out of PVC and had it copied in Aluminium.
I will post a pic on how it clears the oberg filter and the pod filter behing the rear wheel soon.
Thats it for now.
T54

C'mon kids gather round,
there's a new sensation hitting town,
It's moving straight, low to the ground,
it'll pick you up when your feeling down.
|
|
|
 westi westi
Custom Title Time!
what the
    
Posts: 1610
Threads: 28
Registered: August 30th, 2005
Member Is Offline
Location: milperra
Theme: UltimaBB Pro Blue
Mood: not blue, pink
|
| posted on March 26th, 2008 at 11:53 AM |
|
|
coming along nicely.
can't wait to se it finished,when are you aiming for.
down sharon.
 |
|
|
 Turbo54 Turbo54
Veteran Volks Folk
    
Posts: 2220
Threads: 268
Registered: July 13th, 2004
Member Is Offline
Theme: UltimaBB Pro Blue ( Default )
Mood: Boost'n
|
| posted on March 26th, 2008 at 12:32 PM |
|
|
Year from now or there abouts.
C'mon kids gather round,
there's a new sensation hitting town,
It's moving straight, low to the ground,
it'll pick you up when your feeling down.
|
|
|
 bond bond
Veteran Volks Folk
    
Posts: 2456
Threads: 166
Registered: July 11th, 2003
Member Is Offline
Location: brisbane
Theme: UltimaBB Pro Blue ( Default )
|
| posted on March 26th, 2008 at 03:15 PM |
|
|
looks awesome heath. a real credit to you.
who is the other enthusiast fitting 2" widened fenders and 18" porsche rims?
appreciate their details. thanks.
nick
|
|
|
 Turbo54 Turbo54
Veteran Volks Folk
    
Posts: 2220
Threads: 268
Registered: July 13th, 2004
Member Is Offline
Theme: UltimaBB Pro Blue ( Default )
Mood: Boost'n
|
| posted on March 26th, 2008 at 03:57 PM |
|
|
Not too sure if he wants to let it out but they are 4" widened with alloy rear arms, brembos and 18" cup wheels. It's going to go round corners
real well.
I will see if he wants to put up some pics.
T54
C'mon kids gather round,
there's a new sensation hitting town,
It's moving straight, low to the ground,
it'll pick you up when your feeling down.
|
|
|
 humpty humpty
Bishop of Volkswagenism
     
Posts: 3336
Threads: 139
Registered: September 2nd, 2002
Member Is Offline
Location: Fremantle
Theme: UltimaBB Pro Blue ( Default )
Mood: Totally boosted!
|
| posted on March 26th, 2008 at 06:58 PM |
|
|
What is it about you East Coast guys and your wide guards? 
Anyway.... Top stuff Heath.... It sure is coming along nicely... I have no idea how you manage to fit it all in.... Family, house and the amazing
amount of development you have in this car.... Keep it up!
|
|
|
 Turbo54 Turbo54
Veteran Volks Folk
    
Posts: 2220
Threads: 268
Registered: July 13th, 2004
Member Is Offline
Theme: UltimaBB Pro Blue ( Default )
Mood: Boost'n
|
| posted on March 27th, 2008 at 04:53 PM |
|
|
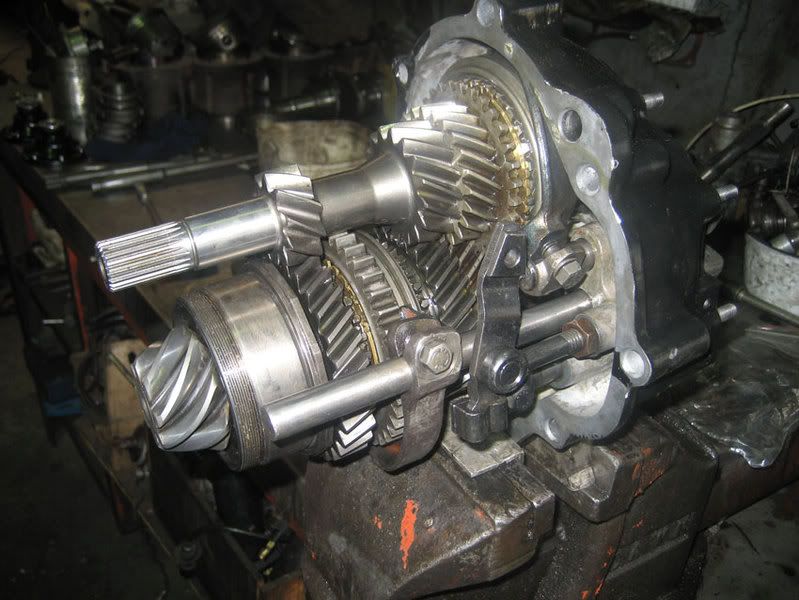
Went down and checked out the progress on my gearbox this afternoon,
Here's some pics. Will try to post some more of what I have been up to tomorrow.
T54


C'mon kids gather round,
there's a new sensation hitting town,
It's moving straight, low to the ground,
it'll pick you up when your feeling down.
|
|
|
 humpty humpty
Bishop of Volkswagenism
     
Posts: 3336
Threads: 139
Registered: September 2nd, 2002
Member Is Offline
Location: Fremantle
Theme: UltimaBB Pro Blue ( Default )
Mood: Totally boosted!
|
| posted on March 27th, 2008 at 09:12 PM |
|
|
Now thats some pretty stuff there Heath.... Its almost a shame to lock it all up inside the transaxle case!
Almost!
|
|
|
 Turbo54 Turbo54
Veteran Volks Folk
    
Posts: 2220
Threads: 268
Registered: July 13th, 2004
Member Is Offline
Theme: UltimaBB Pro Blue ( Default )
Mood: Boost'n
|
| posted on March 31st, 2008 at 09:36 AM |
|
|
Hi All,
Here's some of the other body mods that have been taking place. These have been mentioned back in here somewhere but I have never posted pics.
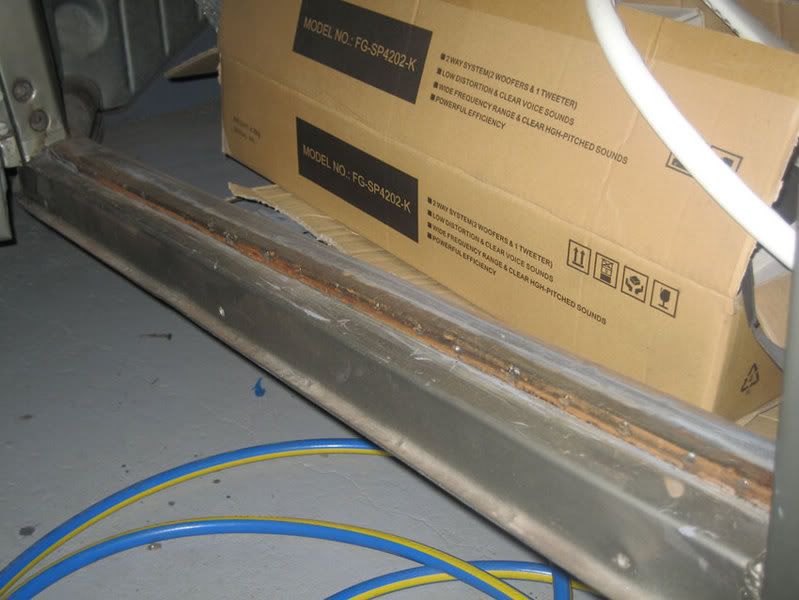
I have now removed all the tabs and interior mounting clips (not just snapped them off) to create my own look interior that I have in mind. Also dont
want the weight of a full trimmed beetle.
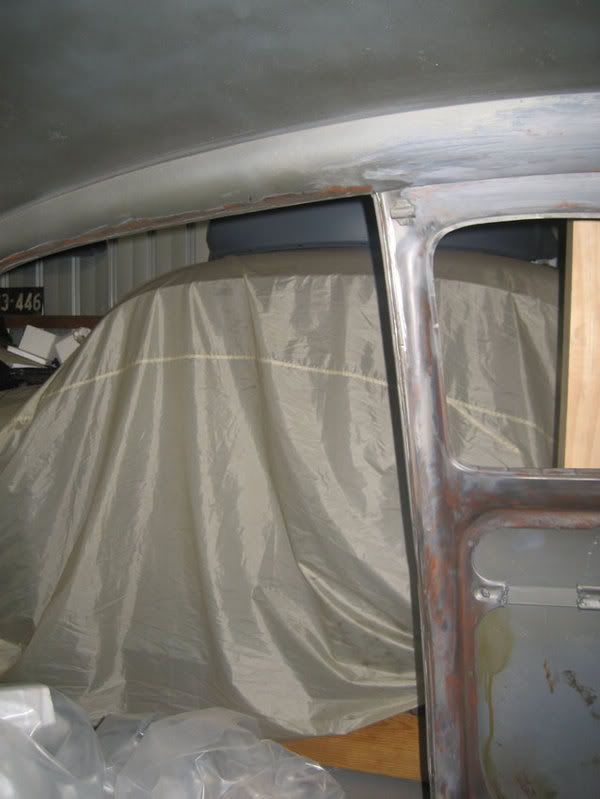
Heater channel lip removed:
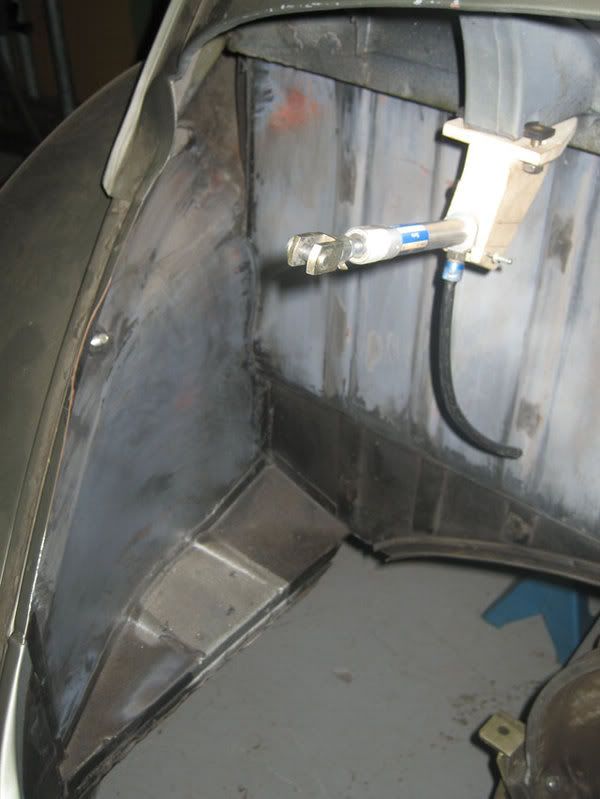
Also as my injector stacks come sreally close to the body I have been looking for a piece of pressed metal that would increase clearance ans look
factory.
I marked the area out in sliver paint that I will have to cut out and that gave me the shape for what of was looking for.
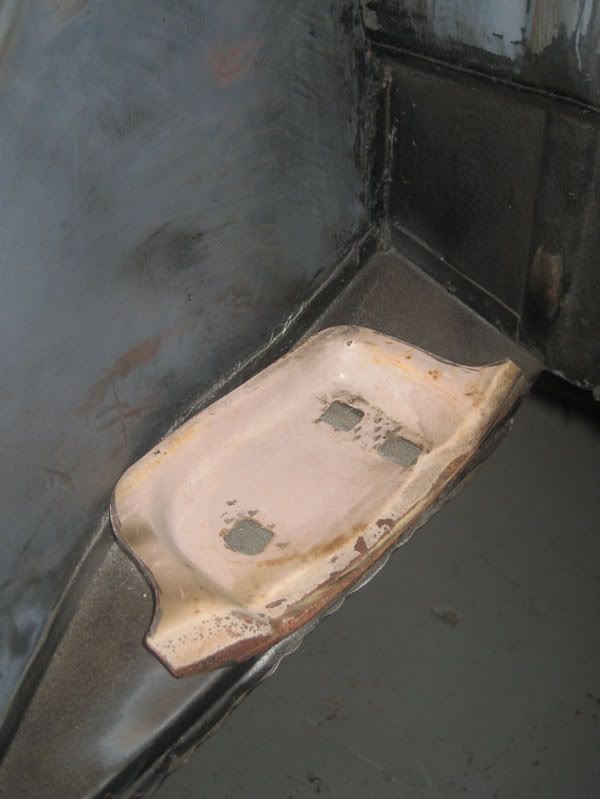
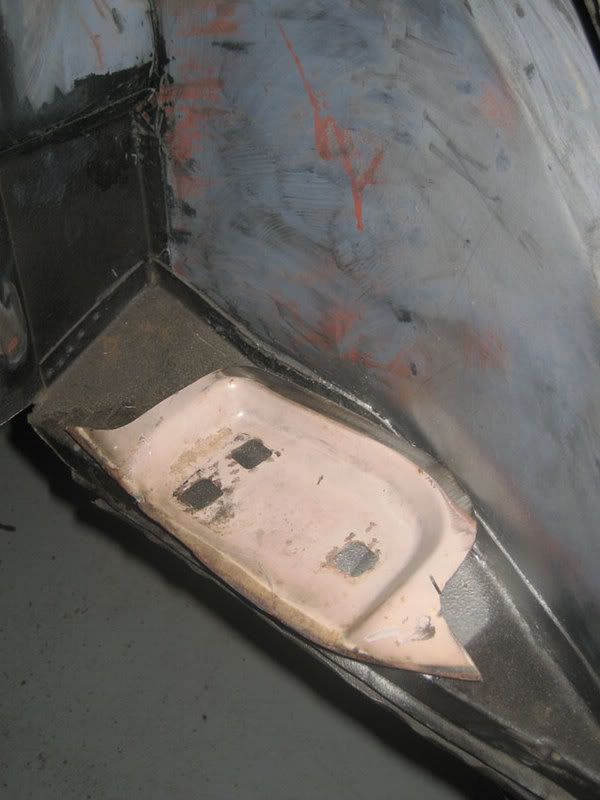
I then cut a template and went to wreckers holding up templates to indents looking for the right shape. I was looking at 180B datsun rear quarters
where the bumper is recessed but could weld a peice of 180B into a VW on principle.
It also did fit but would do if I couldn't find anything else. I went to a old holden place and was looking at bumper recesses when I saw a doo jam
striker plate section of a FB. It was a great match so I bought them home.
What I didn't realise that it was structural and there was 3 of them welding togetherinside each other. After drilling all the spot welds I noe have
the perfect spacers. These will be placed in by my panel beater as I don't trust myself.
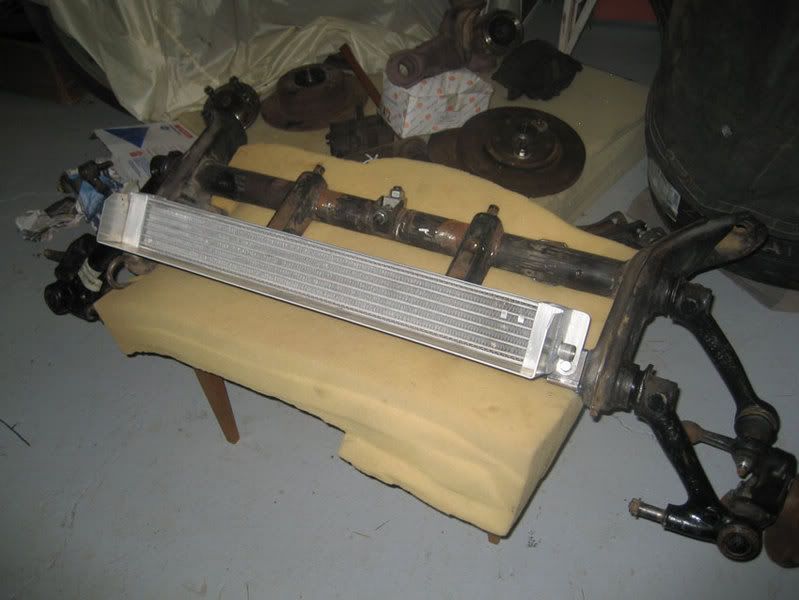
I have also plumbed my hoses through the heater channel for my radiator on the beam and the Ice tank I have made for the intercooloers.
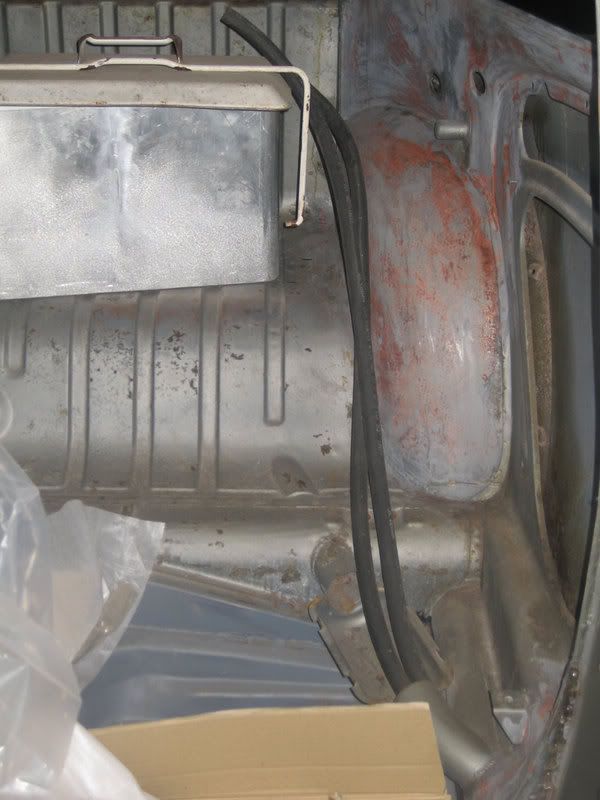
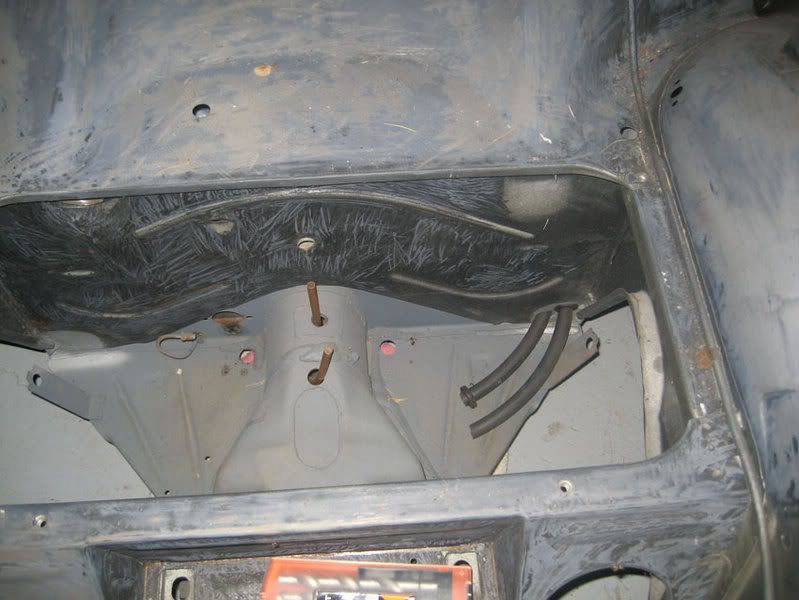
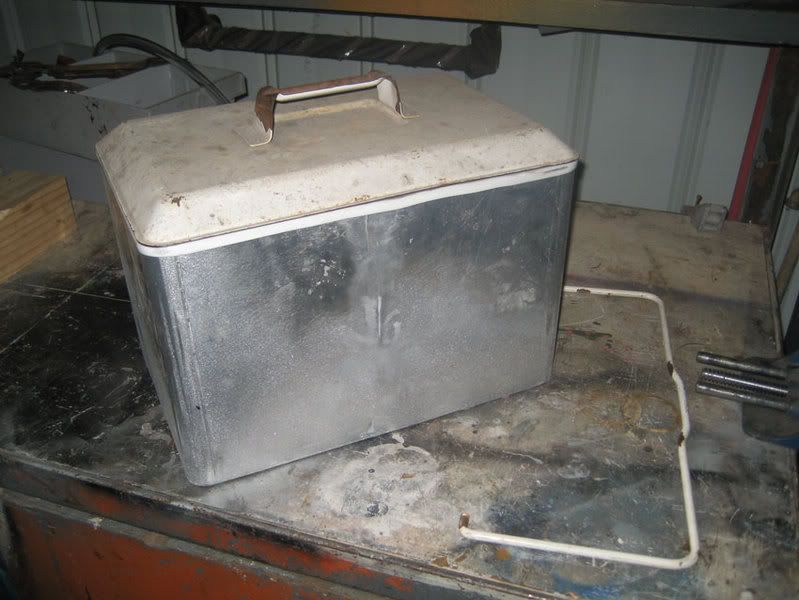
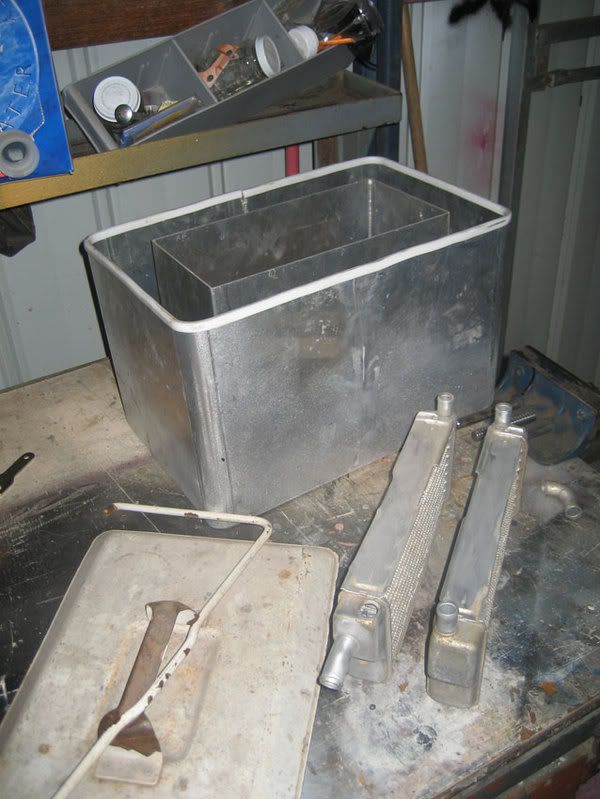
The Ice tank is an old esky I have had for a while but we have built a new esky for it and are using the handle and lid for the look.
It is 4mm aluminium and has an internal section for the ice to go in. The water will be drawn from the outside area run through the coolers through
the radiator and back to the tank. It will then run through the 2 radiators (WR450 Radiators) surrounded with ice and then flow into the outer tank
going through the process all over again. I have done some tests and the temp drops are amazing. I am just awaiting the gearbox and oil cooler to be
installed and I can work out where the water drains can be, then it will be welded up.
Radiator on front beam:
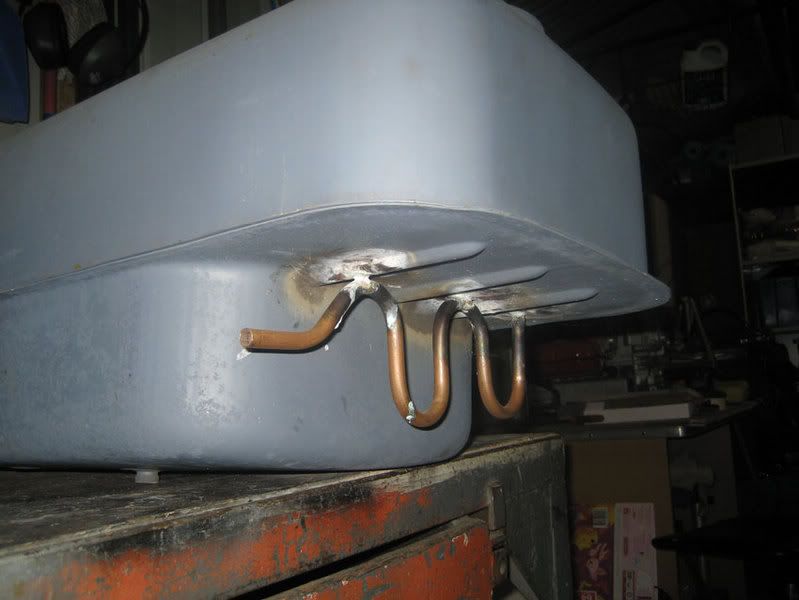
I have also modified my tank for a breather so when I pump the fuel back into the tank it doesn't gas up and pressure lock anything. I know that the
cap does this but I wanted to make sure it is enough.
I made the opening at the top really close to the bottome of the cap and don't think petrol could go down there but if it did it couldn't get
through the loops and will turn to vapour.It had been acid dipped before any welding took place and only etch primed on outside.
Standard tank:
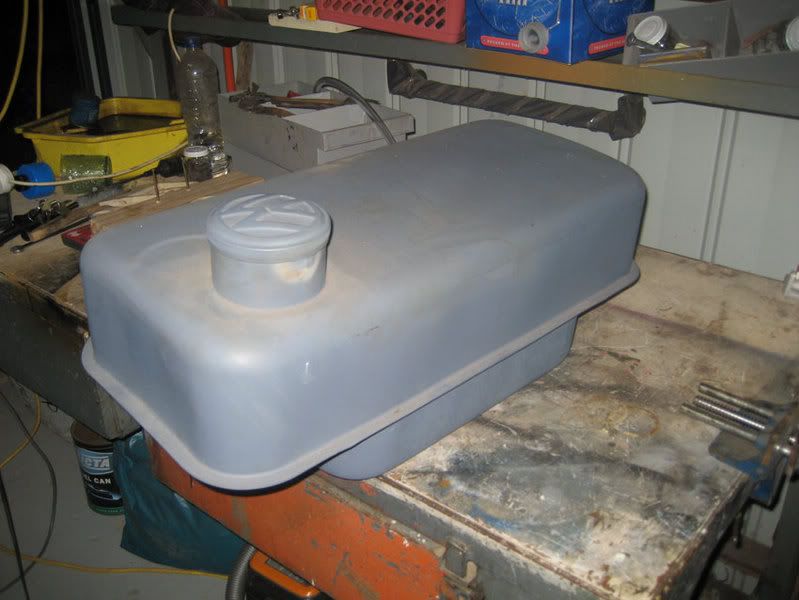
Inside breather:
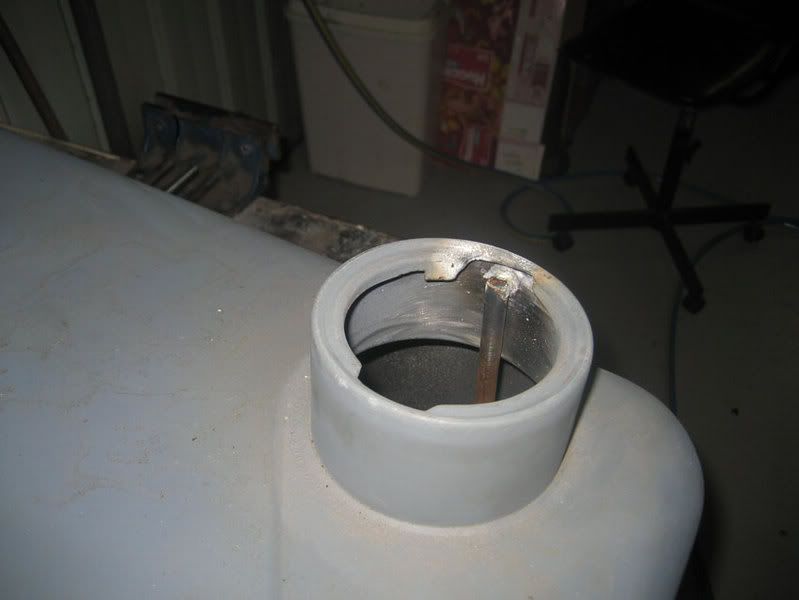
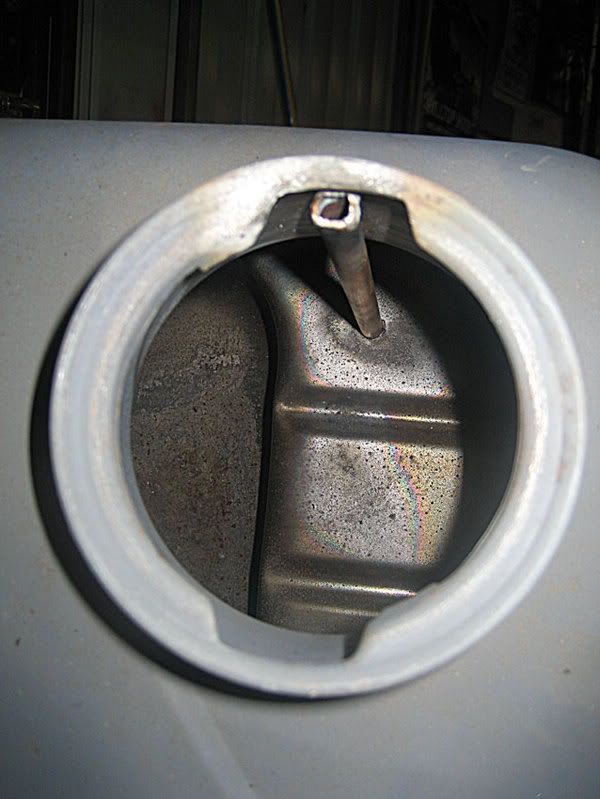
Bottom Section:
C'mon kids gather round,
there's a new sensation hitting town,
It's moving straight, low to the ground,
it'll pick you up when your feeling down.
|
|
|
 Turbo54 Turbo54
Veteran Volks Folk
    
Posts: 2220
Threads: 268
Registered: July 13th, 2004
Member Is Offline
Theme: UltimaBB Pro Blue ( Default )
Mood: Boost'n
|
| posted on March 31st, 2008 at 09:39 AM |
|
|
I have update some of the posts through out this build, they are not all at the end. I didn't want to double up.
I didn't think the car was going anywhere and was getting a little shitty so I went through my own post from the start with all the ups and downs and
am amazed on how much it is really coming along.
I am enthused and will be going up to work on her tonight.
T54
C'mon kids gather round,
there's a new sensation hitting town,
It's moving straight, low to the ground,
it'll pick you up when your feeling down.
|
|
|
 Dasdubber Dasdubber
A.k.a.: Alan Agyik
23 Windows of Awesome
DAS Resto Haus
       
Posts: 5746
Threads: 289
Registered: August 26th, 2002
Member Is Offline
Location: Gold Coast
Theme: UltimaBB Pro Blue
Mood: feeling fine...
|
| posted on April 1st, 2008 at 04:11 PM |
|
|
Hey Heath, great update mate - can't wait to see the next install of progress pics!
|
|
|
 Turbo54 Turbo54
Veteran Volks Folk
    
Posts: 2220
Threads: 268
Registered: July 13th, 2004
Member Is Offline
Theme: UltimaBB Pro Blue ( Default )
Mood: Boost'n
|
| posted on January 28th, 2009 at 04:55 PM |
|
|
Hi All,
Been quite busy with house and family but are managing to squeeze a few hours of car in here and there. Really working to get it rolling soon.
I will be posting more pics this week, here are just a few off my camera for the moment.
This is the progress.
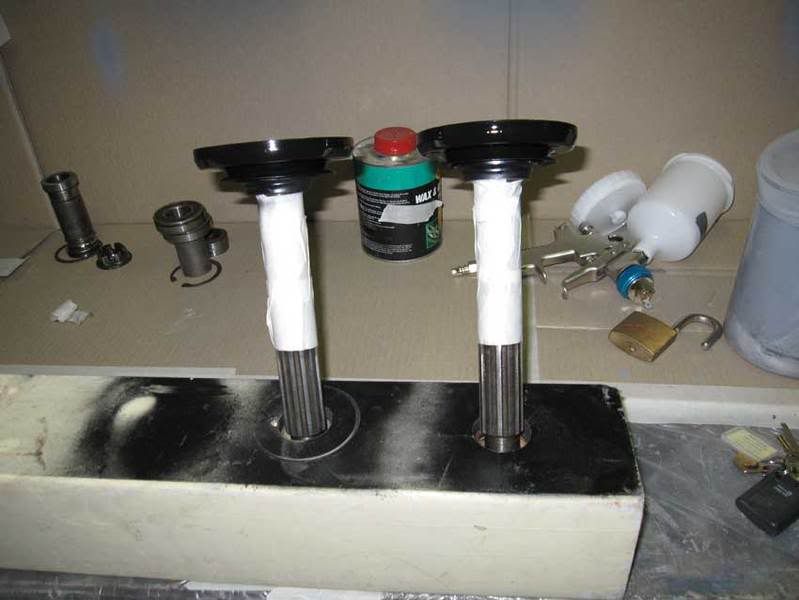
Been working on the rear axles / hubs and brakes. After much playing and checking / measuring etc I have finally machined the adapters to get my big
brakes under my weld wheels. (A big thanks to Dave G who has come over a few times and given me a hand.) I have also had to get my rear arms
re-machined so they were perfectly round as the heat from narrowing them egg'd them slightly and I didn;t like the idea of just forcing my bearings
in there. After that I bought a set of bearings and did a fit up and my machinist has balanced it all so we have a perfectly aligned hub and rotor
package for each side. He also marked all the part so when they are pulled apart it can go back the way it is intended.
While this has been happening I have cleaned up my rotors and given then a fresh coat of heat proof black. Also finished the air intake for my turbo
and the shroud covering the pod filter behind the back drivers wheel. Also been cleaning up my beam and rear arms to get it into hi-fill. I have filed
all the marks out of these and then skimmed them with filler before laying on coats of hi-fill. Also been painting little bits here and there and
getting stuff ready for the power coaters.
I hope to have on its wheels within a few weeks so I can roll it down to the next VW show here in Adelaide. Fingers crossed but as it is 45.7 degrees
here today, and not under 40 until sunday, no work will happen this week.
T54
Front beam getting ready to strip
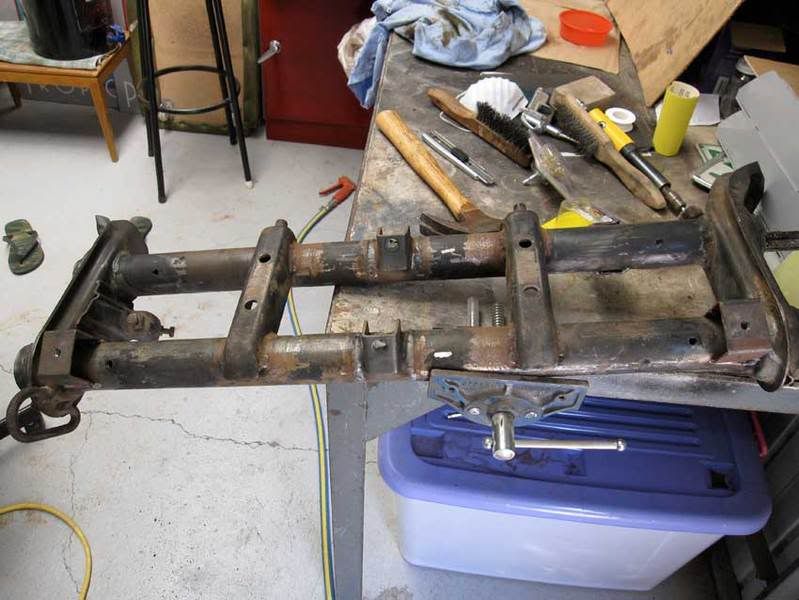
Beam Filed
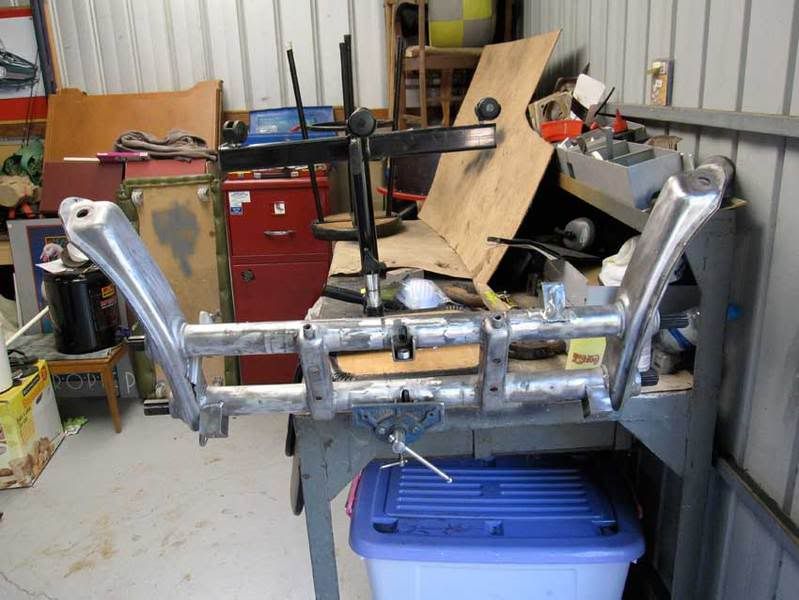
Beam Filled
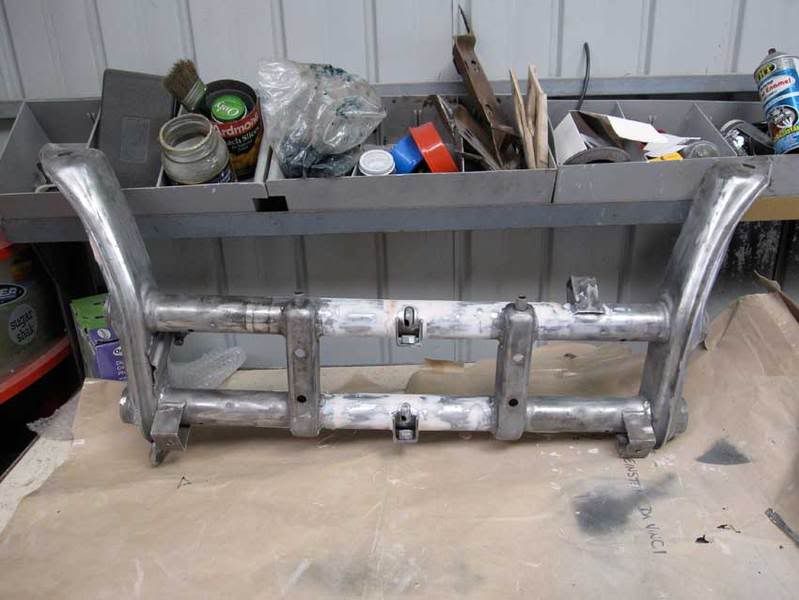
Ready to paint
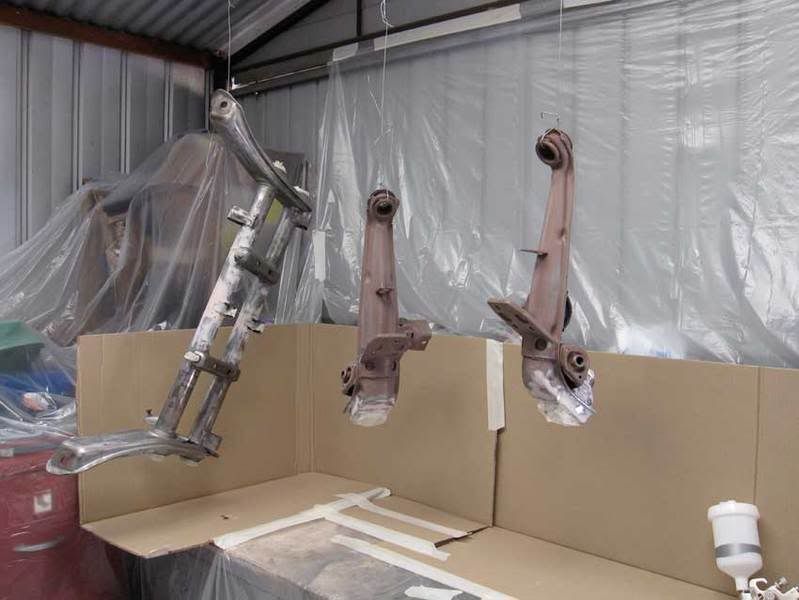
Painting
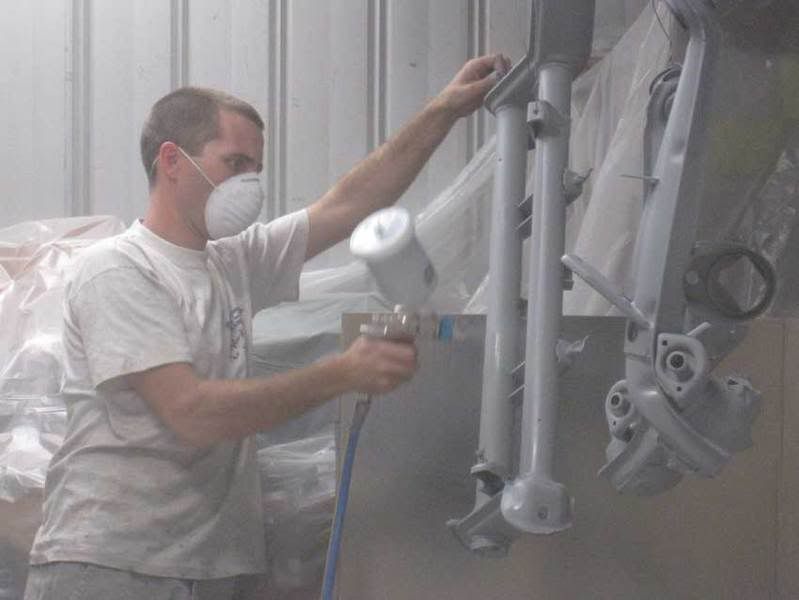
Torsion Bars
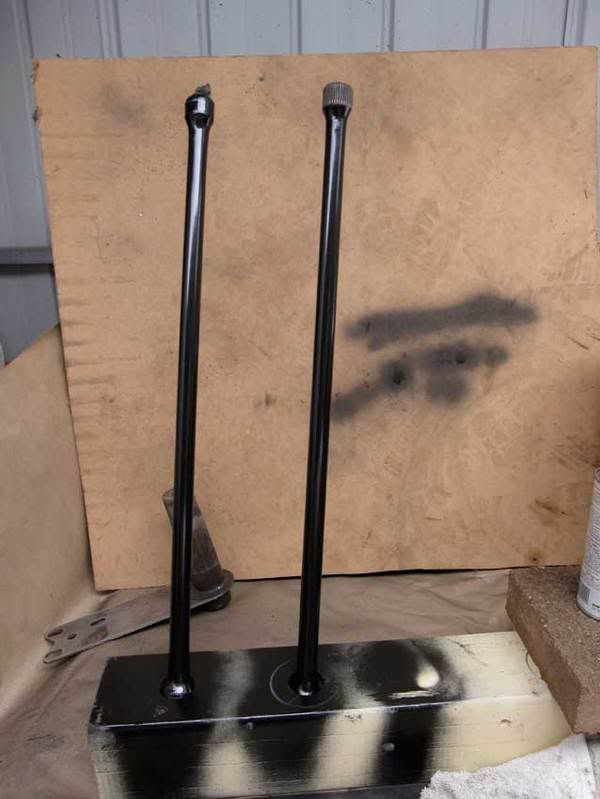
Ready for powder coating
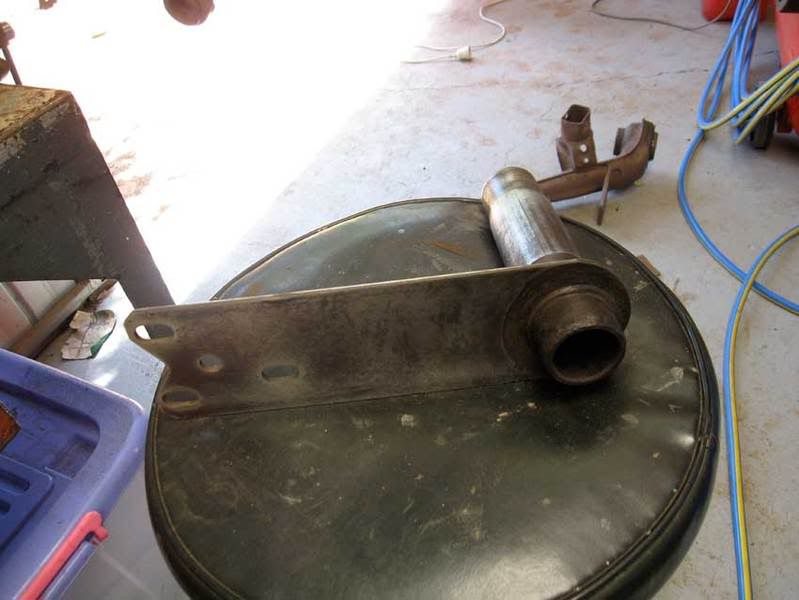
C'mon kids gather round,
there's a new sensation hitting town,
It's moving straight, low to the ground,
it'll pick you up when your feeling down.
|
|
|
 LIFE IN THE LOW LANE LIFE IN THE LOW LANE
A.k.a.: Brennden Alder
Son of Jim - Creator of Good
All people have the right to stupidity but some abuse the privilege
     
Posts: 2534
Threads: 53
Registered: March 11th, 2007
Member Is Offline
Location: Murrumba Downs - Brisbane
Theme: UltimaBB Pro Orange
Mood: What Kombi wants vs what Kombi gets are nowhere near the same...
|
| posted on January 28th, 2009 at 06:32 PM |
|
|
Looking good Heath. you sure do have some hot weather down there atm!!
[size=4] ACCEPT THAT SOME DAYS YOU ARE THE PIDGEON AND SOME DAYS YOU ARE THE STATUE[/size]
Alder Outlaws VW Racing - check it out on fb!!
|
|
|
 VWFREAK VWFREAK
A.k.a.: Peter / Bones
Son of Jim - Creator of Good
VWFREAK
     
Posts: 2577
Threads: 264
Registered: May 11th, 2004
Member Is Offline
Location: ACT
Theme: UltimaBB Pro Blue ( Default )
Mood: FREAKY
|
| posted on January 28th, 2009 at 06:39 PM |
|
|
Nice work, looking good.
|
|
|
 Super1302 Super1302
Officially Full-On Dubber
  
Posts: 361
Threads: 76
Registered: July 31st, 2008
Member Is Offline
Theme: UltimaBB Pro Blue ( Default )
|
| posted on January 28th, 2009 at 08:56 PM |
|
|
NOICE.........
and isn't fiddling in the shed great.
keep it up.
|
|
|
 westi westi
Custom Title Time!
what the
    
Posts: 1610
Threads: 28
Registered: August 30th, 2005
Member Is Offline
Location: milperra
Theme: UltimaBB Pro Blue
Mood: not blue, pink
|
| posted on January 28th, 2009 at 10:56 PM |
|
|
get a riggle on,not that i can talk.
i want to see the brakes and wheels on.the car will look unreal back on her feet.
down sharon.
 |
|
|
 Turbo54 Turbo54
Veteran Volks Folk
    
Posts: 2220
Threads: 268
Registered: July 13th, 2004
Member Is Offline
Theme: UltimaBB Pro Blue ( Default )
Mood: Boost'n
|
| posted on January 29th, 2009 at 11:15 PM |
|
|
Here is a few more as promised,
The rear stub axles are from a type 181 which are meant to be really strong. These have been mated to the hub which is a machined down rear drum and
then drilled and tapped for a ford stud pattern. I have also used fully threaded wheel studs. This is because I am going to mount the brake disk to
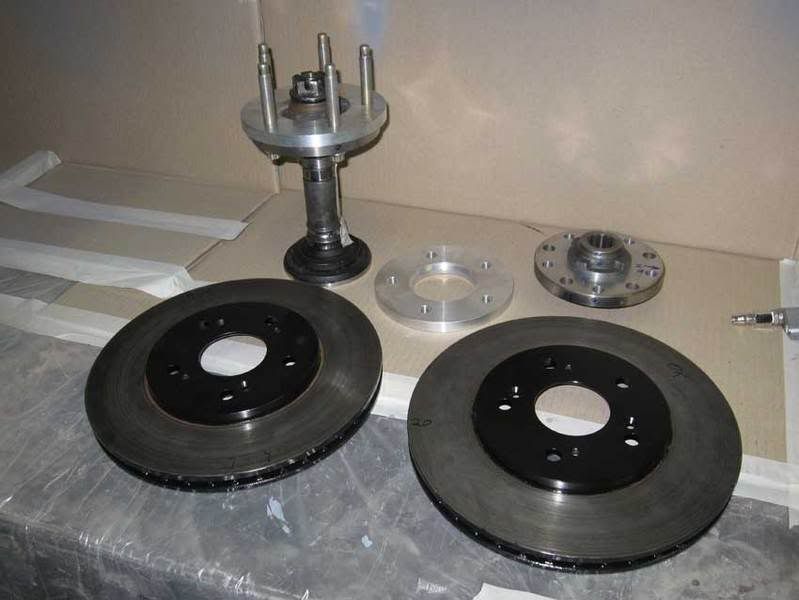
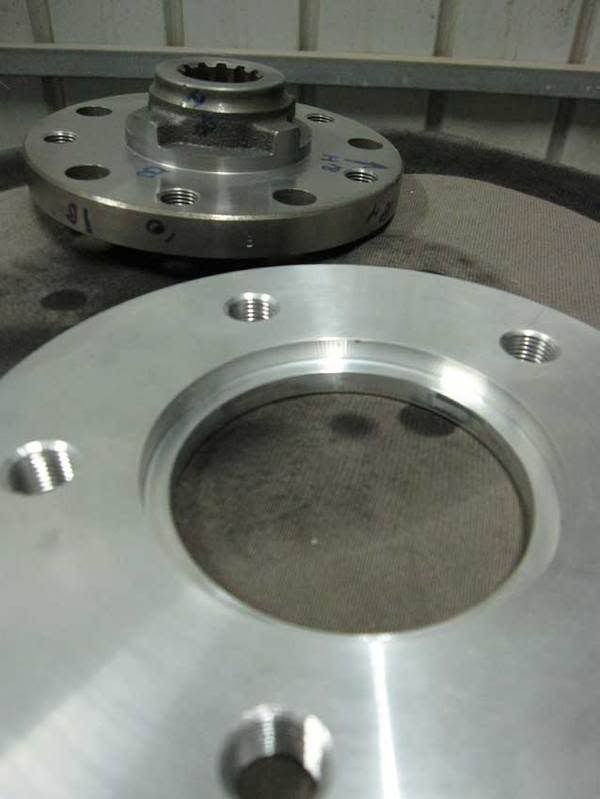
the back of the hub and sandwich it on using the spacer to lock it down. As you can see in the image the spacer is also tapped and it will all be
torqued up together to form a strong unit. The spacers aer machined out of aircraft grade aluminium as the material is already hardened.
The whole lot has been put together and spun on a lathe to work out where the best balance was and then marked so it could be out back together again
the same way left and right. Also after this the whole unit including the disks was balanced. It should be all back together and assembled on the rear
arms next week after being painted.
The hub assembly
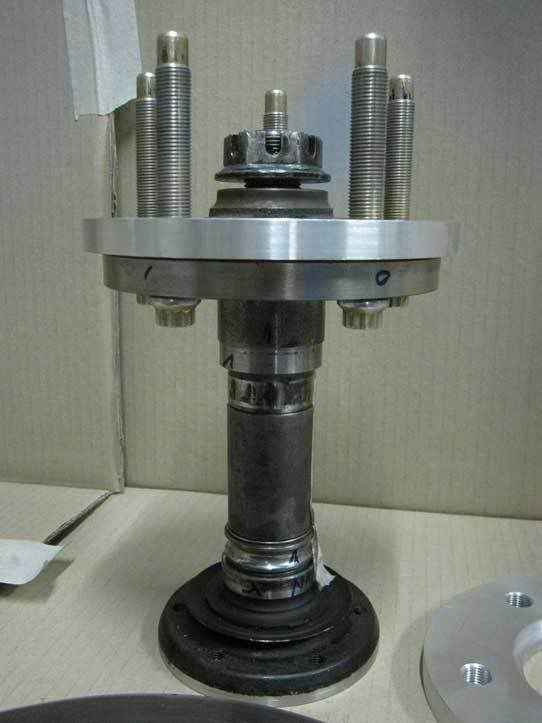
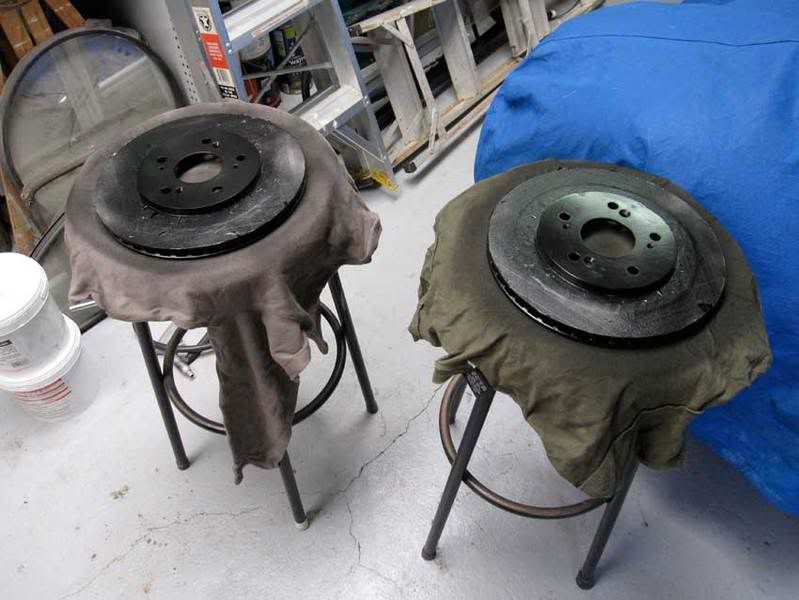
Brakes masked, look back in this post to see condition before machining.
Amazing what a slight skim with wet and dry can do.
Brake disks and parts
Close up of all spacers
181 Stubs
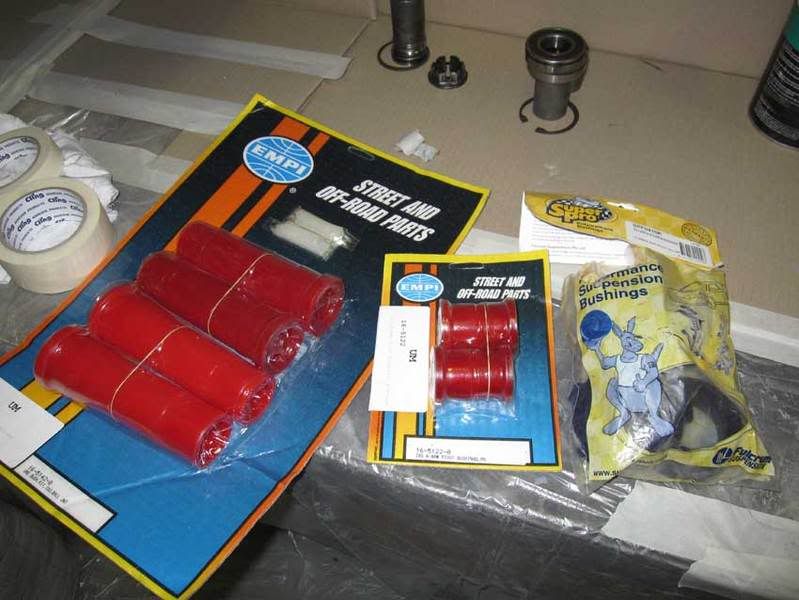
New bushes
C'mon kids gather round,
there's a new sensation hitting town,
It's moving straight, low to the ground,
it'll pick you up when your feeling down.
|
|
|
 Turbo54 Turbo54
Veteran Volks Folk
    
Posts: 2220
Threads: 268
Registered: July 13th, 2004
Member Is Offline
Theme: UltimaBB Pro Blue ( Default )
Mood: Boost'n
|
| posted on January 29th, 2009 at 11:26 PM |
|
|
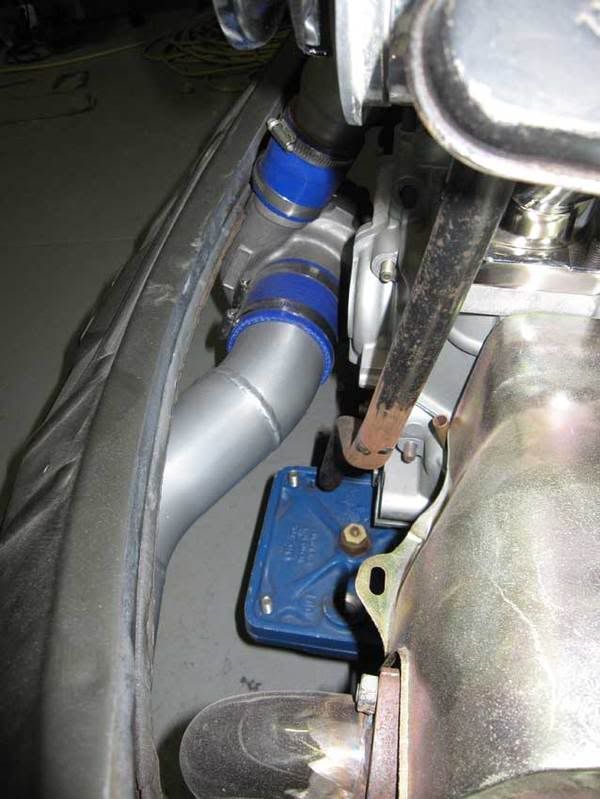
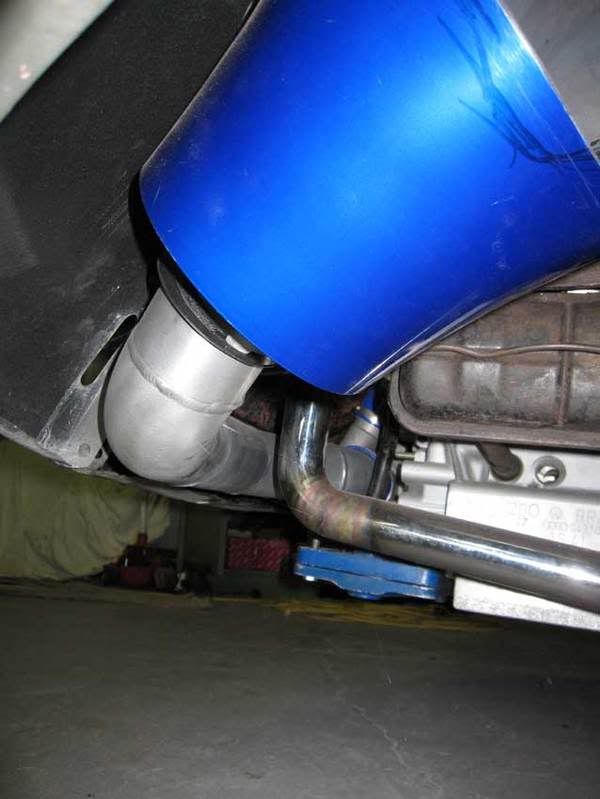
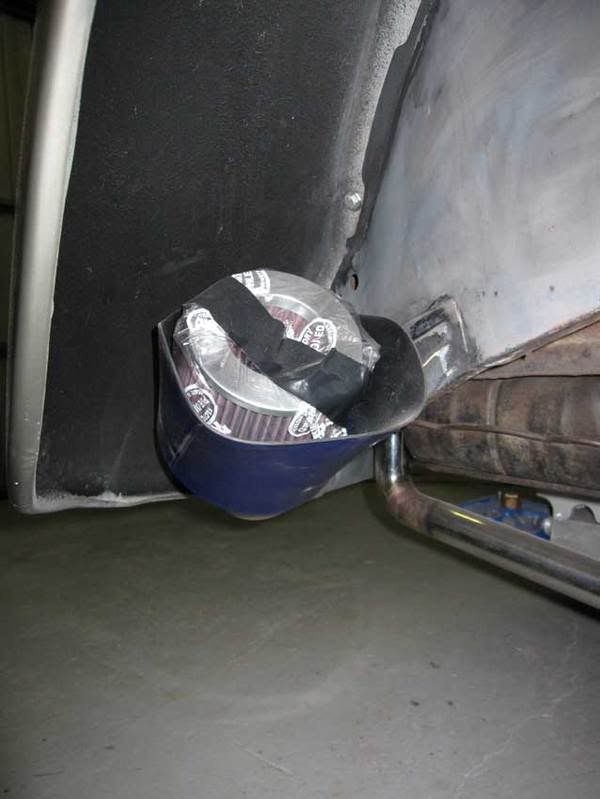
Also if you scroll up a little you will also see a pvc and a aluminium pipe that is the air intake from the turbo, I really needed a wheel on to make
sure it clears the tyre and the oberg filter so while we were doing all of the test fitting, I fitted it up and made sure it all clears. I then sent
it off to have the mounting tab welded on to fit it up on the bumper bracket.
I also bought a K&N pod as I have had good results with back to back testing in my Supercharged Vortech Commodore and found a nice plastic cover
that should protect it from crap coming off the back drivers side tyre. This cover was too big so I have had to trim it down but it is going to work
perfectly - just awaiting a coat of paint now. I am also very happy with the way this bit went together. Fit in nicely and tight up against the rear
apron and wil just need some wrapping / heat sheild in 1 section near the turbo header.
One more bit ticked off! Have a good one.
T54
Air filter pipe out of turbo and around apron
Out from under apron into guard
Pod and cover
C'mon kids gather round,
there's a new sensation hitting town,
It's moving straight, low to the ground,
it'll pick you up when your feeling down.
|
|
|
 trickysimon trickysimon
A.k.a.: Simon Azzopardi
Custom Title Time!
100km/h is only 9 seconds away
    
Posts: 1473
Threads: 43
Registered: December 15th, 2007
Member Is Offline
Location: Wagga Wagga
Theme: UltimaBB Pro Blue ( Default )
|
| posted on January 30th, 2009 at 10:04 AM |
|
|
Nice work so far 
Wont the cover fill up with rocks and dirt?
|
|
|
 debiasi4 debiasi4
Officially Full-On Dubber
  
Posts: 283
Threads: 51
Registered: December 17th, 2004
Member Is Offline
Theme: UltimaBB Pro Blue ( Default )
|
| posted on February 2nd, 2009 at 03:11 PM |
|
|
looking great heath - you have way more attenion to detail than me - i just want to steer the thing around the block
adam
|
|
|
 Resto64 Resto64
Custom Title Time!
Jack of all, master of none
    
Posts: 1081
Threads: 102
Registered: April 23rd, 2004
Member Is Offline
Location: Adelaide its O.K
Theme: UltimaBB Pro Blue ( Default )
Mood: Nucking Futs
|
| posted on February 5th, 2009 at 09:27 AM |
|
|
good stuff heath
took me 2 days to read the post
at home with the kids u know the deal
|
|
|
 Turbo54 Turbo54
Veteran Volks Folk
    
Posts: 2220
Threads: 268
Registered: July 13th, 2004
Member Is Offline
Theme: UltimaBB Pro Blue ( Default )
Mood: Boost'n
|
| posted on February 20th, 2009 at 09:06 AM |
|
|
Hi All,
A fair bit has been happening over the last few weeks. Stuff powedercoated that I will be puting together with pics soon, stuff sand blasted ready to
be details and hi-filled. Have ordered one of the colours of the two-tone so I can start painting the beam and other little bits and pieces. Still
need to detail the calipers and have them checked for leaks as the haven't been on a car for a long time. When this is done they will go on to the
custom brackets. Then onto the front setup.
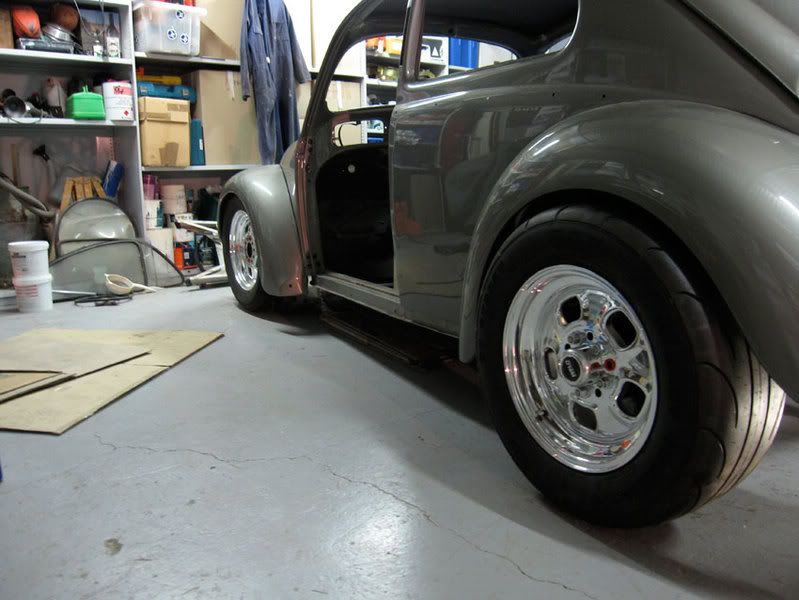
I am very happy with where the wheels sit on the car. I have no issues with fouling on anything and have at least 8mm clearance everywhere so
everything went as planned. I was always worried about fitting such a bit wheel but with the 2" guards that are coming soon they should sit about
10-15mm in under the lip. I like the rear drag look that it is starting to get with the fat and skinnies and the rake. Keeping very motivated at the
moment but will slow down soon with the actual construction of the house starting soon now that the site works are done.
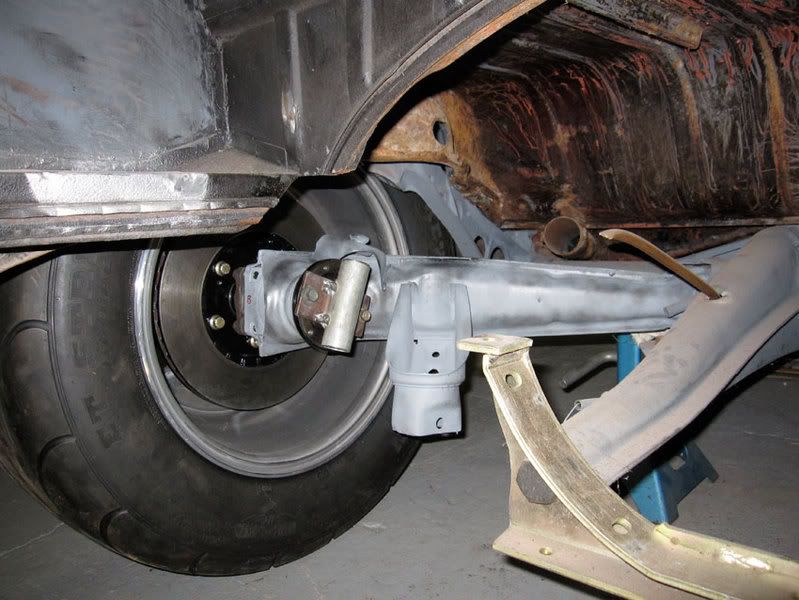
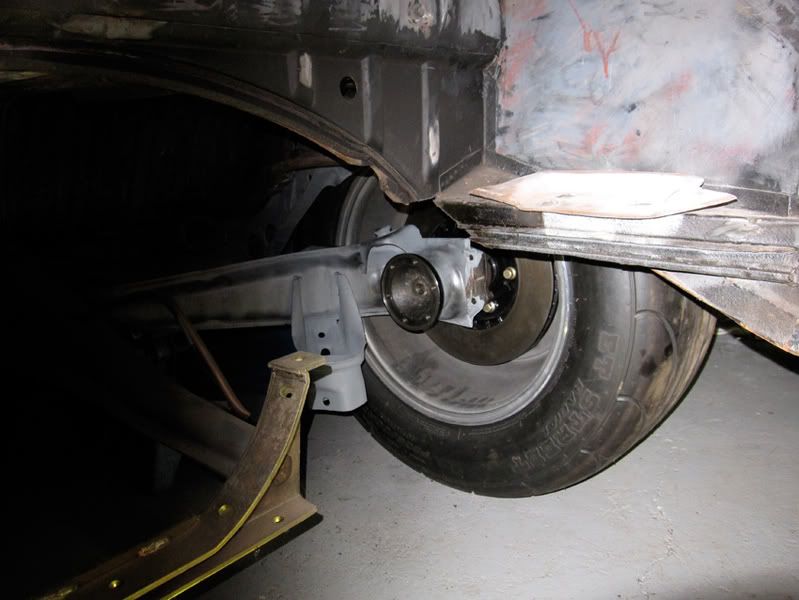
The little thing bolted to the back of the drivers hub is for a bar to hold the hub while on the bench for taking the nut off.
The brake disk is actually bolted to the back of the hub and the spacer to the front sandwiching onto the hub. I have used fully threaded moroso studs
to hold everything together.
Passenger side assembled
Drivers side assembled
C'mon kids gather round,
there's a new sensation hitting town,
It's moving straight, low to the ground,
it'll pick you up when your feeling down.
|
|
|
 oldskl60 oldskl60
Officially Full-On Dubber
  
Posts: 251
Threads: 28
Registered: March 9th, 2008
Member Is Offline
Location: Brisbane
Theme: UltimaBB Pro Blue
|
| posted on February 20th, 2009 at 10:07 AM |
|
|
Looking awesome Heath!! When are you aiming to have it on the streets of SA?
|
|
|
 cnfabo cnfabo
Custom Title Time!
    
Posts: 1353
Threads: 140
Registered: April 15th, 2008
Member Is Offline
Theme: UltimaBB Pro Blue ( Default )
|
| posted on February 20th, 2009 at 11:46 AM |
|
|
that is going to be one bad ass ride dude, keep up the good work...
|
|
|
 boristherat boristherat
Wolfsburg Wizard
  
Posts: 563
Threads: 47
Registered: March 12th, 2006
Member Is Offline
Location: Adelaide
Theme: UltimaBB Pro Blue ( Default )
Mood: The times they are a changin'
|
| posted on February 23rd, 2009 at 11:31 AM |
|
|
You're a clever prick!
Good to catch up Satdee night. Will have to come up and have a closer look at your progress.

1959 Mercedes Benz 190
1963 Chevrolet Corvair
1969 BMW 2002 Auto
1973 Mercedes Benz 230.6 |
|
|
 Turbo54 Turbo54
Veteran Volks Folk
    
Posts: 2220
Threads: 268
Registered: July 13th, 2004
Member Is Offline
Theme: UltimaBB Pro Blue ( Default )
Mood: Boost'n
|
| posted on May 6th, 2009 at 09:43 PM |
|
|
Hi All,
A quick update, still working on getting the wheels right on the rear end, this car is 1 step forward 2 steps back. It's unbelievable. Now that I got
the wheels to fit in the above post The tyres then rubbed on the spring plate bolts so I then took the rear arms off again and had the 3 holes
countersunk to match the countersunk allen key bolts and locktight nuts. Happens that the countersink is a odd 43 degrees so my engineer has to make a
43degree cutting bit to match. It's just the little things like this that is slowing things down. Now it is all fitted up and the wheels are spinning
freely I notice that they are also rubbing on the bumpstops bit that sticks out. Out comes the grinder and yah, they spin by themselves! Then it was
time to set the height but for some reason the brand new nolethane rubbers wouldn't squash into the end plates so off to where I bought the rubbers
to swap them for the right ones. Turns out I had the wrong end plate covers and that sucked cause I just had them powdercoated so I got the right ones
and after powdercoating them they fit perfect.
I have had the motor out for a while now and wanted to fit the final gearbox so the jigsaw was to go in again. This was so I could see the car with
some weight in it and look at the final ride height to suss out the exhaust which is the next piece I am going to tackle. Upon fitting the gearbox I
notice the studs for my middle gearbox mount weren't long enough so They need to pull out and longer ones to go in, not biggy but another thing back
on the too do list. I also noticed that now I am running kombi CV's, the flanges are almost rubbing on the framehorns and will need clearancing ( 2nd
step back for the night)! Have also decided to do a full removable rear end like 2442TT's black beetle. The jigsaw of bits is just frustrating and I
think it will make life easier. Some might give me grief for cutting up a 54 but it is so modified who cares.
While this is being done I have also found a better intercooler ice box setup so I will be changing that and my front top arms of my beam are being
flexed (bent) to give better camber. Also a lot of other things have been powdercoated and my exhaust is all there ready to be shaped and welded,
hopefully I will do a template this weekend. What I have noticed with my killer muffler setup is that it seems to be too big and I am going to have to
modify it also. So my brand new polished muffler is going to have 3" cut out of the middle of it to fit under the guard and not hit on the tyre. (Is
this the 3rd step back for the night?) Anyway it is still moving forward or backwards i am not sure and ticking things off the list.
I also trial fitted a friends shermann 2" guards on to see what it will look like and apart from getting it a little lower I am happy with the way it
sits. Almost looks a little tubbed with the tyres sitting about a inch in from the outer edge. I am not holding my breath with the 2" guards from
vforce and will proberly get a set from shermanns. Also cause my front guards are so perfect I am going to give them to someone who is going to use
them for a plug to make perfect glass ones for a set to shed a few more pounds.
Have a good one,
T54
Empty car

Jigsaw

Gearbox
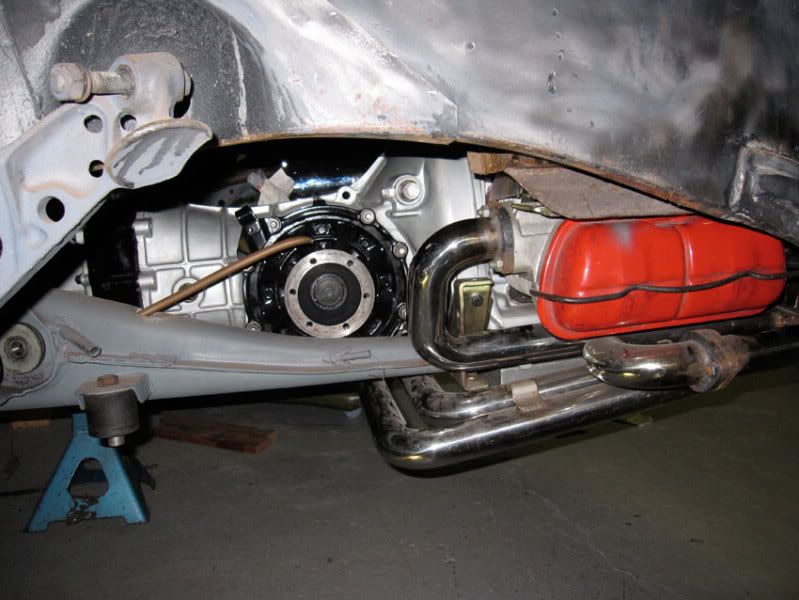
2" widened guards


C'mon kids gather round,
there's a new sensation hitting town,
It's moving straight, low to the ground,
it'll pick you up when your feeling down.
|
|
|
 Stanley Stanley
Compulsive Aussie Vee Dubber
I guess the reward is in the doing of it
      
Posts: 4523
Threads: 270
Registered: March 13th, 2003
Member Is Offline
Location: Karalee...near Ipswich Qld
Theme: UltimaBB Psyche Grey
Mood: caught a bolt of lightning cursed the day I let it go
|
| posted on May 7th, 2009 at 06:47 AM |
|
|
A little pain now for a lot of gain when it's all complete.
Top work
|
|
|
| Pages: 1 .. 6 7 8 9 10 |