| [ Total Views: 2288 | Total Replies: 17 | Thread Id: 66994 ] |
|
|
 GTMac GTMac
A.k.a.: Andrew
Fahrvergnugen
   
Posts: 976
Threads: 246
Registered: November 24th, 2004
Member Is Offline
Location: Sydney
Theme: UltimaBB Pro Blue ( Default )
Mood: Always asleep
|
| posted on January 14th, 2008 at 11:04 AM |
|
|
RocknRob, you were correct! 71 Fasty resto begins - Updated 22.4.08
Most people know my 71 Fasty. Its pretty clean but I want to straighten any dings and attack all rust before it gets out of hand. Am restoring this as
it will fund my resto eventually of my 67 Fasty.
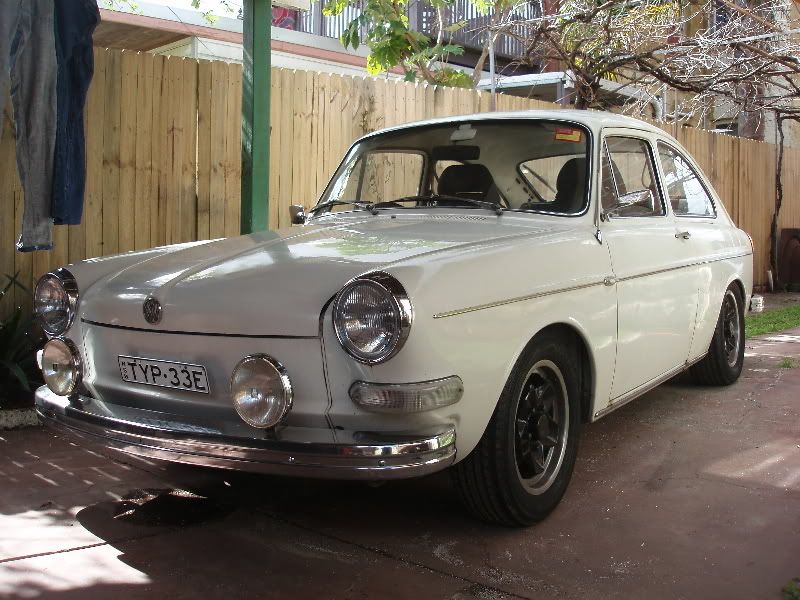
Am in the process of stripping car, repairing panels and fixing rust etc etc. Thought it be intersting to show you what to expect.
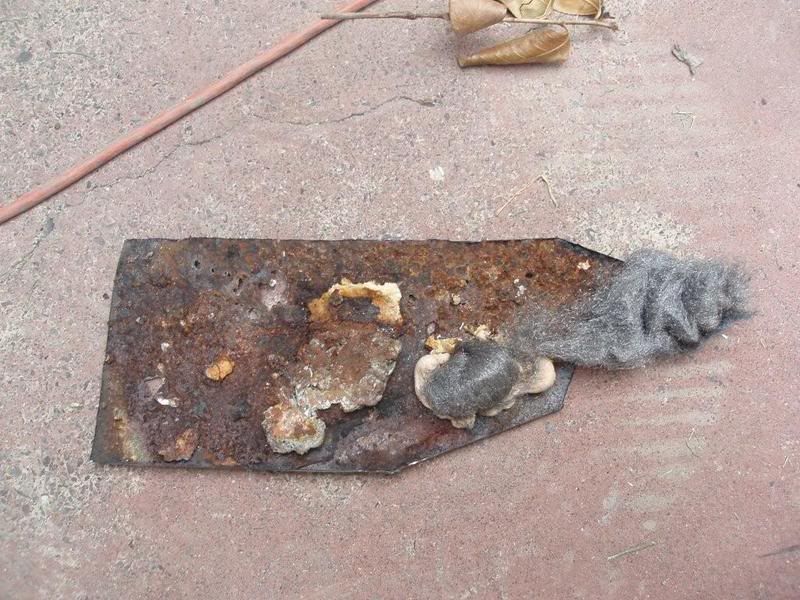
We started with this on the passenger side which I knew was on its way. Couldnt work out how the metal blended so well then realised they had just
"lead" filled the whole area. Lead actually worked well, the bubbles were coming through the bog at the bottom but it was eating the whole way
around anyway.

Lovely mixture of rust, lead, bog and steel wool, glad someones hard earned dollars were well spent with this panel beater!
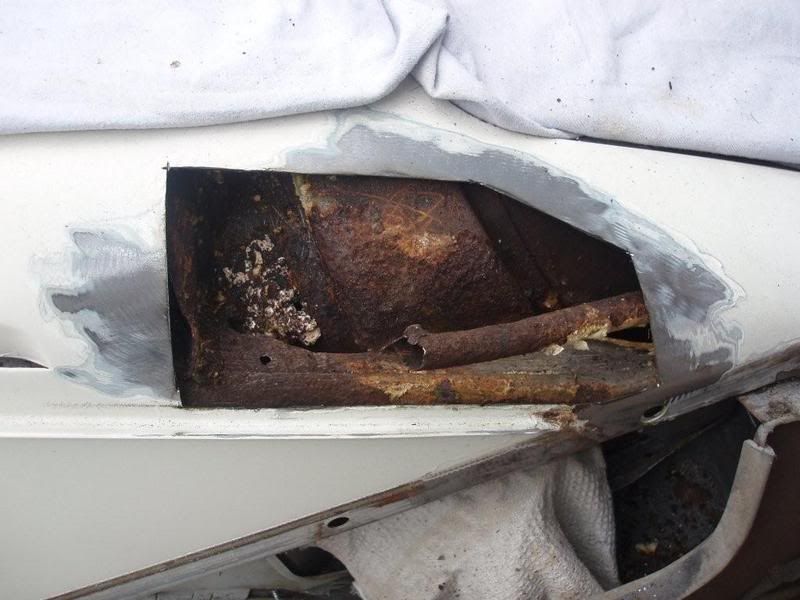
This is what it looks like after the foam has been removed. As the foam surrounds the water exit pipe it eats it away completely. What nuff nuff
thought it would be a good idea to put foam in just this area??? I cant see how the drain pipe could ever work as it is not at the lowest point and
the water just runs down the channel below the vents (vent partially seen left side of pic) and then into the foam for collection and rust
initiating.
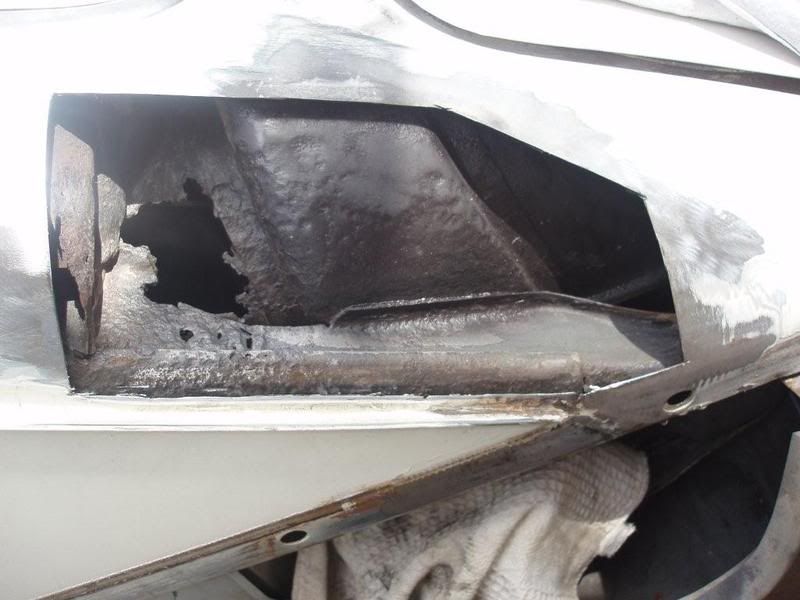
After a good clean and rust converter. You can see that its eaten through to the inside boot section. Will repair from that side after. Will use that
hole to spray in heaps of paint protection and fish oil.
Used an old panel for metal and placed in, does not look like great fit in this shot but once tacked in was quite good.
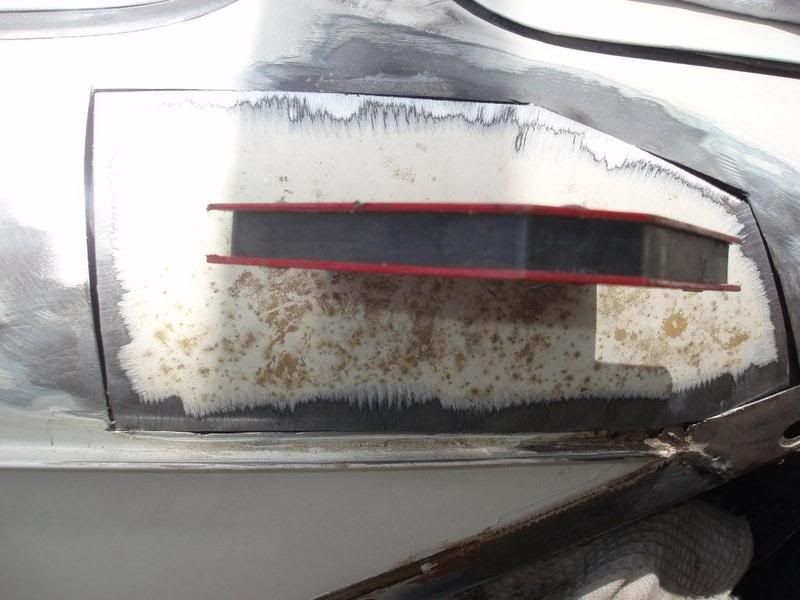
The driver side had no signs at all of rust coming through but I wasnt going to repair and paint a car to find a bubble coming through in 6 months so
I cut out a section anyway and this is what you find on a good one!
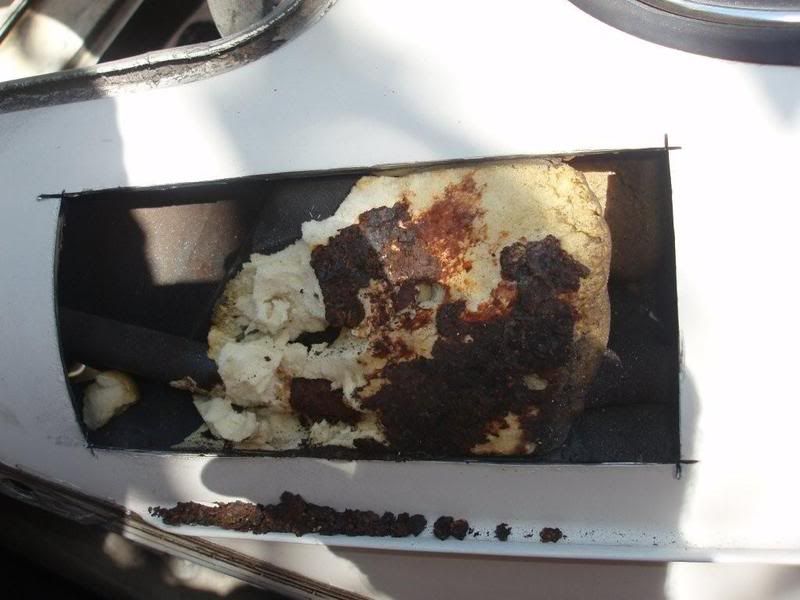
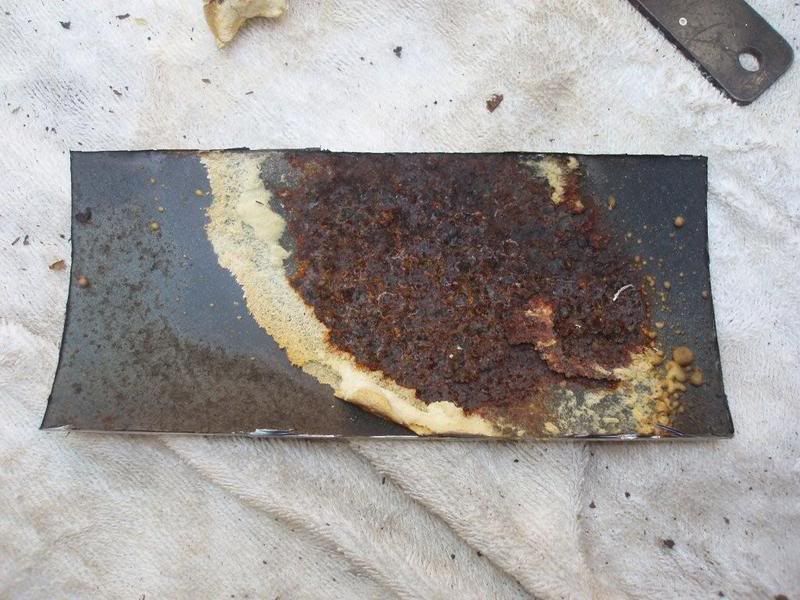
And now after foam removed and starting clean up for rust converter etc. Drain pipe was also gone as well. Even though I dont think they work,
replaced both pipes with plastic tubes.
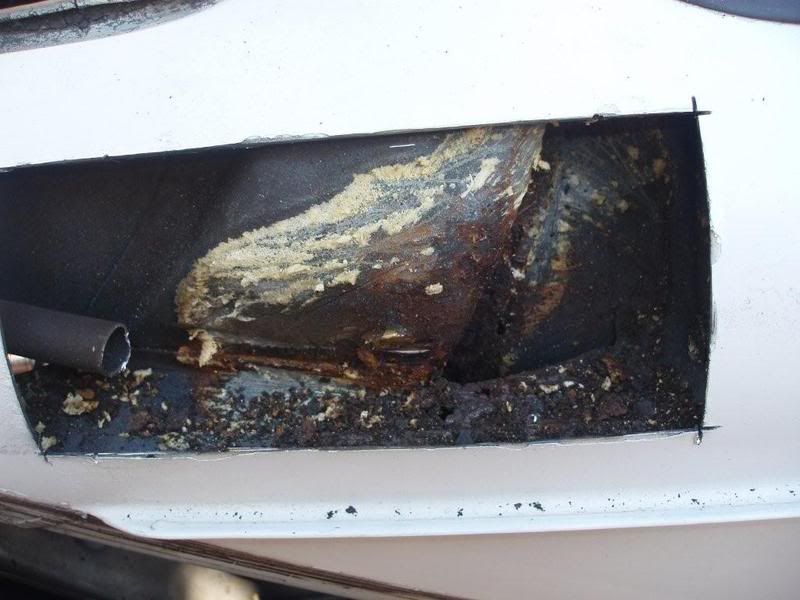
Funny thing is the water boxes at the bottom of the inner guards on the really bad side were perfect but the water boxes on the reasonable side were
stuffed and required fabricating.
So if you see even one small bubble you know what to expect, get it repaired soon.
Its good taking the progress shots as the new owner of the fasty when finished will get a CD with the work done so hopefully some peace of mind.
1971 Type 3 Fasty - EJ20T
I love 242HP sleepers. 
How many sets of lights does it take a $229k Carrera S to learn? 
UPDATE: Cayman S, M3, B4 now added to the list. |
|
|
 fastyman66 fastyman66
Seriously Crusin Dubber
 
Posts: 152
Threads: 14
Registered: July 30th, 2006
Member Is Offline
Theme: UltimaBB Pro Yellow
|
| posted on January 14th, 2008 at 11:04 PM |
|
|
WOW and I thought I found some gremlins...good stuff though. and I thought I found some gremlins...good stuff though.
The foam looks like it was the main course of problem there as it would have acted like a sponge.
|
|
|
 vw54 vw54
Super Administrator
Always Waiting 4 Friday
        
Posts: 16723
Threads: 378
Registered: August 26th, 2002
Member Is Offline
Location: Sunny Sydney
Theme: UltimaBB Pro Blue ( Default )
Mood: Oval resto ongoing
|
| posted on January 15th, 2008 at 06:00 AM |
|
|
that FOAM is a VW killer keep up the good work
|
|
|
 VWCOOL VWCOOL
23 Windows of Awesome
       
Posts: 5158
Threads: 235
Registered: June 19th, 2003
Member Is Offline
Location: In the shed... Lake Macquarie NSW
Theme: UltimaBB Pro Blue ( Default )
Mood: happy to help
|
| posted on January 15th, 2008 at 11:42 AM |
|
|
Yeah nice work mate, it's an inspriation (or a turn-off!) now that I am in my new big car resto shed full of projects!
Pay your debts, CxxT
|
|
|
 GTMac GTMac
A.k.a.: Andrew
Fahrvergnugen
   
Posts: 976
Threads: 246
Registered: November 24th, 2004
Member Is Offline
Location: Sydney
Theme: UltimaBB Pro Blue ( Default )
Mood: Always asleep
|
| posted on January 15th, 2008 at 03:22 PM |
|
|
| Quote: | Originally
posted by VWCOOL
Yeah nice work mate, it's an inspriation (or a turn-off!) now that I am in my new big car resto shed full of projects!
|
Thanks, well no excuse now not to have one of them completed then is it? 
1971 Type 3 Fasty - EJ20T
I love 242HP sleepers. 
How many sets of lights does it take a $229k Carrera S to learn? 
UPDATE: Cayman S, M3, B4 now added to the list. |
|
|
 GTMac GTMac
A.k.a.: Andrew
Fahrvergnugen
   
Posts: 976
Threads: 246
Registered: November 24th, 2004
Member Is Offline
Location: Sydney
Theme: UltimaBB Pro Blue ( Default )
Mood: Always asleep
|
| posted on January 20th, 2008 at 09:57 PM |
|
|
Weather has been ordinary so started to strip front guards off. Knew there was rust in certain areas such as bottom of guard, between guard and front
apron and under bonnet seal.
Expect this amount of dirt to fall out from most Type 3's especially if you see bubbling or swelling. My guard was swelling as it had just been
bogged up previously.
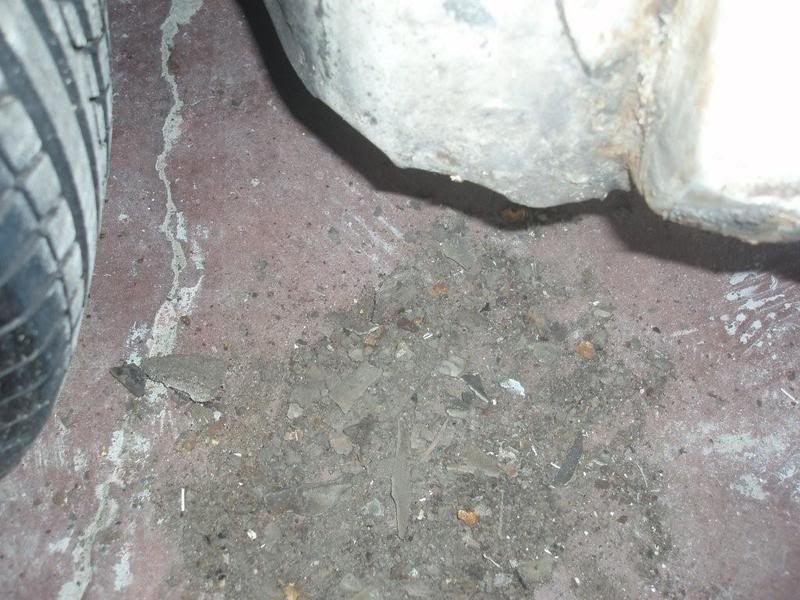
Dirt not only collects at bottom but also top and thus expect to see some more rust. Apart from pulling your guards off once a year, not really sure
how you could stop this happening eventually. When a resto is done you can see why all inner guards are sprayed properly unlike from factory where
there is basically no protection.
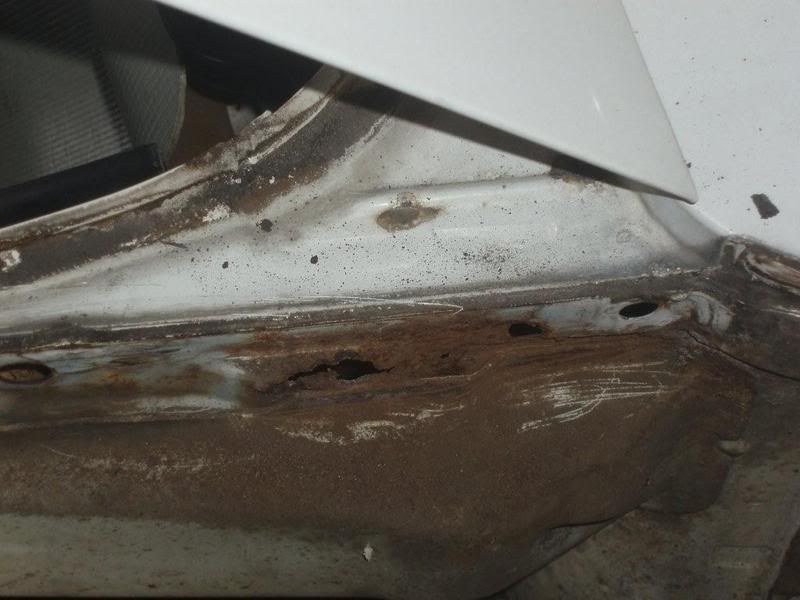
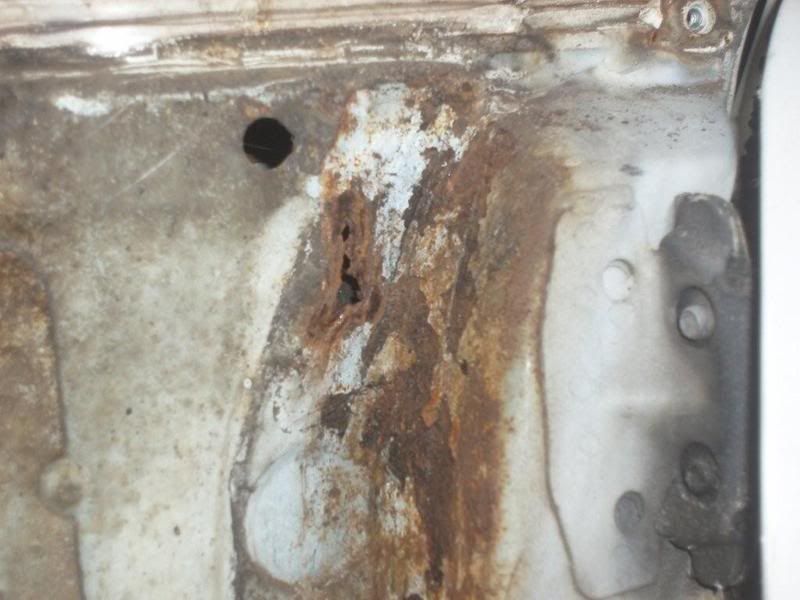
Problem with front apron and body is that its not sealed completely so in between the spot welds, water can creap its way in and start rust. Not sure
if this happens becaused guard beading gets old and then loses its tight seal.
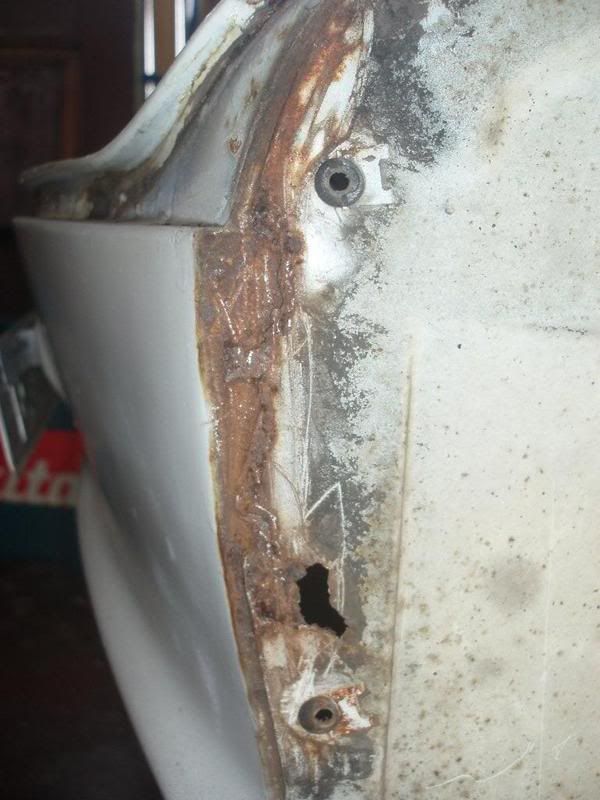
There was evidence of fibre glass under the bonnet seal so expected to see this.
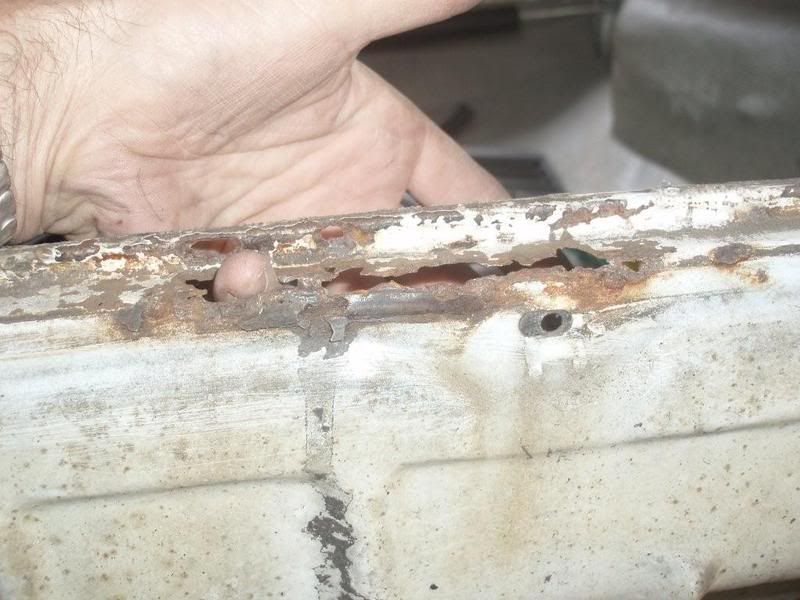
The next area, the bumper bracket is known for rust. Like the foam in the rear pillar, this is also a pretty poor design, so Type 3 owners, please
spend $2 at SuperCheap and 5min of your time and get the fish oil into the bracket (after you have high pressure blown out any dirt). There are 3
nuts welded in for the bumper bracket but not sure why there are 3 more holes, they only aid for more dirt and water to be thrown up by the tyre. I am
going to fit 3 new grommets into these holes and remember to fish oil it. You can see I have already started repair by drilling out spot welds on the
bracket and also the apron.
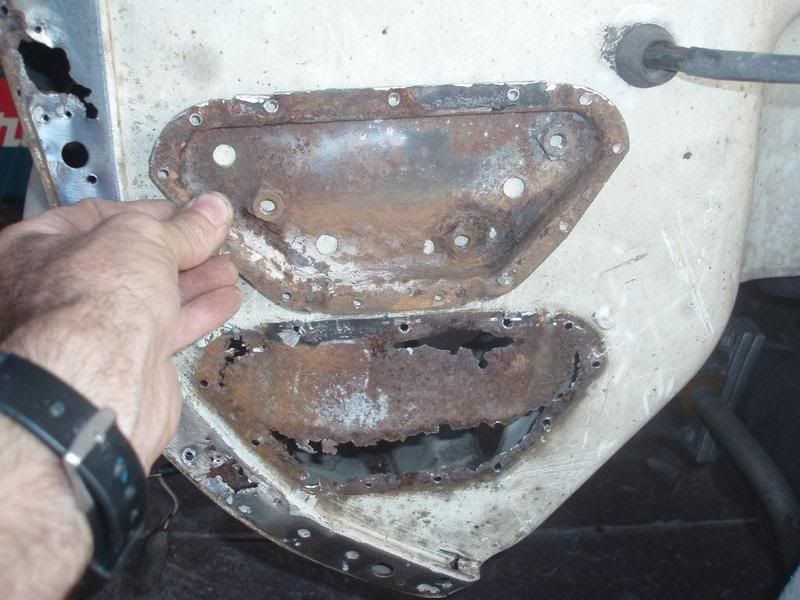
This is the view I saw from inside the spare wheel area(or radiator cavity in my case). The bracket wasnt taken off at this stage. It was confusing as
it looks like it has swelled so much but its actually the bottom lip of the bracket.
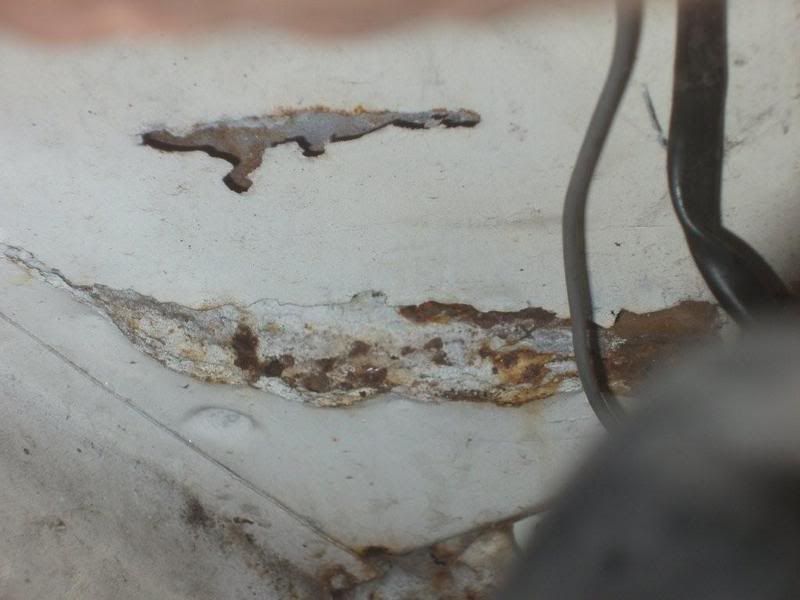
Will show progressive shots of how this has been cut out and repaired at a later date. Take note, this was a well looked after vehicle that I would
have described as mostly rust free as you really had to go searching for any rust evidence when I bought the car 3 years ago. Imagine how bad some
Type 3's would be when you can actually see plenty of rust advertised?? This is why I stay well clear.
1971 Type 3 Fasty - EJ20T
I love 242HP sleepers. 
How many sets of lights does it take a $229k Carrera S to learn? 
UPDATE: Cayman S, M3, B4 now added to the list. |
|
|
 Birch Green Birch Green
Seriously Crusin Dubber
 
Posts: 132
Threads: 22
Registered: August 23rd, 2007
Member Is Offline
Location: Brisbane, QLD
Theme: UltimaBB Pro Blue ( Default )
|
| posted on January 21st, 2008 at 08:09 AM |
|
|
Wow - rust scares me...!  Especially when you say that the car
appeared to be pretty much rust free. Especially when you say that the car
appeared to be pretty much rust free.
Great progress shots - keep us updated.
0XS000 - 333000 - JCM
Wanted: F.I.V timber steering wheel
|
|
|
 GTMac GTMac
A.k.a.: Andrew
Fahrvergnugen
   
Posts: 976
Threads: 246
Registered: November 24th, 2004
Member Is Offline
Location: Sydney
Theme: UltimaBB Pro Blue ( Default )
Mood: Always asleep
|
| posted on January 29th, 2008 at 10:19 PM |
|
|
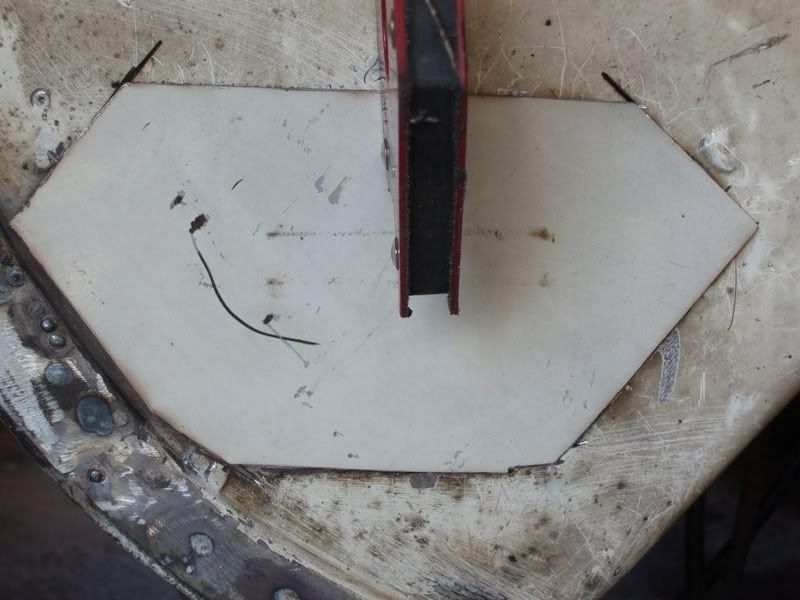
Have made more progress but seem to be here there and everywhere! Cut out new piece for behind the bumpber mounting box. Can see this attached in
later photos.
Next shots show progressive fix of the inner guard to the front apron.
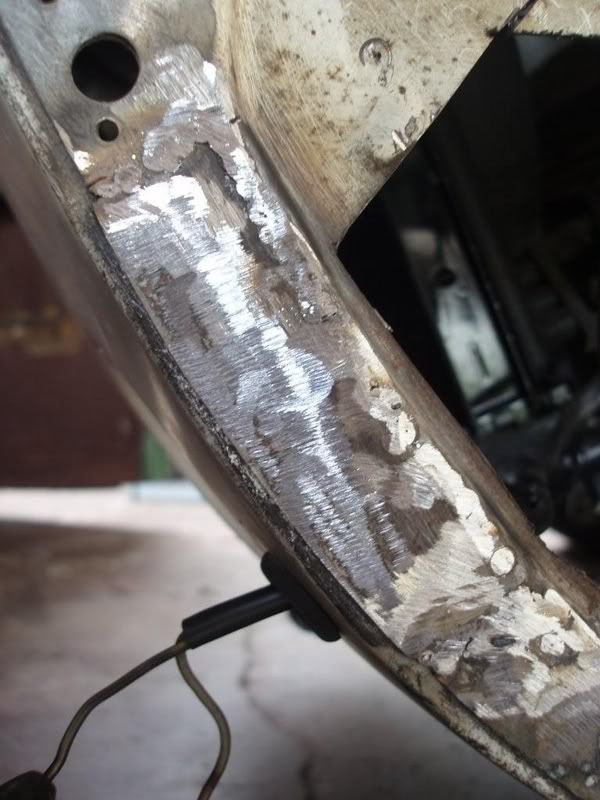
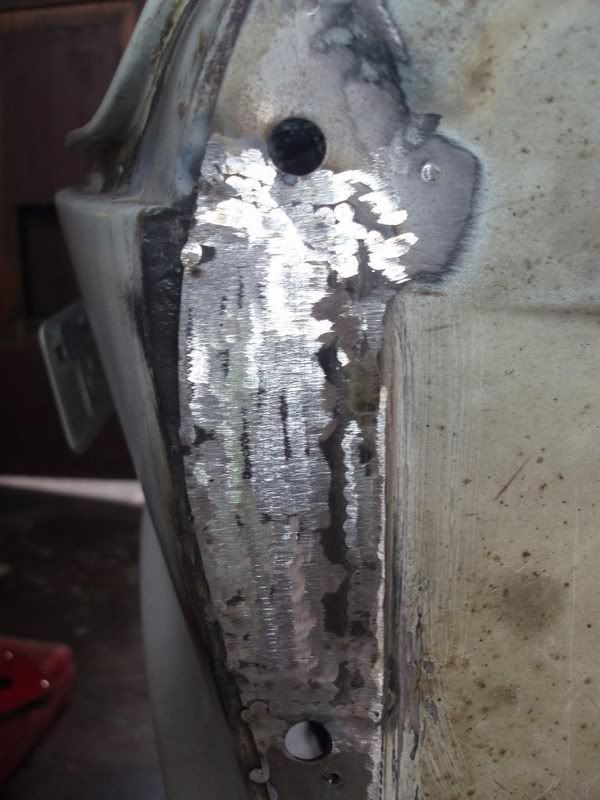
Skim of fine filler and then some primer to protect whilst doing other areas. Can now see the bumper mounting bracket back on in bottom of pic.
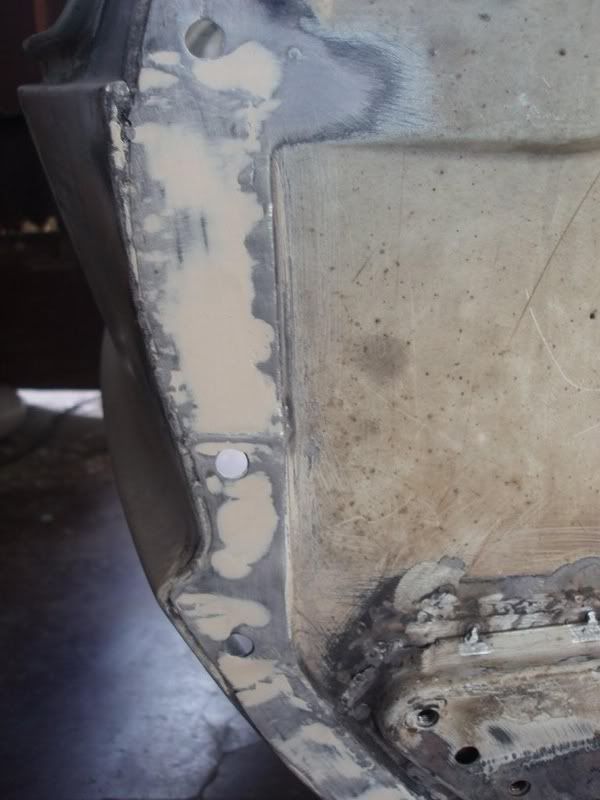
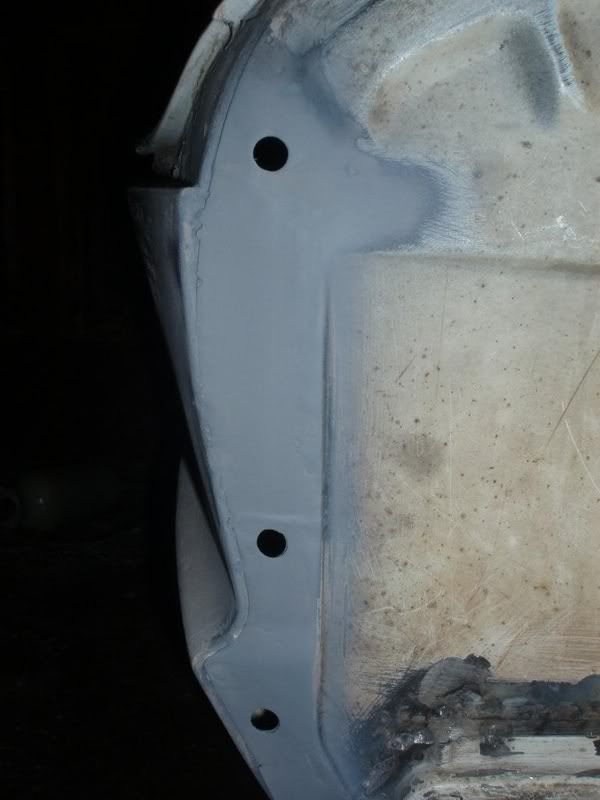
Progressive shots of inner guard area near the top door mount. Bit tricky as the pieces cut out had many bends because of the drainage box. Was able
to tack each end of the repair piece in the first pic and then massage into shape.
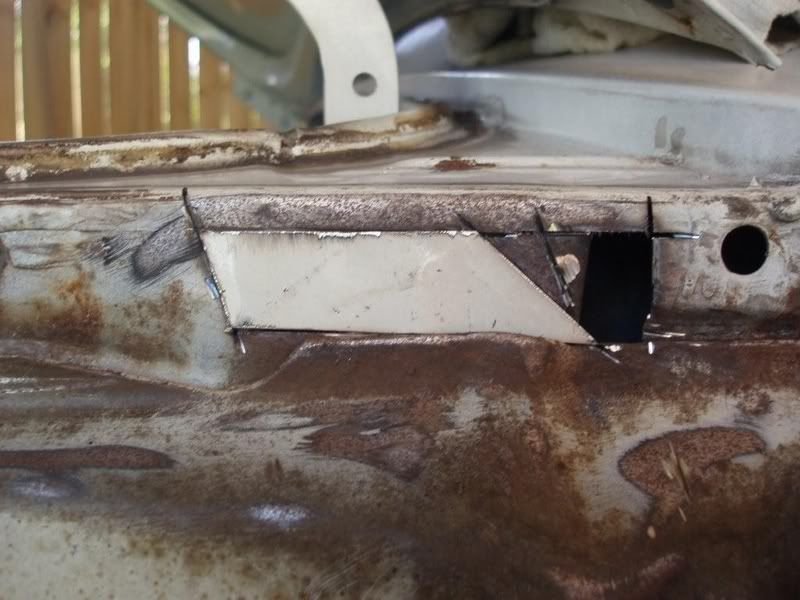
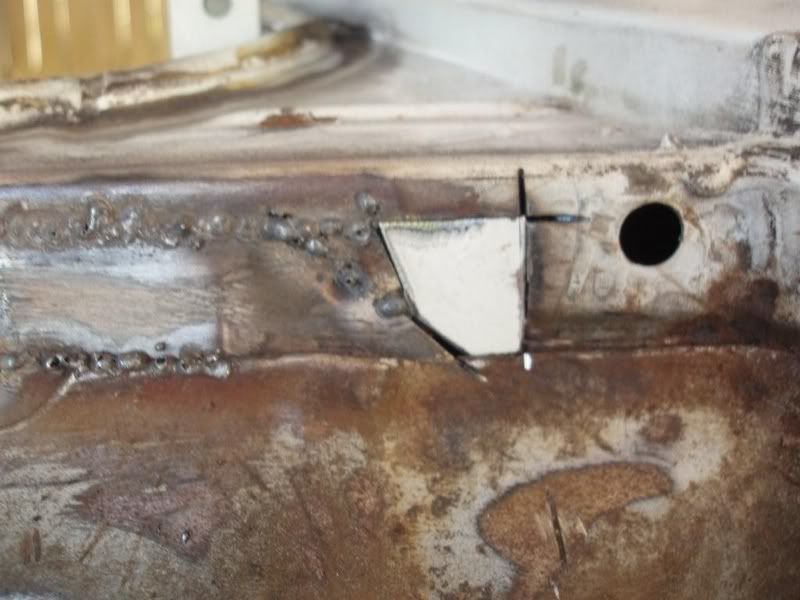
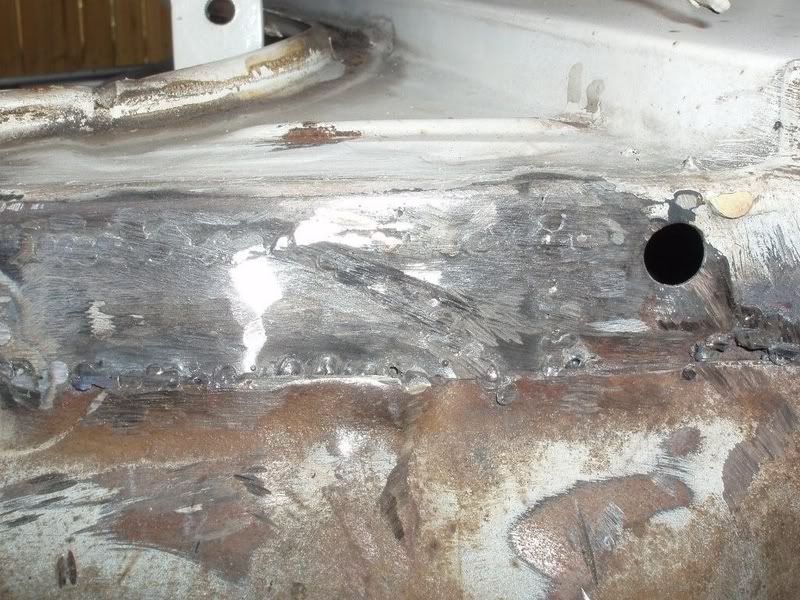
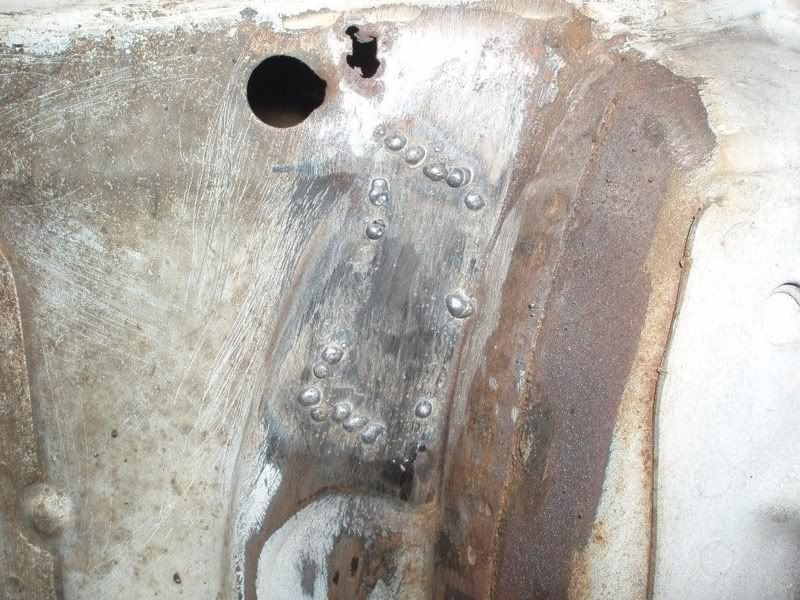
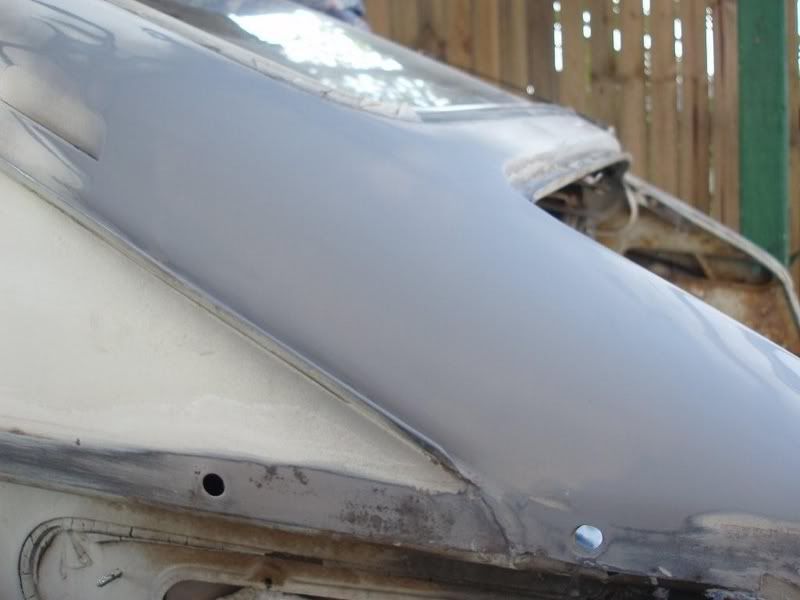
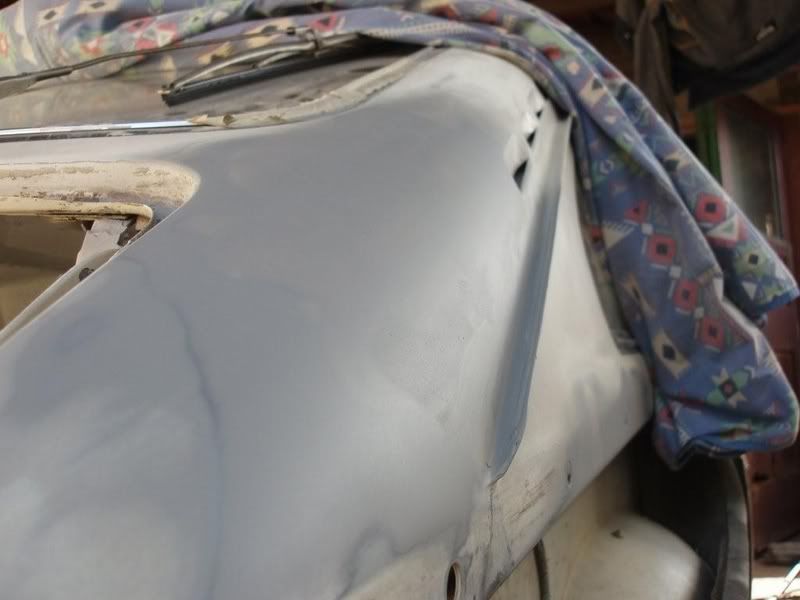
Very hard to show in pic, especially without colour but quite happy with results of both repairs to the back pillars, considering how shitty they
were.
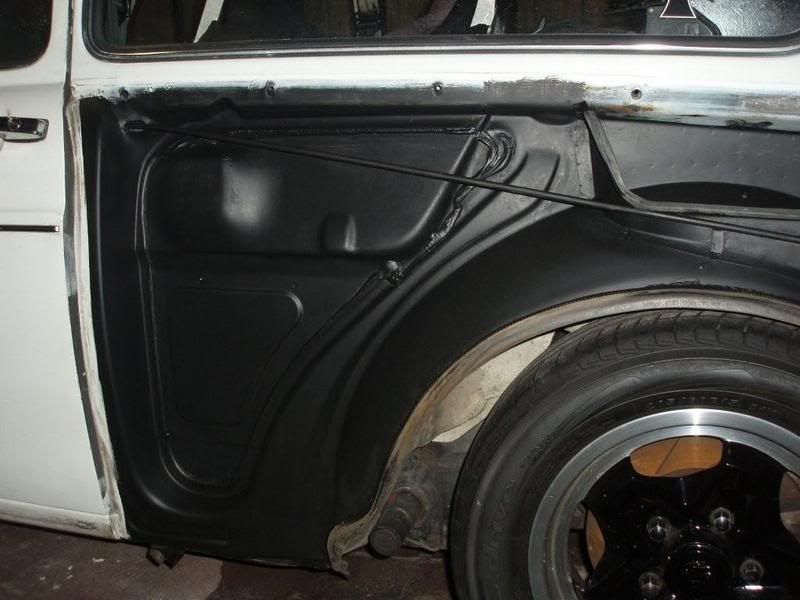
Everything that wasnt really protected from factory has been given a lick of GMH black. All inside guards and doors have been done as well.
1971 Type 3 Fasty - EJ20T
I love 242HP sleepers. 
How many sets of lights does it take a $229k Carrera S to learn? 
UPDATE: Cayman S, M3, B4 now added to the list. |
|
|
 kombimatt kombimatt
Officially Full-On Dubber
  
Posts: 271
Threads: 40
Registered: November 14th, 2006
Member Is Offline
Location: Dodges Ferry - TAS
Theme: UltimaBB Pro Blue ( Default )
Mood: Fast
|
| posted on January 30th, 2008 at 08:11 AM |
|
|
Nice work!
Matt
Lovin' the Dubs
  |
|
|
 Dasdubber Dasdubber
A.k.a.: Alan Agyik
23 Windows of Awesome
DAS Resto Haus
       
Posts: 5746
Threads: 289
Registered: August 26th, 2002
Member Is Offline
Location: Gold Coast
Theme: UltimaBB Pro Blue
Mood: feeling fine...
|
| posted on January 30th, 2008 at 07:20 PM |
|
|
Nice progress mate - amazing how many problems can be uncovered once you start pulling things apart hey!
|
|
|
 GTMac GTMac
A.k.a.: Andrew
Fahrvergnugen
   
Posts: 976
Threads: 246
Registered: November 24th, 2004
Member Is Offline
Location: Sydney
Theme: UltimaBB Pro Blue ( Default )
Mood: Always asleep
|
| posted on January 30th, 2008 at 09:55 PM |
|
|
| Quote: | Originally
posted by Dasdubber
Nice progress mate - amazing how many problems can be uncovered once you start pulling things apart hey!
|
Thanks Allan, and thanks for all your tips along the way. Your posts have helped heaps. For someone with very little knowledge I am having a hoot
doing this, just hope Im happy with the final result.
Im like a sponge, just like to soak in any advice and information and have a go myself..................just a bit scary what I think I can do after
the electrician has left my house 
1971 Type 3 Fasty - EJ20T
I love 242HP sleepers. 
How many sets of lights does it take a $229k Carrera S to learn? 
UPDATE: Cayman S, M3, B4 now added to the list. |
|
|
 GTMac GTMac
A.k.a.: Andrew
Fahrvergnugen
   
Posts: 976
Threads: 246
Registered: November 24th, 2004
Member Is Offline
Location: Sydney
Theme: UltimaBB Pro Blue ( Default )
Mood: Always asleep
|
| posted on February 3rd, 2008 at 10:34 PM |
|
|
Weather very crappy here again so not much panel work with paint and filler so tried to tidy up and do some extra with the grinder and welder.
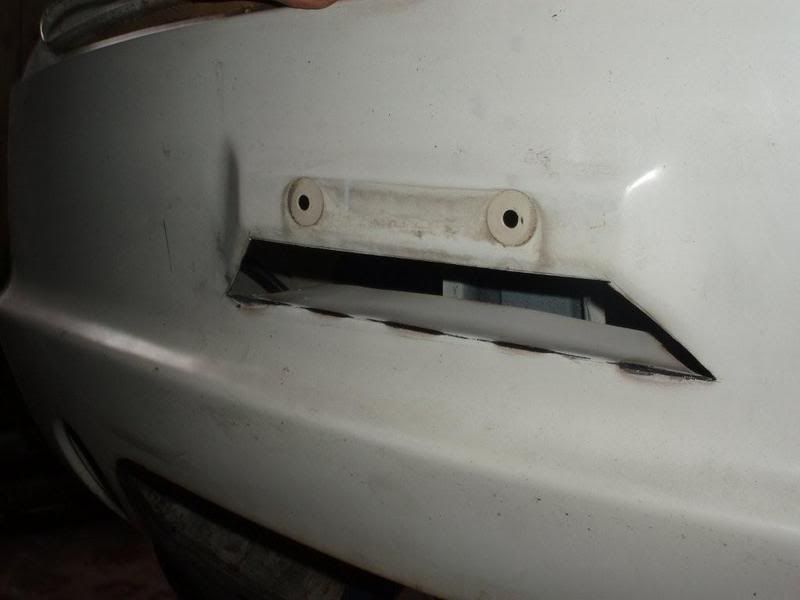
Always looking improving air flow but still keeping stealth at front where possible. Opened up this letter box and kept the flap bent up slightly. It
will all be hidden by the number plate.
Also started on the bonnet panel that will stop the hot air circulating through the luggage area.
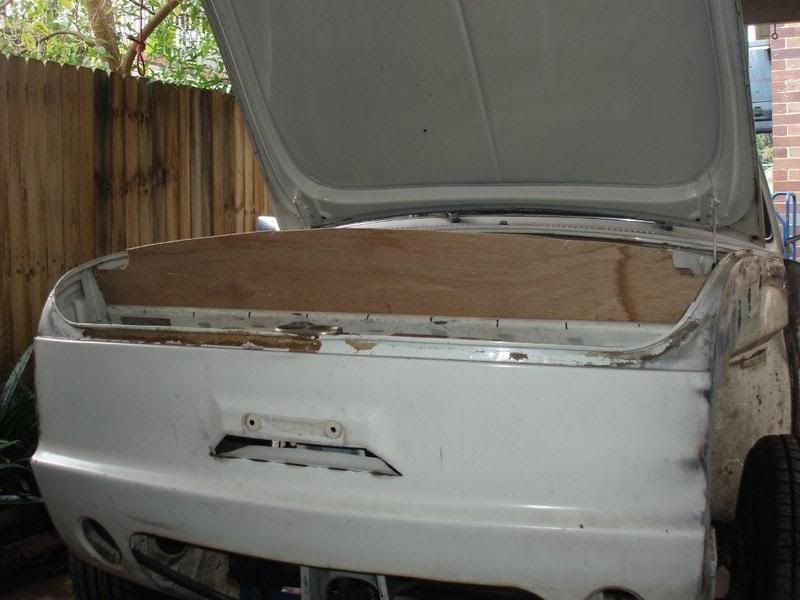
I finally got to bend up the profile to repair the bonnet rubber area.
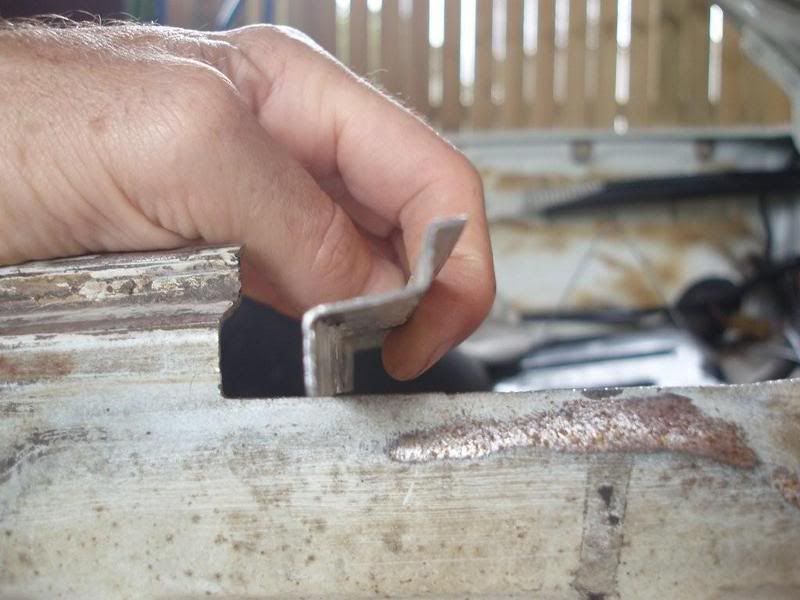
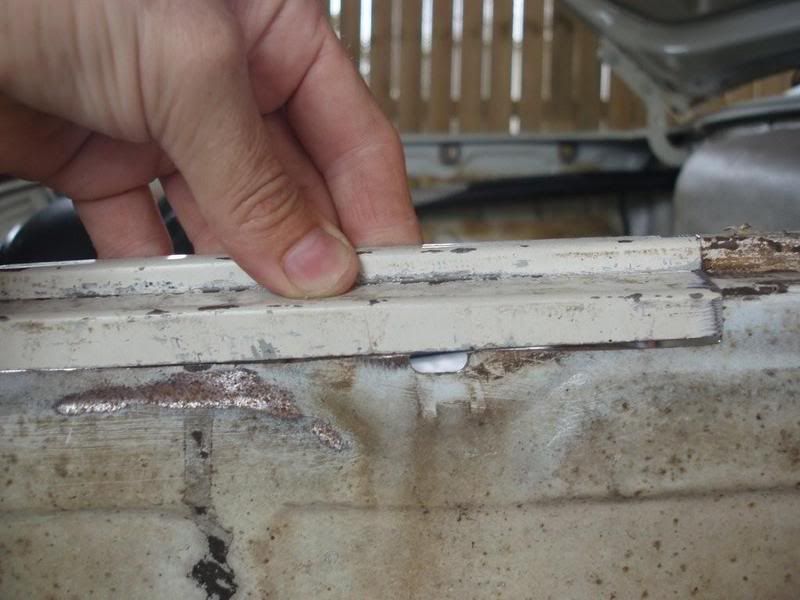
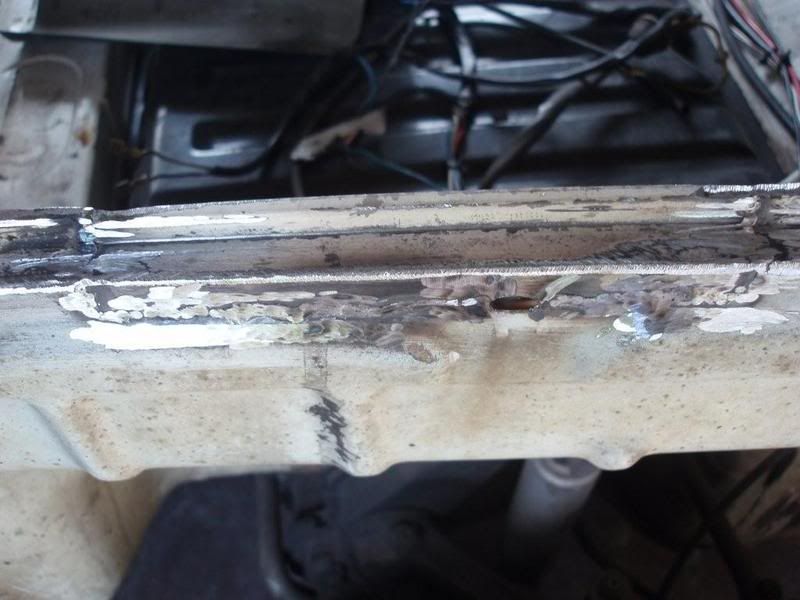
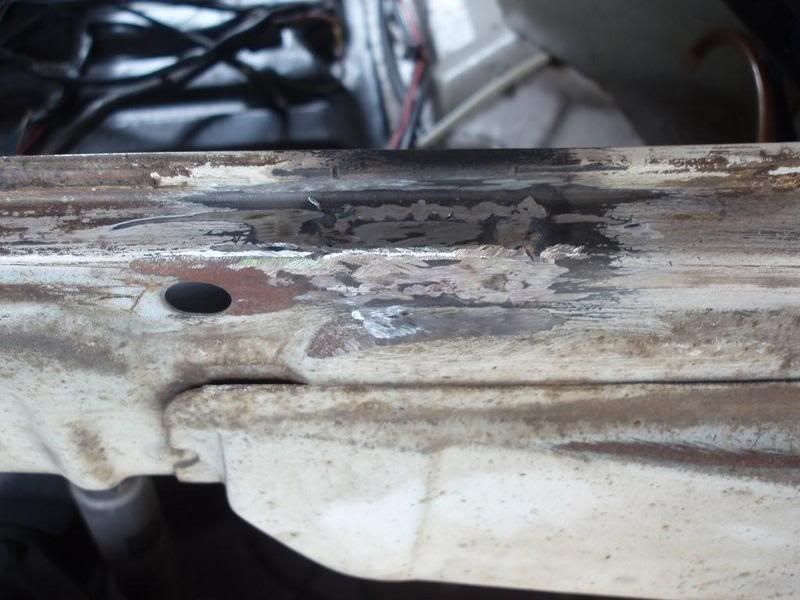
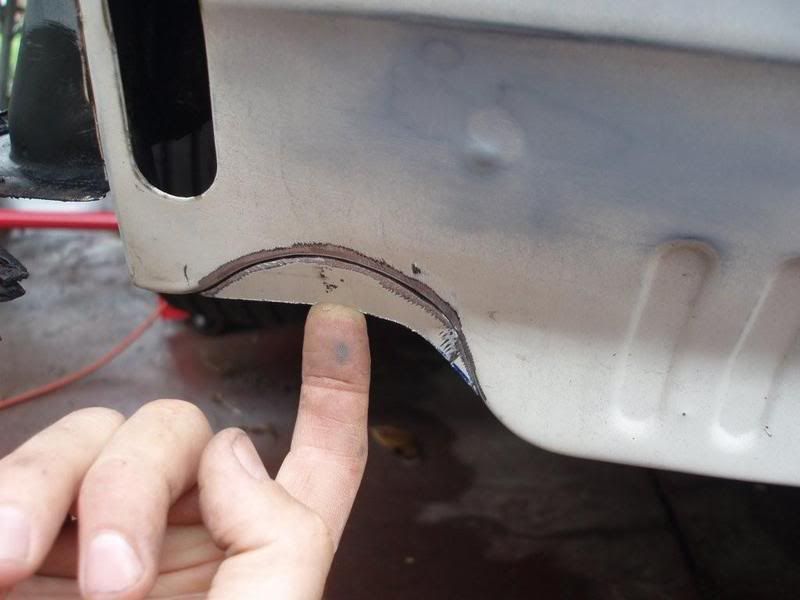
Middle of front apron always rust out so new piece and will drill a drain hole.
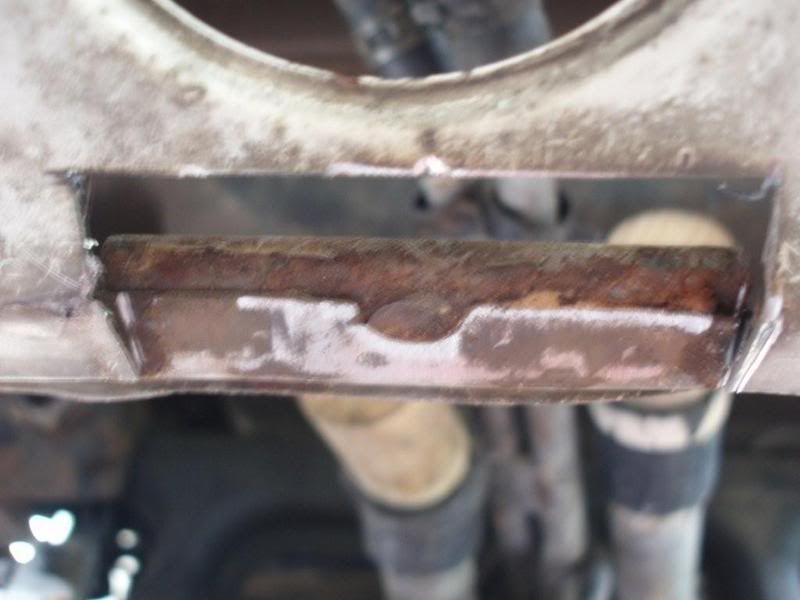
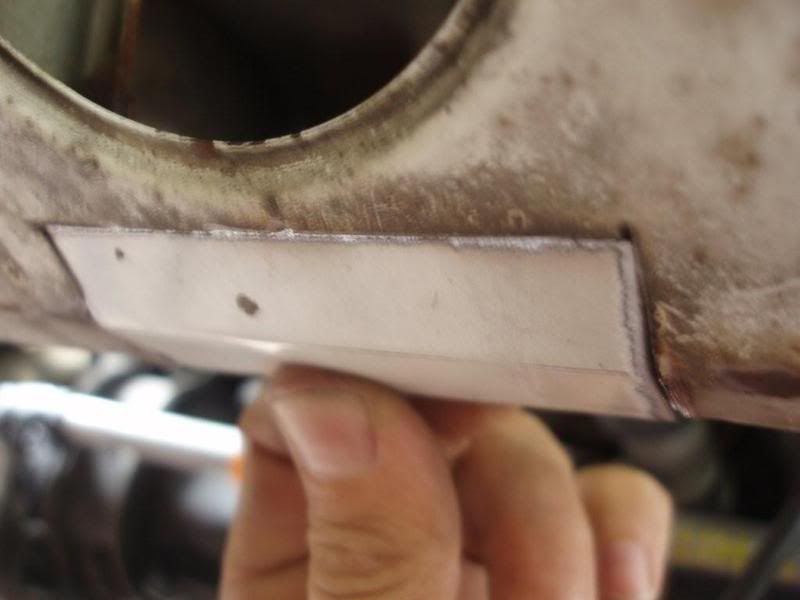
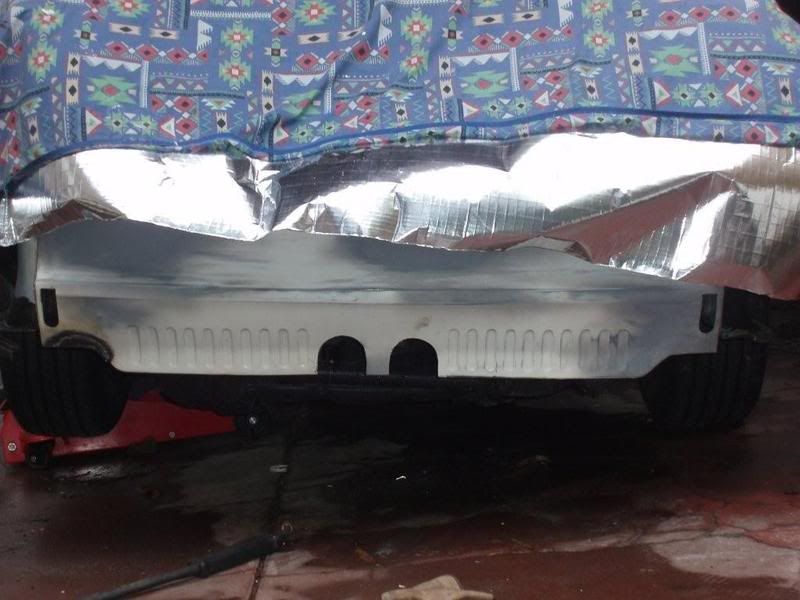
It really annoyed me that the profile on the rear apron didnt match as I no longer ran the exhaust out the passenger side but a dump pipe out the
driver side. Decided to fix that problem.
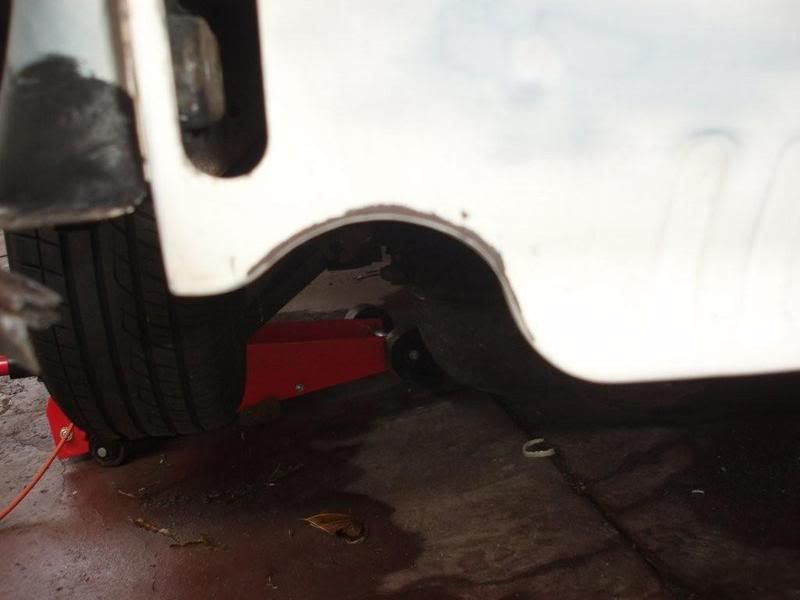
This gives you a progress of what Im after. Also will be running twin ceramic coated tips out the middle, just like the look of a Porsche Boxter S.
Still pretty low key to the un-trained eye especially when the bumper is back on.
1971 Type 3 Fasty - EJ20T
I love 242HP sleepers. 
How many sets of lights does it take a $229k Carrera S to learn? 
UPDATE: Cayman S, M3, B4 now added to the list. |
|
|
 GTMac GTMac
A.k.a.: Andrew
Fahrvergnugen
   
Posts: 976
Threads: 246
Registered: November 24th, 2004
Member Is Offline
Location: Sydney
Theme: UltimaBB Pro Blue ( Default )
Mood: Always asleep
|
| posted on March 31st, 2008 at 10:35 AM |
|
|
Have been consumed so much with work have been slack with update pics...........will get the rest up soon, but in the mean time the old girl starts
getting paint today. Finally some relief and a sort of clean garage.
1971 Type 3 Fasty - EJ20T
I love 242HP sleepers. 
How many sets of lights does it take a $229k Carrera S to learn? 
UPDATE: Cayman S, M3, B4 now added to the list. |
|
|
 GTMac GTMac
A.k.a.: Andrew
Fahrvergnugen
   
Posts: 976
Threads: 246
Registered: November 24th, 2004
Member Is Offline
Location: Sydney
Theme: UltimaBB Pro Blue ( Default )
Mood: Always asleep
|
| posted on April 22nd, 2008 at 11:42 PM |
|
|
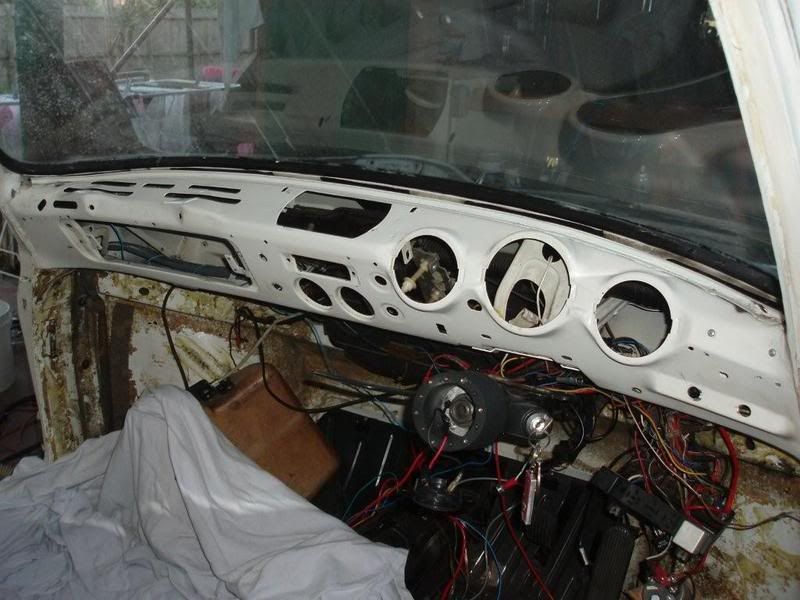
Few uninteresting pics added. Interior stripped totally now less wiring).
Ummmmmed and arrrred about taking the carpet off the fresh air/fan box, prob scared what i would see. When the carpet came off last repair was done
with one large sheet steel pop riveted over the hole to see this. It actually wasnt rusted at all and all I can think is that it was so badly blocked
with leaves they cut a hole in it. You can see the pop rivet holes around the cut out. Not sure if there is a factory inspection cover but I will put
one in later.
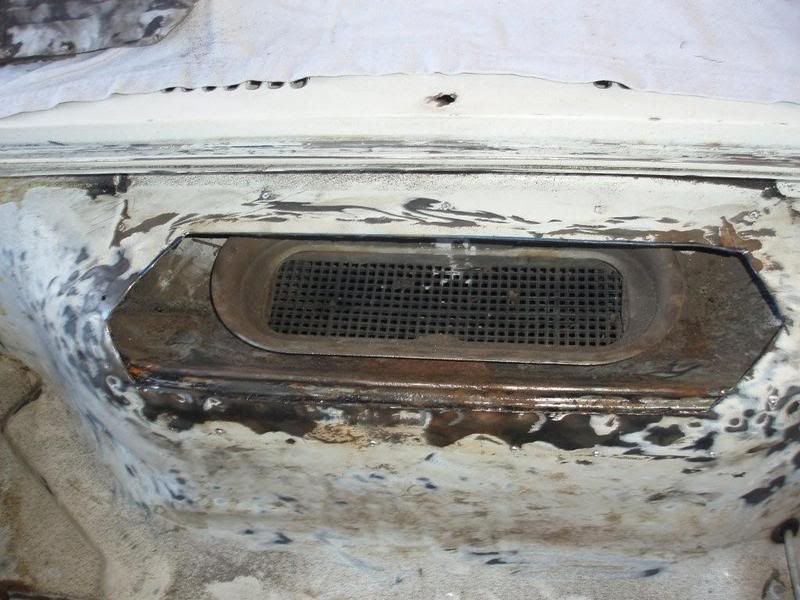
Started to fab up pieces to fit in the tidied up cut out to get the following.
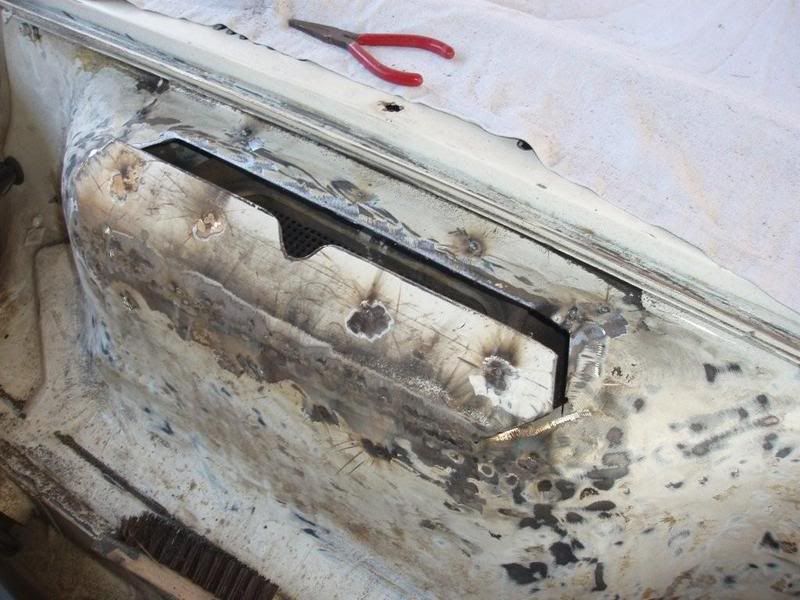
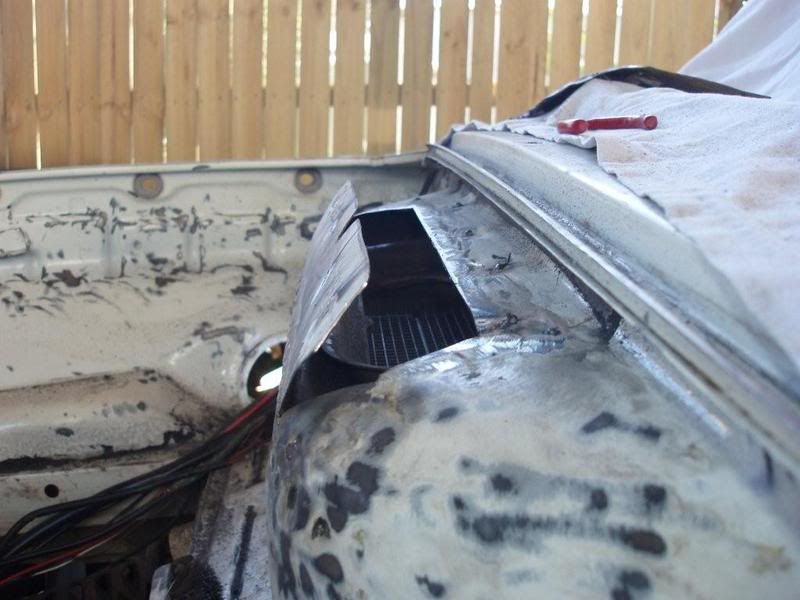
In the last side on pic its hard to see (look at lip in pic before) but I can understand how the fronts rust out as there is a lip that then leads
down to the outer panel and I could image when on the right slope water could get trapped. This is why I tacked the first piece on like this as I put
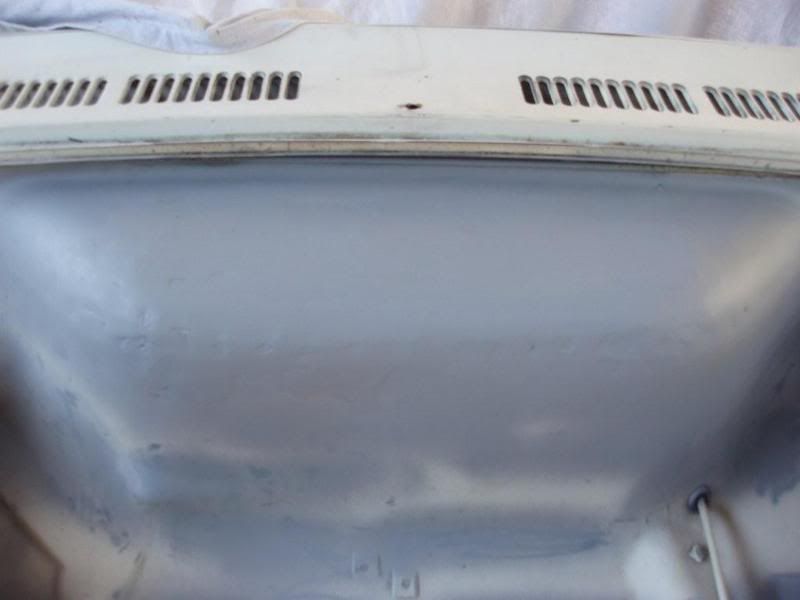
seam sealant in this cavity and made an extra lip so water cannot get down there.
Final finsih before painting looks like this. As it will be carpeted have not gone overboard with fine filler finish. Then again half hour job and
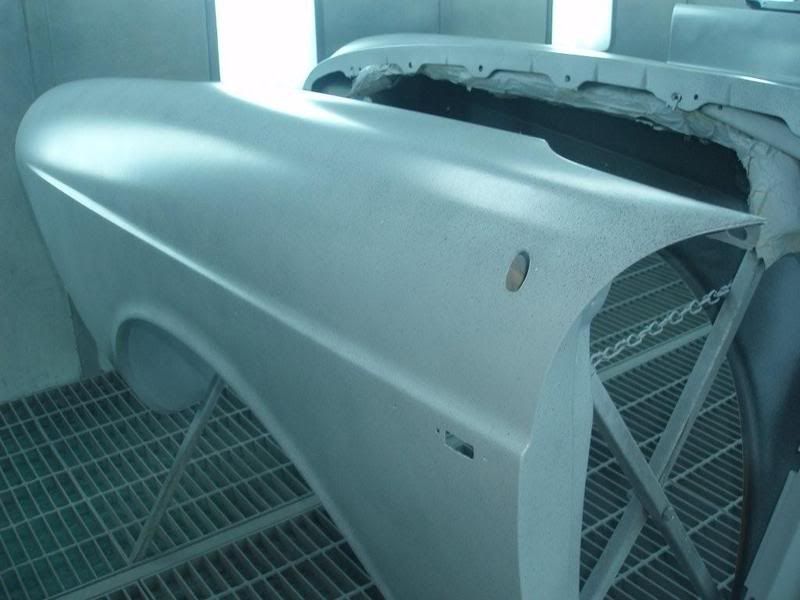
just may leave it as a painted boot area.
Couple of shots whilst spraying the panels in the booth. Colour to go on soon, I hope time permitting.
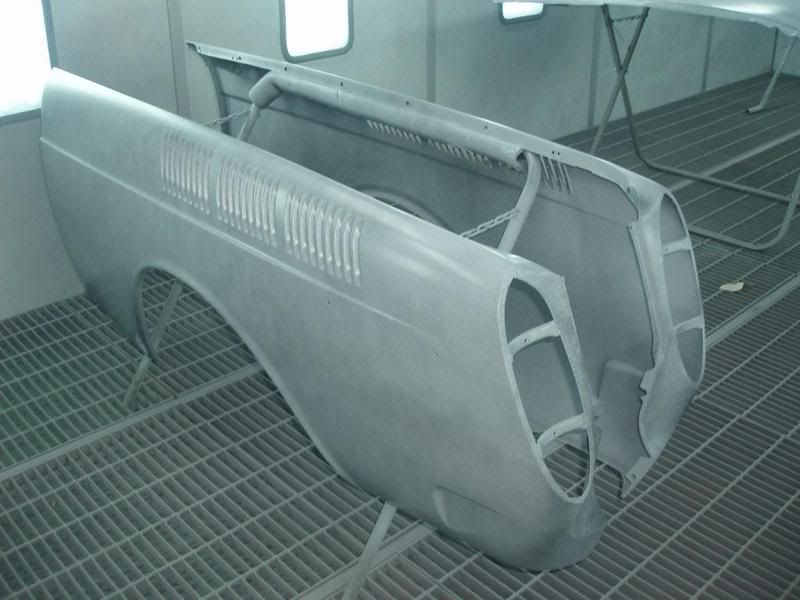
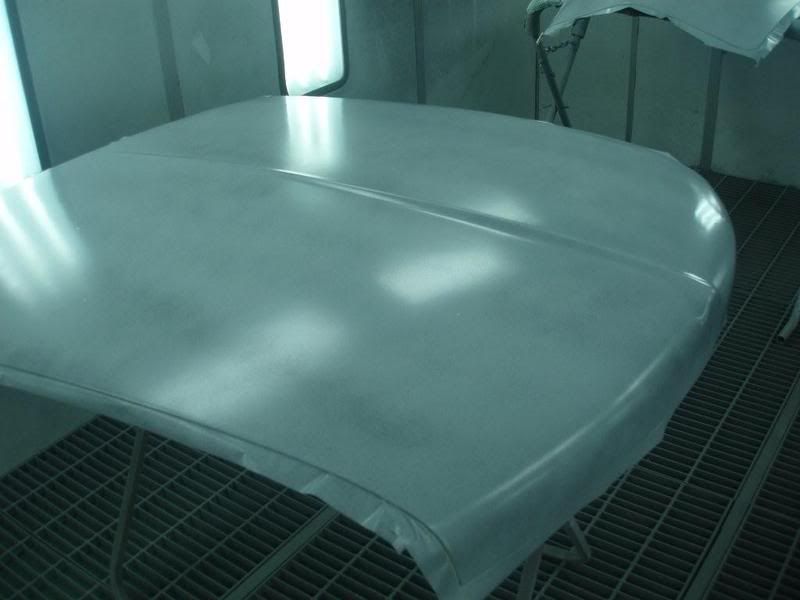
All this for a car Im considering selling.................am I mad?
1971 Type 3 Fasty - EJ20T
I love 242HP sleepers. 
How many sets of lights does it take a $229k Carrera S to learn? 
UPDATE: Cayman S, M3, B4 now added to the list. |
|
|
 rocknrob rocknrob
A.k.a.: Rob
Insano Dub Head
   
Posts: 844
Threads: 90
Registered: December 18th, 2003
Member Is Offline
Location: Gold Coast
Theme: UltimaBB Pro Black
Mood: mystic
|
| posted on April 23rd, 2008 at 05:52 PM |
|
|
you know you won't let it go
|
|
|
 GTMac GTMac
A.k.a.: Andrew
Fahrvergnugen
   
Posts: 976
Threads: 246
Registered: November 24th, 2004
Member Is Offline
Location: Sydney
Theme: UltimaBB Pro Blue ( Default )
Mood: Always asleep
|
| posted on May 5th, 2013 at 06:48 PM |
|
|
Rocknrob 5 years on you we're correct!
| Quote: | Originally
posted by rocknrob
you know you won't let it go
|
Rob on the 23.4.2008 you posted the above, as i was going to sell this resto to fund the next resto. Still have the Fasty and will be buried in
it.
Any other long term predictions you have for me?
1971 Type 3 Fasty - EJ20T
I love 242HP sleepers. 
How many sets of lights does it take a $229k Carrera S to learn? 
UPDATE: Cayman S, M3, B4 now added to the list. |
|
|
 GTMac GTMac
A.k.a.: Andrew
Fahrvergnugen
   
Posts: 976
Threads: 246
Registered: November 24th, 2004
Member Is Offline
Location: Sydney
Theme: UltimaBB Pro Blue ( Default )
Mood: Always asleep
|
| posted on May 5th, 2013 at 06:57 PM |
|
|
The finished product
Well she has been done for years but I'm a lazy bastard with updates
| Error |
| Sorry, you must be a registered user in order to download attachments. |
|
1971 Type 3 Fasty - EJ20T
I love 242HP sleepers. 
How many sets of lights does it take a $229k Carrera S to learn? 
UPDATE: Cayman S, M3, B4 now added to the list. |
|
|
 GTMac GTMac
A.k.a.: Andrew
Fahrvergnugen
   
Posts: 976
Threads: 246
Registered: November 24th, 2004
Member Is Offline
Location: Sydney
Theme: UltimaBB Pro Blue ( Default )
Mood: Always asleep
|
| posted on May 5th, 2013 at 06:59 PM |
|
|
Shots were all taken in old Slazenger factory in Alexandria. Had a bit of power slide fun after the photos.
| Error |
| Sorry, you must be a registered user in order to download attachments. |
|
1971 Type 3 Fasty - EJ20T
I love 242HP sleepers. 
How many sets of lights does it take a $229k Carrera S to learn? 
UPDATE: Cayman S, M3, B4 now added to the list. |
|
|