| [ Total Views: 109849 | Total Replies: 437 | Thread Id: 75812 ] |
| Pages: 1 2 3 4 5 .. 15 |
|
|
 ricola ricola
Wolfsburg Wizard
  
Posts: 437
Threads: 9
Registered: February 5th, 2003
Member Is Offline
Location: UK
Theme: UltimaBB Pro Blue ( Default )
|
| posted on July 26th, 2009 at 05:42 PM |
|
|
Yes, I'll box in the front bit of the hoop, maybe one of today's jobs.
Standard seats are going back in, there is just about enough space if I modify the framework locally so to anybody looking they won't know what is
lurking beneath 
|
|
|
 reub reub
Veteran Volks Folk
VWRX is gone...
    
Posts: 2053
Threads: 160
Registered: September 2nd, 2002
Member Is Offline
Theme: UltimaBB Pro Blue
|
| posted on July 26th, 2009 at 08:47 PM |
|
|
Nice work to date Rich
Seeing all the wrx conversions around the place sure gives me plenty of ideas....
Reub
|
|
|
 ricola ricola
Wolfsburg Wizard
  
Posts: 437
Threads: 9
Registered: February 5th, 2003
Member Is Offline
Location: UK
Theme: UltimaBB Pro Blue ( Default )
|
| posted on July 27th, 2009 at 04:49 AM |
|
|
More mods to your VWRX Reub?!
More accomplished today...
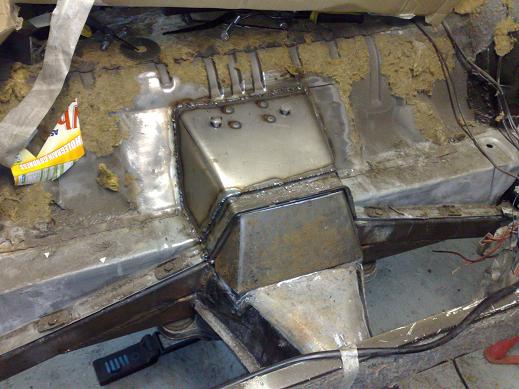
Plug welded the rear seatbelt panel back in
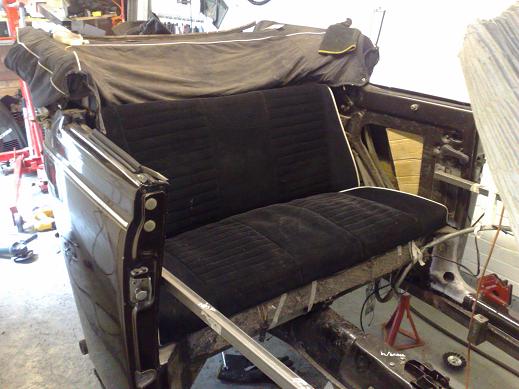
Trial fitted a rear seat
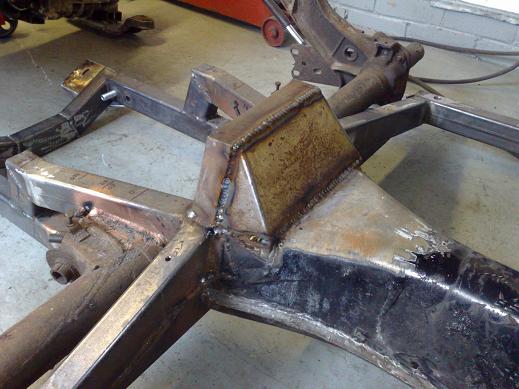
Welded in 3mm sheet on the chassis around the trans nose
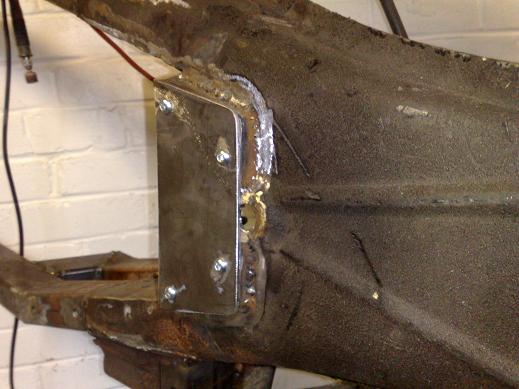
Made an access panel for the shifter coupling
|
|
|
 Flintstones Flintstones
Custom Title Time!
    
Posts: 1077
Threads: 69
Registered: August 27th, 2002
Member Is Offline
Location: Sydney
Theme: UltimaBB Psyche Blue
|
| posted on July 27th, 2009 at 08:50 PM |
|
|
Solid, that's never going to move 
so did you have to mod the seat much in the end?
|
|
|
 ricola ricola
Wolfsburg Wizard
  
Posts: 437
Threads: 9
Registered: February 5th, 2003
Member Is Offline
Location: UK
Theme: UltimaBB Pro Blue ( Default )
|
| posted on July 27th, 2009 at 08:56 PM |
|
|
Just the central brace in the seat base so far to move the kink already in it further forwards to clear the trans tunnel. Nearly set it on fire
welding so I'm going to leave doing it properly until I have stripped the covers off. I also need to gain about 15mm clearance to the seat back
bottom tube but that won't be noticable after the retrim.
|
|
|
 ricola ricola
Wolfsburg Wizard
  
Posts: 437
Threads: 9
Registered: February 5th, 2003
Member Is Offline
Location: UK
Theme: UltimaBB Pro Blue ( Default )
|
| posted on August 2nd, 2009 at 07:21 AM |
|
|
Have been busy on it but mostly lots of smaller jobs that aren't that exciting...
Modified the bulkhead to give more space for pedal travel if needed
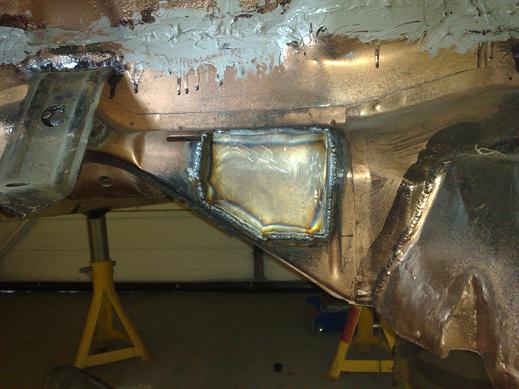
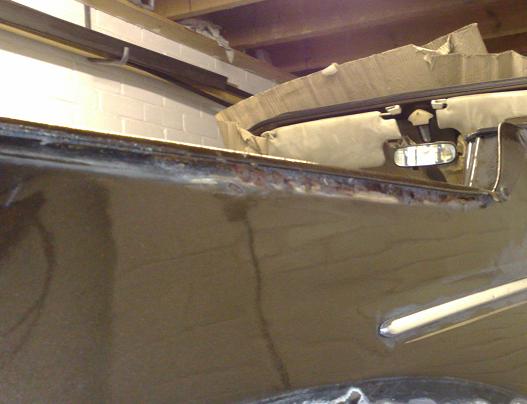
I'm now on to remaking the rear end of the body to make space for the engine and to make it removable. To do this I needed to take the roof off to
get better access and I was greeted with this:
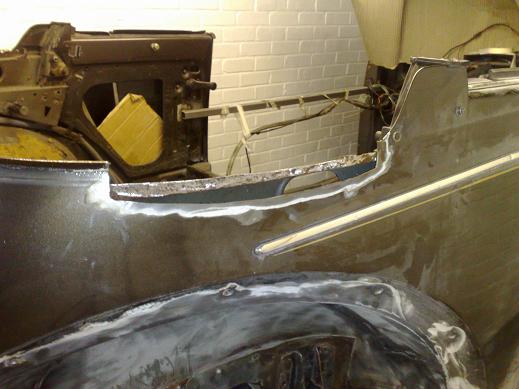
Bit of cutting
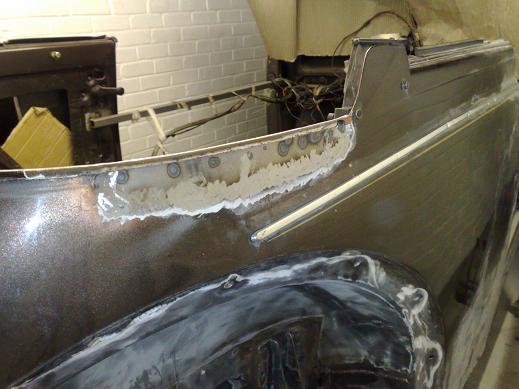
then make new panels and weld all up
|
|
|
 VWFREAK VWFREAK
A.k.a.: Peter / Bones
Son of Jim - Creator of Good
VWFREAK
     
Posts: 2577
Threads: 264
Registered: May 11th, 2004
Member Is Offline
Location: ACT
Theme: UltimaBB Pro Blue ( Default )
Mood: FREAKY
|
| posted on August 2nd, 2009 at 10:31 AM |
|
|
Damm your not mucking around with this build. 
|
|
|
 Flintstones Flintstones
Custom Title Time!
    
Posts: 1077
Threads: 69
Registered: August 27th, 2002
Member Is Offline
Location: Sydney
Theme: UltimaBB Psyche Blue
|
| posted on August 2nd, 2009 at 09:52 PM |
|
|
And now for the not so fun stuff
Do you have a lot of rust to deal with?
|
|
|
 ricola ricola
Wolfsburg Wizard
  
Posts: 437
Threads: 9
Registered: February 5th, 2003
Member Is Offline
Location: UK
Theme: UltimaBB Pro Blue ( Default )
|
| posted on August 2nd, 2009 at 11:08 PM |
|
|
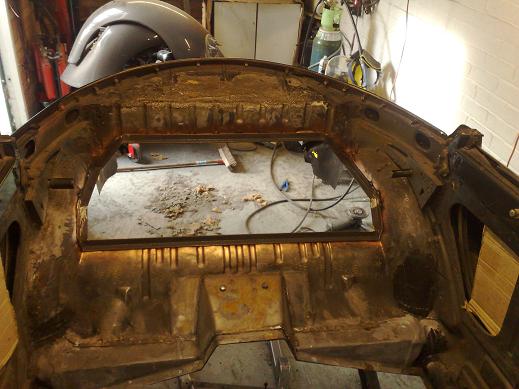
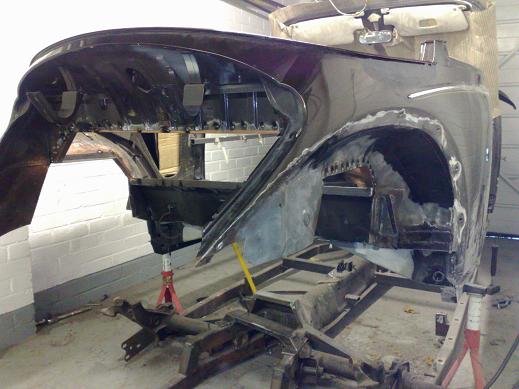
That was about the only remaining hidden area (although I will have to fix a small amount around the windscreen/scuttle area). Just having some lunch
now, but this morning I cut most of the back end out! Will make/weld in a frame this afternoon and post pics... At the back of my mind I want to make
space for framework between the top damper mounts.
|
|
|
 ricola ricola
Wolfsburg Wizard
  
Posts: 437
Threads: 9
Registered: February 5th, 2003
Member Is Offline
Location: UK
Theme: UltimaBB Pro Blue ( Default )
|
| posted on August 3rd, 2009 at 04:43 AM |
|
|
As promised, some more pics...
|
|
|
 Flintstones Flintstones
Custom Title Time!
    
Posts: 1077
Threads: 69
Registered: August 27th, 2002
Member Is Offline
Location: Sydney
Theme: UltimaBB Psyche Blue
|
| posted on August 3rd, 2009 at 07:53 PM |
|
|
I'm curious and puzzled as to why you need such a big opening, considering directly under the opening is the gearbox, but will wait patiently to see
what goes in there.
How's the back part of the body going to be secured, seeing as you've done away with the rear body mounts that are near the dampers?
|
|
|
 ricola ricola
Wolfsburg Wizard
  
Posts: 437
Threads: 9
Registered: February 5th, 2003
Member Is Offline
Location: UK
Theme: UltimaBB Pro Blue ( Default )
|
| posted on August 3rd, 2009 at 07:59 PM |
|
|
First off there is the subaru chargecooler. Secondly in the back of my mind I still may redesign the top damper mounts. The clutch slave was
practically touching the underside of the parcel shelf before so this just gives it a bit more breathing room. I plan to permanently panel in both
sides and have the central section removable, like a bus access panel.
The body mounts are still present, I do need to cut them off to deal with rust in between the double skins and am not sure if I will replace them or
make up new ones..
|
|
|
 ricola ricola
Wolfsburg Wizard
  
Posts: 437
Threads: 9
Registered: February 5th, 2003
Member Is Offline
Location: UK
Theme: UltimaBB Pro Blue ( Default )
|
| posted on August 12th, 2009 at 07:03 AM |
|
|
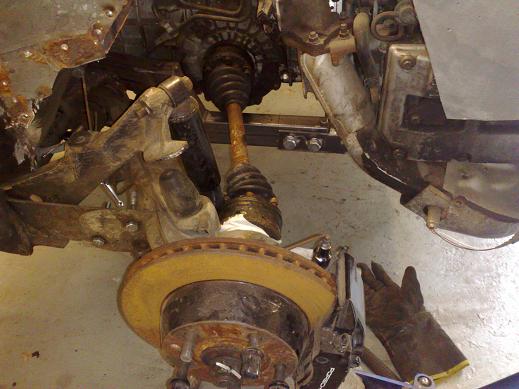
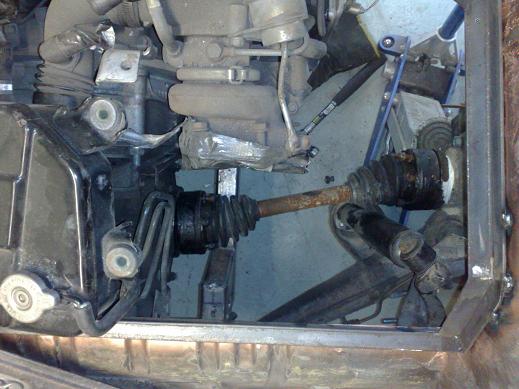
Put in a trailing arm and axle to check clearances. Axle is at about 12 degrees which isn't as bad as I was fearing, what do people think about 944
or should I go with 930 CVs for the extra strength/angle? I may also modify the lower damper position on the arm to get enough clearance for
coil-overs...
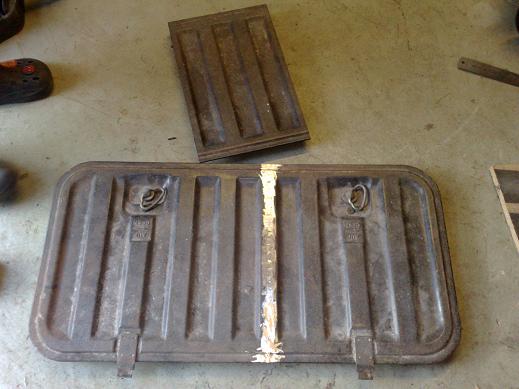
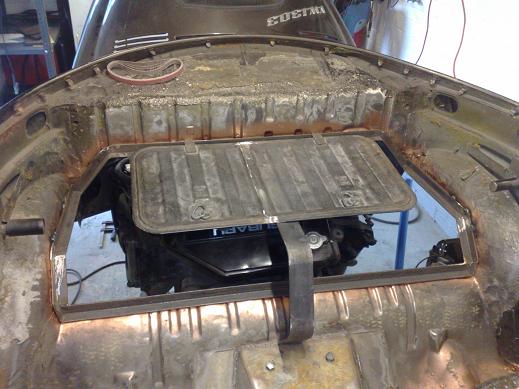
Got hold of a bay window engine access cover and then shortened it to suit. Have to make up suitable framework now...
|
|
|
 Grey 57 Grey 57
A.k.a.: Dean
Son of Jim - Creator of Good
Old Grey Cruiser
     
Posts: 2937
Threads: 355
Registered: August 25th, 2002
Member Is Offline
Location: Phillip Island
Theme: UltimaBB Pro Blue ( Default )
Mood: (OoVoO) (OVO).
|
| posted on August 12th, 2009 at 08:05 AM |
|
|
Very nice build.  How much angle can you get away with on CV's How much angle can you get away with on CV's
|
|
|
 ricola ricola
Wolfsburg Wizard
  
Posts: 437
Threads: 9
Registered: February 5th, 2003
Member Is Offline
Location: UK
Theme: UltimaBB Pro Blue ( Default )
|
| posted on August 12th, 2009 at 08:11 AM |
|
|
According to blindchickenracing:
Type 1 is 12 degrees
Type 2 is 17 degrees
Type 4/944 is 22 degrees
930 is 25 degrees
To stay with 944 size I already have the hubs, I just have to buy carrera 4 front drive flanges as they bolt straight into the G50 and are the correct
bolt pattern.
To go 930 CV I have to sort hub ends and get an extra pair of CVs and then axles (which swayaway do relatively cheaply), bonus will be they are
extremely strong!
|
|
|
 Flintstones Flintstones
Custom Title Time!
    
Posts: 1077
Threads: 69
Registered: August 27th, 2002
Member Is Offline
Location: Sydney
Theme: UltimaBB Psyche Blue
|
| posted on August 12th, 2009 at 10:13 PM |
|
|
Looking good Rich.
What's the car going to be used for? If its a road/track car then the 944 cv's should be more than able to handle what you dish out.
I can't see that you'll be abusing it. Buy the flanges for the box and your done.
At worst if the cv's fail then you can always spend the money and upgrade to the 930 gear.
Cheers
D
|
|
|
 ricola ricola
Wolfsburg Wizard
  
Posts: 437
Threads: 9
Registered: February 5th, 2003
Member Is Offline
Location: UK
Theme: UltimaBB Pro Blue ( Default )
|
| posted on August 12th, 2009 at 10:19 PM |
|
|
At the moment my long term plan is to use the car as a weekend toy. I'm not going to have the time to build another complete car so I plan to play
with engine instead, I feel I have to take advantage of that bulletproof trans! So, I will be going for 4-500bhp later on and I'd rather do it all
right first time as in the end that is always cheaper/better...
Sticking with 944 stuff will definitely be cheaper, I'm guessing about £150 instead of over £400 for 930 stuff ($300 for axles, $200 for stubs, $130
for another pair of CVs then shipping from US for all that stuff).
|
|
|
 ricola ricola
Wolfsburg Wizard
  
Posts: 437
Threads: 9
Registered: February 5th, 2003
Member Is Offline
Location: UK
Theme: UltimaBB Pro Blue ( Default )
|
| posted on August 24th, 2009 at 04:12 AM |
|
|
Work has slowed recently but got a bit of time this weekend...
Made the framework for the hatch
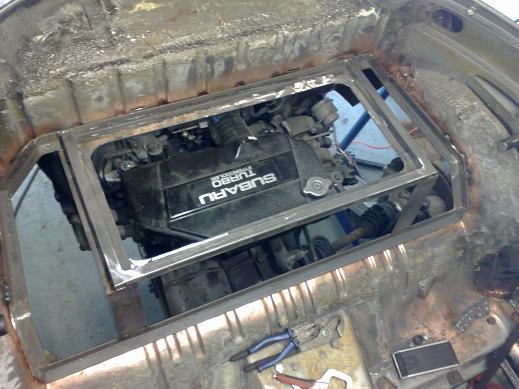
I'll probably make the remaining panels bolt-in too
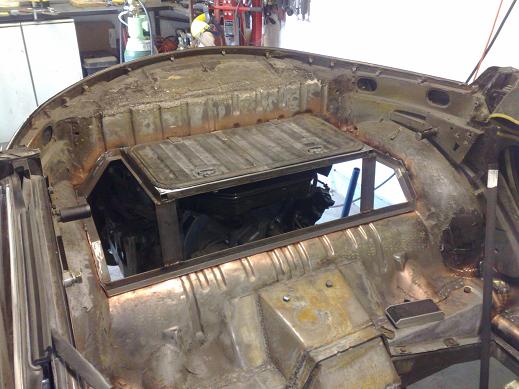
|
|
|
 ricola ricola
Wolfsburg Wizard
  
Posts: 437
Threads: 9
Registered: February 5th, 2003
Member Is Offline
Location: UK
Theme: UltimaBB Pro Blue ( Default )
|
| posted on August 28th, 2009 at 07:46 AM |
|
|
Making up framework to support the rear bodywork and bumper now...
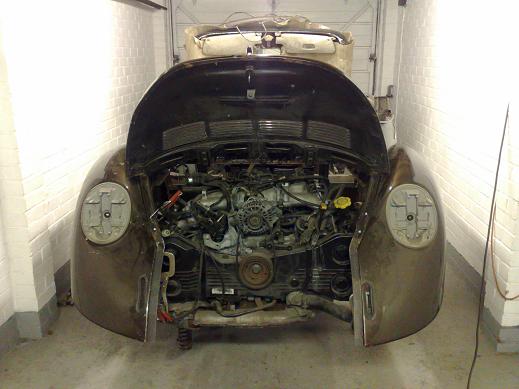
I'll make a bridging piece to go in between leaving as much space as possible under the 'bubble' late valance for a big magnaflow muffler and to
make the assembly a bit more rigid.
|
|
|
 pete wood pete wood
A.k.a.: figure itout
23 Windows of Awesome
       
Posts: 6828
Threads: 389
Registered: January 15th, 2004
Member Is Offline
Location: Nth Nth StMarys, Sydney
Theme: UltimaBB Pro White
Mood: upgrades = jackstands
|
| posted on August 29th, 2009 at 12:12 PM |
|
|
man this car is gonna be awesome. UltraVW should do a feature on it when it's finished!
|
|
|
 ricola ricola
Wolfsburg Wizard
  
Posts: 437
Threads: 9
Registered: February 5th, 2003
Member Is Offline
Location: UK
Theme: UltimaBB Pro Blue ( Default )
|
| posted on September 2nd, 2009 at 06:44 AM |
|
|
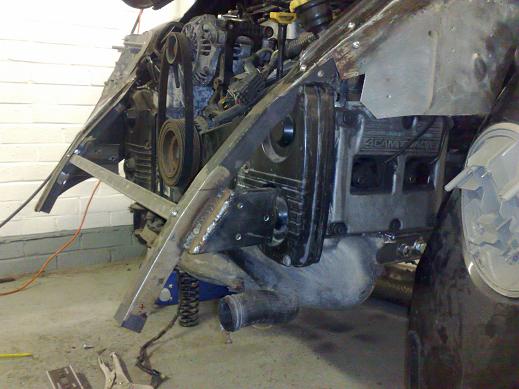
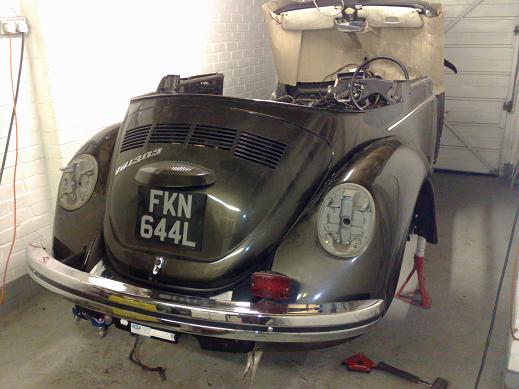
Rear bumper brackets and a cross piece added to stiffen it all up a bit
Quick mock-up...
|
|
|
 ricola ricola
Wolfsburg Wizard
  
Posts: 437
Threads: 9
Registered: February 5th, 2003
Member Is Offline
Location: UK
Theme: UltimaBB Pro Blue ( Default )
|
| posted on September 7th, 2009 at 06:24 AM |
|
|
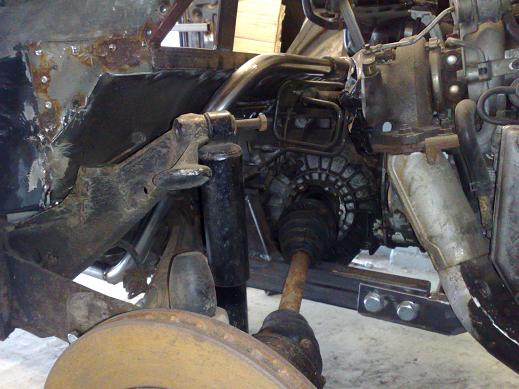
Done the coolant pipes now:
Here you can see the initial tacked together complete runs. After my speedster I was not keen to use the stock subaru thermostat again, I used an
external thermostat on my libra and it worked very well so I am using the same one here.
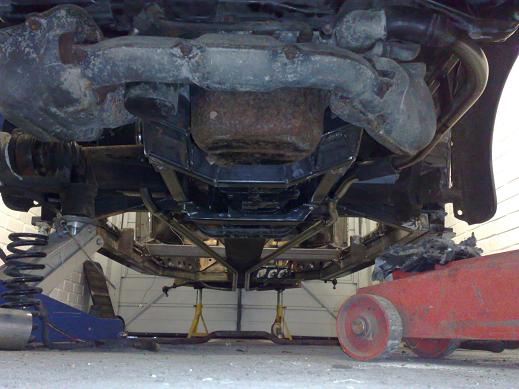 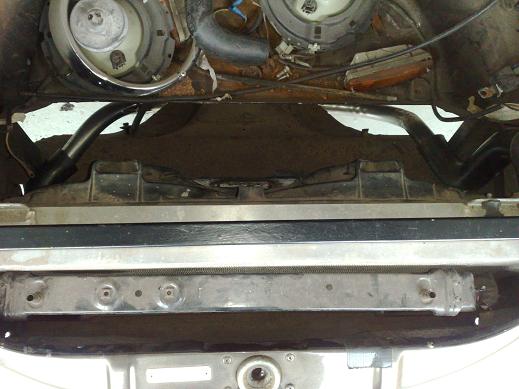 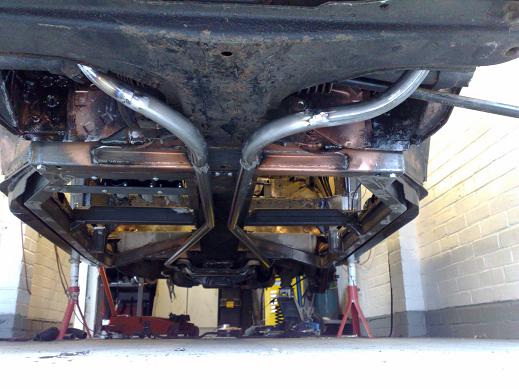 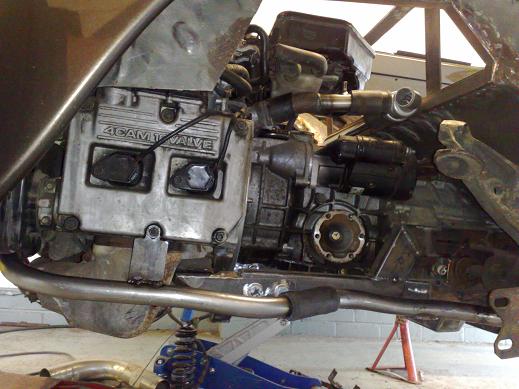 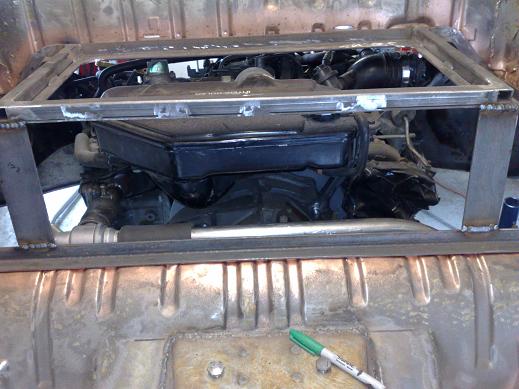
Adapter piece from the manifold converts from the engine's 38mm pipework down to the thermostat and main line size of 32mm, it also incorporates a
bleed line which will go back to the coolant header tank. You can also see how I mounted the return rigid section to the engine with a piece of flex
to account for engine movement.
Here's how the outlet pipe drops down just infront of the trailing arm. I mounted them high enough so that they will not get in the way of a 944
anti-roll bar.
|
|
|
 pete wood pete wood
A.k.a.: figure itout
23 Windows of Awesome
       
Posts: 6828
Threads: 389
Registered: January 15th, 2004
Member Is Offline
Location: Nth Nth StMarys, Sydney
Theme: UltimaBB Pro White
Mood: upgrades = jackstands
|
| posted on September 7th, 2009 at 09:09 AM |
|
|
i guess you've already thought of this, but you will get air pockets in the pipe that goes across the top of the trans. I had that very problem
myself. are you going to put a bleed nipple in for bleeding the whole system up?
|
|
|
 Flintstones Flintstones
Custom Title Time!
    
Posts: 1077
Threads: 69
Registered: August 27th, 2002
Member Is Offline
Location: Sydney
Theme: UltimaBB Psyche Blue
|
| posted on September 7th, 2009 at 01:26 PM |
|
|
looks great Rich.
I like the way you tried to make the pipes look symmetrical underneath.
Not much fabrication work left from the look of it.
Cheers
D
|
|
|
 ricola ricola
Wolfsburg Wizard
  
Posts: 437
Threads: 9
Registered: February 5th, 2003
Member Is Offline
Location: UK
Theme: UltimaBB Pro Blue ( Default )
|
| posted on September 7th, 2009 at 06:12 PM |
|
|
I did have them non-symmetrical to begin with but then changed my mind, looks better for it I think. Inner wings still to be done and also the
decision to make a cross piece or not between top damper mounts...
Pete: I already have a bleed point in the pipe between the engine outlet and the thermostat that will be hooked up to the header tank. I guess an
additional one might be handy during the fill up phase but will be more or less redundant after that, will have a think about it...
Rich
|
|
|
 gerrelt gerrelt
Slammed & Awesome Dubber
 
Posts: 88
Threads: 3
Registered: May 13th, 2005
Member Is Offline
Theme: UltimaBB Pro Blue ( Default )
|
| posted on September 8th, 2009 at 06:11 AM |
|
|
Looks good, Rich!
One thing I encountered in my cooling system was that I made the connections to the engine too rigid. De movement of the engine made the coolant hoses
to "walk off".
I then cut out a long piece of metal coolant pipe, and replaced it with a flexible coolant hose. That solved the problem.
I think your flexible pieces look a bit short. The don't allow much engine movement. I would have made them longer.
|
|
|
 ricola ricola
Wolfsburg Wizard
  
Posts: 437
Threads: 9
Registered: February 5th, 2003
Member Is Offline
Location: UK
Theme: UltimaBB Pro Blue ( Default )
|
| posted on September 8th, 2009 at 06:16 AM |
|
|
I read you had that problem on your site, I'm waiting to fit some silicone hoses to see how flexible they are before commiting finally (and maybe
getting them galvanized)
|
|
|
 ricola ricola
Wolfsburg Wizard
  
Posts: 437
Threads: 9
Registered: February 5th, 2003
Member Is Offline
Location: UK
Theme: UltimaBB Pro Blue ( Default )
|
| posted on September 14th, 2009 at 05:40 AM |
|
|
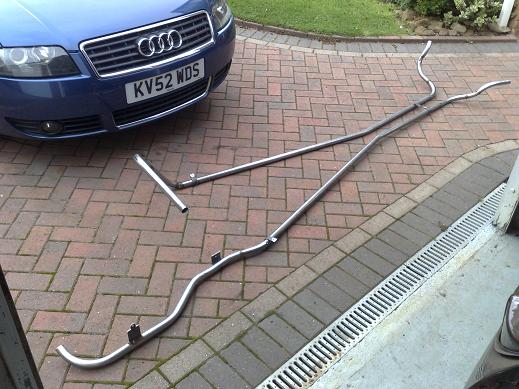
Just about got the exhaust done, still have to source an oxygen sensor boss in stainless to weld in and weld on a tailpipe but I'll wait until the
bodywork is fully finished for that...
General consensus is that a bellmouth turbo outlet is best for flow and general drivability. It merges the wastegate flow into the main turbo outlet
so I had to go round to a mates to open out the flange I had already bought with his plasma cutter (got to get me one of those!!). I made a jig out of
plywood offset the size of the plasma nozzle..
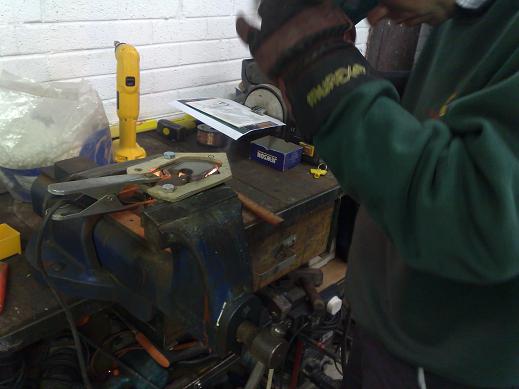
Then I had to bend up the bellmouth section and weld it on
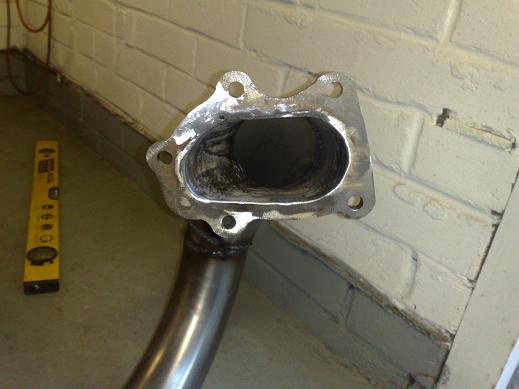 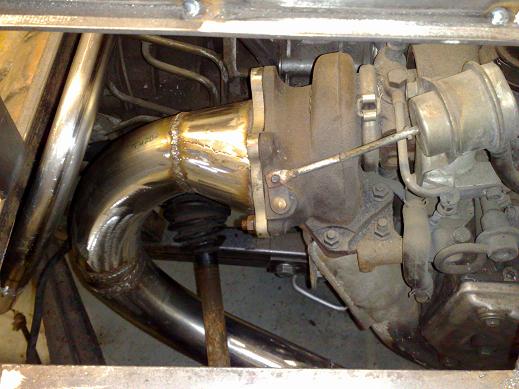
with it being 3" stainless tube I decided to go around the axle rather than an extremely tight radius for better performance, it ends going through a
3" magnaflow muffler I found at a kit car show...
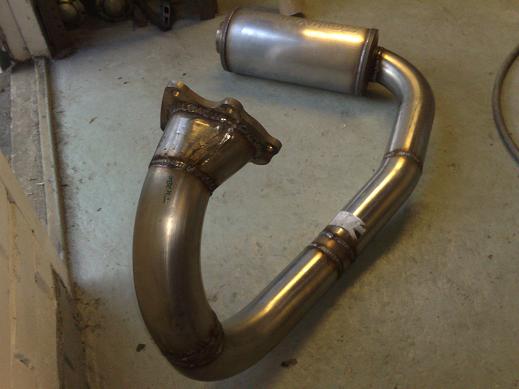 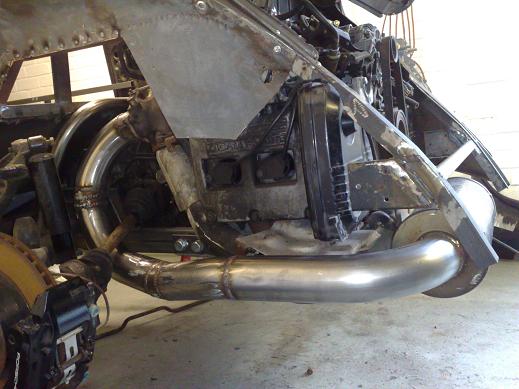
I'll wrap it in thermal tape when I'm finished...
|
|
|
 Mick058 Mick058
Custom Title Time!
    
Posts: 1580
Threads: 109
Registered: January 29th, 2008
Member Is Offline
Location: Sydney
Theme: UltimaBB Pro Blue ( Default )
|
| posted on September 14th, 2009 at 07:51 AM |
|
|
Looks good - my exhaust does the same, around the axle
|
|
|
 Mick058 Mick058
Custom Title Time!
    
Posts: 1580
Threads: 109
Registered: January 29th, 2008
Member Is Offline
Location: Sydney
Theme: UltimaBB Pro Blue ( Default )
|
| posted on September 14th, 2009 at 01:15 PM |
|
|
just 1 thing, where does your sensor sit?


|
|
|
| Pages: 1 2 3 4 5 .. 15 |