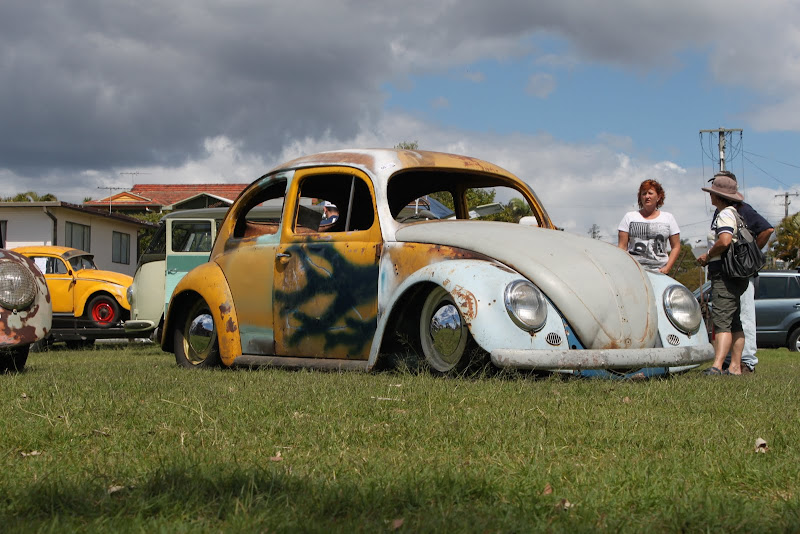
Well thought i should share the rewarding end of this build.....
i have a thread on a locked forum here is Australia which shares alot of my heart and sole and alot of learning (didnt no how to weld till i bought this car at 16)
over the past 5 years (in a nutshell) it has come from this......
a heap of hand beaten panels... and alot of repro ones to...
Both semaphore posts i had to replace as they had ben filled in...
NUG637 ·
then it was on to the other side....
NUG637 ·
the really bad stuff....
Could only get my hands on a big window roof cut (from someone on here) so i had to make do and make it work the shape of the oval windscreen with a few pie cuts...
my oval must of had a HUGE hit back in its time and they built the semaphore post out of lead to get it looking right... we melted it out and look at how out of shape it was.....
inner and out gutter skins replaced using a 58 roof on a oval :-$
one thousand more rust repairs and it was finally time for abit of a mock-up which we trailered to action day a few years back... some of you may have seen it??
i did 2 new pans on and with the help of my brother we built a 4.5in narrowed beam with adjustable spring plates etc and we sat the body on for the show...
Befor
After..
as i had welded on a 60's front nose (all i could get my hands on at the time)
i had to make my own "H" apron....
NUG637 ·
Now that i have let 1000 pictures tell 1 million stories (thousand more panels cut out and replaced but you get the idea... it was a POS).... finally got it in highbuild just after christmas this year after taking it back to bare metal and working all obvious areas.
layed on some high fill
since then i have been block sanding and block sanding... i motherfucken hate sanding!!!
anyway got around to laying colour on the undersides of everything last weekend.... copying KCW's way of painting in 2 stages....
mmmmmm L11 Pastel Green!
Once i was happy with how it was shaping up with the high build.... it came time for wet sanding...
NUG637 ·
Back when i First purchased this and bought the heater chanels off Al at Das resto Haus, he offered me his booth to use when it came to paint... im not sure if he saw the courage and passion i had or if it was an off the cuff gesture which he kept to his word... and i cant thank him enough!
we dragged it down to his and with a few pointers of how to spray (my second time spraying 2k) i went to town!
I honestly can't believe how straight it is! Specially the roof that we made out of a big window roof section...
Just after the first coat I stood back and everything was green and it looked like a brand new car.... I would be lying if I said I didnt choke up abit but had to pull myself together cus I had another mother fucken coat to spray
I managed to get one run over the whole job but it turns out it will mostly be covered by the chrome.... Winning!!!
I really can't thank Al enough... And his systems and advice was grand...
Anyway enough jibba Jabba... Here are the higher quality photos....
Here is a picture or the run... Where the front cowel meets the front quarter... I knew exactly when I did it,,. I doubled back on myself and knew I loaded it up to much... But glad it will be mostly be hidden
The 60's apron I had to make into a h apron
The roof turned out amazing!!!
i was grinning ear to ear that day... and in all honesty i cant beleave i "did" all that.... every square inch....
NUG637 ·
once we got it home and back in our shed
i started cleaning parts, blasting parts and painting parts
cleaned up my interior light swiches that mount in the door jam.... along with alot of other bits and pieces...
While down at Das Resto over the weekend, Al lent me one of his "small guns" and i loved it, so i went out and got one...
it worked a treat with the 2k on the small bits
a few things in highbuild
NUG637 ·
got the wheel, column, and most the interior stuff in paint...
polished and assembled heaps of old stuff
befor...
after...
also had a friend visit the shed and see the progress (comes round every summer, there is another one about 3-4ft bigger... they come and eat the possums that sleep in the shelves...
NUG637 ·
know a marine upholster who is right into his vw's and has one of the nicer rust free country buggies i have seen =D>
asked him if he is interested in doing me a clothe interior which he said he would love to... so we got talking and chose some material... so this has had me pulling down old seats... fixed broken springs and retainer tabs...
out of all the spares we have.... nice seats are few and far between... so had to cut up the most hagard one to fix one of the better bottoms....
i then sent all the frames off to be blasted as it would of cost me to much in garnet to do it with the little POS i have....
my wolfsburgwest mohair headliner came in so i quickly sprayed the seat springs and got a headstart with the sound deadening and foam for the headliner...
feels silly covering up an area i spent days blasting to get rid of all the rust and gunk.... least my mind can rest knowing it was all fresh steel with 3 coats of paint on it
and in-between all this i did abit of freshening up on the speedo...
the original ring was replaced with a better one of a 60's speedo :-$
the needle was stil fairly clear but the paint was flaking off... so i quick whipe with thinner and then applied some new paint...
then polished the shit out of the glass and the speedo face itself... pretensioned the needle (6-8mph)and assembled this mofo!
NUG637 ·
then back onto the headliner
pretty happy with the fitment for an off the shelf wolfsburgwest headliner
NUG637 ·
little bit of a milestone last weekend.....
in the past 5+ years this body has seen the pan 3 times....
1st when it arrived.....
2nd - Mock up for the show...
and for the 3rd and hopefully final time for the next 50 years... 8)
as my blue car was on my ovals pan... im just rolling it around on the blue stockos.... the wheels for this were at the blasters
kombibob ·
You have done such a great job mate.
And i'm sure every project you tackle after this will be a walk in the park with all you have learnt.
NUG637 ·
then this past week i have been doing all the fun stuff
bolting up shiney shit!
And finally got to fit up my nos horn grills I have been hoarding for years, given to me by angus on here
NUG637 ·
got the rims and frames back from the blasters the other day...
came across this aussie stamp on one of the rims (all random years) and thought it was pretty cool.... didnt know they came on rims
round 2 follow the next day with what felt like hours of taping
Mixed a little to much green so got 3 good coats on there 8)
Why didn't I tape the sides you ask? More paint the merrier the face is all the matters in my opinion.
Pretty happy with that!
sorted out my glass and started cleaning it.... didnt even know i had securit labelled rear and both rear quarter glasses 8) one is scratched to buggery tho.... almost like someone has gone to town on it with some 80grit.... gonna take it somewhere to see if they can polish it out?
anyway with the help of my bro... we got the rear and one rear quarter in.... not properly happy with the rear quarter rubber but we had it in and out a few times and we can't get it to sit any better so im just gonna have to live with it.... it might settle over time (fingers crossed)
and now you guys are up to date to where i am at with this huge big learning curve i have gotten myself into at such a young age. Sometimes i wished i was one of those people that could be done with it and walk away... but thats not in my nature.... will keep you guys up to date the more i do.... not aiming to have it ready for the abbey or any show for that matter... just wanna do it once and do it right so in my head i keep telling myself "it'll be done when its done"
NUG637 ·
kombibob wrote:You have done such a great job mate.
And i'm sure every project you tackle after this will be a walk in the park with all you have learnt.
thanks bob 😎
i was talking to a few people at the pimpama show today about this car and thought it was only fair i show a build thread about it so people know the history 😂
Bizarre ·
WOW...........................
Love the colour - but love your work with the welder more
That roof is impressive
NUG637 ·
thanks mate... dont think the colour came in aus? i may be wrong tho... i know agave did but L11 is a pretty early colour and seen on alot of split bugs over seas.... took me a while to choose what i wanted but to be honest i think i would of been happy with any colour other the the yellow it was when i bought it 😂
hus22l ·
This is some amazing work here! The car is going to look fantastic. Keep up the good work!
h ·
great work, I'm sure you are looking forward to driving out of the transport dept all legit on the road.. not long now 🙂 nice one
mystery fang ·
Awesome job mate,looking forward too seeing the end result.
NUG637 ·
thanks guys...
today was abit of a mood kill tho you gotta take the good with the bad...
got a call today... wheels are done 8) went and picked them up and fitted them...
just the standard 165 rears and 135 fronts 8) this combo worked great on the last car so thought i would stick with what i know for now...
fitted the rims and and gave it a push to get it to "settle" abit.... clunk!! wheel bolts takes out the brake retainer.... :? never had this problem befor... same wheel bolts and spaces etc just a different rim.... turns out this rim has been over torqued and has fucked it completely.... the wheel bolt either pretrudes to much or bottoms out befor it tightens onto the rim....
so in other words.... not a straight swap if i ever blow a tyre, so this rim is buggard!! heres to doing things twice!!! woohooo!!!
here you can see the "boldge" of a normal wheel bolt seat... compared to the rather flat ones on the one i painted.... lucky the other 4 where ok so swapped this one wheel over and the problem was fixed.... just have to paint myself another spare...
my bro was also playing on the car and fitted up the column and my nice new steering wheel 8) more pictures when theres abit more bolted up... just thought the wheels looked bitchen!
jobie ·
That whole car looks bitchen! Then when you see where it started..... Nice work!
vassy66T1 ·
Absolutely fantastic!!!!
I seriously admire your persistence and can't wait to see it in the flesh.
dangerous ·
Give this guy a knighthood!
Well done man!
Allbones ·
I take my hat off to you, put it back on, and take it off again. Amazing, great to see such commitment and attention to detail.
HappyDaze ·
Anyone who says that nobody wants to/can do the hard restoration work any more should take a good look at what this bloke has done.👍👍👍👍
Nug, you make it look easy [and I know it IS NOT]. More power to ya!
rusty69 ·
Amazing work man... what an inspiration.... I have just managed to close my mouth and I am now wiping drool off the keyboard....
TOPCAT69 ·
Good as gold nugget 👍😂😂
matberry ·
Words can't describe the amount of work to do a job like you've done on this car. A++++ Super job Nug.
LIFE IN THE LOW LANE ·
Most if not nearly all on here would of sent that body for scrap. Cudos to you for your perseverance to see the project through!! Looks sensational!! As does the size of those snakes damn!!
LUFTMEISTER ·
Nice work. Well thought out and executed. Another bug saved from the scrapper. Unless you build one, you will never know the trials and tribulations of a project that big. Congrats and happy motoring. 👍👍
beetle_nut ·
Love it mate..
DubbyFan ·
Wow, read that start to finish, made me late for work!
Congratulations that is awesome!
NUG637 ·
thanks guys, i would be lieing if it said it was challenging at times.... and it doesnt come easy.... thats a minimum of 3 nights a week in the shed for a minimum 3 hours for the past 5 years.... some repairs i put it and wasnt happy with so cut them out to get fitment better.... but not often.... you only do that once or twice befor you learn 😂
tonight my bro gave me a lift to fit the doors but during the week i have been doing more small stuff... like cleaning/building my tail lights....fitting running boards, the pop nose.... shifter.... handbrake.... sourcing/cleaning/painting door mechs and so on....
pretty happy with these doors.... drivers one is rubbing on the heater chanel so very lightly.... but im not to worried to be honest.... got all the door gaps pretty close and everything lines up sweet as! only got the passanger side latching atm... drivers mechs are in paint
no kamax bolts on this one... just shiney ones... they do the trick.... thought i would take some pictures as it probly wont be this clean ever again...
pete wood ·
I've read back through this thread mate. A-STOUND-ED. 🤪 Mate, I'd have dropped it off at the tip. Huge props for saving the poor old thing and restoring it so amazingly. Seems like my oval had a much happier and easier life than your's. Keep up the good work. 👍
ColonyVW ·
So bloody good mate! Can't wait to see you rolling in it!
NUG637 ·
thanks guys....
fitted up my stainless bars... front on is faultless. a Beautiful reproduction.... the rear not as nice but good enough for this old thing
building headlights was rather rewarding....
mmmm bosch script 8)
a little trick i discovered to hold that sucker on the lense
blasted and painted buckets
polished lense and rings
also fitted up my tail lights, running board chrome and got my wolfsburgwest order so took all my interior stuff to my upholster.... recons it will be a week befor he gets a start on it but all his work looks top notch 8)
got home and thought i would give the top of the fuel tank a touch up.... as i didnt do a good job of it the first time round 5 years ago....
NUG637 ·
had a week that felt like i was chasing the 8 ball the whole week....
got the top of the tank painted.... and polished my "starburst" cap to go on it 8)
pulled all the tin off the engine and will give that another quick once over...
dropped my ghetto abarth off to be ceramic coated 8) looking forward to seeing how that comes up.... should look bitching!
also placed an order for my carpet kit.... from http://www.newtoncomm.co.uk/home/.... man this building cars shit is expensive #-o [-o
NUG637 ·
Got a new windscreen cut last week and come yesterday we tried fitting it.... no fucken way in hell would that bad boy fit.... did abit of calling around and got onto a local mob that will "shave" it down about 5mm off the top hopefully giving us the clearance we need to fit it....
otherwise we strung the other quarter in... gave up looking for a usable big logo securit...
i also ordered some nice new replacment plates as mine were hardly damaged
then started fitting my door rubbers and seals as i have collected most the missing pieces except i desperatley need some good condition vent window frames
i always forget which order these all go in.... i thought after three cars i would have it right but i did it a little ass about face to begin with but will have the other door sussed
i didnt get much time in the shed over the weekend but i snuck in for 2 hours befor we had to be somewhere for dinner and got most my tin blasted and have been working them in-between other jobs on the car.... got them in highbuild tonight.
im really hanging to wash this thing... it bloody filthy but i need all the glass in to do that... hopefully not long now...
NUG637 ·
was feeling pretty misserable the other weekend and i think the missus could tell... had the hot rods cruise past on such a beautiful morning so it got my itching to get in the shed...
got all my tin wet sanded and painted.... come up schmicko!
and just incase you couldnt see....
im getting better at this spraying gig, pretty happy with that off the gun finish....
after that i thought "i havent had enough yet" so i pulled the rocker gear off the 36er and retorqued the heads as i never did after run in and it hasnt hit 5000k's yet. Shit im glad i did... they all NEEDED to be retorqued up to 25 foot pounds. Then back on with the rocker gear and torqued that first to 10ft/lbs then 14 as required for 36hps fitttted a few little bits and bobs i go from Als Dasresto Parts
was doing all this while i let it soak up a little sun....
NUG637 ·
Got the screen sanded down about 5mm and man didnt it make a difference!
slotted straight in without a hitch. The rubber sunk in the corners a little but im happy!!! 8) 8) 8)
also got my "ghetto abarth" back from the ceramic coating mob today... took 2 days longer then they said but im over the moon with the finish 8) 8) 8)
its no longer from the ghetto!
from wrecks
to riches baby yeah!!!
for 270 bucks i think its money well spent in the looks alone!!! :twisted: :twisted:
NUG637 ·
It's been a crazy busy work week this week and haven't had as much shed time as I would like... Luckly tho I had last night and I got tonight in the shed to make up for it 8)
The other afternoon I got the rest of the "tinware" blasted and painted 8)
I won a set of quarter windows and frames off ebay so spent one night driving an hour+ north to get them and then of course the next night was inlaws dinner night ..... Yay :roll:
So tonight I got the quarters polished up... Tint removed and seals and frames installed!!! Both latches where shit... Only one functional so have whacked them in my cip cart already... But soon I'm gonna wash this bad boy down!!!!
but for now it onto engine assembly time 8)
ColonyVW ·
Looking amazing mate. Gotta come out and check it out sometime.
NUG637 ·
Got most my tin etc on and ready to be put in the car but ive been abit cautious of the muffller burning/bubbling the paint on the rear apron so i got an idea off a friend to wrap the exhaust in a fire blanket to keep down heat...
i thought i would take this a step further and also put an alloy barrier between the muffler and the rear apron to create a cavity to keep the heat off the paint
have had this engine in and out of my 58 by myself 3 times but the othernight i asked for help from my bro to be carefull with paint etc and the thing just wouldnt play ball.... fought it for an hour and a half... it seems the small bit of alloy i put in there was stopping the engine from tilting "plumb" to slot onto the shaft.... and while i was trying to gently persuade it.... i put too much pressure on the alloy and it dented the apron from underneath and cracked my paint, so out came the engine and off came the alloy which then became a great Frisbee acorss the yard
still was a fight after that but it gave us just enough room to shimmey it back to a point we could get it in... FUCK!
the first one was always gonna hurt..... but the way i see it now.... without the alloy if it bubbles then too bad ill just live with a shit apron but it it doesnt bubble then ill probly end up respraying the rear apron at some point....
NUG637 ·
on another note....
my friend dave the upholsterer said i could save some coin by doing a few things myself....
he wanted to place a thick material under the coconut pads to stop them from pushing through the springs as they break down over time so i ended up using some marine carpet clipped and glued to the the springs first and then glueing the coconut pads over the top
he should get a start on stitching the seats this week 😀/
NUG637 ·
Chose some piping to the go with the material we ordered...
the brown is obviously gonna be the piping.... just wanted to triple check my choice again the colour of the car....
then finally caught up with my workload this week and only had to work half a day friday 😀/ so it was time for its first ever bath then straight on with some wax then the rest of the shiney bits
waiting on my carpet kit to arrive and the interior to be done and shes good for some cruising [-o
vassy66T1 ·
Very very sweet!!
My favourite beetle right there
Dasdubber ·
Very nice Nug, you did a good job mate. Will look great when you get around to lowering it 😉
tar76 ·
Coming along nicely mate
pete wood ·
Mate love this car. Love your cheap okrasa setup too. What twinport heads are you using there?
NUG637 ·
thanks so much guys... the heads are the wolfsburg ones that come with the kit.... its only the muffler i went on the cheap side and made my own 👍
Al you cheeky mofo, there is no fuel tank, no fuel, no spare, to interior, no tools.... so it should settle to below 100mm when its all in there 😀
i also want people to understand im not building this thing to be a show winner, the whole purpose of this build was for me to learn skills i never had an to challange myself. It has turned out far better then i ever expected but if it was put up to be judged there are to many imperfections to be classed as show quality. i havent cut and polished the paint.... only waxed becasue i am so happy with the finish off the gun and i want to use this car.... not just have it parked up until a show is on... 👍 thanks again for the kind words guys 👍
joesbuell ·
beautiful job!
lohoon ·
For once ill agree with joedirtsbuell. Top job.
vwfive ·
Verryy nice,got a few ?s.Where did you get the grommety things for the trims?,you still running stock 36 with 6v?
NUG637 ·
grommety things for the tim can be bought at das resto parts.... and its a rebuilt 36hp with the ww okrasa kit (heads, carbs and linkages) and an okrasa cam, built all by myself 8)
NUG637 ·
and yes 6v
vwfive ·
Cheers for that will have to get on to them,again great looking bug.
pfillery ·
Wow! What a car. You have put in the hard work and it looks great.
I do have one very serious criticism of your work though.....IT ISN'T PARKED IN MY GARAGE!!!
Seriously awesome drool-worthy work.
What prep coat and paint did you use on the steering wheel? Was it 2k?
NUG637 ·
thanks mate 😁
yep.... used epoxy resin to fill the cracks that i ground out.... then 2k high fill with 2k direct gloss 😎
NUG637 ·
After fitting my new latches i was pushing the drivers side quarter glass into place when the spot weld on the swivel hinge let go.... as i dont have the tools to weld stainless i got one of the guys down the boatyard to weld this sucker back on and run it over the polisher
then after an absolute shit of a week i got a phone call from dave (upholster with the country buggies) asking me to come in.... and holy fuck!!!
these photo's really dont do them justice.... then brown is much more "brown" then the photo suggests but im so happy with the cloth against the piping.... the clothe has a really light brown spec through it and it fucken rocks! it looks.... classy.... and thats what i wanted
he had the backs stitched up but not on yet.... reckons it will ALL be done by monday!!!! wooohoooo!!!!!
made a decision to not run the chrome on the doorcards for now.... i got brandnew stuff sitting there but with the stitch etc it might end up looking abit busy. i can always add it on later on it i want to
im so glad i have chosen a perfectionist to do the one part i cant do 😎😎😎
mystery fang ·
What a ripper,credit to you champ!👍
Mr Bubble Head ·
Nice to see the ghetto getting the treatment. It's looking real nice Nug
NUG637 ·
thanks nick 😎
these arrived the other week.... they were to well priced to pass up.... donno if i wanna run them on this rig or something else... but the option is always there (first ever set of rims)....
thought this was a cool shot.... in dodgey lighting...
got the engine all dialled in and took it for a quick run up the road.... runs better then it ever did 😀/
tho i think I'm due for a new starter.... after running 12v through a 6v starter the past 2 years i think its burnt it out.... it just doesnt have the "kick" anymore now its back to 6v.... going to get a brand new bosch starter tomorrow.
last friday my carpet kit arrived from newton and it really hit home that this car is coming to an end, and i kind of felt like.... "whats next" :-({|= after 5 years it just seems like working on this car is just apart of my everyday lifestyle....
come saturdaymorning i was elbow deep in contact cement... and high off the fumes 😀/ first thing was the sound deadening...
then onto the carpets... the rear arches, they needed stretching so borrowed mum and dads wall paper remover (steamer) and steamed the back of them while pulling it over my knee.... worked a treat....
then the rest just fell into place.... 8)
I dont have one complaint about this kit.... it all fit in beautiful! no word of a lie... top quality product that i will defenly be using again 8)
after admiring my handywork.... it was time to finish the puzzle...
(yes the bubble in the passenger side door card will be fixed :wink: )
i cant believe 5+ years ago aged 17? we pulled this piece of shit off the trailer.... and at times i even doubted myself if i could do it... but its is now basically done!!
not perfect in many ways but perfect for what i wanted/expected of myself and with anything, the first time of "having ago" you would do it differently if you were to do it again.... but thats what this car for me was all about... to learn.... skills, patience, persistence and discipline.
Coming out of high school i had set myself a few goals.... build a house (done) build a car (done) and make a name for yourself.... at age 22 i feel so proud/amazed that i have built this car with my own 2 hands 8) and it wouldnt go without saying a special thanks to most of you with help your over the years but certainly dibba (Damian - brother, OMR_007 on here) for re-igniting the fire when it started to burn out or pulling me out of the deepend from time to time and of course shana (girlfriends) for letting this be the other girlfriend in many instances and being so understanding of my passion and will-power to get it done... 2 people i owe alot to 8)
this wont be the last post regarding this car but it is defenly a closing chapter to the "build"..... im stoked!!
more pictures to come with better lighting and a better camera..... cruise time starts as of next weekend *dm*
baghall ·
That's a neat looking car. Well done!
matberry ·
Awesome job Nug. 👍
vassy66T1 ·
A credit to you.
Your persistence is admirable (or psychotic ... depends on your point of view 🙂 )
I look forward to seeing it in the flesh
sander288 ·
awesome job mate 👍👍👍👍👍👍👍
squizy ·
Hats off to ya Nug, great job. 👍
Pumba ·
Hey nug i see your carpet kit arrived looks the goods,i have been on to newton about mine but find they dont answer emails,did the rear luggage area and wheel arch peices come in the same kit ??? and how long did they take,any info would be great so far the only info they gave me is shipping price.
cheers shane.
NUG637 ·
thanks guys.... hanging for the weekend to come back around to put some miles on it 👍
pumba - the only issue i had with newton was they said 4 weeks for production but it took 7.... i sent 1-2 emails per week of it overdue (really needed it) and they replied to all of them? and yes everything you see that is the brown carpet is what came in the kit... the sound deadening was a separate "kit"...
i would defenly use them again but this time order it a few weeks earlier.... once they told me it was sent i had it at my door withing 3 days 👍
Pumba ·
Thanks for that,it does look great see how much luck i have contacting them,i also emailed TMI but got no answers wish someone in australia would make them.
cheers shane.
NUG637 ·
well drove it home for the first time last night and it all went really well.... tho i noticed a humming noise coming from what sounded like the back.... had me a little worried but after driving it more and more this morning im pretty convinced its a wheel bearing which is good (not gearbox). Had a dry front passenger bearing after the melbourne trip years ago (under blue car) and have had issues with that cheap spindle since day one.... so wouldnt be suprised if that could be it echoing to sound like a rear? but will go through them sometime soon... gonna keep driving it for now tho...
woke up early and went and got a coffee...
then drove around aimlessly for an about 40 minutes until main roads opened.... pulled over and got a few shots... still on the phone but better lighting then the ones in the shed....
i know ive still got shit to do (other projects) but today is one of the first times in about 5 years that i feel "relaxed". and not guilty for sitting on the couch... havent felt like this in a long time.... always felt like i should be making progress.... sure it wont last long befor i get bored but for now its nice. Shit, i might even put a movie on and have a sleep :^o
DubbyDo ·
Looks shit hot dude, pat yourself on the back for sticking with it to the end. Reading thru this thread is great motivation (do you do talk shows yet?😁)
nils ·
Very nice!
Highlight for me is the interior, looks like a very nice place to be
Carl and Emily ·
Thanks for posting.
Builds like yours motivate the rest of us.
I'm sure with your persistence and patience you will be great at what ever you decide to do in life.
Look forward to seeing it in the flesh.
👍
LUFTMEISTER ·
Tribute. Nice style and build. In your free time you may want to take your lady away for a couples retreat. A patient female partner is worth their weight in VW acvessories. Happy motoring. Cheers
beetle_nut ·
This thing is even better in the flesh.
Love this bug.
The owner is a good bloke too.😉
NUG637 ·
DubbyDo wrote:Looks shit hot dude, pat yourself on the back for sticking with it to the end. Reading thru this thread is great motivation (do you do talk shows yet?😁)
thanks mate, no talk shows.... just been brought up knowing if i want something.... i have to work hard for it.... which seems to be a dieing trait.... no debt, no loans... all me baby!!! 😂😎
nils wrote:Very nice!
Highlight for me is the interior, looks like a very nice place to be
it sure is.... its the first bug ive had with carpet and holy shit doesnt it make a difference.... so much quieter.... i can actually have a conversaion with my passengers 😂
Carl and Emily wrote:Thanks for posting.
Builds like yours motivate the rest of us.
I'm sure with your persistence and patience you will be great at what ever you decide to do in life.
Look forward to seeing it in the flesh.
👍
im glad it motivates you because i get mine from similar threads so im happy to give back some of what i take.... Kcw is my usual go to place for motivation....
im currently a carpenter and love the hands on work.... my father (a boat builder) can throw his hand at almost everything which i like to have a go at also...
thanks so much for the kind words... i have been to many shows in my 58 and am a loyal member of melburgluft which some people have a problem with... but im always up for a chat if you see me at an event... 😎
LUFTMEISTER wrote:Tribute. Nice style and build. In your free time you may want to take your lady away for a couples retreat. A patient female partner is worth their weight in VW acvessories. Happy motoring. Cheers
thanks mate. She is a top bird and i try to treat her every now and then 😂 what do they say... treat em mean, keep em keen? hehe nar she knows how appreciative i am of the freedom... but least she knows if im not home.... im probly at the workshop rather then at the pub 😂
beetle_nut wrote:This thing is even better in the flesh.
Love this bug.
The owner is a good bloke too.😉
haha thanks james, should be good to cruise next to that notch of yours 😎
like any new project there are teething issues to sort through befor its super reliable... had a few arise over the past day or so... like a wheel bearing and my points decided to fuck out... but nothing that can't be fixed... its all just a big learning curve... l
NUG637 ·
Been puttin k's on this thing every chance I get slowly sorting through the "new car" gremlins.... Gettin excited for action day,... It's first car show 😎
Bizarre ·
the colour of this is beautiful 👍
bugboymatt ·
Mate, a beautiful ride you have right there. 🙂
reub ·
Beautiful👍
scotta ·
Nugs, great to see your thread here. Hard to summarise the 139 page original but great!
Scott
NUG637 ·
thanks mate 👍
DubbyFan ·
Wow, read this thread from start to finish. From disaster to desire, when you look at the pic's at the start to the finish, for example there was no channels pretty much, wow unreal!
Love the vintage look to the engine and the colours, the white and green go so well together. The fabrication of parts and workmanship, the attention to detail like adding the H section to the later model nose.
Congratulations what an awesome car and story to go with it, thanks for sharing your journey a true inspiration!
whatnowthistime ·
looks great NUG637, but when are you going to lower it???
Carl and Emily ·
So we were talking to your folks at action day.
Apparently you have started a new project. 😁
When are you going to start a thread for it?
Loved seeing this one in the flesh also. 👍
NUG637 ·
Thanks guys... Lowering cars is for fools.... 😀
Yeah Carl, by the time I got back you weren't at the table and as we never met we probly crossed paths all day lol.
New project is full steam ahead... Might wait till it really start taking shape befor I start a thread on it tho 😎
DakDak67 ·
I crawled all over it on Sunday bud, damn impressive and a pretty wicked stance too man ! enjoy your hard efforts with 100,000's of miles of driving !
NUG637 ·
Since Christmas this thing has moved up to daily status, after a few minor adjustments on one of the carbs over the weekend, it is yet again driving like a dream ....
On the way home it rolled over to its first 10,000 miles since a I've bolted it back together. Pretty solid effort for a car that's only just become a daily considering how longs it's been on the road
Today we had abit of a meet between a few friends in the VW scene up Mt Gravatt lookout...
My bro in the ratty black oval snapped this...
Loven it
oldskoolguy ·
Very nice pictures mate, it's been said before but your story and pics are good motivation.
Safe travels, Rob.
OldTimer ·
An inspiration to us all - thanks for sharing. 😀
Super1302 ·
Great work, super tidy ride, well done. 😁
sander288 ·
love to hear a video of the ghetto abarth! awesome job !
NUG637 ·
Here is a pretty shitty video of it idling... Sounds nice with the twin carbs sucking under load 😏
I'm really happy with it and would make another one tomoro over buying the ones on the net.... Everyone I know with one has had to repair it
Doug Sweetman ·
Lumpy 🙂 sounds fabulous - and looks the goods too, you must be stoked !
Ps that type 3 panel looks sweet too !
aircooledjake ·
Reckon I saw this little beast putting around nerang in the late afternoon past my work today, if it was it sounded just beautiful! Wish I got a better look
nbturbo ·
You have got to be kidding-first time I have seen this story about the rebirth of the Oval.I thought I was pretty "anal" about restoring stuff-you win.That is the most amazing restoration of anything I have ever seen.You are a legend.
ACT65Deluxe ·
I am in awe of anyone who takes on this type of task. Fantastic and what a beautiful beetle
NUG637 ·
Thanks guys... She's a great rig and I love it to bits as I guess it's the car I cut my teeth on.... I want to do a few touch up in the near future after being my daily for the past 6 months but she is defenly the car I always dreamed of. Aircooledjake, I hope it wasn't my car cus I have been down in port Macquarie for the past week lol might have to go check the garage....
beetleboyjeff ·
NUG637 wrote:I have been down in port Macquarie for the past week lol
You have been down here and didn't come and say g'day! Snobby bastard. :-)
I better catch up with you at Valla then.
NUG637 ·
😁 flew to Newcastle and have been bringing a boat up to brissy via port Macquarie. So weren't in anything cool this time.... Unless your into power cats? 👍
aircooledjake ·
Well it was a very similar colour NUG hahah, wish I got some pics of the other one now for a better look
psimitar ·
Just read all the way thru your thread dude. Brilliant work there and well done 🙂
Doing a 56 meself at present.
Did you say you did the body spray job yourself? If so what kinda of water filter/trap do you use on your airline to stop moisture and oil in the paint?
And who'd you order the carpet kit from? Looks good.
I'm just doing the heater channels on mine and noticed the outlets on mine are a good foor further forward than yours and so wondered what year carpet kit you ordered?
Sorry for the questions just hoping mine turns out as nice as yours.
Cheers,
Mike 🙂
NUG637 ·
correct, i sprayed the shell myself…. Al lent me his booth and let me go hell for leather 😎 beginners luck i think… haven't managed to get the same finish ever again which worries me cus i wanna fix a few blemishes as i have had abit of "bridging" in the concave corners of my deckled and hood which seems to be abit of gassing from the high build under the 2pac. Must of laid it on a little heavy in these area's. The only thing is i don't want the blends to be "rougher" if that makes sense as The setup in our shed might not be as nice as Das…. it laid silky smooth in the booth with Al's set up
The carpet kit is from Newton in the uk and i highly recommend it but next time i would spend a little extra and get the square weave. But that is a very minor change to what i got. I ask them to send out the kick panel pieces with no holes for the heater vents so i could put them in myself once i had the piece of carpet sitting where i wanted…. they sent out the alloy surround with the kit to finish of the edging for the heater vents…
did abit of work to this rear end of this thing the other week…
had those hard red bushes on my adjustable spring plates and they have been squeaking like fuck! bought some OEM rubber bushes a while back for a rainy day…. half way through putting the rear end back together…. i thought ill just look over these adjusters like i always do with the rear wheels off….. guess i have never fully trusted them but took the risk anyway…. well this time i noticed a big old crack through the weld on the adjuster blokes…. fuck…. checked the other side…. exactly the same….
so out with the adjustable plates and the shorter torsions bars… half the guards off to get the bars past the guards and then back together with the original notched long snout plates…
much better… and a little lower to 😂
bitemeoz ·
very very very nice
psimitar ·
NUG637 wrote:correct, i sprayed the shell myself…. Al lent me his booth and let me go hell for leather 😎 beginners luck i think… haven't managed to get the same finish ever again which worries me cus i wanna fix a few blemishes as i have had abit of "bridging" in the concave corners of my deckled and hood which seems to be abit of gassing from the high build under the 2pac. Must of laid it on a little heavy in these area's. The only thing is i don't want the blends to be "rougher" if that makes sense as The setup in our shed might not be as nice as Das…. it laid silky smooth in the booth with Al's set up
The carpet kit is from Newton in the uk and i highly recommend it but next time i would spend a little extra and get the square weave. But that is a very minor change to what i got. I ask them to send out the kick panel pieces with no holes for the heater vents so i could put them in myself once i had the piece of carpet sitting where i wanted…. they sent out the alloy surround with the kit to finish of the edging for the heater vents…
Ah, well that was fortunate. Means he'll have a proper air dryer etc to take care of that problem. There seems to be a few DIY tricks for water removal using lengths of copper tubing finished with 2 or 3 filters of finer and finer screens with a final filter screwed into the sprayguns handle. Just a case of using the tissue paper method to verify the filtering results 🙂
Was thinking of Newton carpets. Expensive? Useful about the blank kickpanel pieces too.
Shame about those adjustable plates. I've heard many people say they fail and the block actually snapped off on many. Trouble of putting so much weight on a small area along with welding spring and normal steel together.
Glad you got it sorted tho with the old plates 🙂
Boozo ·
lookin good 🙂
joesbuell ·
Looks awesome!
Whats with the ford repair tool on the floor next to it 😉