The story begins with me and my g/f have always wanted to travel australia by road. talked about doing it in a tin top kombi.... but voted against it for not enough room for what could potentially be 1 year+ long trip. Off and on our excitement would grow but i had to finish my apprenticeship and finish my oval resto befor i wanted to go anywhere.... 5 years later and i now work for myself and am enjoying crusing the oval and we have commited to "making it happen"
so a mate down south found this bus in a paddock..... once in its lifetime it has had a big whack in both sides but otherwise solid as....
my brother bought it a whileback with intentions of doing a quick job on it and flipping it.... but time and interest werent on his side so we bought it off him with the plan of turning it into our "home" for a while….
with not being to keen on a tintop idea i bought a heap of camper stuff including a pop top... but then it happend...... i made the mistake of showing my partner how cool the autovilla's were (south african kombi motorhomes) and stupidly saying "that wouldnt be to hard to make" with her reply of "we should make ours into one".... we could travel so much more comfortably. This was around the same time the Rubber tramp had just be revealed.... and we were blown away with that thing. and from that day.... we have had a plan set in concrete....
next year "Valla" is our deadline to leave.... as of christmas I'm not taking on anymore work and ill be going full time on building this snail. we plan on attending the show and then kicking off our travells from there, lets hope it comes together aswelll as i hope
the following week i had the engineer around and he gave me the ok to start cutting away what wasnt needed....
got started on the opposite side befor i packed up and after i cut the corner off i noticed a little black box tucked up in the battery tray area....
Spare keys 8) 8)
NUG637 ·
50mm back from the strengthener on the front cab....
a bit of string to hold it in place while i cut so i doesn't jamb up on the 9" and to lower it down on my own.... might put the tool boxes on the back and drive it to work on monday
off to the drawing board!
NUG637 ·
it is a hell of alot harder to create a better shape then the autovilla's and the cool flo
ive had enough measurements to make a shopping list of alloy... its just the design im had trouble altering now....
NUG637 ·
while brainstorming the frame i had a few little spots to clean up
NUG637 ·
Got the floor ready to be extended.... placed an order for my first lot of steel and alloy and bought some repro belly pans to keep the engineer happy.. Also got a teflon lined mig handle/torch for alloy wire and have a bottle of argon on the way. 8)
Floor sections/returns welded together and beaten over to be extended...
Wheel arches cut.... stretched open more and ready to be extended out to the snail walls....
NUG637 ·
My steel and alloy order arrived, mind you, alot of how im approaching it is making it up on the spot..... i had a brief idea of where i wanted to attach the floor structure to the car and although my first idea didnt work exactly how i thought it would.... it has all panned out beautiful with a few adjustments in the mock up 8)
my datum point is my existing floor, i have set the heights of my front 2 sprockets 50mm below floor height to allow a full length of 50x25 to run ontop of them and create a bearer for my walls. The third sprocket at the back is set to floor height to allow the bearer to butt into it and be welded, Im using a string line to determin heights and width and so far its looking ace!!
The front sprocket i had to pie cut and bend about 2 degrees upwards to be 50mm below floor height. I also checked it out over the solid chassis rail and notched it in so i sits hard againt my jacking point which is tied in from one side to the other giving me plenty of surface to weld to and support my outer alloy frame.... in the pictures below the redline is where i plan to weld allong the jacking point...
3mm wall steel is strong as shit!
the straight edge in the below picture is my floor height and with the sprockets 50mm below it, it allows to me run a bearer ontop like im showing with an off cut...
The bus is currently 1640mm wide measured at the floor... im pushing it out to 2100mm to allow for 50mm of walls (2x20mm studs + 2x5mm inside wall cladding = 50mm) giving 2050mm for me to lay across ways above the cabin
NUG637 ·
It's really not as easy as you think welding upside down... The first sprocket didn't look to pretty but nothing a grinder won't clean up.... The welds turn to shit once it get close to that lap of the sheet metal in the jacking points... They must have sandwiches some sort of sealer in there cus when it gets hot it pours out and ruins that section of weld....
NUG637 ·
finished off the first stage of the floor structure....
in the pics it looks like i could of done that in 5 minutes but checking heights and widths and notching steel over chassis etc really burns up time
NUG637 ·
the rear most mount would easily hold my weight but was the weakest of the lot so i thought this would help strengthen it up while making it easier to frame over/on
NUG637 ·
Spent 4 hours just sitting there looking at how I was gonna attack the next stage after some violent kicking, throwing tools and calling it multiple obscene words I went to bed fuming... Got to work the next morning and my day just dragged on because of how keen I was to get back in the shed....
The plan was to cut down the roof to make some room for mattresses and keep the overall height Down with as much room over our bed as possible as shana (g/f) is claustrophobic... We are trying to work with about 700mm over the mattress.... The thing that was picking my brain was how to mark a level line on a curved surface..... Quick trip to the hardware made life so much easier....
Leveled the floor of the bus up on stands to make sure it level both ways and then started following the red lines with a pen.
ordered a sheet of 1.6mm steel to weld back into the roof and make the base for our bed (in theory) as mentioned earlier... Making it up as I go...
NUG637 ·
And then we had a sun roof... 8)
Less to body work now….
After cutting the roof, i got a better look inside and I decided to lay the beam against the old roofing bow which lines up with the body line behind the front doors which is where I have stopped the floor! Perfect! Befor welding the beam tho I welded up all the seams I cut through as I imagen it would tie it all together and make stronger..
The bed base/floor will lay straight on this and be welded around the roof line... Seems like a lot of work to only gain 100mm but it all counts if we can keep the overal height down
I'm getting better at this welded gig... Not all of them look like this but it's getting more consistent
Tacked on a quick brace to stop the sheet from sagging and sat it ontop to get abit it of a visual and to mark where I had to clean up to weld..
The overhang over the front will be trimmed abit... How much isn't known just yet cus I have to account for a tight roll and still fit in a double matress... But I would like it to line up with the base of the windscreen.
We are hoping the tension of the sheet once fully welded to the existing roof and attached to the wall framing will not require anymore framing to hold a matress and the weight of 2 bodies and not "drum" while driving... If this is not the case and needs more structure I will frame it with alloy box and ply over the top to support us and stop it from drumming etc...
NUG637 ·
The roof done.... Warped like fuck but should be pretty well hidden anyways
With the offcut of the roof sheet I thought I would extend the passenger floor with it. As the passenger side is gonna cop the most traffic (door) It seemed like a good idea to use the thicker sheet (1.6mm) here and then extend the rest out of 1mm or thinner...
Added a few flooring supports at either end on both sides but put an extra one in where the traffic of the door should be.
Bent the tubs up by hand and formed a few bends with the hammer.... so much room for big tread back there now
left abit of over hang to allow for me to beat a right angle lip to pop rivet through to the outter wall/skin. This laser level has really come in handy... mad an easy job of getting the line i have to beat along 8)
a heap of room on this side now for 2 house batteries i would think and the starter battery on the other side
NUG637 ·
a thousand spot welds later and i started bending up a lip to attach to the outside skin....
go to pack up and old mate has laid a log on my car.....
finished the other side.... ground back all the welds and gave it a coat of rustkill top and bottom....
cut the engine lid panel out of one of the type3 wrecks.... a perfect replacement for the shitty hatch some hillbilly cut into it years ago....
NUG637 ·
Pics of the hatch....
NUG637 ·
Think the old man is pretty excited about this build (oldschool timber boat builder).... couldnt get him out of the shed today.... he helped me build the loft and draw up the shape of the snail. With abit of trial and era started bending up the shape of the frame. if i wasnt in a good mood today this could of really gone pear shaped...
if you look really closely you might be able to see the rest of the outline in pencil :wink:
im excited!!
Had a few practice runs welding alloy (never done it before).... playing with the settings to try get it to lay abit flatter.... its a little different to normal steel but not hard to weld...yet...
ive been grinding all my butt joins into a "v" to lay the weld into and it seems strong as shit but not always that pretty to look at... thank god for grinders!
the more i play with settings and weld, the more im getting a feel for it... 8)
after abit of playing with more window positions and brainstorming i started framing up the window for over the cab 8)
NUG637 ·
Well I got plenty of welding to practice on....
Decided on the smaller long window for the drivers side, bigger long window for the back and the smallest double hopper for the passenger rear 8)
This should get the ball rolling
Trial fitted it to see where I'm at...
Have learnt a lot working with alloy... Few things I will do abit different for the next side but over the moon with how it is...
its fucken MAssive!
Ground all the welds down last night then Flipped over the frame and welded the side that was facing the timber... Much happier with how they are looking/penetrating now....
I got a handy hint to put 2 decent tacks on it first and let the alloy heat up then lay a weld.... And I have also found a pretty steep angle on the torch helps push the weld... To far upright and it wants to clump and play up
Ready for the other side now....
NUG637 ·
After a few rough sketches of layouts and cabinetry we decided on what we wanted.... Started cutting it all out tonight... Got a door to make first and then ill start welding it all together 8)
i ended up building a door in the few spare hours i had on sunday after giving the a 36er i built its first 1000km service. Making the door was abit of a bitch with how much alloy moves under heat....
but I'm happy enough with the outcome
then i finished welding in the frame and test fitted... ground it all back... welded the opposite side and clamped it inplace...
then hung the door.... roughly... the screws they supply with the stainless hidings are wood screws and run out of thread so the hindges arent really "tight like a tiger" but you get the idea and im happy with how its looking.... i left the jamb stud (the stud the door closes to) out so i could get my frame in, door hung and then weld it in parallel to the door + door gaps etc....
a friend of mine that purchased a snail a while ago said he had trouble with his door opening towards the way the wind blew while driving as it was very flexable and would flap at higher speeds....i took on board what he said but with the position of the door, swinging it the opposite way would then hinder the passenger door and block light from coming in the window above the bed.... plus i built this door and doubt she will flap around after im finished with it 😂
once i get the right screws and it all swinging tightly i will set up my jamb stud and the head piece (above the door) and i should be right to start bolting the frames down 8)
my friends snail i mentioned about the door is this one below....
NUG637 ·
was in the shed by quarter past 6 this morning to put in a few hours before the christmas party at the carlton brewery
started by propping the front cab area as it is all under tension and wanting to "sag" I did this because one i want the cab to be parrel with with the floor and 2 so i could setup my door post to the right gaps etc.
finished weding in the door frames 8)
and also bolted down the passenger side am using a M8 bolt at 500mm centres which i am gonna put a tack weld on the thread and nut to stop from rattling loose
also screwed all my extended wheel arches to my frame work
and have used 40mm steel screws to strengthen the "upright" posts at 200mm centres
it now officially can't leave the shed until it is lined externally
I fastened down the other side the other night and buggered around with a few minor things
Organised myself 2 days off this week as i was feeling like it was dragging on abit
first thing first was to sort out the rear window. flat window on a curved surface. CHECK!
the idea was to set the window in but continue the curves either side? time to bend up the shape
then i continued to frame the ceiling in? framed in to suit 1200 sheets
you will notice a gapping hole just above where the over cab bed starts? going to make a 1100mm hatch which will hinge off the front of the roof and allow easier access getting into bed and hopefully help with Shanas claustrophobia
watch this space!
NUG637 ·
Funny what a rough week at work will do "i wanna help in the shed on saturday if it helps us leave earlier" 😂
was busy building my brothers birthday present but shana went through and stripped all the surface rust again as the nose was a little out in the weather while in storage
now the frame is done (only the hatch to finish) I'm thinking i will paint the cab before i start lining it so save time taping and help with overspray? I'm not going to do an amazing job on this just a nice neat blow over? as it will cop abit of abuse on the road? what colour? we donno yet 😂
once i finished on the present i jumped on the orbital and we both gave it a quick sand? little more to do before we lay down some primer on but this should be ready for paint pretty quick 8)
NUG637 ·
The smell of high build is bringing back Christmas memories from last year (spraying oval)
The smell of paint fumes is the only thing keeping the sand flys away,.. Coils and areoguard ain't doing shit!!!
tomoro this is getting worked!!!
we are finding it really hard to choose a colour? I lean towards badass colours like pastel green, bordeau red, coral red and brown!!!! and the misses likes all those airy fairy light and bright colours ](*,) the only one that we seem to both fancy is Velvet green
i sure do like green cars!
NUG637 ·
Have had the last two days of so i went to town on body work?
that nose is stupidly straight (from what I'm used to) 8) the drivers door had obviously seen a fair bit of traffic tho.
think I will go over it one more time with some 240 before giving it another coat of high build then good for a 600 wet sand and paint? the 240 is just to knock out the 80 grit scratches?? thoughts?
also forgot to mention we found a caravan park rules and regs pamphlet wedged under the dash from Rockhampton, Qld. Must of done some k's since it was found in Geelong, Vic
will get back onto finishing the hatch and extending the metal to the walls over the engine once the body is ready for paint, in my mind i wanna paint it then sheet it so there is no overspray issues etc remembering I'm on a time frame of august, i set myself a goal to have the frame up by christmas which i have achieved? got abit of a holiday over the christmas break then its hard out on this thing? and although it seems achievable in my head I'm sure there will be things that take twice as long as you expect?.
I'm just hanging to make some memories in this thing and see some of what this beautiful country has to offer.
you guys are now fully up to date with where i am at for our kombi motorhome build "the snail"
LUFTMEISTER ·
Top work as usual. Do you sleep? Have a look at polyurethane adhesives for your cladding. It will save weight and stop rivet rattling. Sikaflex has a good site with recommended bonding strengths (they hold ALL our modern aircrafts together). Looking forwarding to following your progress. Cheers marcus 👍
Flintstones ·
That's a cool project you've got going on there.
I've got one question for you though, how are you going to get it out of the shed?
Doesn't look like it's going to clear the roller door..
Cheers
D
Bizarre ·
You work is to be admired....................... Unbelievable..........................................
Absolutely brilliant.
and all because someone invented oxy acetylene
kombibob ·
Awesome work as usual Nug.
But the sooner you finish this and bugger off the better! that way I can get away from the computer watching your updates and get back in the shed myself 😉
vassy66T1 ·
You are one crazy SOB !!!
Love your spirit mate 👍
NUG637 ·
LUFTMEISTER wrote:Top work as usual. Do you sleep? Have a look at polyurethane adhesives for your cladding. It will save weight and stop rivet rattling. Sikaflex has a good site with recommended bonding strengths (they hold ALL our modern aircrafts together). Looking forwarding to following your progress. Cheers marcus 👍
thanks mate, i looked into that stuff at planning stage but voted against it. the plan is to sheet the outside in polished alloy sheeting glued with sikka and riveted, 19mm styrofoam insulation then 4.5mm laminated ply on the inside glued and screwed also…. having the walls sandwiched as such will brace those bastards like no tomorrow and act as one big beam…. doing it this way also helps support the bed above the cab as those walls will be carrying most the weight up there "beam effect
as for sleep…. some meditate, some go to the gym, other smoke or drink…. i just build shit 😂 carpenter by day and in the shed by 5 most nights and some weekends…. it helps me sleep but also keeps me awake if that makes sense?
NUG637 ·
Flintstones wrote:That's a cool project you've got going on there.
I've got one question for you though, how are you going to get it out of the shed?
Doesn't look like it's going to clear the roller door..
Cheers
D
i think you the 40th person to say this 😂 the garage door comes off easy enough…. and will roll it on its rotors…. if it still won't fit, then beam and cladded out and it will roll out on all fours no worries 😎 up here for thinking (points to head) down there for dancing…. (points at groin)
NUG637 ·
thanks for the kind words guys…. always something going on in the arbers workshop 🤪
bob, i can't agree more…. i can't wait for it to be done either i love building things but i love enjoying the fruits of my labour more…. the first night camping in this thing is gonna be bitten! now stfu and get chopping :wink:
thanks marcus 😎 willing to have a go at anything…. doesnt mean I'm any good at it tho 😁
Smiley ·
Dude!
Amazing work as usual!!
If you are ever back up Rockhampton way on your trip, drop me a line! I would be happy to show you around, especially if you're in this cool rig!
Smiley 🙂
DubbyDo ·
Great work dude, hope it all comes together in time. Makes my trip preparations look like something a kid could do in his sleep
matberry ·
Wow Nugget, simply amazing. Been thinking of do a similar rig myself, and bam!!! You've done it again.
Keep up the good work !!!
oldskoolguy ·
Fantastic work and pictures.
I look forward to seeing it at Valla ****my fingers are crossed for you****.
Rob.
Yogie ·
I am just in AWE at your progress, vision and work ethic. Great project that will give you lots back in return. Enjoy the build and fun afterwards.
Yogie
Carl and Emily ·
Very Cool.
Look forward to following your build.
NUG637 ·
thanks for all the kind words guys 8)
more done on this over the last few days.... but mainly just tying up the loose ends which all seem to be shitty job....
ground back all the surface rust that settled on the sheet i welded above the cab.... then gave it a good coat of rust kill.... abit filthy now ive been crawling all over it but you get the idea....
then fixed the sheet to underside of the frame with sikkaflex and screws at 100mm centres. gonna have alloy pop riveted of it again so shouldnt go anywhere....
cus the sheet warped abit when i welded it to the roof of the kombi. When i fixed the sheet to the underside of the frame it pulled the stud out of shape.... so decided to cut the bed down from a queen to a double (was 1500mm now 1350mm) by bracing the bottom cord to the top of the frame.... and this now creates abit more storage as im gonna sheet it and cut some "port holes" in there so there is a small area to store phones, magazines, tissues etc..... 8)
then i started on the hatch.... had a grand idea of how to seal it but i overlooked a few things (fuck!) with abit of brainstorming between my brother and the old man.... (old man being a boat builder and building his own hatches) we came up with an idea similar to my original thought but with the strengthening frame on top of the sheet.... without going into to much detail this allows me to form a "flashing" for water proofing, a good seal and still be able to line the underside with the same material as the ceiling..... might be a little uglier then planed but only from an eagle eye view.... but at the moment thats the least of my problems.... as long as my bed is dry i dont really mind 8)
gonna get some gas struts to assist with the hatch and the hatch cant be fitted until i start lining the outside.
once i got my head around the hatch i started bending up some sheet to extend the rear bed flooring. Still gotta fit my fuel filler neck in here somewhere, thinking ill move it forward which will require abit of cutting and shutting on the neck itself and will be hidden inside a cubboard....
there is so much to think about in the scheme of things.... its only by chance i found the filler neck in the pile of parts which made me remember to fit it somewhere (oops)
but feeling good with how its all coming together
Craig Torrens ·
Bloody Legend 👍👍👍
NUG637 ·
finished bending up the sheet to extend the floor under the rear bed, once i had them sitting in place i had to find somewhere to put and hide the fuel filler…. as it was a lot further back on the original body…. if i was to put it in the same place on the snail body it would be protruding through the wall in the area we want to sit…. so i moved it forward where it will be hidden inside a cupboard…. out of sight and out of mind…. but the only problem with doing this was the filler neck was 180 degrees out….
so with a little cutting and shutting…. we got a little bit closer to the tank itself…
but the hose still wouldn't reach the tank and with some of the drama dib has had with his in italy we thought it would be better to extend it in steel…quick trip to the exhaust shop… i got a right angle mandrel bent pipe… with a few pie cuts and bending to the right angle…. we have a fuel filler again! boom!
then gave everything a quick rough up and loaded that mother fucker with rust kill!
underside of bed over the cab
that filler was one of those things that you over look for time… "that will only take half an hour" 3 hours later :roll:
also robbed a bmw for its gas struts… hoping they aren't to strong and will do the job on the hatch over then bed tomoro.
NUG637 ·
well shana and i sanded our finger tips off yesterday, gave the inside of the cab a rub down with 240…. such a bitch with all the presses and shit…. not to mention the brush job the was on there :roll: no show room job on this one…. just scuffed it all up and blew it over wet on wet (2k surfacer and 2k direct gloss) i did however spend a little more time on the pillars as they are right in front of your face while driving….. 80% of the rest of it will be covered with carpet etc…. but least its all coated 8) while i had the surfacer out i gave the doors a once over but decided not to top coat them yet as they need to be blocked smoother :wink: (another thing you tend to look at while sitting at a red light.
pretty happy with our setup now… got a high build/primer gun (2.0 tip) and now a decent spray gun (1.4 tip)… really happy with how it laid paint 8)
Holy shit i love green cars!!!!! velvet green is bitchen!
won't be much to report for the next 2 weeks as we are gonna be holidaying on stradbroke island but hoping to have it all painted but mid january 8)
matberry ·
Pics look great Nug. 👍
Merry Christmas
NUG637 ·
first wipe down with 240 today… only one small low i had fill with abit more high build (can)….. ready for wet sand tomoro then paint to follow shortly after 8)
once the cab was done it was paint time for the doors and grill 8)
used My little gun today with 0.8 tip and it worked a treat on the smaller areas….
spot weld porn for you weirdos!
dragsters for life ·
very nice work nug
matberry ·
Who you calling wierdo??????
Awesome work, love the pic with the Volksie sign reflection..... 👍
NUG637 ·
litte bit more orange peel then what i was hoping…still getting used to the new gun, but this was no show stopping job.
played with the settings on the gun on my second coat of the doors and made it a tad to dry so i put a 3rd thicker coat on the doors where the body got 2 coats…. as for straightness… its no oval finish but good enough for this old road basher!
befor paint i seam sealed underside of the floor extensions and in the engine bay etc to make it all water/fume tight 8)
also ordered all 14 sheets of 0.8mm thickness alloy sheeting, 8 sheets of white laminated semi-gloss ply for the inside wall cladding (3.6mm thick) and 5 sheets of pine grain ply which i want to white/lime wash for ceilings to break it up abit 8) should all be in the next few days…. abit of a lazy day for me tomorrow but if it was my way i would be in the shed :P 8)
YEAHHH BITCHES!!!!
hyjinx ·
hahahaha
apart from the reflections thats mad
NUG637 ·
That's no reflection.... It's a crack in the paint 😁
jobie ·
Hey Nug,
Before you put it together maybe look at this www.foilboard.com.au or something similar. Could get hot in there.
Joel
NUG637 ·
After the family thing for my birthday yesterday i went in the shed and layed some white on the roof 8)
Bought an air brush gun to get into the gutters after welding the sheet over the top which made it difficult to get into… worked a treat… then finished it off with the small parts gun…. love that thing….
with white bumpers, and white rims… should look bitchen
Scottkombi ·
Very nice rig.
I am impressed with your fab skills and determination.
Looks great - cant wait to see it clad - will look awesome....
brendanwright ·
Super work, really enjoying seeing the progress. Wish I had 10% of your skills.
Great work and keep on posting progress.....
crsedge ·
Great job and fantastic colour.
Was looking at the T25 Gypsy Joker Vans recently as a great idea; this is much better with a custom built Low Light T2!!! 😎😎
Cheers
Craig
vw54 ·
very nice
didn't they build a similar vehicle for South Africa ??
Carl and Emily ·
Great stuff.
When will it be available for hire?
NUG637 ·
😂 thanks for the kind words guys….
brendanwright - i think you would be amazed with the skills you gain if you just give it a try… I'm no super-hero…. just determine/stupid enough to try something i can gain from….
vw54 - they sure did…. called them an Autovilla
Carl and Emily - not for hire and hopefully never for sale 🤪 i get way to attached to my cars… and specially to ones i have put a lot of blood, sweat and tears into…. and then comes the memories made in them…. yeah i can be a little crazy :P
pfillery ·
Nice build.
Are you expecting any engineering hassles for rego? Did you need to get the plan looked at and approved before you started?
NUG637 ·
have you red the previous page at all? had the engineer round when the idea originated, he gave me the ok with some guidelines…. i got him back once frame was done (before lining and he is more then happy with what has been done)
Rest of the ceiling done on my own today...
Wasn't sure how the ply was gonna do the tighter bend over the bed so I tried slicing the back of the sheet which made it really flexible but ended up splitting... So with abit of thinking I managed to get a full plain sheet up there on my own and fitting like a glove....
Long process...
Cut sheet to length, dry fit sheet tight, pre drill for pop rivets, pull sheet down.., clean off hand marks etc and paint 4 coats of white wash, wait for it to dry then apply glue to the frame... Refit sheet and pop rivet that sucka on befor the glue sets... Turned out pretty good tho 8) just the sheet at the bottom
Looks different from the outside now to!
Scottkombi ·
Nice lining work Mr Nug637.
Just wondering if you have tested your weight plus you GF's weight in the upper bed without the extra props?
Also does it require any diagonal bracing?
Fantastic lining job though - looks great.
beetleboyjeff ·
Scottkombi wrote:Also does it require any diagonal bracing?
I would assume the plywood would brace it quite well - it appears to be well fixed. In buildings, we often use plywood as bracing. Just my thoughts.
It is a great job though. Can't wait to see it done.
NUG637 ·
Correct boyjeff, I'm a carpenter and have used ply to brace houses in all different wind zones... Being glued and riveted at 200mm centres this bitch ain't going nowhere. And doing this makes the walls over the cab/bed act as a big counter levered beam (rule of thumb =1/3 out (hanging) 2/3's in (fixed)) to hold the counter lever. The props are just left there for now for good measure until I sheet the outside which will play the same role as ply by bracing it some more. I have taken them away and swung off the walls over the cab with no movement. Also the sheet of metal I welded to the roof of the cab in held in tension by the welds and the walls of the motorhome. Had both the misses and I up there with no movement either.
Scottkombi ·
No worries - I am a builder so I know plywood is used for buildings that remain stationary their entire lives and they reside on and are tied to big lumps of concrete - but this lovely creation will move ..... and stop.
Just thought it might help for your bed section cantilever. You must be a lot lighter than me and my Mrs.
But its your creation and if youre happy thats all that matters - just wouldnt like to see you go to all this effort and it start to flex and fatigue on you.
I have made timber decorative gates with just a square steel frame to support them and they are still straight after many years of kids swinging off them - so hopefully this will be the same.
Scottkombi ·
By the way, almost all your early photos seem to have dissapeared from this thread???
Comes up with some message from photobucket about upgrading to "Plus" for some reason and wont show the photo?
NUG637 ·
Yeah I have used this months data on that account... They will come back in a week or 2 😵💫
NUG637 ·
There really isn't that much weight hanging off the walls as such, the heaviest part of weight will be in the centre which can't move as it's held in tension by the kombi roof welded to the sheet.... The walls are only gonna hold your feet and head which the load will be slightly transferred through a matress, I would like to see you and your misses even try move it. I'm more then Confident enough in it. there is no way it can buckle. The glue plays a huge roll in this to... Unlike a house which is only nailed.... This has 100% contact to the frame plus fixings at 200mm centre 😎 and that's just the ply... Put the alloy sheeting on the otherside with styrofoam insulation sandwiched between it will be strong as hell. I appreciate your concern but think about it 😉
What do you think boats are made from? Ply? 👍
When you decided to build a snail you can do it your way 🤪
Scottkombi ·
No worries.
Im not trying to be nasty - just trying to help.
I would not have the skills to build something of this intricacy and definately not the time - it is very impressive.
NUG637 ·
Been keeping busy... So much time wasted in problem solving/thinking ahead. Then you start on something and you need more stuff and seems like every bunnings trip is a minimum of one hour... 10minutes to get what I want... 50minutes looking at shit I "might need" :roll:
Back window sheet on... Gotta put some dressy bits of timber either side.
Gonna use this PVC right angle to finish the wall against the window... Had abit of a play with bending it to shape... A little bit of heat seemed to work really well..
Should come up ok.
Bedside storage done to...
As the floor has a 15mm recess from the sills I used some yoga matts as a cheaper alternative to level the floor rather then the $250 rubber they wanted to charge me... Then a layer of 4mm ply for the Lyno to stick to 8) feel nice under the feet.
I also purchased a 59L water tank instead of using water canisters... Mounted it down low to help centre of gravity and plan to build the cabinets over it with access holes to the connections. Perfect size to... 480mm should fit in my 500mm+ cubboard space 8)
Plumbed it all and in and filled it up to check for leaks 8) "beauty mate!!"
Got an external filler point to go on once the outside is sheeted.
Then onto sealing the door...
Didn't know how I would go bending "T" mould alloy so I only bought one length as abit of a test dummy... But with a little jig it worked a treat... Will get another piece tonight.
NUG637 ·
Doors all done and latching 8)
Have mad a start on the cabinetry... Feeling smaller in there already
Fridge is going in the big opening down the bottom... Put it on the opposite side to the water tank to even out the weight distribution. Gonna make a small area on the upper section for hanging clothes just to keep the misses happy but won't be much bigger then 150mm (should stop her from bringing her entire cubboard :roll: )
Yes it's really thin framing = light. Just like the alloy frame, The ply sh'll is what will brace and strengthen it. No need for that 16mm chip board everyone else uses... In my opinion that is just the easy way to go about it and in an automobile it just kills you in the weight department.
beetleboyjeff ·
NUG637 wrote:Yes it's really thin framing = light. Just like the alloy frame, The ply sh'll is what will brace and strengthen it. No need for that 16mm chip board everyone else uses... In my opinion that is just the easy way to go about it and in an automobile it just kills you in the weight department.
I agree, ply will be much lighter. Are you using a pre-finished ply?
I have to say, this is a great build you are doing - I look forward to every update. It must be even more fun actually doing it. :-)
Nickster ·
Wow, just stumbled upon this thread and am really impressed. Awesome work, can't wait to see this finished and at Valla 👍👍👍
NUG637 ·
thanks nickster
jeff…. will be white washed ply
some more storage either side of the type 3 hatch
draw… need to sheet over the draw now thats all up and running...
Am waiting on my metho stove to arrive before i can tackle the kitchen bench. But needed the frame up to get an idea of things…
started sheeting the full height cubbard and will start on hanging doors soon.
LUFTMEISTER ·
Q? Why metho not gas? Metho would seem to be a more volatile fuel to carry (low ignition point, invisible flame) than LPG ? Cheers Marcus
NUG637 ·
Basically for certification. To pass as a motorhome conversion it has to have a "fixed" cooking appliance. If we put in a gas stove it has to be permanently hooked up. Which then means I have to mount the gas bottle in an I closed box... With a vent, 1m away from any ignition. Or if I put in a microwave I have to have 240v certified etc. The new metho stove are really quiet safe efficient and this was nothing needs certifying and I can carry my webber and my gas bottle externally and not permanently hooked up which means I don't need it certification. Just a way of doing as much myself without getting someone else and there labour costs involved 🙂
Everything in this van will be 12v and we will just throw a lead through the window if we need 240v in a caravan park.
NUG637 ·
I forgot to add that I don't have the space for a gas bottle in a box either so a metho single burner stove suits me to pass as a motorhome and we will use the webber for cooking outside and can do the veggies on the metho stove.
dangerous ·
Its turning out awesome Miles!
NUG637 ·
Thanks Dave 😎
nils ·
This is the tits! I wonder is it less work than fixing and restoring the whole rear of a bus.
I'de have to have it as a baja snail though 🤪
OZ Towdster ·
Mate i'dd highly consider replacing those little door hinges on the entry doors with a full height length of piano hinge as those hinges won't last 5 minutes on the road
, apart from that great work as usual
NUG637 ·
Oh I know you do Danny :oops:
Full height clothes Cubbard is now mostly complete... Just need to fit door handles, corner mould, cornice mould and then laminate the bench top...
Also finished lining the top of the day bed. made the door to cover up the hole for our camp chairs storage but have run out of hinges until the next bunnings trip.
matberry ·
👍👍👍👍👍👍👍👍👍👍👍👍👍👍
Keep up the good work Nug, looking great mate 🙂
Doug Sweetman ·
My fav thread for several years. Terribly jealous 🙂 looks like great fun
NUG637 ·
for several years? ^^ I've only been on it for less then 6 months :P
this weeks accomplishment
first time laminating bench tops was fun…. bit different to work with… corse i had to chip the main bench top with the last 100mm of edge to file :evil: bit of 2k paint on there and you would never know… got the smaller becnhtop on the opposite side laminated to but no pictures…
Doug Sweetman ·
Wow looking very professional 🙂.
If I said favourite thread in years would that make more sense ? 🙂 lol
h ·
👍
NUG637 ·
Cabinetry is all done
Dibba (brother) made a start on the wiring...
Ampdub ·
This thing is gold, Can't wait to see this at a show
NUG637 ·
spent last week rebuilding my girlfriends 40hp for her 61, then i finished up a few loose ends on my 58 to sell back to its original owner now that i have put it back to stock.
the 58 sold today so i was straight back onto the snail for the few hours that were left of the afternoon
started off by sickaflexing the cornice line as i gave up on trying to get anything to bend the contour over the cab
then fitted up the drain to the sink. Run the plumbing directly out through the floor with a "push on" drain hose fitting to reach the dump grates etc at campsites. Some nature reserves require you to be able to hold 1/4 of your holding water as waste, ours will just be a jerry can outside :-$
then got a start on the insulation, 19mm foam…. the 2 pieces left out are where I'm yet to run some wires but need the lights to be able to fit them
NUG637 ·
After insulating i found some unused space next to the starter battery so thought i would do what i could with it…. not to be water tight but somewhere to store a hose, snorkels, dildo's whatever you fancy…..
i sheeted it with sheet metal on the inside but no pictures at this stage….
had to come up with a wheel arch…. had the sheet hanging 30mm lower to make the arch bigger but it just didn't look right…
few more measurements and cuts for fuel filler, water filler and storage box….. then i had to make the filler a little less noticeable…. mixed up a little to much paint so did the jam of the engine lid to…
then went to town with cladding….
befor i put that last sheet up above the cab… i knew the tight roll from the underside to the upright over the cab was gonna be a struggle and with leaving the side sheet off i could have access to use clamps etc…. so i then had to change my tactic and finish off everything around the cab….
using the join behind the cab has worked out fricken awesome… scribe the sheet in and pop rivet it from behind… i thought i got a picture of this but nope…. anyway had to pull the draws out in the kitchen to get to the drivers side sheet but the passer sheet was a breeze…. once one was cut (took a while to scribe it in neat) it could be duplicated and used on the opposite side 8)
then on to the sheet on the underside of the bed. This is the only thing I'm not happy with…. as the steel i welded to the roof warped a heap… the sheet has followed the warp and i couldn't pack it straight either as it would the warp the opposite way….. fuckers!
now was the hard part of scripted in the big bend…. was a challenge getting the pillar…. gutter… and roof all in different contours but i made that my bitch!
i should also mention i siliconed the sheet behind this bent sheet so it should be twice as water proof once i silicone this to the roof/body 8)
again once one was made it was duplicated for the other side and worked a treat!
it was time to finish the last of the hard/shit jobs and get this tight bend done… the old mans reckons i should of got it rolled but fuck that…. i like a challenge 😂 first off we tried clamping the edges but the middle was bowing to much… so tried clamping straight edges to pull it in but that wasn't working in our favour either….. starting to second guess if we could get it thn i had a random thought of a ratchet strap (i use these so often at work and in the workshop)
this helped hold the middle in while we worked the sheet flat from the middle outwards
BOOM! fuck yeah bitches!!!! that'll teach the old man 😂
before doing this i also lined the inside of the port holes/storage holes with the left of laminate from the bench tops then insulated the back of that… again no pictures of that small addition...
last sheet to finished the drivers side…. earths run, insulation in… fuck loads of glue….
man I'm happy with how its lookin 8)
started to fit a few of the lights we bought over the weekend… one at either end of the bed and one underside of the cabinets to light up the kitchen
11CAB ·
The Chinese have copied your idea already......
pete wood ·
Looks great nugget. Well done. 👍
nils ·
The only problem you may encounter with having the front panel under so much tension is cracking around or loosening of the rivets, but time will tell.
I think what may be missing at the wheel arch is some sort of form, a little flare like the original bus had would be the ticket. Lets see you metal skills Nug.
very cool as always👍
johndoe980 ·
I love your build, I want one.
Your craftmanship is amazing.
How did you work out the sizes for it?
Did you draw up plans with dimensions that you can share?
When can we see it in person?
Great work keep it up.
NUG637 ·
its not under that much tension really ad being lined both side it shouldn't move an inch…. specially with glue and rivets and thats a no to flared guards…. i like how they look thanks…..
john…. if you go back to the beginning i drew it all out on a loft/fake floor to scale and used it to bend the shape etc…. just went by my height (so i couldn't stand up and lay down (width) ) and worked from there with what i thought looked good….
some serious man hours being burnt up in this thing…. would be so much better with 2 sets of hands….
hoping to be driving/sleeping in this thing at valla… and leave for our trip around australia after that...
vwsteve ·
holy crap! amazing work
would be an interesting drive in the wind though🙂
NUG637 ·
Finished lining this thing bar one sheet short for the hatch ..... Doh!
Was thinking about the engine hatch and was gonna try keep the eyebrow for the number plate light etc but that ended up in the to hard basket and I didn't feel so bad as someone else had already gone to hack town on it anyways.... Just gotta sort out a number plate light now....
While I'm waiting for the last alloy sheet and my alloy angle to arrive I thought I would make a start on the engine even tho I haven't made up my mind on a Combo yet liking the sounds of a stroker with stock top end... As I need to fight head winds and hills.... Not go 140k's to my destination
Even tho I drove this thing around the yard and up and down the street a few times I knew it felt a little sluggish but abit worse then I thought....
Once I pulled the shroud off I notice the nut had worked it way off number 2 bearing area... It wasn't till I got everything off that I noticed the bottom one was gone also.... I forgot to check once I pulled it apart to see if this hadn't bashed the case out of shape... Will check first thing tomoro now it's on my mind.
Then I pulled the heads off and found this little beauty on number 3 exhaust valve
Once I pulled the case down I noticed one of the cam bearings as shit itself to....
Thank fuck I didn't waste my time on trying to get this thing to perform for us just because it ran :shock:
Have been talking engines with every one I know who is "in the know" when it comes to torquey motors... And I owe a big thanks to Isaac (Ritalin boy) and Matt berry who have been great words of wisdom as of late. 8)
mactaylor ·
A trick i have learnt with sikaflex is if you want a nice finish is to use a potato shaped to the desired curve, the sika does not stick to the cut face of the potato. Strange but true!
Carl and Emily ·
Ah the beauty of a vw engine.
That is,. how bad they can be and still run!
Do you think it will be done for Dubs at the Abbey?
NUG637 ·
Hell no! Deadline is valla... Already stretching it for that I think....!
I might try that potato trick! Thanks for tip 🙂
Carl and Emily ·
NUG637 wrote:Hell no! Deadline is valla... Already stretching it for that I think....!
but you're almost done. 😂
what's that I hear your say,...needs an engine rebuild!,.. you can do those in your sleep can't you.🙄
NUG637 ·
Well I cleaned up the as41 case out of the bus and bolted it together and no visual gaps or signs of out of round... Got told to check the matting surfaces around the studs that torque the bearings down for lips or grooves from movement....
Which I think this one checks out ok?
Noticed the other as41 case we had sitting around had all the studs and things taken out so a 5 minute job to open her up and look to see if it's any better to hold a stroker.... My guess is no as this case looks to have more wear then my case with the nuts loose...
With a fairly noticeable lip suggesting the case have been rubbing...
Waiting for more materials to arrive as my first order got damaged in transit...
Scottkombi ·
Nice progress
OZ Towdster ·
Nugget give me a call or PM when your ready for the Sikaflex as i use it all day every day and have plenty of tricks for a neat nice job and am quite happy to come and show you , and none of them include potato's
NUG637 ·
thanks andrew but ive already done most of it, done a fair bit of sikka work in the past so im not all bad....
few things arrived the other day so i had enough to start on the hatch....
fucked around with the door for abit trying to get a trim piece on the outside to finish it all off.... next time i will alloy an extra 3 mm to make things easier... anythings that hinges is just so labour intensive.... i reckon i have collectively burnt up 3-4 days on a single door but thats including making the door itself....
from one shit job to the next.... started on the hatch....
got my sheet in so fitted that to the fram and folded all the edges over by hammer (no the neatest way but good enough for up top...) then welded up the seams..
got some gas struts to help prop this up but these cant be fitted until the hatch is 100% finished....
should be nice laying under the stars up there 8)
as the sheet is spanning 1100mm it got a fair bow through the middle and with the way im gonna seal it i couldnt have any framing through the middle on the underside as it would compromise my seal... so i have decide to put the framing on the top side.... again not the prettiest but im trying my best and being up there it shouldnt matter to much....
wanted to tapper the box section a little to make it less noticeable from the front....
I ran out of box section at 9:30 last night so im waiting on 2 more metres of that to come in befor i can finish the outside of this dam thing....
the idea is to run and upright angle on the inside perimeter of the hole which will press up against a rubber seal on the hatch.... the upturn will make abit of a flashing to stop water etc so i couldnt have any framing on the inside.... then i will put white washed ply on the underside of the hatch (inside the seal) pop rivetted into the framing of the top side.... i think im confusing myself just trying to explain it so just watch and see 😂
might have to make an air barrier on the front side for the airforce while driving doesnt push water upwards and over the flashing.... hmmmmmm
11CAB ·
Look forward to seeing this at Valla 😀
johndoe980 ·
It was called "Rubber Tramp" now its "The coolFlo Cooler"
Very cool ut a bit too low.
I want one......
NUG637 ·
that thing needs a hatch!!!
finished the ribs on the hatch which caused some serious welding burn.... alloy has such a bright flash its incredible! and i blistered like a bitch 3 days later....
once the ribs were on it was time for the seal.... put a 50x25 3mm right angle around the hatch opening for the hatch to seal down on and act as a flashing for water....
sealed it up good
seal on the hatch...
painted up the ply and got that shit on there...
then i had to latch it down..... was original gonna run these latches on the outside cus the "hook" wouldnt work where i wanted it and the hatch will only be used once stopped anyway so would of been easy to release it from the outside once stopped... but being a sucka for punishment... made my own stainless hooks to run them inside the van...
and last but not least got these gas struts on.... i initially fucked up the positioning... but with dibba picking up on my geometry error we got her sorted.
and to finish of the night i got onto the corner mouldings.... could originally only get it in powder coated white or black.... but after a few calls got my hands on a few lengths of milled finish moulding which is no longer run in production! fuck yeah! saves having to paint them all silver....
how straight it that 8)
the middle section where the moulding is fixed through gets a plastic insert in either grey, white or black, the cool flow is black so im leaning towards grey or maybe even white.... hmmmm.... feeling good
NUG637 ·
well i finished off the corner mouldings at the beginning of last week..... helps round the edge abit and make it look a little more finished 8) just waiting on the plastic insert to arrive 8)
the tighter corning wanted to fuck out but with abit of hammering i got it as good as i could get it... good enough...
even tho i glued them on, i then siliconed the edge to be 100% sure no water will get under these.... thats 40meters of the shit :roll:
since then i have been working on shity old carvan windows... starts of with tear down... get out the hard as a rock seals, clean everything! cut new purspex, reseal, and re assmeble with new components....
fuck me! what a shitful job.... onto day 4 of doing this and im pretty sick of it.... only one more to go 8)
and one all done....
as my frame in dept is more then the window reveals i have had to make up the gaps with some white right-angle pvc cornering.... heat it up with the blow torch and bend it to the shape of the frame then glue it to the wallas befor the window goes in....
leaves me will a small gap between the alloy window frame and the Plastic architrave which im thinking i will silicone to neaten up....
in the photo below you can see the architraves clamped inplace waiting for the glue to dry....
i currently have only 2 windows in but all but one rebuilt and ready to go.... once the window is in i can start on the beltline trim on the snail to cover the horizontal join for waterproofing
and last but not least.... a few weeks ago shana and i bought our 2 mattress's.... one for the day bed 70mm and one for our bed over the cab (100mm) i cut the day bed to shape and she took on the task of choosing some material and sewing a cover for it.... keep in mind this is the 3 time she has ever sewn befor (did a pouch and a dog jumper befor tackling this) she smashed this out over 2 weekend and in my opinion did a ripper job! not gonna lie... there were a few break downs but she got there in the end 8)
her net project is the curtains 8)
pete wood ·
Great work. 🙂
vassy66T1 ·
Looking the goods now NUG 👍
Allbones ·
WOW. Thats all.
NUG637 ·
All windows done! Thank fuck! Next is dash painted and fitted.... Doors fitted and new seals then windscreen and this thing is water tight 8)
oldturtle22 ·
That looks great mate
NUG637 ·
went and pick up my engine from being align bored, decked and 8mm case savers inserted yesterday big old thanks to DB... but befor i left i sanded back the dash.... welded up half a dozen holes from aftermarket switches and got it in highbuild later last night. the dash top i went wet on wet with high build and 2k satin black and today i blocked back the dash.... wet sanded it and layed some colour along with abit more black for dash components... and my rusty shifter.....
also fitted the insert for my edge moulding... originaly bought grey but it looked shit so the caravan mob were happy to swap it out for black for me 8) much better
next week im hoping to get dash assembled and in(ready for dib to wire cus im hopeless with that shit) next week, headliner in, doors on and seals in.... (needs to find some delux vent windows!!!!) and front screen in 8)
oldturtle22 ·
Great work, who line bored your engine mate?
NUG637 ·
Dave butler 👍 top dude and A real wealth of knowledge
Flintstones ·
She's looking great!!
vassy66T1 ·
Have you got yourself some sway bars for this?
Trish is impressed ... "Awesome!" she says
urban_myth ·
hi nugget.hope you got my pm.if not give me a call on 0416 067 932 regarding the spindles.i also have a 24mm front sway bar that bolts in the same position.really makes a big difference to the handling.thanks geoff.
NUG637 ·
vassy66T1 wrote:Have you got yourself some sway bars for this?
Trish is impressed ... "Awesome!" she says
funny you should ask.... ive place 2 cip1 orders in the past week and this was on one of them....along with a few other goodies 🤪
rear sway bar 😎 thought about an aftermarket front aswell....
hey geoff, i havent got a pm yet?? will give you a call on monday 😏
took the misses to spotlight yesterday to look for a headliner material (bad decision) i decide of a material i liked within 20 minutes.... 3 hours later and she was well off track..... anyway had an itching to get it done today only took me an hour or so..... by no means the best headliner job you have seen but the price was right ($20 for material and just my time) thinking i will by more of this "Texas Sand" material and do the door cards..... and if im feeling really adventurous i might even have a crack at recovering the seats as they are lookng really aged..... see how we go for time befor i jump into that tho....
this is it....
started off by gluing up some foam first then centering up the material...
then went to town with glue
as i said.... good enough.... the warped sheet metal that now makes the rood mad it had to get the sides "Straight" live an learn tho....
NUG637 ·
dash in, think im gonna need to paint the steering column ...
doors on and latching
i love bolting shit back on
roverv8bay ·
G'day nug637. been following from a distance. this build is superb you should be very chuffed. to think you started with a stock vehicle. I think you should be looking at calling comalco or alcan with the amount you have put onto it
ernie
NUG637 ·
door glass and seals done! 8) bought some vent windows which i think will be worth there weight in gold!!! the first one i fitted…. the seal wouldn't touch the body top or bottom….. i first thought…. piece of dick! aftermarket shit!! spent ages…. modifing it…. bending it…. re-riveting it….. i finally got it to seal against the door body….. then i found out the chrome runs all the way through on a bay window… not like a beetle so the rubber is ment to seal against the chrome and thats why there was a gap…… shit!!!! learnt the hard way but made the second fit super easy and they actually fit really well when you know what you are doing :oops:
the door seals are really really thick on these WW kits and has made the door "spring loaded" and hard to close….. so i ground it down abit…. has helped a heap but still a firm feel apon closing the door…
then obrian came to come fit the front screen they claim to never have problems fitting….. i tried three times and couldn't even get it to side inplace… its about 5 mm to big all round... the fitter said thats horse shit as he has struggled with every one in a vw…. anyway he was soon to leave after giving up…. they have ground the screen down and are coming to try again this morning….
pulled the beam out yesterday afternoon…. everything underneath was a bitch to get apart :roll: but a big learning curve on my half….. first time under a bus and first time playing with disk brakes…..
i read somewhere about going over these with an orbital? but can't remember what to look for…. there is a few big grooves in here so ill take them to get checked along with my booster and master cylinder… starting to get exciting…. i enjoy the machincal side of things….
also did a paint session yesterday with a few silver bits to bolt up to the outside….. pictures of that later…. 8)
NUG637 ·
well been on the front end this weekend….
the brakes were buggered…. must of had water through them cus the pistons were seized inside the callipers with jelly where fluid should be…. dib and i struggled and get 2 out of the 4 pistons out but couldn't even move the others….. after ringing round… found out i could get new pistons and with a tip from the local brakes plus boys…. i got busy getting those suckers out….
they recon they have the same trouble with hilux's that have been on the beach most there life….
then sandblasted the bores and they are as good as new….
did a degreasing session and a paint session yesterday….
and today was beam time after doing abit of running round this morning…. getting the pistons and things…
few broken leaf/s amongst what i pulled out….. will tare down the spare beam and rob it for its good ones 8)
NUG637 ·
tell tonight sucked ball sack! laying in my back with a foot and a half clearance under the car spraying the underside of the bus in rustkill :roll: what a joke…. but its done now… and I'm never doing that again….
anyway from the beginning...
since welding on the adjusters….. I've rebuilt my brakes, got my disks machined, replaced all my ball joints…. painted all the front end bits…. rebuilt my centre steering pin, and started assembling the beam again…. with a spare bay beam i got from Al, (thanks bloke) i got enough spring packs to make 1 good beam as both had broken spring in them…. must be pretty common….
rebuilt/rebushed german centre pin…
rebuilt german ball joints….
rebuilt brake callipers….
beam assembly… new dust seals on trailing arms…. and i may have used 2 sets of the upper bump stops to give me a little more travell before the stop for rego…
then pressed out the old bearing runner and pressed in the new ones ready to go when i put the stub axle back on….
and this arvo i spent on my back wire brushing the underside of the bus from the front cab to the crossmember just in front of the engine bay…. you should of seen the shit i blew out of the chassis rails…. there is still some in there but gonna have to get crafty to get it out…. crazy….once it was cleaned and keys…. i spent most of tonight…. laying some satin rust kill on the under side of this bitch….. like i said…. what a cunt of a job…. next time ill have i hoist!
made the mistake of wearing a balaclava style head sock and a mask (no eye protection) and only gloves with short sleeve…. these are my arms….. my face is much the same only around the opening of my eyes! whoops…. I'm gonna look like a dildo for the next few days…..
there is a dick load of paint under there but i wanted it well sealed for when i put the belly pans on…. as i never plan on getting under there again…..
NUG637 ·
obrian finally got a screen to fit and it fits like balls… gaps in the corners which the just gooped up….. least its in there and hopefully water tight….
got my new booster and master cylinder
the new booster is like fitting up a commodore one…. it mounts different so i had to accommodate for that and make a little bracket for it to tighten up on….
once that was sorted beam went back in and front end assembly is all complete with new bearings machined disks, new rebuilt callipers, new brakes shoes, new brakes hoses and some hard lines, new shocks, new drag link, new tie rods… the whole shebang…
been doing a few other little jobs inside the cab and on the dash cluster etc but got a start on the belly pans….. have been putting this off for a fair while now cus i thought it was going to be a shit of a job….. but i must say these have been the best fitting repro panels i have ever worked with…. only trimming needed so far are for the bits i have added on to make the extension….. as i bought them months ago they turned to surface rust so i spent a while stripping these back and giving them a thick coat of rustkilll before install….
befor closing up the underside i thought i would run a new brake line that runs off the regullator to the rear even tho the old one was looking ok…. cus there is no real easy way of replacing it later…..
and just before lunch i got one pan blasted in most the welds are sitting pretty flat for welding them upside down….. might grind back the odd ugly one before i touch up the paint
couldn't fit the middle belly pan until i straightend the rear crossmember….
i just beat it all straight and welded it back in but look how much shit was in there :shock:
and smashed out the other belly pans tonight…. all day on my back welding with less then 2 feet of space…. and i really enjoyed it…. not often can you say that….
yeah bitches!!!! i should of done this months ago!!!!
NUG637 ·
Dib has been buggen the fuck out of me to get it off the jacks to see what the front looked like…. i got the adjusters about 3/8's down and i think its sitting pretty nice…. just a little attitude and still has abit of travel…. might have to get rid of the bump stops after rego for more travel…. cross that bridge later
got a crazy amount of rake atm… thinking one spline in the rear and once she is all loaded up (water tanks, fuel tank, gearbox, motor, and luggage) I'm hoping it should settle pretty nice….
haldz ·
Loving this project
NUG637 ·
As i haven't taken on any work since christmas, i have had a few phone calls with job offers and not all in my trade either which I'm very grateful for and may even follow them up once this car is done…. anyway the builder i used to work for has called a few times as well, Offering me work but only the other week was it something i thought would be worth my while so i have been back at work for the last week and a half and i feel like "i still got it" 8) i do love the building game but have been loving the break from it aswell…
shana spent anzac day cleaning out the inside and painting the pop rivets and puttying the nail holes in the cabinets etc and did a great job 8) she took all the covers off the windows to…. makes it feel nice an open & airy, which is what we wanted and plenty of natural light….
i have moved onto the rear-end which i finished tearing down tonight…. got it all soaking in the parts washer….
placed another full cip1 order last night and i still don't think i got everything… gonna visit me mate Al from DAS resto (keep ya pants on) on friday and have abit of a shopping list for that to 8)
feeling refreshed since going back to work…. looking forward to getting this thing outside and making a start on the engine….
vassy66T1 ·
Keep the joy going mate!!
I look forward to catching up with you at Valla or earlier
NUG637 ·
shana got the rivets painted, nail holes puttied and gave it a nice clean
put the bunk board on over the bed…
cleaned front seats…. and rubber matts…. chasing a passenger wheel arch matt if someone has a usable one….doesnt have to be perfect…. mines in threes pieces….
Started on the rear bar..
went back to work last week for a couple of days…. turned into a week an a halfs work which helped our bank a little…. but has slowed progress on the bus a little.
NUG637 ·
got the bars in paint….. wet sanding through the cold snap we just had sucked..
and spent the afternoon sandblasting and painting rear suspension parts
NUG637 ·
started off yesterday by painting up the last of the underside and around the engine bay
assembled bumpers and put on the front badge
it just so happened to work out that the bolt at the ends lined up with the floor structure to bolt through and with few bends in the bolt for the head to sit flush on the bumper and not pull the ends upwards. I'm stocked with how they turned out. Don't wanna fit the gas bottle to it now
finished off the afternoon fitting the taillight and reverse lights. Made a template before hacking into the snail. Been putting it off till the bumper was on for something to work off for height etc. Was happy to have a separate reverse light if it ment not using those fat f@#ker lights that should be on it
[/quote]
matberry ·
Nugget, YOU ARE A LEGEND. Top work. Bumpers, tail light treatment, interior .....all get top marks. 👍
NUG637 ·
after a horrible night sleep with a big day put in yesterday i woke up feeling abit under the weather….
thought i would take on a cruisey job of hand making some scoops…. made a test one first which showed some faults but got these 2 knocked out and fitted…. thinking of mounting the number plate off the lid by an inch and drilingl 2x100mm holes behind it for flow…. some say it will end up in a dirty engine bay and some say it will suck hot exhaust air, hmmmmm. So far this is where I'm at for air flow. Think it will be great while cruising and the external oil cooler should help also…
rolled front lip
i liked it better without them but couldn't find much else that would serve the same purpose and look ok. Guess it goes with the hand built theme.
vassy66T1 ·
Gr8 work Miles
HappyDaze ·
So you do actually sleep !.......amazing amount/quality of work there, mister. 👍
I am going to Valla for the Raliegh Park thing [this time WITHOUT a broken inlet manifold], however, 'The Snail' is on the top of my 'Must See' list.
DubbyFan ·
This is so cool, love how you are keeping the VW bits in her, him, it! Are there girl and boy snails?
Scottkombi ·
Looks completely brilliant.
Just as a matter of interest - are you changing the wheels to something more shiny or leaving the stockies?
Also I noted the UK rubber tramp had the spare wheel on the front.
Its not easy to find a spot for the #5 wheel - whats the plan for this one?
Cheers,
Performance Upholstery ·
Reckon you're gonna get it out the shed door??
NUG637 ·
nope it staying in the shed for it entire life…. didn't you know?
Should look ok supporting some grey caps until we return and regain some money for a nice set of mags.... Like gas burners or brims 8)
as for a spare…. i have a bullbar to paint up yet… still undecided if i want to run it or not…. pretty heavy
lunar_c ·
Just read through the whole thread. The amount of thought, hard work and excellent workmanship that has gone into this is a credit to you and your other half. Top work mate, keep it up. You're getting pretty close to the end result now!
Performance Upholstery ·
Ok, that obviously came across like I was being a smart arse... What I was getting at is the car looks bigger than the opening you have to drive it through to get it out of the shed...
NUG637 ·
thanks lunar 😎
PU - i have covered it before…. shed door is coming off and it will be fine…. on track to have it outside this weekend.
took the paint off the the wheel nut holes so i can sleep at night…
all new bearings through-out
new pads and machined drums….
stripped a clump of grease which turned out to have a gearbox in it…..replaced the main shaft seal…
brand new german cv's…. but got rooted by Micks motors once again (this is still from the time i went and bought those brake pistons that didn't fit and thought i should grab the cv boots while I was there….) they sold me 3 kombi cv boots and 1 beetle ... so only one axle on for now until Das rest haus come to the rescue.
fitted up the empi rear sway bar to help stabilise this thing abit…. feels nice and stiff just sitting there….
Dasdubber ·
Nice one Nug, looking good mate, tried returning your call today - not sure if you got onto Steve this arvo or not?
NUG637 ·
Argh bugger! Forgot to call back... No issue... Was just gonna whack a 12v starter bush on last nights order 😉
lunar_c ·
Have you had any more thoughts on the specs of the motor? I'm curious. Also.. Props to you for staying air cooled when you could be forgiven for going to an ej22/25 in this instance. Clearly you're a man of principle.
NUG637 ·
I have bought all my engine parts and will be getting onto that in the next week or 2. A quick run up on specs it's 74mmx85.5mm=1699cc with an engle 100 and drd l3 super stock heads and if anyone jumps on the bandwagon of why not bore it out for 90.5cc I will literally loose my shit Lol I wanted it really basic for ease of swapping out top end parts (top end is relatively stock) and something that should get good mileage. As for keeping it aircooled.... If I wanted to do the trip with SUby motor I would of fitted out a forester haha I love aircooled engines and I know my way around them fairly well which comforts me if anything was to go wrong on the trip.
NUG637 ·
was gonna go through and quote every single person that asked about getting it out of the shed and then post these pictures but I'm to excited to bother…. its out! 8)
Always knew we had to modify the shed. it was 5 minutes work but with a quick cut and slice…. she was out the door 8)
Got three people to sit in the back to see what it will look like with a motor, fuel tank, water tank and three batteries worth of weight in it down…. hopefully with our luggage and everything it should settle pretty level…. otherwise i might have to go 1 click in the rear...
The shed feels huge again now 😂
8)
LUFTMEISTER ·
Looks the Shizz 😎
donn ·
Now that's retro ! 👍
matberry ·
👍👍👍👍 Fabtastic
Flintstones ·
Epic build 👍👍
lunar_c ·
The pics aren't working! Fix it fix it fix it fix it!
lunar_c ·
Now I've seen it, it's a credit to you mate.
Got hub caps for those wheels? That'd make it just right.
NUG637 ·
Awning on....
cut out the floor then glues it down…
as all of our door cards and kick panels were badly water damaged i thought i would make some new ones with the left over masonite from the oval….
shana has been sewing curtains 8)
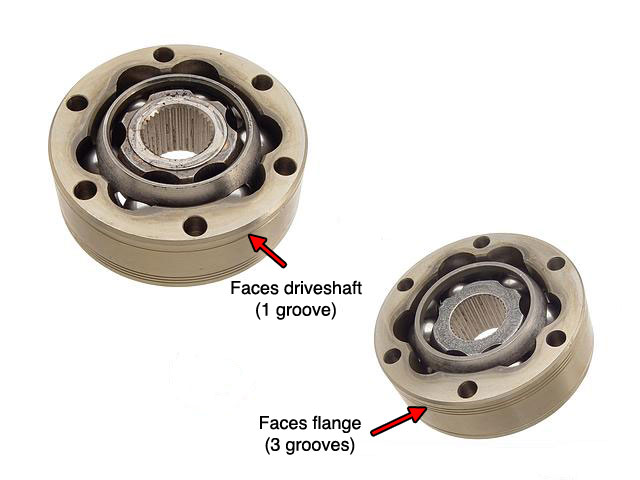
now the not so fun part…. dib came across a thread on the samba about installing lobro cv's…. when i did mine i noticed the 3 rings on one side and a slight chamfer on the inner cage… did a slight search but nothing came up so i took a 50/50 chance and put the three rings towards the shafts….WRONG!!!!
so i pulled them out and flipped them over and got them all back in…. i hate doing things twice but i will never forget now….
NUG637 ·
Made a nifty little step to make getting into bed a little easier as i don't like the idea of a ladder that we have to find a place for…. Yes its small but its holds my 90kg and functions exactly how i wanted… and its not a huge eye sore….
forgot to take pictures but it has three 60mm washers that were supplied with my retractable seat belts stoping the bolts from pulling through the back side…
after taking the step off and painting it i started making some mirror mounts for the mirrors i bought off ebay over the weekend. They look similar to the elephant ear mirrors but half the price. Just waiting for them to arrive before i cut the rods to proper length.
bent some 8mm rod and cut a thread on one of the ends
tried to duplicate the original tapper of the mirror arm
really happy with how the turned out holding out for them to arrive now 8)
The only thing that might be a problem is if they wobble but i think i can easily fix that. Once the mirrors arrive i will cut them to the shortest usable length 😂
vassy66T1 ·
That pink toenail polish looks great on you Miles 😉
Coming along nicely mate
NUG637 ·
Thanks mate 🙂 had to brighten up my black leggings some how 😂
NUG637 ·
shana finished sewing the curtains… she has really impressed me for someone who didn't know how to sew…
received the mirrors in the mail…
after trimming 150mm off the length off the mirror arms… i still think they would of wobbled… should be ok now…
After welding in the adjusters to the beam i wasn't aware it would cause trouble if i ever wanted to raise it with the shift rod clearance being a problem…. Although it looks much nicer at this height it was only 10mm off the bump-stop with no-one in it…. might end up loosing the stops down the track anyway but for now i want it to pass the engineering and roady with flying colours….
so had to chop up my shift road…. given myself 20mm clearance now which should allow the adjuster to move back to its stock position
although after doing this mod i sat and thought i could of done it a much neater way…. just part of the learning curve… will serve its purpose just fine for now tho
also been talking to the cool flo boys abit lately who sent me an awesome package in the mail…. muchly appreciated guys 8)
urban_myth ·
drop spindals are the way to go.no need to adjust the beam.
NUG637 ·
They will come down the track but for the trip I have better use for that $700 then on some drop spindles... And for $60, adjuster have got me where I want to be... But I wasn't aware of the hassels if I wanted to raise it more....fixed now 👍
Dasdubber ·
Nice work Nug, you are doing an absolutely cracking job mate.
NUG637 ·
funny your should use that word CRACKing Al…. my day has been nothing but CRACKing….👎
mirrors on…
had abit of time on my hands over the weekend so made a start on some slip on seat covers….
got 3/4 of the way through the bottom until i ran out of thread and haven't had time to finish it since….
whilst water blasting my tinware today i gave the case a quick blast to get all the machine shavings out of it so i could lay the 74mm crank in to check for clearance…. until i found this while drying it off…. (look for the wet stripe)
and she is all the way through…. i spent a fair bit of money on this case a few months back getting it lined bored, thrust cut, squared up/decked and 8mm case savers and now it just a door stop… *crying on the inside* i called dave butler who was a true gentleman and offered to bore another case for me labour free if i could get it to him by tomoro before he goes on a 5 week holiday….. shit!!! spent all afternoon calling people for cases and pulling down the only other universal case we had which showed to be cracked also…. fuck! after a few sums and a few calls to people with donor motors… i wasn't getting out of this for under 500bucks for another used old engine. Thats half the cost of a brand new vw block and might be just as fucked as the 2 i already have…. so it looks like ill be buying a brand new case tomorrow…. i don't think this crack is anyones fault…. i haven't done anything at my end to warrant that crack and I'm sure dave would of seen it while inserting the case savers if it happened there as the crack runs through the head stud hole….. just one of those things and very grateful for everyone who tried to help me out today (leroy, Matt Berry, Leons motors)…. But most of all Dave Butler who has 0 time on his hands before a holiday but still offers and tried to honour his good word and business ethic. Its just one of those things…. bugger
matberry ·
Good luck with your exploits still Nugget, I thing you've made a good decision re. new case.
Seat covers.....you're a demon
NUG637 ·
thanks matt, just don't want to take anymore chances with old cases for this rig….
waiting for rod penrose to open to get a quote from him for a new case….
its about $1000 to bring my own in from the states….
as for the seat covers…. there not perfect but i might say i have impressed myself this far 😀
NUG637 ·
This should help...
Really wasn't in our budget but we need an engine..
These should help feed power into the snail...
pete wood ·
A new case is probably the best thing you can do. I just went through that struggle myself. 🙁
Luckily I found one that was usable, but boy was a drama!
NUG637 ·
First of many trial fits. Had to clearance the bolts on the cam gear to clear the full flow oil pump... So far the 74mm crank just slots right in. It Is a little close on the bearing web at no3 bearing but with the flywheel on it should hold it back off that. Just waiting on my 8 dowel tool to arrive befor I can try that tho.
Rods to case clearance all good for no1 and no2 throw, Although I will relieve the top of the case a tad cus I would like to see more clearance here.
With the 74mm crank and the 5.325" rods the pistons skirts hit the counter weights so I had to clearance them to.
With piston 1 and 2 on and clearanced, I could finally check my deck height. With my current deck height coming in at 0.55mm and my combustion chambers in my L3 heads should be 59cc (yet to double check that) but that gives me a compression ratio of 7.8-1 which is perfect for the my application and no need for barrel shims etc. Stoked!
Still have piston's 3 & 4 to clearance and check. Then weigh all my pistons and grind them all within 1 gram of each other. Although this is a very minor stroker, The new challenges that are involved have been exciting and great experience this far...
vduboy ·
Very cool build mate, one of my favourites to read, spewing about the case though, at least you get to give it some good motorvation now!
matberry ·
Good job Nugget, getting in there and doing it seems to be a speciality of yours. Keep it up. 👍
fish26 ·
I'm glad my old crank found a new home which is a long story, I hope it serves you well.
This is a very cool build and your fabrication skills are exceptional, you will need every bit of Torque to keep it motoring.
NUG637 ·
thanks guys….. your old crank ey… you gave it to pete?
back on engine duties today…. cylinder 3 and 4 clearanced and deck heights checked… 7.8-1 8)
little more of the case clearancing… wasn't happy with how close the cylinder skirts were to the step on the case in the cylinder bores so i smoothed them out abit while i had the die grinder clearancing the top of the case for the rods shoulders….. it really is bugger all
will cc the heads tomoro to make sure I'm on track with my compression ratio along with weighing all the cylinders etc…. hoping my latest cip order arrives tomorrow to so i can 8 dowel my flywheel… get the flywheel surfaced and then get the entire assembly balanced….
NUG637 ·
Was really getting down to the nitty gritty today… learning every step of the way…. cc'ed my heads this morning, 59cc to the drop..
I'm told the rule of thumb is 0.040 deck height to allow for crank flex, rod stretch, heat stretch etc even tho this isn't gonna be an rpm monster… i want it bullet proof, so with a deck height of .55mm (0.020") i was on the hunt for some .020 barrels shims for my 85.5 cylinders to bring me to a perfect 0.40" (1mm) which brings my comp ratio down to 7.5-1, this is still ok but i was hoping for a little higher and i can still achieve this if i was to flycut the heads but I'm starting to wondering how much money I'm gonna pump into the 1699cc. With 7.5-1 i can run really shitty 91 octain fuel if i ever had to (remote area's?). Alot of people have asked why didn't i just go 1776? less work and more power. The main reason is torque and longevity…. I'm hoping this set up should increase my torque by a fair bit and keeping a fairly stock top end (mild porting on the heads) should last some serious k's. For this build hp doesnt interest me… just torque… and it seemed like abit of an interesting combo
after cc'ing my heads and finding some shims to suit i balanced my rods, balanced my pistons within 1 gram of each other, sorted out my tax and 8 dowelled my stock weight flywheel after my latest cip order arrived. Will get the flywheel surfaced tomorrow to matt with my new clutch then the entire assembly is off to be balanced so i can start bolting this bad boy together….
the flywheel is a tight fit. Can get it most the way down with a rubber mallet and the nut pulls it hard down, but have to rubber mallet it off. I guess thats a good thing to help prevent a loose flywheel. My reason for not buying a lightened flywheel is for torque also…. have been told that a heavier flywheel will help in torque once in motion? weather its true of not time will tell… makes sense in my head. Anyway my head is going a million miles an hour each time i come to this engine and i might be going overboard but i want it sweet as a nut and so far il loving it . will be another nerve racking run in, i always gets the shacks when running in an engine :smile grin: and matt you were spot on…. the moustache bar makes for a real bitch for any full flow 🙅
Scottkombi ·
Youre correct with the flywheel scenario Nug - the light flywheels are for the high revvers.
Torque donks have heavier flywheels for low down torque.
This is why many punters use custom bellhousings when mating subaru donks to VW gearboxes as you retain the heavier flywheel of the Scooby motor. The adapter plates use the VW flywheel which loses some of the torque - that is noticeable as I have a mate with a T3 syncro 16" in Perth that has tried both options - the Suby flywheel made a huge difference for him.
NUG637 ·
ok… lets start with the cam..first of was a really tight cam thrust bearing… so i surfaced that down to fit…
tried using an alloy empi bolt on cam gear (helical) and it was binding and crawling out of the case like a mother fucker… thought i could put my original cam gear on the new engle 100 but found out the old cam was a 4 bolt cam and i need an earlier 3 bolt cam to bolt up to the engle…. after searching through all our shit i found a few spare cam gears but none were the size i need and causing way to much lash… the cam out of the O.G. 1600 fits BEAUTIFULLY and that gear was a 0. All i had was plus or minus gears so i thought i would swap all my 1600 gears for 36hp gears (different pitch)
but then found the offsets are slightly different and the cam gear was rubbing on the case ever so slightly…. :roll: after a few phone calls leons motors let me go through there shit to find a good "0" gear…. got home and its sweet as a nut so i dropped that off to be spot faced to suit bolts,
thought i would have a go a getting my end float set before i assemble as i usually leave this till last but its always a struggle…. you can see a .10mm (0.004") feeler gauge on the crank side of the bearing which is desired spec for endplay plus or minus 0.001"…. i then had 1.02mm gap between the flywheel and had to make this up with 3 of the right sized shims such as 3x0.34mm in a perfect world but with our odd shims i got a .36+.32+.34 = 1.02 8)
cam gear cam back ready to rock!
made sure everything turned and clearance on oil pump etc….
then came crank assembly… everything clean clean clean… check to make sure the rods fall under the own weight… i ended up torquing these arp 8740 bolts to 35lbs with loctite just to be safe…
case assembly soon followed
and i did this processes twice after having trouble with number 4 pulley bearing seizing my assembly once torqued to spec…. so apart it all came again until the problem was solved… made sure there were no highs in my case befor assembling again for the last time. finally she turned free…
relief valves went in and it came time for the empi full flow which needed clearancing for the pulley… and the tinware trimmed to fit…
grabbed the three shims i had measured earlier for my end play and after checking three times to be sure it was spot on! defenly doing it that way again 8) new genuine gland nut to be safe.
pistons and cylinder time… this is where i made i minor mistake… i forgot to clearance for the return stroke of the opposing rod. finding this out the day after i had everything balanced i trimmed them all for clearance and was waiting for the balance shop to open the very next day. he was more then happy to balance them again in front of me while i waited and refused to take anything for payment! another true gentleman.
i bought some 0.020" shims (.50mm) to get my deck height to a beautiful 1mm and straight out of the box they all varied in size and not one was 0.50mm :roll:
so the first one for number one cylinder i spent HOURS hand sanding to a loose .50mm to make my 1mm deck height.
on my other three cylinders i had a deckhieght (without shims) of .55mm so i had to sand the next three shims to .45mm to make 1mm. that took up my entire friday night but i stepped up the pace with using the DA in multiple grades of grit…. check out the dust…
fucken beauty!
made sure barrels were super clean and lightly oiled…
marking sure all arrows point to the flywheel and the under cylinder tins went on….
and the heads went on.. was gonna clay my heads to see for valve to piston clearance but got talked out of it for the very mild engle 100 that I'm running…
next hurdle was rocker gear…. bolted up ok but once on my engine became really hard to turn over but hand…. thought it might of been the hd valve springs but i then notice the bug pack 8mm case studs where to long and fouling on my rocker gear…. fuck!!
didn't want to pull the head off again to trim them so i marked the 2 giving me grief and taped up my heads to start grinding….
the new "super stock" heads have the thicker spark plug boss along with as quoted off the website " Hi Chrome Valve Seats, Silicone Bronze Valve Guides, HD Valve Springs, Chromoly Keepers, and Chromoly Retainers, then finished with a top notch valve job"
then the long bloke assembly… tinware fit fine with engine only being 1mm wider then stock. Cleaned up the 35 PDSIT's i picked up cheap on ebay… he said they had only done 3000k's and i now believe him as there was a spec of crap on the inside… bought jets to jet them down abit but once i got them apart i notice they had been replaced with what i was about to whack in… 50 idles and 140 mains.
had an old header on an engine on the shelf so i cleaned that up and bolted them to my heater boxes…. need to get creative to un heaters but should be easy….
the 75amp alternator straight out of the box felt very rough to spin… once i tightened the cooling fan onto the back it seized also…. i tried my combinations before i came to the conclusion the thing was fucked and contacted cup who are looking into giving me a credit under warranty but dibba decided to pull it all apart and shim it to stop the 5mm of endplay in the shaft and got it free… still has a rough spot in a rotation but was good enough to use on run in… and seemed to charge ok…. (thanks for the hours you put in getting that to work dibba!)
i then bolted a up bug pack breather kit and the muffler to the end of the header… ran my fuel lines… drilled and taped my manifolds for a balance tube which will be "T" pieces to act as a vacuum for the brake booster….
then run in!!! :shock: had been a very stressful 2 weeks… with many ups and downs and a lot of swearing at mediocre aftermarket parts…
this arvo came time to clearance the bell housing on the run in bench for a 12v flywheel and bolt this sucker up…. turned it over without plugs in to get oil pressure up first and fuel to the carbs… then plugged her in and she fired first turn 8) 8)
the exhaust sounds abit poop but the price was right…. will wait and see how it sounds after the carbs are tuned right and i have it dialled in but man I'm looking forward to a good night sleep tonight… I'm stoked on my first little stroker…. so the specs are 74mm crank x 85.5mm barrels = 1699cc with and engle 100 and high flowing stocked valved heads… 8)
NUG637 ·
the pile of boxes of shit that has gone into this little engine is crazy! 😂 i need to do a big clean again :oops:
and a pic with the last few things on taken after run in…
I owe a big thanks to a lot of people who have donated some of their time to the questions i have had during this build… like Dave Butler, Matt Berry and Issac. the best way i have learnt is to just get in there and learn along the way but some of the advice these three have given has really helped me along the way 8)
and a big thanks to dibba (my brother)… although i wanted to punch your teeth in every time you walked into the shed saying "are you finished yet" "just bolt it together" "fuck………!" i also appreciate the time you donated towards it like the alternator and hangin around this arvo during run in although you had somewhere else to be 😂
Dasdubber ·
The lights at the end of the tunnel now Nug! Valla fast approaching 🙂 Fingers crossed for trouble free (From here on on in) lead up to your big trip!
NUG637 ·
so… what a week this far…
engine in last weekend…
the type 3 hatch has been the best mod I've done this far i recon….
had to make a way to mount a head unit behind the dash instead of cutting it to fit….
got my hydraulic crimped end lines fitted for the oil system…
Dib got most the wiring sorted… still a few things to sort out but getting there…
then we tried to start it….
got that sorted by not using the cooler for now… might try plumbing it the other way round if it starts to run abit warm….
there so many things i have done but haven't posted up on here…. like an electric pump adapted to the stock water bottle for the wiper washer bottle… and drilling and tapping the manifolds for balance tube and brake booster vac line… clearanced carbs to fit oem shroud… modified the moustache bar to fit past the oil pump… the list just goes on and on…. getting the the last of it…
drove it under its own steam today which put a big grin on my face…. i don't have the "first drive" on my phone but i got a video of shanas first drive… need to fiddle with the tune again as its a little shit under load… but fine at a stand still… thinking I'm not actually idling on my idle circuit… but on my progression circuit… so when i plant the foot to accelerate it floods abit nd runs way to rich…
anyway here is the last bit of shana first drive 😂
NUG637 ·
i made sure it wasnt pulling vacum at idle... Linkages off... Made sure they were synced at 8 on the snail (were 10), linkages adjusted and back on still a smooth 8.. played with idle mixtures... Went to drive it... Really bogs in the first quarter of acceleration in first... Then pulls hard once you power through it almost stalling... Then second and third are all good.... After this I checked fuel preSure as they say to run these between 1 and 2psi fuel pressure and I was at 5psi :shock: so tonight I've pulled down both carbs to check for anything in then and put in an adjustable fuel pressure reg incase I was flooding them? I Donno will figure it out sooner or later... Revs up fine at idle (a little rich) but shits under load... Will check points plugs and leads next as it's not the first time I've have been chasing what I think is a fuel problem but it's actually and ignition issue...
Had the engineer visit today... He gave me a small list of things he would like to see... Reflectors, grills on the scoops and try round of sharp corners... Even if it happens to fall of after Rego... 😂
well abit more of an in-depth look at what went down today… start off with another tune on the carbs this morning… power was out and it was 6 degrees so it was nice to play on a warm running engine for a change 😂
i can't tell you how much of a good idea that type 3 hatch has been…. and with that big ass back window it makes work supper easy from all angles
my tune seems to have done nothing other then lower my idles… but we bit the bullet and loaded it on the trailer to get weighed…
with water tank full and fuel tank full she came in at a staggering 1700kg flat 8) 30kg in solar panels… 25kg in an awning…. 60L of water, 30kgs in a house battery.. yet to add another…. a hatch, more windows etc etc… there is your 110kg right there ^ so I'm pretty happy as the gvm is something like 2170kg… pretty sure the engineer calculates 120kg per person (including luggage) so that putts me up to 1940kgs and i can still load over 200kgs on and be under the gvm 8) pretty happy with that…. with his visit came some stupid jobs… like reflectors and rounding out the sharp corners and edges :roll: also have to put some kind of grill on the scoop as he thinks they are abit of a hazard but understand they NEED to be there for the engine…. so i got something in mind to keep them looking ok… he also has to do abit of reading on how he is gonna go about a few things so no engineers cert today… hoping monday now and if i get the engine sorted it will be rego shortly after...
tonight i pulled down the carbs to check for shit as the tank could still be flushing shit out…. both had a small amount of gunk in the bowls but nothing i would expect to clog a jet…. but tore them down and blew them out anyways….
got them back on… and called it a night… if its still not running right… i don't want to know till tomoro morning 😂 oh the joys
NUG637 ·
I finished off what i started last night and got my fuel pressure to just below 2psi…. also increased my timing a tad just to see cus these chinese 009 sometime like more timing… fired her up and took it for a drive…. a lot more drivable but is still there so imma keep playing with shit and test driving it… see where it gets me…
dib snapped this just before smoko
NUG637 ·
Spent 2 hours driving it up and down the street on Friday night where I would stop... Adjust accel pump on one carb take off... Stop...adjust... Take off ...stop... Adjust... take off and it really improved... I fatend up the idle mixtures by a turn to and it all seems to be helping.... You still couldn't launch it off the line but it's driveable now... Will keep playing with it once it on the road... Just sounded like it was flooding or being starved for fuel... The more I play the better it's getting
NUG637 ·
my brother took some picks of the mobile Wheel alignment guy that let me do the entire thing as he openly admitted he wasn't quite sure how to do it on kombis… so i dialled in a little bit of negative camber in the front which once loaded with people, sits on 0 camber 👍 and a total of 2mm toe in on the alinement…
Pretty impressive setup on the mobile wheel alignment machine!
then yesterday i drove it to the mechanic for a roadworthy and by the afternoon i was bolting on my new number plates 😀
Didn't think we were gonna make it there for a moment.... But got there with 10 minutes to spare... Until I relised I had no money :shock: an urgent message to dib telling him to bring his credit card and the deal was done 8) thanks ribba dibba! I owe you.... Literally 😂
Bit of a story behind the drive home... Lost a hubcap along the waterfront so parked up and went looking for it... With my eyes on the bushes looking for the cap I missed the big fuck off rock infront of my feet.... And absolutely face planted it, throwing my keys, wallet and phone across someone's front lawn infront of half a dozen joggers... Being the waterfront and all.. After getting up and collecting all the stuff I just threw. i admitted how embarrassing that was and kept looking for the cap… once found i kept on driving the long way back to hq 8)
Put on the plates... Picked up the dog and drove it home 8)
Plates on!!!
72 Twr (tower) kinda fitting....
Shana was over the moon and wanted to drive it so she drove us to hungry jacks and dropped in to see her mum to show off.... Very good feeling
To see her so excited and proud 8)
As usuall i still have a few things left to do befor it's "finished" but It wouldn't even be on the road if dib hadn't busted his ass to wire it all and getting it working like clockwork 8) and Shana for busting her guts and working to feed us and pay the bills while I pieced this thing together... It was surprisingly easily tackling a project "together" even though she wasnt all hands on... Her income and her input... Verbal or physical (sanding,sewing, painting and pop riveting) have made this possible.
Thanks dudes, so far so good 8)
vassy66T1 ·
Thanks for all the story along the way
Great read and an awesome bit of kit!
NUG637 ·
thanks Marcus 😀
a better picture with the plates on 8)
felt confident enough to drive to HQ with the radio on this morning 8)
Doug Sweetman ·
Wicked. Nuff said.
pete wood ·
Snail trail = Awesome 👍
kombivw ·
Wonderful read great pics and awesome job by all involved !
Fun when a hub cap flies off and rolls down the road lol
Took me twenty minutes to find mine when it happened once, nearly gave up
DasAuto77 ·
Pretty sure we saw your camper at Manly yesterday, looked fantastic! A rare sight indeed and a credit to your construction skills.
Luckily my son spotted it as you drove past our bus parked on the foreshore, white over blue late bay.
h ·
good on you mate, it looks great!
a real credit to you and your dedication
looking forward to seeing it in the flesh soon about the traps 😉
cheers
NUG637 ·
DasAuto77 wrote:Pretty sure we saw your camper at Manly yesterday, looked fantastic! A rare sight indeed and a credit to your construction skills.
Luckily my son spotted it as you drove past our bus parked on the foreshore, white over blue late bay.
you sure did… we went to breakfast in manly as we only live in wynnum 😎
thanks H, kind words… been putting a few k's on it over the past week and its going great guns… have been making minor adjustments to carbs and things along the way and checked my CV's for tight after the first 100ks as you hear horror stories…. hoping to pump out a few more k's this week to do a big service before valla 😎 maybe even a small camping trip this weekend… see how things pan out….
Craig Torrens ·
👍👍👍
Carl and Emily ·
Super cool. Well done.
Safe travels to you both.
Congrats.
Ben 89 ·
Keen to see this rolling!! Attention to detail is above and beyond, absolute top build! Only fun times ahead 👍
kombi1976 ·
I just looked through this entire build from start to end.
I have to say, usually I'm not in favour of this sort of campervan conversion but this is truly awesome craftsmanship.
I didn't exactly work out how big your stroker motor is but I'm betting it pushes the "Tower" along well.
Did you have too many engineering challenges with it or did it sail through since so many were converted to pop tops?
And is it a lot heavier than a standard bus?
NUG637 ·
Thanks mate, the motor is a 1699cc... Basically just a stroker crank with everything else being relatively stock 1600.... Engineering we easy as I had the guy around through multiple stages of the build from start to finish... At the end he wanted me to add reflectors and some grills on the scoops to stop then from being a safety hazard... Other then that went through pretty easy...
As mentioned earlier... A normal micro bus is around 1350 kilo grams... With mine full of fuel... Water tanks full... Fridge in... Solar panels, awning, 2 batteries... Etc etc came in at 1700 kilo... So she's on the heavy side but can be loaded to 2200kg as per the gvm so not to bad... No power house but haven't had any dramas climbing hills yet.... But then again that's coming from someone who is used to driving a 36hp most days...
twincab76 ·
Great job mate - I have a Jurgens Autovilla in Brisbane and yours is so much prettier - love it - have a great time with it.
Gary
NUG637 ·
gary i would love to see it 👍
twincab76 ·
Give us a call and we'll organise it Nugget - 0419798698.
Gary
NUG637 ·
well my week has been cut short but for a good reason (bringing a boat up from newcastle to brissy as of tomorrow till saturday). I was hoping to have this week to do valla prep on both my cars in hope that i could find a driver for my oval as well as that car is my favourite…. but can't sleep 2 in that comfortably like this old beast…. so looks like only the snail will be ready as i did its first big service today since building it and looking good 😎 only tightened 2 exhaust valves as they were on the looser side of the feeler gauge but could of gotten away without nipping them up…. changed gear box oil for abit of a flush and new fuel filter as the tank is still cleaning itself out….. good times! checked cv bolts and the big old axle nuts and none of them budged greased the from end again and check over everything…. so I'm feeling confident with this thing now… its been my daily since rego and have had trouble free driving 😎
done a few lengthy trips around town (over an hours driving with traffic etc) and the highest the oil temp has gotten is 180F which from what i can tell is a good sign. this is still without an external oil cooler… 😎 the trip to valla should be a good test….
can you tell I'm excited!!! 😀
LUFTMEISTER ·
😵💫Safe journey Nug.👍 See down there. Cheers 👍
hellbugged ·
😎
.... A-frame for the oval next!?
Mr Bubble Head ·
Just read this post from start to finish ,great work miles it's a credit to your skills and perseverance. It's a shame I'm not making Valla to see this. Just make sure you steer clear of those spotted quolls 😉😉
NUG637 ·
Well we just arrived home safe and sound after our week off for its maiden voyage to valla and back... Over 1000k's and the only trouble I had was a loose bell crank linkage this morning and 2 out of my 3 dash light bulbs blew on the way home tonight.... Other then that this thing didn't miss a beat and it atracked a lot more attention then what we wanted and some points 😂
A solid 65mph the entire way home through torrential rain for 6 hours with 2 stops 8)
dangerous ·
👍
NUG637 ·
Back on track with doing a few things to this befor we call it finished 8)
With little time to do anything other then making sure the snail was machincaly sound for valla I wasn't really happy with the stance but was hoping the back would come down after being loaded but not a chance. The rake wasn't "the look" I was going for. One more spline on the rear and trimming the bumpstops has leveled it out nicely with a mild drop all round and still a reasonably nice ride 8)
Next step I think I'm gonna cut off the front bump stops.... If I don't bin them completely I might turn them abit and weld them back on to stop the tyre scrubing on the tubs....
matberry ·
Nice one Myles, I'm sure I wasn't the only one but I sure loved seeing the Snail. Well done on the reliability too 🙂
NUG637 ·
Thanks Mr berry! Judging by this picture you enjoyed your ride in it to 😂😂
[/URL]
Scottkombi ·
Looks loads better all levelled off
matberry ·
Cool mate, dressed for speed and drinking hi-octane Coka-Cola.......cool ride
h ·
👍
I had a quiet gander at Valla..
excellent workmanship and in all honesty looks like it rolled off a prod line..
nice one mate !
I'm sure people would line up for orders 😉
NUG637 ·
well after returning from valla a few things went down hill with my grandmother passing and having to move out of her house as we were the cre takers while she was in a nursing home, so now we call the snail home, yep we are gypsies :smile grin: parked up on mum and dads property until my brother gets married and we leave on out trip in november… or maybe december if we need more $$
anyway after taking the advise of a few people i class as experts, i dropped the oil after valla and went to a thiner oil. i was using penrite HPR30 20W-60 and now dropped to penrite 10w-40 fully synthetic. Gonna drive up the north coast this weekend so will see how it goes with the thinner oil…. some people report lower oil temps with the thinner oil which will be interesting even tho i haven't ever had temp issues.
finally got a second 120AH house battery as the entire nation was out of am-tech batteries after i got my hands on only one... :roll: mounted it and wired her in last night…. we lasted the valla week with solar panels and short runs without ever running out of power with only one battery so should be ample what we need.
with the start battery on the opposite side
another job off the list….
also my dells arrived this morning…. they look rebuilt (gaskets) but defenly not "bolt on and drive" like advertised. Dog hair and grit all through them… but they look in pretty good nick… fingers crossed they perform like people say. Will pull them down and go through them thoroughly
Now i just need to jet them and get my head around dual 2bbl carbs. If anyone wants to school me on these I'm all ears otherwise i will figure it out like i usually do. 8)
Pumba ·
Nug how did it run with the 35 PDSIT carbs,i have been thinking about buying a set to put on a 1600 im putting in my oval.
cheers shane.
NUG637 ·
They aren't that bad... I fiddled with the jetting and stuff and
Pumba ·
They sound like they might be worth looking into.
NUG637 ·
They aren't that bad, they got us to valla and back which out a hitch and plenty of local driving. A little fiddly to setup and the linkage isn't the best but I guess you get what you pay for as they are the cheaper ones on the market. Mine might be forsale if I can get these dells to work. I pulled down the dirtiest off the two and it was caked with mud... Not just abit of dirt... I mean no air, no fuel getting through the galleries blocked with mud.... Nothing I shouldn't be able to sort out but have sent the seller a dirty email and left bad feedback as they were advertised as rebuilt and ready to bolt on and enjoy.... Full of shit! That's the trouble with buying site unseen....
Luckily no corrosion and everything seems to be coming apart really easily... Including the butterfly's which I thought would be a bitch!
Even the only new thing wasn't installed properly.. To say I'm annoyed is an understatement, I thought I would need to go over them but not to this extent...
vassy66T1 ·
That's a shame 😬
Give me a yell if you need some help getting them sorted.
I've had some practice 😉
NUG637 ·
Marcus, I might hold you to that. Would love abit of a guide once I got them on 👍 think I could work my way around them but would be comforting to have someone with abit more knowledge 🙂 just picked up some new butterfly shaft bearings this morning. Also bought some bi-carb to clean the carbs and carb cleaner to flush the galleries... Just trying to get my hands on a gasket kit locally not looking good.
Pumba ·
Let me know if you want to sell the 35 PDSIT carbs.
cheers shane.
NUG637 ·
i will do shane, will get these dells dialled in and ill get in contact with you.
NUG637 ·
Pat K wrote:
NUG637 wrote:well old mate off the samba has tried to play me for a fool. Definitely not "bolt on and enjoy" you cocksmoker [-X
Went to the local pool shop and bought a 10L bucket of bi-carb soda to blast the hell out of these bad boys with our home made soda blaster (air gun with a glue nozzle taped to it, then poked into abit of fuel line to make a vacuum) and this one has come up micky mouse!
just to show half the venturi blasted the other half not
then soak the carb in water to dissolved any bicarb left in the veins
lovely!
now you can see the 5 holes in both the idle circuits, not mud!
also picked up some new bearings from our local "bearing services", so these babies should be nice and smooth!!!
volksfan ·
Hey Nugget, I'm new to this forum & have just read your build
from beginning to end. Sensational work on so many levels.
I checked out your snail last weekend at the Wynumm show,
& thought it was a resto of an existing 60's/70's Kombi based motor home.
So imagine my surprise to find your very entertaining build thread,
& discover that it's all brand new & bespoke. Can't wait to see it again
& check it out now, knowing more of what you've gone through.
Full credit to you👍
NUG637 ·
thanks mate 😏 sure you'll see me around
NUG637 ·
Rebuild kits arrived this week... Gonna change my air bleed jets and then il bolt these things on (next week)
But with a big trip planned this weekend and driving up the great dividing range I thought it would be a good idea to try get an oil cooler working after the last ordeal with the empi one...
Rhett hooked me up with a rather cool oil cooler and sorted me with some fittings to make it all work 8) top dude that one!
Cleaned it out and mad some brackets to make mounting easier... Bolted it up last night 8) and plumbed it in befor the filter just incase there was any dag I missed while cleaning it out....
Topped up the oil thismorning and started her up while I had an extra set of eyes and not a drop 8)
Will be interesting to watch the oil temps this weekend to see if there is much of a difference... Even if there's not the extra oil capacity make me happy
😂
donn ·
Your not concerned about how low the oil filter is hanging ?
NUG637 ·
it'll smash 1000 other things before it smashes the filter…. thanks for your concern tho.
matberry ·
I'd be concerned that that filter is a cheap Ryco, get yourself a German filter Nug, otherwise, good work buddy 😉
Oh, and the cooler should ALWAYS be before the filter, esp when running second rate filters.
NUG637 ·
😀 thought you might tune in about the filter. I plan on getting my hands on a few german filters...
I may have learnt the hard way with putting the cooler after the filter earlier *doh* sometimes learning the hard way is the best way.
Thanks MB 😎
NUG637 ·
Made it up and over the great dividing range without a hitch... Slowly but surely!
The cooler has dropped my operating temps by a minimum of 10f I would even say more as the ambient temps have started getting warmer since valla I'm stoked!
Pulled up in kenilworth which is up the mountain range on the otherside of maleny... Very pretty countryside with grassy green paddocks and big mountain ranges...
matberry ·
Looks like Kenilworth homestead, a great spot on the Mary River. Not "that" far from Hillbilly country....I got a swag of good filters here mate 😉
NUG637 ·
You are smack on!
Depends what we end up doing sunday and what your doing I might run some moonshine through hillbilly country and give you lot a yeeeeeeehaaaaaaa!!!
matberry ·
cool mate, be here Sunday arvo, feel free to give us a yell (or a yeeeehaaaaw)
roverv8bay ·
G'day all. looking at the filter location do you have mudflaps. as the steel in a lot of filters leave a bit to be desired a rock could easily puncture it. just a thought. talked to you at Valla along with a few hundred others. I followed your build almost from day 1 very impressed with every big or little bit of work you did on SNAIL.
ernie
ernie
NUG637 ·
NUG637 wrote:
well a few weeks have passed while waiting for rebuild kits to arrive so I've been making magnetic fly screens which are now all done bar the hatch as thats got me a little stumped….
rebuild kits arrived the other week so been piecing these back together….
installed new butterfly shaft bearings and set the butterflies etc…
cleaned up all the jets they came with and decided to go with what people were saying and trying the 30mm vents as its within the desired size to my valves (rule of thumb is venture's 4-6mm smaller then your intake valves) tho going to 28's might help in torque down the road… will see how they run. all the jets seems on the fat side which can be better then lean to begin with but again will have a play once i get them running…
set my floats to 5.5mm closed and 12.5mm fully open, put all new "o" rings and fibre washers on all the jets and a new gasket and pump diaphragm, they are all like new! hoping they run pretty good straight off the bat cus I'm running out of steam with this idea after cleaning out truckloads of dirt and wasp nests
this weekend I'm hoping to get them on and hopefully running… fingers crossed!
other then above we have had some cracking weekends away in this thing… covering nearly 500k's on the labor day long weekend 👍
NUG637 ·
Got the dells on over the weekend... First weekend without the misses for a long time and I have never had such little time to play vw's :cry:
The dells went on super easy and started up first kick once primed, had a lean pop on number 2 but blew out the idle circut again and reseated the idle screw and it seems to have fixed itself... Very easy to tune... No so much the black magic I thought dbl barrels would be 8)
Dialed in the linkage last night and fiddled with a few things befor running out of time for a test drive yet again... But it's on the cards for this afternoon. Think I might book it in to get tuned by matt berry if he has some time, just need the jetting done as I don't have an afr reader and I would just be doing it by guesswork and it could get expensive...
But so far I'm please... It idles really smooth, the induction noise sounds awesome and even the exhaust note has changed....
A little video below... Doesn't show a hole lot but you get the idea...
hellbugged ·
👍
vassy66T1 ·
Sweet!
No black magic required 😂
NUG637 ·
Holy moly! There is no comparison from the dual solex's to the dells... Fuck me a completely different car! The solex's have been trouble free... A little fiddly to set up but these dells shit all over them in performance and ease of adjustement. It's running supper fat in the top end but I have ordered some new jets today and looking for some 28mm vents if anyone has any they want to part with?
Here is a video of the first drive! I'm in love with my "new" car!
hellbugged ·
You end up with some velocity stacks on there?
NUG637 ·
Sure did!
Bizarre ·
Dells Rock!
as usual - nice work 👍
NUG637 ·
Man ive been crook.... I haven't been bed ridden sick in over 3 years :roll: and it killed me cus I had all this cool shit laying around while I felt like I was dieing.
Al hooked me up with some 28mm venturi's for the dells and I got some more jets to suit.... Mean while I was mid way through fitting my vintage speed exhaust... They really are a nice kit and I think I made it more difficult for myself with my modified moustache bar (to clear the full flow oil pump) which I had to modify again to fit the exhaust... I also decided to go the flange version so off came the heater boxes to have flanges welded on... With still being abit crook and a few hurdles I wasn't in a great mindset and did a few things ass about face but got there in the end... Absolutely stoked with the sound and performance! Sweet Jesus... Would love to have this engine in a beetle... These last two things (carbs and exhaust) have changed this engine immensely 8)
Have booked it in with Matt berry to get it tuned with an afr reader to tell me where I'm at with jetting etc.
Also got some pics of the magnetic fly screens we made... We did all windows bar the very back window and so far work Great.
Under 2 months befor we leave... Gotta get a few more jobs ticked off the list 8)
vassy66T1 ·
Fabulous mate!!
So stoked you went down the Dells road and a decent exhaust.
PorscheKombi ·
hey mate, I love your build. I have just read both this and your KCW thread as I cant get enough of it hehe. You are so close now to the start of your adventure!
I'd love to see some completed interior shots when you get the chance.
Also, any links to other snail conversion threads you know about please let me know... I've caught the bub...or is it snail 😂
NaFe
NUG637 ·
hey mate, yeah getting close now… 39 days i think….
i don't know of any other build threads to be honest… someone posted a link to one on kcw but thats about it?
will get some interior hots later on… i thought we had some up?
Al hooked me up with some 28mm venturi's so last night I found the time to swap them over from the 30mm's .. Along with changing my idle jets from 55 to 60's and my mains from 132's to to 115's...
Had to test drive it sitting on a plank of wood as the seats have been dropped off at the trimmers to have a number done on them... The springs poking me in the ass got abit over rated... Should have them back on Tuesday... Then it's going up to Matt berry's to be plugged into the afr reader and see where I'm at with the jetting 8)
Love the sound of the "dell whistle". It pulls like a tractor now 8)
NUG637 ·
Went and picked up my seats Last night! 2 day turn around is awesome! Replaced the broken springs, new foam and custom covers 8) performance upholstery have done a great job..!
whacked the seats in at 9:30 last night and drove it home for the first time with the new set up (carbs and exhaust) and i couldn't wipe the smile off my face! honestly if your looking for that little bit of pick up on your 1600 go dual dbl barrel carbies, a HUGE difference….
the seats look like they belong…. just need to work my ass groove into them now 👍
vassy66T1 ·
👍👍
adlbeetle66 ·
👍👍
NUG637 ·
Big old thanks to matt berry for fine tuning a few things on the snail. Went from 170 airs to 180 and tweaked my linkage and mixture scews 👍 but an even bigger thanks for the ride in bluey! My god that was fun! 😂👍 I was probly smiling/giggling like a school girl! 😂
Wasn't as nice of a trip home with the easterly that blew in... Causing me to take up 2 lanes most the way home... But the snail ran on song 👍
matberry ·
😂 Glad you enjoyed the trip into town, Blueys little 2 litre tends to surprise most occupants... 🙂
It was a pleasure to help on such a fantastic vehicle today. The Snail drives beautifully and is a total credit to you Myles.
NUG637 ·
Thanks mate 😁
vassy66T1 ·
Excellent
The airs would have opened up the top end a little and helped with the progression.
Wish I was driving around in a car with Dells on it :-/ ... might take Trish's Dormobile for a run.
vduboy ·
Love your build mate. You have a good set of skills there! 👍 What was the reasoning behind the smaller venturi's? Is there a formula used for figuring out the correct size when we use exotic carbs on our old german machines? I know I have seen a few guidelines for selecting mains and pilots..
I'm still learning alot to but from what i have learnt There are a lot of governing factors... Your engine size, heads, valve size, cam and General driving needs/goals... for my application I'm running stock valve heads (very mild porting and nice valve grind job) with an engle 100 and the 74mm crank which all scream torque. I could go bigger vents if I wanted more top end but would loose my low end torque, the next thing that would limit me tho is my engle 100 cam and then maybe even my heads as I would struggle to make any usable power over 4500rpm deeming my bigger venturi's almost useless and having a very sluggish feeling engine.. With 28mm vents it brings the torque curve lower down through the rpm range but in turn may steal abit of potential top end that the 30's may have given me. I don't drive this thing much over 110 where its really comfortable so I'm happy with where it's at. And being a heavy bus, having the torque curve lower down the rpm range Makes it super drive able. I think matt was pretty impressed feeling the little 1699cc push my 2tone bus along 🙂
vduboy ·
Awesome link modnrod thanks for that. I basically want the same thing out of my buggy motor so was going a similar direction. Thanks for going through all that Myles. The webers I plan to put on mine will be a big improvement over the kads I have on it now, and was thinking of going with traditionally small venturi's for the webers. I'm pretty sure my kads only have 28mm venturis on a 1916. Look forward to seeing more about the snail!
NUG637 ·
matt brought it to my attention that i missed the cylinder head tins…. they often get missed as aftermarket heads don't come with them.
This is the first 1600 based motor I've worked on and never knew they came with tins under the heads…. always made a conscious effort to put the under clinder tins on but i dont recall ever seeing these on 36ers? anyway spent the afternoon pulling the sled tins off and fitting these tricky little suckers in…. job done! not the best picture but its proof
😎
matberry ·
👍👍👍
vassy66T1 ·
Terrible picture 😏
vduboy ·
NUG637 wrote:matt brought it to my attention that i missed the cylinder head tins…. they often get missed as aftermarket heads don't come with them.
This is the first 1600 based motor I've worked on and never knew they came with tins under the heads…. always made a conscious effort to put the under clinder tins on but i dont recall ever seeing these on 36ers? anyway spent the afternoon pulling the sled tins off and fitting these tricky little suckers in…. job done! not the best picture but its proof
😎
Ill second that, I nearly missed the ones I put on the bosses KG motor.. but I think it saved the manufacturer 25 cents a head.. 🤪
NUG637 ·
Shana has been wanting to take bikes on our trip to make seeing the area abit easier and cheaper. Got some brackets laser cut to make a start thanks to Foulcan and also a huge thanks to Tom for leaving the bike rack here for me to use
Had to make it very easily/quickly removable if i ever needed to get to the engine bay in a hurry, so decide to make it hinge out of the way.... in hindsight i probably should of made it hinge to the passenger side so it was off the road if we were pulled over but not to worry
decided on a nice snug fit of 2 pieces of pipe to act as a pivot/hinge. Kept it a little longer for more support when swung out the way...
Ended up using a nice thick bit of right angle to locate it into it closed position and used a hitch pin to lock it in, nice easy removable item but had to put it in an easily accessible position. Clamped it all down really tight when i welded it and drilled the hole, so its a tight fit with no room to rattle or clunk *thank god*
Had to modify the bike rack to suit shana's 60's girls bike with the lower step through frame. Abit of Cut and shutting to make them sit reasonably level when mounted to the rack. With My bike only, i can get it to swing nearly 180 degree's but with shana bike and the basket on it, i can get just over 90 degrees which is more then enough to get into the engine bay.
Abit of rattle can enamel and this bitch is done!
Addressed a few minor issues while i was working under the rear end to.... pulled off the exhaust and fixed a few small leaks that i had looked past when i first installed it and also fixed a kinked breather hose... no matter what i tried i could not stop it from kinking... Matt let me in on a little tip to put an early carb return spring in the hose and it will stop it from kinking and still allow it to bend. The spring is just big enough to not fall through into the tappet covers to.
feels good tho get all these small jobs out the way 8) the count down to when we leave it on
hellbugged ·
Sweet
Noticed the police down here hassling people with bike racks that hinder sight of the number plates... Even those with cardboard "number plates" added to the rack. Not sure about qld , but you can purchase mini plates from the roads authority here to have hassle free touring with the bikes on the back. Apparantley they need to be illuminated for night traveling too
Yeah I just purchased my "accessory plate" for the bike racks which is just a smaller copy of my actual plate. As far as I'm aware qld don't need it illuminated for night driving tho? My actual number plate can still be seen... Just..... The accessory plate has the reflecting background to... Guess I'll just take it as it comes... If we get hassled for no light I will Chuck one on 😎
hellbugged ·
Too easy...... Thought you would be tuned in to it all.
NUG637 ·
thanks Daimo 👍
h ·
👍 good work mate!
to my limited knowledge it's just as u said an accessory plate not for permanent use so it should be ok 😉
NUG637 ·
Santa dropped off a few luxuries for the snail... One being a 12v tv which we were gonna do without but since it was a gift I'm sure we could put it to use!
The tv itself is crazy lightweight but the adjustable wall mount bracket was crazy heavy... So a few speed holes and it dropped 2kg off... It all counts
Mounted it for viewing on the day bed and from our sleeping bed above the cab. Wired it all in myself (electrical is my weakest link) and nothing caught fire... Winning! Mind the mess... Midway between packing and worksite
Also got a 12v lavazza coffee espresso machine! My life is complete!
nils ·
Beautifully built jalopy there NUG,!! I just cant believe you still have a type 1 motor an the back.
HappyDaze ·
Nice set-up there, NUG. 👍
May I suggest you put some sort of 'steady' near the top of the bike rack...even occy straps would do the job. Eventually you would lose the lot, due to 'working' back and forth.
Believe me, I know [ I am the 'MAC' in MAC-RAC ]. 👍
NUG637 ·
nils wrote:Beautifully built jalopy there NUG,!! I just cant believe you still have a type 1 motor an the back.
Thanks mate, Why is that? It runs great! The 1699cc has plenty of torque to get this baby moving and up hills... From what I've read type 4 motors tend to run abit hot and there is no way in hell you would see me going any kind of water cooled... I'm happy as Larry with my choice of engine... Befor going the dual dellorto's I kinda wished I went the 1904 Route (90.5 p&c) but that just cus the old carbs where choking it down so much...
Yeah I have thought about the bike track fatiguing... The weakest link is the rack itself... All the brackets and everything are 10mm and I have confidence in them.. But the off the shelf "rack" is my worry. It doesn't seem to move a lot under normal driving conditions but it's something I plan on keeping and eye on regularly
oldturtle22 ·
Looks great mate.
Finky ·
what a masterpiece!
kombivw ·
Whats next event yr going too ?
Like to see this one
Willie ·
kombivw wrote:Whats next event yr going too ?
Like to see this one
Me too....
Will it be at the Nationals this year?
PHAT BUG ·
Nugget and Shana have started their round OZ trip and are currently in Tassie.
They have limited internet access, but I'm sure once he gets a chance Nugget will update the thread with tales of their travels.
NUG637 ·
Wow, this thread has got away from me, sorry team, some of you may have seen on our Facebook page "Vw Snail Trail"
Well on the 15t of January we left on the trip we built this bus for... A lap around Australia. The afternoon we left, We were driving through Logan where the temperatur was being displayed on one of the buildings reading 39°.... Fuck it was hot! Bus was running at 215f which was great for highway temps on such a hot day...
Pulled into Burleigh for the night where we free camped *thank you* and got up extremely early to hit the beach! Backed in... Cooked breaky then went for a bike ride from one headland to the other befor going for a swim! Awesome day!
That night we drove down to a free camp on the tweed river... Was a nice spot but the mozzies got crazy at night... Not the best solar shower we have ever had! But the price was right...
Another early morning and we thought we would go to fingal for breaky and a swim... Started up.. Let it idle to warm up and off we went... Only 5 minutes down the road we can smell some sort of electrical burning... Pulled over and had a look... Couldn't see anything so drove a little more befor the genny light flicked on and smoke started pouring out of the alternator... It shit a bearing! The same alternator we had to do a tone of work to just to get working straight out of the box... It was way to early to be calling people as it was 6am NSW time so 5am queensland time. Luckily it was on a nice spot on the river. After having breaky and searching the forums it was time to make some phone calls and thankfully Al from Das Resto picked up the phone and was on his way with a new one! Again thank you so much!
After a trail fit to make sure we were ok we waved Alan off and proceeded to bolt this sucka together... As I had to have carbs, linkages, breather box and fan shroud all off... We started her up at 2:30pm after cooking in the sun all day... Even with the awning out it was stinking hot! But we got the job done and headed straight to dreamtime beach at fingal... Lovely spot!
Then continued to head south along the coast where we pulled up in a pet friendly caravan park at Wooyung for $28 a night unpowered. Just across the road from the beach
NUG637 ·
A huge thanks goes to Dion and Bree for given us a driveway for the night in coffs, Was cool going for a spin in the oval and catching up 8) we really enjoyed our night.
Got to see abit of Coffs I had never seen befor and some cool cars to!
Cracked the hatch and watched the boys surf... Also the only time it didn't rain the entire time we were in Coffs. Rained all night and all morning so we thought fuck this and drove and drove till it stopped raining... Wanted to stop in at south west rocks but was raining so hard we missed the exit so kept on until Forster where It seemed to let up! Amazing place to!
Thought we would pull up on the beach to make dinner
NUG637 ·
we spent a few days in port Stephens as it beautiful through there and on our last night there we got caught in a crazy localized storm which had hail bigger then golf balls. It hit while we were fast asleep at 2:30 in the morning... I can't explain how hard and fast this shit came down... The rain drops were travelling horizontal and so was the hail... I normally love storms but that was really frightening! When I started the bus to try escape it abit... I took off the handbrake and went to to reverse and it started rolling forward and not slowly... And if you've ever tried to push this thing you will know that's not and easy task...
Pretty bummed about over the back window... The driver side copped it abit to, but not like the back did...
This is not where we parked when the storm hit but there is shit everywhere!
This was a real downer on our trip but we have now gotten over it. This car was built for this trip and this is part of the adventure. Plus cus I built I could fix it if I ever wanted to. I let insurance know but havent made a claim so they also have it on file if I ever want to get it fixed/get paid to fix it myself.
NUG637 ·
Shana has been doing a heap of the photography on the sites which can be seen on Facebook along with detailed events etc just search "Vw snail trail"
Had to get a picture early on in the piece of the big prawn at ballina!
Pulled over near byron at a roadside fruit stall
A quick shot with dions crazy OG single
Soldiers point - Port Stephens
Our camp at Nelsons bay - port Stephens
Our camp at Anna bay port Stephens
Hyams beach near Jervis bay, holds the Guinness world record for the worlds whitest sand... The glare was killer!
Wollongong light house
Breakfast at Kiama
Stopped at a general store that's more of a cafe in Tomakin and the owners and staff loved the van so much they took a ton of pictures then insisted on coffee and cake on the house! Went back the next morning and paid for our breakfast as a thank you.
Cooking dinner in Guerrilla bay
And our neighbors for our stay in Potato Point
NUG637 ·
Also did a I of a write up on how the bus in running on facebook....
Also With clicking over our first 1000miles the other day, I Thought I would update on how the snail has been running. Just a recap on the motor (1699cc) with a 74mm (small stroker) crank, engle 100 cam, stock sized Mahle piston and barrels, stock sized valves with cleaned up ports with a 3 angle valve job fed by twin 36mm dellorto drla's and breathing through a vintage speed exhaust with an in-out hd oil pump with external filter and cooler.
We left brisbabe on a 39° day and that's the hottest the bus has run on this trip, getting as high as 215f at highway temps.. on the highway we sit consistently on 60mph unless there is bad head/side winds throwing us around... sometimes even faster if I'm feeling impatient.
Since that day the bus hasn't gotten over 200f at highway temps... The closest It got was 195f climbing up peats ridge coming into Sydney then 185f climbing the blue mountains but then dropped dramatically to 160f when we stopped climbing... which is probly abit cooler then I would like but better then being hot. The blue mountains where cold and wet which also contributes I guess but On normal sunny days these temps of 190f are the usual highway temps and about 175-180f are the around town temps.
Its used roughly 500ml of oil since leaving Brisbane QLD to Batemans bay. With a known very minor rear main leak and a leaking tappet cover I feel that is still a pretty good effort... But can't remember what the factory specs on oil consumption were. Other than that we worked out its using somewhere between 13.5-14L of fuel per 100k's which is better then the 16.5L per 100k's I was getting when I was using the h35 pdsit's and empi extractors, not to mention the performance/ drivability gain since doing the swap to the dellorto's.
To wrap it up I'm super stoked with this little stroker engine combo. To push a 2tone bus + windage around with those figures is pretty impressive in my book! 8)
NUG637 ·
Loved these shots at the stony creek trestle bridge just befor lakes entrance...
NUG637 ·
Then from melbourne we shot across to Tasmania where we have nearly 2 months here.
Tassie is very special, lots of hills but nothing the 1699cc hasn't chewed up and spat out...
Coles bay with Freycinet in the back drop
Bay of fires
And with shanas birthday and easter coming up we got abit of a combined present from my side of the family! Fucken ace! Now we just need to work out how to get the paperwork done and get them down to us 😎
modnrod ·
Very cool!
volksfan ·
Extremely cool, on many, many levels.
Looks like you are truly "living the dream"
Those plates will be the icing on the cake.
Enjoy every moment
adlbeetle66 ·
Extremely cool.... Looks like you made it into the latest mag ❗
oldskoolguy ·
Great pictures and words. Thanks for sharing the trip. Happy trails!
oldturtle22 ·
Glad to see you're using it mate, have fun!
NUG637 ·
WELL, I can't believe after 12 months and 20,521miles (33025km) the snail pulled back into home after completing an entire lap of Aus. We owe a few people abit more then just a thank you and hopefully one day in the near future i can square up those favours but you have made this trip and absolute blast!
Here are a Few more shots of some of the special places we have seen in the last couple of months
time to get back to reality over these next few weeks and time to start saving for a house 8)
beetleboyjeff ·
Welcome home. Looks like you had a great time, and the snail looked after you.
hellbugged ·
Just awsome
Well done
Bizarre ·
"just awsome" aint even close
Where was the infinity pool shot - stunning
modnrod ·
Cool. Great trip!
NUG637 ·
Thanks guys, the infinity pool is at Lake Argyle in the north east of Western Australia
wombatventures ·
I'm finding it hard to top Awesome...
Brilliantly Awesome perhaps....
Great to hear you had such a top trip.
Willie ·
I'm still keen to have a look over this old girl. Are you going to the Nats this year?
baywindowbandit ·
Damn, what an awesome adventure.
baywindowbandit ·
Damn, what an awesome adventure.
HappyDaze ·
You can say that again !
lunar_c ·
I had a good look at this at the Perth day of the Volkswagen, great build! Congratulations on the trip.