OK well i guess its about time i pulled my finger out and started a thread on the conversion
ive already started one on VWKD awhile back but have been very slack keeping it updated so most of this is just copied and pasted from it
for those that dont know yet im putting an subaru EJ22 in my beetle and im one of these people who likes to do alot of research on things before i start especially something as big as an engine conversion
and i found that while plenty of people have done this and made threads about their car noone has really done an indepth thread showing whats involved from go to whoa so ive decided to do that for people that are maybe considering this conversion in the future
i'm an ex photography student so be warned you will be bombarded with photos but i find most interested parties generally like it this way anyway
Just a quick project overview without trying to bore people to much.
ive wanted to subi power a vw for a long time, i fell inlove with the idea after a local put an EJ20T in his superbug convertable back in the mid 90s
I do love VW motors, ive grown up with them and have knocked that many toghether over the years i could do it in my sleep.
i had planned on always keeping my Lbug pretty well standard and VW powered so in 2001 i bought my 70 beetle which already had already been fitted with a mazda rotary and was going to swap it over to an EJ20T as it was already setup for water cooled engine
well that worked...... i sold the car last year cos after nearly 8 years taking up valuable garage realestate i had only got as far as fixing the body and giving it a quick paintjob cos i was too busy always doing something to the Lbug and various other VW projects i dragged home
i hadnt ever given any thought to converting the Lbug, being an unmolested car i never had the heart to cut it up or do anything that was irreversable
but then i started looking into new 2 projects - Fuel injection and Air conditioning
looking at off the shelf EFI kits starting at $3k and even building up myself a junkyard kit wouldnt have left much change out of $1.5k, and mounting a compressor and setting up belts and pulleys on a vw was a hassle id already been thro once already setting up the supercharger so i wasnt sure what direction to take but i definately wanted to step into the 21st century and get away from carbs
after almost 10 years ownership i realised i would never sell it and should just make it into what i really wanted so all of a sudden a Subaru conversion was looking more and more attractive
i wasnt actively looking for a subaru engine, i was happy enough with my 1776 which is only 4500kms old for the time being but a guy i know locally had just bought a Liberty only to get a few parts from for his and the car was just sitting on his front lawn so i jokingly made him an offer and to my surprise he accepted
it had been a well maintiained old ladys car untill some kids decided to use the roof as a trampoline
it was still complete and drivable so not only could i see the engine running i was actually able to take it for a good drive
that was all it took to convince me, it ran like clockwork, none of the usual subaru lifter clacking or shaking around, the oil and coolant were nice and clean and the sticker on the firewall showed the timing belt was done only 3 years ago with a quality Dayco belt and best of all no oil leaks from the engine, only abit of auto trans oil around the back of the engine and a bit of residual shit around the rocker covers
I was told it didnt use any oil either but we'll see, it certainly didnt blow any smoke
for people considering going down this route the best advice i can offer is if you have the room and resources get a donor car as apposed to buying the engine and bits
main reasons are: everything matches. Subaru changed things on a yearly basis particularly ECUs and more often than not parts are not compatible
ive heard horror stories of people buying engines from a wrecker and the loom has been taken from another vehicle and doesnt match the engine
there are also lots of small fiddly parts seprate to the engine that are needed but can easily be missed
it often works out cheaper to, a whole running car can be bought rusted or damaged for as little as $400
you may pay around $1k just for an engine and loom from a wrecker that u cant hear running and maybe a mis match to, plus compression test figures can be fudged
pulling the engine out isnt real difficult but the wiring is a big job and also very delicate and time consuming, wreckers have bad habits of just cutting wires and breaking things being rough with them etc
and you can also recoupe costs selling off uneeded stuff from the car and maybe get some cash for scrap with the shell
I went the EJ22 for a number of reasons, the main one was fit
theyre almost identical in dimensions to a 1600 so theres no body cutting needed except for 2 minor sections of the seal lip cut off the valance in either corner to clear the timing belt covers
you can even leave the valance attached and a few people do but its no biggy to remove and acutally makes life a hell of a lot easier, even with vw motors
the quad cam motors like EJ20T need basically the whole bumper mount area of the innergaurds removed to fit which i wasnt prepared to do
you need to move the gearbox forward 2" unless you want to cut whopping great holes in the valance, gaurds and decklid for the timing belt covers to stick out which totally looks like ass and i dont think engineers would be real impressed by it either plus the rear firewall and parcel shelf area need cutting out for turbo and charge cooler fitting
Ian was telling me at warwick his bug is getting incredibly hot inside from the heat of the turbo sitting in the parcel tray area
theres also significantly more cost involved and they love eating gearboxes, a gearbox to handle the power would cost more than my entire EJ22 conversion will
yes, an EJ20T would have been nice but my bugs a cruiser not a race car and in my case the cons out weighted the pros
EJ22 are widely regarded as the most bullet proof subaru motors, they easily make 300,000 to 400,000KMs with no attention
theyre very common, from 89 to 98 they were used in libertys and the engine itself was unchanged in that time so can be swapped.
only minor details like single port exhaust outlets which i think started with OBDII in 95ish which just means another exhust is needed and the change from hydraulic lifters which is only an internal difference
cos of this there cheap too, replacement engines can be picked up easily from $500 and low KM jap import motors are cheap to
and power, 100KW standard with plenty of scope for improvement and a low boost turbo setup would make for one torquey engine
theres a turbo EJ22 bug getting around VWKD thats allegedly got 300hp
i have looked into putting one of my blowers on, someone on aus subaru has fitted an SC12 on an EJ22 but in a bug there just isnt room to do it
other things like already fitted with A/C compressor, high output alternator, full self diagnostics and far smoother and quieter than VW motors will ever be are just bonuses
I also want this conversion to be nice and neat to, not something that looks like a bunch of junkyard parts slapped in the arse of a bug in someones backyard after to many beers
Joel ·
Stripping the Donor
one nice sunny day back in march (I've forgotten what those are like) i went back up and we stripped the donor liberty of all required parts.
i must have been to full of excitement (or dread) cos i forgot to take my camera with me, which im really quite shitty about cos its one of the most important parts knowing what to take and how to remove it
engines come out fairly easily just unplugging a couple of electrical connections, fuel lines, radiator/heater, AC and power steering hoses, throttle and cruise control crap and the lower cross member mounts oh yeah and exhaust system
then just remove all the bell housing bolts to remove the engine
however he had a nice shiny new engine crane so we took the engine and gearbox out as one which ended up a god send as when we got it down on the deck and unbolted they were well and truely stuck toghether
i dont think they'd ever been separated before and it turned out the culprit was a little locating lug on the side of the bellhousing so getting them apart still in the car would have been a nightmare
after lots of swearing, WD40 and gentle prying with a screw driver they came apart
it wasnt much extra work doing it this way, just d/c the front CVs, rear tail shaft, linkage thing and a few other mounts and electrical
that was all pretty straight forward.
The Engine as removed
along with the engine here are some of the other critical parts to get from the engine bay
these are all parts that more often that not arent included when an engine is bought seprately
Air box with Air Flow Meter
altho the only part thats required is the actual AFM
Ignitor which is mounted on the center of the firewall
charcoal canister with mounting bracket and the little non return valve. this isnt needed for the engine to run but is required for emissions purposes
i also grabbed the fuel filter mount and all the A/C parts even tho i would be replacing the drier, hoses and the condensor has seen better days
OK the loom-o-doom.....
here was where pics are really needed, its removal was epic to say the least, its a good 5hours plus work
i'd read about its removal on US sites but turns out RHD cars are worse yet again
only the left gaurd on LHD cars has to come off but with RHD its both front gaurds needed removing and the ENTIRE bloody dashboard
then the main engine loom goes thro the firewall right down behind the heatercore and A/C evap which meant they need removing to
there were 4 main looms in this liberty and im assuming most subis are the same
i kept 3 of them:
the critical one, the main engine management loom:
parts in the top right corner are all redundant equipment like the cruise control brain and pump, auto tranny brain, duty resistor etc
the ECU, fuel pump, ignition and fan relays etc were all part of it and were mounted behind the dash, it sent 2 looms to the engine bay, one thro the middle of the firewall and another under the Left front gaurd
this was the other main loom,
i didnt really know it at the time but it doesnt actually have any engine related parts except for the alternator connections which could just be cut off it so it probably could have been left in the car which wouldnt have required the right gaurd removed
it has the main fusebox under the bonnet with a big loom feeding all the lights, fans, indicators etc then goes under the Right front gaurd into the car and has the main interior fuse box
there was another loom that run back to the rear of the car obviously for all the rear lights, fuel pump, speakers etc, so i just left that in the car
and finally this is the dash loom
i only grabbed this as i kept the liberty dash cluster which i was thinking of grafting into one of the Lbug dashes i have laying around
As i wanted to adapt the A/C system it had all the controls for it and lots of outlet vents, plus other things like electric mirror controls, fog-lights, demister and hazard switch and the speedo has a built in Vehicle Speed Sensor which the ECU needs
but also my donor car being auto you can see it has the ugly P for pass, D for drag, R for race, etc icons down the middle which means i would want another from a manual
so for now i gave up on that idea, plus ive already got a full range of gauges in my bug anyway
but Neil on VWKD did this with his split and it does look awesome
subaru parts network can be frustrating trying to order parts thro
their systems work off VIN numbers so if you dont have that its quite often you'll get- computer says nooooo......
so if possible record the VIN number of the donor
i took the lazy way and just kept the compliance plate off mine
im sure they'll look at me crossed eyed when they ask for the vin and i hand them the compliance plate
Joel ·
So with all the donor parts sitting in the garage i decided not to jump in too quickly and instead begin planning out the conversion and start gathering parts
i got one of seagulls new 200mm adapter kits (thanks again mate)
the aftermarket clutch scene is alot better for 200mm type1s than the 215mm type4 clutches that alot of them use
also i already had a HD clutch on my 1776 i wanted to reuse as it was only 4500kms old
Ebay and various car forums have been invaluable for buying parts at really good prices
the donor rad was there but i found that it was just to wide to fit neatly in the Lbug spare wheel well so i began looking for replacements.
brad used the EJ22 rad in his Lbug but it sat up very high, i still wanted room to chuck a spare tyre in if needed.
on a front mounted rad, with metal lines under the car you get free cooling thro conduction so the rad doesnt have to be as big, also the long lines from engine to front gives increase coolant capacity
i spoke to simons (humpty) brother mark, hes got a notch that has an EJ20T thats been in for something like 10 years and his rad...... a tiny little thing from an early model honda civic
Even in 40c WA summers it has never over heated, he also puts it down to the conduction thro metal pipes
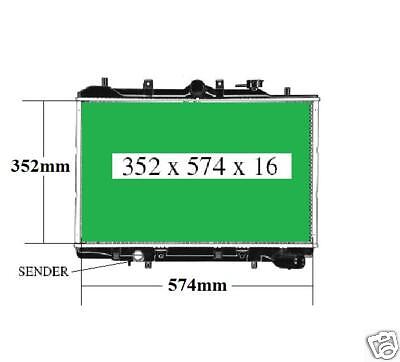
I ended up getting this one which has been reconditioned and in execellent nick off ebay for only $20
its from a B6 mazda engine so its fairly common and is perfect size for a Lbug wheel well and the hose spigots are also right size
i tried to show the scale against a 17" rim and tyre
it also has a sender in the bottom for cycling the fan on and off as the temp gets up
EJ motors have a sender in the coolant manifold that switches on the fan and many use and swear by this
all well and good but my take on it is the water coming out of the engine will be hot yes, so the computer turns the fan on.
by the time its run thro the pipes up to the front its shed a bit of heat, then going down thro the radiators sheds most of the heat then back to the engine even more heat gone
so i can see potential for the ECU to be over cooling it and the thermostat constantly opening and shutting
by using this sender instead if the coolant is still too hot coming out of the rad then it will turn the fan on so to my way of thinking the temp differential between leaving the engine and returning should be smaller but we shall see
Copper is one of the best conductors out there so ill probably run my lines in that plus its so easy to work with
its an expensive option which is why radiators arent made from it anymore but i worked for years in the the refrigeration game ages ago and can get it cheap thro old work contacts
Ive also got a brand new 14" thermo fan that was bought for the roof top A/C condensor on one of the tractors after i took out a low branch and smashed one of the blades off
i had an aluminuim header tank and surge tank tigged up by bloke up the coast who does great work at very good prices
as well you can see the new rad cap and some of the 3" silicon hoses for the intake i got
genuine Bosch VL turbo fuel pump for $51
brand new pod filter for $12
this is the fan belt needed when the powersteering pump is removed
lots of EFI hose
i did get the header and cat from the donor but they really are a shitty design and as i would be making a custom system up i prefered a better starting point
so i picked up a stock EJ20 forester/imprezza header
you can see it on the left is much better basis to build something from than the stock EJ22 obscenity
ppl have made good systems for bugs using the EJ22 header but i was after something abit more elegant and better flowing
so i was gonna need a cat as the EJ20 header didnt come with one
i got this hi-flow catco one brand new off ebay for $50
i checked up on the catco US site and its worth $279US new so im cheering on that
Joel ·
The Little EJ chariot
Before i started doing anything to the engine i needed to make it easily movable so one of my first tasks was to make an engine trolley
EJ22s are only supposed to be 25kg heavier than a 1600.......
i may have a rooted back but i can still manhandle a 1600 up onto the work bench
but this bloody thing.... i nearly had a hernia lifting it off the trailer with the old man
taking off the powersteering pump and A/C compresser shed abit of weight but it was still a heavy little f'ker
me being a stereotypical farmer means im a shocking hoarder of all things unvalueable especially scrap metal
but times like now it really pays off
"Little Red" here was a birthday present from my grandparents a long time ago.
After 14 years of faithfull service it stopped getting it up so to speak but i never chucked it out
so it went under the grinder and very kindly donated its wheels
also an old farm gate and some scrap RHS resulted in a height adjustable trolley that can move the engine around with enough room for "Big Red" to get under the sump and lift it up
the height adjustable stands sit under the exhaust ports
Joel ·
Fitting the Adapter kit
as my engine came from an auto meant it had this big ugly torque converter on the back
theres 4 bolts holding it to the flex plate
these face the engine so theyre acessed thro a hole in the crank case on the top left which has a rubber plug over it
you can see here the plug sitting on top of the torque converter and a 14mm ring spanner was the only tool that would get down there without ripping off the intake manifold
with the 4 bolts out the torque converter is just pulled off the crank
be aware it maybe full of auto trans fluid
with it gone i was left with just the flex plate bolted to the crank
its easily removed by undoing the 8 bolts
i locked it from turning by sticking 2 large screwdrivers thro the holes in the case that line up with holes in the flex plate
and gone
in the circles you can see on the left is the locating lug
the one of the right was the little bastard that stuck the engine and trans together and i didnt notice at the time but it must have stayed in the tranny.
im not overly concerned, youll see why when i bolt on the adapter plate but they're the same on all EJ motors and even the EG has the same ones as well
at this point i was fairly chuffed with a few things
as you can see the crank seal is bone dry no leaking and its also a brown OEM one
the subaru world has the same problem as VWs with inferior quality aftermarket seals out there (coloured black like shitty brazillian ones for vws)
also the oil separator (big plate inside the bellhousing) is metal and not leaking either
alot of models had a plastic one which leaks badly and can go brittle with age
this is also the case with the thermostat housing, some of them where made of plastic but luckily mines a metal one.
i think the added weight of long coolant lines connected to them could cause a problem with plastic versions
i did notice too that this engine shows all the signs of never being frigged with
the factory sealing paint is still undisturbed on all the adjuster screws for the throttle adjustments, idle control valve, throttle position sensor etc
my poor engine is abit dirty in couple of spots tho
the bellhousing has a bit of nasty stinky ATF around the bottom, the powersteering pump has leaked abit where i disconnected it and has left residue in that area and all down that side of the sump and the rocker cover areas are a bit weepy but all in all im more than happy
the bottom 2 engine studs needed to come out
that was easy as just locking to nuts together and unscrewing them out
it seems nearly all of the threads with the engine are 1.25 pitch
which isnt handy when nearly all VW is 1.5pitch
i got caught out with the flywheel bolts too,
seagull told me to use the stock subi bolts as they're very strong
problem tho is the bolts for a flex plate are alot shorter and wont dont stick thro even far enough to get started.
No worries i just went to the bolt shop and got some nice new high tensile bolts to do the job
Problem..... the subi bolts have a round shoulder on them and a little 14mm head, the aftermarket bolts i got had bigger 16mm heads and would do the job fine but i couldnt get a 16mm socket down the flywheel bores to get them done up
that was solved by going and seeing Bernie at subi village and getting some manual EJ bolts
the adapter plate came with cut outs for the 2 locating lugs
but i hit on an idea thanks to my missing one
as an extra bit of insurance i put bolts thro them as to help bolt the adapter plate to the engine as even tho it only had 4 bolts like a vw its 25kg heavier
you will have to excuse this shitty pic as it was late one night in the middle of the floods we were having and it was cold and miserable and my camera lense was obviously fogged up.
I didnt take as many pics as i meant to, not that theres much to it,
adapter bolted up, followed by the flywheel then clutch went on like a normal vw and clutch plate aligned with an old input shaft, something every VW tinkerers should own if they dont have a purpose made alignment tool
Joel ·
Removing the Valance
this was a job ive been planning on doing for a long time even if i hadnt gone the subaru conversion
my black beetle had the valance removed and was fitted with one of John Shermans at volksconversions fibreglass ones which are just a mould of a factory 75 onwards EFI type with no peashooter cutouts,
it made engine installation and removal so much easier and faster, i was able just roll a vw motor straight in on a trolley jack and bolt it up without even jacking the bug up, it also meant that extractors, heater hoses and breastplate didnt even need to come off as per normal removal and also with stock metal ones the gen pulley nuts and vac advance cans cans just love catching on them and ripping up the seal in the great drop down
heres a couple of pics just showing how it looks and the fit
so when i saw john last i grabbed another off him
by this time i'd dropped my 1776 engine out as removing the valance is something that cant be done with the engine in
i have seen ppl fit EJ22 motors with the valance left in place but from what i can see the only way you would have enough clearance to get the engine to clear it on installation would be remove the timng belt covers and take off the 2 cam gears and even then before it could be done requires some trimming of the seal lip in either corner for clearance
first things needed doing are removing the back bumper, brackets and both rear gaurds
cleaning up the flange down the gaurd mounting surface shows up all the spot welds
with a 4mm drill bit i started drilling out the welds trying not go all the way thro but it was inevitable that it would happen on a few
theres no pattern to the welds, it totally random and all over the place, u can also see in the first pic theres a tack weld right near the top, the other side didnt have this yet its the original valance thats never been worked on
there was also a few spot welds around the decklid rubber area but again only on the left side, guess the apprentice must have done the right side.....
inside the engine bay theres a long tack weld that needs grinding off just below the engine bay seal lip and more spot welds up the inside flange
once all those are broken it should slightly break loose
last thing left to do is cut thro the welds on the seal area
john told me to use a hack saw and i gave that ago but it wasnt quite cutting it so to speak
so out came mr grinder with one of those really thin wafer wheels and made light work of it
and now go thro all that again on the otherside and with some wriggling, grunting and swearing it should come free
once the gaurds are back johns valance is just aligned with the decklid and bottom line of the gaurds then holes are drilled thro it so that the bottom 2 gaurd bolts hold it in place
a quick dummy fit
Joel ·
Trial Fit
so it was time to put the little chariot and big red to work
engine slid staight thro the old valances domain and straight into position like it meant to be there
i quickly nipped up the nuts and ran into a problem most ppl in this situation face
the mounting bolts holdign the adapter plate to the engine were hitting the gearbox mounts and stopping the engine from pulling up flush
ive swapped my gearbox cradle and mounts for the earlier pre 72 type as there a much better and stronger design so i dont know if this would be an issue if i still had the cruddy late model parts but it was easy fixed,
out it came and a big drill bit (think it was 3/4") just chewed out a abit of rubber
not much at all, wasnt even the depth of the bolt heads but enough that when i tried again the engine pulled up flush beautifully
dropping it down off the jack soon revealed why shortened sumps are necessary with subi engines
my bug isnt exaclty a ground scrapper but it is fairly low
somehow part of one of my old engine cases snapped off once where the tinware sleds mount bottoming out and ive destoyed plenty of exhausts over the years,
ive tweaked the torsion bars that many times that its somewhere between a 1 and 2 spline drop, around 3.5" lower than stock so ive established i may need to lift it back up abit even with a shortened sump
Back up ontop all looked pretty good
the throttle body was hard up against the firewall
some people cut away the firewall for clearance but i plan on making up an elbow to mount it like this so the firewall remains untouched
the stock oil filler was sticking up just abit to high for the decklid to close, also easily fixed just by shortening it
putting the stock valance back on also showed where the slight bit of trimming was needed for the timing belt covers to clear
after seeing how well the stock valance fitted i've decided to modify it to clear the covers and bolt in place same as johns would have
i dont want to alter the cars appearance to much and also ive come up with an exhaust design that will have to outlets that will exit the cutouts same as stock
im not sure how the strength would be affected of the fibreglass one with 2 big cutouts added,
black bug had only one cut out and i wondered about its how good its strength was, you can see in the pic of it a tiny crack line going up from it
Joel ·
i had originally planned on chopping down the loom myself
ive been messing around with auto electrics for the best part of 15 years plus working at a couple of car audio/air conditioning places has given me pretty good knowledge of it all
however stripping down the loom, tracing all the wires, discarding the unused stuff, shortening and lengthening various wires then rewrapping it and tidying it all up was gonna make $250 money well spent to have Al at AM auto do it for me
even someone wiht my experience in auto electrics doing this for the first time i reckon would take a minimum of 15-20 hours which is just something i cant face going thro at the moment
cram ·
great thread Joel!
tagging along
trickysimon ·
Any pics on how you mount valance back on?
Joel ·
havnet got that far yet
will be pretty simple tho
where the cutouts are to go around the 2 gaurd bolts ill weld in some sheet metal with holes thro to pick up the guard bolts
and also the flat flange in the engine bay i will reinforce and put some bolts thro the inner gaurd
that should keep it firmly in place
Euro_67 ·
Nice work Joel. Looks like a good fit, not too much cutting. Can you reverse the inlet to face the rear and avoid the elbow ? Im sure I have seen it done before.
Mr I ·
Awesome read. Will have some questions for you if we go down this road. Hope you don't mind.
Cheers,
Scott
alien8 ·
Lovin this thread and great work so far mate!
This should be a sticky.
Joel ·
Euro_67 wrote:Nice work Joel. Looks like a good fit, not too much cutting. Can you reverse the inlet to face the rear and avoid the elbow ? Im sure I have seen it done before.
yep sure can and i intend on doing that to as it dramatically tidys up the engine bay and also simplifies the coolant path
it was another point i forgot to make
subarus are a like VW engines in that they're very symetrical
the 3 manifolds, exhaust, intake and coolant can all be flipped around to face the other way
Scott ask all the questions you like, thats the reason i started this thread
pete wood ·
damn that sump is low! I'd be getting the thinnest one I could if I were you. CustomVeeDub make a very skinny sump. Be worth every dollar and I know they aren't that cheap. Coz if it's cheap it will leak. BTW, I agree with you re having the loom ct down by someone else. Best thing I did.
Joel ·
that wasnt even settled either just straight off the jack so it will probably drop another inch
initially i was gonna chop my sump down myself and add some wings to get some capacity back but im starting to think its alot less hassle to just get mine shortend by someone like COR or sharpbuilt, I think even Al might do the them
Joel ·
for those people that were interested in the removable valance, ive put it all back together with the valance sitting in position the gaurds clamped it in place when they were tightend down very firmly
if u diddnt notice the joint had been cut thro in the seal area next to the taillight it could pretty much pass for undisturbed
poor old girl hasnt been to a show since valla last year, i took the mainstreamer to warwick, actionday, goldcoast show, dubs by the pub and mardigrass
so i wanna take it to klubfest on sunday
people are starting to question its existance
1303Steve ·
Hi Joel
Don't give my son any ideas with your car.
When I fitted the Wasserboxer to my 1302 I kept the car running as long as I could before dropped the air cooler out, I fitted up the cooling system etc while still driving it around.
Steve
jzk25 ·
Loom is ready Joel. Give us a call tomorrow and we'll get it in the post.
Joel ·
now theres the best news i've heard all week
cheers Al
will give you a buzz tomorrow
Joel ·
1303Steve wrote:Hi Joel
Don't give my son any ideas with your car.
When I fitted the Wasserboxer to my 1302 I kept the car running as long as I could before dropped the air cooler out, I fitted up the cooling system etc while still driving it around.
Steve
I'm sure David's already been corrupted by fathers blue project in the garage 😂
i know i would be
im not gonna take the plunge and cut the wheel well till the rumble of a subaru boxer rattles the neighbours windows first
the bugs a fair weather toy so im not relying on it as a daily, otherwise i would do it the same way
flat_iv ·
Joel,
Why dont you rotate the complete intake around 180 degrees? I can email you a few pics of my 2.2 in the back of my ghia with the complete intake rotated 180.
flat_iv
Mick058 ·
like this???
Jak Rizzo ·
Hi Mick
Is your intercooler bolted to your Fire wall? if so, are u not worried about the motor moving but the intercooler bolted solid thus putting strain on the intercooler piping & joints?
Juat a thought
regards
Jak
Joel ·
i must have been in noddy land when i answered waynes question the other day
the reason i didnt flip the intake is the A/C compressor is staying so the alt would need mounting on the left side where the powersteering pump was
which means a custom bracket would need fabbing up
abit more work than making a simple elbow for the TB
rocknrob ·
pretty simple brackets Joel...
[/img]
[/img]
l
rocknrob ·
cover it up with the ironing board...
[/img]
leaves room in the middle for you know what...
[/img]
Joel ·
i like your thinking rob,
im thinking of the same project later on down the track
i really do have to say a huge thankyou to Al and Miles who did a fantastic job on my loom
it came back about 1/10th the size of what i sent to them all clearly labled with a nice simple instruction sheet
even on a shoe string budget i would still recommend it and anyone who did it themselves says for that money its well worth it
about a month ago a nice old bloke with a subi powered buggy came and checked out my bug as he also has an Lbug hes planning on converting. he had the whole engine swap inthe buggy done by Al and Miles and also speaks very highly of them
Miles sorted me on the rad fan wiring
its best of to use the ECU control, main reason being the computer Idles the engine up to compensate for the load of running the fan.
on the subject of radiators i meant to say earlier in the thread i found when trying to find a rad that fitted theres a few sellers that give the core dimensions and outlet sizes on ebay which is really handy, thats how i found that my mazda rad would be the perfect size:
this is the stock ej22 lib rad, you can see how the core alone is another 100mm wider and the end tanks are on the sides not top and bottom which would add another 100mm as well so thats why it was just to wide for my application
most people would think the B6 rad is too small but thing to remember is 6Meters worth of copper lines under the bug in road draft are gonna shed nearly as much heat as what the rad will
most ppl that fit big rads have over cooling probs
ian.mezz ·
Yeah then sizes should be OK as my EJ20T bug Radiator is
600 x 360 x 16 cross flow with custom side tanks so that the hose fitting are in the best spot
One little fan in centre of radiator that comes on when the computer tells it to 😂
Joel ·
The Intake
well yet another pouring wet weekend down here in sunny australia...... :smt022
the old man says its real pommy weather.... so if any of you are planning a nice trip here to aus to escape it might as well stay at home :smt016
i should be happy gives me a break from working so thought i'd get stuck back into DUB74L
i wanted to start on the intake
as posted earlier in the thread in the stock position the throttle body is hard up against the firewall and i wasnt cutting my firewall away to clear it
doing that would also mean fabbing a box into the firewall around it and building a new subwoofer enclosure so meh to all that
easier to either A. spin the intake manifold around as some have said above or B. make a throttle body elbow
this was the easier option for me as flipping the manifold means making custom alt brackets, rewiring the injectors, coolant sensors, etc oh and finding a belt the right lenght considering ive just spent $28 on a belt to fit the alt in the stock position made the choice easier
Custom offroad here in aus make a nice looking throttle body inverter at a good price too
its an easy option, the only reason i didnt go this way was their inverter is a full 180degree, i only wanted 90 as it makes for less visual clutter without intake plumbing sitting on top of the engine
i assume they do it this way so theres clearance under bus engine hatches and buggy bodys
so first thing i did was got a 2.5" 90 degree mandrel bend from the zorst shop
thats the exact size of the of the intake and TB once you remove it
i cut out a template of the bend from some scrap MDF i had so i could keep trimming it till i got a shape i was happy with rather than play guess work with the bend and risk ruining it by cutting to much
it was just a matter of cutting out flanges in 1/4" plate using the old gasket as template and welding it all together
i also ran a quick bead of JB weld over the top of the joints just incase there were any tiny pin holes i couldnt see
it bolted up nicely with enough clearance for eveything and plenty of room for the TPS plug to fit on despite how close it looks to the firewall in this pic
with that out of the way i needed to sort out the rest of the intake
this is the stock subaru donkey dick that goes between the TB and the AFM
it has a big port on the right side of the accordian section which is the the connection for the Idle Air Control valve
the ECU uses this to control the idle speed so it kinda needs to be there
all the smaller ports on the left are just all the PCV breather connectors, one for the case and 2 for the rocker covers
im not overly worried about these as i would prefer to keep the case fumes out of the intake and illl probably just run the bug pack breather box from my 1776 same setup as per a vw engine
my original plan was out of the throttle body a 3" 135* silicon hose, then a 3" 45* metal bend into which i was going to weld a spigot for the IAC hose
then a straight 3" silicon hose joing the 45* to the AFM
i had all the silicon hoses already but hadnt done anything about the 45* bend with the IAC port yet
then i hit on the idea of just using part of the original subi donkey dick as it was made from very tough, thick plastic which already had the port in it, was the right diameter and as a bonus it was that close to a 45*
so out came the hack saw
i already had a pod filter but hadnt got an adapter yet just so happened that a PVC downpipe fitting laying around fitted nicely
this will only be a temporary measure untill i make or buy a proper metal one
so heres how my intake looked all put together less pod filter
i will have to do some shortening of the hoses to get it sitting perfectly but that will come later on
but for now im happy enough i know it will do the job with a bit of tweaking
Joel ·
The Exhaust
i had made a small start on the exhaust system a few weeks ago but hadnt exactly dont much
i got as far as stripping the EJ20 header of its heatshields
this is what i had roughly come up with in my head
Lukey mufflers make a short stubby little box with 2 outlets alot like badly photoshopped quietpack here
i knew id have to shorten the headers abit but when i bolted it to the engine i thought the collector directly under my diff probably wasnt a smart move
so it was back to the drawing board there but anyway i went those 2 headers needed shortening as they hung even lower than the sump
it would be a chance to straighten up the pipework coming out of the base
so i did a bit of marking......
and a bit of chopping
and ended up with something a bit more practical
and welding back together
not going to win any prizes for best looking headers but still welded alot better than any EMPI piece of crap on the market
like most engine conversions this will be a temporary exhauast system, eventually ill buy a nice stainless steel extractor system and mod it to suit the bug
but for now this one will do
thats as far as ive got with the zorst at the moment till i can get some more bends
ill move the collector over to the side of the gearbox so its not underneath it anymore
im thinking maybe a bigger box is gonna be needed tho cos with no resonator only a single box its gonna be very WRX style droany but ill just have to wait and see how bad it is before i worry to much
Joel ·
i also noticed while i was under there that my gearbox cradle is starting to get a slight bend in it
you can see from the pics ive already swapped to an earlier model gearbox cradle as they're just so much better built
i went hunting for another cradle just to replace mine and found another earlier one but i also found an original 73 on one as well just to show the problem
its not the one off my Lbug bug, i think its the one from my red 75.
the later cradel was blatantly obvious cost cutting on VWs part
there is absolutely no substance to it compared to the earlier ones
you can see how bent and warped it is which makes the engine sit at funny angles and just weakens the rear end
any decent motor with enough torque can do this, it certainly wasnt an abused bug.
Richard at Vforce sells an aftermarket one that is based on the original earlier ones but made even stronger again
the extra weight of the subi is gonna play hell with my chassis forks
i had planned on making my own brace up but have decided its not worth skimping on something so structural so im getting one of Craigs Kafer bars 😎
Joel ·
I spent this arvo getting my loom ready to install into the bug
Al and Miles had already been thro and removed all the redundant wires so all that was left for me to do was postion all the plugs where i wanted them and insulate it all with corrigated split loom
they sorted out the A/C wiring for me as well
using the ECU to control the compressor as per the stock subi setup is better as it makes the engine idle up a split second before the compressor clutch kicks in and also cuts the compressor out if you floor it or the engine gets to hot
now rather than go out and buy the 300 different sizes of corrigated loom required and only end up needing small amounts of each i instead salavaged it from the main wiring harness i pulled out of the donor as it was all there in good condition with lots of assorted sizes
In doing this i can honestly say to anyone who is going to do there own engine management harness you will spend a good 10 hours just unwrapping electrical tape
those Japs truely didnt skimp on electrical tape
not only is the outside of the corrigated loom all wrapped up, once you get that off then all the wires are wrapped in it as well....
its a sticky, messy, frustrating... C U Next Tuesday of a job that i'm just glad i missed the worst of
but under the guidence of Dweezle the tabby i got thro it
you can see how much electrical tape resulted from just removing a few bits of loom, the whole harness is still wrapped in the stuff
while i did that i also extracted the alternator connections which are a part of this harness
theres 2 of them but they join up into one loom.... the main B+ connector with rubber saftey boot and a round black and orange plug with 3 wires
i cut them off with a good meters worth of wiring as im just going to splice them into the old VW alternator connections thro a terminal strip on the firewall
that way incase of unusual circumstances requireing me to refit a vw engine it will be easy to reconnect the electrical side of things
now the connections for the subi alt are bit more complicated than a VW alt
its an internally regulated alt which is where the small yellow wire comes in
it needs to be connected to the ignition circuit as its as a switch wire to turn the internal regualtor on and off
Im going to use my old coil wire for this, it will flatten the battery real quick if its connected to an constant power source
the black wire with the white trace is the charge light connection
so it can just be spliced into the existing VW idiot light wire
and finally all the large white wires can be connected toghther, theyre the B+ so they connect to the cars main power supply
the subi used 2 connected to the main B+ terminal on the alternator and theres yet another one coming from the round plug as well
luckily the 2 B+ are seprate wires so i got rid of one and as my bug only needs one B+ wire coming from the alt im just going to solder the 2 remaining together at the alt end
Now apologies to people with small screens.....
heres my reward for spending a cold wet afternoon in a freezing garage
I hadnt actually given much thought yet to the ECU/relays placement
most bug engine conversions just place them in the rear parcel tray area
problem in my bug is my subwoofer enclosure takes up the entire area and given that its the 4th box ive made i really dont feel like redesigning and making yet another
under the back seat on the left is the next nearest area
altho thats currently occupied by my 2nd battery
i can live without that tho
its just a leisure battery setup same as used in campervans cept mine runs my audio system at sound offs and shows so it can be run completely flat without running the main battery flat and it charges once the engines started
i'll get rid of it and make up a board to mount the ECU, relays, connectors etc like this to sit in the batterys place
im also going to mount the ignitor there as well
subarus have the ignitor mounted on the firewall in the engine bay but i'd like to keep it inside the car away from the elements
most of the vanagon mob that do EJ conversions all mount there ignitors in with ECU and ive yet to hear about anyone having dramas
Mick058 ·
Joel, they can mount bumpers too!
Enjoying the thread, looking good mate 👍
pete wood ·
mate, my ignitor is on the fire wall in all the elements and has never had a drama. the plug has a rubber seal on it so all is good. also, I've heard the ignitor gets a bit hot, so putting it in a spot where it will get air flow is better than inside the car probably.
btw, those factory headers are very strong. I've bashed mine on rocks and everythign and the sheilds have dings but that's all. I do wonder how well they flow?
BlueV2 ·
This is a great thread. Excellent info in here for anyone wanting to do a conversion. Great job Joel.👍
rocknrob ·
btw, those factory headers are very strong. I've bashed mine on rocks and everythign and the sheilds have dings but that's all. I do wonder how well they flow? [/quote]
Pete on the standard EJ22 they work very well providing good low torque. I built custom equal length headers which rev very freely but lost some of that bottom end...oh well can't have everything🙅
Joel ·
ill give the ignitor a go there and just see how hot it gets
as i mentioned b4 the subaru vanagon guys are boxing them into cabinants and containers with no probs yet so hopefully should be ok
before i had the slave battery there one of my amps was there and the heat that comes off them when u really work them is pretty intense
the guy i got my EJ20 header from had just switched it for a borla replica style staino header
he actullly noticed a drop in power right up till the higher rev range but didnt care as he just wanted the boxer rumble
rocknrob ·
Joel you might have noticed when you cut those headers they narrow down to about 28mm obviously for a good reason. I made my headers from some old water pipe i had lying around about 1 5/8 ID and its a bit big for the NA EJ22 in the heavier kombi but would probably work better in a beetle. I reckon 1 3/8 equal length would be perfect👍
Joel ·
yea i noticed the original EJ22 header off the donor really tapers down in the bottom
but the EJ20 header i got doesnt do it half as much
i reckon i could make an alright equal lenght 4into1 header up if i didnt have to run a cat
1303Steve ·
Hi
Silly question, would a WRX header bolt up to your heads, the flange looks similar.
Is there a mark on the stock headers where they miss match the head outlet? WRX headers are like this and apparently a bit of porting really helps there.
Steve
Joel2 ·
Hi Steve,
yea there is a mark but the gaskets have holes about 10mm bigger than the head and header so that doesnt help
yup the WRX headers do fit and a few people have gone that way with EJ22 engines. only reason i didnt is the headers look as though they are cast so cant be easily cut and shut shorter
good thing about EJ motors nearly all have the same zorst port flanges
only exception seems to be OBDII EJ22 which have single ports
well i was hoping for a start up this weekend
instead it has to go on the back burner for a littler while
isnt it just typical.......
you turn your back for 2 seconds and a sick and injured vw will appear in the garage
got a mates Sbug for a couple of weeks with a shitload of work to be done, my new other new car ive just bought needs some small jobs done before i wanna drive it and my mainstreamer has 11 days of rego left and i still need to legalise a few mods to get thro pinkslip
yeesh never ends with frigging cars.....
on a positive note tho i did make a start on brain central
As i mentioned earlier in the post im going to mount the ECU under the back seat where my second battery was.
as im not using the stock heater outlets it made sense to get rid of the heater junction pipe as its dead weight and taking up alot of space
and once its gone the bakolite tube mount thingy will be perfect for the loom to come into the car from the engine
now theres a fun job...
the bakolite housings need to be unbolted to get the junction pipe out
the bolts for them are in some nice little hard to reach places behind the torsion bar housings
not only that they can only be losened off not removed without lifting the body off the floor pan
so heres my board with ECU mounted and terminal strips for all the wire connections
i still need to make a rack for the relays
sits nicely in the floor pan
i also worked out once the VW regulator is gone the mounting holes for it are perfect for the ignitor bracket
regulators get pretty hot so i have no issues mounting the ignitor there
1303Steve ·
Who are you Joel2? Are you an alien that's taken over the body of Joel?
Joel2 ·
yea im the new improved better lookign version 😂
AVD is playing games with my profiles
which reminds me VWCOOL i cant read your PM
can you email me boosted_bug at yahoo dot com
cheers
seagull ·
Joel , make sure you run a few good earths while your doing that wiring.
Joel ·
cheers Neil,
i had a quick talk to Al about earths, hes got me all sorted
Joel ·
Well I guess people may have noticed the lack of activity in this thread
classic Joel tradition.... with the end almost insight i lost motivation
mainly cos i got a new toy/pet project that ive been too busy driving and tinkering with.
its not a vw so i wont go into details but if people wanna hazard a guess think 2 door hardtop coupe from the mid 90s class of "Orphaned Performers"
Ive also been stuck working on everyone elses cars so when i got a free moment working on mine was the last thing i felt like
and being upto the hard part of the cooling system was making it hard to get motivated
but i had a good look over Brads Orange Lbug this morning for some rad mounting and coolant line ideas which has re-kindelled my interest
so with a few spare hours this weekend i got back into and finished off my exhaust
Also a few weeks ago my Craigy bar turned up
i was too lazy to drop the gearbox so i just supported it with the jack and took the cradle off.
this allowed me to shuffle it to the sides enough to weld the back brackets
front ones are easy enough
and yes the underneath of my cars are filthy, its pissing into the wind trying to keep them clean
according to GPS and the car odometers its 0.8km from the farms front gate upto the shed which for the last 6 months has resembled a colin macrae mud stage more than a driveway
while i had the cradle off i took the opprtunity to swap it over as it was starting to get a bit bent with this much straighter one
formerly at home holding the engine and gearbox into a late 50s splitty i hope it doesnt feel inadequate now
my current bananna mounts werent in bad shape, i replaced them in 1998 and they had a bit of life left but it was the perfect oppertunity to replace them
and they're only $14 each
i use german OEM ones as ive tried the pretty red poly ones before and dont like them
now back to the zorst
i had already cut down the manifolds over a month ago but thats as far as i got
so heres what the EJ20 header looks like cut up and welded back together
i was pretty happy with how it fitted, it got the collector out from under the diff and didnt hang down to much
from the collector i wanted to run it in 2.25" with mandrel bends
so i got a 45degree out of the collector into the cat
i also welded a bung into this for the o2 sensor
a small amout of body trimming was needed to keep the cat outlet up nice and high
a 90 degree mandrel bend out of the cat and i could stick on whatever muffler i wanted
for now ive just welded on one of the staino cannons ive got lying around
just needs a dump pipe on it now
i doubt this will stay permanant as when it was on my celica everyone moaned about it being to deep and hurting your ears.
we'll see how it sounds first
im happy with the overall result
it doenst hang down too low or stand out at all
unless you get down on your hands and knees you wouldnt notice anythings any different
so all i have to do now is finish hooking up the rest of the electrical, run some coolant lines, mount the rad and fit a shortened sump
everyone i speak to involved with subi dubs says fit a Custom veedub sump, and after seeing a few im impressed
Brad showed me his alloy Bug@5Speed sump and they look neat but it only gave less the 2" raise is no good to me anyway
COR is good for 85mm and i need every bit i can get with my bug
i got a spare sump and pickup from the boys over at subi-village ready to send to be shortened
Joel ·
forgot to add you can see in that last pic ive done the trimming to my valance so it clears timing belt covers and sits down properly
i went totally overkill with what i cut off but as they say you can never have to much overkill
1303Steve ·
Hi Joel
Looking good, will it be on the road in 2 weeks?
I'm working flat out on the sons bug getting it back on the road.
Steve
Joel ·
quite possibly
but im not real keen on the idea of its first trip being 200kms from home till its been thoroughly soak tested .
ill see how things pans out
rocknrob ·
Hey Joel you are going great👍 yes lots of short trips to see what leaks etc...i had trouble with coolant hoses blowing off...with the radiator at the front the thermostat didn't open so too much heat and pressure...answer? no thermostat...heheh... better than cooking an engine😁
Joel ·
yeah the cooling system is my biggest concern
i was originaly thinking of going with one of those remote BMW/rover external thermostats on the hot side but a good chat with brad got me sorted
the subi setup with the bypass working correctly works fine even with the the extra looooooooooong coolant pipe runs
what are u usiung for coolant lines rob?
the main issue with no 'stat is the ecu uses coolant temp to dictate cold start enrichment to a degree
1303Steve ·
Hi
No worries Joel hope you can make it, its sucks going to VW events without a VW.
Give all your hoses a good re-tighten after the car warms up a few times, they will usually take a few turns.
The Subi thermostat is a 2 stage unit, so they cant be removed, just make sure your header tank is as high as possible.
Steve
rocknrob ·
yeah i should really have the thermostat back in for winter perhaps with some holes drilled in it...by the time i get around to it will be summer👍 coolant lines...heheh i had some 38mm stainless "lying around" and bought a couple of metres of pressure hose from the local hose shop for $20 or $25/m...had to flare the end of the pipes to stop the hose popping off😬
Baja Wes ·
What's this silly testing close to home talk. I drove my V6 Baja to Fraser Island not long after the conversion. Sure it would have been more convenient to be close to home instead of Fraser Island when I found out the cheap brand of kombi clutch plate will explode at 8000rpm, but it wouldn't have been the same exciting experience. Luckily the fragments jammed between the pressure plate and flywheel causing it to be stuck engaged rather than disengaged. Driving home from the middle of Fraser stopping, starting and changing gears with what was like a broken clutch cable wasn't that bad! 🙂
66BTL ·
This is agood thread was thinking of doing similar conversion
71-BEETLE-SEDAN ·
Hey joel,
i was wondering what gearbox you are running,
Joel ·
just stock Lbug
good thing about EJ22 is it wont break the gearbox any more than a modded VW engine
its the turbo motors that eat gearboxes
Joel ·
i can finally get stuck into this abit more often now as i finished harvest for this year on thursay which frees me up alittle
i must have been going soft driving around with a sick 1300 engine till it finally bit the dust on thursday
a drive in Daimos berg screamer and Ians VWRX (thanks again guys!) was the reminder i needed of how much fun a high power VW is
As a few people here already know the outcome of this weekend has probably changed the direction this project is heading thanks to me spending to much time in Ians bug and a little birdy whispering in my ear about an EJ20T that may be up for grabs
ill still finish the EJ22 off but it most likely wont be staying in for long
Mick058 ·
vvvrrrroooommmm -ppppchheeeeeee
Joel ·
hehe , yea your someone that now knows what im talking about 😉
Ians bug was a blast, can drive like a total stocker if you want it to then slam the noise pedal and it will quite literally throw you back in your seat
lets see how quickly i can burn out my stockpile of gearboxes 😂
Mick058 ·
seems we have the same box issue now too 🤪
Joel ·
maybe i need a swing axle bug
joshs 74 EJ20T bug has about 220hp at the wheels with a stock untouched gearbox that was almost out of oil and he doesnt exactly go easy on it 😂
Mick058 ·
this is true - see how lucky we get 🙂
Joel ·
i think we'll all be keeping Dave B gainfully employed for quite a while
DaveCarter ·
haha well if you ever need to get rid of your EJ22.................... I'm sure nag power will bring dad over to my side sooner or later LOL
Joel ·
funnily enough i said the exact same thing to him on sunday
DaveCarter ·
😀
hellbugged ·
oh you know you only came to Sawtell to suck in all the bad influences on offer Joel.....thinking about turbo now hey 😏
trickysimon ·
At least this temptation is better than the last one you had 😉
Joel ·
anyone know what it means?
havent had a chance to do any research yet
but i'll bet a left testical its probably knock sensor as mine has some cracks through it
trickysimon ·
Means you're not running any boost 😂
Seriously though congratz on getting it going, sounds fullsick hectic.
Whats the metallic sound when it first starts up?
Joel ·
ah yeah thats a bit of an ongoing contentious issue
its my flywheel and starter motor having intimacy problems
it sounds alot better than my crappy mobile phone makes out
Joel ·
damn i really valued that left nut
FAULTS CODES:
13 Cam Position Sensor or Circuit (TDC Sensor on Justy)
whats funny was when i first turned the ignition on to prime the pumps it was giving the everythings fine and dandy flash
was only after i kicked it in the guts that it changed
mights have to check the plug hasnt come adrift.
it was a pain to get at, i really need to dump that stupid chrome louvered firewall
STIDUB ·
ditch the shiny bits, it makes the zorst look backyard style :lol
Joel ·
you be laughter cracking at my zorst?
rightly so, its terrible at the moment, still needs a dump pipe fitted and a stealth black paintjob
i was worried it was gonna be too loud so the staino cannon wasnt gonna be permanant but at idle its no different to a stock liberty
even revving its just like a mellow WRX
ian.mezz ·
My light comes on all the time, I just drive the sucker. cause certain things don't stop the car its just for that emission stuff
Joel ·
cheers Ian, ill have a better look around it see if its just the plug or wiring not playing ball
anyway guess i better back track abit 😂
i havent actually worked on it for quite a while
still been flat out working and we had a death in the family recently so i spent a bit of time on it this weekend just to help keep my mind off things
obviuosly by the fact its now running ive got all my electrical in and hooked up
i think its a page back now, but i got my ECU mounted under the backseat opposite the battery along with various relays, fuses and a circuit breaker
heres how it looked before the subaru loom entered the equation
subi fuel pump and ignition relays ontop of the ECU still need mounting somewhere
I felt like a gynecologist feeding the subi loom thro the heating ducting
painfull but evetually got it through there
i was gonna need 2 other looms as well
one from the ECU to the front of the car for the fuel pump and fans and another from the ECU to the dash for things like water temp gauge, check engine light, tacho etc
i started by gutting the interior abit
poor bug looks like a theft recovery
it was also a good opertunity to clean up some of my birds nest wiring additions
check engine light and water temp gauge installed
the front loom only needed 2 wires but now was the easiest time to run a few extras
i pulled it all from the left over liberty looms
nice big 8 guage wire for the pump in the correct black with red trace and yellow for the fan
a few others there as spares
there was an empty hole in the kick panel area so i chucked a grommet in that and fed the loom through into the boot
same deal with the loom to the dash, only needed 3 light wires but i ran a heap of spares including a couple of big 8 guage wires
all tidied up and properly hidden along the sills this time
the other thing i had to do was lengthen the wires to the TPS due to the relocated throttle body
while i was at it i removed the stock liberty temp gauge sender and fitted the new one for my speco gauge
there was also a couple of unused vac ports on the manifold
in the liberty the small one is for the ventilation flaps as there all vacuum opertated and the big one is for the brake booster
theyre both 1/8th NPT so i removed them and chucked in some blanks i had laying around
but you could just do the old bit of hose with a bolt in the end trick if you wer'nt fussed about looks
1303Steve ·
Hi Joel
Looking and sounding good, so are going to drive it to Warwick?
Steve
Joel ·
Hi Steve,
yep fingers crossed, warwick is the deadline ive given myself to have it running by
i had a look today the cam sensor is all plugged in ok and wiring looks fine
it wasnt throwing any codes in the liberty before i removed it.
might have to do a homer simpson and put some tape over the the check engine light 😂
gotta love these engines,
last time it was running was march 21st when i drove the liberty into the shed and dropped the engine out
so prety much 6 months ago, and it started up first go and sat there idling smooth as the day it left the factory, not even a wif of smoke or the usual clacky subaru lifters
i was expecting it to considering i havent touched a thing on it except checking that it still had oil 😂
Klaus ·
pull the sensor out and see if there's any fine shavings stuck to it , my crank sensor has this happen occ and throws an error code.
Joel ·
cheers Klaus
thats a good possiblity with all the welding and grinding ive been doing
looks like a pain to get in and out
anyone know if its the same as the crank pos sensor?
they look the same
gerrelt ·
gotta love these engines,
last time it was running was march 21st when i drove the liberty into the shed and dropped the engine out
so prety much 6 months ago, and it started up first go and sat there idling smooth as the day it left the factory, not even a wif of smoke or the usual clacky subaru lifters
i was expecting it to considering i havent touched a thing on it except checking that it still had oil 😂
That's great! 🙂
I also found it a revelation that I could start the car, without sitting in it. Just reach in through the window and turn the key. No need to step on the gaspedal during starting anymore!! The CPU does it all for you.
Joel ·
Klaus, your a legend, i owe you a beer
i pulled the sensor out and it didnt have anything on it except a bit of greasy dirt but cleaned up and reinstalled theres no errors codes now just that steady world peace is restored flash
i mentioned early in this thread i was still deciding on what to do about coolant lines
being an ex fridgy i can get copper at cost price but only in 6m lenghts which worked out to roughly $24/meter
copper is one of the best conductors out there but its also ugly
anyway i decided a better option which has been used by many is just plain jane exhaust tube
at $5per foot its alot cheaper but talking to mum and dads neighbour who works at a plumbing shop led me there
for $45 i came home with 3m of food grade stainless steel 1.5" nice shiny tube
i honestly couldnt beleive it was cheaper than cruddy exhaust tube and looks 100x better
cooling properties will be better as well
anyway i took the lengths to a mate with a bender and we bent them up to sit in the sill channels on either side
this was how my black beetle was setup as well
it had hose clamps tucked under those funny body bolt washers to hold the pipes up
worked well for 13 years so im gonna do the same thing with this one
whilst still on the topic of cooling systems i made up some brackets to mount the fan to my radiator
the original mazda fan the radiator came with was one of those old 4 huge straight blade things that are noisey as buggery and could probaby be overpowered by a decent fart
this new one is one of those fancy "S" blade fans which are allegedly quiter and move a shitload more air
well everycar made after 92 that ive owned has had them so if there good enough for the jap manufactures i guess they must work
i actually bought it a couple of years ago
i took out a low branch with the rooftop A/C condensor fan on the tractor on and smashed a blade off it
i thought id try these new ones as tractor A/C systems have a huge job in summer time but ofcorse the mounts and plugs were all different and i couldnt return it
funny though hanging onto the old rooted one all this time payed off
i cracked it open for the magnets inside
this is my $9 speed sensor
im going to attach the magnets to the CV joint and mount the reed switch off the bump stop bracket
thats all the stock liberty speed sensor was
a reed switch and a couple of magnets attached to a disc in the back off the speedo
it had 5 magnets but its not of concern, it only uses the pulses to work out if the cars moving or stationary, or rolling to a stop
people have used these Gaurd reed switches before they seem to be up to task
also working off the rear axle instead of the front is better for dyno situations
its apparently not an issue with EJ22s but some of the later ones when on the dyno without the speed sensor turning go into limp mode and cut the revs to 4k or something
ElusiveStranger ·
Nice going Joel, glad you got the sensor sorted. It may have been a bit of swarf or just the grease stopping it picking up the proper signal
Joel ·
cheers Balders,
im not exactly sure what caused it, there was only abit of grease on it but ill see how things go, might be an intermittent fault
to be completely honest i was expecting a line up of error codes so its a bit of surprise to have none now as my wiring is a total birdsnest during these trial periods
anyway looks like im in for a weekend of welding again
got 7 meters worth of stainless tube all bent up ready to be welded toghether
1303Steve ·
Hi Joel
I saw this 1303 on the Kamei site, looks like it has a cut for the factory air con vents.
Steve
pete wood ·
mmm, hubcaps and crossplys.................... 👎
Joel ·
cheers for the pic steve,
i still havent decided what to do about it yet.
as you know yourself they just handle too differently without a kamei on
im pretty impressed with how gerrelts looks with the slots cut in it but i'm also gonna talk to a mate thats a fibreglasser and see if he can mould in a discrete scoop that is effective but doesnt look all ricey/transformer autobot style
sorry to the people that have been following this, ive just been to busy/tired/lazy to keep it updated
i have to sort through about 400 pics to finish off the rest
so is this thing gonna be ready for warwick??
im not pinning any hopes on it but i may be lucky
pretty much everything to finish it off is sitting here waiting
custom veedub have finished off my sump and its on its way and all my rad lines just need welding toghether
one area i havent really touched on in this thread yet is my fuel system
the subi requires 2x 8mm fuel lines, one supply and one return
i was halfway there already as i ran a new 8mm supply line years ago for my old blow through turbo setup and used the stock vw line as the return
it was no use in this case though as its only 6mm.
all i did with the original new line i put it was ran a rubber EFI hose through the tunnel inside a protective tube, so all ive done is run another of those
they enter the tunnel through grommets one on the master cylinder side and the other on the opposite side of the frame head
at the rear they exit the tunnel on the right hand side just near the gearbox nose cone.
if i did it over again id just run metal lines under the car with a protective gaurd over them.
alot less work, easier to service and work just as well
the stock 6mm fuel line will be used as the line from the charcoal canister to the tank as its also 6mm in the subaru
when i stripped the liberty i kept the mounting bracket and clamp for the filter from it and bought a new filter (part# Z348)
there not cheap but last 30,000kms
ive mounted it on the side firewall
you can see the couple of holes ive put in for the fuel lines and electrical to enter the engine bay through
ive left the tank as is for the time being
the stock 6mm outlet is feeding the lift pump adequately but i plan on taking the tank out and putting on one of my old SBug ones
they have a bung in the very bottom which is used to access the filter sock thats fitted over the outlet
they stopped installing these in Lbugs and started using inline fuel filters instead so mine doesnt have it
what im going to do is fit the Sbug tank and ive got a big 8mm barbed fitting fitted inplace of the bung just for abit better flow
ive reused the facet pump from my supercharger as a lift pump as its only done 3000kms so hopefully it will be up to the task
ive made up a bracket and im mounting it on some waffle pad to keep the noise down
we used to use this stuff to sit A/C outdoor units on
finally a use for one of those 3 million coil brackets i seem to have lying around
fit my Bosch EFI pump like a glove
now ill do a Lee so that people can understand the chaos that is my pump setup at the moment
now to get the return back into the main tank to save having weld the actual tank which is a real nightmare and dangerous job, i silver soldered another 8mm barb into the filler neck instead
only problem with doing it this way is you have to do it in situ as once the barbs in the neck you cant get it back through the hole in the body unless you make it screw in some how by fitting a threaded boss instead.....or crack out the tin snips like i did 😊
i dropped the engine back out today to do a couple of things
first was get rid of that louvered firewall and tarboard insulation
its amazing how much more room there is once they're gone
ive put in sound deadner on the inside of the car plus my sub enclosure acts as a big sound barrier between the engine and the cabin as well so it wont be missed
now cos ive relocated the thtrottle body the 2 coolant lines that run to it no longer reach
these work alot like pre heater pipes on a beetle, warming up the intake
doing a bit of reading on subaru forums as i thought in a warmer climate like here its not needed and some people have actually reported power gains by removing it
so all ive done is removed the 2 pieces of hose. once comes off the idle control valve and the other dumps into the heater/thermostat return hardline and joined them with a single piece
good quality EFI hose works well
also the purge valve hose to the throttlebody wont reach either
so i ran a new longer one plus ive also disconnected the original canister hard line from the purge valve and run a new rubber vac line which will go straight to the canister instead of through the solid line jungle which im going to remove once i get time to pull the intake manifold off
to give me abit more room for the coolant hoses while the engine was out i also trimmed abit off the the coolant manifold outlet
and finally a really important but often overlooked area is the heater loop
its VITAL that an unobstructed loop is in place with the 2 heaterlines as the thermostat
the subaru engines use a completely different thermostat setup than most mainstreamers as the thermostat is on the cold side of the engine
most cars have it on the hot side so once the water coming out of the block is hot the 'stat starts to open and circulates it through the radiator
with subis its after the rad on the cold side and the engine instead constantly circulates the water through the heater core and back to the thermostat
so as the engine heats ups it just "sips" the cold water as it needs from the radiator relying on the hot water coming back from the heater to control the thermostat so it must be connected and flowing freely otherwise you end up with overheating
Joel ·
Throttle body inverter......Take 2
i guess noone spied the f@@k up with my first one
all was fine and dandy till i removed my decklid stand offs and put the decklid back on stock
and the blooddy thing wouldnt open far enough cos it was hitting the intake hose 😊
would be fine if i owned a baja
the new one i made is pretty much exactly what custom veedub sell
save yourself the hassle and just get one of theres.
welding pipe to flanges sucks especially when they have such tight bends with limited access
definatley not a pretty as my first one but ah welll it can hardly be seen and has no leaks thats the main thing
all fits up nicely now and i can have a decklid spring again.... nothing like holding a decklid up with your head trying to adjust twin webers 🤪
i also made a new joiner piece with the spigots for the IACV and case PCV hoses as the 45degree one i cut from the subi donkey dick was the wrong angle now and i needed a straight
the engine wont run without these so ive made up a bodgy short term solution
i need it running so i can back it in and out of the shed. my driveways to steep to push it
its just 3" PCV down pipe with some home irrigation fittings epoxied in
i need to get some 3" exhaust pipe that i can solder some brass barbs into for the final product
Joel ·
DUB74L now availble in powered form
had a couple of hours spare this arvo so decided to hack my valance around abit
im not real keen on the idea of just cutting a big hole and glueing in some boy racer mesh as the valance loses alot of strength doing that and very rarely does it look good
for one of the rare instances were it does look good check out what Steve did to Davids bug when it was painted
for those that dont really know superbeetles, in the US air conditioning was a very common dealer fitted accessory so all superbeetles bound for the US market left the factory with valances that had vents for the A/C condensor like so:
Steve fitted one of these valances to his yellow bug and it cooled very well but at the moment i just couldnt face unpicking another valance as the front is alot more involved than the back so i figured i'd have a stab at making one similar, i had nothing to lose
gotta thank Gerrelt for the tip
all in all it worked out ok, with the bars still there the valance hasnt lost any strength.
ill eventually put my Kamei spoiler back on once i sort out what to do with it so it will be covered up anyway but it will do for now
luckily i still have abit of crystal white left so i gave it a quick spray job to stop the raw metal edges rusting
now i just have to brace myself and cut the rest of the wheel well out
ian.mezz ·
I started doing that only to find my valance was 1cm thick bog🥲
sso I went with the big hole.😂
Joel ·
my front valance was one of the straightest panel on the car when i got it till i barrelled a possum the size of a large dog hence the ripple in the bottom
they're normally the first panels to get crumpled
funny most yanks would give anything for a smooth valance like these and yets heres me turning mine into one like theirs 🤪
colonel mustard ·
I do like the idea of this for an external oil cooler.... kinda like hellbugged's setup.... just the oil change would be a killer. looks great though Joel. keep up the good work 🙂
DaveCarter ·
we just chucked one in mine colonel. No pics up yet but have a squiz at warwick
colonel mustard ·
mate, im gonna look at, take photo;s of, lay underneath.... your car at warwick. and most likely pester you and your dad for a few hours in conversational topics... 🙂
gerrelt ·
Looks very good Joel!👍
I'm glad I could help a little! 🙂
71-BEETLE-SEDAN ·
another question
The guys that did you wiring harness, where are they based and how much did it cost.
Joel ·
that would be Al and Miles at AMauto - amauto.com.au
when i stopped for lunch today mr courier man had left a nice present for me
these things truely are a work of art
alot better than anything i could have made
just look at how short they are
i couldnt see a thing i was doing down the paddock cos of the dust so i spent the rest of the arvo in the garage and finish sorting the engine bay wiring out
this is the standard bug engine bay wiring with the outter shield removed
being a 74 it has the externally regulated alternator which is the stuff on the left
coil power and oil light wiring in the middle
and the 2 on the right are part of the dealership plug in computer diagonosis system which is all now redundant
i had used them as wires for my tacho and oil pressure gauge
all the wiring for the EJ22 is part of the subi loom with the exception of the alternator which needs to be spliced into the vw loom
im sure i showed the alternator plugs earlier in this thread but its very simple
theres a main B+ (white) out same as VW, a warning light (Black/white) and a wire which needs ignition power (yellow), this turns on the internal regulator
without this it wont charge and connected to always live power will flatten the battery
i made up a new loom with the EJ alternator wires and connectors
i also ran 2 others, one for the oil pressure switch and another will be for my oil pressure gauge sender when i get around to fitting it
now rather than cutting and joining these wires to the VW loom i chose to mount a terminal strip on the fire wall instead
a few reasons for this
its so much easier than soldering wires together, allows for easier changes and finally if for some unknown reason i need to put a vw engine back in all i have to do is connect up this
connections are very simple. theres 2 big white B+ wires that come off the alternator, these need to be joined together and connected to the VW B+ which is the big red/white wire
for the regulator wire i just connected it to the old coil power supply
and the warning light i connect to the small red D+ wire as this goes straight to the speedo charge light
generator equiped VWs would be slightly different but if your undertaking the work yourself you should really know what the differences are anyway
oh yeah and the oil light and pressure gauge sender wires just connected as well
other thing i did while electrically speaking is the bracket for the ignitor with a little bending bolted up beautifully to the old regulator mount
the other thing i did the other day was hook up the throttle cable
i was determined to make this engine use the standard beetle throttle cable as i had an aftermarket cable for the dellorto on the supercharger and it was forever being a problem child
i used some thick walled 3/8" tube i had laying around to replace the guide tube that goes through the fan housing
it had to be thick walled as welding the stock vw one would have only blown holes in it as its paper thin
i bent up a bracket to weld to it that picked up one of the throttle body mount bolts
looks ugly as but its very sturdy
all the cruise control linkages of my throttle body went missing a while ago but it still has the pin that held the springs which was in the way
it was only a press fit and pulled straight out with some vice grips
now to use the standard vw barrel clamp holder thingy was simple, i just folded over a piece of 16 gauge sheetmetal, drilled a hole through it for the barrel to fit then silver soldered it to the throttle body arm
again looks ugly but it works
a few important steps when doing this
firstly is to get the pivot point measurement the same as a vw carb
a 34pict3 had a 24mm distance from the center of the butterfly shaft to the center of the barrel clamp so i had to set it up the same
if you have this measurement smaller then the pedal will only go down about half way before the butterfly is wide open
and on the other hand to big and the pedal will go flat before it fully opens so u wont get WOT (wide open throttle)
this is important for a few reasons other than performance
Now when Joel gets impatient and decides and nail it to overtake 3 cars and 1 truck right before a blind bend , the TPS senses WOT and kills the A/C if its running and sends the computer into closed loop mode for max power and also WOT when starting sends the ECU into flood clear mode
and secondly the angle needs to be just right so it pulls evenly from fully closed to wide open
if its pulling on to much of an angle at any point it only places excess stress on the cable and linakges
anyway it all worked out well, theres less effort required on the noise pedal than a vw carb even though the subi throttle has 2 springs
i just need to tweak with my cable where the barrel clamps it as can be seen here im not quite hitting the WOT stop screw
ive made a little bit of a start on the cooling system
heres a sneak peak
im using hose clamps tucked under the body mounting bolts to hold the pipework up along the sills
mighten't be the pretty solution but it worked well for over 10 years on my black beetle
71-BEETLE-SEDAN ·
I see the firewall is back on, or did you take them pics out of order?
Joel ·
nah its off for good
once its all done im going to detail my engine bay and repaint the firewall
alot of this thread is all out of order, i just add bits and pieces to it as i sort through the pics
71-BEETLE-SEDAN ·
okoay yeah thought so, just re read and would have needed wiring to get engine error codes duhh
ian.mezz ·
that don't look rite all neat and tidy 🙅
Joel ·
well i cant out class you with power 😂
ian.mezz ·
Joel wrote:well i cant out class you with power 😂
yeah i've been driving it around for 12 months now. And I thought i'd give it a treat with some subaru upper engine cleaner and it feels like it's got an exta 20hp🤪😂 So it realy does do something 🤪
Joel ·
just put 2 more bottles in then and youll have more HP than josh
colonel mustard ·
a clean engine is a happy engine. looks good Joel. can't wait to see it. 🙂
Joel ·
got its first genuine part this weekend
there was only one coolant hose left that hadnt been replaced, the waterpump return line and being the original hose it felt pretty crispy when it was squeezed
speaking of , for all the flexible rubber hoses i picked up some really common ones so that if i ever get caught out the back of whoop whoop needing a hose chances are the local redneck garage might have half a chance of helping
giving my poor bug a bogan element are 2 early commodore top hoses for my header tank in and out
an EA-ED falcon top hose and a bottom hose from a XG falcon ute/panno
i mounted my header tank first so i knew where the hoses had to run too
i mounted it on an angle as it makes for easier hose routing but also it puts the cap in a nice easily accessable place
ive welded up the stainless solid lines as far back as the gearbox.
the supply side just needs a 45 degree bend to go from the chassis fork up over the axle to the rubber hose to finish it off
and the return side its a similar situation execpt it needs a dogleg bent up to come out around the exhaust manifold and into the thermostat housing
im pretty stoked with how the hardlines worked out
at the back i havent lost any ground clearance at all as they actually sit higher than what the floor pans do
even down the sills theres no risk of them hitting anything as they hang down about half and inch lower than the floor pan rails
at the front is where theres usally clearance problems especially when it comes to superbeetles
theres the control arms, tierods and center rod to get passed as the radiator is mounted in front of these
most people go underneath all that which is fine if you have 4WD ride height status as they need to hang low enough that the suspension on full droop is no where near hitting them
that guy in NZ with the white EJ25 powered SBug in one of the VWMA runs his underneath and had a mishap where his rubber hose hit the road and it dumped all its coolant
ive got topline maxx struts on my bug which are already on the highest setting so unfortunately theres no way of getting it any higher than it already is so playing it safe ive decided to take another route and go over all the suspension instead
heres were the falcon top hose came in
cut in half it made for 2 nice elbows that are just a fraz past 90degrees which was needed as i put a small kick down on the pipe to get it under the bulk head
the 2 elbows are only hanging down about half an inch lower than the center of the floor pan bulk head but because they're inline with the wheels there no chance of them hitting anything
from there they will run up and across the bottom of the wheel well to the radiator
Joel ·
oh yeah a couple of other jobs i got done
the speed sensor is finished and mounted
and ive made up the permanant IAC intake adapter thingy
1 scrap of 3" exhaust
1 19mm brass barb
and 1 12mm spray boom fitting thats been rattling around in my ash tray for months
all silver soldered together
painted and installed
and finally all the PCV hoses needed hooking up
its alot like the aftermarket breather kit setups for vws
the 2 rocker covers are ported, they're connected together and also the case PCV is Tee'd into the hose as well then into the air intake
Klaus ·
nice one with the coolant lines . I've got 9 flex joints 😂 in the wagon
ian.mezz ·
thats the easy part getting the coolant lines to the front, now you have to get em past the moving suspension.
STIDUB ·
pull ye finger out & get it drivable before the weekend, you spend way too much time on here/msn etc
colonel mustard ·
STIDUB wrote:pull ye finger out & get it drivable before the weekend, you spend way too much time on here/msn etc
Irony.....
Joel ·
STIDUB wrote:pull ye finger out & get it drivable before the weekend, you spend way too much time on here/msn etc
that aint gonna happen and you know why
klaus, i was trying to make as minimal joints as possible but still have a system that has some flexibilty
we'll see if it works out
the other thing ive been doing when welding up the solid lines is putting a couple of spotwelds on the ends
this will stop the hoses blowing off by giving the hose clamps something to tension against
ElusiveStranger ·
Nice work Joel
You might want to look at a WRX 'stat housing. It's inlet is 90 out compared to a NA motor so it faces the front (of the dub)
Joel ·
cheers for the tip Balders, i remember Jorg doing that with his 22 only problem with mine is that points it straight at my exhaust manifold
ive actually already got the hardlines finished and im halfway through mounting the rad.
im hoping it will self bleed as theres no high points in my system except for the 2 caps which will let any air out
Joel ·
ok apologies to people who have been following this, i will update it soon just at the moment im night spraying which really screws around my body clock up bigtime and makes me not a nice person,
people who know me know to stay clear 😂
but just quick minutes for those who are interested
it is up and running, it didnt make warwick due to a minor issue which the concerned party happily rectified, the tuesday after warwick....... 🥲
i;ve only been for a quick 5 min run out the road mainly due to the fact i havent finished enclosing my radiator
a rubber floor mat over it may work fine in ians bug but in mine i could nearly cook an egg on the fuel tank by the time i got back 😂
what are people using to close in their rads? ive made an RHS frame that i can screw whatever too but i wanna make it fairly non conductive and not to heavy
im thinking exterior ply maybe or fibreglass
anyway heres a sneak peak of the sump and rad
ground clearance is better than a vw engine with a deep sump and the header hangs down lower so if anythings gonna hit it will be it which im already used to anyway
ian.mezz ·
I have a couple of old street 60km/h signs that go over my rubber mat, they are made of alloy and easy to bend and not hard to find some as they are ever where you look 😂🤪😂
your radiator sits really high.
and I dont think you can have two overflow recovery radiator caps,
youll have to get one of those none recovery caps like they have on V6 toyata Camry's
ps the rubber mat makes it easy to check it over, in the running in period😂🤪😂
Joel ·
might have to go on a good old roadsign adoption missiom, mmm that takes me back 😂
overflow hose on the rad is just plugged off, only using the one on the header tank
STIDUB ·
ahh, that explains alot, forgot about the spraying, funny though, we have both progressed a lil bit more, maybe u need to work the opposite time slot to me so they get done sometime in the next.... year?
1303Steve ·
Hi Joel
How did feel power wise on the test drive?
I closed my radiator in using thin sheet aluminum, maybe you could make up a sandwich with two sheets and some insulation in between to cut down heat.
Steve
Baja Wes ·
Joel,
I enclosed my radiator with aluminium checker plate at first. I then put automotive carpet insulation (the fiberous brown crap that gets everywhere) followed by marine carpet over top. It still let heaps of heat through and made the car like an oven inside (rear radiator for me). I soon fixed that problem by lining the radiator side of the aluminium with that aluminium foil / sound deadening material thermal insulation sheeting. It works fantastically well and really keeps the heat out. You can't feel the heat come in from the back at all anymore.
Joel ·
cheers for that Wes, ive been thinking of covering my heater channels and floors with that stuff instead of the regular insulation i currently have just to prevent some of the heat that is gonna radiate into the cabin from the stainless lines under the sills
so i might get some more and cover the rad box as well
but for now i did a temp el'bodjo solution till i work something out
Steve, i couldnt really tell you, i dont think ive ever driven more like a scone gobbler in my life
it was just a quick nanna putt up to the intersection and back and i didnt give it much but it does feel like it really wants to go
i havent been game to unleash it much yet, mainly cos of the way the rad was heating up my fuel tank uncovered but also theres a couple of small issues
ive either got an innaccurate temp gauge or my ECU temp sender is playing up (wouldnt that throw a code??)
my fans not coming on
i let it idle for about 15 mins and the temp gradually snuck up till it hit just over 100c
im thinking its just the gauge reading abit high
it was warm but didnt seeem real hot and wasnt spitting out the overflow but i earthed the fan relay manually and within about 1min the temp dropped back down to 85
i know i should have replaced the thermostat and its on my list but it seems to be working
ill let it go abit longer tomoro and see if either the fan comes on or it starts to boil
guage is a brand new speco sports series and ive never had an issue with speco gauges ive always found them to be very accurate
ive also got an inlet leak somewhere
just a minor one but enough to make the idle hunt abit and its whistling like it has a turbo spooling 😂
ian.mezz ·
ther you go Joel the fan is the brown wire🙅🙅
Joel ·
mines red 😉
Joel ·
well until i get my arse in gear and finish updating heres a quick virtual tour 😂
Bizarre ·
So - you been for a drive??
Did you find the air leak??
Whatever - looks brilliant
Well done 👍
Joel ·
yeah been for a couple of drives but havent gone far yet
just building confidence up first
waiting for the paranoia of blown coolant joints and electrical faults to die down 😂
Bizarre ·
Well???
How does it compare to the blower??
Joel ·
its got plenty to give by the feel of it but i havent been too adventuress yet
definatley feels as quick off the mark but i havent had a chance to try out top end power
not expecting miracles comparing it to a force fed 1776 but its best described as smoooooooooth power delivery
the biggest problem im having so far is a force of habit i just cant break no matter what is double clutching back to second when i drive a bug.
which is a fun with a modern EFI engine cos they take so long to idle back
STIDUB ·
bastard, u left msn early, not fair, will try catch you tomorrow night though, nice work anyway
1303Steve ·
Hi Joel
We want to see videos on your famous "private" test course. Just give all the hoses a good tighten and get out there.
Steve
gerrelt ·
Nice work Joel!
There's only one way to find out if everything will hold... 😂
Joel ·
god damn it
took the old man for a blat out the road tonight and it seems my speed sensor didnt agree with going a speed....umm..... somewhat faster than it was supposed to 😂
yes, im slowly getting more game with it
might try plan B and setup an inferred proximity sensor instead.
they will handle higher speeds abit better than a reed switch
all is going well, my fan is happily doing its thing
comes on at 103 and off at 98 so my guage is reading about 8c high but thats better than being to low
Joel ·
ok turns out code 24 is
24 Air Control Valve or Circuit (Exc. Justy)
not VSS like i suspected, although i have a feeling the 2 are connected as alot of ppl get the IACV code on subaru vanagon with faulty VSS
its running really well just the light came on when i drilled it then coasted down a hill so i suspected it was VSS as it didnt effect anything other than the light coming on
ElusiveStranger ·
Joel wrote:ok turns out code 24 is
24 Air Control Valve or Circuit (Exc. Justy)
not VSS like i suspected, although i have a feeling the 2 are connected as alot of ppl get the IACV code on subaru vanagon with faulty VSS
its running really well just the light came on when i drilled it then coasted down a hill so i suspected it was VSS as it didnt effect anything other than the light coming on
Ahhh, I had that with mi bus. Coasting down in 4th or 3rd (never happened in 2nd or 1st) and only when the engine was warm. 'UK '98 EJ20 ODB-I
Short out your neutral switch. Easiest way with mine was to use half a paper clip inserted into the connector as a link.
Job's a good un
Joel ·
mine was auto so had the inhibitor and park switches but all thats already been chopped out and bridged
after doing some reading thro the subaruvanagon archeives this seems to be a really common problem
in my case its just cos my VSS has stopped producing a signal
cheers Balders for the souvineer too 👍
got plenty of room for it 😎
my shiny new sump got its first battle scar today
ol girl is squatting in the bum abit with the extra weight
gonna have to raise it back up abit
ill get some better vids later but in the mean time heres a quick dodgy incar footage of me driving like a grandma and not breaking any speed limits
1303Steve ·
Hi Joel
Are you running type 3 rear bars, looks like you might need them or heavier ones again.
Steve
Joel ·
nah stock Lbug, need to chase a pair down
was gonna swap over the squareback rear end from my black bug but i hate duel spring plates with a passion
1303Steve ·
Hi Joel
I hate the dual as well, you can still run the wagon bars with single spring plates.
My biggest issue was because they were so stubby they were hard to get into place.
The car sounds sweet by the way.
Is that Glenn Torrens in your avatar?
Steve
Joel ·
Ha! im sure Glenn wil be thrilled to know you think he looks like frank gallagher from shameless 😂
was it only squarebacks that had bigger bars?
colonel mustard ·
Joel, I wanna see your bug with black running boards... it makes my eyes freak out with white ones... haha
That photo is awesome, good work 🙂
DaveCarter ·
That acceleration looks so effortless. I can't wait to see it in person
colonel mustard ·
as you say joel, the rear could go up a bit and still look good.
1303Steve ·
Hi Joel
It was only the square backs with the thick bars, the Notch and fastback had the same bars as a bug.
Steve
ian.mezz ·
yeah call Richard at v force
he has torsion bars
Joel ·
colonel mustard wrote:Joel, I wanna see your bug with black running boards... it makes my eyes freak out with white ones... haha
really?
see i was the other way around, once i colour coded the bumpers and blacked the trim out i found the white running boards really cleaned the lines up
i was thinking of going carbon fibre but thought id try out this first
it was only rough attempt, theyre just shitty old ones that used to be on jasmine, jess's purple Lbug
DaveCarter wrote:That acceleration looks so effortless. I can't wait to see it in person
i gave it abit in 1st but that wasnt really up it much, gets motoring alot quicker than that 😂
just so unusual to have such smooth powerband
just spewin it wasnt ready for warwick
Ian i'll give richard a buzz, cheers for the heads up
STIDUB ·
28mm bars for about $300ish i think, nice pic btw
trickysimon ·
Nice work!
Good to finally meet you at Warwick.
Can't wait to feel the subi power next time 😉😂
colonel mustard ·
I like the black board better, but thats just me. love the white headlight surrounds though. 🙂
Joel ·
i had to do the reverse of my rear lowering thread today
it had to be raised anyway as it was almost sitting on the spring plate stops but i took dylan the dubber and his little brother for a spin in it this morn and i drilled it alot harder out of a corner than i previously have only to hear my header go cruuuuuunch along the road in the same style as mick and ians bugs drag the sumps
so shes back to stock height at the back now which is about 1" lower than actual stock due to the increased weight higher than i wanted but on the plus side itll be a struggle to hit anything now
check out all that ground clearance 😵
colonel mustard ·
side profile........ :P
better to be higher than need a new sump, or lose it and all your oil.
Joel ·
i pulled up in a nice scenic location for a side shot and the camera batterys said up yours 😠
will get one tomoro as its doing a run down to byron
colonel mustard ·
I took out my camera to take a photo of some parts, and it was on in my bag... therefore dead. same as what happened at warwick, hence why most of my photos were rubbish.
Stupid digital cameras. I want an SLR!!
1303Steve ·
Hi Joel
The heavier bars when you get them will help with sudden dips or acceleration. What size are your rear tyres, maybe go up a size as well.
Steve
ian.mezz ·
colonel mustard wrote:side profile........ :P
better to be higher than need a new sump, or lose it and all your oil.
yeah gentleman raise your veedubs😂🤪😂
and be normal🤪🤪🤪 like me
Joel ·
colonel mustard wrote:side profile........ :P
better to be higher than need a new sump, or lose it and all your oil.
just cos i like u so much :p
Steve, im definately gonna track down some Squareback bars cos i want it lower without the bounce
its funnny how the smallest changes can make a huge difference to a cooling systems efficiency
i made a very simple scoop to mount below my rad
hasnt made a huge difference at speed but around town its dropped a good 10 degrees
ian.mezz ·
Joel
you shouldn't be able to see the radiator with the hood open.
or is the picture just to show the air scoop???
and you have a cover???
Joel ·
The speed sensor....... Take 2....
seeing as my first speed sensor failed fairly early in the piece i needed to re think the design
it was to be expected that it wouldnt really work as it was very agricultural
it was just a simple alarm reed switch designed to tell if a door is either opened or closed, not sense a wheel turning 100x per minute
people have used that setup before with good results and mine worked till i took it to a speed faster than what the road signs said
i thought it was worth a try as the subi dash cluster only had a simple reed switch and 5 magnets on a plastic disc
so i needed to come up with something a little more advanced
sure there are the off the shelf VDO inline VSS that screw into the back of the speedo cable but due to the lack of room behind an Lbug dash this wasnt an option anyway and theyre also $200+
enter stage left inductive proximity sensor
its merely a metal detector like at air ports and was only $25 but has a very high frequency response so can read stupidly high speeds well over 300mph with perfect accuracy 😂
to trigger this one i just needed metal to pass in front of it 5 times per wheel revolution
so i made up the wheel of death that bolts to the CV joint
it needed to be cut in half so it could be slipped over the axle
without doing this would require the CV joint to be removed from the axle which is a horrible messy job
credit for this design must go to Andy Malec from the subaru vanagon group
i printed off a copy hes made and traced it onto some 16 gauge sheet metal
a bracket to hold the sensor was easy, just an L shaped bracket rivetted to the bump stop mount
with the wheel of death bolted to the CV joint and the sensor mounted i hooked up the power and checked that it was working
the sensor has a little LED thats part of the housing that lights up whenever its detecting metal
all looked good at this stage, theres only 3 wires to connect, power, ground and the signal to the ECU
first test drive revealed its working perfectly
the OBD1 engines like mine arent as finicky about running with no speed sensors
the main thing they do is stall when coming to a stop or bring the check engine light on when rolling down hill
mine never stalled but it did drop down to about 400rpm when stopping at intersections for a breif second and the idle often hunted alot, bouncing upto 400rpm
its now stopped doing that and has also stopped throwing code 24
i havent done any high speed driving yet but so far its working flawlessly
the wheel of death is very strong and theres no risk of the blades bending
alot of people with OBD1 eninges dont worry about a VSS and just put up with the codes coming on and engine revs dropping right down when coasting to a stop
but OBD2 engines can be alot more problematic doing things like rev limiting and going into limp mode etc
some of them use the VSS to work out what speed to run the cooling fans at as well so can suffer from overheating problems in rare cases
1303Steve ·
Hi Joel
That looks great, it will slice & dice the road kill.
I have one of the VDO sensors to mount on a speedo cable, my SPA speedo is digital anyway so maybe I can use the signal for both. What is most likely going to be an issue is if I ever put the car on a dyno, there will be no signal getting to the ECU, might have to work something out with battery drill or maybe do what you've done and scrap the VDO unit.
I heard somewhere about making fans up to cool the CV joints, with a bit of angle on your blades you could have "CV coolers"
Steve
colonel mustard ·
Steve, is the SPA speedo the same as Dave's LCD screen speedo?
1303Steve ·
Hi Jason
the one I have has a tacho built in as well, it only goes to 9000, unlike the photo.
Steve
Joel ·
ian.mezz wrote:Joel
you shouldn't be able to see the radiator with the hood open.
or is the picture just to show the air scoop???
and you have a cover???
sorry i started answering your question yesterday and AVD crashed
it wasnt covered to start with
it worked fine uncovered but more as a neatness thing ive covered it over now and carpeted the enclosure
Joel ·
1303Steve wrote:Hi Joel
That looks great, it will slice & dice the road kill.
I have one of the VDO sensors to mount on a speedo cable, my SPA speedo is digital anyway so maybe I can use the signal for both. What is most likely going to be an issue is if I ever put the car on a dyno, there will be no signal getting to the ECU, might have to work something out with battery drill or maybe do what you've done and scrap the VDO unit.
I heard somewhere about making fans up to cool the CV joints, with a bit of angle on your blades you could have "CV coolers"
Steve
yes keep your fingers clear at speed 😂
this one dices road kill and the last one with the magnets picked up everyones lost wheel nuts off the road
its another reason i set it up on the rear wheeel so dyno situations arent a problem
not that its really an issue on an OBD1 engine but OBD2 motors often go into limp mode on dynos if the VSS isnt spinning
ian.mezz ·
Joel wrote:
ian.mezz wrote:Joel
you shouldn't be able to see the radiator with the hood open.
or is the picture just to show the air scoop???
and you have a cover???
sorry i started answering your question yesterday and AVD crashed
it wasnt covered to start with
it worked fine uncovered but more as a neatness thing ive covered it over now and carpeted the enclosure
Good boy
you dont want the hot air coming in ur car like mine does 😂
Joel ·
thats the joy of an Lbug no where for the hot air to get thro the dash anyway 😂
one thing thats surprised me though is even with stainless steel lines hard against the bottom of the sills its not doing the same as yours and heating the inside of the car
maybe u need some more carpet lol
ian.mezz ·
Joel wrote:thats the joy of an Lbug no where for the hot air to get thro the dash anyway 😂
one thing thats surprised me though is even with stainless steel lines hard against the bottom of the sills its not doing the same as yours and heating the inside of the car
maybe u need some more carpet lol
or just some carpet😂
i am not a big fan of fancy stuff. eg carpet😂
Joel ·
speaking of fancy stuff,
the sticker of approval 😀
BulletBug ·
joel... finally i catch up with ur subaru conv...
still remember me?? hehe..
Joel ·
ok time i finished the rest of this thread off
ive been too busy out enjoying driving it
you know you've done something right when a subaru mechanic with decades of experience thinks its a WRX engine as u pull up 😀
the look on his face when i opened the decklid and he saw it was only an NA EJ22 was priceless
ive now got just under 300kms on it so far as a combination of city and highway just soak testing everything
first fill up came up with 9.3L/100km which is highly reflective of how ive been driving it, so it'll get way better than that once i ease up on the noise pedal
out on the open road it seems to settle at 90c and around town in stop go it gets up around 95 but its a rare moment for the fan to come on unless im stationary or close to for several minutes
in over 100kms of city driving the fan has still yet to come on other than sitting for 5 mins idling when its hot
the hottest day so far its seen has been yesterday at 32c and it still sat happily around the 90c mark and the fan doesnt come on till 100c so im confident in the cooling systems capabilities
i had an unused hole in my dash so i hooked an LED pilot light up to the fan relay just temporarily so i know when its coming on
anyway back to where i left off, ive ended up using 8M worth of the stainless line which all up cost me $110
this is all thats left over, all joined up theres probably nearlly 1 meter there but oh well, good money in scrap stainless lol
the cooling lines under the sills were run, at the back i just needed a 45 bend for the supply to match it up with the hose coming off the header tank
and on the return a dogleg to kick it out around the header
i used the falcon bottom hose as the link between the thermostat housing and the dogleg
it has a spring in it so it never kinks or loses its shape
heres how the lines look out of the car
at the front the lines run up over the suspension and into the wheel well
now owners of most supers will recognise this hunk of metal
its a defomation/crush plate which is allegedly reinforcing, it also mounts the A/C condensor and fan where fitted and it also covers the hole where the shift rod comes out of the napoleans hat
my first Sbug was a 71 and never had one just a plate over the hole but all the 72 on supers ive owned or worked on have had them
anyway after undoing half a dozen bolts and removing the swaybar saddles its amazing how much more room there is
to deal with the shift rod hole i just cut that section of it out and bolted it back on
Chop...chop....chop
the cut out is still in one piece so if worse comes to worse it can always be welded back in
i got some pinch welting to cover up the raw edges and keep the engineer happy and save my hands
the other thing i did was got some indaflex insulation to cover the pipes up where they run thro the wheel well
just to avoid heating up the fuel lines and pumps
its used to lag refrigeration lines , its good for up to 180c and completely prevents any heat transfer
i made up a frame that will bolt into the wheel well and also supports the radiator
now the days of radiators solid mounted to the body dissapeared along with copper cores many moons ago
these day there all rubber mounted to add some flexiblity
most have little peg feet like this top and bottom
that sit in rubber mounts like this
a few scraps of subaru exhaust pipe were the perfect size for the rubber mounts so i welded them to a piece of angle and made that bolt to the the old crush plate mounts
i mounted it using booker rod so it could be height adjustable
so all bolted in place it looks like this
it was at this point i took the bug for its first drive
i found when i got back that the fuel pumps and fuel tank were a little toasty from the heat of the radiator which was to be expected
i hadnt really decided on what to close the rad in with just yet
the token material seems to be alumnium or sheet metal.
thats fine and strong enough but being highly conductive they really heat the inside of the boot up big time
i intially thought fibrglass as it wont transfer the heat, is strong and light and i have a good mate thats a fibreglasser who owes me a few favours
but unfortunaltely hes out of action for another month due to knee operation so in the mean time i just went to bunnings and bought a sheet of 7mm waterproof ply
i gotta say i was really surprised by how well it does the job
the first thing i noticed was how much it dampend the fan noise
without a cover on the rad it sounded like i had a jet turbine under the hood whenever the fan cut in
now its no louder than any mainstreamer car fan running
but the most impressive thing is when ive been out for a drive and get back with the car hot enough that the fans cycling touching the ply it could barely even be described as warm
anything metal, would cook an egg nicely
to make it look alittle less out of place i gave it a coat of black paint
i did start carpeting the rad cover but it just got to fiddly
wasted effort on soemthing thats hardly gonna be seen
funny, even with the radiator and a spare tyre i still have more room left than a standard bug has normally
the top is on hinges just to allow access
i just use some R clips through pins to hold the lid shut
ive completley closed in the sides to stop any air getting past the rad
and i also made up a small scoop to sit under the rad
simple but highly effective, it dropped my average temps by 10c
lots of coolant
to my amazement first fill and not a single leak
all up the system holds 14L, so just on double the standard subi cooling system
i achieved my goal of having a system that doesnt need bleeding
i just leave the radiator and header tank caps off and fill till they're full and just start the engine and let it circulate the coolant abit
any air soon bubbles to the top
after it cooled down for the first time i got about 1 turn on each hose clamp
ive just got an old windscreen washer bottle as an overflow for now
when its cold i just fill it to the texta line
at it hottest its expands about 2" above that then sucks it back in as it cools down
if theres anything i've missed with the cooling system or any particular part of the conversion that anyone wants to know about, just ask
ive got nealry 600 pics ive taken during the conversion so theres lots of stuff covered that i didnt put up
trickysimon ·
Joel wrote:funny, even with the radiator and a spare tyre i still have more room left than a standard bug has normally
Rub it in why don't you 🥲
Joel ·
i never keep anything in there other than a few tools anyway
its only a pizza cutter spare as the vw spare doestn match my stud pattern anyway but itll get me home.....at 80km/h 😂
ryana89 ·
I've read the entire thread right through and have been watching it for updates for the last couple of weeks and i suppose i should say congratulations😁 You've got enough on this conversion to write a book.. or 2!!. I was surprised that you still managed to get room for a spare tyre/wheel. Again congratulations on a job well done
Ryan😀
Joel ·
cheers
i wanted some practical aspects like still having a spare
ive got roadside cover on it in the event of a flat but i still would rather not be stuck on the side of the road all for the sake of not having a spare
another thing ive done is hooked up my oil temp and pressure gauges
the oil temp was easy, the senders just screwed into the drain plug
but pressure sender required abit more thought
the stock idiot light sender on EJs is buried down under the alternator and powersteering pump bracket
only way to really see it is with the bracket gone
room is very tight there
at the other end of the block is a second sender port with a blank in it but its buried rigght down deep below the IACV, the PCV hoses and main engine loom
its all 1/8th gas fittings so i got a Tee fitting of an old compressor with one end capped off and fit an oil pressure Y piece to it
a normal 90degree fitting woulda been much easier but i had this laying around
idiot light sender and pressure gauge sender fitted it nicely
the powersteering bracket interefered slightly so it copped a small haircut
now is anyone else out there running temp and pressure guages?
my oil temp seems to sit around 85c and can get upto 90 with some spritely driving
ive changed the oil and filter and running 15/40 my pressure maxes at 80psi at aound 3000rpm even at 90c
at idle it sits around 15-20 when hot
that sound normal?
im used to VW figures which are lucky to be over 50psi
ian.mezz ·
now is anyone else out there running temp and pressure guages?
my oil temp seems to sit around 85c and can get upto 90 with some spritely driving
ive changed the oil and filter and running 15/40 my pressure maxes at 80psi at aound 3000rpm even at 90c
at idle it sits around 15-20 when hot
that sound normal?
im used to VW figures which are lucky to be over 50psi
if the red IDIOT 😂 light is not coming on it must be ok 🤪
1303Steve ·
Hi
I asked an oil pressure question on a WRX forum, with some interesting responses.
Steve
=========
Hi
I'm going to buy an oil pressure gauge for my car, what sort of oil pressure do you guys normally see? Would I need to buy a 5 bar (72 psi) or 10 bar (145 psi) gauge?
Steve
=============
i got a blitz pressure gauge.. the gauge reads upto 10 something.. pressure goes up to 7, spends most of its time around 6. goes around 2.5 and 3 on idle when warm.
==============
Hi
Thanks for that, your gauge should have some tiny writing on it and it will say what sort of measurement it is, could you check for me next time your in your car.
Thanks, Steve
===============
I have a HKS gauge.
Mine has similar 1 to 10 rating.
Sits on 3 at idle and rises very quickly to 6 if you are driving around. It stays pegged at 6 constantly when driving hard.
============
Hi
Thanks for that. 5 bar = 72.5 psi. So I think I had better get a 10 bar gauge otherwise it will spend a lot of time off the scale.
Steve
============
Definitely want at least 100psi gauge, my car almost got that at startup ~95psi. So you don't want something lower as you may damage the gauge.
Joel ·
how bout that, right on par
not bad for an untouched 17 year old engine
no wonder these things live so long
ElusiveStranger ·
Nice going Joel.
Right, you gonna pop round and take me for a spin?
The sticker looks good 😉
Joel ·
cheers,
that really clever who came up with design?
WKD has only just recently hit australia so not many here would get the reference
rose ·
so have you been brain washed with the subie power🤪😂🤪? And is the only way or would you go back to vee dub power?
Personally I love the sound of vee dub power with twin carbs.
rose ·
OMG Steve how old are you what's the go with the lights?? 😂
1303Steve wrote:Hi Jason
the one I have has a tacho built in as well, it only goes to 9000, unlike the photo.
Steve
1303Steve ·
Hi Rose
How old, when I grow up I wanna be a kid😂
Steve
DaveCarter ·
His car is going to have sub lights like mine as well 😂
Joel ·
rose wrote:so have you been brain washed with the subie power🤪😂🤪? And is the only way or would you go back to vee dub power?
Personally I love the sound of vee dub power with twin carbs.
my love of VW motors will never die
hell, ive been building them since i was 15, my brain still ticks over conrod bolt torque values and head tension patterns etc when i try to sleep at night 😂
but i am truely happy with the end result of the converstion to though. in the next few years another VW will probably join the stable again and stay mecjhanically stock
how else am i supposed to make use of all these parts i got laying around 😂
i'll get some vids up soon but from inside the car u would swear its just a big VW engine running IDAs
thats exactly what it sounds like
back on topic
it seems i have some territorial marking going on.....
And it aint coming from the engine
J'ACCUSE.......... INPUT SHAFT!
original looking abit raped after removal
bore cleaned out ready for new seal
OEM german parts all the way baby
to tap it home squarely an old axle nut and some of the staino pipe i seem to have an abundance of at the moment
new shaft installed with a dab of permatex on the outside and well oiled on the sealing lip with fresh tranny oil
No more leaks 😎
trickysimon ·
Wheres the timed video of the subi coming out? 😁
1303Steve ·
Hi Joel
I didn't know Exedy made clutches for VWs.
Steve
Joel ·
1303Steve wrote:Hi Joel
I didn't know Exedy made clutches for VWs.
Steve
i got introduced to exedy button clutches a few years back when i was part of the the toyota world when i had the celica and corolla
id always gone the token kennedy in the past but at the time there was a stage1 famine on
couldnt get one anywhere
autobahn had the exedy clutch in overnight
not badly priced either
200mm type1 is the only HD air cooled clutch they do
1303Steve ·
Hi Joel
So apart form the colour, how does it rate against a Kennedy?
Steve
Joel ·
gotta love the pink 🤪
its been a few years since ive had a stage1 but to be honest i dont think theres much difference in it
i was thinking of trying the exedy cushion button next time i get a clutch
just dont like HD clutches that just about dislocate your hip to operate
kombibob ·
love this thread!
you have done a fantastic job joel and i will be using this thread very soon for my next project.
Joel ·
cheers Bob,
still got that spare from Ray?
kombibob ·
no that went with ray but we do have ash's EJ22 and all the conversion kit she was going to use in her beetle in perth.
now i just need to convince her dad to chuck it all in the back of his landcruser and bring it over at christmas.
Joel ·
she would have just about forgotten what mildred looks like 😂
so....
Who ordered the caramel milkshake?
a direct result of my stupidity, it highlights the importance of the cooling system with these engines
the only weakness with these engines....and there it is 😂
after i stuck the engine back in the other day from replacing the shaft seal i just poured what coolant i drained back in but was still a bit short
one mainstreamer was parked in and the other was down at byron for the day
so i took the bug down to autobahn to ggrab some more coolant
it didnt seem that low and didnt get hot on the trip but next morning i got 2.5L of cooant into it
since then its still running perfectly fine but ive noticed the overflow fills up more than usual and if its just idling the fan stays on alot longer than normal
just gotta decide now whether i can be arsed pulling it down to do the headgaksets or just swap it for another engine
ill probably just fix this one up as i know the history of it and even with a leaking headgasket its still running like clockwork
i was actually in shock when i found out cos its running to well so it must only be the tinyest leak that opens up when its hot
ive put over 100kms on it and didnt even notice anything was wrong till i saw under the oil cap
ill proabably do the timing belt, waterpump, 'stat and cam seals at the same time
im getting abit sentimentally attached to this engine so id rather stick with the devil i know
1303Steve ·
Hi Joel
That's bad luck, they were probably on the way out, the extra heat just tipped them over. You need to fix it, otherwise your going to reluctant to drive it on trip.
Steve
Bragi ·
Hi Joel
Iam about to but a EJ22 motor in my super beetle and I was wondering if you could help me answer some questions.
How much HP can you run through the original transmission?
What kind of suspension and brakes are you using?
Thanks, Bragi
Joel ·
Your probably right Steve.
it wont even be run again now till i get it sorted, the only reason it has been is i was blissfully unaware of the problem.
im really not too upset over it, pissed off at myself for letting it happen but its not a hard fix, the headgaskets are something i should have done the in the first place 🤪
to much of a rush to get it on the road
Hi Bragi, you'll love it
a kafer brace is the only strenghtening required. you could get away without one but the risk of the chassis forks bending or fatigue cracking is there
they're not hard to install and you can really notice the way it strenghtens up the rear of the car
the standard trans will take the power of a stock EJ22 if your not permanantly driving like a race car
its a bit of a piece of string question you can damage a tranny with a stock vw engine if your rough enough or driven fairly sensibly would last even with an ej20turbo
at present im running 4 wheel discs which were on the car before the conversion
bigger rear torsion bars are a good idea but that said im not running them, now that ive raised the back up a bit its riding perfectly fine
an EJ22 is only putting out about 20 or so more HP than most 1916 vw engines people put in and very few of them bother upgrading transmissions or brakes
ian.mezz ·
change the oil and just chuck some chem weld in the radiator.
isn't it great to go water cooled🤪
ElusiveStranger ·
ian.mezz wrote:change the oil and just chuck some chem weld in the radiator.
isn't it great to go water cooled🤪
Don't use "mechanic in a bottle" tsk, tsk 🤪
Do it properly, it's not difficult, just a PITA as you'll have to pull the motor.
Don't forget you'll need inlet & exhaust gaskets too
bajachris88 ·
Nice work Joel, this has really come around mate. Been seeing it grow since day one of this thread 👍
hmm... vrs sets sounds like a bit of effort. It will run like a dream after...
The liquid glass (with hte copper flake) Chemiweld i think its called, is a good permanent fix. They even recommend for new engines to seal any factory pin holes. And it works. I was a bit 'reluctant' as i was worried about coating everything and making a mess inside the block. But it only 'collagulates' where the loss of pressure is, so it doesn't deposit everywhere. It simply seals the leak after driving 30 mins minium. Then you drain water, flush, fill with fresh coolant.
If i remember right though, I been told thta when the leaks in the oil you can't use the chemiweld stuff. Can't confirm though... but i would imagine it ain't healthy.
You'd konw more about this than me anyways with your watercooled background. I'm just going from the experience on my celica 2 months ago :P, and took an old mechanics advice (friend of mine) when i was having head gasket issues. its since been sealed, regardless of the torment i put my car through.
Joel ·
cheers Chris
im just hoping the thread helps people that are in the situation i was facing 9 months ago, considering the conversion but not sure of exactly whats involved
its under $100 for a pair of genuine head gaskets
im not a fan of temporary fixes plus its a good excuse to give the top end a freshen up
my old boss will skim the heads for me if they need it which i highly doubt but you never know
colonel mustard ·
if its free... do it 🙂
Joel ·
trouble with shaving the head is it raises the compression if a stock gasket is used which works against me as im still kicking ideas around about force feeding this thing
71-BEETLE-SEDAN ·
My mate blew head gaskets the other night in a commodore stationwagon, i laughed at himcause i was doing the same thing in my bug and was fine, now he has no car. And once the mechanics done will have no money.
Joel ·
hmmm Déjà Vu.....
in and out more times than a honeymooners co........😂
pooor bug must feel like a $2 hooker
anyway seems #4 is where all the excitements at
ian.mezz ·
good now that you have that milk shake making motor out. whack a EJ20T in and stop stuffing around,
Ino you want to.🤪
Joel ·
u gonna find me a gearbox that wont break?
rocknrob ·
joel ej20t has nice stainless steel head gaskets not cardboard ones🙂
Joel ·
dont you start being a bad influence as well 🤪
im happy with the EJ22, gets me shit from both sides
from the vws guys cos its not a vw and from the subi guys cos its not turbo 😂
put an air-cooled motor back in.....this subi stuff seems like it's too much hassle 😀 LoL
Joel ·
not gonna happen
im enjoying this engine to much.....when it works 😂
ian.mezz ·
Joel wrote:not gonna happen
im enjoying this engine to much.....when it works 😂
who are you trying to kid🤪
brrrrrrmmmmm pitchooooo😂
colonel mustard ·
back on the road and fully working by Movember 29th 🙂
Joel ·
ian.mezz wrote:
Joel wrote:not gonna happen
im enjoying this engine to much.....when it works 😂
who are you trying to kid🤪
brrrrrrmmmmm pitchooooo😂
keep trying you nearly won last time 😉
ian.mezz ·
Joel wrote:
ian.mezz wrote:
Joel wrote:not gonna happen
im enjoying this engine to much.....when it works 😂
who are you trying to kid🤪
brrrrrrmmmmm pitchooooo😂
keep trying you nearly won last time 😉
me , steve & rocknrob could send you some spare cutting wheels uno you want to.😂
Joel ·
that'd be handy acutally
i reckon i've gone through about 20 of the bloody things already cutting up my car, water lines, zorst piping etc
guess thats what broke my budget
colonel mustard ·
ah man... you dont count paint, sandpaper, cutting/grinding wheels, glue, zip ties or gaffa in a budget..
Joel ·
who says EJ22 arent as fun as EJ20T......
just add a shot of some laughy gas
this thing is only running twin 36IDFs for anyone who doesnt get on STF
ryana89 ·
Does yours sound like that?....... or better🤓
Ryan
Joel ·
it does sound pretty similar actually
my exhaust setup is almost the same as that one
its running a WRX header and a fatboy muffler which is essentially what mine is
i did make one in car vid the other day before i took the engine out but the camera wedged into the passenger headrest lead to a bit of a camera technical difficulty so i havent bothered uploading it
rocknrob ·
Hey Joel you are going to love the EJ22 in the bug once you get it running right. even in a kombi it was fun to drive and made highway trips a pleasure...but mine had 280,000 klicks on it and was leaking oil everywhere and could do with a rebuild so when i saw the 98 EJ20T with 86k for $400...well...but i had the 22 in it for 2 1/2 years! can't believe it!🙅
Joel ·
ive already got over 300kms on it so far and im loving it already
im starting to suspect the head gasket was leaking from the word go but even with that it still hammered
they're just such a torquey engine, i can see why people love them in kombis
Baja Wes ·
Trying telling the air cooled purists, they don't listen to reason. They like to knock things they haven't tried 🙂
My V6 has been in my car for nearly 7 years. It still runs perfect. I just changing the oil and filter every now and again and it keeps going! The air con in this summer weather is also awesome. When are you sticking air con in yours Joel?
Joel ·
its not for everyone but each to their own
although out of everyone thats seen it so far i havent got any neg feedback yet, there were alot of old school purists at the show i took it to the other week and eveyrone seems to love how neatly its intergrated and that its modernised a classic, still has that old vw charm but reliability and performance of a modern car
sounds like a sales spiel 🤪
anyway the A/C just have to work out evap placement and im right.
original Lbug evaps sit ontop of the fuel tank and duct in through the fresh air fan box
ive limited my trunk room already so dont really want to make it worse
ive got spare Lbug dashs i can have a play around with
im thinking of making one a porsche style like this
there's room in behind the radio/glove box area to fit an evap core.
Once all the stock Lbug dash vent and defroster ducting is gone theres alot more room behind there
ive got the evap from the liberty but its fairly big and clunky, i've got access to more slimline ones just have to box them in
end result will be similar to how you've done yours
ElusiveStranger ·
Joel wrote:that'd be handy acutally
i reckon i've gone through about 20 of the bloody things already cutting up my car, water lines, zorst piping etc
guess thats what broke my budget
Ahhh feck it.
I'll bloody send you some
Maybe you could get a sponsorship deal from "pommieland" 😉
Edit: Keep it stock looking in the driver's posn
*biased mode* Jorgen's bug is to die for on discrete looks. But, each to their own.
STIDUB ·
let me know when you want the checker floors 😂
ian.mezz ·
yeah Joel get the Turbo motor in before the RTA does something silly like change the rules on modified cars🤪
colonel mustard ·
That's probably the most explained suggestion I've seen you make Ian. 😂🙂 I cant wait to see your subi bug... soon. I heard its gettting lowered at the front///// 😂 :P
Joel ·
geez this thread slaughters my inbox
can any mods explain why i get 5 notifiactons per reply?
used to be about 7 🤪
top idea balders, please send to:
save an EJ20T, donate a cutting disc. PO BOX.....😂
its booked for an engineers cert on the 18th so i'll see what comes of that first
colonel mustard ·
boostcrusing....?
Joel ·
lol yea i use it for the classifieds.
good for cheap parts
theres always some ricer selling parts cheap to pay child support to his 3 16 year old girlfriends or getting his VL commodore out of hock
Joel ·
just for peoples comical amusment heres the vid i took coming up the hill the other day showing that wedging a camera in the passenger headrest doesnt work
oh yeah for the record our speed limits around here are still in MPH no KM/H
trickysimon ·
Must have some torque if your getting torque steer in the camera 😉
ryana89 ·
Hahaha the camera lovs ya, cant keep it 'eyes' off you
ian, your not one to use peer pressure to persuade someone are you? 😂
ian.mezz ·
yeah I don't want young Joel to be left out when all his mates have Turbo cars and his is nanna powered😂
Joel ·
STIDUB wrote:ian, your not one to use peer pressure to persuade someone are you? 😂
every school yard had a bully,
this one doesnt steel my lunch money, he makes me spend it on engine conversions i dont need 😂
im digging the invisible price tag ian, does that mean its free? ill stick it in the bug tomoro if thats that story
STIDUB ·
funny, its usually the older kids that do it too, perhaps joel doesnt need the * extension of having the turbo...
altho... that makes me look really bad 😂
DaveCarter ·
oh man i went on holidays for 2 days and come back to 72 emails about this thread. You know how to draw a crowd joel 😂
Joel ·
hehe now u know what i been going thro for the last 9 months
so i guess that makes you one of the mystery email addresses on my notifications
dont worry another few months ill think of another new project and it will be like this and blowing the bug all over again 🤪
much to ians delight it will probably be an EJ20t conversion
DaveCarter ·
haha at least your projects always work. That is why there is such a big joel following. Can't wait to see this beast in the flesh
1303Steve ·
Hi Joel
Cant you deactivate the email notification, I don't bother with it.
Steve
Joel ·
Steve i normally dont bother either, its just for long topics like this where its easy for me to miss peoples questions
DaveCarter wrote:haha at least your projects always work. That is why there is such a big joel following. Can't wait to see this beast in the flesh
trust me for each sucessfull project i have theres lots more unsucessfull ones, they just dont get forum air time 😂
classic example was my turbo engine, wasnt a failure but it was one problem after another till i gave up on it
71-BEETLE-SEDAN ·
a turbo engine aye, seen a cop witha bug with a turbo engine yesterday, had ps on it too. Dunno how it eneded but. Got plans from it still?
Joel ·
i never work off plans, just build and modify as i go
that one was pre digitial camera days but i was tearing my hair out over it so much i was just glad to see it gone
trickysimon ·
So then he "cheated" and got a Subi "lol"
71-BEETLE-SEDAN ·
okay, im tossing up the idea but steve carter posted some vey scary figueres earlier
Joel ·
will scare you no matter which way you go,
going fast aint cheap
71-BEETLE-SEDAN ·
what engine were you trying it on
Joel ·
ummm well frankenstein v1.0 i ASSuMEd was a 1600 cos although it was an AB block which is 1300 i pulled if from a superbug and it had a 1600 carb and manifold and exhaust
i pulled it down after it grenaded to find it was still a 1300
frankenstien v2.0 that replaced it was a 1600 but had some bad piston slap and used to detonate pretty bad under boost it was a time bomb but the turbo gave out before it did
71-BEETLE-SEDAN ·
Alrighty, will look into it, hows the subi going
Joel ·
not goin at all for a while
got it dropped out ready to pull down but currently theres just not enough hours in the day
im putting in 14 hours+ a day at the momemt just cos im so snowed under
no wonder im look like the walking dead at the moment
im deteremined to have it ready for run to the sun in acouple of weeks so i;ll make some time for it
only needs a few hours and some parts
71-BEETLE-SEDAN ·
okay sounds good.
ian.mezz ·
Joel wrote:not goin at all for a while
got it dropped out ready to pull down but currently theres just not enough hours in the day
im putting in 14 hours+ a day at the momemt just cos im so snowed under
no wonder im look like the walking dead at the moment
im deteremined to have it ready for run to the sun in acouple of weeks so i;ll make some time for it
only needs a few hours and some parts
14 hours a day.
your nuts🤪😂🤪
trickysimon ·
I whinge and I'm only workin 9-5 😂
colonel mustard ·
ian.mezz wrote:14 hours a day.
your nuts🤪😂🤪
I think you're right, he does farm nuts.
Joel ·
im very nuts, but im also at the mercy of the weather at the moment and have to work around it
dads gonna look after the place for me next week so i can treat myself to a few days off and hopefully get my bug back up and running
Joel ·
it seems this is the month everyone on the interwebs has chosen to look at my pics and have burned out all my photobucket bandwidth
lucky for me i have a couple of others lol
so im stuck in the middle of that wonderfull situation known as awaiting parts at the moment
so ive decided to dress up the plant room alittle while everythings out and apart
subi engines arent much to look at so any help they can get to look better is good
and my engine bay was starting to look a little junkyard-ish now i've removed the chrome louvered firewall and tarboard
i was sick of them as the louvered rattelled badly when the stereo was cranked and the tarboard is doing nothing now i have sound/heat deadner on the inside of the firewall
ive been planing for ages to just paint the firewall but ive been holding off as a few people know already theres a colour change on the cards for my bug so i couldnt see the point in painting it yet
but with how things are going thats gonna be a while off yet
the contact glue on it everywhere that held the padding was looking very ugly
and those little spikes that hold the tarboard are just the ticket for skinned knuckles
and in the corners all the facotry seam sealer has long since crumbled and fallen off and you can also see there was a massive foam tumour that i had to scrape away years ago to get my kadrons to fit
where i removed the valance was also a lot of bare metal and various unpainted metal areas
so i did a heap of prep, removed all those little sharp bastards and painted away
Joel ·
ok thats the bug looking a bit better
so to tidy up the engine first thing to get attention was the timing belt covers
now the easy thing with them would have been get a new set, they're cheap and easily availble but wheres the fun in that??
first thing i did was degrease all the years of roadgrime, oil spills and powersteering fluid off them
the outter sections are in good condition but the center section has had the crank pulley rubbing away on it at some point and its had an intimate moment with the timing belt idler
and look theres even a love stain to prove it
damage is actualluy most curious
its obvious that the idlers been rubbing againt the cover and melted it abit
but in one of lifes little mysteries its managed to some how stop and position itself about 2" lower and leave a perfect imprint in the plastic
so perfect you can read the back to front JAPAN in the plastic
anyway with a dose of ABS plastic glue and some paint its loooking marginally better
i didnt fuss to much about the pulley rub mark as it will be covered up by the pulley
Joel ·
anther thing that sticks out like dogs balls on a subi engine is the inlet manifold
there was a few jobs i wanted to do to this while its off
firstly is remove all the hardlines that were for the charcoal canister
im connecting directly to the purge solenoid so they're not doinging anything and ive already had to cut off the canister ends to clear my top radiator hose
i wanted to remove all the wiring loom as well and rewrap the electrical tape on it as its starting to unwind in a few spots and check the loom for wear spots
ive heard that people have found on some EJ engines where the loom has worn through on something metal and can short out the wiring
i didnt find any of that but i did find the rubber hose on the canister hard line had worn through on the compressor/alt bracket
good thing i havent been using it
now before u go tearing things apart its a good idea to take lots of reference pics
the plug wire holders are like a friggen jigsaw puzzle
all the electrical plugs are different so they cant be mixed up....EXCEPT for the the injectors which are all the same
now im pretty sure theses engines arent sequential fire but they would most likely atleast be batch fire which means u cant mix them up
mine had one on each side marked
but i still marked each one indiviually to play it safe
anyway stripped down with the offending hard lines removed and a coat of paint theres an instant 20HP
goes faster already
i noticed as i was putting it back together that it looked rather animal like......
ive got the IACV still sitting here which im gonna give the clean out treatemtn tomorrow
71-BEETLE-SEDAN ·
I wish i had the patience,tools,time,skills to do all the stuff you do, you make it look and seem effortless.
Joel ·
its just a hobby
everything i know is all self taught
ive never done any sort of coarses or training
just abit of time working as a mechanic doing stuff i had already learned years ago
when i got my first bug i was too scared to even take the dissy cap off.
granted i was only 13 years old at the time but i soon learned just pull it apart taking note of how it goes together and its pretty easy to suss out how they work
vws are very simple cars and one of the best to start learning with
i once knew nothing about body work or painting either
all i did was bought a shitty $200 beetle, a heap of sandpaper and bog and a spray gun and had a go
10 years ago a $200 solid bug was easy to find but u can do the same thing these days with an old corolla or pulsar etc
its easy to have a go at anything, you dont develope skills if u dont try
BulletBug ·
what kinda paint u use joel? (the red paint)
BTW.. im ojan from Malaysia... we chatted for a while a few months back bout ur SC...
nice to see the progress of ur SUBABUG...
hope im not disturbing ur thread...
Joel ·
hey Ojan, havent heard from you for a while
ofcourse your not disturbing, this thread is here for people to ask questions
the paint is just ordinary fire engine red enamel
the manifold doesnt get hot enough to call for hi-temp paint
another things ive done is mounted my charcoal canister
its hiding away neatly behind the header tank
BulletBug ·
ya its been a while... hope my post are not to nubie... if so.. i will proceed to PM... 🙂
its amazing what u've done here joel...
the SC idea just slips through my mind after seeing ur subaru conv...
i did some search in my local scrapyard and no EJ22 available.. only turbo engines... mostly the EJ20 sti and the twin turbo version...🤪
not too sure if my 1303 gbox is up for that much power... is ur trans stock? its hard to find an N/A suby motor here joel...🥲
Joel ·
yea i know what you mean
the blower had the "cool" factor and was on a par with the EJ22 power wise but this engine is just so much smoother
the bugs lost it soul abit but the reliability factor makes up for it
i know i could just jump in and drive to melbourne without any worrys except whats playing on the stereo
my gearbox is just stock
thats the joy of N/A subi motors they work in perfect harmony with a stock trans unlike turbo motors
but dont tell the others i said that 😂
just for those who are wondering i havent had a chance to do much with it
stripped down to a long block shows just how close in size to a vw engine it really is
i also got another treat for the bug
its amazing the new in box stuff you can find hidden in peoples atticks lol
bosch germany starter motor for a semiautomatic beetle
these are higher HP than a standard a starter and are self supporting so no more dealing with starter bushings
bit more clunkier than a stock starter
DylanTheDubber ·
Yeah the motors are pretty simmilar. There simmilar size , there both boxster motors , The Subi just runs on water 😂
The Subaru motor is just a modern vw motor 😂
BulletBug ·
ya... but i dont know if my malaysian road officers will agree with the 'modern vw engine mod'....
gosh!!! i wish malaysian rules were like in OZ....
what options of gbox for the ej20T? will a bus box hold? too many bus box and im confused... 002,091got one more but i forgot... which one is which? which is the best for a blown EJ?
STIDUB ·
bulletbug, see my gearbox when its finished, its based on an 091, the other option is porsche 915 / G50... alternatively, use a bug box, treat it nicely or get an exceptionally well built bug box & be sympathetic to it, my option is for flogging to death & it should be more than adequate 😀
3days joel, get it done so i can go for a ride, pretty please? & dont even think about mentioning the almost dead 1300 idea🙅
1303Steve ·
Hi Joel
Is that STI red on the manifold? Is that the starter from Stockers?
A benefit that I've never mentioned when I had my WBX powered 1302, heated windscreen washer fluid, yep run your washer fluid hose around the radiator hose and you will have heated washer fluid, gets rid of bugs etc much better than cold water, I know this because sometimes I wash up at home😂, cant move any gunk of the washing up if you use cold water.
Steve
colonel mustard ·
I got told the stokers sale was a bit of a joke - stupid prices etc. sadly, i personally cannot go.
DylanTheDubber ·
Well if there prices were a joke i would hate to buy something off them when they werent having a sale cause they claimed everything would be 50% off.
Joel ·
BulletBug wrote:ya... but i dont know if my malaysian road officers will agree with the 'modern vw engine mod'....
gosh!!! i wish malaysian rules were like in OZ....
what options of gbox for the ej20T? will a bus box hold? too many bus box and im confused... 002,091got one more but i forgot... which one is which? which is the best for a blown EJ?
thats outta my jurisdiction i dont speak gearbox to well
bus boxes have bad ratios for a bug but that can be changed
dangerous on here is the man to talk to
STIDUB wrote:3days joel, get it done so i can go for a ride, pretty please? & dont even think about mentioning the almost dead 1300 idea🙅
boring..... trust me its way more fun counting how many death rattles a vw engine can make
Steve, nah its TORO touch up paint 😂
yeah thats the startermotor,
ive been getting parts from alan for over 10 years, ive always found his prices good, and he looks after his good customers
that starter for example is brand new german and was $287 and while i was there i grabbed a pair of wheel cylinders for dads and genuine german ATE they were $3 cheaper than another vw shop i tried
ian.mezz ·
1303Steve wrote:Hi Joel
Is that STI red on the manifold?
ahhh steve you funny you beat me to it.😂
Joel ·
i knew someone had to say it 😂
ian.mezz ·
Joel is you going to put a timing belt kit on it ??
it all looks a bit old .
I think the dearest part is the tensioner.
we get parts cheap.
Joel ·
i am yeah while its off its easy to and ive also got a new genuine water pump coming aswell
ill keep that belt as a spare cos its actually not that old and still looks pretty new, thats just a shitty pic
was only replaced a couple of years ago and done 46,000kms
rose ·
Hey Joel have you been to the Lee noonan (68autobug) school of painting 😂😂
71-BEETLE-SEDAN ·
Preety sure i dislike timimng belts, my girlfriends mum drives a camry and its timing belt is loose. It has been rubbing the inside of its cover for ages. I apparenly am the man for the job cause i work on my dub. So far ive got half the cover off and now ive gotta take the wheel and heaps of other shit off jus to get at the second cover, and i dont even know if it needs a new belt or tensioner. Worst bit is she needs it nearly everyday. So your lucky you can take yours out to do it. They dont make removeable fornt ends for camrys. 🙂
Joel ·
not yet i seemed to have misplaced my yellow and flourescent green
rose ·
you need to buy a can of kromebrite (liquid chrome enamel) for the case and the heads that the engine reconditioner does where we are. it looks pretty
O by the way how are your nuts?????😂
colonel mustard ·
71-BEETLE-SEDAN wrote:Preety sure i dislike timimng belts, my girlfriends mum drives a camry and its timing belt is loose. It has been rubbing the inside of its cover for ages. I apparenly am the man for the job cause i work on my dub. So far ive got half the cover off and now ive gotta take the wheel and heaps of other shit off jus to get at the second cover, and i dont even know if it needs a new belt or tensioner. Worst bit is she needs it nearly everyday. So your lucky you can take yours out to do it. They dont make removeable fornt ends for camrys. 🙂
not to be rude, but it sounds like you don't think your the man for the job...
71-BEETLE-SEDAN ·
im in year 11 and my dub is like only car ive workeed on and there is no forums like this to help.
BulletBug ·
STIDUB wrote:bulletbug, see my gearbox when its finished, its based on an 091, the other option is porsche 915 / G50... alternatively, use a bug box, treat it nicely or get an exceptionally well built bug box & be sympathetic to it, my option is for flogging to death & it should be more than adequate 😀
091 is gbox from what model? G50 cost a lot of GGG's... 🙂
and not to mention.... very hard to find right...
i will wait for ur gbox outcome...when is the test? do u have a thread bout your project? do give feedback... 🙂
BulletBug ·
Joel wrote:
BulletBug wrote:ya... but i dont know if my malaysian road officers will agree with the 'modern vw engine mod'....
gosh!!! i wish malaysian rules were like in OZ....
what options of gbox for the ej20T? will a bus box hold? too many bus box and im confused... 002,091got one more but i forgot... which one is which? which is the best for a blown EJ?
thats outta my jurisdiction i dont speak gearbox to well
bus boxes have bad ratios for a bug but that can be changed
dangerous on here is the man to talk to
STIDUB wrote:3days joel, get it done so i can go for a ride, pretty please? & dont even think about mentioning the almost dead 1300 idea🙅
boring..... trust me its way more fun counting how many death rattles a vw engine can make
Steve, nah its TORO touch up paint 😂
yeah thats the startermotor,
ive been getting parts from alan for over 10 years, ive always found his prices good, and he looks after his good customers
that starter for example is brand new german and was $287 and while i was there i grabbed a pair of wheel cylinders for dads and genuine german ATE they were $3 cheaper than another vw shop i tried
'dangerous' is a persons nick right? u have a link joel?
thats my thread, 091 is from mid 70s 2L kombi's, aka a 2L box, has 6 ribs on it, instead of 3-5 on the other kombi boxes, plenty of info on each of them on thesamba, keep in mind they arent that cheap either, expect to pay $300-500AUD for the basic box from what ive seen in the last year or so, then add the parts to make it fit with the beetle nose cone, new gears for stronger & better ratios), diff - im told by a friend in the UK that the syncro diff is up to the task if you can source one, seems they are a cheap solution in that part of the world.
Crap i gotta go to work, ill explain more later 👍
Joel ·
rose wrote:you need to buy a can of kromebrite (liquid chrome enamel) for the case and the heads that the engine reconditioner does where we are. it looks pretty
O by the way how are your nuts?????😂
quite comfortable thanks..... oh right 🤪 seriuosly though not good actually thanks to the heat wave
doubt we'll break even next year
Kromebrite huh? sounds like the key ingredient in a GEX engine rebuild
BulletBug ·
ok... one Q...
if a project is planned... whats the most important thing...? is my priority right in oder?
1. bodywork
2. braking(4 pot front, 2 pot rear) do i really need a 4 pot(f),2 pot(r)? planning on using ej20 engine...
3. suspension
4. power plant (EJ20)
5. tranny (or this should be no 4?)
do comment...
ian.mezz ·
BulletBug wrote:ok... one Q...
if a project is planned... whats the most important thing...? is my priority right in oder?
1. bodywork
2. braking(4 pot front, 2 pot rear) do i really need a 4 pot(f),2 pot(r)? planning on using ej20 engine...
3. suspension
4. power plant (EJ20)
5. tranny (or this should be no 4?)
do comment...
none of the above
if you are in NSW I would check with the RTA and a engineer bfore doing anything as the rules are starting to change on mod cars.
I know a bloke who spent 50k on a Kit car only to find out it didnt meet the RTA rules🙅🙅
Joel ·
Ian, he's in malaysia
probably abit overkill with the brakes, but you can never have to much stopping power
and gearbox depends how you drive
Ian has a stock one with a turbo EJ20 but he drives like a grandma
BulletBug ·
Joel wrote:Ian, he's in malaysia
probably abit overkill with the brakes, but you can never have to much stopping power
and gearbox depends how you drive
Ian has a stock one with a turbo EJ20 but he drives like a grandma
what is RTA anyway?
ok how if ej20 with stock box?
dont rev too high?
what makes a box get destroyed?
colonel mustard ·
RTA I'd the road traffic authority. There are laws in aus (and they are different in all states) controlling what you can and can't do to modify registered cars.
What kills gear boxes? Power. These gearboxes were not designed to have heapsss of power to go through them, hence why Dave (stidub) is upgrading. And with an ej20 turbo, the last thing you wannt to happen is to have to pull the engine and gearbox out.
Priorities in the correct order?? Probably not. Unless and a
amazing pro is doing all the custom work (exhaust/ intake piping ect) leave body work till last.
ian.mezz ·
BulletBug wrote:
Joel wrote:Ian, he's in malaysia
probably abit overkill with the brakes, but you can never have to much stopping power
and gearbox depends how you drive
Ian has a stock one with a turbo EJ20 but he drives like a grandma
what is RTA anyway?
ok how if ej20 with stock box?
dont rev too high?
what makes a box get destroyed?
ok what ever the road rules are where you are.
after your done all of your home work.
the main thing is that you finish what you start
ian.mezz ·
Joel wrote:Ian, he's in malaysia
probably abit overkill with the brakes, but you can never have to much stopping power
and gearbox depends how you drive
Ian has a stock one with a turbo EJ20 but he drives like a grandma
What is that up near the top end of NT
BulletBug ·
Any idea what box jak rizzo is using?
boof2332 ·
Nice work Joel,
Just to comment on the box. most use single side plate boxes with a super diff...and welded 3rd and 4th gears.
I am pretty sure both Jak and Paul spun 3rd prior to gettin the gears welded.
I had the welded gears from the start, although i blew up 2nd gear twice......
I now have albins internals with really tall first (3.0), tall 2nd (2.0) stock ratio 3rd and taller 4th(.82)
Dave butler did mine and I have been taking heaps of people for "hard" runs and the box has not missed a beat.
Without a turbo a stock single side plate will last along time ....if you are not stupid with it all the time..
Matt
Joel ·
You win some, you lose some.....
well its a rainy, dark and gloomy day so i figured perfect to finally get those heads off and suss out my engine
shoulda known better as my mood would soon match.... cos what i found aint pretty
confusious say dont always trust low mileage engines.
because its so long between services this can happen:
lack of schedueled coolant changes has allowed severe electrolosis to nom nom the heads and engine block
and looking how close its got to the combustion chambers and cylinder liners i dont know how it was possible that it ran as well as it did
in all i got 387kms on it and it really impressed me even being like this with how it ran, so i realise that a fresher engine will be even better again
be that as it may though, at the moment im just really over all this shit and the haha told you so's so for now its going back to vw power
no fun but i got rego coming up shortly and its only done 600kms since last years pinky, so as you can imagine i just really want my bug back on the road wont be for too long though
once i regain motivation ill track down another engine or as a last resort theres a WRX front cut sitting here that can go in it but i really would prefer not go thro all the bullshit involved
a good mate of mine who's a car dealer has offered to pick me up a good liberty from the auctions when hes back fromt he US so if nothing turns up in the mean time thats proabbly the way ill go
DaveCarter ·
ouch man that sucks. What a pity. It looked like it went so well
Joel ·
ah shit happens
its a shame cos i cant find anything else wrong it, pistons look abit oilly but it wasnt burning any
it could be fixed with welding and lots of cleaning but in the end its so much easier and cheaper to just grab another long block
gonna look into a few possibilitys cos i can get one half the age and bigger if i went twincam EJ25 just gotta find out whats compatible with what
Bizarre ·
Hope you have a stack of the sh!t the cat has - man you gunna need something to mellow out on
So the blower goes back in??
Joel ·
quite possibly but i wanna get my 1776 back in and setup so i can put it on the market.
id like to have it running in car so potential buyers can see how it drives though so theres one good to come out of all this
funny as it may seem though yea its a shame but im not terribly upset, this situation is yet another reason why i went the conversion
another engine can just be slotted in and away u go, no frigging around with tuning setting up carbs etc just plug and play
its just getting hold of one
i havent done much in the way of tracking one down yet but the subi boys are looking after me and are gonna try and chase one up,
he tells me he can get late 90s/early 00s EJ20s for alot cheaper than EJ22 with the added benefit of being a much newer engine and the power difference between the two is fairly minimal
trickysimon ·
Ah well man...back on that horse. It will be sorted out soon enough.
rocknrob ·
Too bad Joel but cheer up...my 98 forester engine cost $400...supposedly only got 86k on the clock...havn't got
it going yet so may be no better than yours😂 still its cheaper than a service on a new car👍
Joel ·
yea that eases the pain the fact that they're so cheap
hell 3weeks ago i sold a plain old 1600 twinport running well but usual oil leaks for $600 and the buyer was more than happy with it at that price
vw motors arent cheap anymore
my mate reckons he can get me a good lib or imp from the damaged auctions for no more than $300 with a good engine but ill see what the subi boys find first
STIDUB ·
SOHC ej25 would suit you nicely yes? no turbo, no massive heads... came out of the foresters & such
colonel mustard ·
Put the 1776 in and pick me up on Sunday 🙂
1303Steve ·
Hi Joel
Bad luck. Some EJ25 models have a known head gasket problem, I'm sure the Subi guys could tell you more about which models are affected.
Steve
Baja Wes ·
HTFU!
🙂
It's just a suby motor, plenty more where that one came from. You should just put some new head gaskets on the suby and keep driving it. Just keep some spare water in the car 😀
That sort of weird damage is why I like the idea of buying a front cut rather than a motor, as you can see the coolant still in it to get a better idea of how bad it might be inside.
BulletBug ·
gosh... thats some nasty stuff there... its kinda eating ur engine... dont be upset joel... with a talent like u, i know this thread wont be RIP...🙂
just have faith and im sure those subi boys will help u find a motor, hope fully a wrx sti(TURBO)... 😁
Joel ·
im pretty sure the SOHC EJ25 are wider than 20s and 22s so they still need the bug to be baja'd to fit in which case id just go ahead and fit the WRX lump sitting at my mates place
there was no way of picking this problem without pulling the engine down
Wes, I know better than to buy straight engines aswell, this was actually a complete driving car i bought and i had a decent drive of it before, it ran perfectly and had nice clean coolant in it and continued to run well in the bug and wasnt getting hot at all. coolant may have been changed but i severly doubt it, he was in no effort to tidy up the car or engine as it was only going to scrap if it didnt sell
even my old boss whos a mechanic of 43 years was impressed with how it ran
this problem only showed up when i ran the coolant low and the headgasket let go otherwise who knows how long it might have gone for
and even then it was still running fine just started getting hot on me around town. came as a surprise
scott the subi bloke said he sees it all time in older EJ motors and what happened is usually the way it goes, they keep running till the headgaskets give out
itll be back up and running under subi steam soon enough
ian.mezz ·
Bad luck.
I told you to go ej20T🤪🙅🤪
YOU bETA CALL your mate down the coast.
We can get Trade price for you on parts.😵
71-BEETLE-SEDAN ·
Bad luck. I know how annoyed i would be right now.
But onto the positives this 1776 woUld it come with carbs and exhaust etc. And roughly how much are we talkin.
Bad luck with That block at least there is heaps of subis out there people will continue to write off.
alkoran ·
Hey Joel, check out this thread out of volks-swap. It says that the Ej25 fits with tweaking but no cutting.
Still, at least they're cheap(ish). I'm sure you'll find a good un soon.
Fingers crossed for ya mate
Joel ·
thanks all for the encouragement and kind words.
you can imagine my frustration, I just got a taste test good enough to enjoy it and this happens
but Ive got a few leads to chase up and thanks to alkoran its confirmed something bouncing round in my head
i knew all the EJ18 thro to EJ22 have the same stroke so are the same width but i wasnt sure how much wider an EJ25 ended up
if they fit without innergaurd cutting then all the better
however not sure if an EJ22 ECU is upto fueling an EJ25 but maybe its an excuse to follow through with aftermarket management
but in the meantime if i have to put up with lawnmower motivation (damn VWKD rubbing off on me 😂) then it could be worse
alkoran ·
As for the aftermarket ems, I know you guys got pretty good made in Australia but if your budget doesnt permit a 1000$ one, you can always check for Megasquirt. The thing that is good for you is that an almost pnp version just got out. Check this thread.
I was told by a Subaru factory tech that the early EJ25 and the EJ22 will run off the same ECU, just take the sensors off the EJ22 and put them on the EJ25 and off you go. 😁
BTW, I've had no dramas with mine, but I could understand how regular servicing would do what you have found in your water galleries.
rocknrob ·
hey joel in a way we are in the same boat...installing new engines we want to last and one factor is getting the operating temp to factory specs. I see your question on a crappy unmentionable site(wouldn't allow me to register!) regarding flow thru the thermostat. I have done the drilling the 8mm hole but all it does is allow the pump to suck more cool water in. I have a genuine sooby thermostat and it had to sit in boiling water for 5 minutes before it would open 10mm
[/img]
cool water from your radiator just isn't going to do it
i'm going to place my thermostat on the outlet end of the water manifold which gets the hottest water...the normal little trickle hole should be enough to let hot water get to the spring which will be facing the engine of course. a simple housing can be made using the EJ22 spigot and a turbo spigot which are opposite hand
[/img]
all thats needed is this spacer
[/img]
still waiting on this from a mates mate😬
should fit in easy as its pretty much inline
hopefully this will allow the system to work as it was intended and maintain optimum temps👍
Joel ·
Rob, PM elusive stranger on here, hes one of the mods on vwkd he'll help sort out your registration probs
thats a brilliant idea with the 2 thermostat housings
ive been looking around a few cars out there use inline remote thermostats like some BMW and landrovers
might look into it if i have dramas
cheers for the info Pete, i knew 20s will run fine with a 22 manifold and injector but wasnt sure bout a 25
Joel ·
It seems nothing stays a secret long around here....
for some bizarre reason i got this strange sense of dejavu......
gotta love them, as you can see in the vid, just turn the key it fired up instantly, no smoke or clackly lifters
the way vw engines seem to breed in the shed it wasnt gonna be long before the subis started multiplying aswell
looking abit more presentable now than in a past life
it took a bit of fiddling to fit
being a later model and a JDM Legacy import everything on top was different, had to swap my manifold, harness, alternator, AC compressor, sensors etc
but cooling system pressure tested, compression tested and a 3 month warranty for $550 im not complaining
and you can make that $450 cos i got $50 each for the compressor and powersteering pump, yet to sell the alternator
allegedly under 100k on the clock, im sceptical but i started pulling it down to swap stuff over and it would appear to be likely
inside of the sump is clean as a whistle with no sludge or grit on the bottom,
i doubt its been off cos it was still firmly attached with that original orange silastic in the same manner the other 2 were
all inside the block is nice and clean
all the breather connections are all clear with no real carboning
and most importantly the insides of the cooling system is like new
i have just run it till the fan cycled and all is good
it threw a knock sensor code at first for some reason but it hasnt done it since
i replaced the aftermarket thermostat it had in it with a genuine subi one
its amazing the difference it makes
only took about 5 mins for the temp gauge to hit 90c and just sat there for next 10 or so mins till the fan cut in
1303Steve ·
Hi Joel
Looking good. Is this a EJ20 or 22?
Steve
gerrelt ·
Very nice, Joel! 🙂
Joel ·
oops 😊
its another 22
seemed destined to be a 20, they were having trouble finding 22s, but could get 20s no worries and cheaper too, but they found this on and i prefered to stay 22 so it was a done deal
still got a few things to do with it
got a new timing belt to chuck on it
theres also a new water pump for the old motor but when i swapped the thermostat the current water pump is either new or in perfect cond so itll stay
ricola ·
Nice one Joel, glad you didn't have to make do with air so soon after the conversion!
Rich
Baja Wes ·
yeah Joel, good to see you staying on the path to darkness 🙂
colonel mustard ·
Nice one joel! Now the subaru parts collection starts....
71-BEETLE-SEDAN ·
Wow, didnt take long.
Whatcha gunna do with the 1776.
I like that exhaust too, is the pasengerside tailpipe actually doing anything?
colonel mustard ·
71-BEETLE-SEDAN wrote:Whatcha gunna do with the 1776.
Sell it.
71-BEETLE-SEDAN ·
OKay, whats it gunna come with, i may be keen.
colonel mustard ·
PM joel and he will let you know. 🙂
BulletBug ·
yahoo!!! keep it goin joel... wonder how if u decided to go ej20... 👍
mackaymanx ·
rocknrob, have you considered how your thermostat is going to sense the water temterature with that setup. You have no flow of water past the thermostat.
rocknrob ·
Hi (excuse me joel) yeah it will receive hot water same as any thermostat...it will be at the hotwater outlet of the engine and enough water flow thru the little trickle hole so its not a dead end...and it will get a realistic temperature compared to at the inlet
[/img]
Joel ·
colonel mustard wrote:Nice one joel! Now the subaru parts collection starts....
dont be saying that, i'd probably be put up for adoption
after 15 years my bug/s still live in the shed in town at mum and dads along with too many vws in pieces
if i bring them out here to my place they have to live in the tractor shed and the rats use them as night clubs
but on the subject of parts any one want an authentic subaru paper wieght?
runs well if u only drive 2mins to the shops 😂
Joel ·
Robs thermostat setup will work well if the original heater loop is in place as a bypass when its shut
that makes it just the same setup as most cars have with the 'stat on the hot side of the engine
just as long as the spring side is toward the engine so it can sense how hot the water coming from the block is
i was thinking of going this way as well but thought i'd give the stock setup a try first
im surprised how well it works actually
i was worried about the engine getting cold shocks but watching the temp gauge i could see it doing exactly what brad said they do
to get up temp really quick it just circulates the water around the engine only then as it starts to heat up it just keeps sipping cold from the radiator return
as i wasnt driving there was no air through the radiator so it just kept doing this till all the cold was used up then the fan cut in for about 3 mins
incidently does anyone know the cut in/out temps for the fan?
both motors were identical to the degree
on at 103 and off at 98 which i know isnt the stock so im trying to work out how off my gauge is reading
it sat on about 87 till the 'stat opened and given its a 78c 'stat im guessing my gauge is about 10c too high
STIDUB ·
...that paperweight looks like strange bubble top case, hang onto it, find some BIG p&b's, make the fan & tinware fit.... instant OHC'd 2-3L aircooled 😂
Joel ·
Ha! subaru Oxyboxer 👍
that'll sort the overheating problem 😂
ElusiveStranger ·
Baja Wes wrote:yeah Joel, good to see you staying on the path to darkness 🙂
*Boomy voice*
The Force is strong in this one!
Gotta say I'm laughing over here. Joel didn't want to come over to the Darkside, had a small tinker then loves it.
Glad he found a cheap replacement 👍
PS this thread is funny
kombibob ·
Nice one Joel👍
just a couple of weeks until Ashes folks come over from W.A. with our EJ22 and kit, but it will no longer be going in Mildred 😉
Joel ·
nice one bob, we gonna see all the purists crying at a subi powered split?
well 2:30 this arvo and still 36c and F'King hot!
but i decided what the hell and gingerly went on a maiden voyage run 20km out the bangalow/byron bay road
the new thermostat is certainly doing its job but its abit un-nerving seeing the temp gauge hit 90 within the first 1-2KM
the old motor used to take a good 5-10KM or so before it hit those kinda temps but for those that read my VWKD thread it was cos the thermostat in it loooked like this
but once it got to 90 it pretty much stayed there varying between 90-95 which is really only 80-85 thanks to my innaccurate gauge
didnt get any hotter than that till i got back into town and slowed down to climb the big hill up to mum and dads place, even then it only hit about 98 which isnt that hot
fan didnt start till i got home and let it idle for about 4-5mins
im not giving this motor too much stick till its been running for a while as its been sitting for a quite a while but over all it doesnt feel any different to the other one but its certainly running well and much to my delight when i got back after the run the level in the overflow tank was exactly where i left it
the old motor used to raise it by several inches on a long trip then suck it back in overnight
i also noticed when i came back pulling from down low it pinged abit. it hasnt thrown the knock sensor code again but thats probably cos its not working
rocknrob ·
Hey Joel you are going to love the sooby when you learn to trust it😂 but it is a bit of a worry this watercooled bit(don't tell the aircooled people🙅) probably telling you something you already know but after a while go back and tighten all your hose clamps...heheh don't ask me how i know😬
Joel ·
dont worry Rob, its the first thing i check after it cools down the first time
i can nearly always get an extra turn on each hose clamp after the first heat up/cool down cycle
the down side to this thread is your not seeing all the f**k ups i have, and theres been a few
had a doozy yesterday after i split a hose
Joel ·
i think the bug must be really pineing for forced induction again
the first subi motor had a really high pitched whine which sounded like a turbo spooling
so much so even an expeirenced subi mechanic thought it was a rexxy dub when i pulled up
i found when i pulledit down it was the bearings in the timing belt tensioner
but to add to the irony, this new motor is also whineing, but a much deeper one, that sounds alot like a supercharger
my camera has crap sound quality but u get the idea
its probably coming off the timing belt, i got a new one here to chuck on it, just havient got round to it yet, been enjoying being back on the road
got a dose of sunshine today at the northcoast christmas toyrun
dad and patrick got the trikes out so i thought what the hell, ill go for a pose
its funny the respect VWs get from all walks of life
i had people coming up all morning wanting to have look
71-BEETLE-SEDAN ·
At least we get to see a pic of it outside your garage now, not good bout that coolant but, at least its cause theyre over tight, better than loose i guess.
(and is that the 1776 with the white tinware)
Joel ·
71-BEETLE-SEDAN wrote:I like that exhaust too, is the pasengerside tailpipe actually doing anything?
nah just for looks but shhhhh dont tell anyone
71-BEETLE-SEDAN ·
At least we get to see a pic of it outside your garage now, not good bout that coolant but, at least its cause theyre over tight, better than loose i guess.
(and is that the 1776 with the white tinware)
Joel ·
yea thats it sitting there going to waste
too snooty to sit over in the other corner with all the other motors lol
colonel mustard ·
Joel wrote:nah just for looks but shhhhh dont tell anyone
oh. I actually thought it did...
Nice shots with the trikes 🙂
STIDUB ·
Joel wrote:
71-BEETLE-SEDAN wrote:I like that exhaust too, is the pasengerside tailpipe actually doing anything?
nah just for looks but shhhhh dont tell anyone
but when it gets a whopping great big turbo on it, theres gunna be an external gate attached & its gunna scream out via that one!😂
joel just doesnt know it yet 😀
Joel ·
pffft screamer pipes belong at the track not on the street
I laugh at the dickheads with screamers on street reg'd cars
colonel mustard ·
Joel wrote:yea thats it sitting there going to waste
too snooty to sit over in the other corner with all the other motors lol
thats because it runs... unlike the others. hahaha.
Joel ·
i was born without a soul so you will have to imagine it
$350 lighter now but my bug is again legal
only 2 changes required and dont even relate to the engine.
my front end needs raising cos it doesnt clear 100mm and my tacho needs relocating cos its illegal to have any gauges or accesories mounted ontop of the dash or the windscreen area
just the kick start i needed to begin on my custom dash i wanna build but for now it can go underneath
thanks to one of Ians secret tricks of the trade it snuck under the noise limit by 4dB
71-BEETLE-SEDAN ·
I cant wait till i get mine checked over, glad i mounted my tacho where i did, dunno how im gunna go with the noise limit but, what is the noise limit.
And is 100mm the lowest its legally gotta be?
colonel mustard ·
well, im glad i didnt mount the tacho yet!
Nice work Joel!!
Joel ·
dunno with yours being 71 but mine being 74 had ADR 25 and 27 on the compliance plate that it has to meet
pre 83 cars i think it was have to be under 94dB
we were able to make it abit easier though
the EJ22 like i have make 100KW @6000RPM
but he used the figures from the later ones which make 94KW @5400
the noise level has to be measured at 3/4 peak power so its only 3900RPM with the later ones which i "supposedly" have 😂
at 3900RPM it was only pumping out 83dB but thats with the mr mezz device in
whats interesting though is its actully louder at 3500rpm than it is at 4500rpm
must be the resonation from that stupid canon
re the lowereing rule, lowest part of the car exclusding the wheels cannot be any lower than 100mm
my coolant hoses were at 87mm at the front and my swaybar saddles were at 95mm
71-BEETLE-SEDAN ·
Alright well i think mine is louder than that but will see cause its not to bad around half power.
100mm seems like a preety good height to have it sitting at anyways.
Is this one comin to the nationals?
Joel ·
more than likely
i think ill end up on a few peoples hit list if i dont come next year
trickysimon ·
If yours is 83dB, I would hate to think what mine is with twin webers and a sidewinder 🤪
Wouldn't clear the 100mm either with the muffler 75mm off the ground.
Joel ·
it'll be well over once i take the restrictor out thanks to the hiflow cat
im lucky subis are such a smooth quiet engine
that same muffler on other cars used to set off car alarms in undercover carparks
colonel mustard ·
my zorst sets off car alarms when i drive past flat out in second..... oh yeah!
BlueV2 ·
Pretty sure the limit for VW's is 96dB, which is pretty loud. As I understand it, the sound goes up exponentially, so it takes a fair bit to get to 96dB. My EJ25 with a high flow cat and a straight through muffler registered 90dB at 4000 rpm.
Joel, I would love to know what trick you used to get yours down to 83dB, as long as it doesn't rob too much power.
trickysimon ·
It's every 4dB, the sound "doubles".
Dads an audiologist 🤓
Joel ·
BlueV2 wrote:Pretty sure the limit for VW's is 96dB, which is pretty loud. As I understand it, the sound goes up exponentially, so it takes a fair bit to get to 96dB. My EJ25 with a high flow cat and a straight through muffler registered 90dB at 4000 rpm.
Joel, I would love to know what trick you used to get yours down to 83dB, as long as it doesn't rob too much power.
it could only be 1 of 1 things to shut it up
gasket after the cat only has a 1" hole
you can feel it holding back a little over 4500rpm but nothing major
infact down low its actually pulling better but it is a very free flowing system so that was to be expected
it hasnt really changed the note of the car at all and you cant really tell its there till over 4.5Gs
for the sake of a piece of sheetmetal (or coffee tin lid ala mr mezz) its worth a try
probably still alot better flowing than the stock liberty exhaust system
im gonna leave it in for the time being but i may try it with a slightly bigger hole as i may be able to find a happy compromise
Joel ·
such a lovely day for a quiet country drive....😂
nothing like scaring the marsupials out of your way with the rumble of a subaru boxer
this is just throwing it through the windies coming up the tuckomobil range (which is a private race track ofcourse....🙄) to see if i could dislodge the camera again
A little something i like to call Toxic build up Release...... Im sure its real name is irresponsible driving but noone needs to know that
trickysimon ·
That does sound pretty loud 👍
How did you mount the camera this time?
Joel ·
yes the muffler's back to urban assault vehicle specs
as u can tell by the shaky camera action its hung off the passenger headrest
ian.mezz ·
Joel wrote:such a lovely day for a quiet country drive....😂
nothing like scaring the marsupials out of your way with the rumble of a subaru boxer
this is just throwing it through the windies coming up the tuckomobil range (which is a private race track ofcourse....🙄) to see if i could dislodge the camera again
A little something i like to call Toxic build up Release...... Im sure its real name is irresponsible driving but noone needs to know that
Dislaimer: if your gonna drive like a dickhead on the roads, not that i endorse it (do as i say not as i do) atleast know the limitations of your car. its putting innocent lives at risk as it only takes one lose on a bend to head into one of those cars heading the other way and its all over not in a good way
ahhh you bloody young hoooon😂🤪😂
ian.mezz ·
so tell us Joel how much better is it then a old vw motor?
DaveCarter ·
It sounds tough as
rose ·
Sounds good but I still think that the 1915 with twin dels sound better 😂😂
Who taught you to drive? You shouldn't steer by putting your hand inside of the steering wheel you can get a broken wrist by doing that.
71-BEETLE-SEDAN ·
I love that sound, it sounds good at the start when your pull around that corner.
I love knowing the capabilities of my car and also knowing the road helps a tonn too.
I may have to try that little trick too.
Joel ·
well spotted miss rose
not actually a habit i tend to make but at that 20km/h a non rack and peanut superbeetle with a small steering wheel and wiiiiide tyres takes some leverage
might break a pinky at that speed but i think my wrist is safe
rose ·
If you break a pinky you'll have trouble playing with your nuts😂😂
Joel wrote:well spotted miss rose
not actually a habit i tend to make but at that 20km/h a non rack and peanut superbeetle with a small steering wheel and wiiiiide tyres takes some leverage
might break a pinky at that speed but i think my wrist is safe
Joel ·
oh shit what ever will i do....
have to employ you to do it for me 😉
rose ·
How much do you pay???😂
Joel wrote:oh shit what ever will i do....
have to employ you to do it for me 😉
Joel ·
rose wrote:How much do you pay???😂
😉
STIDUB ·
get a room you two 😂
nice vid joel, well the part that loaded before i gave up anyway, & welcome to being deaf in the near future from that exhaust, thats MIGHTY loud in the vid
Joel ·
dont say that, her big scary husband will come after me
im already deaf as a post, got fairly chronic industrial deafness but my camera has a bad tendency to over amplify audio, especially driving with the window down
may sound loud but its still quieter than my 1776
god bless that factory CW crank and balanced bottom end
i keep thinking its stalled when i pull up at an intersection cos u just cant hear it idling from inside
tacho now being way out of my line of vision now isnt helping that
Joel ·
ian.mezz wrote:so tell us Joel how much better is it then a old vw motor?
worst thing i ever did.....
im getting fat now, cos im not gettting the exercise of leaning forward going up hills
Joel ·
speaking of things getting fat....my fatchick seems to have an obescity issue
tipped the scales at 1004kg today 🤪
admittedly thats with a full tank of fuel, about 50kgs of audio gear, probably 30kg of my tools in the front and various other bits like central locking and powerwindow motors etc not in the original 860kg tare weight
EJ22 are supposed to be25kg heavier than a stock 1600 and 14L of coolant....... pipework, frames etc so i guess 140kg more than stock isnt to bad all things considered
my rims are light weight schneider japan racing rims and even with tyres are lighter than stock vw steelies so i cant blame them
trickysimon ·
Gunna need to shed a few pounds if your planning on keeping up with me at Nationals 😎😂
STIDUB ·
trickysimon wrote:Gunna need to shed a few pounds if your planning on keeping up with me at Nationals 😎😂
untill the corner after the straight bit, the one after the lil kink in the straight, think ur drag orientated beam thing will struggle with that, though, theres plenty of dirt all around the corse, i hear beams are good on dirt 😂
Joel ·
i'll buzz your mirrors as i flyby when your grabbing 1st to get around the corners 😂
Joel ·
haha dave, great super owners think alike
1303Steve ·
Hi
We can see if they need the outfield ploughed with all the tractor frontends.
Steve
Joel ·
well i guess i coulda had my 15 minutes of fame here.....
fire her up, stick a screw driver in the belt and bam..... overnight internet celebrity 🤪
but wheres the fun in that??
I picked up this belt originally for the first motor nearly a month ago but i figured what the hell its there and common logic would say replace it anyway
i also have a brand new water pump but it seems the one on the new motor is either new or very low mileage so im leaving sleeping dogs lie on that one
Ive only replaced one subaru timing belt in my life and it was a SOHC impreza about 4 years ago and i swore id never do another again.......
but thats in a subaru 😂
those who have ever done it will confirm IT SUX!!!!, feeling down the back of couch for coins has more room and visibilty
anyway muffler out of the way and alternator belt off
the pulley comes off easy, just buzz the bolt undone with the rattle gun and it just pops off, no pullers needed like a vw pulley
all the covers just unbolt off pretty simply
good to see none of the usual oil leaks from the oil pump, crank and cam seals that theses engines usually suffer from
all the idler pulleys, tensioner pulley and water pump all appear to be new, even the belt doesnt look that old so its probably not long been done,
the engine apprently has just under 100k on it but im wondering if its actually a tad over with all this evidence showing that the timing belt service has just been done
its standard procedure to replace the waterpump, thermostat and all the idler/tensioners as well as the cam and crank seals when done by someone who actually knows subarus and given that everything except the thermostat was genuine parts im thinking im replaceing a perfectly good new belt, but while im at this stage ill replace it anyway so i know where i stand
it may have been done when the engine was removed and sold, i didnt ask much about the history, i was just happy to have a new engine
they didnt mention it had been done to me but ive put over 200kms on it now, just enough to start wearing the markings off the original belt
i could just make them out, its a dayco belt same as the one im putting on
Theres a lot of confusion out there over the indexing marks for the timing belt
lining up the 2 arrows on the cam gears with the notches in the plastic covers:
and arrow on the crank pulley with the slot in the case:
gives TDC
BUT..... as one of the other cylinders is midway through one of the valve stokes the engine naturally wants to keep rotating
and also if u take the belt off at this stage the right cam (left in subaru orientation) as it has valves half open it also want to keep rotating
SO...
thats why theres a second pair of marks
1/8th turn further on the cams lines up a notch in the outer gear with the slot in the covers:
And 90degrees further on the crank lines up the slot at the back:
To remove the old belt i just unbolt the tensioner:
2 bolts, easy as
also removing the lower left idler pulley helps with getting the new belt on
the belt then slides off the pulleys fairly easy
checking the operation of all the pulleys as was expected they were all smooth and quiet, but on my old engine they all were abit sloppy, and very noisy so always someting to check
Now the tensioner is a strange little bit of gear
its hydraulically operated and needs manually compressing to refit the new belt
easiest way to do it is in vice like so
but its a very delicate item and can be very easily be damaged if its done to quick
its a cup of coffee and a smoke process as it takes a good 5-10mins to compress it fully
i found i was getting about 1/8th of a turn on the vice handle every 30 secs till it was fully compressed
doing it to quick can result in blowing the seals
Once its compressed enough drop something strong and the right diameter through the hole like so and remove from the vice
it can then be bolted back to the engine
its too hard to try and get back in place once the belt is on
Its important to get the belt direction facing the right way (arrows facing clockwise)
dayco belts luckily have 3 index marks on them as well which helps with the lining up process on the pulleys
You can also see what i do to stop the belt jumping cogs as its slipped onto the pulleys
important to do it gently and with a cushion like cardboard so as not to damage the new belt
After lots of choice swear words and probably a few thrown tools/nearby inanimate objects it the belt will reappear on the pulleys
it may take a couple of attempts as they do like jumping teeth
removing the upper left idler may also help if its being a PITA
doesnt take much effort to bolt the lower left idler pulley back on
just be sure to get the bolt started nice and straight so it doesnt cross thread
once confindent that all is well the pin can be pulled
a final double check can be doing a tooth count
from the line on the left cam (right side of bug) to the line on the crank is 40 and a half teeth
other side is 44 teeth
i didnt bother, i trust myself.......🙄
Turn the engine over by hand a couple of revolutions to make sure the belt seats properly.
i fired it up for 10 secs just to check all is well,
im sure the neighbours love it with no muffler
putting all back togther is a no-brainer
i just have some work to do with the timing belt backing plates first
the thread inserts in a few spots have pulled out and need fixing back in
BlueV2 ·
Well done Joel.
Now can you find a quad cam engine and do the same thing so I have pictures to follow .... or you can take the pictures while doing mine 😂
ian.mezz ·
WTF🤪🙅🤪
No Pink or Blue belt😂😂😂😂🤪😂😊
Joel ·
pffft i dont go for fancy schmancy stuff like you turbo guys 😂
11CAB ·
One thing you didnt mention which I always do when replacing timing belts, is rotate the crank 2 revolutions and rechecking the timing marks, before firing up the engine
Joel ·
good point
all i do is unplug the ground harness and wind it over with the starter a few times
Jak Rizzo ·
Pfft, twin cam, try replacing the cam belt on a quad cam rexxy engine, it's a lesson in patience. I installed a blue Gates belt in mine a few months ago, now sounds like I have a supercharger driving sowly in traffic zzzzzzzzzzzzzzz, zzzzzzzzzzzz or straight cut cam gears on my Engle K-8.
Is the twin cam an interference engine like the quad cam, ie: valves will hit pistons if not careful Joel?
regards
Jak
PS I hope u are going to bring that thing to the Nationals Supersprint this year, I've never seen it in the flesh
Joel ·
yeah hardly anyones seen it in the flesh since valla 08
all SOHC up to about 97 are non interfernce, but beyond that they are interferance but of the ones ive seen that have spat the belt, they only ever bend the valves, the pistons dont seem to cop any damage
those 4 cam belts look like a prick of a job
how old is your belt Jak?
my belt was doing exactly what you described,
i can only really hear it when im loping around town about 1000-1500rpm sounds like what you said, a blower/straight cut whine
i thought it may have been a worn idler but they were all new and now with the new belt it does it even louder
im thinking its just the belt bedding in, the old belt was almost new aswell, got me a spare now lol
Jak Rizzo ·
Apparently u are supposed to replace the belt every 100000k's, mine had well over that though. The belt that I took off had a few small nicks & 1mm sized stones in it.
The gates belt was installed about 6 months ago from memory & it's still making the zzzzzz sound.
I was in an undercover carpark today & it sounds absolutely fantastic! I can't beleive after all this time my car still makes me smile.
Jak
Joel ·
i know that feeling
i was cruising into town today driving along side a concrete center divider just enjoying the note bouncing off
im getting good value outta all the WRX guys rubber necking expecting to see another REX, the look of disbeleife on their face when they see an innocent vw is priceless
would be more fun if i had the power to really embarrase them but oh well itll come one day
Jak Rizzo ·
I had 2 flanalet wearing mullet headed bogans in an SS commodore give me the thumbs up yesterday bringing the kids home from the beach. They couldn't keep up climbing up & hill & then through a roundabout.
The looks on their faces were priceless, after all this time it never ever gets old.
Jak
PS I don't think getting a thumbs up from bogans is a good thing is it?
pete wood ·
totally. I'm a bogan. 😂
ElusiveStranger ·
Jak Rizzo wrote:I had 2 flanalet wearing mullet headed bogans
Bogans???
Advacheersnce
Joel ·
thanks jak, now i got this stuck in my head
colonel mustard ·
Classic!
Baja Wes ·
Joel wrote:tipped the scales at 1004kg today 🤪
admittedly thats with a full tank of fuel, about 50kgs of audio gear, probably 30kg of my tools in the front and various other bits like central locking and powerwindow motors etc not in the original 860kg tare weight
That's nothing. My V6 powered, climate controlled, electric windowed, kombi gearboxed, subwoofered audio, lift kitted, offroad tyre fitted Baja weighs 1140kg!😀
Jak Rizzo ·
Joel wrote:thanks jak, now i got this stuck in my head
I think that was the guy driving!
jak
colonel mustard ·
Baja Wes wrote:
Joel wrote:tipped the scales at 1004kg today 🤪
admittedly thats with a full tank of fuel, about 50kgs of audio gear, probably 30kg of my tools in the front and various other bits like central locking and powerwindow motors etc not in the original 860kg tare weight
That's nothing. My V6 powered, climate controlled, electric windowed, kombi gearboxed, subwoofered audio, lift kitted, offroad tyre fitted Baja weighs 1140kg!😀
isnt that a bad thing.....?
Smiley ·
colonel mustard wrote:
Baja Wes wrote:
Joel wrote:tipped the scales at 1004kg today 🤪
admittedly thats with a full tank of fuel, about 50kgs of audio gear, probably 30kg of my tools in the front and various other bits like central locking and powerwindow motors etc not in the original 860kg tare weight
That's nothing. My V6 powered, climate controlled, electric windowed, kombi gearboxed, subwoofered audio, lift kitted, offroad tyre fitted Baja weighs 1140kg!😀
isnt that a bad thing.....?
It's a Baja, so going fast isn't the greatest thing, I'm sure Wes's car would give most a run for their money though. Plus a lot of the weight is over the rear wheels which helps add traction while offroading. Still weighs a darn sight less than just about every 4WD out there.
Smiley
Baja Wes ·
colonel mustard wrote:isnt that a bad thing.....?
Depends on what you crash into.
😂
surfbeetle ·
I have been reading this entire thread over the last few days in my spare time. It's very impressive. Also I must say thank you as it has answered questions I had regarding the alternator wiring as well as the surge tank. Hopefully I can get my EJ20 Turbo up and running soon as money permits. I am in California, out here in the desert, a lot of people have been using EJ's for a while in their sand buggies. I was able to pick up a Link ECU for it on ebay with a wiring harness. It plugged in with no issues.
One thing I must comment on is the oil pressure and oil light sender. On my VW motor, I used a VDO sender that was both a pressure and the dash light sender, not two separate items. Also, I saw on a vanagon/subaru conversion website that they used a stainless steel braided line to allow the sender to be mounted out of the way of the alternator. This is what I plan to do as I am leaving the alternator and air conditioning in the stock location.
Again thanks for the great thread and motivation to continue with my project.
Joel ·
Hi Surfbeetle
this time last year when i was first considering this conversion i just couldnt find any real thorough info on it which is why i decided to make the thread.
Its becoming more and more popular conversion so the more info there is out there the easy it will be for people in the future
the oil sender issue really is a PITA....
because of the alternator/powersteering bracket and even the alternator itself its just not possible to screw a pressure sender directly into the port like the stock idiot light sender
those duel pole ones like you have are good as they eliminate the need for a tee and a the idiot light sender
ive seen them fitted by using a pair of 45degree adapters so it clears the alt and powersteering bracket
the other option is at the flywheel end of the block is a second oil gallery with a blank plug in it
with an 90 degree elblow fitted here you can just squeeze in a pressure sender like the pic below
i kept the gallery fitting from my old engine with the intention of doing the same, but in too much of a rush to get the new engine in its on the still to do list
Jak Rizzo ·
My Autometer Oil Pressure sender fits fine under the alternator, maybe it's different on my rexxy engine? Mine is in a VDO T-Section so that I can run a 2.1L wasserboxer oil pressure switch hooked up to an Autometer warning light on my dash.
The wasserboxer switches come on at a higher pressure than the standard Subaru ones.
jak
Joel ·
they would surely be the same
mine with a 690pk can just get the alternator low enough to actually get the belt on the pulleys
maybe with that underdrive pulley on yours jak it lets the alt sit abit higher??
looks like you have got the alt sitting pretty high on the tensioner bracket?
Jak Rizzo ·
my alternator height came about purely from belt length. i could definantly do with one an inch shorter, which u just reminded me is on my to do list.
regards
Jak
Joel ·
ok so it was giving me the shits not having the snow plough on
anyone who has a kamei chin spoiler on there bug will know the difference they make especially at speed
for phase one i decided to go the swiss cheese route
i was just a bit worried about losing to much strenght if i just cut a whopping hole in it
i know jak has done that with his but mine has taken a hell of a beating from when my bug was stupid low and has a few stress cracks around the place
anyway with a heap of 40mm holes it looked alittle something like this
when on the move my temp gauge never budges off 90c
within about 5 mins it got there as per normal and sat there for about 5kms but not long after that it started to climb till finally the fan cut in
i was still over 5kms from town but kept it going
it ddint get over 102 which is the temp the fan cuts in at but the fan never turned off the whole way into town
had me kinda puzzled cos the opening i made was perfectly matched to the slots in my valance
then it twigged
the spoiler hanging down below the bottom of the valance was cutting off the air flow to the scoop i made
so spoiler back off problem gone
not a total loss, as i suspected putting a heap of holes in the center partially defeats the purpose
but it was still working to a degree, just not as well as it used to
STIDUB ·
perhaps runa bit of flat ally from the kamei to the apron then passed the bottom of the radiator, so everything goes thru it not under? jak has a big boxy looking duct going from kamei to apron seems to be very effective 🙂
gerrelt ·
Hi Joel,
I am fitting a kamei spoiler too.
I allready had it on the car, for test-fitting. I had no problems with cooling.
I recreated the slots I made in my front vallance in the spoiler:
I made some brackets to make the spoiler a little sturdier on the sides, and two lower brackets to make the part below the vents a little stronger.
I also made a plate that goes from the underside of the spoiler to the underside of the radiator.
It's screwed on to these two lower brackets (plate not in place in this picture):
I still have to paint the second hand spoiler flat black. I don't really like the purple.. 😎
But it's to cold at the moment here for painting...or working in my barn... 🥲
This all might not apply to you, btw, you've got your radiator mounted higher, and I am running a 1400 cc, which is probably easier to cool.
re: the pic above, where the two support pieces of alloy are, make it a sheet....?? air flow.......
my question is, does it work as well with holes in it??
ian.mezz ·
you may have trouble cause your radiator sits so hi and its not a cross flow and only the bootom half doing all the cooling, and you may need two small fans????
I ran my around over winter with no hole and the fan used to say on longer at idle. but still go off.
71-BEETLE-SEDAN ·
May i say thewy are some nice welds on that rad frame.
Joel ·
Gerrelt, yours works well because your radiator is right down low in the air flow,
due to size of my rad its up on top of the frame head
i've got my setup so the radiator cap and headertank cap are both level with each other and the highest point of the system
so all i have to do is tip the coolant in and drive, no bleeding needed
if i ever have to get a new radiator ill get a small low profile cross flow one from an alfa or a pug but the problem with those are theyre a pain to bleed cos there so low and dont have a cap
i know the alfas have a bleed port on the top but im happy with my current setup its proven itself to be more than adequate in 40c+ weather and my current rad is freshly reco'd so it probably wont come to that
colonel mustard ·
shotgun kamei...?
Joel ·
its pretty well fubar and has a decent crack along the bottom and the gel coats gone where its been bottomed out to many times at the base
oh and now has lots of holes
1303Steve ·
Hi Joel
I made an alloy section that fitted where the old deformation element bolted it and I completely boxed in around air intake behind the front apron.
Steve
Joel ·
so ive now got over 600kms on this thing since the new engines gone in
all is going sweet, its getting better fuel economy than the old motor
i'm averaging 8.2L/100 which is about 60%city/40%highway which will get alot better once i stop driving it like its stolen
my city cycle sux cos every stop sign or redlight theres always some young dickhead in a falcodoore or rice burner that hears it and wants to race
anyway oil and coolant levels havent moved and the only error code ive had was when i broke the wire off the TPS connection when i was getting the eng cert done
ive already hacked about my kamei, figured i may as well hack up my car bra as well
had a small issue of it blocking the rad intake
easy fixed with a pair of scissors 😂
when i get a chance ill get the upholstry shop to sew in some fabric mesh like mainstream car bras have
this will help give it some strength and stop animals and small children being sucked in
not too many people saw my bug before i resprayed it in 2001 but it had what could easily be described as the worst case of gravel rash on the north coast.
i live out on some very dodgy roads so it doesnt take long for it to get bad hence the need for a bra now that im using it alot more regularly
71-BEETLE-SEDAN ·
I was gunna say why you usiing that i think they look like crap on every sort of car.
Mine is the same but only cause havent got running boards and at the moment we are working at saleyards and they have a massive area which is just gravel and i kinda had to show off to the guys i work with. I must say it is fun.
Is there any more accesories youve got for your bug that are gunna be cut up cause they black the intake?
Joel ·
umm no theres not too much more than can be in the way
colonel mustard ·
car bra's worth it on expensive paint. 🙂
Joel ·
its a 9 year old 2 pak respray so its not exactly an expensive paintjob
the car bra may look stupid but its a good preventative measure, it new at $50 is alot cheaper than what it cost me nearly 10 years ago to have the car sandblasted cos the stone chips were so bad
now ive pretty much finished the mechanical side of things i'll finally get into gear and repaint this year, the new paint i have for it has been sitting in the back of my shed cupboard for over a year now and i dont feel like having to have it sandblasted all over again
Joel ·
I guess by now everyones wanting to know the $64,000 question
i kept track of everything that went into it right down to silly little things like $2 check engine light etc
my initial gameplan was on the road and engineered for $3k and 3 months
that was with me doing the entire lot
the 3 month part was way off but that was my doing.
everytime something got hard i cracked the shits and walked away from it, sometimes for several weeks
and if it wasnt that i was waiting on parts or just busy working on other cars
after i bought the S coupe i spent over a month tinkering with it and never once touched the bug
then people kept dumping their own cars on me for work
Well anyway before the first engine replacement the budget looked alittle something like this with me instead taking the smart option and paying the pro's for the loom and sump
1992 Subaru Liberty 500
ENGINE/ADAPTER PARTS
Adapter plate and flywheel 480
Flywheel pilot bearing 08
5PK690 alt belt 23
flywheel bolts 10
adapter bolts 04
Sump modification 605
COOLING SYSTEM
Radiator 20
header tank 129
radiator cap 12
Stainless steel tube 1.5" x8M 113
bend pipes 45
Commodore V8 top hose x2 32
EA-ED Falcon top hose 18
XG falcon ute/van btm hose x2 40
box of 20 Tridon hose clamps 31
marine ply for radiator 12
pinch welting 12
FUEL SYSTEM
Surge tank 57
7M spool of codan EFI hose 70
1M 12mm fuel hose 14
Fuel tank fittings 16
Fuel Filter 39
Assorted grommets 20
replacement lift pump 80
EXHAUST SYSTEM
Catco Hi-flow catalytic converter 50
impreza header 20
mandrel bend 2.25" 45* 20
mandrel bend 2.25" 90* 19
press bend 42mm 10
stainless steel exhaust tips 44
cat flange gaskets 10
INTAKE SYSTEM
pod filter 12
silicon hose straight 3" 13
Silicon hose 3" 135* 23
mandrel bend 2.5" 90* 16
mandrel bend 180* 2.5" 40
TOTAL 3167
if u took out the $250 for the loom and 605 for the sump and factor in engineer cert ($350) i woulda been under the original budget had i have gone with my original plan
but looking back im so glad i made the right decision and had those 2 professionally done, they're the 2 main areas that make life hell if you skimp
In the end with the new engine costing me $550 and the engineers cert costing $350 I still only ended up just over $4k which is less than what my 1776 cost me to build 4 years ago even with me doing all the assembly
$4k now wont even buy one of those 1600 mexi crate motors after the price jump they had last year and im not even going to comment on the quality of those, i doubt even a stock reco would be under that if done properly
and to build a 150hp vw engine would take double that $4k figure and at the end of the day it will only have 1/3 the lifespan, wont be anywhere as smooth or economical and when it blows up will cost another $8k to replace
i know which i'd rather
there are alot of things missing off that list that i already had like
radiator fan
facet Lift pump
HD clutch
relays
wiring
electrical connectors
clamps
sealants
epoxys
muffler
welding supplies
various nuts and bolts
various scrap metal plate and box section RHS
I did fluke afew things cheap, the chances of getting a brand new hiflow catco cat for $50, bosch EFI pump for $50 or a reco radiator for $20 are pretty slim but with other things it was the opposite
there no real reason to go all out on a custom tigged alu header tank when a plastic factory one from something european works fine and the alu surge tank....well lets not open up that can of worms again
Also i dont really count the kafer bar as being part of the conversion
its a fixture of the car and would always stay even if the subi went for good and knowing now the difference it makes i woulda fitted one regardless
its been a huge job, the amount of welding done has been obscene, especially all the stainless welding on the coolant lines and exhaust
i felt like giving up several times but with alot of perserverance in the end with the way the car now performs now i couldnt be happier
yea a turbo engine woulda been nice but then I'd need to spend another $4k on a gearbox to be able to enjoy it instead of driving like a grandma and hack my car up a whole lot more to get the engine, turbo and intercooler to fit
this engine has more than ample power for me and has surprised more than a few people already
besides my bug is just a toy/cruiser not a race car
Joel ·
damn it my price list didnt copy and paste too well
STIDUB ·
$64,000!!!!!!!!! woah! i thought this was supposed to be a cheap conversion!!!!!!! now id really hate to know how much micks' cost him 😂
you can tell you dont have a minister of war & finance posting up the expenses :P
Joel ·
thats 64,000 japanese yen 😉
with change left over
1303Steve ·
STIDUB wrote:you can tell you dont have a minister of war & finance posting up the expenses :P
Hi
When people ask you do you want a receipt you need to say no, its only incriminating evidence.
I spent much more than that on the motor in Davids car, next time is Suby time.
Steve
ian.mezz ·
STIDUB wrote:$64,000!!!!!!!!! woah! i thought this was supposed to be a cheap conversion!!!!!!! now id really hate to know how much micks' cost him 😂
you can tell you dont have a minister of war & finance posting up the expenses :P
🙅🙅🙅 It was $63,999
Joel ·
you know me, not to be outdone by anyone.....
Kabba63 ·
WOW...! Gee mate I only new to this site, and I have been looking for a thread like this for weeks as I am wanting to do the same conversion to mine yet a EJ22T although in saying that you a really starting to make me think EJ22 as it cuts alot of time and work out. Its just that I really want horse power this time round so maybe I will have to go turbo, hhmmmm Im a little lost now, "scratching my head" I must say it is really nice to see everyone on this site seems to be helping each other out. I would really like to say thank you for such an awesome write up! And I wish there was someone like you down here in Sydney because I would be asking them a thousand and 1 questions...😀 good work Joel...
rocknrob ·
Yes it was a great write up Joel and it really is a hard call to decide between the EJ22 and the EJ20t...just depends what you want your car for. In a beetle the 2.2 must be so torquey down low cos i know it was in the kombi.👍 So glad I still have the 2.2 to swap back should i decide to👍
Joel ·
Kabba, just ask any questions on here, its what the thread is for.
theres probably other people with the same questions and if i dont know the answer someone else reading probably does.
overall im pretty happy with the EJ22
i still havent grown out of that leadfoot boy racer mentality and would really loved an EJ20T.
Theres a GT-B legacy twin turbo engine sitting in a little birdys shed with my name on it but still weighing up if i go through with it or not
the EJ22 pretty much fell into place and fired up where as a turbo engine needs alot of body work.
All the rear parcel tray needs chopping out and boxing in higher for intercooler or charge cooler clearance, and the quad cam motors dont fit between beetle bodywork, see ricolas thread to see exactly what i mean, which takes some major reconstructive surgery to get around
then theres the gearbox which needs moving forward and intensive work over to handle the power.
for all that extra work involved im happy to live with alittle less power, and alot less cost
a stock liberty is no slouch, but chuck that engine in a car thats nearly half a tonne lighter and you still get one f**king quick bug
besides the subaru community widely accept that the EJ22 is one of subarus best built bulletproof engines and very under stressed.
just dont overheat them and look after the cooling system and they'll go for well over 300k. dont seem to see many turbo motors making those kinda KMs, they have a rep for spinning bearings, and having head problems on some models but im probably just trying to find excuses not to do it
Joel ·
first big trip report
well the run upto dubs by the pub yesterday marks the bugs first decent trip with the new engine,
up till now the longest its done is only about 50kms in one hit
its now done a tad over 1500kms since the engine number 2 went in
im happy to say the trip went well, car ran perfect up and back
i filled up as i left ballina and being early on a sunday morn there was sweet FA traffic on the roads
i drove nonstop till i got to the nudgee service center which is 5 mins down the road from the brissy entainment center where every meets
when i say non stop i literally mean NON STOP.
i didnt get stopped at the sextons hill lights and now the gateway bridge toll gates are gone i didnt have to slow down once thanks to the low levels off traffic
it didnt twig till i actually stopped at the servo that i hadnt changed out of 4th once between leaving ballina and pulling into nudgee service center, thats over 200kms without a gear change....crazy
it pulled up every hill and over the gateway happilly in 4th
i didnt fill up till i headed home but that tank i got 7.6L/100km
thats sitting on 110-115km/h as its duel carriage motorway all the way from byron now but also abit of stop/go convoy driving
i took a couple of people for some rigorous joyrides too which probably didnt help things either
i had to head into the city on the way home to catch up with the younger brother who lives over fairfield way
even with all the stopping at traffic lights my fan never came on once
to date in 1500kms the only times its actually come on was my failed kamei spoiler gag and a few times when ive let it idle in my driveway for about 5mins after a drive to make sure the fan really does work
it just doesnt get hot enough to turn it on under normal driving, gets very close some times but hasnt yet, the stainless pipes underneath are largely to thank for this
just goes to show how much energy is wasted on old RWD cars with direct drive fans
it sat on 92c the whole way up there and on the way back untill i slowed down to 100km/h around nerang and interestingly it climbed upto 98 and stayed there.
soon as i left tweed and cranked back upto the 115km/h it dropped back to 92
so my assumption on this is the intake on the valance needs opening up abit more
im just gonna cut the bars out and make it a square hole i think
im surprised actually that it stays as cool as it does given the small area of the intake currently
only other observation was as i pulled off the highway and coasted down the hill into bangalow i noticed the EFI fuel pump was making the cavitating noise again, alot like ians does all the time with no surge tank 😂
a quick check proved the surge tank was pretty toasty to touch.
but im pretty sure the reasons for that is 1. my surge tank is only 1L and 2. my fuel line setup,
i run straight rubber hose all the way through the tunnels which are also inside another protective hose so theyre very well insulated.
if they were metal and running underneath the car they would be getting a good cooling effect from road draft like the coolant pipes
i had pushed the bug abit just prior to this as i wanted to see how it pulled up the st helena hill at byron
probably shouldnt be admitting this on a public forum but anyway it pulled 130km/h in 4th up there with abit more to give but i didnt wanna push my luck,
i'd already done that enough through sleepy hollow where a red P-plater in a BA XR6 just had to play. no wonder they keep killing themselves in accidents
damn this thing is gonna lose me my license
anyway thinking another possiblity was the fuel rails are just getting hot from the non vented decklid i chucked the standoffs on but it actually ended up making no difference
first step is gonna be metal lines under the bug
i feel abit more comfortable doing that now that ive raised it 1" front and 2" at the back
and failing that im thinking of simplifying things with an intank fuel pump.
1303Steve ·
Hi Joel
Sounds like fun drive, nothing like a bug with some grunt on the open road.
When I 1st fitted the WBX in my 1302 I only did city stop start driving with an occasional quick blast down the M5.
My 1st real road trip was to Valla in 1988, every time I got up to around 100-110 kph the water temp would drop, I kept getting paranoid that I had lost coolant and that there was nothing for the sender to register.
Same thing happened driving down Dorrigo mountain stuck behind slow moving cars, the temp dropped about 20 degrees.
Its your call but I would leave it alone.
Steve
71-BEETLE-SEDAN ·
If you loose your liscence ill confiscate your bug so you don do it again.
Joel ·
1303Steve wrote:Hi Joel
Sounds like fun drive, nothing like a bug with some grunt on the open road.
When I 1st fitted the WBX in my 1302 I only did city stop start driving with an occasional quick blast down the M5.
My 1st real road trip was to Valla in 1988, every time I got up to around 100-110 kph the water temp would drop, I kept getting paranoid that I had lost coolant and that there was nothing for the sender to register.
Same thing happened driving down Dorrigo mountain stuck behind slow moving cars, the temp dropped about 20 degrees.
Its your call but I would leave it alone.
Steve
when i get it repainted im going to fit a usa A/C valance but till then just weighing up options
weather is only gonna start cooling down now and some other driving i wont mention failed to get it any hotter so maybe its best left
got another vw gathering on the goldy next sunday which will test a few changes
i'd love to unleash it legally somewhere decent like mt panorama just to properly expeirence what its really got
the back roads around here are no fun, by the time u get a decent speed up u have to slow down for a corner or dodge an animal
colonel mustard ·
Sherman front valance for $190.. :P
gerrelt ·
Nice drive, Joel. It sounds like you had fun!
Maybe if you cut out the front vent slots to make a square, you can put the Kamei spoiler back on?
pete wood ·
I think 92 is perfectly acceptable. Mine sits on about 91 most of the time on the freeway. Even on a really hot day... and that's pushing 31" tyres with a 0.77 overdrive in an 091 box. It's doing like 2700rpm at 110 or there abouts. I used to freak out when it got over 90, but really, it's pretty good now. I mean when I first had it going with the rear mount radiator, it used to creep up to 100deg on the freeway. 91-2 is much more acceptable. I went out on sunday arvo offroading up the mountains and the fans came on a few times then and in traffic on the way home, but the rest of the time it's great. Afterall, the fans are spose to come on. Re the aerodynamics of the radiator box, I'd look at what's happening under the car before opening up the front more. A little gurney flap to create extra pressure under the car might be the trick.
Joel ·
heats getting away from the rad fine
was just that 90-100km/h threshold that it crept up abit
but anyway valance is now modified 🤓
havent done any testing yet but its opened up by over 50%
today it hit 38c and for the first time ever my fan finally came on
but not while i was driving.
sitting in stop go lunch time traffic it came up abit but no fan,
I stopped and went into a shop for 5 mins when i came out and i fired it back up the fan cut straight in, ran about 1 min and cut off, i reckon i can blame heat soak on that one
JVLRacing ·
it will eventually take a toll joel...these motors still like cold air around them.....heatsoak ,fuelrails ,surge tank etc u will end up with probs....
Joel ·
i was thinking that JVL,
curiosity got the better off me so i went for a wander next door and popped the hood of the neighbours 96 GX wagon and had a looksee
the only air entering the engine bay is coming in through the radiator, so its already preheated,
crank the a/c on a hot day too then the extra heat of the condensor is only adding to that
granted the stock airbox has a cold air feed from inside the wheel well but seems to be boy racer etiquette to throw that out and fit shiny pretty pod filters instead so the engine can run soooo much better on hot engine bay air 🤪
im thinking maybe of stealing jaks idea and boxing in my filter and ducting a feed into the wheel well
maybe a frenched intake in the guard, if i can be arsed doing that much body work
but at present my filter is sitting right below the louvers for the rear window intake
been meaning to chuck the digitem remote probe on it and go for a spin
colonel mustard ·
could you run a "daimo style" pipe up to the condensor, just to get some air flow onto it??
i would have to agree that jak's hole in the gaurd would logically mean cooler intake air temps.... but what evidence do you hvae that your intake temp is too high??
Joel ·
colonel mustard wrote:could you run a "daimo style" pipe up to the condensor, just to get some air flow onto it??
i would have to agree that jak's hole in the gaurd would logically mean cooler intake air temps.... but what evidence do you hvae that your intake temp is too high??
by condensor u mean pod filter 😉
i dont think they are high
if i had one of them flashy scanreader thingys i could see what my intake temps are but meh engine runs happy enough and putting the decklid standoffs on for the last 30km home didnt make any differences
but the idea of a cooler intake charge is appealing
havent you read boostcruisng, coldair intakes or CAI for the cool ppl is where its at according to all the 17y/o mechnical engineers that post on there
JVLRacing ·
Jaks way of scollopin the guards is very good....
but first do a test with the deckids u have *heat test with them both* temp testing could save lots of dollars!
colonel mustard ·
Joel wrote:by condensor u mean pod filter 😉
ah no... i mean -
Joel wrote:crank the a/c on a hot day too then the extra heat of the condensor is only adding to that
Joel ·
thinking im missing the gist of that one
anyway the condensor will just sit infront of the rad like a stock install and use the rad fans
but now that the engines in the back, heat off it is not gonna be an issue
Joel ·
JVLRacing wrote:Jaks way of scollopin the guards is very good....
but first do a test with the deckids u have *heat test with them both* temp testing could save lots of dollars!
yea gonna do some testing soon as i get the chance
the highly variable weather we get here isnt making it easy
38c and truely oppresive yesterday.... pouring down with over 2" rain today... gotta love it 🙄,
just on the subject of temps
Pete, can you satisfy my curiousity?
i know your's is a 25 but what temp does your gauge say when the fans cut in?
im assuming your fans are switched by the ECU?
mine are on at 102 and off at 98 which i always thought was a bit high but both engines did it exactly the same and seem happy enough about it, i cant seem to find info on what temps the OBDI single speed fans operate
cheers
JVLRacing ·
My one fan worked of ECU......but never ran at those temps u blokes are at....
So are u living around balina joel?
jjwebb123 ·
what a beast well done.
Joel ·
JVLRacing wrote:My one fan worked of ECU......but never ran at those temps u blokes are at....
So are u living around balina joel?
yea just 15 mins out of it
im wondering about the accuracy of my temp gauge
i meant to test it when i swapped the motors over
within about 5 mins it gets to 90c and sits there for ages which im guessing is the 'stat opening temp
but the 'stat is rated at 78c so i'm really thinking gauge could be off
none the less though its not gettting hot at any rate even hot enough that the fan is cycling it only rises the overflow level by 1.5"
not bad for a 14L capacity system
oh yeah steve, i found out the othe day its blatantly obvious when you get a coolant leak
i got a big white steam cloud behind me the oter day driving along, checked it out and my tyre wore a hole in the overflow bottle....oops, knew mounting it under there would have a downside somewhere
ian can only do it cos he has pizza cutter tyres
ian.mezz ·
Joel wrote:
JVLRacing wrote:Jaks way of scollopin the guards is very good....
but first do a test with the deckids u have *heat test with them both* temp testing could save lots of dollars!
yea gonna do some testing soon as i get the chance
the highly variable weather we get here isnt making it easy
38c and truely oppresive yesterday.... pouring down with over 2" rain today... gotta love it 🙄,
just on the subject of temps
Pete, can you satisfy my curiousity?
i know your's is a 25 but what temp does your gauge say when the fans cut in?
im assuming your fans are switched by the ECU?
mine are on at 102 and off at 98 which i always thought was a bit high but both engines did it exactly the same and seem happy enough about it, i cant seem to find info on what temps the OBDI single speed fans operate
cheers
102 sounds ok to me, you think to much🤪
ElusiveStranger ·
Nice going J.
OT - Why do I get 3 notifications sent when someone replies to this thread? I logged in 5 hours ago, now I've logged back in (E-mail) and 30 bloody notifications for 10 posts!
1303Steve ·
Hi Joel
Most Euro cars have the fans wired to the battery so that the fans continue to run after shutdown, this is a good idea as the coolant will continue to circulate even with the motor off.
On my old 1302 I had a Davies Craig fan switch, when it was 1st put together with carbs it just turned on or off when needed.
When I went EFI I used the ECU to trigger the fans, I felt that this was not a great idea for cooldowns so I wired the Davies Craig switch to work via the "buzzer" terminal from the ignition switch so as soon as the key was removed the Davies Craig switch took over the fan switching.
Steve
Joel ·
Balders, atleast you only get 3, i get 6 🤪
its just due to the amount of people who subscribed, must only be so many can be sent per email or soemthing like that
Steve, my radiator has a fan sender switch in the bottom of it, i've thought about using but the ECU seems to do a good job of managing it so ill leave it be for now
plus the ECU idles the engine up when it kicks the fan in like that
and once i get my a/c going it will make things easier too as the ECU controls the a/c side of things too
My S coupe i just sold was also like that with the fan switch, running after shutting down.
A few times i pulled up in a carpark locked it up and walked away and someone called out your car's still running 😂
Joel ·
as i mentioned i ended up opening up the radiator intake by cutting the bars out of it which opened it up by 50% as i had the slots evenly spaced
gaping hole looked like crap so i got some expanded metal to put in it
oh whatever 🙄
well its failed to turn my bug into a show car, i want my refund
ugh.... chrome how tacky
thats better
i noticed while i had the rad cover off there's proof there that the airflow is making it all the way to the top of the rad
bug radiator 1
two crickets and a fly 0
now i just gotta wait for some warmer weather with less precipitation to see what sort of difference it makes
pete wood ·
Mine aren't switched by the ECU. I have them set to come on at 95deg.
ian.mezz ·
HA yOU
that's what I did,
A Ricer job, stop taking all my good ideas 🤪 next thing you'll know you'll have a Turbo hanging off the thing.
Joel ·
yea, will be the same time i put it back on 165s and stock rideheight 😂
thanks Pete, where bouts does your sender take the reading from?
BlueV2 ·
Mine is a EJ25 with a Imprezza radiator and the fan runs off the ECU. The fan hardly ever comes on, but it did on the weekend when I was at Stockton. It was pretty warm on Saturday and the fan came on a few times after working the motor hard for about 10 minutes or so. I run a imprezza gauge cluster so I cant tell at exactly what temp the fan comes on, but it never goes up past half way.
ian.mezz ·
Joel wrote:yea, will be the same time i put it back on 165s and stock rideheight 😂
thanks Pete, where bouts does your sender take the reading from?
IF You have a used radiator it maybe half blocked already.
you should get ones of those laser gun temp checkers.
or feel the front of radiator and make sure hot all over.
Joel ·
radiators just been reco'd and fitted with new top and bottom tanks
you can see inside its clean as a whistle
its not actually getting hot, hell the fan has only come one once in 1500kms without forcing it
i just noticed the temp went up 5c when doing between 90 and 100km/h and im pretty sure it was my valance opening wasnt quite big enough
rocknrob ·
Hey Joel its not only the air inlet that matters its the exit too...at 100kph assuming that inlet is roughly 10cm x 80cm you have roughly 2 cubic metres of fresh air per second hitting it but it all needs to go somewhere. There is a possible venturi effect or vacuum caused by the airflow under the car or if its wrong it could prevent airflow...i have frigged around with airflaps a bit but it all gets too hard🤓 someone like Wes could explain it better👍
Joel ·
yeah i made sure there was heaps of room for the air to get away behind the rad, all the wheel arch areas are open
on those couple of 42c days we had a month or so ago when the fan cut in if it was parked you could really feel the heat coming out under the running boards
was making like a tornado under there
Joel ·
well i finally got to try it out today, went for a cruise into ballina to see what this tsunami was doing to the surf
well im stoked
firstly, with the mesh in and painted you cant even tell theres a radiator intake there unless you really look for it
stands out 100x less than the slots did
but more importantly its now running cooler
most noticably in town
where it used to run at 92c its now dropped back to 85 and even out on highway its dropped from 92 back to 88ish
just to check that it wasnt a fluke i pulled over and let it heat up to 100c then took off again
without about 1km it had dropped back to mid 80s.
but best of all that temp differential between 90-100km/h has now gone
didnt seem to matter whether i was doing 60,80,100 or 110 it stayed below 90 so i think i got it nutted now
just needed more airflow
i decided to conduct alittle experiment and covered part of the rad up with cardboard just to see how temps were effected
on the highway it went back to its usual 92c and around town sat at 95, still couldnt get the fan to come on though without stopping completely for a few mins
ian.mezz ·
ahhh I see a bit of the farmer coming out in you.
trying the old potato bag over the tractor radiator trick
to warm it on on those cold morning.😂
JVLRacing ·
aaarr now u are seein good numbers....nice
Jak Rizzo ·
JVLRacing wrote:My one fan worked of ECU......but never ran at those temps u blokes are at....
thats cause u never F*&king drove it!😂 LMFAO!
Hi Joel,
I too had my pod filter sitting under the air vents under the back window. Thats when I cracked a piston skirt due to too hot air intake temps, BUT, I put mine on the track & it's turboed. But still , I would have the pod filter totally enclosed from the engine bay, at least it will be legal then as well.
As for the decklid, I would definantly go back the original with the slots in it, they actually let hot air out, not in, so would help with the heatsoak that our Subie engines are renown for.
If u want to check your intake temps, just get a probe with digital display form jaycar, cost me $45. Not totally needed though since u are normally aspirated.
regards
Jak
PS black wheels look great!
pete wood ·
^ 😂😂😂😂😂😂
Joel, my temp sender is in the stock position.
Joel ·
the one for the fans Pete?
cheers for the tips Jak,
I'm not normally one for copying others ideas but I'm thinking about a similar setup to yours by boxing in my air filter and ducting it atleast into the wheel arch, if not into the top of the guard as well
some of the guys on ozliberty seem to swear a CAI gives an improvement
might help stop some of the intake roar too
not as bad as twin webers but still there
it was due for its monthly rim swap, theyre not staying though, just a result of a rim shuffle amongst cars
the bugs the only car of mine that can run 18s without scrubbing.
the roads around here are too neglected to run 18s all the time
colonel mustard ·
What's it look like with 15's..... 🙂
Jak Rizzo ·
Sorry Joel, but my air intake only increased my intake noise & also the blow off valve noise. it comes right into the drivers window.............................I love it!
It's so quiet I have to have some fun!
Without a doubt cold air makes an improvement, the last couple of days I've had air intake temps in the 20's, the engine really loves it! It literally goes off with the colder air.
Jak
Joel ·
i dont doubt at all it makes an improvement, 99% of stock filter boxes have some fresh air ducting into them
sadly i havent got a wooshka valve to enjoy the sound of yet, which is funny cos people who here the exhaust note would probably expect it, but i can see now you mention it how it might amplify the intake roar especially in the drivers window
my problem is i still have an AFM to deal with
your running map based management now yea?
Jak Rizzo ·
I've had an aftermarket ECU from the start. No AFM to contend with.
regards
Jak
GTMac ·
Same as Jak, after market ECU and no problems. I had tried to run the subi ecu from the start but always had gremlins 😬
JVLRacing ·
Jak Rizzo wrote:
JVLRacing wrote:My one fan worked of ECU......but never ran at those temps u blokes are at....
thats cause u never F*&king drove it!😂 LMFAO!
Hi Joel,
I too had my pod filter sitting under the air vents under the back window. Thats when I cracked a piston skirt due to too hot air intake temps, BUT, I put mine on the track & it's turboed. But still , I would have the pod filter totally enclosed from the engine bay, at least it will be legal then as well.
As for the decklid, I would definantly go back the original with the slots in it, they actually let hot air out, not in, so would help with the heatsoak that our Subie engines are renown for.
If u want to check your intake temps, just get a probe with digital display form jaycar, cost me $45. Not totally needed though since u are normally aspirated.
regards
Jak
PS black wheels look great!
Wat jak! takin pot shots are u....little do u know😂 Heatsoak Jak REALLY!
Jak Rizzo ·
u don't get heatsoak unless u drive the car either! JVL really?😂
jak
JVLRacing ·
Jak Rizzo wrote:u don't get heatsoak unless u drive the car either! JVL really?😂
jak
pissin in ur pocket again jako haha
Joel ·
ahh you two are a crack up
now i have both lids painted up all ill do is swap the vented one in summer and warmer periods and the non vented one for monsoonal periods like we seem to be having atm.
no joke it hasnt stopped raining in over 36hours
but atleast all my tanks are full
takes me 30 secs to swap them over,
R clips, best invention ever
colonel mustard ·
3 days of constant rain here.... not fun for driving my car here....
Jak Rizzo ·
[/quote]pissin in ur pocket again jako haha [/quote]
No John, pissing in my pocket & giving advice on things that I have actually done are 2 different things.
Joel,
Are u coming to the Nationals Supersprint this year? I've never actually seen your car in the flesh. Would be good to finally catch up.
regards
Jak
Joel ·
i am so over rain at the moment its not funny
was getting chronic fucking cabin fever being stuck in the house so i decided to do the little kid thing and chuck on some gumboots and go vent my frustration in some puddles
nah not really but i did stick my head in the shed and thank god my bug is still intown at mum and dads cos my poor laser is submerged
its only 1" deep and barely wetting the tyres 🙄 but thats beside the point
i cant get in it without getting my feet wet 😂
Joel ·
not sure yet jak, would like to make the nats this year
just gotta con the parents so they can come out here and feed the animals when i go away
might have to bribe good seeing as vallas coming up soon too
JVLRacing ·
Jak Rizzo wrote:
pissin in ur pocket again jako haha [/quote]
No John, pissing in my pocket & giving advice on things that I have actually done are 2 different things.
Joel,
Are u coming to the Nationals Supersprint this year? I've never actually seen your car in the flesh. Would be good to finally catch up.
regards
Jak [/quote]
So now ur expert how to piss in ur pants! sweet..😂
Just remember lots of ur advice has come from people who know as well!
JVLRacing ·
Joel wrote:i am so over rain at the moment its not funny
was getting chronic fucking cabin fever so i decided to do the little kid thing and chuck on some gumboots and go vent my frustration in some puddles
nah not really but i did stick my head in the shed and thank god my bug is still intown at mum and dads cos my poor laser is submerged
its only 1" deep and barely wetting the tyres 🙄 but thats beside the point
i cant get in it without getting my feet wet 😂
ur gettin alot more rain then we here in Coffs!....i heard on the rad shit more to come
Joel ·
i think up the coast has been copping it worse than we have
JVLRacing ·
Joel wrote:i think up the coast has been copping it worse than we have
yeh agree
Mate really impress with the car looks good easily one of the best...
Joel ·
Jak Rizzo wrote:Sorry Joel, but my air intake only increased my intake noise & also the blow off valve noise. it comes right into the drivers window.............................I love it!
It's so quiet I have to have some fun!
Just found out i dont need one of them fancy turbo engines to get the same cool noise as you
just need one of them wanker iphone things
how lame
pete wood ·
Joel wrote:the one for the fans Pete?
nope the stock ECU sensor.
the fan switch sensor is in the top radiator hose as it comes out the engine at the back of the car. I used to have it at the front but the engine used to heat up too much before the sensor caught the drift. I tried lowering the deg setting but then the fans ran for too long.
also, just reiterating what Jak said re lower air temps making a huge difference. Drove mine all day yesterday in 25deg outside and the temp never got much above 87-88 deg. For the last few months it's been 90deg on the freeway. Funny how much difference it makes. If I drive it in winter on a rainy day, it struggles to get above 85deg.
p.s. I'm loving my heater, I know people think I'm a nana for having one in a buggy, but that hot water powered heater is awesome. 😎
Joel ·
cheers,
im undecided at this stage yet if i'll put a heater in, dont really need one much around here
i did have working vw heaters for ages but removed them as i just never used the car when it was cold
im thinking my water temps stay so consistant cos i have a nice short heater return loop with no heater core inline.
works well in a subaru but in a vw which usually have the heatercore along way from the engine can cause overheating
most of the vanagon guys have real dramas cos the heater cores in those are so big and there usually 2 of them too, they have to run an extra bypass hose
kommodius ·
I've only just joined this forum and I did it to look for exactly this kind of information.
A brilliant write up Joel. You answered virtually every question I had!
Great pics too.
Thanks a lot!
Ray & da Boyz
Joel ·
thats what it's here for 😉
kombibob ·
yep i think i have gone over this thread from start to finish just about every night for the last 3 weeks.. ha ha
Joel ·
Aside from the few people that have been for a ride in it noone has seen what accelaration is like so here ya's go
excuse my ugly mug
that was vid 1 of 2.
first one i took down a street in the industrial estate which was probably a stupid move and secondly i made the rookie mistake of hitting rev limiter in 2nd gear
dunno how many of you have heard a subi with a big exhaust hitting the rev limiter but it sounds like a dog barking 😂
as you can see i got a dumbshit speedo, i need to try another in it
its bit slow to register properly and according to GPS it reads 5km/h fast which is probably because of my front tyre size.
but that taken into account works out to roughly 0-100 in 6.5sec which is over 1 sec quicker than my blown 1776
seeemed strange at first, they're both putting down about same power but then i twigged..... its the rev range
my 1776 only has a balanced non c/w crank so i dont take it over 5k
the EJ hits revlimiter at 6.5k so im still in 2nd by the time i hit 100km/h
the 1776 was in 3rd and ready for 4th at about 115km/h
not a bad effort for a 15 year old $550 engine
same time as the current SS commodore
71-BEETLE-SEDAN ·
where is the one where you hit the limiter?
Joel ·
I'm not putting that one up, i wasnt driving into the sun so its pretty obvious that im in an industrial estate and signs on the shops give away which one it is too
i normally atleast do this kind of irresponsible driving out of town
71-BEETLE-SEDAN ·
fair nuf then i guess
colonel mustard ·
Yeah.... Don't encourage the little ones to misbehave Joel!
Can't view the video now (stupid iPhone, I'm seriously overthis thing!!!) will check it out this arvo. Pretty sure I'm still impressed from my ride at the pie. 🙂
rose ·
Keep it for the track see you at Gunnedah. It takes me 10.7sec in Buz on the track to get to 103klms
Joel wrote:I'm not putting that one up, i wasnt driving into the sun so its pretty obvious that im in an industrial estate and signs on the shops give away which one it is too
i normally atleast do this kind of irresponsible driving out of town
ElusiveStranger ·
Sounds sweeeeeeeeeeeet dude
Joel ·
rose wrote:Keep it for the track see you at Gunnedah. It takes me 10.7sec in Buz on the track to get to 103klms
pffft come watch me at summerland drags 😉
Joel ·
Geez, I actually had to go back 3 pages to find this thread
so I guess I should bump it with a new video
Nothing like that subi rumble bouncing of concrete dividers, not that my camera picks it up over the wind noise
but anyway a good example of how these engines will happily lug about in town traffic
Find me a 150hp VW engine that will effortlessly pull out of a round-about from 40km/h in 4th like that with an Lbug gearbox and still get less than 8.7L/100km and I'll gladly swap back
Seeing as I've just ticked over 5000kms since the new engine went in I suppose I should update, except there's not really much to update about
I've had 5000kms of trouble free motoring, my average tank gets 8.7L/100km with mainly round town running about and the drive out to my house is 20kms of winding hilly rural road so it's not exactly ideal economy conditions
but still not bad for a 2.2L 100kw engine, my 1.8L 92kw laser under the same conditions only gets 8.2L/100km
gets alot better on the motorway naturally, best ive got so far is 7.2L/100
The coolant level has not been touched since the engine went in and when cold is still at the same level as when it went in back in late November
I have swapped to a new stepper movement style temp gauge for better accuracy though
I checked the calibration of it and the old gauge when i swapped them and as I suspected all along my old gauge was reading high.
7c to high to be exact, but the new one is spot on to the degree
So it turns out that it's happy temp that it always likes to sit on is really 82c
It's become fairly obvious that I've over engineered my cooling system, in that 5000kms the cooling fan has only ever come on twice and that was sitting in the bumper to bumper traffic trying to get into Byron at easter time
It doesnt run cool though, infact no matter what ambient temp from cold it only ever takes 6-8 mins to hit 82c and it just sits there never drops below and has to sit stationary for a good 10 mins before the fan comes on at 95c
All that with a stock genuine subi thermostat and water pump, I'll be interested to see how hooking up my heater effects it though.
After Valla i gotta drop it out to do a few jobs like hooking up the heater and fixing the epic oil leakage I have happening at the moment, it's just like having a real VW engine in there
In a rush to get the new engine in i didnt do the best job in sealing the sump when i swapped it and my rocker cover gaskets are leaking too
the bodywork is in the way to get them off with it in situ
Also while its out #2 cylinder is burning a touch of oil after highway runs so i gotta pull it down and find out why
Its still has perfect compression and doesnt do it with low speed town driving for some reason
the Subi Guru here says its common on these jap import motors that spend ages just idling in traffic that the rings gum up we shall see anyway, may just be a a crook valve stem seal
but I'm gonna run some of that subi upper engine cleaner that everyone raves about through it and see if that makes any difference
ElusiveStranger ·
Sounds nice 🙂
It's weird having a motor in the back that you occasionally see, isn't it?!
I saw mine the other day when I was fiddling with my reversing lights - I'd forgotten it was in there.
rocknrob ·
yeah subaru engines are boring...til you put your foot down🤘
Joel ·
Now not to be outdone by a certain other subabug owner I'll also do a Valla trip report....
I'm really happy with how it went all weekend.
I convoyed from Ballina to Grafton before sitting on 75-90 got too much and i left them behind.
Filled up at Coffs and that tank got me from there to valla, all the weekends running about and back to Grafton and was still half full.
To my amazement it returned 7.1L/100km on that tank
Surprised me cos I sat on 110km on the highway and gave a few people some joyrides taking if faster in 3rd gear than a 1600 bug can normally do in 4th
I filled it with premium on that tank too but i dont think it would have had that much effect as it was already half full of regular.
But I decided to try for an economy run between grafton and ballina so just took it easy sitting on 100km/h and not nailing it passed all the slow cars and got 6.7L/100
I dont think it would get much better than that though, that was scone gobbling it too the extreme.
anyway It seems to have a thing for the number 80
water temp sat consistantly on 80-82
and the oil temp on the same and 80psi oil pressure
BlueV2 ·
They are impressive mileage figures.
trickysimon ·
Pfft highest wins, doesn't beat my 20L/100km.
Is 80 degree water temp not too low?
ian.mezz ·
Joel wrote:Now not to be outdone by a certain other subabug owner I'll also do a Valla trip report....
I'm really happy with how it went all weekend.
I convoyed from Ballina to Grafton before sitting on 75-90 got too much and i left them behind.
Filled up at Coffs and that tank got me from there to valla, all the weekends running about and back to Grafton and was still half full.
To my amazement it returned 7.1L/100km on that tank
Surprised me cos I sat on 110km on the highway and gave a few people some joyrides taking if faster in 3rd gear than a 1600 bug can normally do in 4th
I filled it with premium on that tank too but i dont think it would have had that much effect as it was already half full of regular.
But I decided to try for an economy run between grafton and ballina so just took it easy sitting on 100km/h and not nailing it passed all the slow cars and got 6.7L/100
I dont think it would get much better than that though, that was scone gobbling it too the extreme.
anyway It seems to have a thing for the number 80
]
hahaha I was doing a bit more then the 110 speed limit😂
and noboby past me up a hill😂🤪😂
to get 7.4😊
Joel ·
80c water temp is spot on optimal, the thermostat opens at 78c, anything below that is too cold, but the thermostat never lets it drop below that anyway
Proof though that you dont need a big radiator when it runs temps like that even with a tiny 1.5L mazda aluminium core rad
That probably wasn't a fair mileage test as almost any car would do well on that stretch of road
Its pretty well dead flat between Grafton and Ballina and no need to stop for anything, just slow down for a couple of 60 zones, i didnt even get out of 4th gear from one servo to another.
Id bet a 1600 vw motor would probably get similar but I guarantee a 150hp vw engine wouldn't 😂
ian.mezz ·
Joel wrote:80c water temp is spot on optimal, the thermostat opens at 78c, anything below that is too cold, but the thermostat never lets it drop below that anyway
Proof though that you dont need a big radiator when it runs temps like that even with a tiny 1.5L mazda aluminium core rad
That probably wasn't a fair mileage test as almost any car would do well on that stretch of road
Its pretty well dead flat between Grafton and Ballina and no need to stop for anything, just slow down for a couple of 60 zones, i didnt even get out of 4th gear from one servo to another.
Id bet a 1600 vw motor would probably get similar but I guarantee a 150hp vw engine wouldn't 😂
Wait until you put that Subaru top end cleaner in it 😂🤪
Joel ·
Funny you should say that, got 2 cans of the stuff here ready to go
Joel ·
Hmmmmm..... somethings missing ❗
71-BEETLE-SEDAN ·
i dont get it?
Joel ·
So I guess noone worked it out 😂
Although a "before" shot might help
I've got my new stealth radiator setup in
My existing radiator was only ever temporary, I wasnt putting lots of effort or $$ into the cooling system till I knew the conversion was a success
I guess it passes for that now so a new radiator that didnt take up so much boot space was going in.
Aside from the room the space saver takes up my boot space is now back to normal superbeetle
The radiator for those that can't pick it is from an Alfa 33
It looks tiny next to the 323/Laser radiator but its double row, so in terms of capacity its actually about 25% bigger than the Laser one.
The two 9" fans cover alot more area than the single 14" fan aswell, although I'll only be wiring one for the cooling system, the other will only run on A/C request same as the standard setup
I'm pretty sure once the coolant gets over a certain temp after the main fan has cut in the computer will bring on the A/C condensor fan as well
Its the same rad thats fitted to Pauls old blue rexxy Lbug and if that one can handle the heatload of a chargecooler rad in front of it whilst doing laps of the track then I'm sure mine will be fine
the Laser radiator has proved to be way beyond adequate by the fact my fan has only come on 3 times now in 6000kms and everytime its when I'm stationary for more than 5 mins and this one is bigger again
I just have to finish off the enclosure for it
I went the waterproof ply again as its easy to work with but mainly theres no heat transfer at all
It will have a hinged lid like the other one for easy access
Whilst the coolant was drained I also made one other change
the only one weakness with my plumbing layout was the rubber elbows that went under the bulk head hung down very low
The left one has already had a brush with something at some stage
Eventually I'll end up stuck on the side of the road somewhere with a big green puddle underneath so I've replaced the rubber elbows with stainless and put the rubbber joint up above it out of harms way
The way I should have just done it in the beggining
I've also gained abit more ground clearance by doing this too
ian.mezz ·
You should of ask me, as we used a radiator like that in Joshes vw toooooo 😂🤪😂
1303Steve ·
Hi Joel
That looks great, where did source the Alfa radiator from? Did you hook up the heater yet?
Steve
Joel ·
I found an Alfa enthusiast only about 10kms away from me who had 3 of them sitting in his shed, one had been reco'd and only used for a couple of hours running in an engine so I grabbed that one
and a few days prior to that I won one on Ebay as well.
I couldnt find a second hand one anywhere when I was first looking, talk about one extreme to the other
I Actually gave up on project heater for the time being.
Reason being mainly the worst of winters done now, and I;ve survived the last 3 years without heat, but also Ive had a change of mind with my layout
This was version one with the commodore heater tap and beetle vent cable.
I had originally planned to put it under the backseat and duct into the heater channels but my placement of the ECU there foiled that plan so i was just going to mount it in the parcel tray area
But Ive dropped that idea now as the A/C evaporator unit im fitting i can get with a built in heater core for an extra $10 and the heat coming out of dash vents and window defrost vents like im used to in the mainstreamer anyway would probably make for a more effective heater
gerrelt ·
You've been bussy Joel! Nice work.
Of course I totally aprove your radiator choice! 😎
Joel ·
I thought you might 😂,
Actually it was seeing how well yours fit that made me realise how perfect they are for a superbeetle.
Oh yeah i forgot to mention, it's now even easier to fill the coolant up.
These radiators don't have a cap, just an air bleed hose on the top left tank, so all I do now is lift the hose on that up above the level of the header tank and fill it till the header tanks full, no bleeding needed, only took about 5 mins.
Heres a pic of the other radiator I won on ebay for those who want a closer look
You can see the air bleed port on the top left
gerrelt ·
These radiators don't have a cap, just an air bleed hose on the top left tank, so all I do now is lift the hose on that up above the level of the header tank and fill it till the header tanks full, no bleeding needed, only took about 5 mins.
Yep, that's how I do it too, works perfectly (I use a bit of duct tape to attach the hose to the opened front decklid).
Only I have to squeeze some coolant hoses a little bit to make the water move around. Then the level slowly goes down in the header tank.
Must be because both my coolant pipes run over the engine to the front.
If the system is full I plug the bleed hose that's connected to the radiator and put it away somewhere on the side of the radiator.
BlueV2 ·
Hey Joel, what are the physical dimensions of that radiator ?
Joel ·
Hi Mark, I'll get the exact measurements for you next time I'm in town, my bug is in the shed at the oldies place at the moment but you should be able to get a rough idea from this
Core Size: 545x245x34
BlueV2 ·
Cool. No big rush, just curious.
Joel ·
Oh yeah, another radiator with similar dimensions I looked into as well was from a SB Barina
or Opel Corsa for the oversea'ers
Theyre a little bit bigger but would have been overkill in my case
Core Size: 680x260x26
1303Steve ·
Hi Joel
Your new install looks so good that I'm thinking of ditching my cut down Ford Transit radiator.
The other ones that I've thought about are from Audi 100 & 200s core is 570 x 305 x 42. They come from a heavy turbo 5 cylinder car so they should be up for the job.
On my old bug the ECU controlled the fan but once the motor was off the fan stopped, I like to have a fan after run if the motor is hot enough, I used a separate sensor and only powered the fan relay when the key was removed via the extra circuit in the ignition switch.
Steve
Joel ·
Theres a few other cross flow rads out there that are very low profile
the 4L Jeep Cherokees have a 250mm high rad but it's very wide and probably total overkill for a sub 2.5L engine
I always just make sure my fans cycled before I shut down, one of the joys of having a fan pilot light on the dash
BlueV2 ·
I am running a standard Impreza radiator and it does the job very well. The fan has come on a few times on hot days when I am stuck at lights and it comes on when at Stockton after going for a hard run....but that is to be expected.
Excuss my ignorance Steve, but what is the advantage of having the fan run when the motor is off, since there is no water flow, the cooled water in the rad will just sit there until you start the motor again.
1303Steve ·
Hi Blue V2
Most European cars have the fan running after shut down, the coolant will still circulate via thermo syphon, it gets rid of hot coolant around the heads etc.
I used to have an Audi 200 turbo, it had a whole symphony of things happening after shut down depending on coolant temp, an electric water pump, radiator cooling fan and cool air blowers on the injectors.
Passers by would often tell that I left my car running
Steve
BlueV2 ·
Thanks Steve. That makes sense.
Cheers,
Mark.
Joel ·
I used to get the same thing with the Scoupe.
I didn't realise people thought the sound of a thermo fan resembled that of a petrol combustion engine
I'm sure it works well ina front engine arrangement but i dont know how much effect there would be when the engine is 3m down the pipeline
ian.mezz ·
we had a mix up with Joshes small Radiator
, the radiator hose fittings Were in the wrong position so he crossed pipes over under the back of car so the flow went the same way as it did in the subaru.
Joel ·
With a cross flow radiator it doesnt matter which side is in or out
With all engines the hot water outlet always comes out the top of the engines and the return to the waterpump is always down pretty low near the crank
So when the radiator is right next to the engine to keep the hoses short is the only reason a cross flow rad has one hose up high and the other down low
I've got my rad hooked opposite to what it is in the Alfa, makes no difference
This only applies to crossflow rads though, the other type have to flow top to bottom
gerrelt ·
Joel wrote:Hi Mark, I'll get the exact measurements for you next time I'm in town, my bug is in the shed at the oldies place at the moment but you should be able to get a rough idea from this
Core Size: 545x245x34
I've got the measurements of mine:
Dimensions: 34 by 62 cm or 13.4 by 24.4 inch (widest points).
But my radiator looks a little bit different. De lower hose connector is not pointing to the side a bit, but points straight back.
See:
Joel ·
Yours is the series 3 (91-94), the series 1 and 2 79-90 had the different ones like I've got.
Think Alfasud were the same as well I'm pretty sure.
Probably the only part of the car that didnt disintegrate on one of them
Joel ·
Well my radiator decided for laughs to develope an incontinence issue
Nothing major, I took it back to the rad shop and just from sitting dry for a few years the rubber O-ring that seals the end tank to the core is leaking
but I realised that this one will be in there for the long run so may as well go all out and bought a new one, as it wasn't much in the scale of things and would probably pay off in the long run
I must say I was delighted when I realised my $350 had actually bought me a fair dinks genuine valeo radiator
anyway its all mounted up sweet
Just gotta finish tidying up under the hood
and working a charm to, actually better than the others, only takes the fans abit over a min to drop the temp from 95 back to 90.
the old radiators used to take nearly 2.
But i think that might be to do with how big and open the galleries are in this new one
compared to the old copper core one and the laser rad was the same, very narrow passages
colonel mustard ·
You are indeed a craftsman Joel 🙂
Joel ·
ian.mezz wrote:Wait until you put that Subaru top end cleaner in it 😂🤪
Just don't tell Mr Garrett on me 😉
1303Steve ·
Hi Joel
Did it make any difference to how the runs?
Steve
Joel ·
Seat of the pants tells me no
I was rather dissapointed by the lack of a decent smoke show like all the others on youtube more like this
Guess I should be happy, means my engine was already pretty clean inside
its a tiny bit smoother down low, it had a very slight surging before which seems to be gone but other than that no real obvious change
71-BEETLE-SEDAN ·
Do any other cars need a treatment like this,
Ive been driving my brothers charade around and im wanting to make sure im looking after it and ive seen the injector cleaners etc at shops but are they worth it?
Joel ·
The yanks swear by seafoam
I got taught the water cleaning trick by an oldschool mechanic, he had spray bottle setup rigged up to squirt down the carby throat while he was out the road giving it shit
WOrked well on all these old granny putt putt cars that come in all carboned up farting and spluttering, steam cleans all the crap out
gerrelt ·
😂 @ tailpipe comment!
Jak Rizzo ·
Hi Joel
with regards to the Subaru upper engine cleaner, I have found it works far better if u leave the first half of the can in the engine for at least 20minutes (instead of 10) before restarting the engine & spraying in the 2nd half. The other weeekend before a Supersprint, I forgot about it, went back to working & left it in there for 30minutes.
The amount of white smoke that came out was most that I have ever seen with the cleaner.
The difference in the idle & the way the car drove was so noticable, felt as though it deffinantly had more hp. My engine swears by it LOL
hope this helps.
regards
jak
Joel ·
Cheers Jak, I'd bet your right, any cleaner thats designed to dissolve build ups works better if it has a chance to sit
It says 5 mins on the can I'm sure but whats stupid is talking with a subaru mechanic subaru now recomends not even feeding it into a stopped engine
Just feed the whole can in while it's running, mainly cos they're worried about people hydrolocking engines
which is crap the stuff is foam not fluid
STIDUB ·
ashing over your engine joel? smoke while filling the mowers/tractors with fuel too 🙄
trickysimon ·
My mate is a mechainic at a VW/Subaru dealer. I'm gunna grab some off him next time i see him.😏
Joel ·
STIDUB wrote:ashing over your engine joel? smoke while filling the mowers/tractors with fuel too 🙄
pffft coca-cola is more flamable than diesel is
matberry ·
Joel wrote:
STIDUB wrote:ashing over your engine joel? smoke while filling the mowers/tractors with fuel too 🙄
pffft coca-cola is more flamable than diesel is
😂😂😂
Reminds me of the boy's in the workshop putting out thier cigarettes in a container of petrol.....won't light with a cigarette no matter how hard you try........🥲
Joel ·
Yes noone seems to realise its the vapour thats flammable not the liquid
Joel ·
Now that I've driven it abit more since it's detox I've noticed that it is actually behaving abit better
Cold start fast idle now has a much smoother transition to normal idle but the hot idle is where the biggest improvement is noticed.
Before when it was hot if it sat idling for more than a few mins the idle speed started to hunt abit.
It always bumps the idle up a touch when the fans cut in but I knew from day dot that it needed an IACV cleanse but looks like I may have gotten out of that one.
I still havent completely finished tidying up the new radiator install yet but I haven't really put up a much info about for those that may have been interested as I pretty well had to start from scratch again with all the mounting and hoses.
First thing was to make up a new rad cradle which is what this crazy looking creation is
The big holes at the back are for the rubber feet in the foreground that the rad pegs sit in
and the 2 small holes in the tabs off the front are for my A/C condenser.
the deflector is actually the old one from the mazda radiator just chopped down abit
The whole thing bolts to the frame head using the old deformation plate holes same as the first setup
The top rad support is just a piece of angle iron that bolts to the body at the sides and picks up the mounting lug on the center top of the radiator
You can also see the tabs I welded on to mount my A/C condenser and the new outlet hose I had to buy
going for the nice common one its the lower water pump hose from those SOHC Opel motors so all N13 pulsar, vector, astra and camiras
On the otherside just a 90 degree bend and my air bleed hose capped off and tied out of harms way
The new lid has rubber edgeing around the sides to stop any heat from the radiator and condensor from entering the trunk
Its hinged for easy access but the only time I actually need to get in there is when filling from empty using the air bleed hose so it wont be open real often
The lid lays down flat where the original spare tyre cover used to sit so trunk space is now no different to stock super without the spare in place
And then there's just the thermo fan mounted on the front of the condensor
It only runs on A/C request
Ive put over 500kms on it since this setups gone in, and it behaves exactly as it did with the old setup
No more than 7 mins to hit 80c just sits there consistantly, takes sitting stopped about 5 mins before the fan cuts in at 95 and they only run for about a minute and a half.
Even with the condensor and its fan in front theres no change.
This big boss approves
But thinks i should finish cleaning 36 years worth of mould off the inside of the hood
STIDUB ·
looking good joel 👍
im curious abot that last pic - factory cat or aftermarket high flow type? 😂
i see these pics are prior to the lOl light install too
itawolf ·
nice work JOEL --always love reading your posts
now to track down a new rad here in the states or get someone at home and buy and then ship it back to me
That little alfa radiator was the one i had in my conversion when I first did it. Paul then used the slightly later model one (bit bigger) in his...Only thing I hated was the outlets were on the wrong side... you want high on passenger side and low on the driver side. Pissed me off, crossing them over.
Another option i just put in the superbug we are doin is the last of the celica or mr2 radiators....
Love the time you are taking.... superbugs are great for conversions!
Matt
Joel ·
Cheers Matt, Those Alfa rads seem to be perfectly sized both physical fit and capacity.
I wish I could have found one in the beginning, it would have saved alot of time and work, kinda frustrating knowing there was 3 sitting in a shed only 10kms away all along but oh well shit happens.
The MR2 rads look to be a perfect fit too, a guy in the states I chat with has just fitted one to his 72 bug, its a beam front end though.
Being cross flow it really doesnt matter which side is in or out, like you said theyre opposite to the engine but I just connected mine in reverse, makes no difference
Just did my first big trip on sunday to action day since the rad swap and the temps were perfect.
fans ran once while I was being shoe-horned into a park at the show but even in the stop go city traffic (I seem to cop every red light) it kept it's cool so to speak
Even with the A/C condenser and fan in the way it sat on 80c the whole trip
436km round trip and used 33.4L which worked out to 7.6L/100km
not too bad considering my average speed probably woulda been 105-110
gotta love that duel carriage motorway all the way from Byron to Bris
Joel ·
CRAPPY SHITTY F@#$NG CHEAP MUFFLERS 😂
Stainless steel my arse, I've seen newspaper thicker than China's stainless steel.
It's been progressively getting louder and louder over the last 6 months
Dad had his first spin for quite some time in it a few weeks ago and was rather amused when i set off a car alarm driving by a Subaru of all cars 😂
I was quick to blame the fiberglass insulation in it disintergrating for the rising noise levels and when a rattle started at idle I was also accusing the internal baffle mounts of letting go
It wasnt till I put my foot on the tail pipe this arvo causing the rattle to stop that I realised it was probably something else
I'm really surprised by how much quieter it is now but then again thats to be expected, a few to many bottom outs has taken it's toll.
This muffler was only ever temporary, it was just one I had laying around till I decided what I was gonna do with it
Atleast now it will get me to Warwick without sounding like a bunch of coins in the washing machine
pete wood ·
I gather that's one westy didn't make. 😀
Joel ·
Nope not a westi job
more like a festy job
ECU gaurdian kitteh sez......
third time lucky
For those that didn't read my other thread I had to replace my first ECU as the A/C controls weren't working.
Fair enough its a 18 year old ECU so over to the Subi boys and grab another.
Now my A/C controls work but my check engine light not going out was a tad frustrating
It was throwing code 35 permanantly and even trying a different purge solenoid and swapping the wiring didnt fix it
a 3rd computer seems to be doing everything just rosie so I'll keep my fingers crossed
rocknrob ·
yeah subaru parts grow nearly as bad as VW parts😏 i've got three engines three ECUs and looms alternators etc...i'll have to do another conversion to use it all up👍
1303Steve ·
Hi Joel
I didn't know you could get cat scans on ECUs.
Steve
ElusiveStranger ·
1303Steve wrote:Hi Joel
I didn't know you could get cat scans on ECUs.
Steve
Groan
pete wood ·
DAD joke! 😂
p.s. kinda jealous I missed making it 🥲
ryana89 ·
Liked the little video explanation of the error code reading.
Would be nice if my Golf did the same thing for error codes, would make diagnosing car problems much easier.
But alas, Digifant 2 isn't 'smart' enough to store error codes🙄
Joel ·
Jeebus, you're quick off the mark, I'll have to organise you a prize for being first viewer 😉
What Ryan is talking about is while I was dicking around swapping the ECU around I figured a demo video of how to check the error codes may help people
I'll make its own thread so people searching can find it easier but untill then heres the link
If you need a good laff to lighten up your day chuck up the closed captions and watch it with no sound,
As per usual they disagree with me in a rather comical manner with various innuendos and randomness
ryana89 ·
I was the first viewer🤓
Must be my lucky day, I can now read a 90's Subaru fault codes aswell.
Joel ·
Such an important skill to have, will look great on your résumé.
Now I don't know if these ECU's have a CMOS battery inside or what but my first ECU from the the original donor Liberty used to erase the codes after only a few hours of no power.
Since I made that vid it has sat for a full 24hours almost to the dot and when I reconnected the power the code is still in the memory 😢
Looks like I may have to learn the ancient black magic voodoo art of clearing error codes
colonel mustard ·
or find a dealer with a computer.... 🙂
DylanTheDubber ·
Joel , you done it again mate , just another thing i cant belive you and i are on the same wave lenth. I saw in your picture with the cat , computer and console that you put your air con switches in and also the compressor. have you got it opperational yet? Where did you get the switches from?
From Dylan
Joel ·
Just an update on a couple of things
Most will remember when I first put the engine in the standard EJ22 oil filler sat to high for the decklid to shut
i got around that by cutting abut 1" out and joining it back with some rad hose and hose clamps.
Bit of a hokey fix but its worked for over a year now
I had to get some A/C lines out of a 97 Outback for the aircon conversion and that same car kindly donated its oil filler.
The EJ25 have a short one thats cocked over at more of an angle with a dogleg in it.
A good OEM solution to the problem
If your putting a SOHC engine in a bug this will do the job well....... as long as you dont have A/C
Discharge line is in the way but without a compressor in the way it would work well
The other change I made was a new surge tank.
My fuel system worked fine, but after 30-45 mins running in hotter weather my EFI pump started getting noisy.
It wasnt cavitating but it certainly wasn't happy either.
The first one was only 1L and the fuel rail return was right next to the EFI pump supply so it was doing alot of recirculating hot fuel.
Matt that made my first one knocked up a new one the same only twice as tall and with a supply at the bottom but all the returns at the very top.
Fuel pump is much happier now, even after giving the car some shit through burringbar range on the way home from goldcoast on sunday it was still quiet as a mouse.
Bugaru03 ·
That's pretty good find Joel, the oil filler will help the situation!! Thanks for the update..
Inane Cathode ·
Subaru svx has a really short oil filler, its probably about 4 inches tall, it might also work.
Joel ·
I guess this thread is due for an update seeing as engine number 2 has been in 18 months and over 12,000kms now.
Aside from the radiator swap all I've done in that time is change the oil and filter once and late last year I built a new exhaust for rego as my "temporary" one was disintergrating.
The baby Alfa radiator has been working out well, the ultimate test was coming home from dubs by the pub on a 40c+ day with the 2 of us in the car, sitting on 115 on the motorway with the A/C on, the highest temp in the memory (my new temp gauge has peak recall) was 98c.
And I know when that happened too, the A/C decided to cut in at the bottom of the Gateway bridge and ran almost till the top which was when the highest temp was reached.
Not even breaking a sweat.
The standard Subaru temprature gauges dont even move between 80-110c to stop people worrying - common feature in most jap cars, my Laser is the same.
Average Fuel mileage which for me is 20kms into town and back out on windy hilly country roads is 8.5-9L/100
Stop/start round town with A/C use is 9.5-10 worst I've ever got was 10.4
Still havent beaten my Valla return trip Grafton to Ballina of 6.6 but an average highway run yeilds 7.4-7.6
So all is well but I wasn't about to break Joel tradition and leave good enough alone.
Hanging around with the Subi boys is becoming a bad and expensive influence.
They have discovered my weakness and are exploiting my Magpie Syndrome:
MMMMMMM Shiney Stuffz
It all started innocently enough.
I was just having a chinwag with the boss (he's an old VW nut from way back) eyeing off the EJ20 Sequential Twin Turbo package sitting on the floor
Thinking along the lines of that would go really sweet in the back of my bug.
But I haven't heard from many people inclusive of most Subi mechanics with a nice thing to say about the twin turbo engines and the boys have just done 2 conversions in the last few months fitting them and refuse to have part of another.
Also by the time you go through all the bullshit involved in converting one to single you may as well start off with a single turbo package.
But finding one of them than hasn't had the arse flogged off it is a mission all of it's own.
As it turned out when it was fitted to the dark blue Liberty in the back ground and fired up it had a bad big end knock 🙄
So anyway I had a discussion with him about creating a hybrid engine - An EJ20 turbo bottom end with SOHC heads so it would fit my bug with no body work.
Turbo placement would be easy as pie and a small charge cooler like Micks 58 so no firewall mods were needed.
Well as it turns out my stock EJ22 block is just as strong as your garden variety 90s Open deck block EJ20T engines and can safely support 14psi and over 200hp
I'd read that sort of thing on the internetz before but to hear it from the mouth of a long time professional subi mechanic and race car driver put my mind abit more at ease.
Luckily for me my bug being the weight it is and in the 74 and later ADR rules category means 2.2 is the biggest size engine I can legally fit a turbo to.
If that's not a sign I dunno what is.
So after a quick tear down revealed my engine really is a spring chicken fresh off subi mumma's teet we made some heads abit more turbo freindly and now baby's ready for boost.
All I gotta do now is work out turbo placement and make up a header.
I've got another stock header here I'll chop up and use.
The stock EJ20T ones hang too low and are cast so there's not much you can do with them
A chargecooler would be more suitable than an A2A intercooler but then i gotta find room for another radiator.
1303Steve ·
Hi Joel
Good news, may the boost be with you.
I was talking the local subi guy the other day, not keen on 2.5 at all, we talked about one day building a 2.2
Steve
ElusiveStranger ·
Hehe, sweet dude
ian.mezz ·
I knew that ride in my super was always going to make you want to get a TURBO 🤪😂🤪
rocknrob ·
any plans to lower the compression joel? i want to go back to my ej22 as well so i'll be watching with interest👍
Joel ·
It's down a tiny bit due to headgaskets used but I didn't want to drop it too much.
You can get different thickness headgaskets to play with the CR.
There is two ways to go with forced induction.
keep the CR high and just run low boost, this gives nice all round drivability with abit extra power on tap.
or run a lower CR and heaps of boost,
This can be fun and the way alot of people usually go cos when it starts spooling it gives a real kick up the arse.
The trade off is the drivability off boost is horrible.
I'm not looking for big numbers, just abit extra power to play with, it has more than enough now but like everything you get used to it.
I don't plan on running more than 5-6psi, even that will probably spell doom for my gearbox.
Jeza ·
Nice move Joel
Once again I will be watching with great interest...
What work did you have done on the heads?
Cheers
Jeremy
Joel ·
They are pretty strong heads to start with, you could probably use them as is.
I just had them stripped, media blasted, new guides and stem seals, cam seals, turbo valve springs, might be new valves I'll have to look at the docket and some stronger head gaskets.
I was going to do some porting while they were stripped down but laziness got the better of me, just cbf getting each one identical.
lou0060 ·
looking good Joel. the EJ20TT would have been an interesting conversion on a street car. I had to do a fair bit of cutting to make mine fit as you can see from the photos. I took the whole fire wall out. anyway, your heads look nice and neat. look forward to seeing how it comes together.
which shop is this? and what did the heads end up costing?
Collinsm1 ·
Hey Joel, I have been reading over your project for along time now and have been collecting the parts i need for me to do the conversion. I just wanted to know how to contact you as i need some help with some thing.
Thanks
Mitchell
Joel ·
Mitchell, just drop me an email boosted_bug at yahoo dot com and I can send you my mobile number.
Lou, it's Subie Village, the boss was telling me those TT motors have really good bottom and topend power when everything is working right, it's just that transition from the small turbo to the primary one leaves the mid range hanging, and once that black box of doom starts playing up not sending vac signals and such which control the turbos the boost levels start to drop off
Also due to the ECU control of the 2 turbos it's not easy to run aftermarket management.
I have seen a couple fitted to bugs and a split window Kombi, biggest problem is the second turbo interferes with the starter motor.
It was abit over $300 per head which for a full recondition is good value, my 1776 heads cost me alot more than that.
ElusiveStranger ·
Joel, wasn't it Rockinrob who added a turbo on here, running a low boost?
Shirley (sic) you could do better - super charger "Mad Max" stylee
Still loving this thread. You've been there, done that, then marched on.
Jak Rizzo ·
Joels gettin a Turbo, Joels gettin a Turbo, Joels gettin a Turbo....................
to be honest, that took longer than I expected, u thought u were havin fun before😁
Joels gettin a Turbo.................u should have that as a ring tone🙂
Joel ·
ElusiveStranger wrote:Shirley (sic) you could do better - super charger "Mad Max" stylee
I'd love to but sadly the old crowd favorite is abit too chunky to fit anywhere
ttriebler ·
Good to see you're gettin boosted Joel, this should make for interesting reading.
ElusiveStranger ·
I'd love to but sadly the old crowd favorite is abit too chunky to fit anywhere
I could give that a very good home, plenty of room in my bay.
Hand it over!
rocknrob ·
yeah joel...are you interested in parting with that setup? i know a young fella who is looking for some grunt out of his L bug😵
Joel ·
Ha, like all my old crap I tend to hang onto to it cos everytime I get rid of something I end up needing/wanting it later.
Scares me abit sometimes when I look how much stuff is sitting around gathering dust though.
I've got over $3k just in rims alone sitting around doing nothing.
By the time I sold off all my engines, gofast bits, gearboxes, audio gear, VW panels etc I'd probably have a lifetime supply of beer money 🤪
Jak Rizzo ·
Joel , have u had your bug on the dyno?, would be great to have a before & after comparison
regards
Jak
Joel ·
I'll see if i can get out to the tafe sometime and get it on the dyno but stock EJ22s in a VW always seem to hit 100hp at the wheels
Joel ·
ttriebler wrote:Good to see you're gettin boosted Joel, this should make for interesting reading.
Cheers Todd, I just came across some of your handy work on Youtube, that blue EJ22 69 bug with the 5 speed box turned out sweet.
Thats on my list when my gearbox finally dies
OK So quick question for the turbo guys.
If I flip my coolant manifold and mount my header tank on the other side I have plenty of room for the turbo in the stock spot.
radiator hose is stopping it sitting right up in the normal spot at the moment
If I clock the turbine housing and get the inlet facing the side more I can probably utilize my existing header.
Drain can run into the rocker cover and will still have plenty of fall
Only trouble I have that I knew I would encounter is that Kafer bar is sitting right where the turbo needs to go....
I know we had the thread about them interfering with heaterboxes but nothing really came up as an alternative.
So what is everyone else doing??
seagull ·
1303Steve wrote:Hi Joel
Good news, may the boost be with you.
I was talking the local subi guy the other day, not keen on 2.5 at all, we talked about one day building a 2.2
Steve
Taken from a wrx forum
Here's an interesting piece of information regarding bearing clearances as list by Subaru having WAY too much of a tolerance range & why this is not so good for #2 & #3 con rod bigends (generally the two that fail hard) specificly in the EJ engine family.
"For example, according to the Subaru Manual, the acceptable range for the connecting rod oil clearance is 0.0007-0.0018 inches. While a tolerance of 0.0011 inches might not seem significant, it actually allows an oil volume difference of 264 percent.
In other words, the larger clearance of 0.0018 inches allows 2.6 times more oil to pass through the bearing and thereby accomplish one of its primary functions: removing heat. This is a dramatic increase in terms of bearing heat-load management. At the lower end of the Subaru production engine clearance scale, 0.0007 is woefully inadequate for providing effective heat removal in a performance/ high boost engine."
Whilst this ^^ is interesting from an engineering point of view and quazzi standard practice for most mass produced engines - 11 thou is a huge range for a 'standard' bearing clearance, the following spells out why this is bad particularly to any EJ.......
Unlike the bigends for cyls 1 & 4 - which are fed from separate, individual main journals - the bigends of cyls 2 & 3 are fed oil from the same single point on the crankshaft (#3 main journal)
rocknrob ·
Hi Joel i have a set of standard turbo manifolds here you are welcome to borrow to figure your turbo location
also here is a pic using na headers for the turbo...still pretty low
[/img]
STIDUB ·
uh... wheres the V-band style clamp part that holds the exhaust housing & the center of the turbo together???
Joel ·
Cheers for the offer Rob,
I did think about mount the turbo at the timing belt end, just a little bit harder in a bug and Im worried about heat issues being so close the timing belt and covers.
If I can sort out the Kafer bar issue it'll work out well in the stock position.
I've been talking with Dave he's given me a few ideas to chew over.
Joel ·
Geez all these Subaru related posts at the top of topic activity must be giving all the purists nosebleeds 😂
Speaking of, yesterday a good example of another reason why I love my conversion.
All the purists who like VWs cos they are so mechanically simple ( the kind of people who know what a spanner is but not sure what it actually does) can't understand why I would take that setup out and add one of them new fangdangle computer controlled engine with elebenty million wires and sensors.
I've put abit over 300kms on it since the motor went back in and so far has all been running well.
Yesterday was one of our club cruises, backing out of the driveway it cut out on me, I didnt think anything of it as it restarted and drove fine, till I got about 5 km out of town and it did it again.
Didn't die completely but it did cut out for maybe 1-1.5 secs and started doing that on a regular basis.
I was sure it was electrical, it was too consistant to be a mechanical or fuel problem, it was like the spark was stopping or the injectors werent opening for a split second.
I had no check engine light and everything seem to be plugged in, After going through everything in my head trying to work out what I did wrong I plugged in the computer when I got home and it told me straight away.
Cam position sensor.
A quick check showed when i put the engine back in the other week I had plugged it in but hadn't clicked it in place so it was reading fine but periodically losing contact.
Nothing like a nice easy fix, it told me what the problem was and I wasn't chasing my tail fucking around with carbs, looking for ignition problems etc.
maybe just a sign I'm just getting older that I'm becoming the lazy mechanic.
Since I was old enough to hold a spanner I've loved a mechanical challenge, take a car (or anything mechanical for that matter) not running right, track down what it was and getting it running/working sweet.
It started with the lawnmowers, by the time I was 10 I owned 11 of them, back 20 years ago you could scavange anything from the tip, then the VWs started.....The old running joke, same thing just no blades 🙄.
Now I just wanna enjoy driving the bug and not work on it all the time.
Has this happened to anyone else or am I just speshul?
1303Steve ·
seagull wrote:
1303Steve wrote:Hi Joel
Good news, may the boost be with you.
I was talking the local subi guy the other day, not keen on 2.5 at all, we talked about one day building a 2.2
Steve
Taken from a wrx forum
Here's an interesting piece of information regarding bearing clearances as list by Subaru having WAY too much of a tolerance range & why this is not so good for #2 & #3 con rod bigends (generally the two that fail hard) specificly in the EJ engine family.
"For example, according to the Subaru Manual, the acceptable range for the connecting rod oil clearance is 0.0007-0.0018 inches. While a tolerance of 0.0011 inches might not seem significant, it actually allows an oil volume difference of 264 percent.
In other words, the larger clearance of 0.0018 inches allows 2.6 times more oil to pass through the bearing and thereby accomplish one of its primary functions: removing heat. This is a dramatic increase in terms of bearing heat-load management. At the lower end of the Subaru production engine clearance scale, 0.0007 is woefully inadequate for providing effective heat removal in a performance/ high boost engine."
Whilst this ^^ is interesting from an engineering point of view and quazzi standard practice for most mass produced engines - 11 thou is a huge range for a 'standard' bearing clearance, the following spells out why this is bad particularly to any EJ.......
Unlike the bigends for cyls 1 & 4 - which are fed from separate, individual main journals - the bigends of cyls 2 & 3 are fed oil from the same single point on the crankshaft (#3 main journal)
Hi Neil
My local Subi guy told me that the issues that they have are the bore being too large, cast pistons and a bad rod ratio.
He often builds up 2.2 (stroked 2.00) in place of 2.5s.
Steve
surfbeetle ·
Joel wrote:...Now I just wanna enjoy driving the bug and not work on it all the time.
Has this happened to anyone else or am I just speshul?
That's the reason I'm doing my conversion. I had kadron dual carbs and later 48IDAs. I got sick of the valve adjustments, syncing the carb linkage every time the weather changed. Cant wait to drive my suby VW.
Jak Rizzo ·
I agree totally with everything u are saying Joel, but, I have gotten to the point over the last 6+ years that I go into the garage looking for things to do on the car. Sad but true.
I was wrapped last weekend to have to replace the Autometor oil pressure sender. After 6 years it had sprung a leak. Only problem was it only took about 4 minutes to do. Now what?
Luckily for me CT lets me work on his car so I can get my vintage vw fix, then I get in my fuel injected turbo charged bug for the drive home😎
Jak
matberry ·
Jak Rizzo wrote:I agree totally with everything u are saying Joel, but, I have gotten to the point over the last 6+ years that I go into the garage looking for things to do on the car. Sad but true.
I was wrapped last weekend to have to replace the Autometor oil pressure sender. After 6 years it had sprung a leak. Only problem was it only took about 4 minutes to do. Now what?
Luckily for me CT lets me work on his car so I can get my vintage vw fix, then I get in my fuel injected turbo charged bug for the drive home😎
Jak
yawn ; yawn
😂😂😂
Joel ·
I know what you mean Jak, I guess my downfalling is I take on way too big projects instead of doing smaller jobs
Anyway, may sound cliche but I've got a real bond with my bug, after 12 years the literally 100s of modifications I've done to the engines, suspension, brakes, electrics etc all have the potential to fail but that bug just never lets me down and always does it's darnedest to get me home when it's farhkenbroken.
The only one time *touch wood* that it ever left me stranded was when the wheel bearing seized and that was my fault for mixing and matching bearings with the wrong outer race.
One of my old 1600s crapped out both right side exhaust valve seats when I was out west and got me from Broken hill back to home (over 1000kms) on 2 and abit cylinders, my old turbo motor got me home when the rings fell to bits and it lost nearly all compression, my supercharged motor got me home when the crank pulley bolt fell out but the crank pulley and fanbelt magically stayed in position, and the first subaru engine got me home when the headgaskets let go despite the water temp geting to 120c.
Had yet another example of this yesterday.
Sitting in stop go peak hour traffic through the main street of Alstonville which is the main highway between Lismore and Ballina with no where to pull off it waited till I got through town and turned into an empty side street before it did last weekends trick of cutting out for a few seconds before catching again.
Only this time a few seconds later it cut out completely and wouldnt restart.
It was cranking over like there was no spark, naturally first thing I checked was that cam position sensor plug, it was still plugged in but I gave it a nudge and the car started up.
Soon as I touched the plug it cut out again.
No matter how hard I pushed it would not click into place so I wedged it in there with a piece of twig and babied it back home.
Guess the computer doesnt know what to do when it can't tell the cam positions, it wouldn't know when to fire the plugs or pulse the injectors.
Had it have done it about 1 minute prior I would have caused peak hour chaos.
GOod thing I kept the sensors off the first motor.
And there it is.....
The 1mm X 5mm piece of missing plastic that nearly did my head in.
The simplest things can seem so dramatic.
ElusiveStranger ·
Oooh, not the bit of placky that meant you couldn't remove the plug, Joel? Feel for ya bud. Use a pin (what seamstresses use)
Jak - come to the UK, daily hacks rot faster than Subies give up :'(
Joel ·
Just a little teaser for now as to why my bug's been off the road for a while.
As promised baby's been boosted, but,
not in the force fed way everyone was expecting.....
A boost in capacity 😉
A warm welcome for Subaru engine number 3.
It's an EJ254 from a 2005 Outback and for those who know their Subarus that are wondering how the hell I got a late model fly by wire and AVCS (V-tec YO!) engine to fit my bug all will be revealed soon, I've just got a few photos and shit to sort through and a messy shed to get cleaned up.
I'm facing the firing squad if I don't get some of the oil stains and scattered parts from my shenanigans cleaned up.
SebastienPeek ·
JOEL!
I feel as though this is a worthy upgrade of your bug! 😉
I can't wait to hear this one, you need to put up a video on YouTube kind sir.
STIDUB ·
i guess this means ill see you at oxenford in 2 weeks 😀
Joel ·
OK that's enough suspense.
A few people suspected I was just playing a prank, but no EJ25 is alive and well.
I've only just replaced my video camera so my youtube channel is back in action and it does make an appearance in my latest vid but I will make some more detailed vids about it once things slow down for me abit more work wise.
Anyway people are probably wondering what possessed me to fit a whole new engine when I'd only just redone the top end of my current EJ22.
It's been a very long drawn out process, it all started way back in May, I was in town and a hail storm came over so I raced the over to the subi joint as it was nearest, stuck the bug undercover then stood at the front videoing the engine bay of the bosses WRX race car filling up with hail while it passed.
It was only a minor storm but they can quickly turn nasty around here, I didn't want the bug to match my little paddock basher farmcar, it already looks like a golf ball with wheels.
While I was there I started having a piss and moan about how hard the turbo project was ending up.
I didn't want to do any more body work or give up my parcel tray but I also wanted something that wasn't so cramped into the engine bay that it takes a contorsionist to change the plugs which was how it was going to end up.
Why don't you just go bigger N/A then? the boss says to me.....
We're about to do an engine swap on that outback sitting in the workshop, you can have the old EJ25 out of it if you want.
A Fuel injected, 2.5L, 16 valve, twin cam engine in a bug....
I'm sure he could see the gears ticking over in my head.
It was not going to be a nice straight forward swap though.
The outback was a 2005 Gen 4 and has a lot of features that don't play out well with conversions.
First one was it had fly by wire electronic throttle and the manifold is very different so I couldn't just fit my EJ22 one on like you can with early gen1 EJ25s.
Next problem was even though its a single overhead cam engine like my 22 it has AVCS which is Subarus version of V-tec.
The computer controls the cam timing, so it can have agressive valve timing when granny gets on the noise pedal to get the first seat at bingo, but drive like Birch does and you get a nice smooth engine and good fuel economy.
To make all that work though firstly I would need all the wiring loom and ECU from the donor car to control it which is a whole heap of bullshit I didn't want to go through again and setting up fly by wire throttle... I don't even....
Secondly as you can see the AVCS heads are alot more chunky than my current EJ22s heads and the plug access ports would be hard up against the bodywork.
To get these to fit in the bug is alot work, they stick through the bumper mounts almost the same amount as the quad cam motors only they dont need the gearbox moved forward to stay under the guards and apron.
A guy in the US I've chatted with has one in his bug and you can see he had to do some mods to fit it.
The side engine bay tray would also need chopping out to allow access to the plugs.
Now the beauty of EJ suby engines is they are exactly like type1 VW engines - Lego motors.
You can mix and match parts to build one out of .
So what we did was put my two new reco heads from the 22 on the 25 bottom end.
Overall It's just like the old EJ22 but with longer stroke and bigger bore
This made it a nice easy plug and play fit and it's still a non-interference engine (all quad cam EJs and twin cam EJs after 96 are interference)
The engine had just ticked over 155,000kms and was running fine but while it was half torn down I couldn't see the point in being half assed about things so the boss pulled it right down and gave it a full freshen up in his free time which hasn't been very often while he worked on his hill climb car hence the slow progress.
Its been in for bit over 2 months and 2000kms now, the main issue I've had is a rebuilt EJ25 with EJ22 heads has a lot of compression and even the brand new German semi-auto starter motor turns it abit slow once it's warmed up so a cranky kit is on the horizon.
It's not a bad little power increase (about 35-40hp) over the EJ22 but it's the torque of that longer stroke thats most impressive.
The stock EJ22 is good for 190nm, the EJ254 in stock for with AVCS is 229nm but even without that my engine would be around 220nm same a non-variable SOHC EJ25.
So in a light weight bug it's no wonder it pulls up steep hills in topgear like a tractor.
I was worried this thing was gonna be thirsty, but to my surprise it's been no worse on fuel than the EJ22.
Boss wants to plug the laptop into it with the wideband and go for a spin so we can make sure it's not leaning out under load otherwise it may need some bigger injectors but plugs so far show no sign of it.
My average tanks so far have all been between 8.8 and 9.0L/100km.
I've done 2 runs up the gold coast, i had to drive it hard the first time to bed the rings in but it still got 8.2L/100 and the second time got 7.6L and that was even with the a/c on (it was 27c and hot)
So in a nutshell, it was a lot of rooting around but very pleased with the results.
Smiley ·
Great work as usual Mr Joel. Good to see that you took the time to think things through and do the job properly 👍
Smiley 🙂
JVLRacing ·
luv the purist comment😂 but great round up of proceedings😎
Joel ·
Cheers guys, wasn't sure if anyone was still following this thread.
I've changed a few other things with the cooling system and a new exhaust system but didn't bother updating.
SebastienPeek ·
Definitely want to hear about this and see this exhaust and cooling upgrade as well Joel!
kaiisons ·
This is one of the best documented conversions on the web. I keep reading over and over. Great work!
cam070 ·
Joel wrote:Cheers guys, wasn't sure if anyone was still following this
Shame on you Joel. I bet there are loads of us following this thread and plenty that come back looking for tips. Details, details, we love 'em. Keep them coming we are listening!
JVLRacing ·
haha love the topic joel....move ur ass give more pics,
maybe ad wat $expenses$
it takes to do these improvements!
Even i am impressed😂 Seagull would be too😂
ElusiveStranger ·
Joel wrote:Cheers guys, wasn't sure if anyone was still following this thread.
Well I still get about 6 notifications for every new post on it.
Good work fella
surfbeetle ·
I usually get 4 notification emails... by the way, Joel, did you happen to post how you did the air conditioning? I am planning on installing air conditioning in mine but need a diagram of what is needed and how it should be plumbed. Any tips are greatly appreciated.
Joel ·
Half your luck, I get 7 of the bloody things each reply so i've just come back to a chockers inbox.
I did a write up of the A/C in my readers rides thread, its on page 8
I didn't mention what I spent on this last little endevour as it's not really an accurate representation of what this sort of work typically costs.
Its cost me $1800 for what is a full rebuild but most of that is parts, I specified that everything had to be genuine Subaru.
He was going to fit some low KM STi pistons which had some sort of special coating in but this thing wont see boost now and it would only complicated things further getting the CR right
It was a good running engine but I couldnt see the point in strapping fresh heads to a 155k old bottom end so the block had to be honed, new rings, bearings, etc etc but i consider it good value still for a 170hp engine that I can beat the crap out of and it's still gonna last 300,000kms if i keep the maintaince up to it and get good fuel mileage.
lou0060 ·
hi Joel, good to see the 2.5 is up and running. didn't see you at Warwick but we'll catch up somewhere I'm sure. I sorted out my relay issue on the air flow sensor so thanks for the info on the Saturday.
Joel ·
No worries mate, glad you got it sorted.
Didn't end up getting up to warwick unfortunately, just been flat out working.
surfbeetle ·
Thanks for the AC info. So far I have found the entire thread fascinating. It's very cool to see the evolution of your car.
sx200 ·
thanks great post
sx200 ·
thanks for info on ac
sx200 ·
great post
KoenvdW ·
Joel,
I'm new here on this forum, but I used you're topic as a guideline for my subaru powered beetle. Which i'm currently building. I'm from the Netherlands, and i'm building a EJ20 into my vw Bug. I got a couple of questions about the electronics, and i was wondering if you could help me perhaps...
In the picture below, there's a part of the engine wiring diagram. There are 6 wire's coming from the main fuse box, but when i looked at your photo of the completed wiring loom, i don't see a fuse box.. I assume you don't use them(Main and fuse&relay)?
Were did you get the 3 wires(Main power, Ignito power and Fuel pump) from. And don't you use a mass connection?
I hope you're willing to help me, and sorry about possible language faults and the number of questions😂
Joel ·
Howdy,
I didn't use the standard Subaru fuse box, all that has been chopped out of my loom and I run inline fuses.
Al that converted my loom to fit recommended a 30amp circuit breaker rather than a fuse on the main power so it just comes off the Battery through the breaker to the main power wire of the ECU.
The ignition I've got a 15 or 20 amp inline fuse for, it just comes from the ignition switch via the bugs main fuse box and the fuel pump gets its power from inside the ECU from the main power wire, so I have another inline fuse on that where it comes out of the ECU.
My wiring is a total jumble under the backseat, another of those "oneday" gonna tidy up things.
Hope that helps anyway.
KoenvdW ·
Thank, that helps me alot!
I guess the main power is coming from FB-28 or FB-18?
How did you make the radiator fan relay? Is it possible to send me the email address of this guy Al?
I'll have to have a look at my rats nest but fairly sure from memory that Yellow is the constant live wire and red wires are ignition power.
Fan relay is pretty easy, if you can find the fan output from the ECU, that is the ground for the fan relay.
Other side of the relay coil just needs an ignition power source.
Craig Torrens ·
It needs some flared guards 😂
Joel ·
You'd better be supplying Torana tail lights and a whale tail with them....
Should compliment my Carrera running boards and Jellybeans nicely.
DylanTheDubber ·
Joel,
Im after a pair of careara Side Skirts??
From Dylan
Joel ·
Was a joke.
If i had a pair to get rid of you woulda scored them ages ago.
Anyway seeing as this thread has bumped back from the dead there were a couple of other un exciting minor changes that went unoticed.
The new muffler actually went on back in late 2010 for pinkslip.
That old stainless steel canon was only ever temporary and forever breaking apart and being welded back together and was starting to look like big lump of duckshit
Also being cheap chinese shit the fibreglass insulation was starting to disintigrate, made more noticable by the car alarms I was frequently setting off, particularly in undercover carparks.
I really didn't want to lose the note it had, you don't have a subi engine without the subi sound, it's the next best thing to an old carbed V8 rumble, but I needed it quieter so I went and bought one of my favorite Mercury mufflers and a mandrel bend
It;s the exact same dimensions as the canon but being a quality built muffler means its that slightly quieter.
One of the main reasons the canon was always breaking was the two tail pipes were always bottoming out on stuff and transfering the shock through the muffler.
Also my shitty bracketry was mainly to blame.
It all came down to simple mathematics, I had a bracket holding the weight in the wrong spot, the center of the weak sheetmetal at the wrong end.
So my new bracket is at the unsupported tail pipe end of the muffler and is welded to the end cap for extra strength instead of thin sheet metal.
Not gonna win any beauty pagents but it does the job
It's all hidden behind the valance.
Also instead of having the dummy mock tail pipe like the old one I decided to have a single one and finally fit that fibreglass valance.
It seems to scrape alot less than it used too,
I've got some sound test footage using my phone as it amplifies the sound alot more than my video camera so you can hear it better
so excuse the crappy footage and turn up the bass
The other change I made was a new coolant overflow bottle.
My existing one was just a washer bottle with the pump removed.
It worked amazingly well but was alittle small in capacity so on really hot summers days it almost filled right up .
so I needed one with a bit more capacity so I bought a universal one but it didn't suit the availble space I had.
As you can imagine there is a million choices out there when it comes to OEM bottles as nearly every model of car has a different configuration bottle, but I had a few requirements which narrowed down my search.
I wanted one that had the inlet and outlet hoses coming in through the lid not the bottom of the bottle so it didn't need draining if it needed removing from the car.
Also one that sat on a slide bracket rather than bolt in place for easy remove and replace.
Both these things means it only takes 10 secs to remove from the car as it doesnt need draining or unbolting, just remove the lid and slide off its bracket.
Also needed one that fitted with my limited space so fairly tall but also narrow in width
So the perfect candidate was from a DB platform Mazda.
which means any 1991 onwards Mazda 121 Bubble or Metro or 1994 and later Ford Festiva.
I came home with one from a 2000 WF Festiva
Unfortunately half the Festiva comes with it as it was attached the Battery tray.
No matter, I just cut off the slide bracket piece I needed, attached it to a bracket and bolted to the engine.
Like a bought one....
Been working like a charm
Even these stinking hot summer days puttering around town with the A/C on which is when the engine is at it's hottest I have seen it get much over the full mark.
Jak Rizzo ·
Hi Joel,
That coolant overflow bottle is the same as mine, I got it out of a Toyota Corrolla
Been working fine for over 7 years now.
Jak
Joel ·
Ah yep that takes me back actually, would have been from an AE92 Corolla.
The ex's mother had a 93 Corolla that used to pump oil into the coolant so i had to flush the caramel thick shake out of the cooling system every few weeks as it wasnt worth spending money on so i was well acquainted with the cooling system.
A tribute to Toyota, that little 4a-fe was still running after 70,000kms of doing that with no oil or filter change and nearly 350,000kms on the clock.
I felt bad sending it the wreckers when it had literally been such an indestructable little car.
vlad01 ·
I am looking at getting a 97-98 corolla this year for a work car coz I hear they are hard to kill and economical.
Joel ·
As long as you find one that hasn't been too abused or neglected they are great cars.
As good as Euro engines are I still reckon Japs build the best motors, well excluding Mitsubishi 😂
All of my Toyotas, Nissans and Mazdas as well as ones owned by friends and family have had bullet proof, well built engines.
I havent put enough KMs on my Subaru engines yet rave about them but the amount of trouble free high KM Subarus around speaks for itself.
jmms ·
WOW... this thread is flowing with info ....THANKS Joel and all thats been posting.
I've just started a EJ25 conversion on my Rewaco Trike
and will be asking ....allot 🙂 as this is my very first conversion
Some photos:
Joel ·
Glad it's helping out.
Actually, I would like to follow your progress.
My old man has one of the first batch of fully imported Rewaco trikes.
I'd love to drop an EJ in it but looking at radiator and ECU placement needs some serious planning and things like crash bar and fuel tank need modding.
Dad likes the idea but he is also continually dropping hints about my 1776 VW engine and my old Supercharger setup.
Shuffs ·
Looks like your thread has been hijacked by a Trike conversion.A lot of motor to be putting in a trike,might have trouble keeping the front wheel on the deck!
Joel ·
Broken the silence finally.
Well if Leon can keep 2.2 fuel injected twin turbo in a straight line (only just) I'm sure a 2.5 N/A subi will be ok.
Shuffs ·
😀I think his wheelie bars are also a bit of help!
Joel ·
While this thread is back at the top and the topic of adaptor kits is going in other thread I'll add something of relevance.
I replaced Seagulls shitty adapter kit with one of John Shermans Volksconversions Kits.
I got stung by not obeying the old Buy once, Cry once rule.
Seagulls kit has held it together for over 30,000kms now but I've had several issues with it from day one.
The thing with all rear mounted VW engines is it doesn't matter if its a 1940s 1100 or an early 90s Caravelle Wasserboxer, they all have an identical locating spigot that centralises the engine to the gearbox.
Seagulls adaptor and alot of other cheap ones made are just machined flat and don't have that locating spigot
It relies on the 4 bolts locating the engine and they can get it close but not spot on the money.
What this does is pulls the gearbox input shaft off center so first thing that goes is the oil seal, then eventually the bearing will start to flog out too.
It also plays with the starter motor and clutch throw out bearing alignment not to mention vibrations and such.
It's only has to be a bee's dick out to start causing problems.
I spent even more $$ getting this spigot machined onto the adaptor plate to correct all these issues
So in the end it ended up costing more than one of Shermans adaptor kits which are made to far better quality.
One other thing about it was Seagulls kit doenst have a new flywheel, its actually an old VW flywheel with the center machined out and a new hub welded in and machined for a Subaru crank.
John machines his flywheels up from scratch.
Although I and a few engineers that have checked over it agree that part has been done to an acceptable standard.
And finally becuase my new EJ25 is a 2005 its one of the newer generation "8 bolt mounting" blocks instead of the old 4 and John's is made to suit these motors
So I've bought one of his and Seagulls will be used for another project
You can see the 2 extra mounting bolts and also the special countersunk bolts in the bottom 2 bolts that John uses.
That stops the interference with the gearbox cradle and rubbers that happens in bugs when normal bolts are used.
The only one regret I have with John's kit is something Brad warned me about.
John uses all old Impreial UNC bolts on his side of things.
His reasoning is if you break a bolt out woop woop somewhere the local bogan Wolf creek garage can probably find something down the back of the workshop to help you out.
Brad used to buy the adaptor plates untapped so they could be tapped for metric threads.
Where this is good is you can use the standard VW mounting studs screwed to the adaptor plate like I did with Seagulls.
John gives you bolts to screw the adaptor to the gearbox which aren;t availble as studs.
And let me say for the record trying to line up and engine with a VW gearbox with no studs to guide you FUCKING SUCKS!!!
Jak Rizzo ·
The only thing I changed on Johns kit was the bolts as well, instead I went to an engineering shop & bought some chromoly threaded rod & made my own bolts as the ones supplied just looked cheap & fragile.
Jak
1303Steve ·
Hi
I bought my 1st kit from Unicap, it had the ridge machined in to it but used a modified VW flywheel. Unicap has been a VW Nationals sponsor for years.
Steve
kombibob ·
Yep I had the same problems with the cheaper adapter plate flogging out input shaft seals, replaced it with a Sherman and have been trouble free since.
ian.mezz ·
I got JVL old adaptor and the thing was out buy about 5mm and the starter never meshed in proper , once you added about two auto washer behind the flywheel the starter would work fine 😊
BlueV2 ·
You can buy them from Sharpbuilt with the ridge machined in and with metric bolts and studs.
Joel ·
Another classy repair Ian 😉
If I was pulling the engine on a regular basis I'd do something about it.
Jak, was the threaded rod hard to get?
tried the bolt bahn and they can get threaded rod in mild steel but not high tensile so I left it.
Jak Rizzo ·
I don't know if it's hard to find as I got it at my local Engineering nut & bolt store first go. it's very very tough stuff, i cut them to length by hand, 1 blade equaled 1 cut ! took forever too.
Jak
Jak Rizzo ·
ian.mezz wrote:I got JVL old adaptor and the thing was out buy about 5mm and the starter never meshed in proper , once you added about two auto washer behind the flywheel the starter would work fine 😊
maybe that explain's why JVL's car never ran? the starter motor couldn't work properly😂
Aaaah, the simplest things.
JVLRacing ·
Jak Rizzo wrote:
ian.mezz wrote:I got JVL old adaptor and the thing was out buy about 5mm and the starter never meshed in proper , once you added about two auto washer behind the flywheel the starter would work fine 😊
maybe that explain's why JVL's car never ran? the starter motor couldn't work properly😂
Aaaah, the simplest things.
ouch! Jako the expert.....🙅
Hey Ian wat starter are u using?
Joel ·
Owww says my inbox.
Cheers Jak, might chase that up next time theres a reason to pull out.
Gearbox failure will be my guess.
Jak Rizzo ·
JVLRacing wrote:ouch! Jako the expert.....🙅
Yes, in comparison to you I'm a Nobel Prize Winner😂
JVLRacing ·
Jak Rizzo wrote:
JVLRacing wrote:ouch! Jako the expert.....🙅
Yes, in comparison to you I'm a Nobel Prize Winner😂
Dont be mad jako😂
iwantbus ·
I have been reading this thread for awhile now and I have learned a lot, just wanted to say thanks.
iwantbus ·
Oh and by the way my project is my 74 Bay window bus that now has an EJ25 DOHC motor in it now.
No where near complete and this is the reason I am reading here....wiring and cooling are killing me!
madness726 ·
Thanks for the thread Joel. i am going to start my convert in a few months, and i know this will be a lot of help.. Since this site seems to be dead now. not many recent posts. So i will just use your post for my reference and figure out the rest on my own...
Thanks again.!!
madness726 ·
Oh yeah, and if you are still on here!!
Is your stock gearbox still holding up?
Joel ·
I've been on Aussieveedubbers for 10 years now since day1 except for a break in 04-05, I ain't going anywhere 😂
My gearbox is still working fine but the bearings are really getting noisy in it, but it's been doing that for years before the Subi went in and reverse is not in a good way....again.
I think Working on my reverse 180degree J-turn spins a while back I've chipped some teeth on it which is what happened to it the last time I had it rebuilt back in 2001, it had several chipped teeth.
Lbug reverse gears are abit to fragile to be trying that stuff I've found out.
When I can be arsed pulling it out it's going to get a freshen up with new bearings, a 0.89 4th and if it can be done an Sbug/1500 reverse (much stronger).
madness726 ·
Great to hear.
Your post has inspired me to build a Lbug instead of a standard which i was going to convert into a Volksrod. I want to have a bug that i can also take to the track.. I live in US, and there is a great track 20 mins from my house. Thanks again for this thread, and i will probably be asking some questions here in the next couple of months.
Joel ·
Nice work, look forward to seeing what you get up to.
Have a search around on here and Youtube for Jaks bug, he has the grey super with the rexxy engine which is both a track/street car.
Joel ·
I thought the bug was being abit louder than usual...
Seems muffler #2 picked up some bad habits from muffler #1 god damn it.
The bolts holding the muffler to the cat were abit loose and its also cracked around the support hanger so I'm not sure which caused which but I think I'm gonna have to take the same approach as Paul did with his and run a strap all the way around the muffler to take the weight and possible 2 of them.
Other than that can;t complain about much, EJ25 has now done almost 12,000kms now since it's gone in.
probably could do with an oil change, did it once at 5000kms, but didn't change the filter....oops
Joel ·
Some interesting trivia...
If ever I feel the need to sink my bug to the bottom of a fresh water lake........ as you do,
I'm now confident after reading this that it could be fished out 3 months later and would still start first go and drive 20kms back into town....
Anyway, muffler is now fixed, no longer have a bracket welded to the muffler anymore its got a strap running around and bolted to it instead, lets see how long this ones lasts.
I also noticed while I was under there that despite 3 years of being regularly pounded on speed bumps and kerbs my Custom Veedub sump is still looking as good as when it went on minus some paint.
madness726 ·
Finally got the bug...1974 1303.. A little ruff on the out side but pan is solid... zero rust..
I was wondering what I have to change in the front suspension to a 1973 so i can get the 5 inch lowering kit from topline? i dont know how to post a pic here.. will figure out later and post one of it..
madness726 ·
how do you post pics with the text like U do?
Joel ·
Upload the pics to TheSamba gallery or photobucket and paste the [img] code.
Actually looks like that one might be a 73 anyway, got the old style non shock bumpers and are they mix and match front seats?
looks like passanger is 73 and driver is 74 on.
the way the front wheels are sitting looks like its 3 bolt too.
If its got the 2 bolt struts you just need to do the same as I did, 3 bolt 71-73 control arms, spindles and get a 3 bolt topline super low kit.
madness726 ·
The title says it is a 74.. But I will look at the struts and see if 2 bolt or 3. I might get lucky.. And ya they are mix and may seats it seems. I going to trash them.. They not that nice.. I have it halfway stripped already, took only 3 hours 🙂.. I love how easy it is to deconstruct a bug.....
madness726 ·
So looks like i have the right ones ..... Right? 🙂
Weird thing is, This is a 1974 German made super, But seems to have everything the 73 has.
Yogie ·
The bolts you are needing to check are at the bottom of the strut near the spindle. The 3 bolt is a small triangular plate and the 2 bolt has the bolts one above the other.
Yogie
madness726 ·
Thanks for the info Yogie.
Yeah i just checked And i do have the 3 bolt. So now i just have to get the topline kit and I am good to go with the front suspension.
Joel ·
As I thought the front track didn't look wide enough to be a 2 bolter.
Some weird stuff going on with it though, it's got the big hole on the strut towers which means it was a 2 bolt body and title says 74 yet its 3 bolt struts and early bumpers.
Might be a late 73 build before they change happened
Is the first numbers of the VIN 133 or 134?
You'll need a Super low kit but they come with versa struts so you'll have to stick with stock wheels.
Joel wrote:When I can be arsed pulling it out it's going to get a freshen up with new bearings, a 0.89 4th and if it can be done an Sbug/1500 reverse (much stronger).
Hi Joel,
I have the Kombi 0.82 4th in my gearbox, with the 3.88 R/P it's a fantastic top gear, prefect for our engines & awesome on the freeway. You have to watch it though, mine likes sitting on 140kph so you have to be alert as it does it very easily.
Not the best gearing for drags or circuit but it's a nice compromise
jak
madness726 ·
the VIN starts with 134.
Why would i have to stick with stock rims... 17x7 wont work with the kit?
Or do i also have to get the Maxx struts to change the rims?
ian.mezz ·
madness726 wrote:the VIN starts with 134.
Why would i have to stick with stock rims... 17x7 wont work with the kit?
Or do i also have to get the Maxx struts to change the rims?
give topline a call , they are a workshop.
Joel ·
madness726 wrote:the VIN starts with 134.
Why would i have to stick with stock rims... 17x7 wont work with the kit?
Or do i also have to get the Maxx struts to change the rims?
The normal versa struts just use stock springs which don't clear 7" wheels, you need the Maxx springs.
Thats a 74 chassis number and the big strut tower holes means 74 body too,
It's got a 75 and later front hood so it may have had parts swapped to repair an accident.
Your struts definately look like this?
And not like this?
Joel ·
Jak Rizzo wrote:
Joel wrote:When I can be arsed pulling it out it's going to get a freshen up with new bearings, a 0.89 4th and if it can be done an Sbug/1500 reverse (much stronger).
Hi Joel,
I have the Kombi 0.82 4th in my gearbox, with the 3.88 R/P it's a fantastic top gear, prefect for our engines & awesome on the freeway. You have to watch it though, mine likes sitting on 140kph so you have to be alert as it does it very easily.
Not the best gearing for drags or circuit but it's a nice compromise
jak
Gday Jak,
Trying to work out which way to go gearbox wise at the moment.
My stock AT Lbug box is working and shifting fine but the bearings are starting to get a little noisy at certain speeds so its about due for a freshen up.
Trying to weigh up whether to rebuilt the stock AT Lbug box and maybe change to a shorter 3rd and 4th or I also have an AH Sbug box and a DC type 3 box that I could use and just fit the 3.88 R&P to.
I'm just warey of changing the 4th gear about creating too big of a gap between 3rd and 4th.
madness726 ·
The struts definatly are 3 bolt.. I i have notice repairs in the from from and accident.
Jak Rizzo ·
I'm just warey of changing the 4th gear about creating too big of a gap between 3rd and 4th. [/quote]
just strap on a turbo to fill in the gap 😂
lou0060 ·
Joel, Jak is NEVER going to lay off you for not fitting that turbo.....😂😂😂😂
Joel ·
Ah all part of the fun
Although in classic Joel tradition of why leave good enough alone I've recently been kicking around the idea in my head of taking a garden variety EJ20turbo and swapping the DOHC for the later style SOHC EJ20 heads so it fits in a bug without chopping the sides out of the bumper mounts or moving the gearbox forward.
That is my biggest dislike of the DOHC engines
I just have to play around with some dead engines at the subi joint and see what works and fits.
Leaving my newly rebuilt engine alone now that it's run in would just be too boring and sensible.
Jak Rizzo ·
Joel wrote:Although in classic Joel tradition of why leave good enough alone I've recently been kicking around the idea in my head of taking a garden variety EJ20turbo and swapping the DOHC for the later style SOHC EJ20 heads so it fits in a bug without chopping the sides out of the bumper mounts or moving the gearbox forward.
I'm pretty sure thats what this guy has done & it gets along OK😂 I'm sure I have seen a website showing details of a turboe'd twin cam 2.2L engine.
Joel ·
Seen pics of that car on Shoptalk or Germanlook but none of the driveline in it.
Be nice to see it's set up.
Flying along at those speeds I'd be paranoid about someone up ahead pulling out to overtake and leaving you with no where to go.
They must have some spectacular crashes on ze autobahn from time to time.
gerrelt ·
The thing is, the germans are aware that there is no speed limit on some highways. So people stay out of the fast lane, and they first look good before they go switch lane. That being said, I do think the highway was a little bit busy for such speeds in that video. He must have excellent brakes..
Of course there only has to be one idiot...
Here in the Netherlands there is a speed limit of 120 km/h (130 on 2 or three, but they are an exception). So, driving that fast over here is much more dangerous, because poeple don't expect it.
Brilliant video, btw, his other video's are pretty fast too. I subscribed.. 🙂
Also do i have to buy the super low kit then buy the maxx struts also to run 17x7 rims. Or can I just buy the maxx stuts and lower it and run the rims?
Crais ·
Hi Joel,
Thanks for the thread, it certainly clears up alot of questions and Ive been studying your thread quite a bit doing my own conversion. Is there any reason why you sent the exhaust around the back of the motor instead of just pointing it toward the back of the car?
Joel ·
Cheers, there wasn't room to fit the cat without running the muffler along the back.
MYSuperBulletBug ·
Hye Joel... its been a while ive been following your subabeetle progress and youtube...
Any updates on the new gearbox? Have it been installed in the bug?
Really want to see the gearbox specs.. cheers
madness726 ·
170,000 views.. Only on Joel's thread.. 😂
Dave_In_Florida ·
Joel, in reading posts on the various forums, I believe you said the EJ25 doesn't fit in the rear of the beetle without ALOT of cutting. In this thread you mention in your EJ25 swap that you put earlier heads on which are smaller than the newer EJ25 heads.
So if I want the displacement of a 2.5, but put earlier SOHC heads on it, how much rear sheetmetal needs to be cut on a beetle? Can I keep the bumper mounts with this combo? FYI, at this point I'm strongly considering running the Subaru MT5 trans.
Hello Joel,
I have read all your topic: thank you!!! it is very very good for me!
Now I study all details because my target is buy a VW and assembly Subaru motor;
I live in Italy and Subaru motors are not diffused;
I see that you have installed on your Beetle a EJ25 SOHC motor, right?
Unfortunately in Italy, we have not this motor 2500cc. :-( and...
...now in 2016, old subaru models are not available then... what do you say? what motor can I install?
Can you make a suggestion?
Thank you Joel!!!
Birdman ·
2 Cam EJ motors, such as the EJ22, are much easier to fit and require minimal cutting of the body sheet metal.
4 Cam motors, such as the EJ20T, make more power but are much harder to fit due to the extensive cutting required to fit the heads.
It all depends on how much power you need.
christianmlr ·
Hi Birdman!
Thank you for your answer!
There are precious informations. In Italy, unfortunately, I can not find EJ22 and EJ25 :-(
In Italy Subaru WRX, STI etc. are diffused (EJ20 turbo);
but you write me that is very hard to assembly in Beetle;
the power for my car is not a problem because I think that 130 HP in a Beetle are very good;
I think that aspirated motor is best than turbocompressed motor for a rear wheel drive (to drive);
but... antoher problem is this:
where can I find a motor complete of all components (electrical, electronic etc...)?
Have you a seller to contact that can prepare motor complete?
In this way I can plug & play the motor without lost time for undress cable and control unit.
Best way for me is purchase an engine "ready to switch on anf go"; have you a contact?
what do you think?
p.s. Sorry for my english but is not very good ;-)
Yogie ·
Your English is pretty good and we can understand you. The cost of shipping an engine from Australia may be pretty high but there is probably someone that can do it for you. It may be easier to try and get the rebuilt engine from England as they have had a range of Subaru's delivered there. Once you have that, there are people here that can supply the wiring and other bits and pieces for you.
Todd from Subaru gears on here can probably help guide you as well. Once you have 5 posts on here, you can PM Todd if he hasn't responded on here.
Where in Italy do you live?
Yogie
christianmlr ·
Thank you Yogie! You are too kind :-)
yes, shipping costs are high; I have seen many engines on ebay site web; good price;
but my big problem is central unit and cabling :-(
Is not easy find correct elements to turn on engine.
I think that the solution is buy it in Italy;
I live in Piemonte near Torino :-)
in Italy Subaru Impreza WRX and STI are diffused; I can find EJ turbo simply.
I think this is a very very good idea but you say that is hard to install.
Have you pictures of the beetle with ej20 turbo Beetle's body modify?
I see Bugaru Beetle on youtube channel and I think (if this is engine of subaru impreza 2.0 turbo) isn't a problem for me;
for example this: http://www.subito.it/accessori-auto/motore-subaru-impreza-wrx-turbo-sondrio-124015361.htm
the problems are:
- rear bumper
- cutting behind the rear seats
another?
Ok, after 5 messages I write to Todd.
Thank you!!! :-)))
surfbeetle ·
You have some options for the Wiring and Computer to run the engine. 1. You can source the stock Subaru unit and wiring. You have said that this is difficult for you do to your location. It is the cheapest but the wiring harness can be difficult to shorten and prepare for use in a non Subaru vehicle.
2. Look for the Megasquirt computer. This is a build your own solution where you can either buy assembled computers and wiring or completely build your own from a kit. https://www.diyautotune.com/ has info on these.
3. Purchase a complete unit and wiring for your engine, this is the easiest but most expensive option, http://www.outfrontmotorsports.com/engine_management.htm has info on this. An example is that they show about $1500 US for the computer and another $500 US for the wiring harness.
Option 1 above in my opinion, is the least expensive but most difficult option. Option 2 is the medium priced and medium effort and option 3 is the most expensive, but least amount of effort.
Good Luck.
christianmlr ·
Thank you Surfbeetle!
Good idea! Now I read web site;
but... for the changes, for the subaru wrx turbo engine http://www.subito.it/accessori-auto/motore-subaru-impreza-wrx-turbo-sondrio-1...
the problems are:
- rear bumper
- cutting behind the rear seats
another problems or changes?
Have you pictures?
If I define and read up all the problems, the work is best :-)
surfbeetle ·
Here's a link http://forums.aussieveedubbers.com/viewtopic.php?tid=67295&page=1 on this forum for a Subaru turbo bug. I suggest that you find a forum and start your own build thread. This thread is Joel's build thread and asking a few questions is great but we don't want to take over his build thread with all of your questions.
My build thread is http://www.shoptalkforums.com/viewtopic.php?f=19&t=134735 There used to be a lot of photos in it but the site upgraded and lost some of the photos. I have a EJ20 Turbo DOHC with rear bumpers. It takes a lot of fabrication compared to a Single Overhead Cam engine.
Joel,
I shot you an email a week or so ago but haven't heard anything back. I'm looking for a little more information on the EJ25 hybrid motor. I currently have a EJ22 in my 73 Super Beetle and I'm looking into the possibility of going the same route you did in lieu of going turbo. Let me know if you have a better email address that would work to reach out to you.