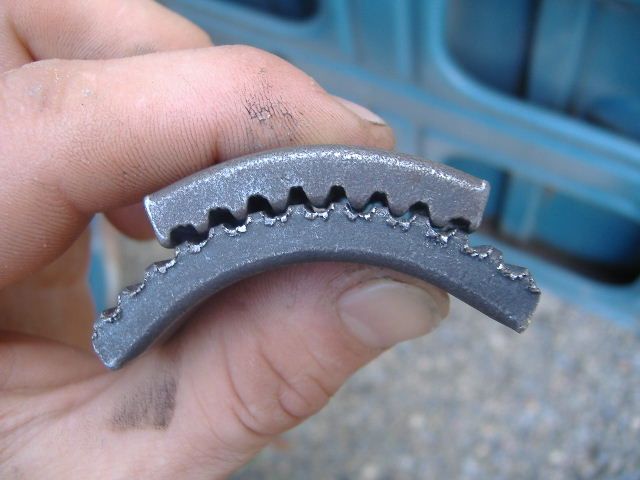
front beam adjusters
baghall - July 19th, 2013 at 03:26 PM
Need to weld on front beam adjusters but am wondering about where to position them in order to lift the ffront of the car for off road use.
matberry - July 19th, 2013 at 04:24 PM
put max down level with original, that way you'll have all the adjustment up.
baghall - July 19th, 2013 at 05:38 PM
Thanks Matt.
Also is there any tuts etc on preping for welding on adjuster cause I understand there is a bit of prep work required?
Smiley - July 19th, 2013 at 11:50 PM
Hey man.
Have a read through this thread here
http://forums.aussieveedubbers.com/viewtopic.php?tid=78783&page=1
It's for narrowing and lowering a beam, but the principles the same.
Make sure you clean the metal very thoroughly where you are going to weld. And ensure that there is no grease on the inside of the beam or this can
contaminate your weld also.
When I did my current beam I used lengths of angle iron and stainless hose clamps on both beams to hold it all straight. You clamp them both and can
weld most of the way round, then remove one piece of angle and finish one off. And let it cool. Then remove the other piece of angle and finish
welding the second one off. Do not grind your welds down flat as it will remove a lot of the strength from your weld. You want them as strong as
possible (ask me how I know)
It's a good idea to chamfer the edges of the join slightly to help with penetration. Make sure you run your welder pretty high and get a good deep
weld on there.
As for positioning. When I did mine I set it so the lowest setting was slightly above stock ride height, and then it was all up from there! Lets be
honest, in a Baja you don't want it low, so I didn't see why I would put them so you could go down to stock height!
And since then I've had them cranked up to max the whole time anyway. I've never adjusted them, they are actually rusted in place now.
I'm about to start doing a new beam for mine but I'm going to remove the adjusters and just put standard set screws in at the height I want.
There's some pictures of how I did my first beam on the first page of my build thread, But as I said above, DO NOT GRIND THE WELDS FLAT!!
You can skip to page 14 if you want to see the results from that. And on that note I would 357% recommend fitting some front end support bars. More
info of that on page 14-15 too.
http://forums.aussieveedubbers.com/viewtopic.php?tid=80275&page=1
If you have any more question just ask!!
Smiley 
baghall - July 20th, 2013 at 12:54 AM
Hey Smiley, thanks for the input but I have bought a different set of adjusters. It is illegal for the beam to be cut and welded in NSW, so I bought a
set of weld on adjusters which frommy understanding require the hole in the beam to be elongated and for the dimples to be ground out in order to be
able to turn the inside section around.
I just want to make sure I am correct with what I think needs doing.
matberry - July 20th, 2013 at 09:34 AM
^ yep, that's how you fit Avis style adjusters. A word of warning tho, Avis style will be VERY difficult to get the lift as there is nothing to push
the adjuster up against the load of the torsion bar. Fine for lowering as the load is not there. To not cut the beam, get some Sway-a-way style
adjusters and cut the external pieces off the body of the adjusters and weld them to the outside of the tube. Use the rest of the hardware from the
adjuster also and job done. As far s not allowable tho, I'd question that, it's about interpretation of the rules, the beam is a housing, not a cast
suspension arm/component, it is welded from factory and leagal to be welded now IMO.
Smiley - July 20th, 2013 at 11:13 AM
Yeah. I would say if you are a competent welder then I don't see what the issue is.
As Matt said with your style just make sure all your adjustment is in the upward direction. This will mean that when you slot them out you'll be
grinding metal out from the top of the original hole and in the direction that is up and towards the back of the car.
If you run them make sure you do them up nice and tight. You don't want this happening either.

Smiley 


