
HOW TO: shift rod bushing replacement
Joel - March 16th, 2008 at 07:54 PM
ok heres the $9 + 2hr way to completely transform what your VW is like to drive
ask anyone who has done this simple little repair how much the difference is amazing
most people assume that vw gearshifts are just naturally shitty cos this job rarely gets done so most average VWs have nice sloppy gearshifts
it seems like a fairly scary job to someone who hasnt done it b4 which is why im putting this howto up so people can see its really not that bad and
certainly well worth the effort
im doing it to my 74 Lbug but all beetles, type3, KG are the same and even kombis are fairly similar to from memory
i already replaced the gearshift bushing in my bug about 6 years ago
but i learned the hard way dont lubricate the new bushing with ordinary wheel bearing grease
only use a white lithuim grease
anything else will cause the rubber to deteriorate rather quickly as i found out
ive got a 20mm quick shift kit in my bug so i hadnt noticed any slop but the rattling when i accelerate through the gears was shitting me no end
so get yourself a new bushing and it may pay to check the condition of the coupler as well as this can also have a dramatic affect on shifting quality
too
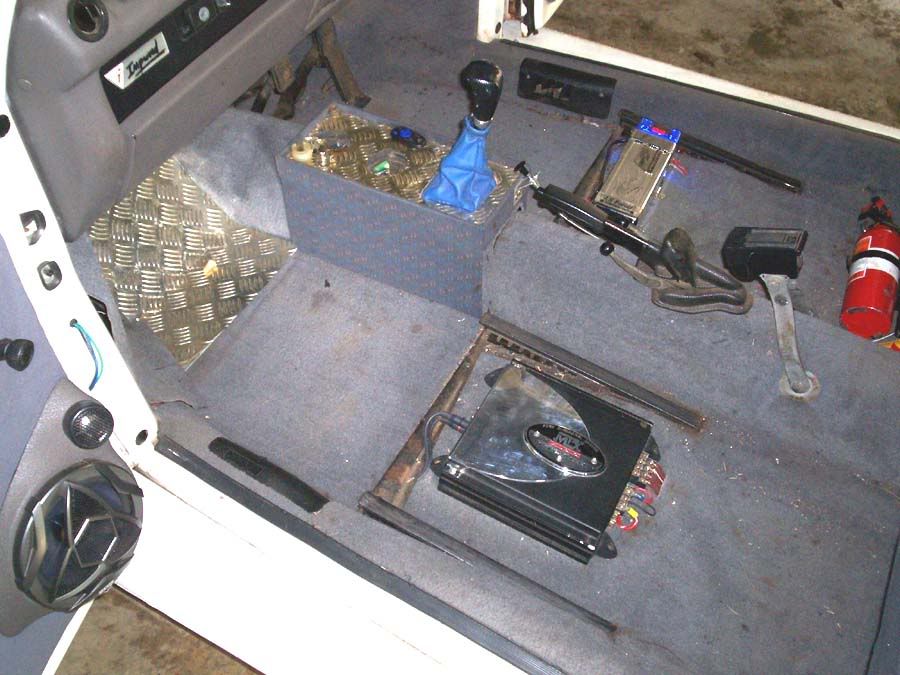
ok first step is rip out the seats
u could do it with them in but it would be a PITA to work around them and they would surely end up covered with lots of greasy hand marks
also the base of the back seat needs to be removed too.
Joel - March 16th, 2008 at 07:55 PM
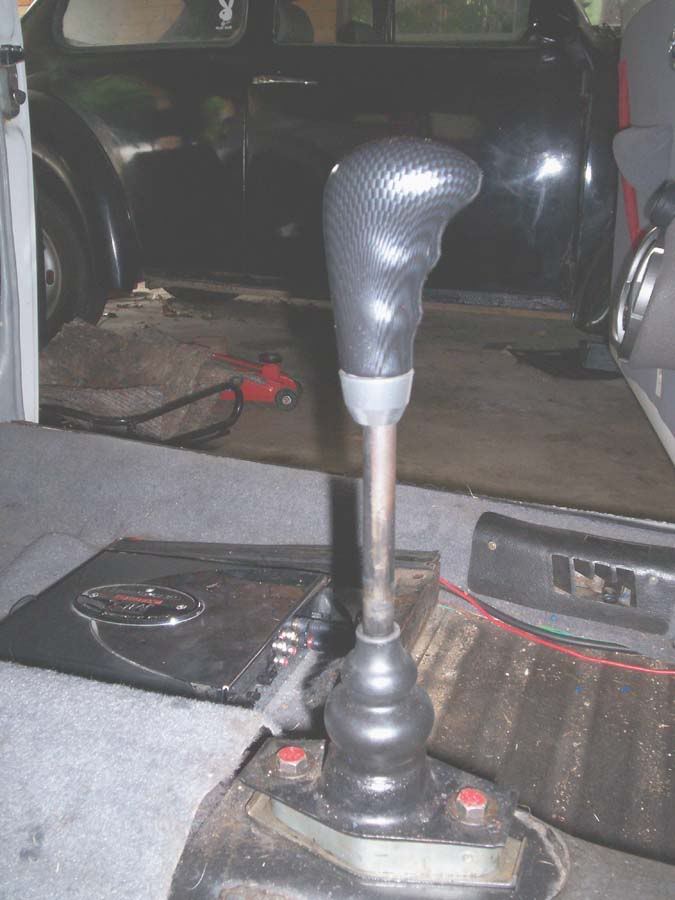
VW never really changed their shifters much in aircoolers, its the same overall design in most models
now b4 u go loosing the bolts THE MOST IMPORTANT THING is to put a few reference marks on the housing so u can bolt it back down in the same spot
if not u will pull your hair out trying to re align it so u can get all gears easily
one of the biggest problems is when they're to far to the right it causes 2nd gear and reverse to bind
which gives a lovely grinding on 2nd gear downshifts that the whole district can hear happening
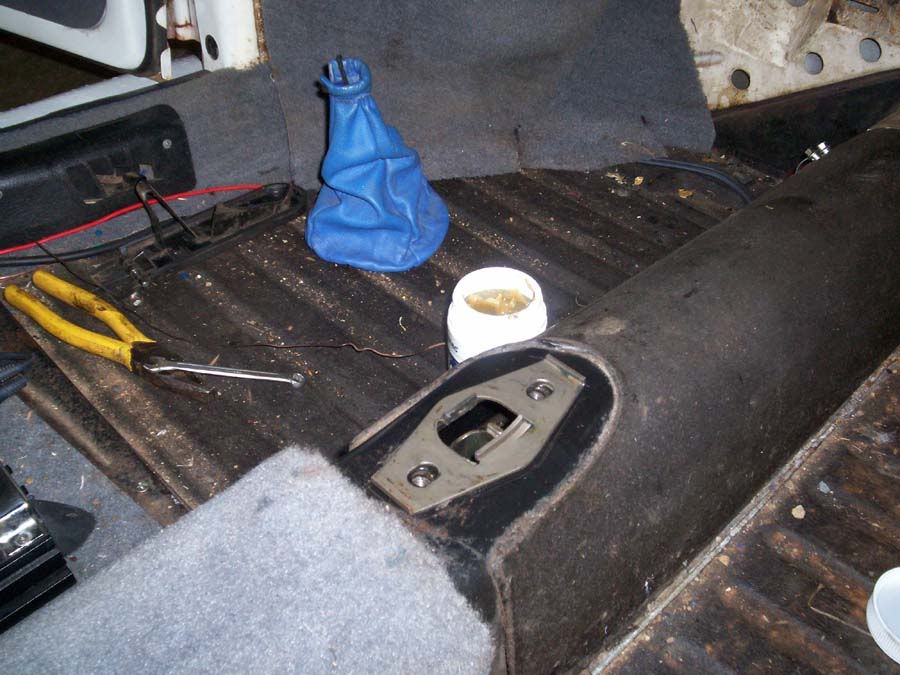
pull the 2 bolts and the shifter, retainer, spring and shift gate will come off
take notice of the position of the shiftgate
its what locks out reverse until u push down
Joel - March 16th, 2008 at 07:57 PM
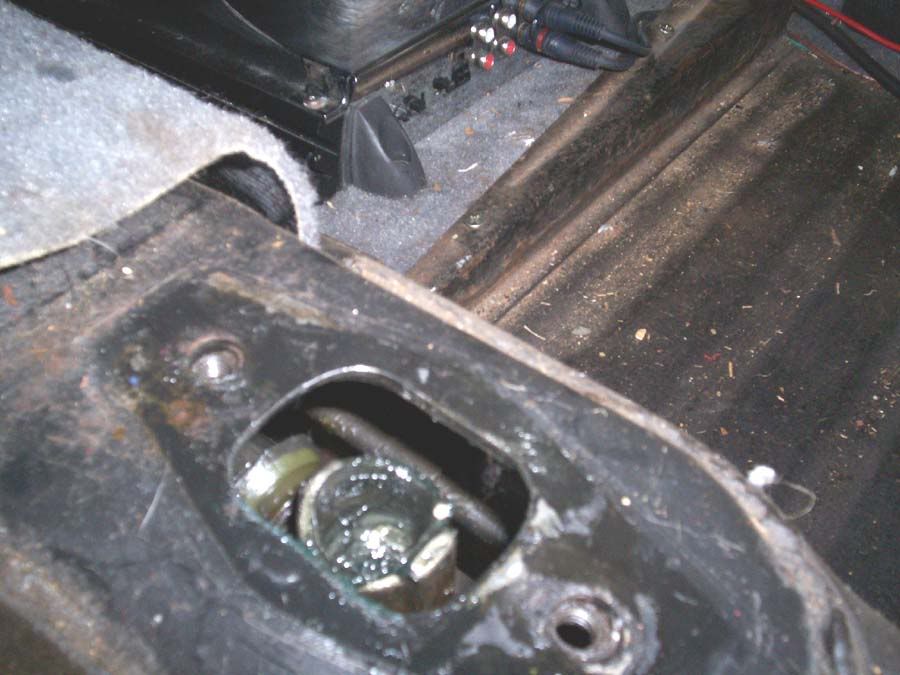
its hard to see cos the hole is so small but my bushing has split in 2 at the groove where it rides in the hanger
check the condition of the hanger too
quite often through years running with no bushing, the round hole elongates or in extreme cases wears completely through.
Joel - March 16th, 2008 at 07:58 PM
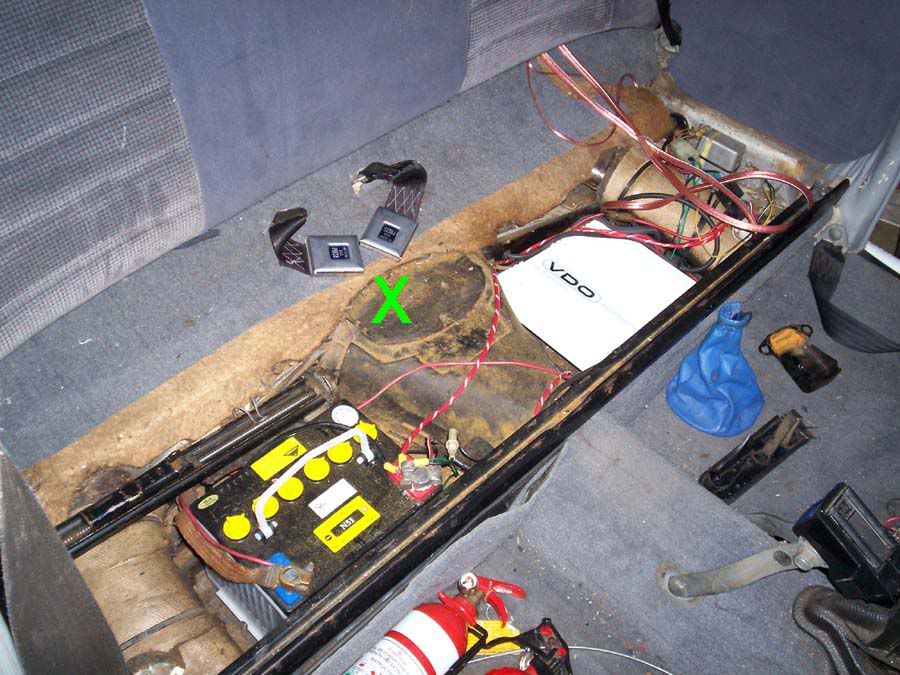
under the backseat you'll see the access panel that covers the coupler its held down by a phillips head screw.
Joel - March 16th, 2008 at 08:00 PM
with that gone the coupler needs to be d/c from both the gearbox and the shifter rod
you'll see there's a square headed grub screw that locks it to the input shaft coming out of the gear box
these have a hole through the head and originally had a tie wire going tho them so they wouldn't undo
you'll need to cut this if there's still one there
there's also usually a tie wire through the coupler bolt as well
it has a stupid square head thing at one end
i just hold it with a pair of pliers and undo the 8mm bolt through it
pull these out and the whole coupler can be moved out of the way
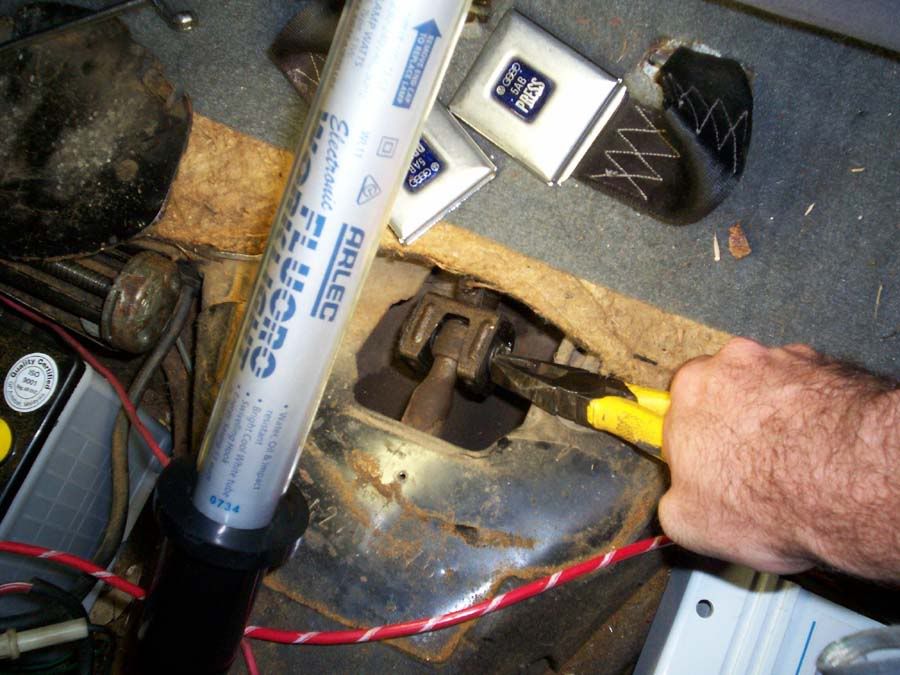
Joel - March 16th, 2008 at 08:01 PM
Heres where i learned the most valuable lesson when i did this the 1st time
tie some strong string the the holes on the end of the rod
this will help when u pull it back through to make sure it follows the right path
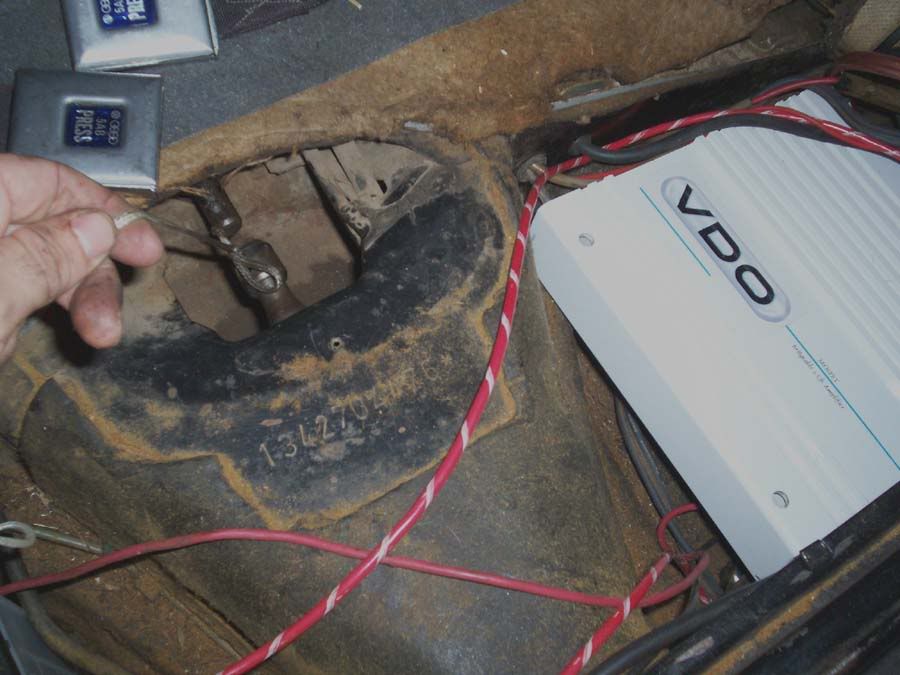
Joel - March 16th, 2008 at 08:02 PM
now heres where the steps can change depending on what model vw u have
in S and L superbugs u can just keep sliding the rod all the way forward till its out of the hanger, theres enough room inside the tunnel
but in all standard beetles it will hit the front beams mount before its out of the hanger
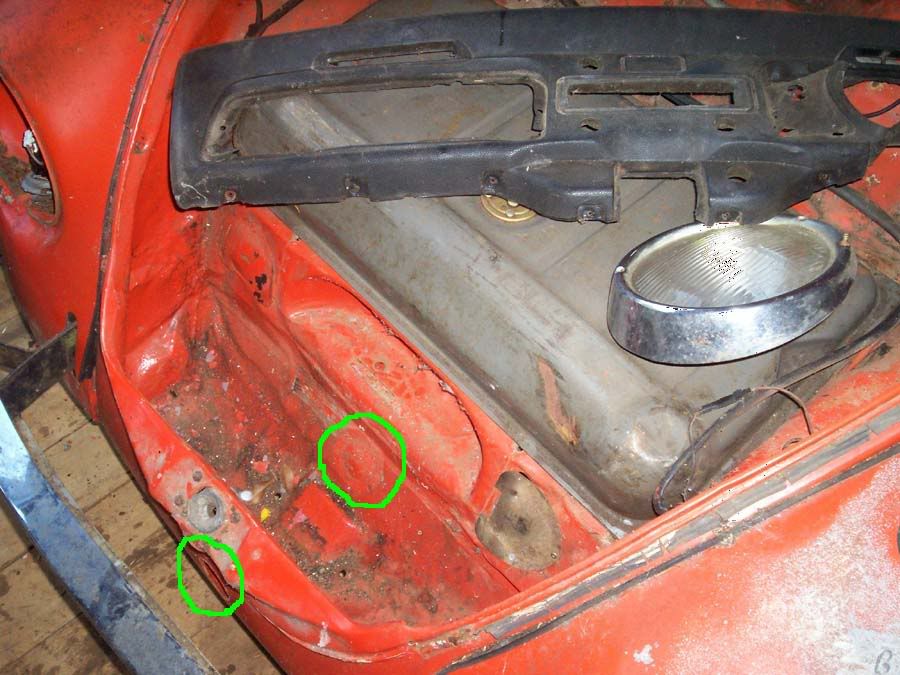
so u have to remove some inspection plates in the spare wheel well
first 2 pics show 2 of my standard bugs and which plates u need to remove from the spare wheel well
its harder to see on the red bug cos some idiot has painted over the inspection plates
they are both 74s but all 68 on standards are like that and pre67 6 volt beetles have a hole just below the hood catch that it comes out
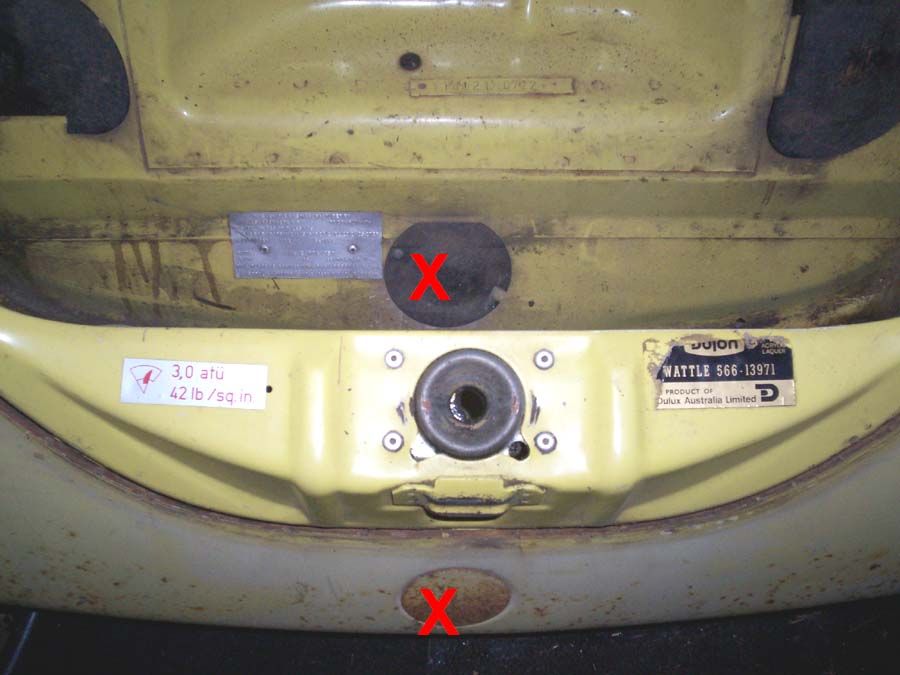
then theres one more plate on the frame head u get to under neath the car
luckily my other 70 bug has a radiator so the spare wheel wells been removed and u can see the plate on the frame head between the 2 torsion bars
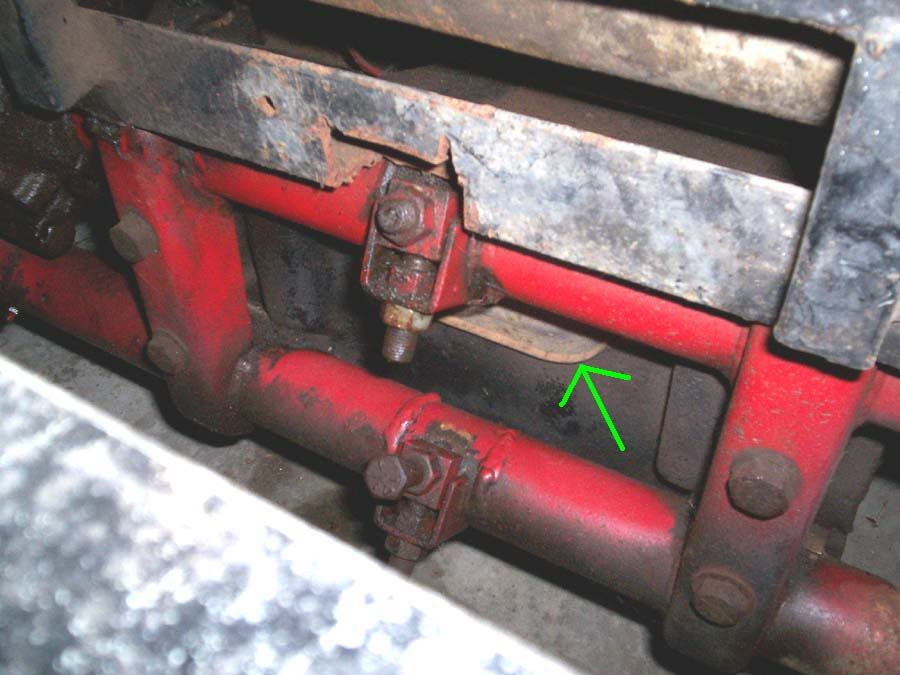
If you need to remove the rod from an S or L bug you will first need to remove the crumple zone/deformation plate
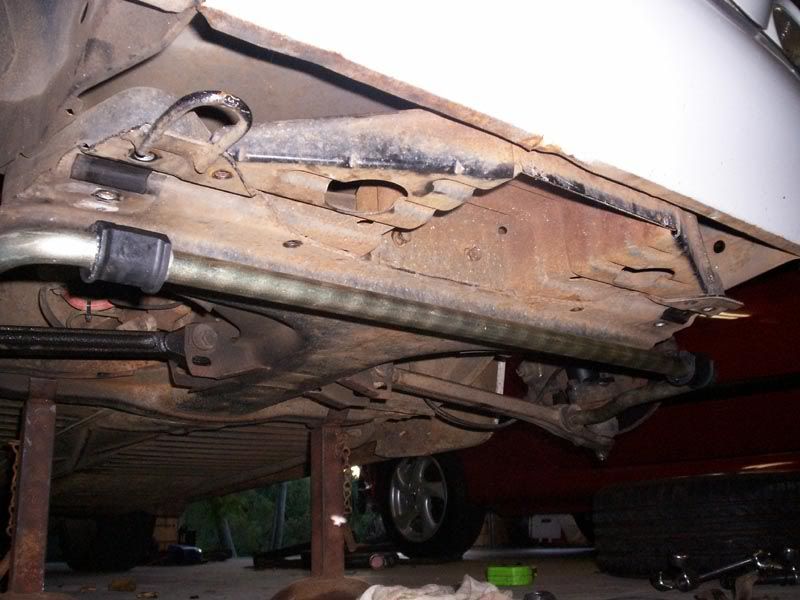
once its out the hole the rod comes out of will be exposed.
The rod will come out under the apron.
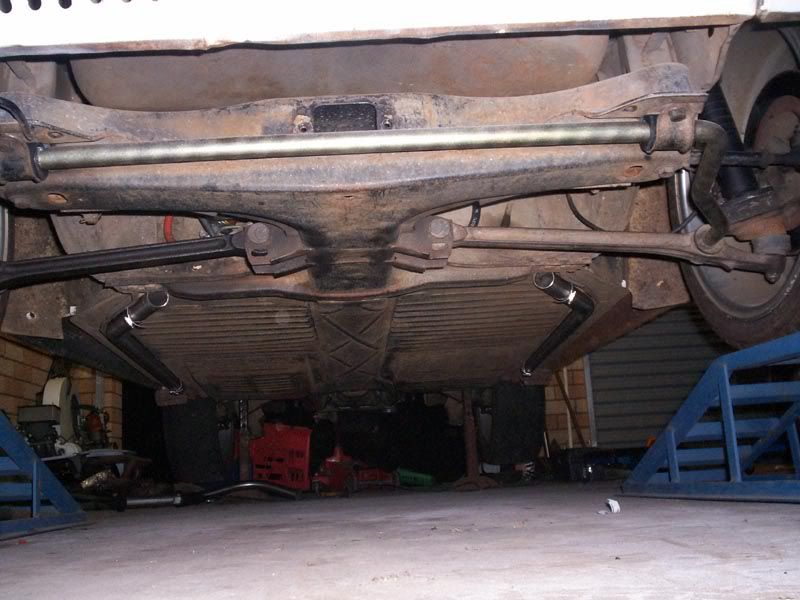
Joel - March 16th, 2008 at 08:04 PM
depending on the life your car has had the shift rod might be in a pretty sad way
if its heaps rusty it may pay to remove it from the car and clean it up with emery tape or a wire brush so its not so hard to get back through the new
bushing
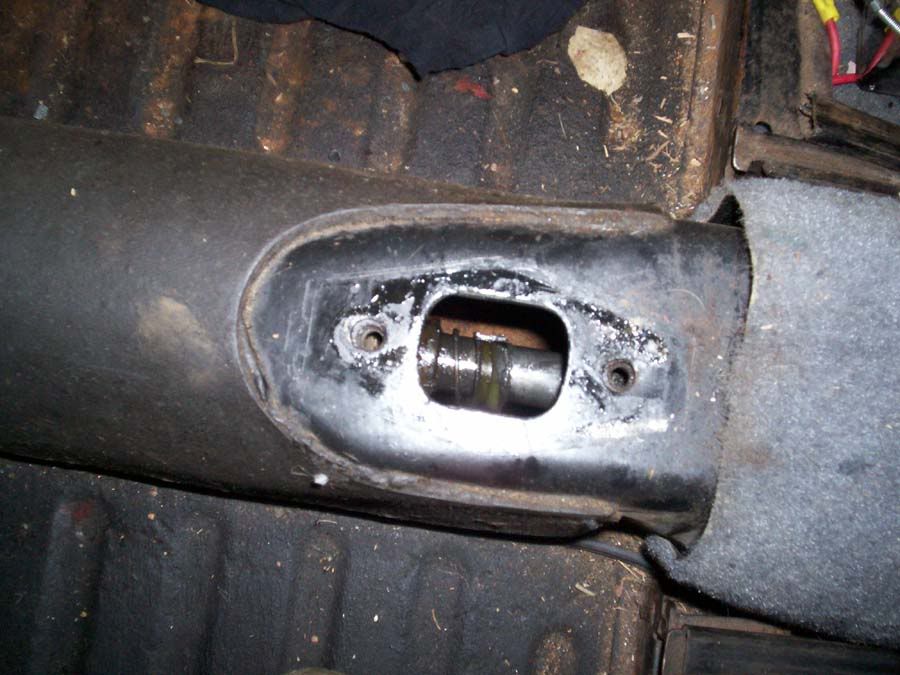
ok to remove the rod first u need to spin it 180* so the shifter cup is facing down
it will get caught up on things facing up or sideways
if u have skinny arms like me u can push it for a bit through the couple hole at the back
but once its out of reach u will have to inch it forward using pointy nose pliers through the shifter hole
its important to that u keep the metal snap ring visible through the hole as you'll need to pull this off the end of the rod and use it on the new
bushing
i slide the rod forward a few inches at a time then move the snap ring back abit over and over till finally the end comes through the hanger
some people make a wire hanger to keep the rod at the right height once its out of the hanger but i don't bother but ive only done it in superbugs
b4
standards it might fall to the floor once its free and would be a PITA to get back up high enough to get back through
Joel - March 16th, 2008 at 08:05 PM
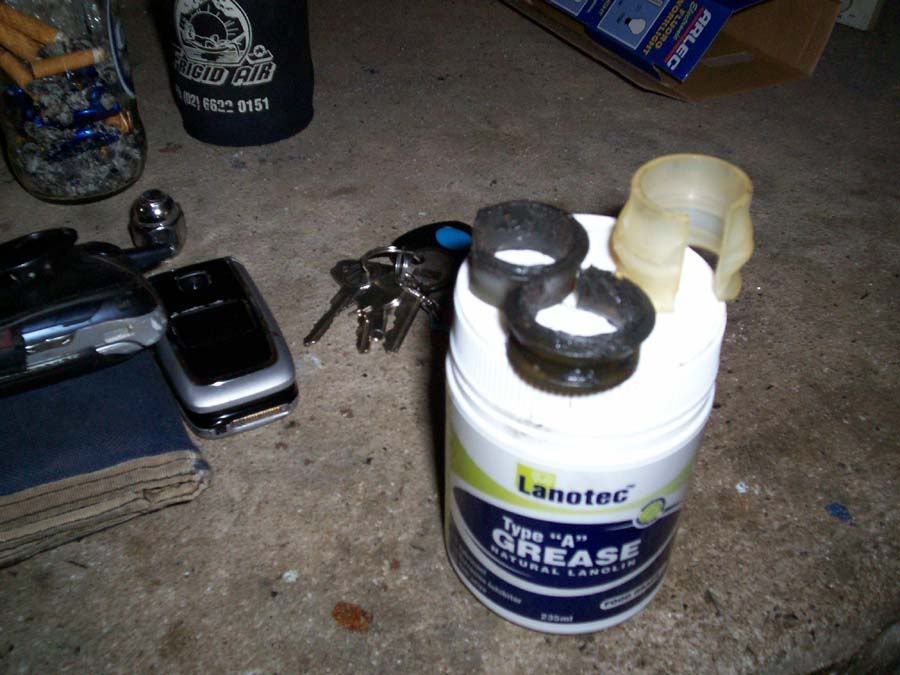
well heres my old bushing or should i say pieces of next to the new one sitting ontop of the white lithium grease ive bought to do the job
Joel - March 16th, 2008 at 08:06 PM
ok so fish the retainer ring off the end of the rod
the beauty about the string means you cant drop it
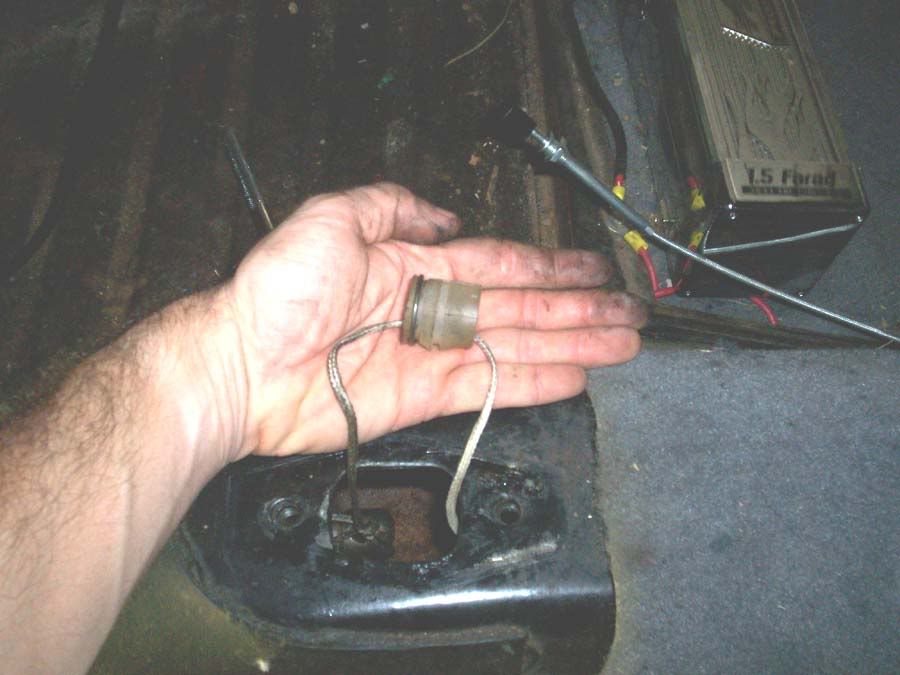
feed it over the new bushing
this is the direction it needs to be facing:
Joel - March 16th, 2008 at 08:07 PM
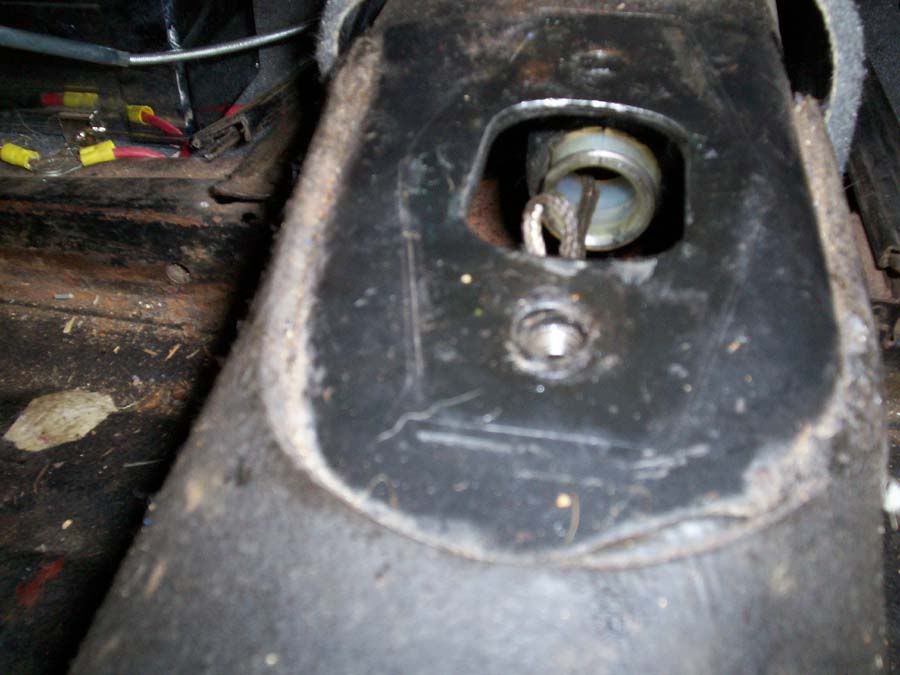
feed it down the string and slip it into place on the hanger
the joint needs to face the drivers side (RHD cars)
and give it a good dose of grease
Joel - March 16th, 2008 at 08:08 PM
now for the most funnest part of the whole job
feeding the rod back through
grease up the end of the rod and line it up with the hole in the bushing
take the slack out of the string and with a pair of pliers force it into the bushing
it might take a few goes but once its through just keep feeding it through a few inches at a time and keep tension on the string
thats so that it takes the right path through the jungle of obstacles in the tunnel
heres a nice list of things it will get caught up on
fuel line
clutch cable
accelerator cable
handbrake cables x2
heater cables x4
seatbelt mounting bolts
and anything else thats found its way in there
mine jammed twice
once on the seatbelt mounting bolt
and once near the end when it tried to go under the rear footwell heater cables when it needed to go over
best thing for the job is a light and a small mirror down the coupler hole to see whats going on
the string line will help u see where its supposed to be heading
once its all the way through
the coupler can be reinstalled on the rod
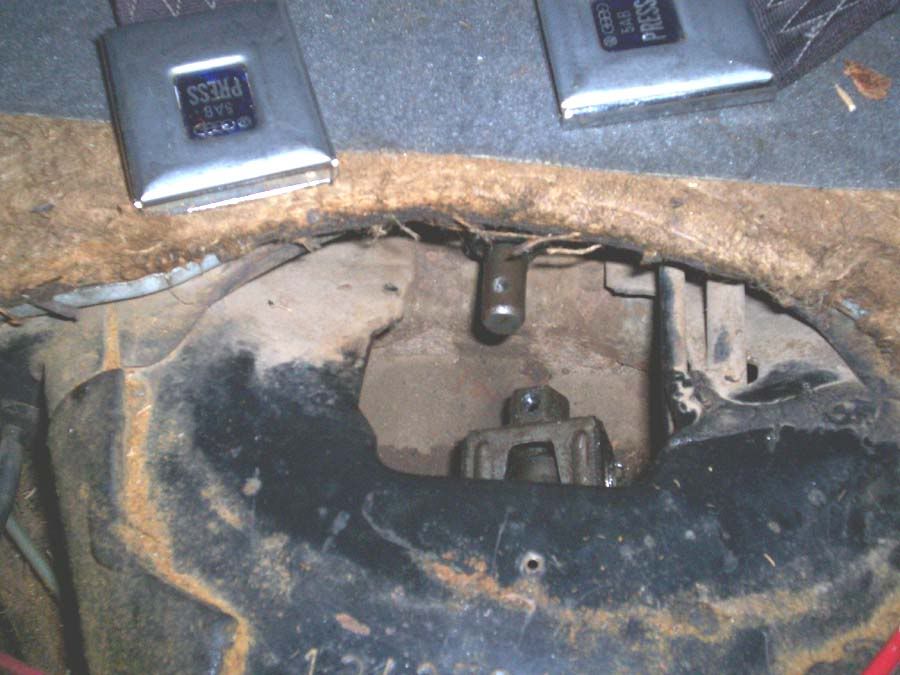
when bolting it back to the gearbox input shaft make sure the grub screw goes down into the locating hole on the shaft as seen in this pic
Joel - March 16th, 2008 at 08:10 PM
whack the cover back on and thats done
now for those that forgot how the shiftgate sat its like this:
Joel - March 16th, 2008 at 08:11 PM
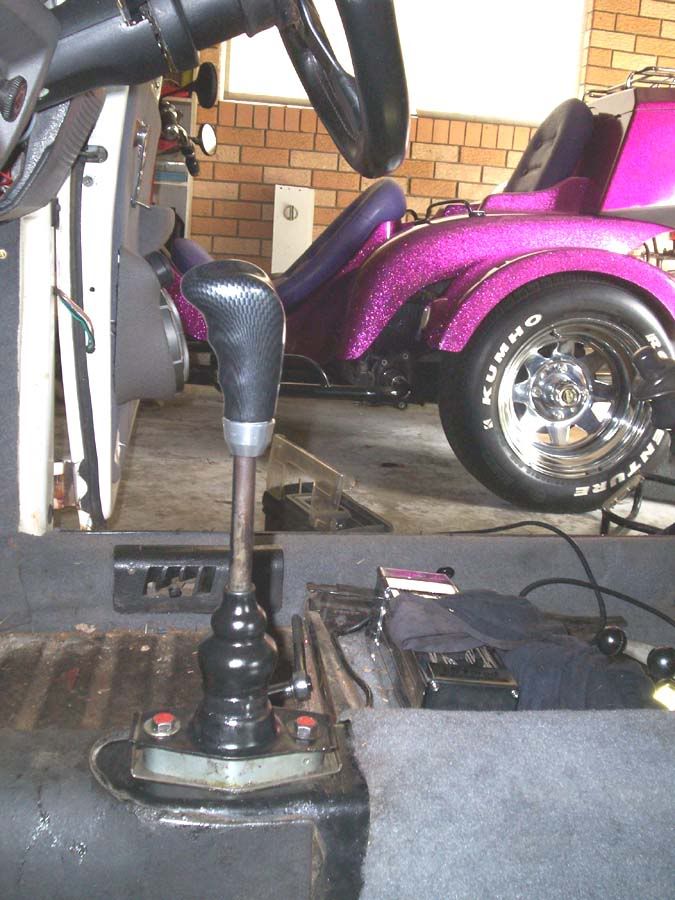
bolt the shifter back down just fairly firmly aligning it with the marks u made and run through the gears inc reverse
if its all good do the bolts up tight if not your gonna have to try moving the shifter around a bit till u get it right
it pretty much works in the opposite direction, if u cant get reverse try moving the shift to the right, if 1st and 3rd are a prob try moving it back
and so on
and thats it go for a blat out the road and enjoy a dub that shifts better than most new cars do these days
Burgo - September 12th, 2009 at 08:10 AM
Thanks for the guide, helped a tonne.
BUT BUT BUT BUT, dont bother with attaching string to the end of the gear rod! It (no joke) added 3+ hours to my bush replacement, because 1. If you
drop the string, it becomes a major distraction trying to fish the bloody thing back up agian.
2. when you attach a knot at the end of the rod, it is very very very hard to get the rod through the tight bush hole. (ended cutting it off at that
stage- thus defeating the purpose of the string.
and 3. The string often is the thing that gets snagged upon stuff in the shaft- and has a high chance of snapping if its rubbed too much and wears
thin.
But apart from the string- i wouldnt have been able to do it myself and would have forked our $$$ to get some other dude to do it,
Thanks!
Brian - September 12th, 2009 at 08:38 AM
Typical of the advise given here
wrong


Joel - September 12th, 2009 at 09:04 AM
Oh Do f@#k off Brian
Just don;t drop the string next time and you;ll be right .
maybe i just fluked it with the string this time as it was the only time ive tried it that way
that first few times ive done it was without and it was a f88king nightmare trying to get the rod back through without hooking up on things in the
tunnel
bajachris88 - September 12th, 2009 at 09:15 AM
Thanks Joel. just did mine successfully using your instructions.
It wasn't that bad hey!
Mind you, its easier with the body off the pan no doubt :P
top stuff!
cam070 - September 26th, 2009 at 11:39 PM
I am going to have to try this. This thread resolves a problem that my bug is experiencing.
Just shows how a bit of research is worthwhile, and how valuable this forum is.
1303Steve - September 30th, 2009 at 08:34 PM
Hi Joel
Very good writeup.
I just pulled shift rod apart again thinking that the bush was gone, it was replaced about 3 years ago.
The bush was fine but I changed it anyway, but when I was putting it back together I noticed that the new seat belt bolts were touching the shaft, no
noise now.
I also fitted a spring on the shift coupling, pulls the shifter of to the 3rd & 4th side of the neutral gate.
Extra holes are from when I was trying to get the spring pressure just right.
Steve

alien8 - September 30th, 2009 at 08:49 PM
| Quote: |
Originally
posted by 1303Steve
Hi Joel
Very good writeup.
I just pulled shift rod apart again thinking that the bush was gone, it was replaced about 3 years ago.
The bush was fine but I changed it anyway, but when I was putting it back together I noticed that the new seat belt bolts were touching the shaft, no
noise now.
I also fitted a spring on the shift coupling, pulls the shifter of to the 3rd & 4th side of the neutral gate.
Extra holes are from when I was trying to get the spring pressure just right.
Steve

|
Forgive me if this is a stupid question Steve but why use the spring for 3rd and 4th?
1303Steve - September 30th, 2009 at 09:11 PM
Hi
No stupid questions. When you go up through the gears it pulls the stick over ready for 3rd, like most other cars on the road.
Steve
Joel - September 30th, 2009 at 09:43 PM
nice idea Steve, mine did do it till i put the quickshift kit in
cam070 - September 30th, 2009 at 10:54 PM
| Quote: |
Originally
posted by 1303Steve
Hi Joel
Very good writeup.
I just pulled shift rod apart again thinking that the bush was gone, it was replaced about 3 years ago.
The bush was fine but I changed it anyway, but when I was putting it back together I noticed that the new seat belt bolts were touching the shaft, no
noise now.
I also fitted a spring on the shift coupling, pulls the shifter of to the 3rd & 4th side of the neutral gate.
Extra holes are from when I was trying to get the spring pressure just right.
Steve

|
Nice idea Steve. Can you tell me what sping you used, so I can copy an d hopefully create the same spring tension without having to drill loads of
holes?
1303Steve - October 1st, 2009 at 06:54 AM
Hi
No idea what the spring is from, I found it in my tool box. I tried the spring that later bugs have on the heater box flap, it was too soft.
Steve
cam070 - October 1st, 2009 at 10:01 AM
| Quote: |
Originally
posted by 1303Steve
Hi
No idea what the spring is from, I found it in my tool box. I tried the spring that later bugs have on the heater box flap, it was too soft.
Steve
|
Steve, do you use a quickshift kit?
Would this spring foul with a quickshifter?
1303Steve - October 5th, 2009 at 04:23 PM
Hi
The quick shift is under the shift lever so the spring doesn't interfere at all.
Steve
Scarab - October 11th, 2009 at 07:42 PM
awesome write up, thanks heaps! While i don't have to do it yet, I will be doing it when I restore my floor pan.....I'm sure it will make things
easier with no body in the way 
on the subject of the quick shift, is this something that is readily available for type 3's do you know?....and if so, where can I spend my hard
earned to purchase one?
cheers guys!
Scarab (aka: Paul)
Joel - October 11th, 2009 at 07:58 PM
type3 and beetle use pretty much the exact same shifter
the quickshift kits fit both
68AutoBug - October 12th, 2009 at 12:44 AM
| Quote: |
Originally
posted by cam070
Nice idea Steve. Can you tell me what spring you used, so I can copy an d hopefully create the same spring tension without having to drill loads of
holes?
|
the spring has quite a bit of tension...
its impossible to pull it open with Your hands... [using pliers etc]
it only moves a bit when you are changing gears...
I don't know if My spring is original or one i found??? lol
but the shifter rests next to My left leg.. lol
cheers
LEE


