Crossmember for EJ20T into Bay Van (Pics and Plans)
71EJVan - October 4th, 2005 at 09:27 PM
Took an extra day off for the long weekend intending to put some serious hours in on the van. Furtunately (or unfortunately) got some surfing in but
didn't get everything finished.
The crossmember is now complete and the radiator mount is halfway there.
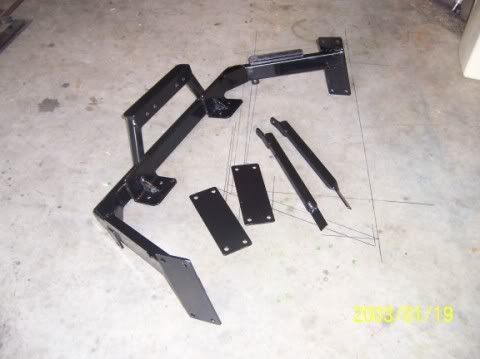
Here is the completed crossmember. It picks up the existing WRX engine mounts and also has a frame to connect to the 4 bottom belhousing to gearbox
bolts via 2 rubber mounts. The tabs on the sides and the 25x25mm sections will bolt up to the original crossmember hangers at the back of the engine
bay. This will assist in reducing any twist at the bottom of the frame under acceleration. You can also see in the picture the transfered measurements
on the floor.
The van is in member's rides under "The Surf and Swoosh Project" I suppose I should move it here.
Brendan

[ Edited on 26-10-2005 by 71EJVan ]
vwtyp2 - October 5th, 2005 at 07:58 AM
looking good Brendan.
I have special interest in this project, as a previous owner.
squizy - October 5th, 2005 at 01:35 PM
Brendan that's a work of art. I'd get those drawings blueprinted and patented.
71EJVan - October 5th, 2005 at 01:45 PM
Squizy,
I have no problems sharing the plans if someone wants to do a conversion. (They would have to get their own engineer's approval for the design
though)
Regards
Brendan
richbaker78 - October 18th, 2005 at 10:10 PM
id be interested in any drawings - im doing an EJ20T from a 2002 WRX into my 1970 bus. Almost at the engine mounting stage!
richbaker78@hotmail.com
71EJVan - October 19th, 2005 at 08:26 PM
Rich,
I'll scan the drawings and e-mail it to you on the weekend. I need to take some pictures of the engine and gearbox mounted also. In the meantime have
a look at "the surf and swoosh project" in members rides for some other pictures.
Brendan
71EJVan - October 24th, 2005 at 09:37 PM
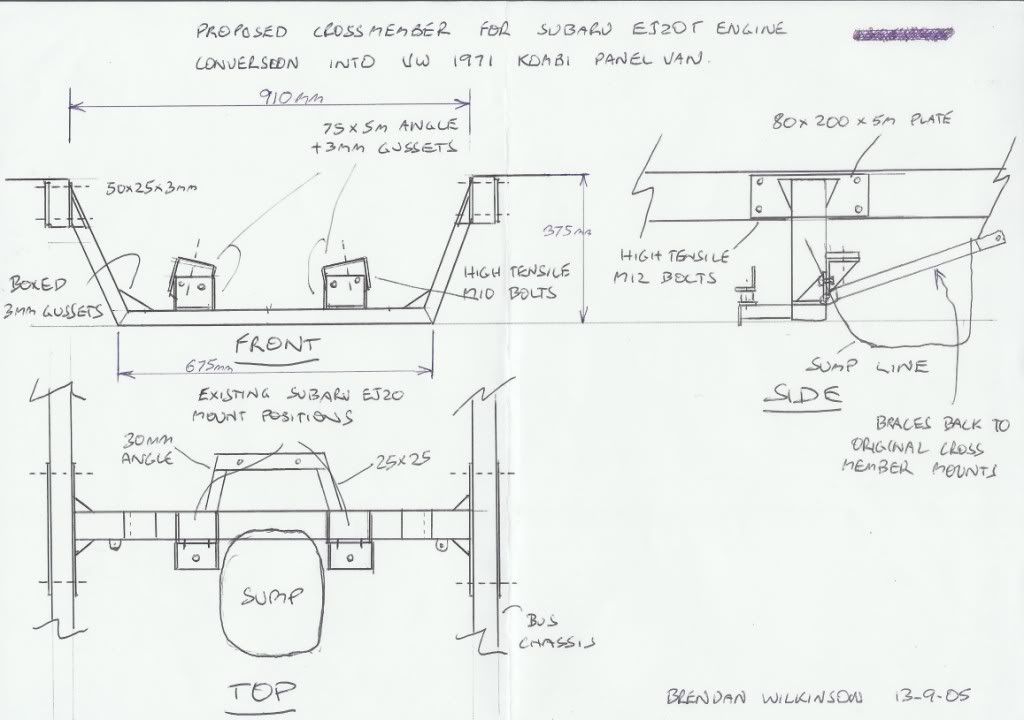
Here it is for those interested in welding and grinding until they hate Tim The Toolman Taylor.

71EJVan - October 24th, 2005 at 09:48 PM
Notes to drawing:
The crossmember is fitted in front of the tappet covers by 30mm.
The width may vary a little between chassis rails.
Be sure to allow for weld cooling shrinkage on the gussets. (It will pull the mount plates together if you are not carefull).
The mount at the lower front picks up the four lower belhousing bolts of the 091 gearbox.
I would not attempt this unless you are an acomplished welder/fabricator. Chickensh!t welds and engine crossmembers don't mix! Tool me about 25 hours
of labor including measuring and fitting.
Brendan
Mikey - October 30th, 2005 at 12:43 PM
The crossmember looks great!
Just wondering, are you a welder/fabricator? I'm going to school right now for welding and I currently have a blueprinting class, those blueprints
look real good.  The more I look, I think you almost have to be,
they're increibly detailed.
[ Edited on October 30, 2005 by Mikey ]
71EJVan - October 30th, 2005 at 06:16 PM
Mikey
I learnt to weld at 12 years old when my father built a steel trawler. Actually I am an electrician by trade.
If you are getting taught and you practice you should be fine. The trick is to match the amperage to the rod to the metal to be welded and also to
have a comfortable (for you) work area. 3mm steel = 1.6 - 2.0mm rods, 5mm steel = 2.4 - 3.2mm rods.
Regards
Brendan
richbaker78 - November 3rd, 2005 at 09:50 PM
many thanks for that - youve done a gr8 job there!
saved me so much time too!!
im watching you developments with interest.
Cheers
Rich
71EJVan - December 1st, 2005 at 07:06 PM
Been a while since an update.
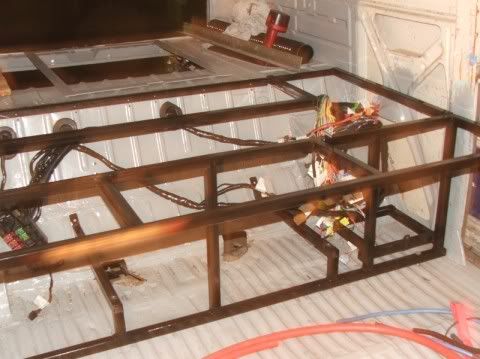
Here is a pic of the completed fuel tank, battery, electrics, fuel pumps, storage housing. The tank will sit in timber mounts on the two rails in the
centre and be held down by steel straps (I'm re-useing the old ones). The fuel tank area will be sheeted in 0.4mm steel and be sealed with both up
and down ventilation to the outside (40mm pipe). the rest will be sheeted in ply and be trimmed in waterproof carpet. There will be 4 accessable
enclosures. 2 for wiring and electronics, 1 for battery (you can see the frame on the lower right hand side) and 1 for tool storage (might put a
second battery in here).

Regards
Brendan


 The more I look, I think you almost have to be,
they're increibly detailed.