| [ Total Views: 7573 | Total Replies: 41 | Thread Id: 111306 ] |
| Pages: 1 2 |
|
|
 dragvw2180 dragvw2180
Officially Full-On Dubber
  
Posts: 393
Threads: 33
Registered: May 27th, 2006
Member Is Offline
Location: North Carolina,usa
Theme: UltimaBB Pro Blue
|
| posted on July 21st, 2016 at 06:34 AM |
|
|
Finally completed car project
This has been a long project , actually taken years to complete. We raced at Drag Nite . Here is a video of the pass he made,
http://s91.photobucket.com/user/dragvw2180/media/20160709_180101%201_zpspekw2...
We did everything ourselves , chassis, , engine , trans , body and paint
Car ran 6.41 , 1.35 60 ft and weighs 2050 , a street car.
If anyone is interested I will post the build pics. Mike McCarthy
|
|
|
 nbturbo nbturbo
Veteran Volks Folk
    
Posts: 2171
Threads: 89
Registered: December 19th, 2002
Member Is Offline
Location: Whyalla Sth.Aust.
Theme: UltimaBB Powder
|
| posted on July 21st, 2016 at 08:21 AM |
|
|
Of course- give us something. Well done.
|
|
|
 mactaylor mactaylor
Custom Title Time!
    
Posts: 1005
Threads: 54
Registered: August 14th, 2007
Member Is Offline
Location: Albury
Theme: UltimaBB Pro Blue
Mood: even my dog is german
|
| posted on July 21st, 2016 at 08:46 AM |
|
|
Build pics would be great! thanks Mike!
EVERLAST CONCRETE TANKS
1800 552 123
|
|
|
 dragvw2180 dragvw2180
Officially Full-On Dubber
  
Posts: 393
Threads: 33
Registered: May 27th, 2006
Member Is Offline
Location: North Carolina,usa
Theme: UltimaBB Pro Blue
|
| posted on July 21st, 2016 at 08:53 AM |
|
|
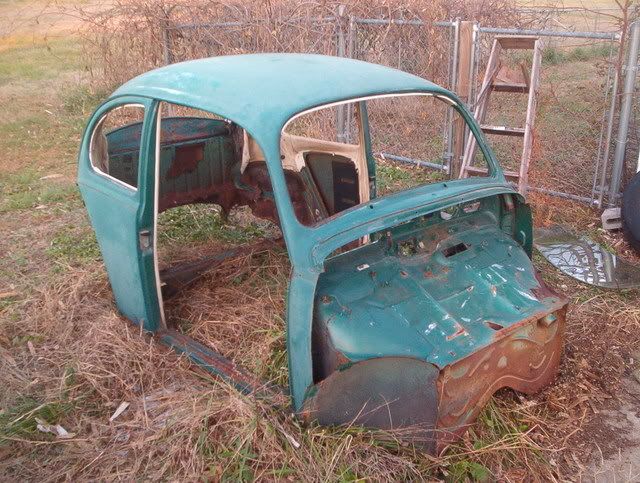
This is what we started with , she had been hit in front so we cut off the bad stuff, hey it was free.
|
|
|
 dragvw2180 dragvw2180
Officially Full-On Dubber
  
Posts: 393
Threads: 33
Registered: May 27th, 2006
Member Is Offline
Location: North Carolina,usa
Theme: UltimaBB Pro Blue
|
| posted on July 21st, 2016 at 09:08 AM |
|
|
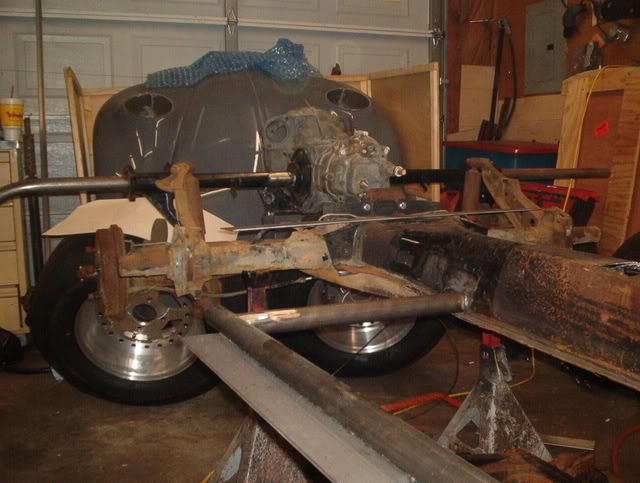
Originally we were going to do a simple 3" trans raise, here is the mock up on that, After looking at the pan and rollcage we decided to go further
by back halfing the car and went to ladder bar suspension.
|
|
|
 dragvw2180 dragvw2180
Officially Full-On Dubber
  
Posts: 393
Threads: 33
Registered: May 27th, 2006
Member Is Offline
Location: North Carolina,usa
Theme: UltimaBB Pro Blue
|
| posted on July 21st, 2016 at 09:13 AM |
|
|
John my racing partner decided he liked the way my old car handled so we copied my front suspension and narrowed his beam 7" same as I had. We used
Ghia front brakes so it kicked out the wheels slightly and made the narrowed beam fit perfectly.

|
|
|
 dragvw2180 dragvw2180
Officially Full-On Dubber
  
Posts: 393
Threads: 33
Registered: May 27th, 2006
Member Is Offline
Location: North Carolina,usa
Theme: UltimaBB Pro Blue
|
| posted on July 21st, 2016 at 09:19 AM |
|
|
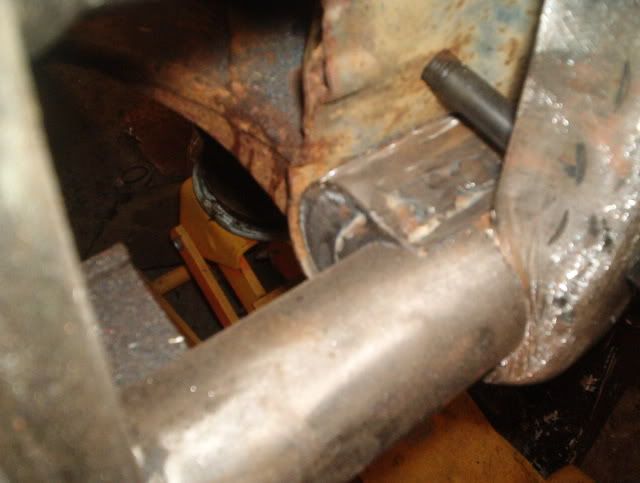
We like alot of caster so we fabbed up some shims, 15 degrees caster makes the car want to go straight. After aligning the front end we welded the
shims to the body so nothing could move.
|
|
|
 dragvw2180 dragvw2180
Officially Full-On Dubber
  
Posts: 393
Threads: 33
Registered: May 27th, 2006
Member Is Offline
Location: North Carolina,usa
Theme: UltimaBB Pro Blue
|
| posted on July 21st, 2016 at 09:30 AM |
|
|
Well we got to the point where we had to start on the roll cage, after drinking a few shots of tequila and a few beers we reassessed the direction of
the car . We decided to not only raise the transmission 4" but to also back half it and do ladder bars.
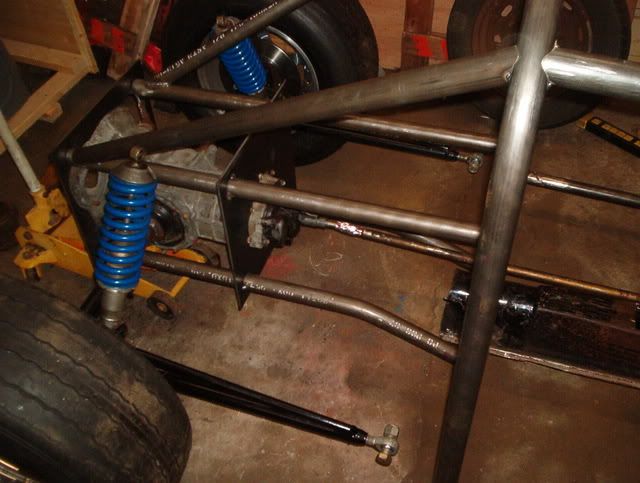
We welded the front transmission mount plate in and it made the rear really ridged , the engine mount we used 4 stock bolts so we could remove it for
ease of trans replacement. We made bungs that were welded inside the tubing for those bolts.
|
|
|
 dragvw2180 dragvw2180
Officially Full-On Dubber
  
Posts: 393
Threads: 33
Registered: May 27th, 2006
Member Is Offline
Location: North Carolina,usa
Theme: UltimaBB Pro Blue
|
| posted on July 21st, 2016 at 09:35 AM |
|
|
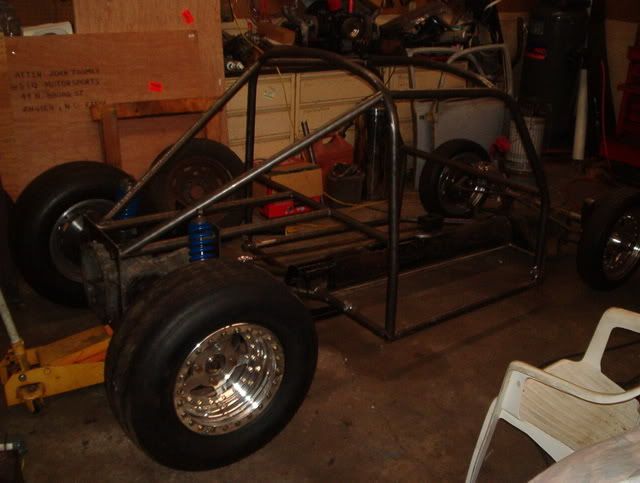
we both replaced and moved some pipes as we went along , tack as you go and weld once.
|
|
|
 dragvw2180 dragvw2180
Officially Full-On Dubber
  
Posts: 393
Threads: 33
Registered: May 27th, 2006
Member Is Offline
Location: North Carolina,usa
Theme: UltimaBB Pro Blue
|
| posted on July 21st, 2016 at 10:08 AM |
|
|
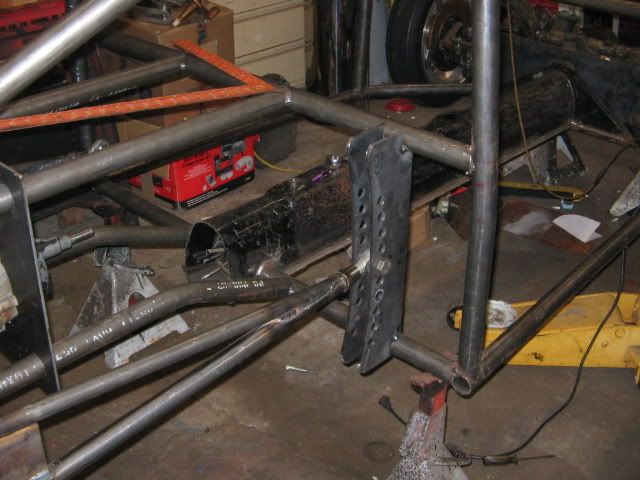
Our original ladder bars ended up being 4" too short to work correctly so we made new ones and also the plates to bolt them to. After reading some
chassis books we discovered we accidentally put everything exactly where it should be . We made in way more adjustments on everything which will allow
us to change any setting.
|
|
|
 dragvw2180 dragvw2180
Officially Full-On Dubber
  
Posts: 393
Threads: 33
Registered: May 27th, 2006
Member Is Offline
Location: North Carolina,usa
Theme: UltimaBB Pro Blue
|
| posted on July 21st, 2016 at 10:16 AM |
|
|
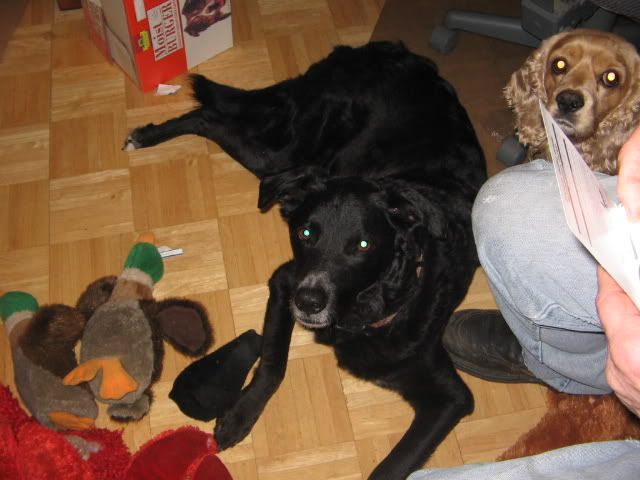
These were my two supervisors, they overlooked every weld I did and kept me company, miss my old lab.
|
|
|
 dragvw2180 dragvw2180
Officially Full-On Dubber
  
Posts: 393
Threads: 33
Registered: May 27th, 2006
Member Is Offline
Location: North Carolina,usa
Theme: UltimaBB Pro Blue
|
| posted on July 21st, 2016 at 10:20 AM |
|
|
Here you can see we installed new floor pans and started on the interior metal work. We decided that since this was going to be a street/race car that
we wanted to upholster everything, carpeting and padding covers the sheet metal interior later down the road.
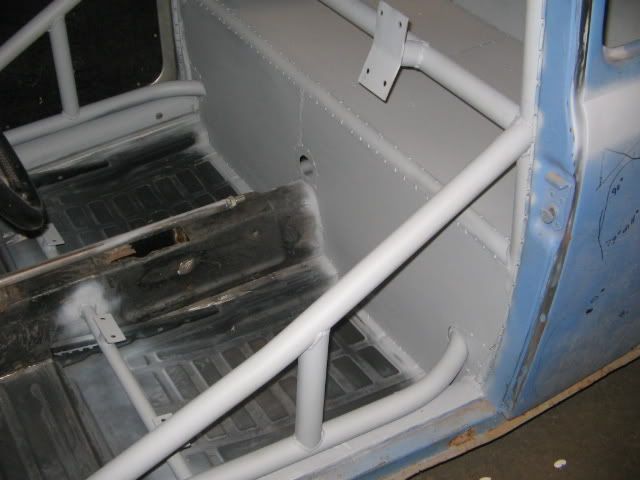
you can see the way we mounted the race seats and we had the chassis certed for 8.5 1/4 before doing the tin work
|
|
|
 dragvw2180 dragvw2180
Officially Full-On Dubber
  
Posts: 393
Threads: 33
Registered: May 27th, 2006
Member Is Offline
Location: North Carolina,usa
Theme: UltimaBB Pro Blue
|
| posted on July 21st, 2016 at 10:25 AM |
|
|
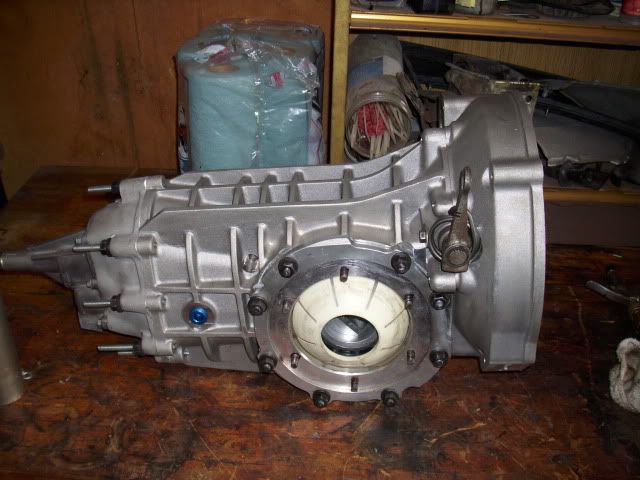
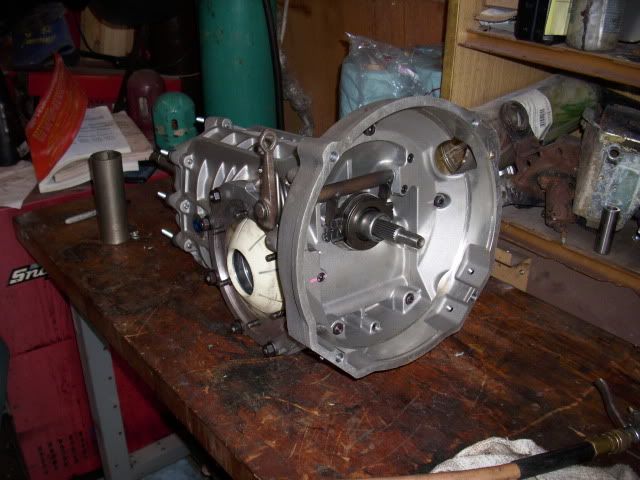
A pic of the transmission we built , a duplicate of mine. Autocraft case and all the accessories
|
|
|
 dragvw2180 dragvw2180
Officially Full-On Dubber
  
Posts: 393
Threads: 33
Registered: May 27th, 2006
Member Is Offline
Location: North Carolina,usa
Theme: UltimaBB Pro Blue
|
| posted on July 21st, 2016 at 10:33 AM |
|
|
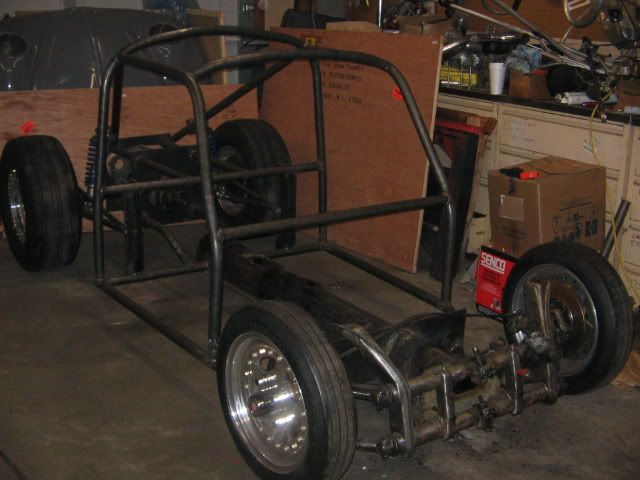
The last of the chassis work done until we refit the body ,it actually rolls.
I will post some more tomorrow . Mike
|
|
|
 nbturbo nbturbo
Veteran Volks Folk
    
Posts: 2171
Threads: 89
Registered: December 19th, 2002
Member Is Offline
Location: Whyalla Sth.Aust.
Theme: UltimaBB Powder
|
| posted on July 21st, 2016 at 04:44 PM |
|
|
Thanks so much for the pics n stories-keep it coming.
|
|
|
 dragvw2180 dragvw2180
Officially Full-On Dubber
  
Posts: 393
Threads: 33
Registered: May 27th, 2006
Member Is Offline
Location: North Carolina,usa
Theme: UltimaBB Pro Blue
|
| posted on July 22nd, 2016 at 01:28 AM |
|
|
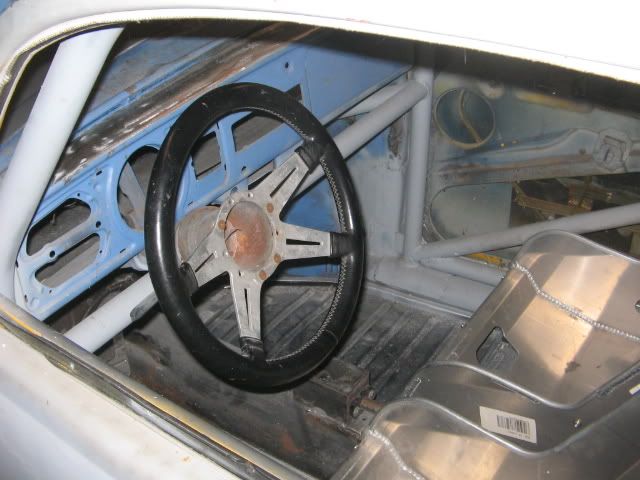
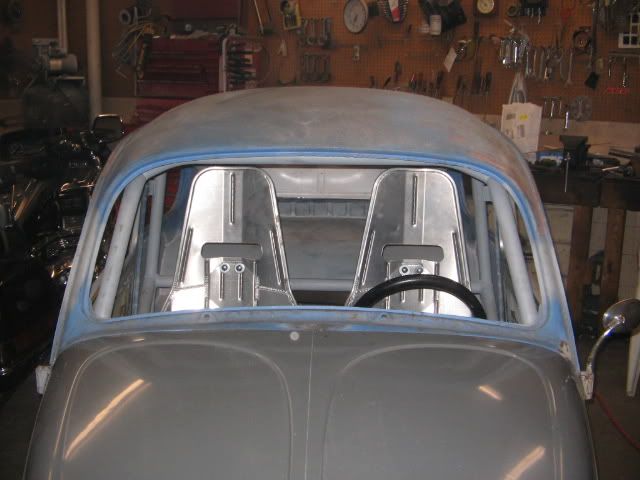
We tried really hard to make the cage fit as tight as possible to the body , even tied the roll cage hoop to the seat belt bolt on the B pillar.
|
|
|
 dragvw2180 dragvw2180
Officially Full-On Dubber
  
Posts: 393
Threads: 33
Registered: May 27th, 2006
Member Is Offline
Location: North Carolina,usa
Theme: UltimaBB Pro Blue
|
| posted on July 22nd, 2016 at 01:38 AM |
|
|
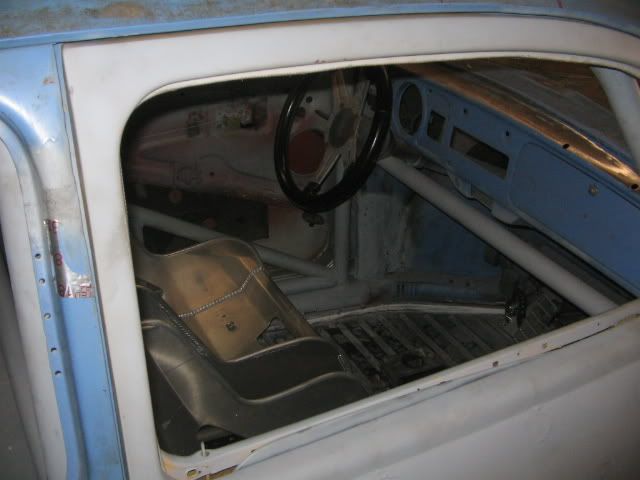
Another view of the cage on drivers side. When we had it certed the inspector wanted to see the lower pipe which is covered up by the heater ( just a
skin ) channel so we welded another pipe above the rocker and added a Kidney pipe to meet all standards.
|
|
|
 dragvw2180 dragvw2180
Officially Full-On Dubber
  
Posts: 393
Threads: 33
Registered: May 27th, 2006
Member Is Offline
Location: North Carolina,usa
Theme: UltimaBB Pro Blue
|
| posted on July 22nd, 2016 at 01:55 AM |
|
|
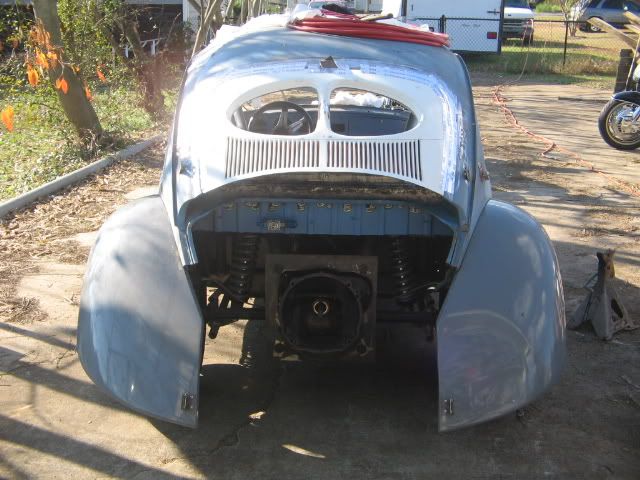
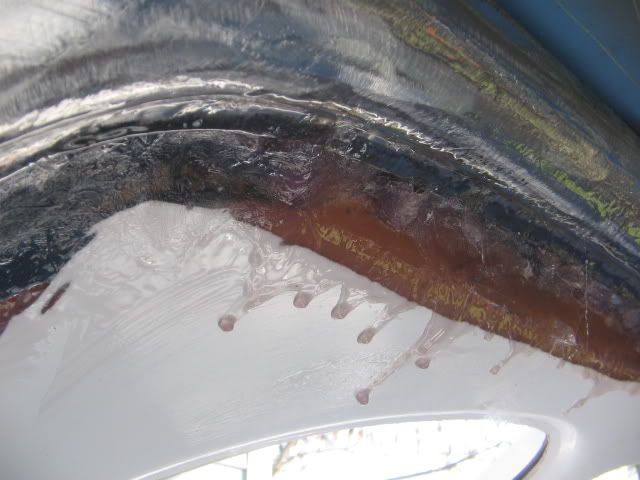
I needed a break from welding so we decided to work on the body awhile . The rear window had alot of rust at the bottom so instead of just patching it
up we decided to replace it with a fibre glass split kit. The first two we had sent to us did not come close to fitting the way I wanted to so I had
the company send me a kit that was not bonded together. After cutting and removing unneeded metal from the 67 window frame I fitted the two pieces
into place and clamped them to check for fit, perfect ! I removed the window and ground the whole area with a 36 grit disk so the fibre glass would
have something to bond to and then refitted both halves .
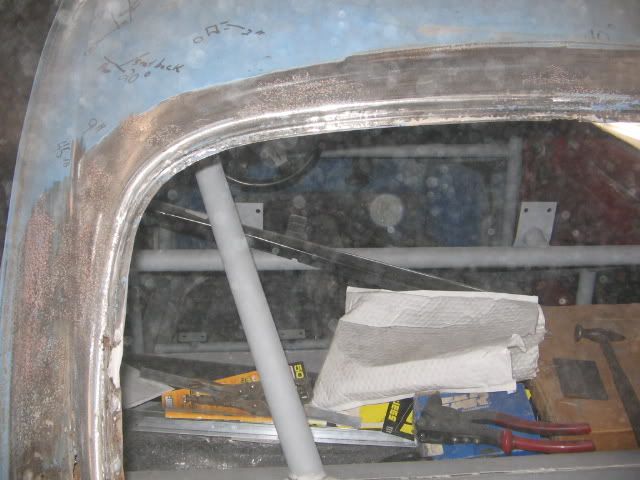
We had to roll it outside to get a better visual look to make sure it all looked right, ya man were we excited , LOL
|
|
|
 dragvw2180 dragvw2180
Officially Full-On Dubber
  
Posts: 393
Threads: 33
Registered: May 27th, 2006
Member Is Offline
Location: North Carolina,usa
Theme: UltimaBB Pro Blue
|
| posted on July 22nd, 2016 at 02:03 AM |
|
|
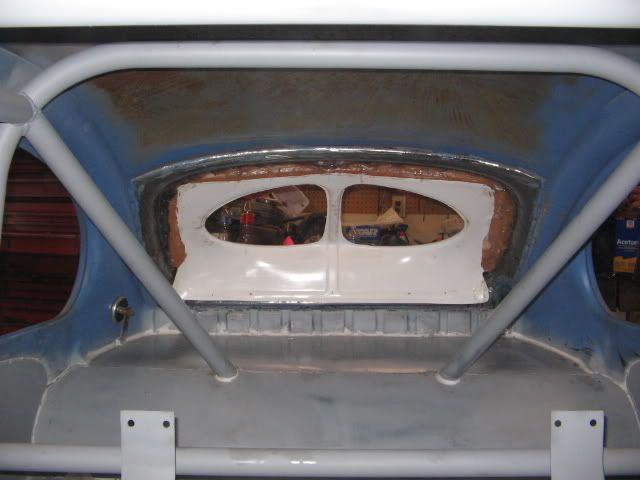
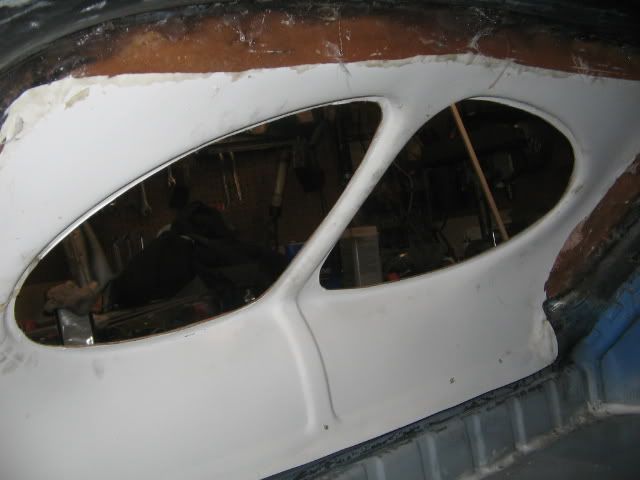
I went to the interior and started to glss the inner panel in place, the outer panel was taped in place with aluminum tape so it would stay flush and
also hold the inner panel from moving . You can see I used fibre glass and Matting rather than cloth as it was easier to pack and fill the gaps with
it.
|
|
|
 dragvw2180 dragvw2180
Officially Full-On Dubber
  
Posts: 393
Threads: 33
Registered: May 27th, 2006
Member Is Offline
Location: North Carolina,usa
Theme: UltimaBB Pro Blue
|
| posted on July 22nd, 2016 at 02:10 AM |
|
|
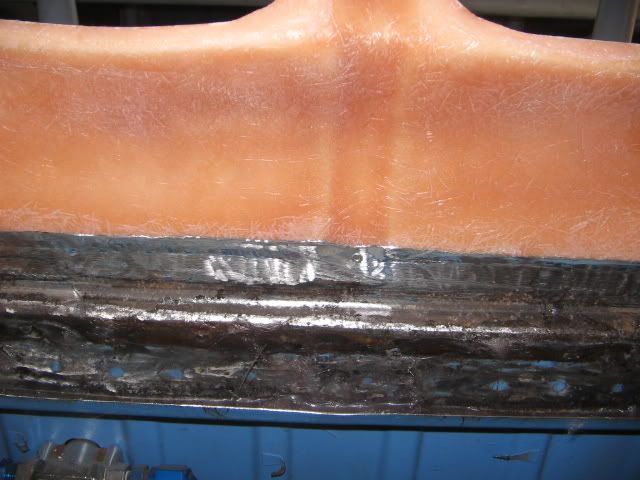
I let it harden all night and next morning I removed the outer skin , this is what it looked like ,
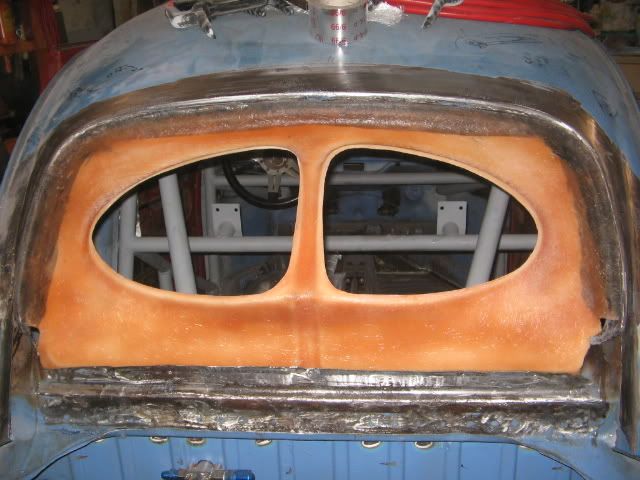
I was very happy so I filled the gaps and made a nice smooth surface for the outer skin to bond to .
|
|
|
 dragvw2180 dragvw2180
Officially Full-On Dubber
  
Posts: 393
Threads: 33
Registered: May 27th, 2006
Member Is Offline
Location: North Carolina,usa
Theme: UltimaBB Pro Blue
|
| posted on July 22nd, 2016 at 02:40 AM |
|
|
After prepping and checking the fit of the outside skin I painted both surfaces with Resin and filled gaps between both pieces with resin soaked
matting then clamped both pieces together, I think I used every clamp I owned.
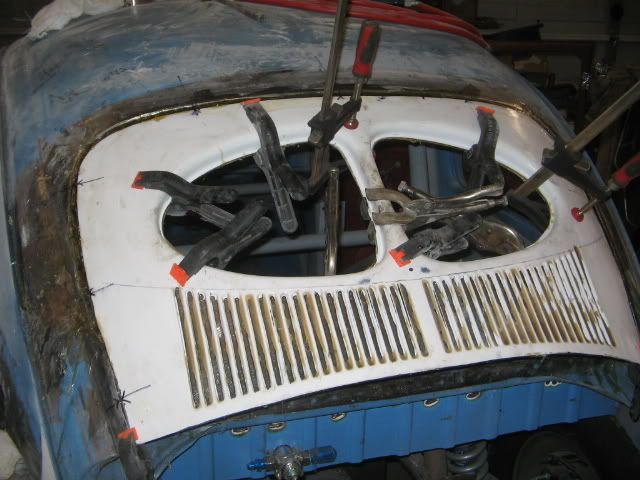
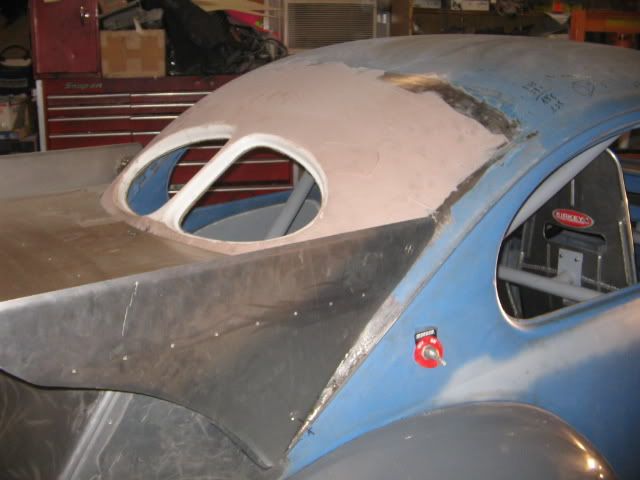
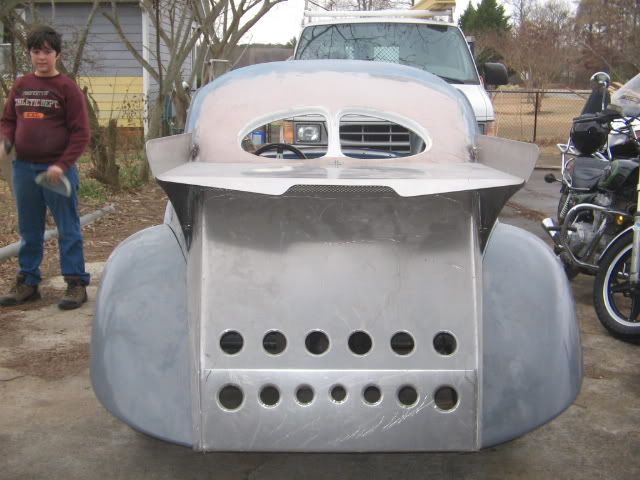
I ground all the excess glass and paint and put a skim coat of body filler over the whole area , time to fit up the wing and bread box, yippeeee !
|
|
|
 modnrod modnrod
Fahrvergnugen
   
Posts: 978
Threads: 50
Registered: March 17th, 2011
Member Is Offline
Location: Midwest, Westoz.
Theme: UltimaBB Pro Blue
Mood: Old School Volksies!
|
| posted on July 22nd, 2016 at 08:50 PM |
|
|
Looks hard as nails! Thanks for the write up, very cool to see the steps you took to get there.
That glass matting is DAMN strong isn't it? I use a flap disc to get the levels right coz it tears up sandpaper in seconds.
|
|
|
 dragvw2180 dragvw2180
Officially Full-On Dubber
  
Posts: 393
Threads: 33
Registered: May 27th, 2006
Member Is Offline
Location: North Carolina,usa
Theme: UltimaBB Pro Blue
|
| posted on July 22nd, 2016 at 11:15 PM |
|
|
You are absolutely correct, you could hit the fibreglass with a hammer and not chip it . I used a 6" grinder disc with backing plate on my old air
grinder to remove the excess , small enough to get into tight places but big enough to make it pretty smooth. Before I ground it I used a small
sandblaster to remove the worst rust spots. I do have many many more pictures if there is something specific you want to see.
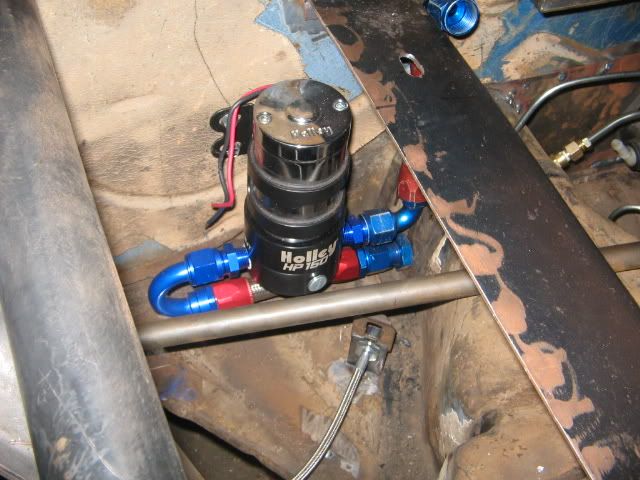
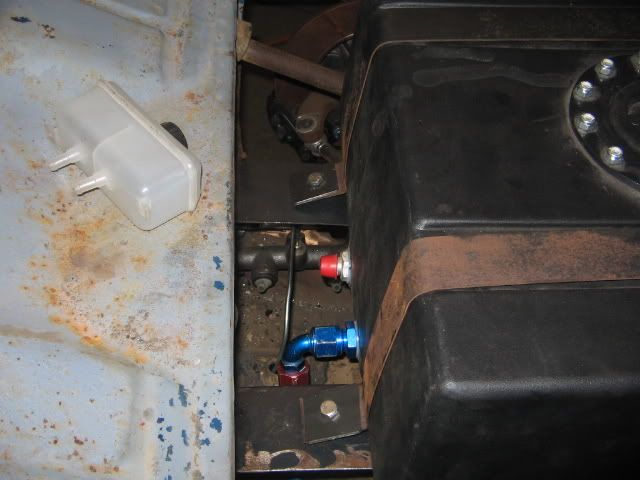
Well back to the chassis, we gutted the inside of the pan tunnel so we could use it to hide plumbing inside it , here you can see where we mounted
the fuel pump and we used a bulkhead connector to simplify our fuel line connection . Our fuel line , clutch and brake lines for the rear are inside
the tunnel .
|
|
|
 dragvw2180 dragvw2180
Officially Full-On Dubber
  
Posts: 393
Threads: 33
Registered: May 27th, 2006
Member Is Offline
Location: North Carolina,usa
Theme: UltimaBB Pro Blue
|
| posted on July 22nd, 2016 at 11:28 PM |
|
|
Some more pics of the front ,
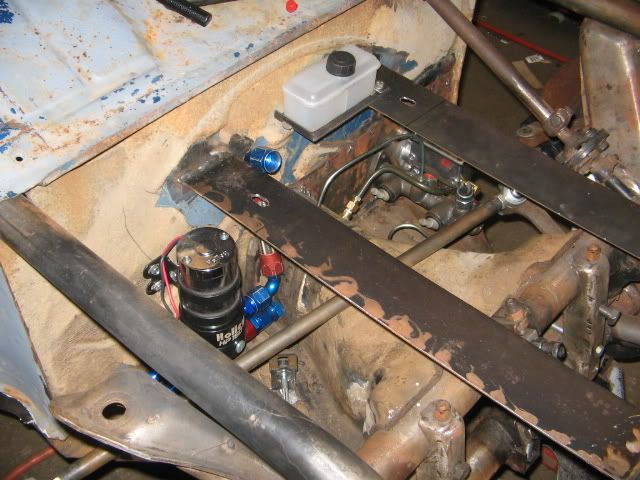
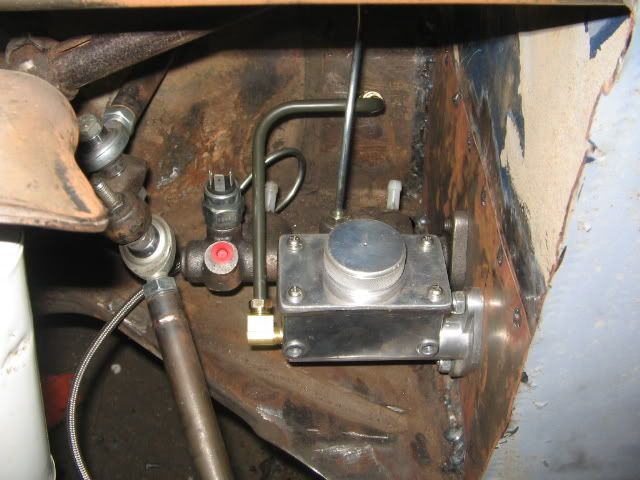
the tie rods were just slapped on in this picture so we could move the car around. We made those out of CM tubing, tapped them and used Heim joints
instead of tie rod ends and located them on the upper side . I added a flat washer just in case a joint ever came apart to retain it.
[URL=http://s91.photobucket.com/user/dragvw2180/media/Johnspics419.jpg.html
|
|
|
 dragvw2180 dragvw2180
Officially Full-On Dubber
  
Posts: 393
Threads: 33
Registered: May 27th, 2006
Member Is Offline
Location: North Carolina,usa
Theme: UltimaBB Pro Blue
|
| posted on July 22nd, 2016 at 11:45 PM |
|
|
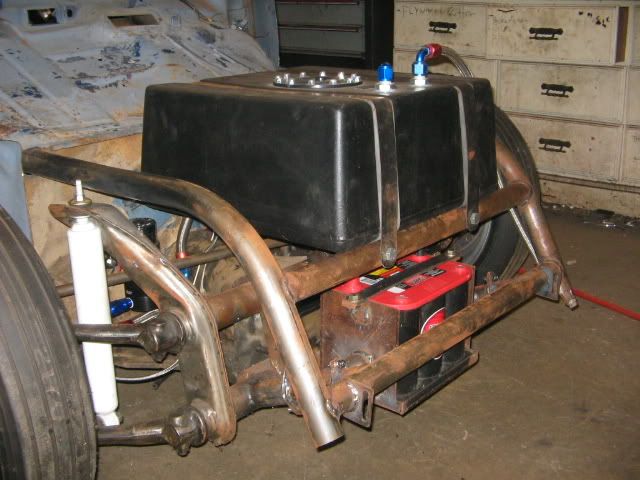
LOL , the front of the cage was pretty packed with stuff. Weight distribution was a big worry when we started on this project, we decided on a larger
fuel cell because this car is a street car. It was built for a race class called Unlimited Street East , you had to drive the car 20 miles and then
race it heads up , we didn't want to run out of fuel, LOL. We also wanted the battery up there so we mounted it under the front roll cage in a
battery box. The box and the lower roll cage unbolts from the beam so any and all of it can be removed.
|
|
|
 dragvw2180 dragvw2180
Officially Full-On Dubber
  
Posts: 393
Threads: 33
Registered: May 27th, 2006
Member Is Offline
Location: North Carolina,usa
Theme: UltimaBB Pro Blue
|
| posted on July 23rd, 2016 at 12:08 AM |
|
|
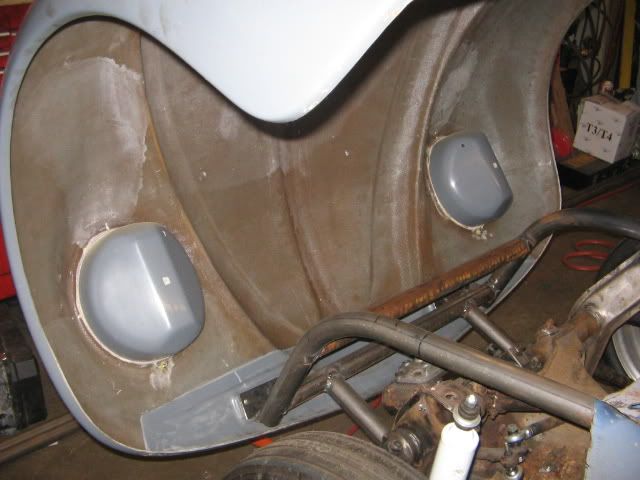
We used Heim joints for the tilt mechanism so we could adjust it up, down, and sideways, axtually worked out really well.
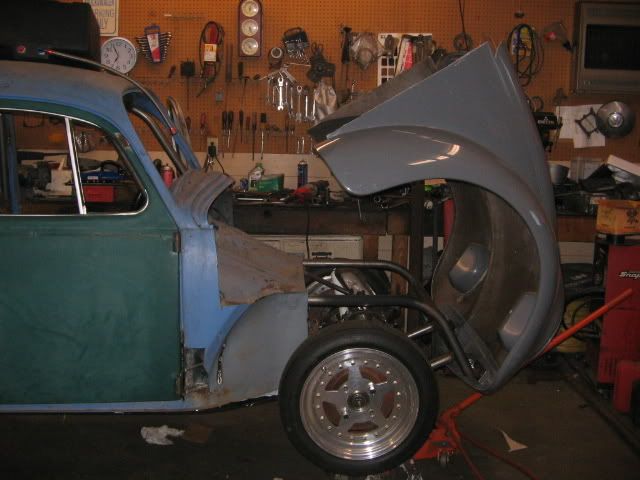
I also built stops so that when opened it would not crack the F/E , plus one person can open and close it without scraping any paint off
|
|
|
 dragvw2180 dragvw2180
Officially Full-On Dubber
  
Posts: 393
Threads: 33
Registered: May 27th, 2006
Member Is Offline
Location: North Carolina,usa
Theme: UltimaBB Pro Blue
|
| posted on July 23rd, 2016 at 12:17 AM |
|
|
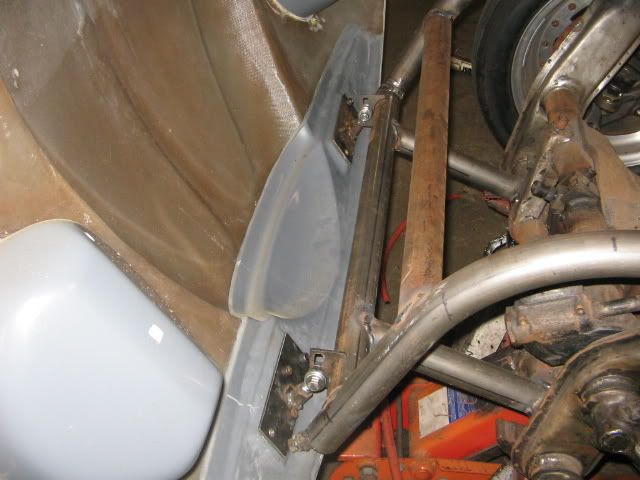
This is the best picture I have of how we built the tilt setup,
|
|
|
 dragvw2180 dragvw2180
Officially Full-On Dubber
  
Posts: 393
Threads: 33
Registered: May 27th, 2006
Member Is Offline
Location: North Carolina,usa
Theme: UltimaBB Pro Blue
|
| posted on July 23rd, 2016 at 12:24 AM |
|
|
John's grandson dropped by to give us some help ,
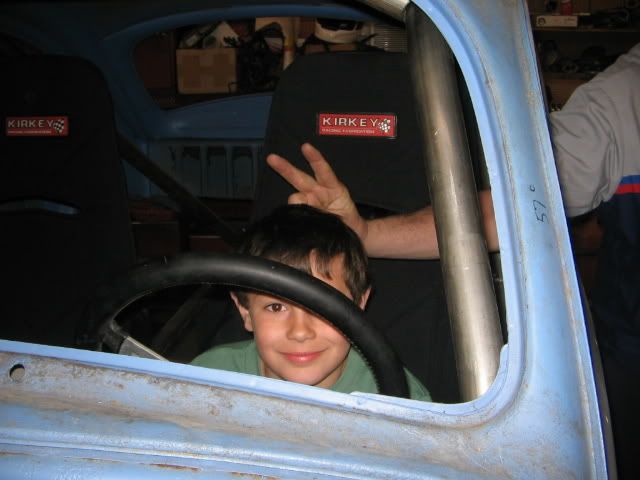
If anyone wonders what the numbers are on the paint, it is the degrees for each tubing bend on the roll cage . Two old guys trying to remember by
writing them down on the car as we went, LOL
|
|
|
 dragvw2180 dragvw2180
Officially Full-On Dubber
  
Posts: 393
Threads: 33
Registered: May 27th, 2006
Member Is Offline
Location: North Carolina,usa
Theme: UltimaBB Pro Blue
|
| posted on July 23rd, 2016 at 12:38 AM |
|
|
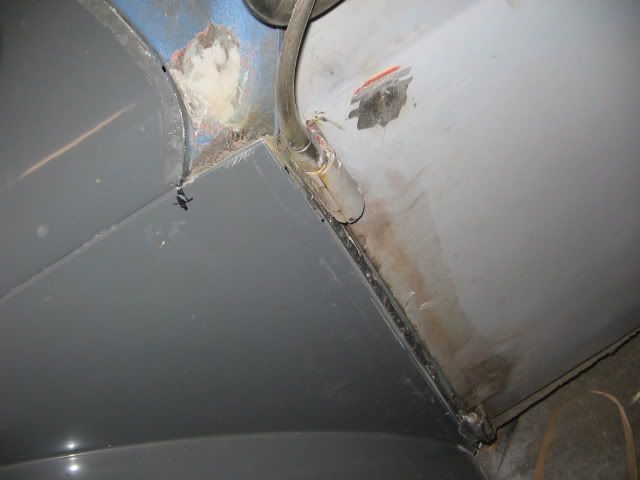
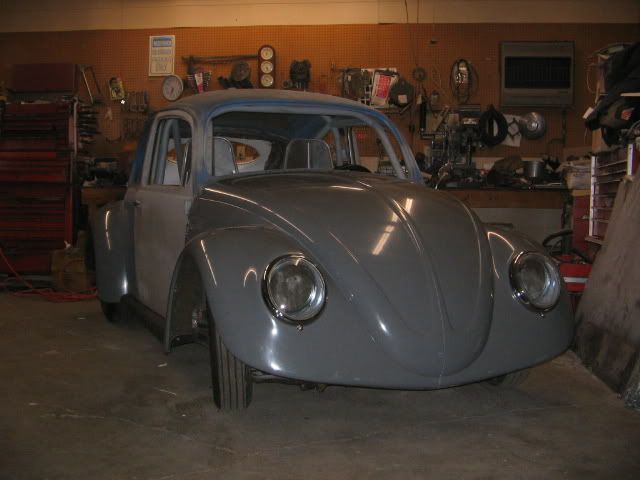
After we completd the tilt we adjusted the F.E , was pretty happy with final result. John said he wanted the doors removable see we removed the hinge
pins and made removable pins out of bolts , left them a 1/4 long so we could push them out easily.
|
|
|
 dragvw2180 dragvw2180
Officially Full-On Dubber
  
Posts: 393
Threads: 33
Registered: May 27th, 2006
Member Is Offline
Location: North Carolina,usa
Theme: UltimaBB Pro Blue
|
| posted on July 23rd, 2016 at 12:54 AM |
|
|
There never seemed to be an end to welding , my welding abilities are kinda like sex, I am not that good but I like doing it, LOL
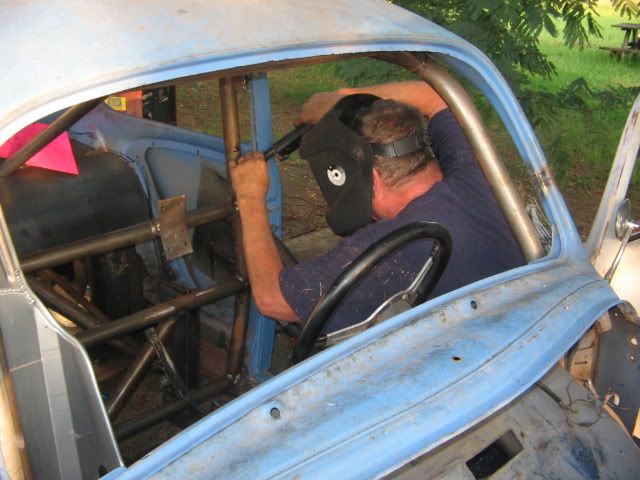
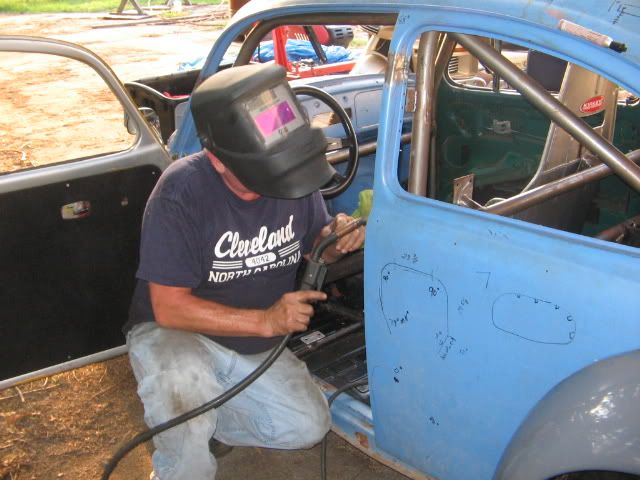
Time to go cut my grass , see you Monday, taking my wife to the coast for the weekend.
Notice my blue print for the rollcage pipe angles and lengths written on the car
|
|
|
| Pages: 1 2 |