| [ Total Views: 150345 | Total Replies: 102 | Thread Id: 46532 ] |
| Pages: 1 2 3 4 |
|
|
 boof2332 boof2332
Custom Title Time!
    
Posts: 1210
Threads: 120
Registered: May 10th, 2004
Member Is Offline
Location: Beecroft Sydney
Theme: UltimaBB Pro Blue ( Default )
Mood: Sympathetic
|
| posted on August 2nd, 2006 at 12:54 AM |
|
|
I am just about to put together the exhaust on the splitty...its got less room then my bug due to that massive cradle under th box.
Matt
|
|
|
 71EJVan 71EJVan
Officially Full-On Dubber
  
Posts: 352
Threads: 23
Registered: August 19th, 2005
Member Is Offline
Location: Central Coast NSW, Australia
Theme: UltimaBB Pro White
|
| posted on August 2nd, 2006 at 09:05 AM |
|
|
Matt,
I'm going to change my exhaust. I originally used slip joints on the cat which meant that I could not have the cat close to the loop that goes around
the axle. I will cut them off and use flange joints which will pust the cat forward by about 3 inches clearing the O2 sensor by plenty and allowing me
to spin the cat and get more ground clearance.
Not sure how your crossmember is but the up beams of mine weld to the inner chassis flanges and not below the chassis rails as some do. This gives
more side clearance.
Regards
Brendan
A VW for everyone!!
1972 1302 German Look
1971 Bay Panel with Subaru EJ20T
1970 Type 3 squareback in progress
1971 Type 3 notchback in progress

|
|
|
 kroozzn63 kroozzn63
Bishop of Volkswagenism
     
Posts: 3005
Threads: 317
Registered: January 31st, 2004
Member Is Offline
Location: sydney
Theme: UltimaBB Pro Yellow
Mood: mmm coffee
|
| posted on August 2nd, 2006 at 09:27 AM |
|
|
how far now to go ??
show us your gates
|
|
|
 71EJVan 71EJVan
Officially Full-On Dubber
  
Posts: 352
Threads: 23
Registered: August 19th, 2005
Member Is Offline
Location: Central Coast NSW, Australia
Theme: UltimaBB Pro White
|
| posted on August 25th, 2006 at 10:27 AM |
|
|
Man have I been slack in keeping you all up to date.
The problem with winter is it is always dark when I'm at home during the week and 3 x kids soccer takes up a lot of the weekends AND the surf is
better during winter!
Having said that some progress has been made.
The new front skin is almost ready to weld in place. It is quite a good fit with only minimal adjustment).
Made a Subaru engine carrier with casters that allows me to bolt it up under the motor and jack from under it with a trolley jack. Unbolt engine and
drop it all down on the casters and remove the jack. Sweet.
I dropped the subi motor to fit the flywheel, kennedy 2100lb pressure plate and HD clutch plate.(snapped a clutch bolt on fitting the pressure plate
due to old man poor eyesight syndrome and setting torque wrench too high! Luckily the busted bolt came out easily and I replaced the whole set with
new high tensile units)
Measured everything up with the 091 gearbox (with 002 200mm bell housing) and 200mm flywheel and other than a little bit of trimming (1-2mm) the input
shaft spline back it should all go together fine.
Removed the clutch cable arm, cut it and lengthened it by 20mm. Welded strengthening sections into it also as it now has to pull against a 2100lb
pressure plate. (Did this to keep the clutch pedal reasonably soft and reduce stress on the front pedal mount area).
Trimmed the Volksconversions adaptor plate for the turbo to intercooler pipe to clear and also the intercooler bracket.
Redid the exhaust system moving the Cat further forward to give more clearance on the oxygen sensor and also got rid of the slip joints and used
proper flanges. (I may need to do this again as the Cat might foul the new swaybar mounts on the bottom of the shock mounting point).
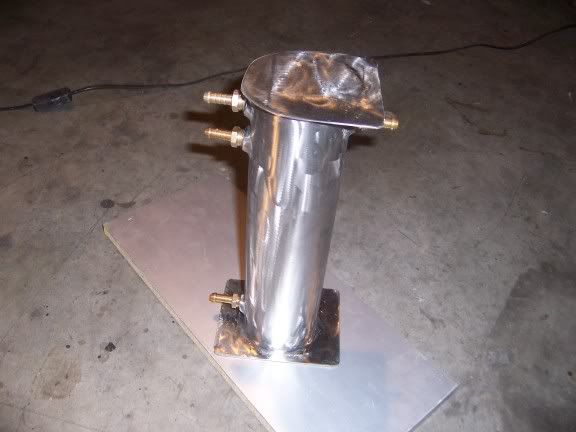
Made a new 1.5 litre swirl pot for the fuel injection system out of a piece of stainless 3.5 inch exhaust pipe cut 300mm long. Cut 2 other pieces
140mm long and split and flattened them to cap the ends of the pipe. Went down to Pirtek and bought 4 stainless threaded fitting and also welded them
in which will take the 5/16 barb fittings. Total cost $24 and it's all stainless!
Got hold of a spun stainless pot that I'mm going to use for the VSS by attaching it to the CV flange (starter side).
Dropped the front end last night and removed everything from the beam except for the torsion leaves. Getting a new adjustable beam from Mike at CBB
tomorrow.
Will remove the rear brakes tonight as I'm also getting a CBB rear disc brake kit (I have realised I don't have time to source bits and build my own
even though I am capable of it).
I will also pick one of their front and rear sway bar kits to attempt to address the 200hp in the poorly handling vehicle issue.
Been also busy collecting some parts....new master cylinder, bearings, brake rebuild kits, seals, brake hoses (Thanks Peter, VW Performance)
While the engine is out I will also do some more bracing to the cross member (two braces from under the gearbox mount to the torsion housing)
Will also make and fit crush tubes to the cross member bolts that go through the chassis rails (To keep the RTA happy).
The project is really starting to move now after a slow period. I had better get some pictures now to explain my words above.
Regards
Brendan
A VW for everyone!!
1972 1302 German Look
1971 Bay Panel with Subaru EJ20T
1970 Type 3 squareback in progress
1971 Type 3 notchback in progress

|
|
|
 malcolm malcolm
Insano Dub Head
   
Posts: 812
Threads: 102
Registered: November 14th, 2004
Member Is Offline
Location: werribee south vic
Theme: UltimaBB Pro Blue ( Default )
Mood: where did he go!!!!!!
|
| posted on August 25th, 2006 at 02:58 PM |
|
|
great work keeps the pics coming
|
|
|
 pete wood pete wood
A.k.a.: figure itout
23 Windows of Awesome
       
Posts: 6828
Threads: 389
Registered: January 15th, 2004
Member Is Offline
Location: Nth Nth StMarys, Sydney
Theme: UltimaBB Pro White
Mood: upgrades = jackstands
|
| posted on August 25th, 2006 at 04:35 PM |
|
|
good stuff mate. :thumb
|
|
|
 ricola ricola
Wolfsburg Wizard
  
Posts: 437
Threads: 9
Registered: February 5th, 2003
Member Is Offline
Location: UK
Theme: UltimaBB Pro Blue ( Default )
|
| posted on August 26th, 2006 at 06:25 PM |
|
|
Nice progress :thumb do you have any better pics of the turbo end of the exhaust and did you do the merged bit yourself?
I also plan to extend the clutch arm so my wife can drive, would be very interested in how you get on with the reduced stroke, I heard the KEP
clutches need less travel?
Before you get too far with that VSS, I doubt there is enough ferrous (magnetic) content to trigger hall sensors, unless you are gluing magnets on and
using a reed switch?
Rich
[ Edited on 26-8-06 by ricola ]
|
|
|
 71EJVan 71EJVan
Officially Full-On Dubber
  
Posts: 352
Threads: 23
Registered: August 19th, 2005
Member Is Offline
Location: Central Coast NSW, Australia
Theme: UltimaBB Pro White
|
| posted on August 26th, 2006 at 10:19 PM |
|
|
Rich,
You are right I need to get better pictures.
I had a local guy make the merged part/flange.
The other option to extending the clutch arm is to use a Type 3 unit I'm told. I haven't got one to confirm it though.
The hall sensor has a inbuilt magnet one side and the pickup on the other. It is a ZD1900 which cost AU$19 http://www.jaycar.com.au/productResults.asp?FORM=KEYWORD
Seagull has used these also.
Regards
Brendan
A VW for everyone!!
1972 1302 German Look
1971 Bay Panel with Subaru EJ20T
1970 Type 3 squareback in progress
1971 Type 3 notchback in progress

|
|
|
 ricola ricola
Wolfsburg Wizard
  
Posts: 437
Threads: 9
Registered: February 5th, 2003
Member Is Offline
Location: UK
Theme: UltimaBB Pro Blue ( Default )
|
| posted on August 27th, 2006 at 02:27 AM |
|
|
Hi Brendan,
I'll have to look into type 3 clutch arm, I thought I read on here that type 2s had the longest ones?
I think you will still have problems using a stainless disc with that sensor, it says in the spec it needs 'iron' to block the sensor, unles it is a
very crappy stainless it won't have much ferrous content (ie non-magnetic) so won't block the field and if it did it would rust anyway defeating the
purpose of using stainless.. Probably best to zinc passivate a steel disc..
Hope this helps!
Rich
|
|
|
 71EJVan 71EJVan
Officially Full-On Dubber
  
Posts: 352
Threads: 23
Registered: August 19th, 2005
Member Is Offline
Location: Central Coast NSW, Australia
Theme: UltimaBB Pro White
|
| posted on August 28th, 2006 at 08:19 AM |
|
|
Rich,
I will spin it up on a bench and measure the output with a digital multimeter (A CRO would be beter but I don't have one). The stainless disc is
certainly magnetically attracted to the sensor when I pass it through.
Regards
Brendan
A VW for everyone!!
1972 1302 German Look
1971 Bay Panel with Subaru EJ20T
1970 Type 3 squareback in progress
1971 Type 3 notchback in progress

|
|
|
 71EJVan 71EJVan
Officially Full-On Dubber
  
Posts: 352
Threads: 23
Registered: August 19th, 2005
Member Is Offline
Location: Central Coast NSW, Australia
Theme: UltimaBB Pro White
|
| posted on September 4th, 2006 at 10:21 AM |
|
|
I promised some pictures so here are a few teasers.
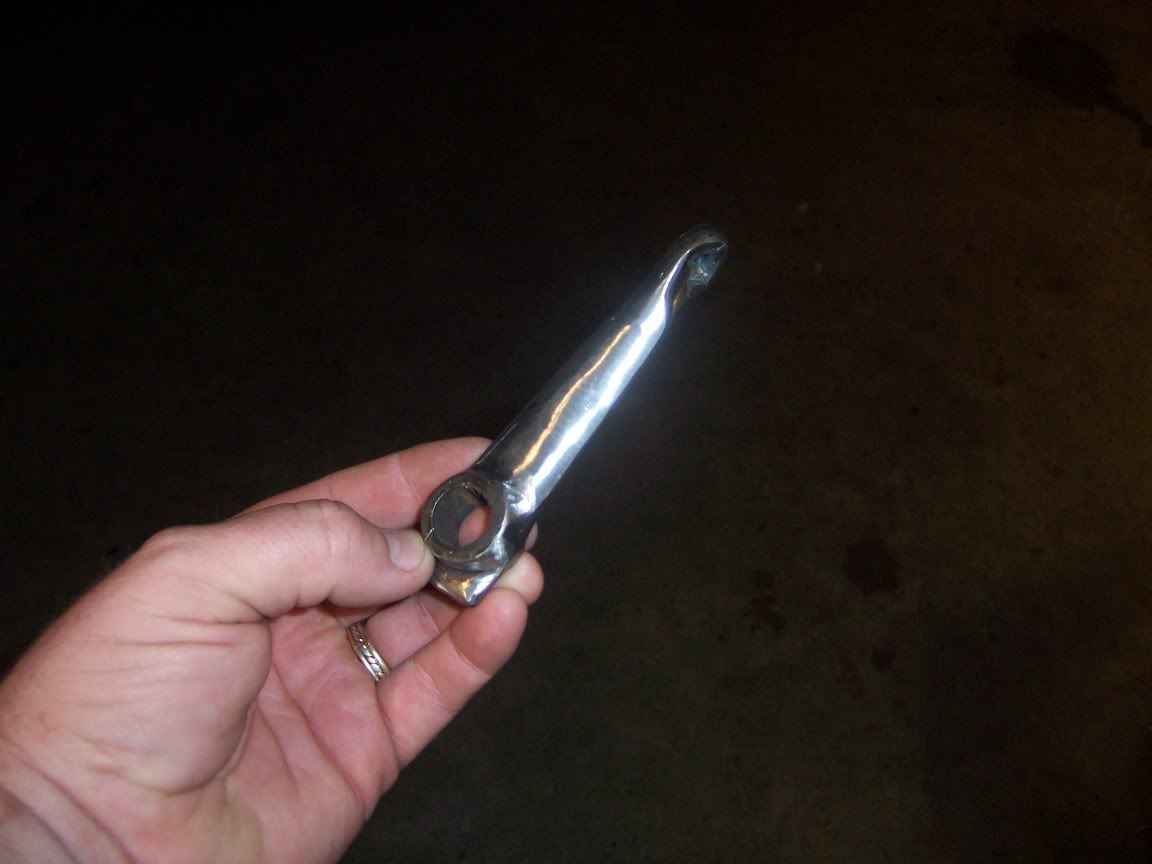
VW 1600 002 clutch arm lengthened 20mm and gusseted. Looks flash now but it will be painted black. Still have to drill and shape the centre hole.
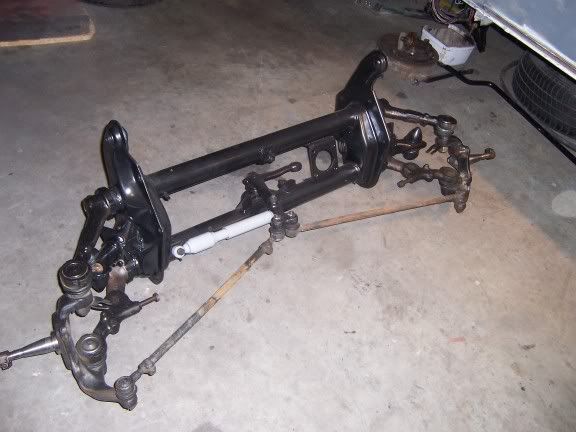
Adjustable front beam nearing completion. Had to replace a few ball joints also.
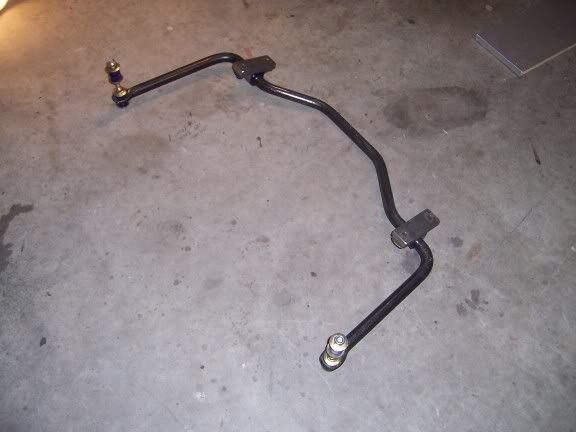
Got a front and rear sway bar. This should fix the 200hp in a sloppy handling vehicle.
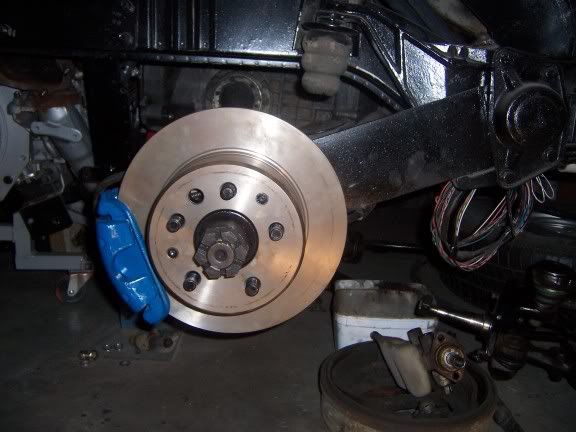
Rear disc brake setup. (Commodore unit grafted to Kombi hubs) Will have to get longer wheel studs though. (Swap them over for front studs).
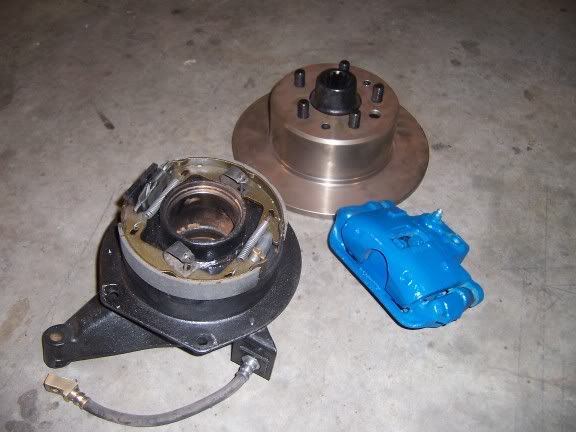
Right side fitted up. Took longer to pack and fit bearings and seals than it did to fit it up.
My $24 swirlpot that I made. Will be mounted at the base with a bracket to the top to stop any nasty vibrations.
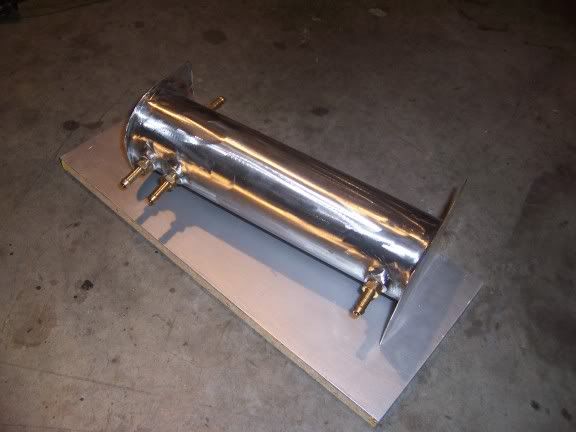
Regards
Brendan
[ Edited on 4-9-2006 by 71EJVan ]
[ Edited on 4-9-2006 by 71EJVan ]
A VW for everyone!!
1972 1302 German Look
1971 Bay Panel with Subaru EJ20T
1970 Type 3 squareback in progress
1971 Type 3 notchback in progress

|
|
|
 boof2332 boof2332
Custom Title Time!
    
Posts: 1210
Threads: 120
Registered: May 10th, 2004
Member Is Offline
Location: Beecroft Sydney
Theme: UltimaBB Pro Blue ( Default )
Mood: Sympathetic
|
| posted on September 16th, 2006 at 12:57 AM |
|
|
| Quote: | Originally
posted by ricola
Nice progress :thumb do you have any better pics of the turbo end of the exhaust and did you do the merged bit yourself?
[ Edited on 26-8-06 by ricola ]
|
I made the dump pipe for my car and a couple of others. It is important to seperate the wastegate opening from the rear turbine. Either with a
seperate pipe merging into the main pipe, or a open mouth design with a splitter. On the dyno they are pretty much the same in power, significantly up
on the stock style.
Matt
|
|
|
 71EJVan 71EJVan
Officially Full-On Dubber
  
Posts: 352
Threads: 23
Registered: August 19th, 2005
Member Is Offline
Location: Central Coast NSW, Australia
Theme: UltimaBB Pro White
|
| posted on January 8th, 2007 at 07:43 PM |
|
|
Happy New Year to you all!
It has been a while!
I promised some pictures and I'm a bit late in supplying them but here they are.
A lot of work goes into fabricating bits that weren't intended to be there and I believe that dodgy just won't do. I also enjoy seeing the result
and the journey of making these items (sick I know!).
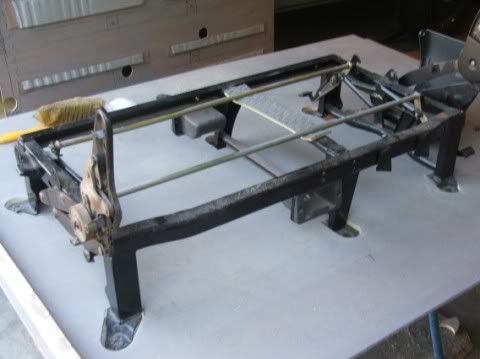
This is the framework for the middle seat. As it has seatbelts attached to it it must be secured by plates that are more than 6.5mm thick to the
floor. I have cut the legs through the flooring so they contact the upper plates and pull up tight with the high tensile bolts.
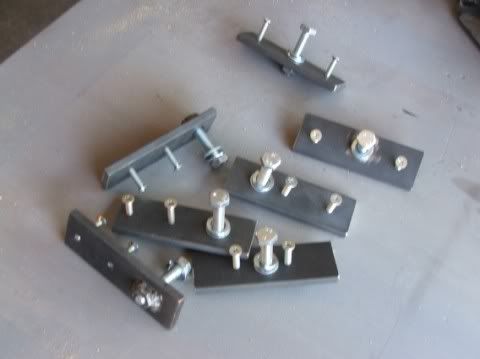
These are the plates 8mm thick with high tensile M12 nuts tack welded behind them. These will fit underneath the floor and be held in spot by the M6
countersunk screws through 3mm plates above the floor. The whole lot will be sealed to stop water ingress. Takes a while to tap these threads by
hand!
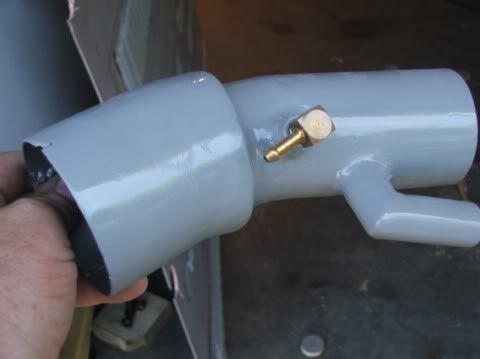
Due to the closeness of the turbo to the Mass Airflow Sensor I could not fit the standard Subaru Resonator. This is an adaptor I made to get the angle
correct and match the two different pipe sizes. It also has tee offs for purge control etc. Made this out of various size exhaust pipe.
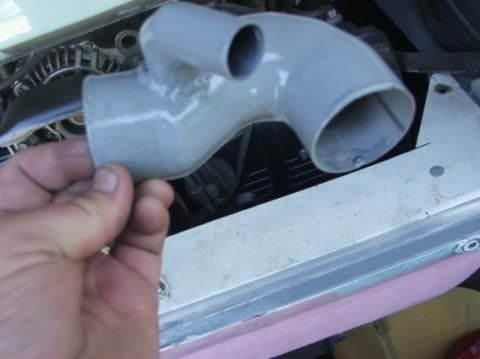
Another bit of fabrication. The plastic pipe from the turbo to the intercooler which has the blow-off valve broke and getting one that fitted proved a
little difficult. The answer was to make one out of 2 inch exhaust pipe. Sectioned up the pipe and welded each piece to make the bend. Holesawed and
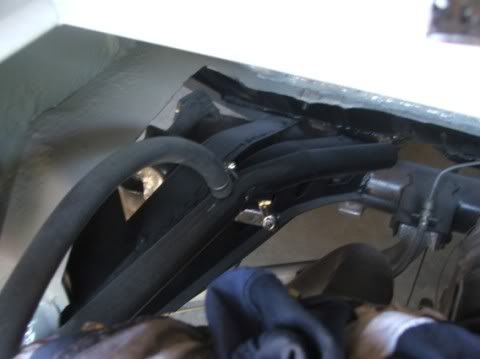
welded in the tee at the correct angle. The ends of the pipe has a rib welded in to stop the hose blowing off under boost.
The rear radiator pipes are in for the final time including tee offs for air bleed (this and the other side is the highest points in the system).
These pipes are made out of exhaust pipe also. Once the design proves itself I will remove them and use them as templates for stainless pipework for
longevity.
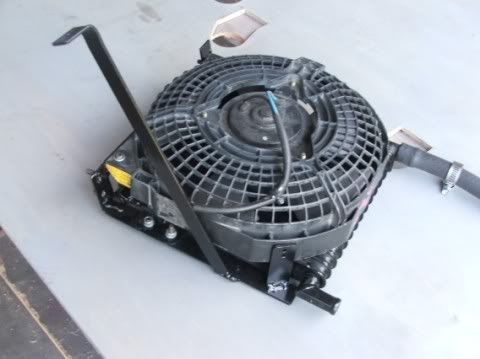
Whilst I'm on the cooling system here is the intercooler radiator bolted into the nount with thermatic fan attached. This mounts above the starter
motor to the firewall where the fuel tank use to be.
Brendan
A VW for everyone!!
1972 1302 German Look
1971 Bay Panel with Subaru EJ20T
1970 Type 3 squareback in progress
1971 Type 3 notchback in progress

|
|
|
 ricola ricola
Wolfsburg Wizard
  
Posts: 437
Threads: 9
Registered: February 5th, 2003
Member Is Offline
Location: UK
Theme: UltimaBB Pro Blue ( Default )
|
| posted on January 9th, 2007 at 04:02 PM |
|
|
Nice progress pics :thumb I broke my dump valve pipe too but ended up getting a silicone version..
Rich
|
|
|
 kevo kevo
A.k.a.: kevo Milner
Officially Full-On Dubber
  
Posts: 371
Threads: 53
Registered: March 22nd, 2005
Member Is Offline
Location: wanneroo, perth WA
Theme: UltimaBB Psyche Green
Mood: always happy
|
| posted on January 9th, 2007 at 10:51 PM |
|
|
great photos and excellent engineering mate!
this is for sure the best subaru bus conversion i have ever seen,
keep the posts coming mate!
76 baywindow kombi - V8 & Weddle racing diff and gearbox
Daily driven beach cruiser
|
|
|
 ElusiveStranger ElusiveStranger
Officially Full-On Dubber
  
Posts: 330
Threads: 30
Registered: May 28th, 2006
Member Is Offline
Location: Kent. England
Theme: UltimaBB Pro Blue ( Default )
|
| posted on January 19th, 2007 at 04:31 AM |
|
|
Nice work Brendan, been looking forward to more instalments! :thumb
How much longer to go?
|
|
|
 71EJVan 71EJVan
Officially Full-On Dubber
  
Posts: 352
Threads: 23
Registered: August 19th, 2005
Member Is Offline
Location: Central Coast NSW, Australia
Theme: UltimaBB Pro White
|
| posted on January 20th, 2007 at 12:01 PM |
|
|
Painting main body next weekend. Woohoo!
A VW for everyone!!
1972 1302 German Look
1971 Bay Panel with Subaru EJ20T
1970 Type 3 squareback in progress
1971 Type 3 notchback in progress

|
|
|
 kroozzn63 kroozzn63
Bishop of Volkswagenism
     
Posts: 3005
Threads: 317
Registered: January 31st, 2004
Member Is Offline
Location: sydney
Theme: UltimaBB Pro Yellow
Mood: mmm coffee
|
| posted on January 20th, 2007 at 12:35 PM |
|
|
more more , brendan can you take a pics of the van
complete,
or are you holding us with suspense
show us your gates
|
|
|
 71EJVan 71EJVan
Officially Full-On Dubber
  
Posts: 352
Threads: 23
Registered: August 19th, 2005
Member Is Offline
Location: Central Coast NSW, Australia
Theme: UltimaBB Pro White
|
| posted on January 29th, 2007 at 07:21 AM |
|
|
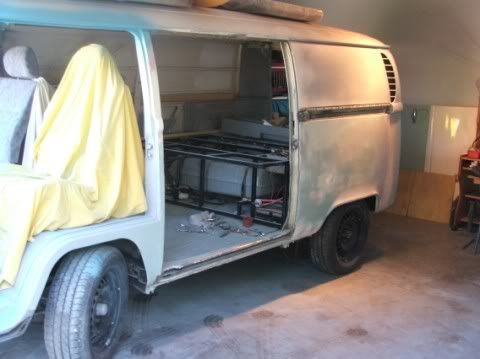
I came to the realization that I couldn't paint the whole van in the garage where it was so I focussed on one side, front and rear. I finished the
fold back seans of the front skin which was a job I've been putting off for months. Used seam sealer before the final fold over for a nice waterproof
joint. I will flood the inner with fish oil to really seal it up after all the painting is done.
I undercoated on Friday, 2 coats of color on Saturday. A light wet rub back with 800 grit this morning just to get it real smooth then the final two
coats this afternoon. I will now leave it for 2 weeks before 1200 grit and then polish. I also gave the new rims a coat of alluminium spray to see
what it will eventually look like.
This panel was ripple city and needed a recunstructed sill front to back and a fair bit of cancer cut out of the dogleg. Also had a new battery tray
and outer skin to support it. It also had bolt holes right through the B pillar!
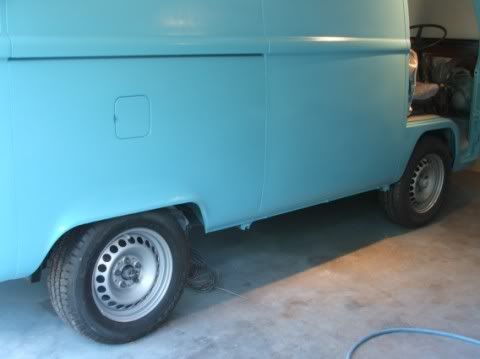
The front skin turned out pretty good. Late upper with the indicator holes welded up and grafted onto the vent surround (I left 10mm metal around it)
and also a early lower cut and shut together. Raised emblem area is a giveaway but where do you stop? Cutting that out and getting the whole panel
straight would have been fun I did not want to have.
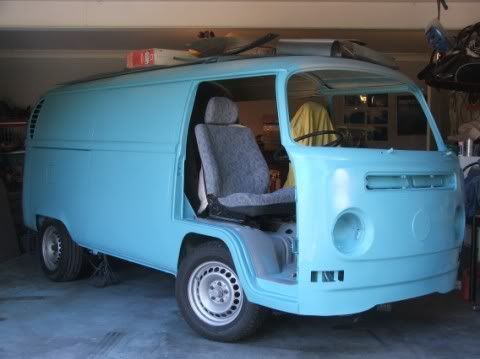
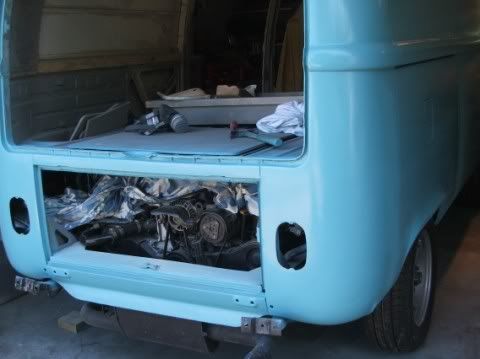
Spun the whole thing around to work on the other side. Passenger side dog leg is too far gone, both outer and inner. Will order one this week. With
the van facing this way it will now be a lot easier to finish off the middle seat and easier access to finish the fuel, seat belt mounts and
electricals.
That's all for now
Brendan
A VW for everyone!!
1972 1302 German Look
1971 Bay Panel with Subaru EJ20T
1970 Type 3 squareback in progress
1971 Type 3 notchback in progress

|
|
|
 pete wood pete wood
A.k.a.: figure itout
23 Windows of Awesome
       
Posts: 6828
Threads: 389
Registered: January 15th, 2004
Member Is Offline
Location: Nth Nth StMarys, Sydney
Theme: UltimaBB Pro White
Mood: upgrades = jackstands
|
| posted on January 29th, 2007 at 07:42 AM |
|
|
great stuff mate 
|
|
|
 kevo kevo
A.k.a.: kevo Milner
Officially Full-On Dubber
  
Posts: 371
Threads: 53
Registered: March 22nd, 2005
Member Is Offline
Location: wanneroo, perth WA
Theme: UltimaBB Psyche Green
Mood: always happy
|
| posted on January 29th, 2007 at 10:26 PM |
|
|
keep it coming!
76 baywindow kombi - V8 & Weddle racing diff and gearbox
Daily driven beach cruiser
|
|
|
 squizy squizy
A.k.a.: Paul
Compulsive Aussie Vee Dubber
Thinking about another dub...maybe
      
Posts: 4082
Threads: 243
Registered: December 17th, 2002
Member Is Offline
Location: Thornleigh
Theme: UltimaBB Pro Blue
|
| posted on January 29th, 2007 at 10:40 PM |
|
|
As always Brendan great stuff.
|
|
|
 ElusiveStranger ElusiveStranger
Officially Full-On Dubber
  
Posts: 330
Threads: 30
Registered: May 28th, 2006
Member Is Offline
Location: Kent. England
Theme: UltimaBB Pro Blue ( Default )
|
| posted on January 30th, 2007 at 10:04 AM |
|
|
Nice work Brendan. :thumb
Can't wait for next weeks instalment 
|
|
|
 boof2332 boof2332
Custom Title Time!
    
Posts: 1210
Threads: 120
Registered: May 10th, 2004
Member Is Offline
Location: Beecroft Sydney
Theme: UltimaBB Pro Blue ( Default )
Mood: Sympathetic
|
| posted on February 6th, 2007 at 10:27 PM |
|
|
Hey Brendan,
Have you run your radiator yet...Reason being, is I used a similar set up on the splitty we did and it has had issues. It seems that there is not
enough airflow past the back opening and the fans were too close to the under carriage. Instead of causing a low pressure drop behind(on top) it is a
high pressure area of stagnant air. We dropped it lower to help the air flow out the back, however its still not as effective as I thought. It got
dynoed today and made 141kw at the wheels, which is pretty good considering the air intake temps are always higher on the dyno.
Tomorrow, i will be tilting the radiator the opposite way with nose down at the front, allowing abundant, unrestricted exit flow to the air. How far
foward in the chassis rails will also effect the operation...ours was too far back.
Let me know if you have run it.
Matt
I have a one owner bay that Shane is driving till he picks up the splitty... then I am sure common sense would say, take out the awesome 2.0l air
cooled motor and wreck another perfectly good vw in the name of power!
|
|
|
 ElusiveStranger ElusiveStranger
Officially Full-On Dubber
  
Posts: 330
Threads: 30
Registered: May 28th, 2006
Member Is Offline
Location: Kent. England
Theme: UltimaBB Pro Blue ( Default )
|
| posted on February 7th, 2007 at 04:53 AM |
|
|
| Quote: | Originally
posted by boof2332
Hey Brendan,
Have you run your radiator yet...Reason being, is I used a similar set up on the splitty we did and it has had issues. It seems that there is not
enough airflow past the back opening and the fans were too close to the under carriage. Instead of causing a low pressure drop behind(on top) it is a
high pressure area of stagnant air. We dropped it lower to help the air flow out the back, however its still not as effective as I thought. It got
dynoed today and made 141kw at the wheels, which is pretty good considering the air intake temps are always higher on the dyno.
Tomorrow, i will be tilting the radiator the opposite way with nose down at the front, allowing abundant, unrestricted exit flow to the air. How far
foward in the chassis rails will also effect the operation...ours was too far back.
Let me know if you have run it.
|
Looking forward to your findings. My rad (Jag XJ 40) is scooped exactly how you intend to do yours tomorrow (front down, back up, fully boxed in).
I've got a huge blower fan on top. Would be great to find out if my theory holds water (haha, sorry) ie not blowing into stagnated air.
I have a front spoiler on my '78 which I intend to take a mould, modify and run ducting to the rad. It's blocking heaps of flow at the mo.
Not that that matters as it's mid winter here in the UK.
|
|
|
 boof2332 boof2332
Custom Title Time!
    
Posts: 1210
Threads: 120
Registered: May 10th, 2004
Member Is Offline
Location: Beecroft Sydney
Theme: UltimaBB Pro Blue ( Default )
Mood: Sympathetic
|
| posted on February 7th, 2007 at 04:37 PM |
|
|
I have been stuffing around all day with it since the car got back from the dyno and reading lots last night on aerodynamics etc.
I will have the low front and high back and then build a shroud to hold the 2x thermos, which will for about 10cm, be parrallel to the ground then
angle up sharply to hold the fans just off verticle. This should then create a really nice low pressure area to draw the air through the rad.
Will let you know tomorrow.
Sorry for themini hi jacking of your post brendan.
Matt
|
|
|
 kroozzn63 kroozzn63
Bishop of Volkswagenism
     
Posts: 3005
Threads: 317
Registered: January 31st, 2004
Member Is Offline
Location: sydney
Theme: UltimaBB Pro Yellow
Mood: mmm coffee
|
| posted on February 7th, 2007 at 07:52 PM |
|
|
ooooo yeah thats the stuff, man thats gotta get a magazine story its looking better than the daily driver roughly looking van you were describing, its
gunna /it is looking sweet as..
show us your gates
|
|
|
 71EJVan 71EJVan
Officially Full-On Dubber
  
Posts: 352
Threads: 23
Registered: August 19th, 2005
Member Is Offline
Location: Central Coast NSW, Australia
Theme: UltimaBB Pro White
|
| posted on February 10th, 2007 at 06:54 PM |
|
|
No worries Matt.
I'm going to totally seal the rad in with sheeting as well as in front of the scoop in a curve up to the floor to smooth out the airflow from behind
the beam. This turbulent air that is caused by the lower tube of the beam is, I think the the reason a low pressure at the back is so important. I may
also sheet the rear and create a Gurney flap to assist in the suction through the rad.
ES,
It's killing me not getting back to the conversion but I've got to get the rust and panel work finished. Bolt the rad in, attach the hoses, hook up
the punp and intercooler, splice in the wiring that I've already labelled, fill it with oil and fuel and start it. Sound real easy when I tell myself
this but there is the issue of a few little jobs I have to do prior to these tasks that are not related to the engine start. I don't want to have to
go back and pull the rad to get the middle seat in and also renove the intercooler rad to do the final fit of the rear swaybar. Bloody catch 22! BTW
how is your VSS going? Send me a U2U.
Thanks Brendon,
It's not magazine material. Whilst I've spent a lot of time straightening the panels, removing old bog and peining out dings, I've not done a show
car prep and paint job. This is my surf wagon that I don't want to attract too much attention. I've swapped the audi A3 wheels for Merc steelies and
am also thinking of buying another 2.5 inch mandrel U bend to lift the rear exhaust out of sight further.
I'm also thinking of the next project that is currently in storage (2nd Daughter's 71 Notch)....more damn sanding!
Brendan
A VW for everyone!!
1972 1302 German Look
1971 Bay Panel with Subaru EJ20T
1970 Type 3 squareback in progress
1971 Type 3 notchback in progress

|
|
|
 boof2332 boof2332
Custom Title Time!
    
Posts: 1210
Threads: 120
Registered: May 10th, 2004
Member Is Offline
Location: Beecroft Sydney
Theme: UltimaBB Pro Blue ( Default )
Mood: Sympathetic
|
| posted on February 10th, 2007 at 09:24 PM |
|
|
I finished the new one today on the splitty. I too have smoothed out the floor from the front cross beam to the top of the radiator. I will try and
post some pics although the ones I took were too dark.
I have been reading a bit about air flow dynamics, and as long as there is a pressure drop between the front and the back, it will work. My one like
yours was a little too high and close to the cross rail and the back.
Matt
|
|
|
 h h
A.k.a.: Towely BuMpEr KING! ILLegal ALIEN on a roadtrip
Scirocco Rare
fractals - an ever changing lifestyle
        
Posts: 7671
Threads: 375
Registered: February 3rd, 2005
Member Is Offline
Location: noosa hillbilly 'yee har'
Theme: XMBX Pro Green
Mood: A T3 is not a Kombi - stop waving at me
|
| posted on February 10th, 2007 at 10:17 PM |
|
|
man thats lookin sweet.. keep em comin yeah..
|
|
|
| Pages: 1 2 3 4 |