| [ Total Views: 97325 | Total Replies: 299 | Thread Id: 64212 ] |
| Pages: 1 2 3 4 .. 10 |
|
|
 StenGuns StenGuns
Veteran Volks Folk
    
Posts: 2147
Threads: 236
Registered: March 1st, 2004
Member Is Offline
Location: Sydney, Australia
Theme: UltimaBB Pro Blue ( Default )
|
| posted on October 21st, 2007 at 09:19 AM |
|
|
Speedo
I am also replacing all instrumentation with VDO cockpit series gauges..
The Oil Pressure, Temp, Clock and Fuel are Tacho all fit nicely into the dash panels.. They will be black faced with Chrome Bezel.. They look
great!
The speedo was a different story.. The largest VDO speedo is 100mm and its just too small to fit into the speedo housing on the dash.. I wanted to
update the speedo but keep the "old skool" style so only one option..
Adapted the housing of the old speedo to take the 100mm VDO unit.. A fair bit of modification and playing but the end result is excellent..
Front

Side

Top

Rear

|
|
|
 StenGuns StenGuns
Veteran Volks Folk
    
Posts: 2147
Threads: 236
Registered: March 1st, 2004
Member Is Offline
Location: Sydney, Australia
Theme: UltimaBB Pro Blue ( Default )
|
| posted on October 21st, 2007 at 09:21 AM |
|
|
Brightware
Finally.. Boris at VVD is carefully grading and polishing a complete original set of chrome strips.. Also a set of quarter windows.. I'm thinking of
Popouts for the rear but want to take a good look at a set before I commit.. If anyone in Sydney central area has them, can I come and look?
I bought a set of german "long neck" external mirrors as used on 356's, Karmens and early 911's.. Originally I was going to install beetle mirrors
on the door hinges but decided to keep with the period 356 theme a little..
View


|
|
|
 StenGuns StenGuns
Veteran Volks Folk
    
Posts: 2147
Threads: 236
Registered: March 1st, 2004
Member Is Offline
Location: Sydney, Australia
Theme: UltimaBB Pro Blue ( Default )
|
| posted on October 21st, 2007 at 09:23 AM |
|
|
Interior
The interior is all imported Procar Upholstery from Scat Enterprises (why not with the exchange rate?).. The seats are the ELITE model in Beige-54
vinyl.. Same with rear seat covers and the door panels.. I decided against Leather due to wearability and cost.
| Error |
| Sorry, you must be a registered user in order to download attachments. |
|
|
|
|
 Dasdubber Dasdubber
A.k.a.: Alan Agyik
23 Windows of Awesome
DAS Resto Haus
       
Posts: 5746
Threads: 289
Registered: August 26th, 2002
Member Is Offline
Location: Gold Coast
Theme: UltimaBB Pro Blue
Mood: feeling fine...
|
| posted on October 21st, 2007 at 07:18 PM |
|
|
Nice one mate - progress is looking really good. Keep up the good work!
|
|
|
 StenGuns StenGuns
Veteran Volks Folk
    
Posts: 2147
Threads: 236
Registered: March 1st, 2004
Member Is Offline
Location: Sydney, Australia
Theme: UltimaBB Pro Blue ( Default )
|
| posted on October 30th, 2007 at 06:45 AM |
|
|
Side Repeaters
Nothing much worth updating except for these nifty Golf 4/Passat side repeaters the we have frenched into a panel and then grafted to the body.. They
are cool and add another small difference to the final look..
The big day is closer!!

|
|
|
 Bizarre Bizarre
Super Moderator
The artist formerly known as blue74l
      
Posts: 12780
Threads: 734
Registered: August 25th, 2002
Member Is Offline
Location: Abbotsford, Sydney
Theme: UltimaBB Pro Blue ( Default )
|
| posted on October 30th, 2007 at 09:51 AM |
|
|
THAT looks good
Futue te ipsum!!!
|
|
|
 StenGuns StenGuns
Veteran Volks Folk
    
Posts: 2147
Threads: 236
Registered: March 1st, 2004
Member Is Offline
Location: Sydney, Australia
Theme: UltimaBB Pro Blue ( Default )
|
| posted on October 30th, 2007 at 12:18 PM |
|
|
Oh.. Also had the tinware painted and sent off door handles, light rims and other bits for chroming with the blades.. The interior housing of the
headlights is also sent off for painting with the body.. Not sure whether I want the alternator stand in chrome or paint yet.. I'm leaning toward
chrome..
|
|
|
 StenGuns StenGuns
Veteran Volks Folk
    
Posts: 2147
Threads: 236
Registered: March 1st, 2004
Member Is Offline
Location: Sydney, Australia
Theme: UltimaBB Pro Blue ( Default )
|
| posted on October 30th, 2007 at 07:54 PM |
|
|
And meets the safety issue Barry.. The new front LEDs are totally directional. Apparently you need a 45degree visibility of your turn indicators so
these side lights work fine!
| Quote: | Originally
posted by Bizarre
THAT looks good
|
|
|
|
 bond bond
Veteran Volks Folk
    
Posts: 2456
Threads: 166
Registered: July 11th, 2003
Member Is Offline
Location: brisbane
Theme: UltimaBB Pro Blue ( Default )
|
| posted on October 30th, 2007 at 08:10 PM |
|
|
alan (das) did the same with his lights on the 63 rag. is a nice look.
nick
|
|
|
 StenGuns StenGuns
Veteran Volks Folk
    
Posts: 2147
Threads: 236
Registered: March 1st, 2004
Member Is Offline
Location: Sydney, Australia
Theme: UltimaBB Pro Blue ( Default )
|
| posted on November 10th, 2007 at 12:46 PM |
|
|
Tail Lights
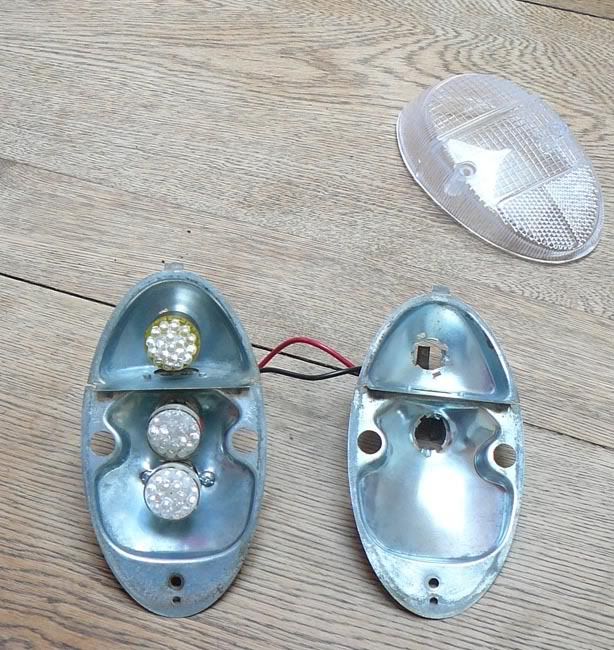
The decision to run LED's led to another issue.. The existing taillight setup is a dual filament bulb that acts as the taillight and brakelight. I
wasn't sure how the LED bulb (although it has two contacts) would act in the circumstances.. eg; with taillight on, would the brake light illuminate
"brighter". The theory is that it should, however a couple of tests were inconclusive..
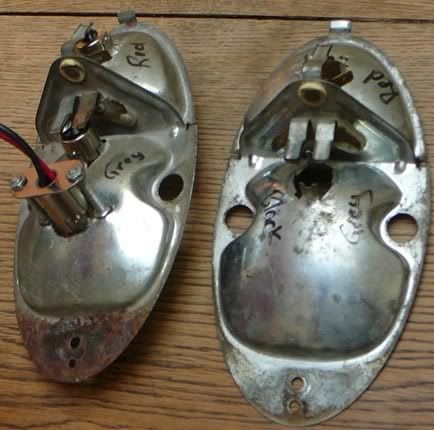
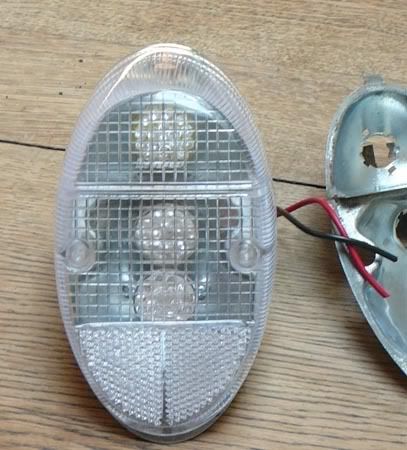
So.. With a safety first approach, I deciided to mount a 2nd red LED in the taillight housing. This can either be wired up with the 1st LED are run on
a separate circuit for the brakes only..
The positioning of the 2nd LED is tricky, however I managed a fair result on the first one I tried..
Here are the results:
|
|
|
 Dasdubber Dasdubber
A.k.a.: Alan Agyik
23 Windows of Awesome
DAS Resto Haus
       
Posts: 5746
Threads: 289
Registered: August 26th, 2002
Member Is Offline
Location: Gold Coast
Theme: UltimaBB Pro Blue
Mood: feeling fine...
|
| posted on November 10th, 2007 at 07:43 PM |
|
|
Nice detail work mate - really enjoying the progress and neat ideas. As Nick mentioned, I did the side indicator mod as well and it was well worth it
especially with drivers who don't pay much attention to the indicators down low on the bumper (or in the head lights!)
Alan
|
|
|
 StenGuns StenGuns
Veteran Volks Folk
    
Posts: 2147
Threads: 236
Registered: March 1st, 2004
Member Is Offline
Location: Sydney, Australia
Theme: UltimaBB Pro Blue ( Default )
|
| posted on November 10th, 2007 at 07:57 PM |
|
|
Thanks Alan..
|
|
|
 StenGuns StenGuns
Veteran Volks Folk
    
Posts: 2147
Threads: 236
Registered: March 1st, 2004
Member Is Offline
Location: Sydney, Australia
Theme: UltimaBB Pro Blue ( Default )
|
| posted on November 17th, 2007 at 11:42 AM |
|
|
Tinware
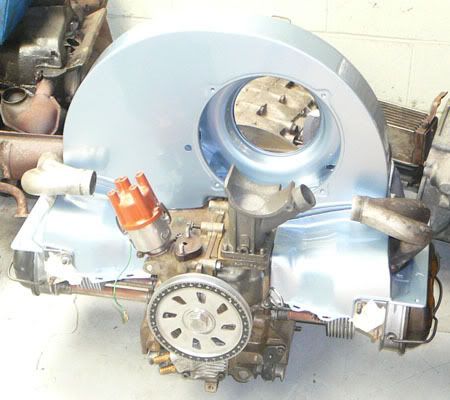
This is a quick peek at the tiinware.. The Engine block is to be cleaned up and painted today.. Then the EFI system can start to be sorted out.. The
guy who's doing (experimenting) with my EFI is fabricting some type of plenum setup.. Doing away with the distributer and relocating all the leads
behind the shroud.. Don't ask me too much as I know sweet FA on the subject..
The plenum housing is CAD drawn, cut and fabricated, then polished up to ensure it is consistent with the aesthetics of the engine bay and the whole
car (thats my dept). I'll get more photos up during the progress..
|
|
|
 StenGuns StenGuns
Veteran Volks Folk
    
Posts: 2147
Threads: 236
Registered: March 1st, 2004
Member Is Offline
Location: Sydney, Australia
Theme: UltimaBB Pro Blue ( Default )
|
| posted on November 17th, 2007 at 11:45 AM |
|
|
PS: that colour is "Liquid Blue" which is a current Audi A4 colour.. It looks sweet with beige interior and lightly tinted glass... Add a bit of
chrome and low profile rubber on 17" Escra's... You get the picture
|
|
|
 StenGuns StenGuns
Veteran Volks Folk
    
Posts: 2147
Threads: 236
Registered: March 1st, 2004
Member Is Offline
Location: Sydney, Australia
Theme: UltimaBB Pro Blue ( Default )
|
| posted on November 18th, 2007 at 06:48 PM |
|
|
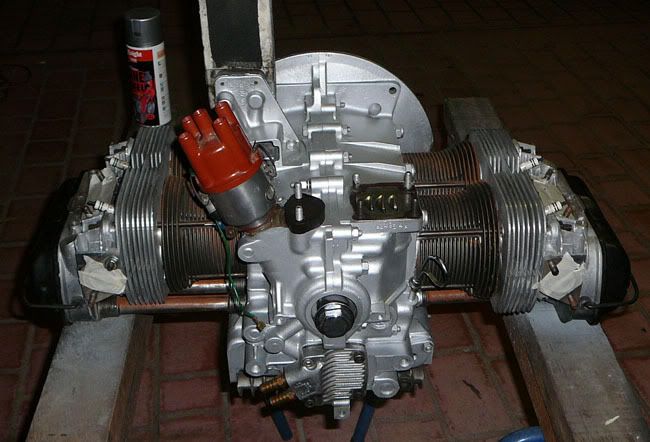
You've got to love those rattle cans..
White Knight Engine enamel "Aluminium" Same as on my tranny..
Mind you. its all in the prep.. Acetone Wash, Wirewheel and Rub Down then a 2nd Acetone wash.. Should be sweet

|
|
|
 StenGuns StenGuns
Veteran Volks Folk
    
Posts: 2147
Threads: 236
Registered: March 1st, 2004
Member Is Offline
Location: Sydney, Australia
Theme: UltimaBB Pro Blue ( Default )
|
| posted on November 18th, 2007 at 07:17 PM |
|
|
Happy with that!
|
|
|
 vw54 vw54
Super Administrator
Always Waiting 4 Friday
        
Posts: 16723
Threads: 378
Registered: August 26th, 2002
Member Is Offline
Location: Sunny Sydney
Theme: UltimaBB Pro Blue ( Default )
Mood: Oval resto ongoing
|
| posted on November 19th, 2007 at 06:18 AM |
|
|
Rob
The tailight n front blinkers look great
You will have to adjust the axle boots on the gearbox, to about the 10 oclock position as they tend to pull when there fitted in the 12 oclock pos
|
|
|
 OZ Towdster OZ Towdster
A.k.a.: Andrew Westwood
Custom Title Time!
Keen to finish some projects
    
Posts: 1921
Threads: 132
Registered: December 7th, 2003
Member Is Offline
Location: Alexandra Hills Brisbane QLD
Theme: UltimaBB Pro Yellow
Mood: Having fun in our great land
|
| posted on November 19th, 2007 at 07:18 AM |
|
|
| Quote: | Originally
posted by vw54
Rob
You will have to adjust the axle boots on the gearbox, to about the 10 oclock position as they tend to pull when there fitted in the 12 oclock pos
|
I was just reading through the posts and noticed the same thing and was going to post the same suggestion , but it would seem youve got to get up
ealier to beat Mr Birchall to the post
Don't let body work get in the way of real suspension travel
|
|
|
 StenGuns StenGuns
Veteran Volks Folk
    
Posts: 2147
Threads: 236
Registered: March 1st, 2004
Member Is Offline
Location: Sydney, Australia
Theme: UltimaBB Pro Blue ( Default )
|
| posted on November 19th, 2007 at 07:23 AM |
|
|
Tks boyz... Dumone advised me about this on U2U some time back.. Just haven't got round to it..
|
|
|
 StenGuns StenGuns
Veteran Volks Folk
    
Posts: 2147
Threads: 236
Registered: March 1st, 2004
Member Is Offline
Location: Sydney, Australia
Theme: UltimaBB Pro Blue ( Default )
|
| posted on January 26th, 2008 at 05:58 AM |
|
|
67 Beetle Resto - Re-build (Paint Time!)
Body Panels have all been painted..
Body has a bit more prep to do then paint next week
Looks like the body will marry back onto the pan in two weeks!
I haven't seen the painted panels yet but the builder (Chris) is a convert to the colour scheme,, Qucik trip down to the Gong thoday to check out
progress, I'll take the camera
|
|
|
 GTMac GTMac
A.k.a.: Andrew
Fahrvergnugen
   
Posts: 976
Threads: 246
Registered: November 24th, 2004
Member Is Offline
Location: Sydney
Theme: UltimaBB Pro Blue ( Default )
Mood: Always asleep
|
| posted on January 26th, 2008 at 08:05 AM |
|
|
Excellent work. With taste you can definately add to an old VW some new mods and yours are looking good. I like the idea of the side blinkers. I was
lucky my side markers on the fastback were faded completely so some orange bulbs and wired into the blinker relay do the trick.
Was thinking of LED's for my front and rears as well, are these from Jaycar?
Keep up the good work.
Andrew
1971 Type 3 Fasty - EJ20T
I love 242HP sleepers. 
How many sets of lights does it take a $229k Carrera S to learn? 
UPDATE: Cayman S, M3, B4 now added to the list. |
|
|
 StenGuns StenGuns
Veteran Volks Folk
    
Posts: 2147
Threads: 236
Registered: March 1st, 2004
Member Is Offline
Location: Sydney, Australia
Theme: UltimaBB Pro Blue ( Default )
|
| posted on January 26th, 2008 at 01:04 PM |
|
|
Thanks.. Not Jaycar.. I'll find the details and let you know..
|
|
|
 StenGuns StenGuns
Veteran Volks Folk
    
Posts: 2147
Threads: 236
Registered: March 1st, 2004
Member Is Offline
Location: Sydney, Australia
Theme: UltimaBB Pro Blue ( Default )
|
| posted on January 26th, 2008 at 01:23 PM |
|
|
Here are some pictures from today's visit..
We went through and inventoried all parts, brightware, hardware etc that needs to go back on the vehicle.. One lot for paint, one for chroming.. New
stainless hardware for the rebuild..
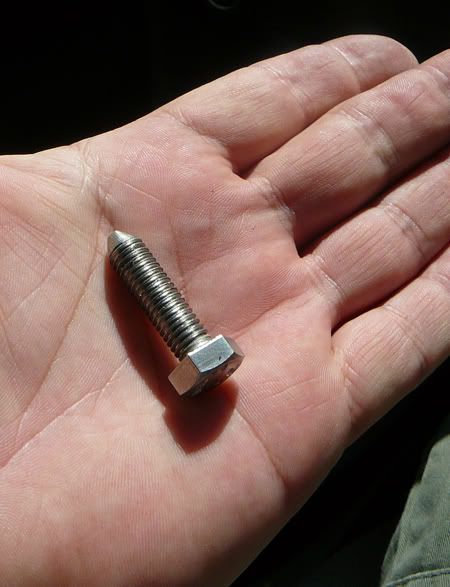
Here is a pic of the stainless bolts we are using to mount the pan to the body.. Each one had to be hand ground to get the taper.. I couldn't find
stock ones. The mounting plates have all been powder coated
.
.
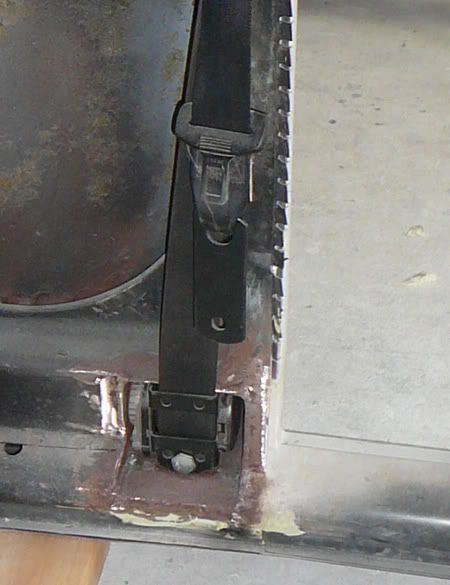
This is a good shot of how we have recessed the seatbelt inertia reels into the bottom of the B Pillars..
.
.
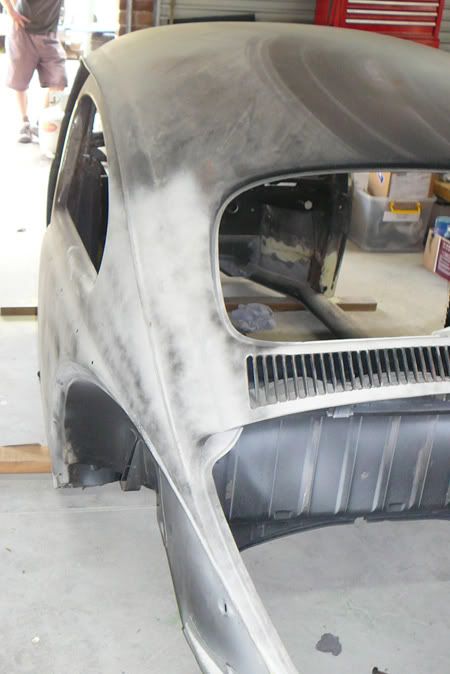
The body is ready for a rub down and then off to get the primer coat
.
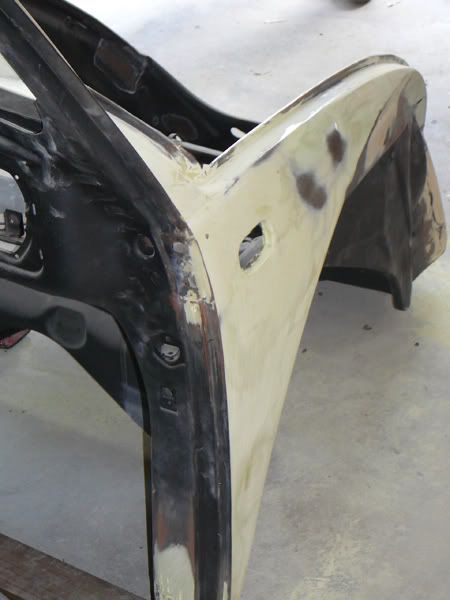
|
|
|
 StenGuns StenGuns
Veteran Volks Folk
    
Posts: 2147
Threads: 236
Registered: March 1st, 2004
Member Is Offline
Location: Sydney, Australia
Theme: UltimaBB Pro Blue ( Default )
|
| posted on January 26th, 2008 at 01:30 PM |
|
|
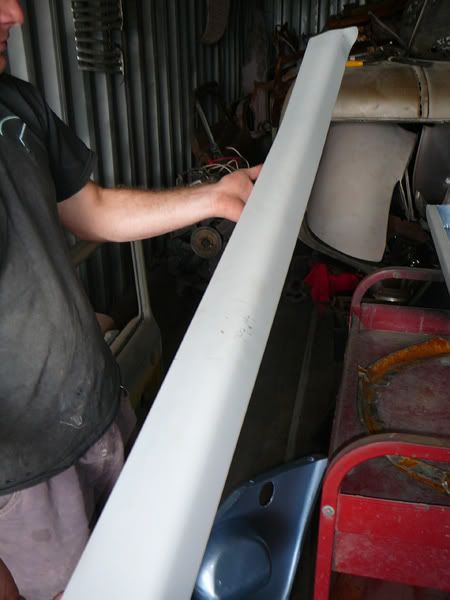
Hand made running boards (perfect fit)
.
.
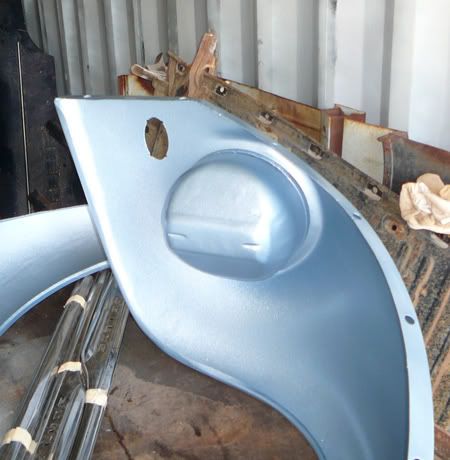
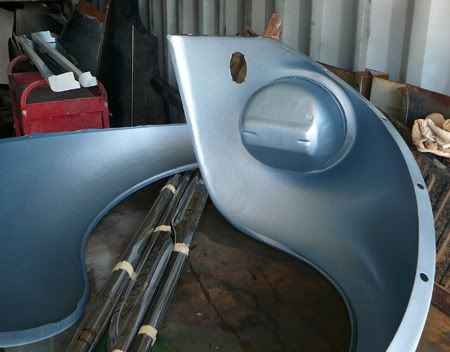
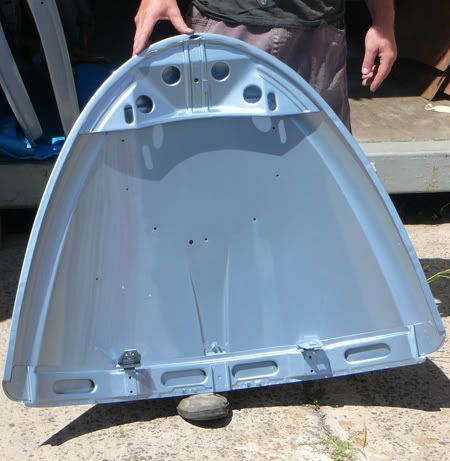
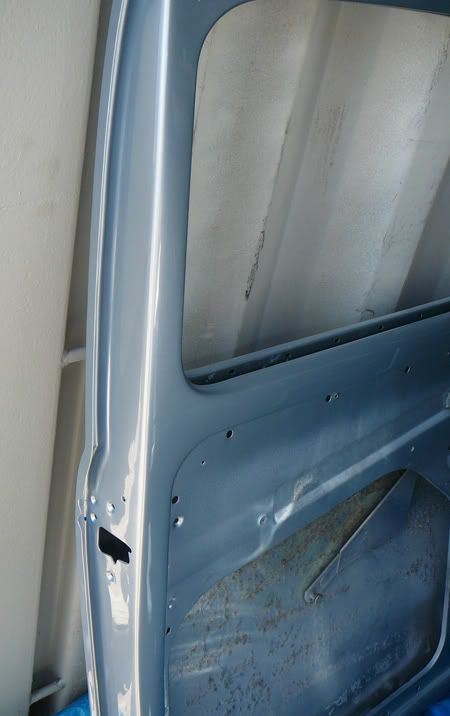
Running boards, guards etc have all been gravitexed before sprayed with top coat.. No color change over the whole car (except the pan and running gear
which is mostly black powder coat)
.
.
.
The doors and lids have all been painted on the reverse sides.. We are going to bolt the body to the pan, fit and hang the doors, lids etc before the
final paint goes on.. Guards will be painted off the body and fitted after.
.
.
...
|
|
|
 StenGuns StenGuns
Veteran Volks Folk
    
Posts: 2147
Threads: 236
Registered: March 1st, 2004
Member Is Offline
Location: Sydney, Australia
Theme: UltimaBB Pro Blue ( Default )
|
| posted on January 26th, 2008 at 01:33 PM |
|
|
Thats about it.. The next update will be when the body is fitted to the pan.. Piss Up in Helensburgh, NSW that weekend
|
|
|
 StenGuns StenGuns
Veteran Volks Folk
    
Posts: 2147
Threads: 236
Registered: March 1st, 2004
Member Is Offline
Location: Sydney, Australia
Theme: UltimaBB Pro Blue ( Default )
|
| posted on January 28th, 2008 at 03:35 PM |
|
|
Andrew, the LED's are from
http://www.ledshoponline.com/index.html
Excellent (Nthn QLD) supplier.. Ships most days via Experess Post and you can ring for advice.. Forgeotten his name
| Quote: | Originally
posted by GTMac
Excellent work. With taste you can definately add to an old VW some new mods and yours are looking good. I like the idea of the side blinkers. I was
lucky my side markers on the fastback were faded completely so some orange bulbs and wired into the blinker relay do the trick.
Was thinking of LED's for my front and rears as well, are these from Jaycar?
Keep up the good work.
Andrew
|
|
|
|
 StenGuns StenGuns
Veteran Volks Folk
    
Posts: 2147
Threads: 236
Registered: March 1st, 2004
Member Is Offline
Location: Sydney, Australia
Theme: UltimaBB Pro Blue ( Default )
|
| posted on March 8th, 2008 at 05:49 PM |
|
|
Loaded the Pan onto the ute today for the drive down to the panel shop tomorrow... The body is final coat in the inside and primed on the outside..
All the guards and lids are final coated as well.. Once the body is back on the pan, the body will get its exterior coat and the doors, guards, and
lids will be fitted..
This was a bitch to get onto the ute.. Me and my wife with the neighbour to give a final lift..
.
.

..

..

|
|
|
 StenGuns StenGuns
Veteran Volks Folk
    
Posts: 2147
Threads: 236
Registered: March 1st, 2004
Member Is Offline
Location: Sydney, Australia
Theme: UltimaBB Pro Blue ( Default )
|
| posted on March 8th, 2008 at 05:54 PM |
|
|
Speaking of POR15 (in other threads).. I had my front beam sand blasted then coated in POR15.. After about 6 months of weather, the POR 15 coat is
crap.. Discoloured and looks ordinary against the powder coated pan which has maintained a high gloss finish.. I'm not at all worried about any
flexing or chipping issues with the powder coat and will always use and recommend this as an underbody finish against POR or 2-pac.. Haven't iused
silver bullet yet but in my mind the Blast, etch prime and electrostatic coat is the way to go..
.
.
You can see in these shots what I mean.. (and by the way, the por 15 was applied by an expert)..
.
.

.
.

.
.


|
|
|
 StenGuns StenGuns
Veteran Volks Folk
    
Posts: 2147
Threads: 236
Registered: March 1st, 2004
Member Is Offline
Location: Sydney, Australia
Theme: UltimaBB Pro Blue ( Default )
|
| posted on March 9th, 2008 at 02:25 PM |
|
|
I delivered the pan today.. Nice run in the SC down to Helensburgh..
This was an opportunity to take a look at the paintwork to date on the body shell.. The body interior has basically had its finish coat, as has all
the under guards, engine bay and front compartment.. i must admit I was blown away, however Chris isn't happy and is getting some bits re-done.. I
couldn't tell but I guess to the trained eye!!.. He also has spent 100's of hours on the body and wants everything just right..
Here's a series of shots from today..


|
|
|
 StenGuns StenGuns
Veteran Volks Folk
    
Posts: 2147
Threads: 236
Registered: March 1st, 2004
Member Is Offline
Location: Sydney, Australia
Theme: UltimaBB Pro Blue ( Default )
|
| posted on March 9th, 2008 at 02:30 PM |
|
|
Here's some body shots.. You need to see this baby in the flesh.. AWESOME!!


|
|
|
| Pages: 1 2 3 4 .. 10 |