| [ Total Views: 6639 | Total Replies: 78 | Thread Id: 69475 ] |
| Pages: 1 2 3 |
|
|
 Joel Joel
Scirocco Rare
Now containing 100% E-Wang
        
Posts: 9368
Threads: 211
Registered: February 14th, 2006
Member Is Offline
Location: Northern Rivers NSW
Theme: UltimaBB Pro Purple
Mood: Tact Level 0.00
|
| posted on October 12th, 2010 at 02:26 PM |
|
|
The horn wiring on these cars is really basic
I'm guessing it worked fine with the old steering wheel?
A positive 12 volts goes straight from the fuse box to the horn and the horn button just earths on the steering shaft to complete the circuit.
Like Ian said touch the black wire on the boss to test, the horn should work if everything is sweet, you'll need to do up the boss nut to make sure
you have a good earth on the boss to the steering shaft though.
If touching the black wire doesnt do anything and the boss contact ring is touching the one on the indicator switch put the meter in continuity mode
which is the one at about 5:00 with the diode and soundwaves symbols to the left of the one that says temp.
touch one lead on the boss and another on something that is a good earth like the door checkrod or door interior light switch.
If the meter beeps it means all is well and the boss is earthed but if not it probably just needs the air gap between the boss and the column
adjusted.
The bolts that hold the steering column to the body are slotted for adjusting
Now you just need the horn button which usually grounds itself to the boss to send earth down the black wire, thro the contact at the base of the boss
and through the contact on the indicator switch
|
|
|
 Craig S Craig S
A.k.a.: Craig
Wolfsburg Wizard
  
Posts: 635
Threads: 83
Registered: May 26th, 2008
Member Is Offline
Location: Sunny Western Sydney
Theme: UltimaBB Pro Blue ( Default )
Mood: In the mood for change
|
| posted on October 12th, 2010 at 05:15 PM |
|
|
Thanks for the help!!
| Quote: | Originally
posted by Joel
The horn wiring on these cars is really basic
|
Not as basic as my skills though 
Steve, the middle finger idea is good, but too many people own 4wds around here and wouldn't mind a beetle as a bonnet ornament.
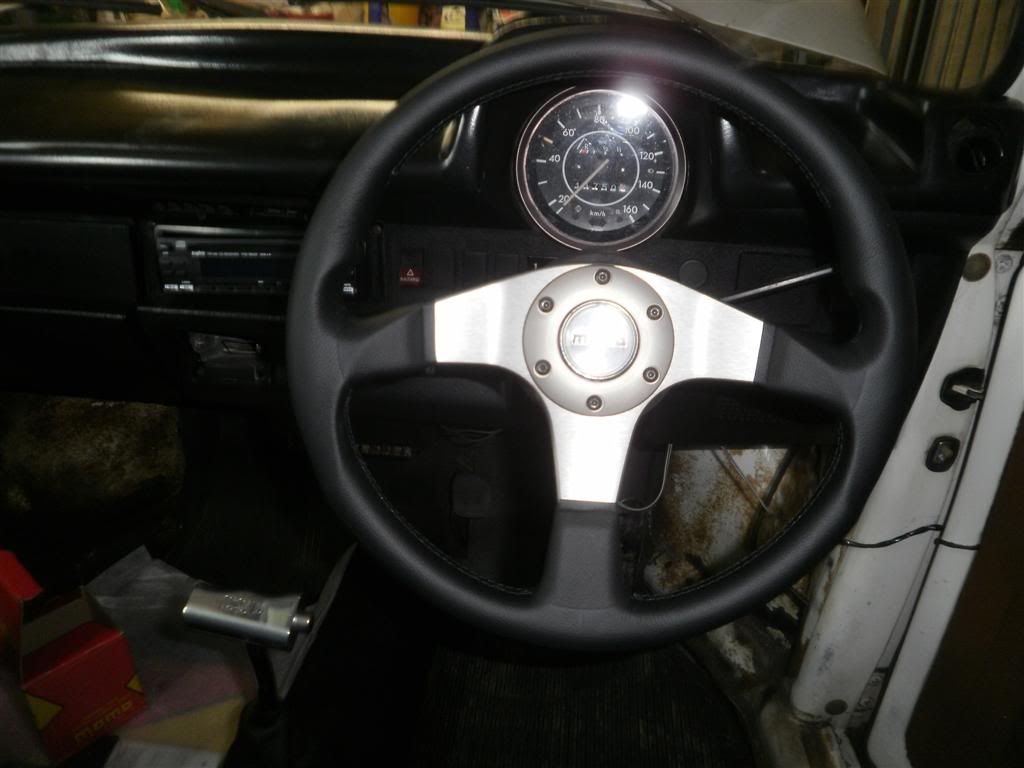
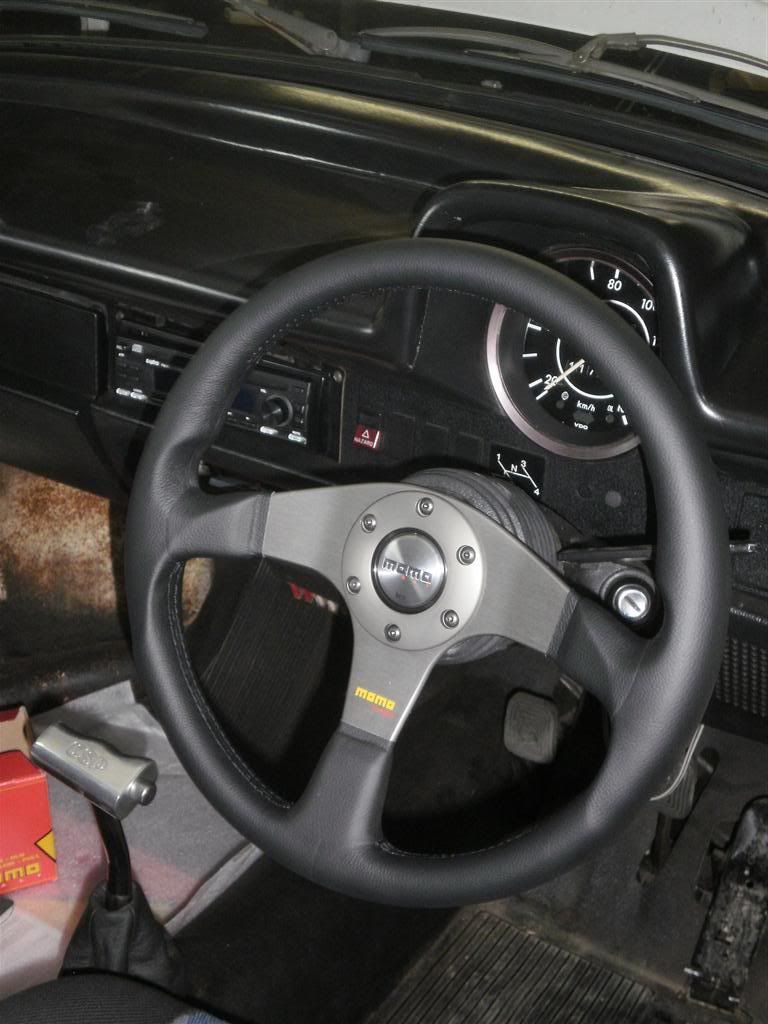
Well the good news is that it is now all working. Turns out I was just being too wussy with bending the copper connector on the column. Once I moved
it a really good amount it was all good and much happiness reigned down on my little garage. The neighbours must think I'm nuts with all this pipping
of the horn emanating from the garage.
So here is the finished product....
More goods news:
Finally managed to plonk my bottom in some Recaro seats at a shop and decide which one I like best. Even better news is that my beloved was with me,
heard the price of said pews and hasn't raised a single objection (I think because we were away last week with friends who have a boat and regular
mention was made of the costs involved in boat ownership), so all I have to do is convince myself they're worth that much money.
Thanks again.
Craig
1969 Beetle - June
1974 L Bug - Gwendolyn
2002 Bora V6 4Motion - Anita
|
|
|
 1303Steve 1303Steve
A.k.a.: Steve Carter
Scirocco Rare
        
Posts: 8650
Threads: 564
Registered: August 27th, 2002
Member Is Offline
Location: Sydney, NSW
Theme: UltimaBB Pro Blue ( Default )
Mood: Parrot Heading
|
| posted on October 12th, 2010 at 10:14 PM |
|
|
Hi
There is a small amount of adjustment in the switch housing to allow it to slide back & forward, this may have helped with the copper tang
contact.
There is an Allen key under the housing for this adjustment and the 2 securing bolts also need to be loosened as well.
Steve
|
|
|
 barls barls
A.k.a.: Mr indestructible
Super Administrator
Causer of Chaos and Mayhem
        
Posts: 9470
Threads: 296
Registered: June 22nd, 2004
Member Is Offline
Location: cruising in denistone east
Theme: UltimaBB Streamlined2
Mood: indestructible? and listening to the voices
|
| posted on October 12th, 2010 at 10:39 PM |
|
|
looks good mate, what size wheel did you end up going with.
|
|
|
 Craig S Craig S
A.k.a.: Craig
Wolfsburg Wizard
  
Posts: 635
Threads: 83
Registered: May 26th, 2008
Member Is Offline
Location: Sunny Western Sydney
Theme: UltimaBB Pro Blue ( Default )
Mood: In the mood for change
|
| posted on November 16th, 2010 at 09:09 PM |
|
|
So quick update,
I pick up my new Recaro seats later in the week, and the brakes and suspension are currently being put together. Hopefully the new look and feel will
be done by Christmas. 
http://www.idealseat.com.au/html/03_ergonomics/specialist_l.html
Then I go back into my cave and start saving for an engine and a thousand other things. 
Whether I have the capability of putting together the other engine that is sitting in pieces in my garage to have fun with while I'll continue to
save is another matter all together. Only time will tell. 
1969 Beetle - June
1974 L Bug - Gwendolyn
2002 Bora V6 4Motion - Anita
|
|
|
 68AutoBug 68AutoBug
A.k.a.: Lee Noonan
Aircooled Master
Beetle Restorer - Experience over 138% - YIKES --
         
Posts: 11654
Threads: 449
Registered: August 31st, 2002
Member Is Offline
Location: SCONE in UPPER HUNTER VALLEY NSW
Theme: UltimaBB Pro Yellow
Mood: Really Mentally Ill - all of the time -
|
 posted on November 16th, 2010 at 09:45 PM posted on November 16th, 2010 at 09:45 PM |
|
|
[size=6]EXCELLENT PICS...
You are learning Fast.....
but tell Me why the face of Your stereo is sticking out on one end??
I've never taken My face off....!!
cheers
LEE
[/size]
- [size=4]Helping keep Air Cooled VWs on the road - location: SCONE in the Upper Hunter Valley - Northern NSW 320 kms NNW of SYDNEY--- [/size]
|
|
|
 Craig S Craig S
A.k.a.: Craig
Wolfsburg Wizard
  
Posts: 635
Threads: 83
Registered: May 26th, 2008
Member Is Offline
Location: Sunny Western Sydney
Theme: UltimaBB Pro Blue ( Default )
Mood: In the mood for change
|
| posted on November 21st, 2010 at 09:07 PM |
|
|
Firstly, in answer to the question of Barls a few posts up, the steering wheel is 350mm. Smaller, but not too small. I'm loving it, it is sooooo much
more comfortable than the original, but badly cracked, skinny ships tiller. Of course it completely obscures the speedo, so it's a bit of a guessing
game as to the speed, in fact if anything it makes me listen closer to the revs because I can estimate reasonably accurately what my speed is based on
the gear and the amount of noise I can hear. Guess I shouldn't do any sound proofing until I fix the speedo situation  Actually I can see below 40km/h which means I'm all good in school
zones. Actually I can see below 40km/h which means I'm all good in school
zones.
Secondly, in answer to Lee, the stereo has been wired (by the previous owner) such that the face is always fully lit even when the car is off and it
is turned off. Whilst it wouldn't draw too much power, sometimes the car does sit for a week or more, so given that I can pop the face off and save
the drain I just do it. The stereo is one of the things on my long list of things to replace, but it comes below stopping, turning and going faster

Have to drop the car off early this week so the engineer can have his pre-work inspection, problem is I'll be away with work for the remainder of the
week and weekend, so rather than cause inconvenience in the workshop my wife might go and pick Gwendolyn up. Given that it has been about 2 years
since she last drove her (and pre CSP shifter and smaller steering wheel), after we'd finished taking some "before" photos of the car I got her to
drive her home.
Now my wife is a country girl, so has been driving since she was tall enough to sit on her dad's lap and steer, so she's not a bad driver, but it
was just like sitting next to a learner. We had bunny hopping, gear crunching, sailing through intersections due to lack of brake application, wipers
going on instead of indicators. The kids found it hilarious. Fortunately we all lived, but if she does go to collect it I'll be checking my mobile
every 5 minutes to make sure she's made it home it one piece.
1969 Beetle - June
1974 L Bug - Gwendolyn
2002 Bora V6 4Motion - Anita
|
|
|
 Craig S Craig S
A.k.a.: Craig
Wolfsburg Wizard
  
Posts: 635
Threads: 83
Registered: May 26th, 2008
Member Is Offline
Location: Sunny Western Sydney
Theme: UltimaBB Pro Blue ( Default )
Mood: In the mood for change
|
| posted on November 21st, 2010 at 09:09 PM |
|
|
Oh, and I also picked up a few boxes yesterday..
I wonder what's inside....
(actually they better be worth it!!!)
| Error |
| Sorry, you must be a registered user in order to download attachments. |
|
1969 Beetle - June
1974 L Bug - Gwendolyn
2002 Bora V6 4Motion - Anita
|
|
|
 STIDUB STIDUB
Custom Title Time!
Over it.
    
Posts: 1497
Threads: 57
Registered: June 23rd, 2008
Member Is Offline
Location: Where else but QLD :)
Theme: UltimaBB Pro Blue
Mood: Worn out, for no benefit.
|
| posted on November 21st, 2010 at 10:32 PM |
|
|
german wine glassed to bribe the other half to approve your plans? 
Volkswagen Drivers Club of Queensland - member 
STIDUB - yep its still a work in progress
Vwdcq club car racing/ and crashing while my bug isn't finished.
The above are personal views, no more, no less |
|
|
 Craig S Craig S
A.k.a.: Craig
Wolfsburg Wizard
  
Posts: 635
Threads: 83
Registered: May 26th, 2008
Member Is Offline
Location: Sunny Western Sydney
Theme: UltimaBB Pro Blue ( Default )
Mood: In the mood for change
|
| posted on November 22nd, 2010 at 12:56 PM |
|
|
No bribes required, she knows she's lucky to have me 
Her sister was over yesterday and said "Those are nice seats, how much were they", to which my wife answered "$400 each weren't they?"
In that instant I had the opportunity to minimise the perceived cost (despite the fact that on the brochure we got the price is written in her
handwriting), but my thinking went along the lines of "O what a tangled web we weave...." so I fessed up. Fortunately she didn't bat an eyelid 
1969 Beetle - June
1974 L Bug - Gwendolyn
2002 Bora V6 4Motion - Anita
|
|
|
 Craig S Craig S
A.k.a.: Craig
Wolfsburg Wizard
  
Posts: 635
Threads: 83
Registered: May 26th, 2008
Member Is Offline
Location: Sunny Western Sydney
Theme: UltimaBB Pro Blue ( Default )
Mood: In the mood for change
|
| posted on December 26th, 2010 at 09:31 PM |
|
|
When I got Gwendolyn there was a bit of a mess behind the back seat, that I sort of tidied up, but never did a proper job. So anyway I decided I
should get in there, get rid of all the old crap, take it back to bare, and then start over.
So this afternoon I spent some time communing with various implements in an attempt to remove as much crud as possible. Having got most of the glue,
I'll now get stuck in with the wire wheel, and once that's done, then the primer will be put to good use.
Anyway, a couple of questions:
Photo 1, the glorious foam that sits between the vertical and diagonal sections at the back. Should I get rid of it all now? Do I need to replace it
with something?
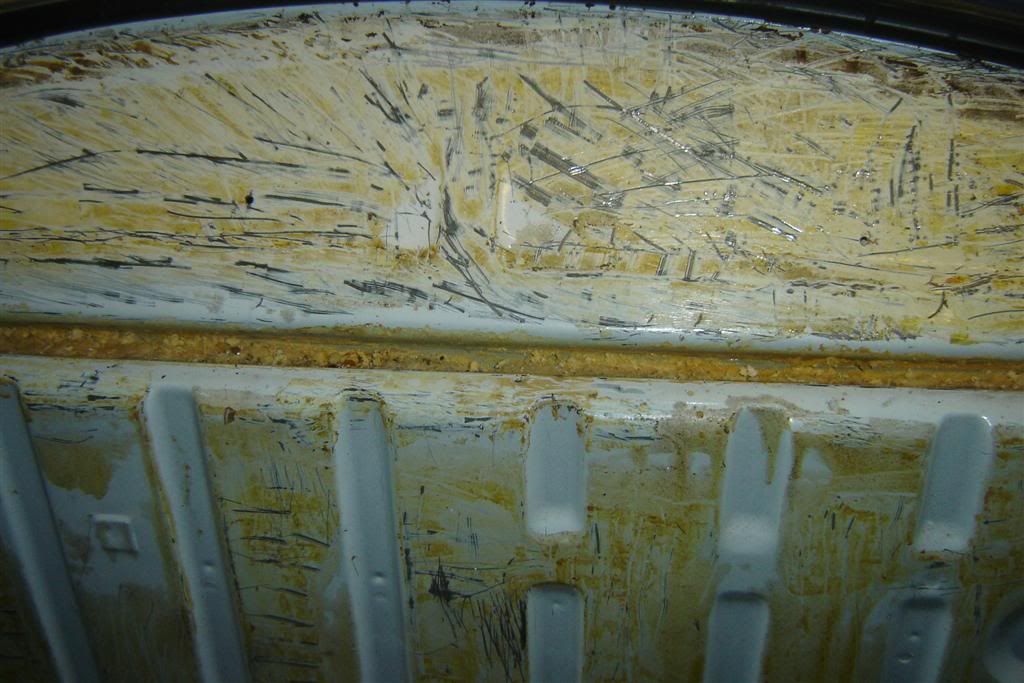
Photo 2
After getting the stuff off the bottom of the parcel shelf, I found two small holes through to the wheel well / engine. The is some nice corrosion
around the holes, and the little metal plates that original covered them became one with the sound proofing sometime over the last 36 years.
Do these holes serve any purpose, or should I just fill them?
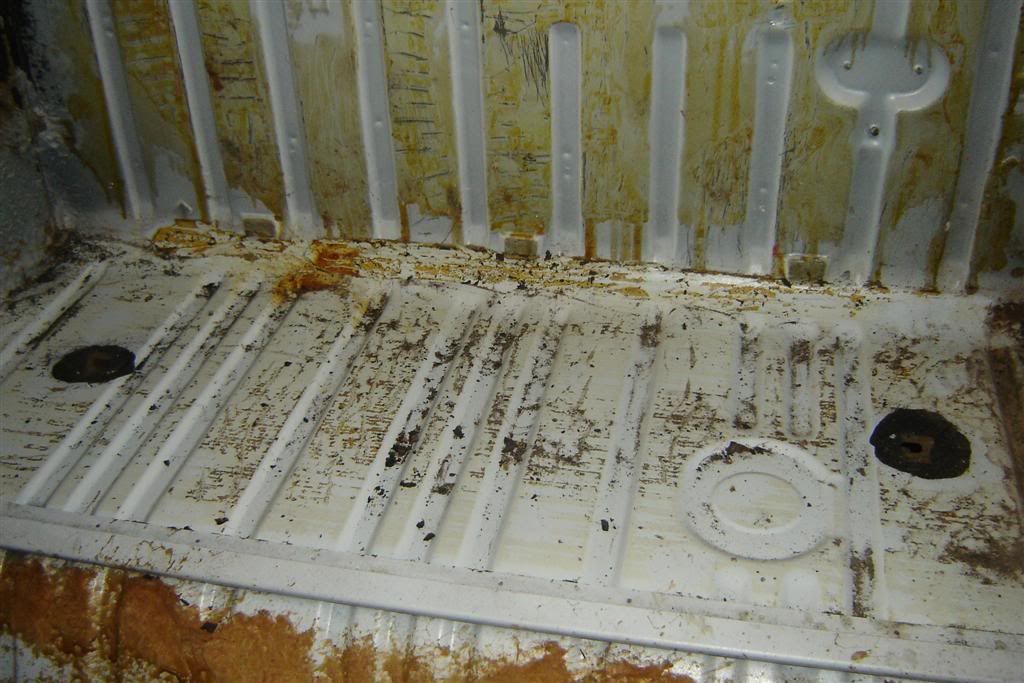
Photo 3
I took away the headlining up to the first join just north of the rear seat belt. Behind there are a myriad of holes. Obviously there are the ones
that (in theory) connect to the half moon vents, which (depending on who you listen to) I should delete at the earliest opportunity.
After poking around with a screwdriver I couldn't feel any foam in the pillar. Should there be some there?
And what of the holes. What are they all there for? Do they serve any purpose, should I fill them, or just leave them to be covered over again with
lining sometime soon?
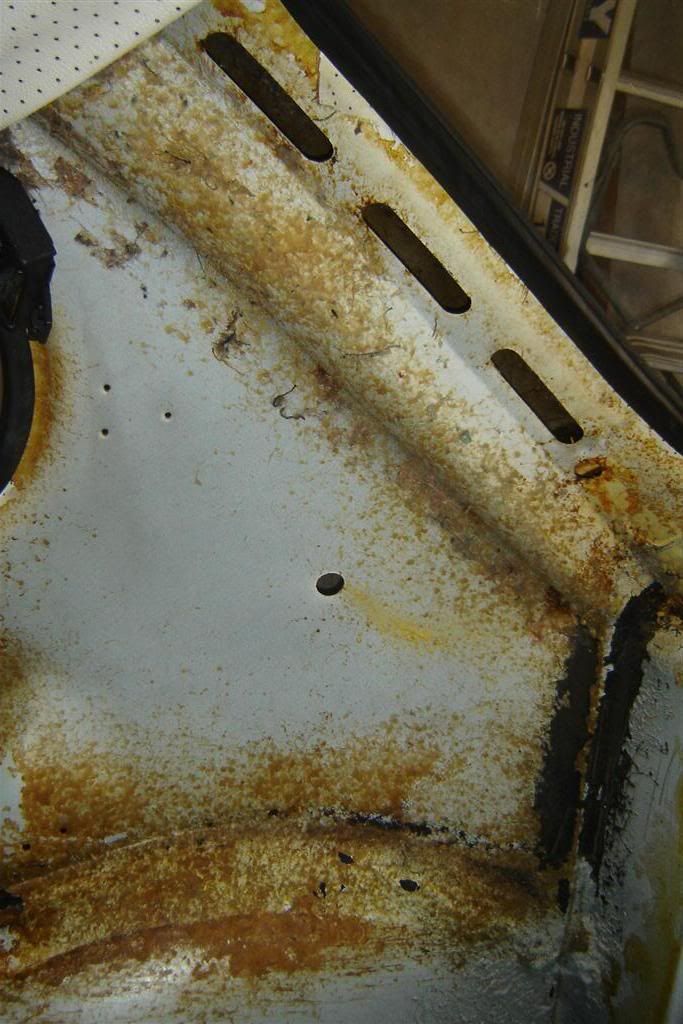
Thanks for your help.
Craig
1969 Beetle - June
1974 L Bug - Gwendolyn
2002 Bora V6 4Motion - Anita
|
|
|
 cam070 cam070
Custom Title Time!
    
Posts: 1332
Threads: 53
Registered: July 25th, 2009
Member Is Offline
Location: Sydney
Theme: UltimaBB Pro Blue ( Default )
Mood: Getting hands dirty stripping the bug down
|
| posted on December 26th, 2010 at 11:03 PM |
|
|
VW filled that section down the C-Pillar with foam at the factory as an acoustic insulation. I think you will find everyone who has a later model bug
has cursed VW for using this foam as it has been the source of much rust for all these cars. If your car lacks the foam, it may be that someone has
done you a favour and removed it, and hopefully repaired the rust at the same time.
You will usually find it down the lower section of the pillar, through the round hole and lower.
Also, congrat's on getting Recaro's. I have them in my car, similar to your seats, but much older. In my opinion, best mod you can do, seats and
steering wheel. recaro amd Momo, can't go wrong, my preferred combo as well!Exactly what I am running.
|
|
|
 Joel Joel
Scirocco Rare
Now containing 100% E-Wang
        
Posts: 9368
Threads: 211
Registered: February 14th, 2006
Member Is Offline
Location: Northern Rivers NSW
Theme: UltimaBB Pro Purple
Mood: Tact Level 0.00
|
| posted on December 27th, 2010 at 08:52 AM |
|
|
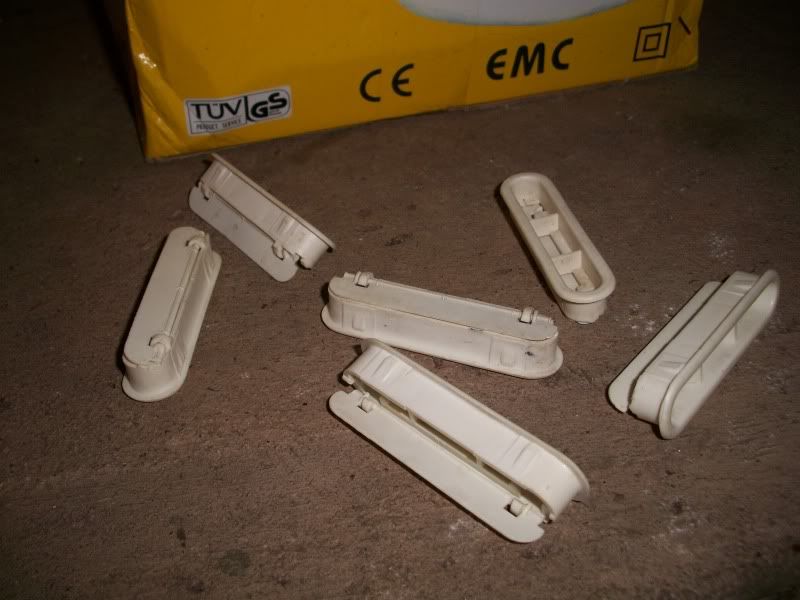
Here's a good shot showing how the crescent vents connect to the inside ones, and that nasty death foam

When I redid my headliner about 9 years ago I covered the inside vents over, the plastic trim that fit in each one was disintergrating and I figured
my 70 bug doesnt have them so why not cover them over.
I've only just cut them back out in the last month and first thing I noticed is how much easier my doors shut when the windows are all closed.
Also My ears don't pop as bad if I wind the windows up while driving.
But there main purpose is to help out the heating system, because the heater is always introducing outside air to the cabin, an equal amount of air
must be expelled and considering most people have the windows up when the heaters on this was why the flow through ventilation system was introduced
in 70s bugs.
Also the same situation exists in Lbugs when you have the defroster fan running
I managed to score some NOS german vent trims for the inside. I didnt realise till I got them they actually have little flaps on them so they stay
shut normally but release the pressure when the heater is on, the doors are slammed shut or the fresh air fan is running
|
|
|
 Craig S Craig S
A.k.a.: Craig
Wolfsburg Wizard
  
Posts: 635
Threads: 83
Registered: May 26th, 2008
Member Is Offline
Location: Sunny Western Sydney
Theme: UltimaBB Pro Blue ( Default )
Mood: In the mood for change
|
| posted on December 27th, 2010 at 01:03 PM |
|
|
Wow, great photo Joel.
I gather the only way to get rid of the foam in the pillar is by cutting metal 
Good job on the NOS vents, the ones I removed yesterday disintegrated upon touch.
Cam, I can assure you that the previous owners didn't do any work back there, it was all pure 1970s headlining on that part. More $ will escape my
wallet in due course to get the foam out.
I guess I'll continue my clean up and go from there.
1969 Beetle - June
1974 L Bug - Gwendolyn
2002 Bora V6 4Motion - Anita
|
|
|
 1303Steve 1303Steve
A.k.a.: Steve Carter
Scirocco Rare
        
Posts: 8650
Threads: 564
Registered: August 27th, 2002
Member Is Offline
Location: Sydney, NSW
Theme: UltimaBB Pro Blue ( Default )
Mood: Parrot Heading
|
| posted on December 27th, 2010 at 02:10 PM |
|
|
Hi
The group of 3 holes is for pop out windows.
You can get a lot of foam out with a long bit of rod with nasty hook on the end.
After seeing what is behind the 1/2 moon vents I elected to keep them.
Steve
|
|
|
 cam070 cam070
Custom Title Time!
    
Posts: 1332
Threads: 53
Registered: July 25th, 2009
Member Is Offline
Location: Sydney
Theme: UltimaBB Pro Blue ( Default )
Mood: Getting hands dirty stripping the bug down
|
| posted on December 27th, 2010 at 10:56 PM |
|
|
| Quote: | Originally
posted by Craig S
Wow, great photo Joel.
I gather the only way to get rid of the foam in the pillar is by cutting metal 
Good job on the NOS vents, the ones I removed yesterday disintegrated upon touch.
Cam, I can assure you that the previous owners didn't do any work back there, it was all pure 1970s headlining on that part. More $ will escape my
wallet in due course to get the foam out.
I guess I'll continue my clean up and go from there.
|
I cut metal from the inside. I figured a not so neat repair could be hidden behind the headlining. Not sure how I am going to tackle the rust though.
|
|
|
 Craig S Craig S
A.k.a.: Craig
Wolfsburg Wizard
  
Posts: 635
Threads: 83
Registered: May 26th, 2008
Member Is Offline
Location: Sunny Western Sydney
Theme: UltimaBB Pro Blue ( Default )
Mood: In the mood for change
|
| posted on December 28th, 2010 at 08:31 PM |
|
|
In between keeping the kids entertained (my lovely wife has had to work the last three days) I've been hiding in the back of the beetle with a drill
and various nasty implements.
I sat in there for about half an hour each time before my back insisted I get out and stretch and I contemplated how much more room there would be in
a Kombi.
Anyway, still more to do, but I've made some good progress, and should hopefully get it finished on the weekend, and get some primer on it.
One question though: The evil crud that VW put along where all the metal seams meet, once it's removed, should I replace it with something before I
put primer on? Should I weld these seams up? It's nasty stuff and difficult to remove.
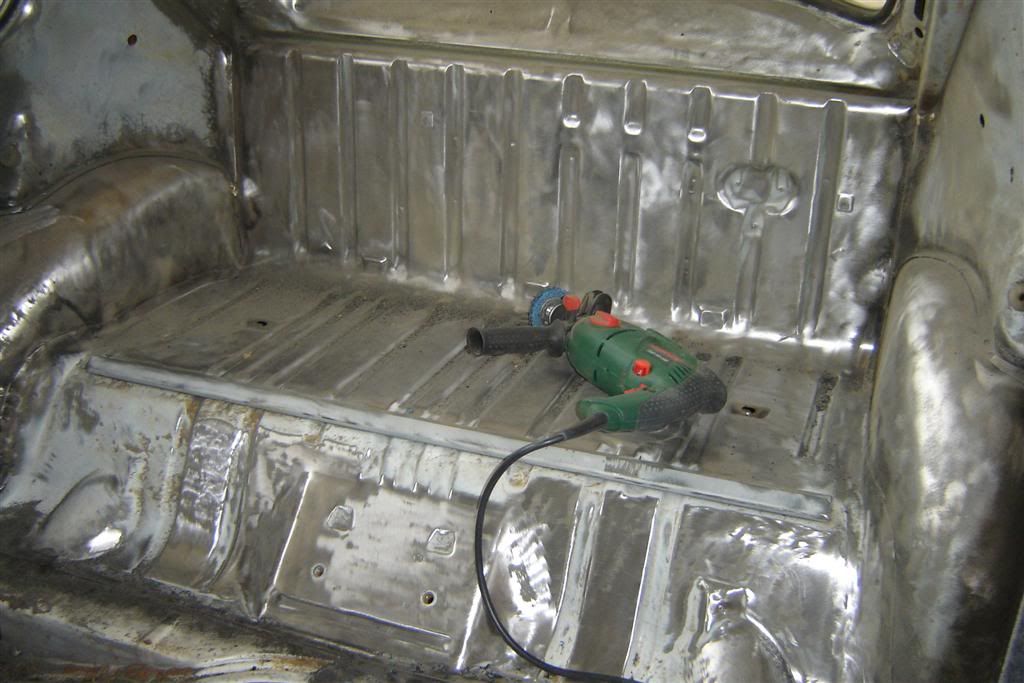
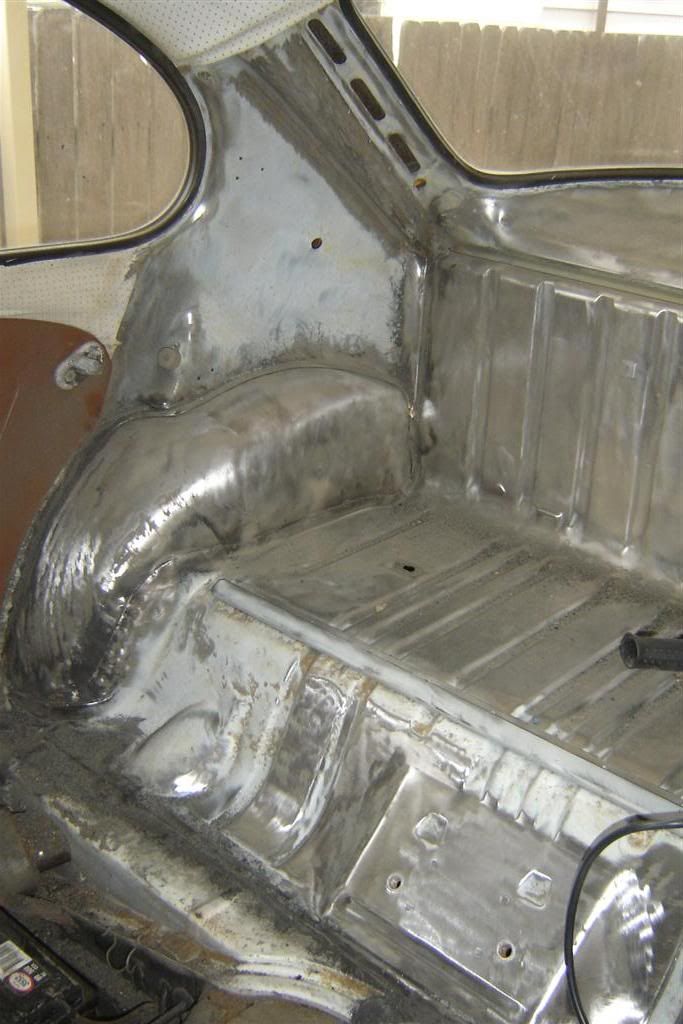
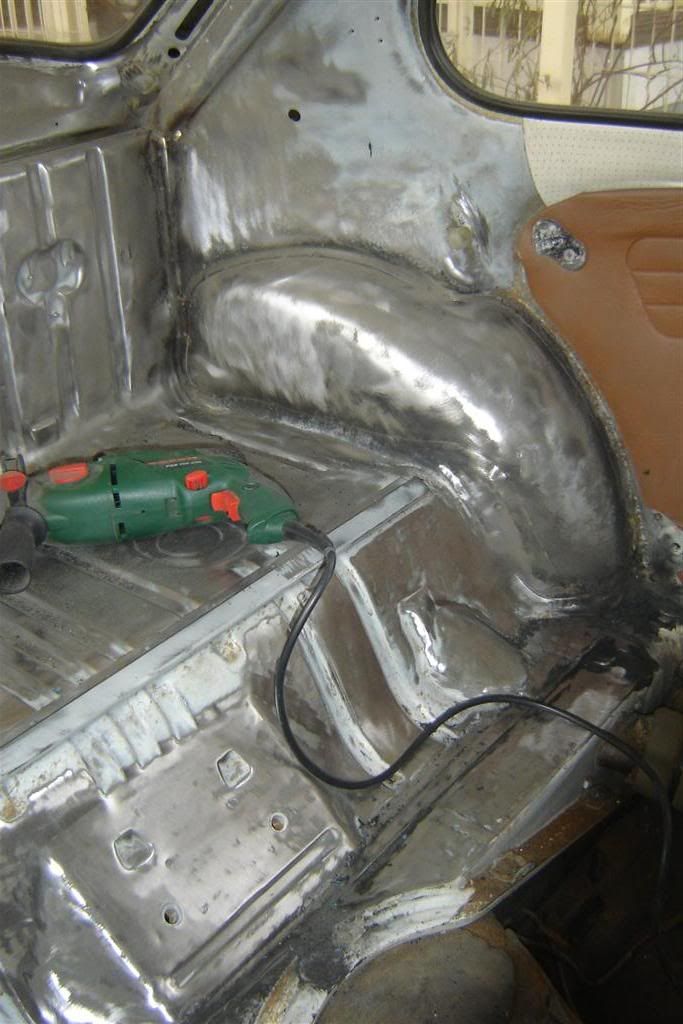
This is the evil crud, which I've grown to hate:
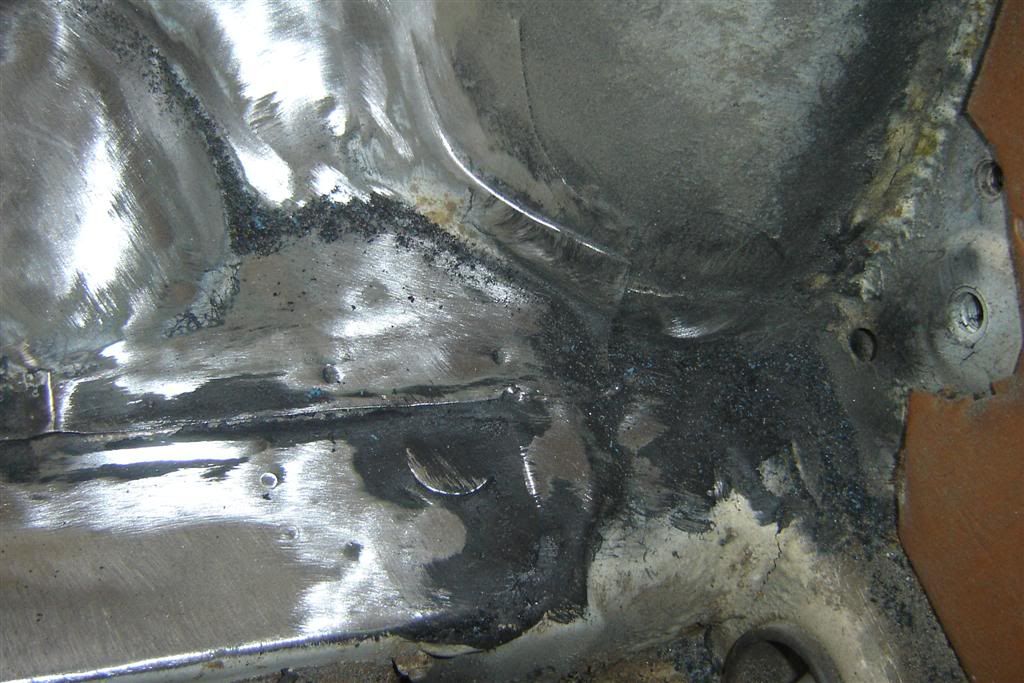
Once I've finished the parcel shelf areas, then I'm onto the front footwell and after that a bit of a tidy up in the boot.
1969 Beetle - June
1974 L Bug - Gwendolyn
2002 Bora V6 4Motion - Anita
|
|
|
 ian.mezz ian.mezz
Wolfsburg Elder
I never said, I could write or spell
      
Posts: 3913
Threads: 280
Registered: September 11th, 2004
Member Is Offline
Location: Newcastle
Theme: UltimaBB Pro Blue ( Default )
Mood: Happy
|
| posted on December 28th, 2010 at 08:49 PM |
|
|
I think its called, drip check or seal sealer.
|
|
|
 Craig S Craig S
A.k.a.: Craig
Wolfsburg Wizard
  
Posts: 635
Threads: 83
Registered: May 26th, 2008
Member Is Offline
Location: Sunny Western Sydney
Theme: UltimaBB Pro Blue ( Default )
Mood: In the mood for change
|
| posted on January 3rd, 2011 at 12:13 PM |
|
|
Well now that the temp has dropped below 40 I've headed out to keep doing work.
After digging away at stuff I managed to lift up some more sound deadening and found, surprise, surprise, more rust.
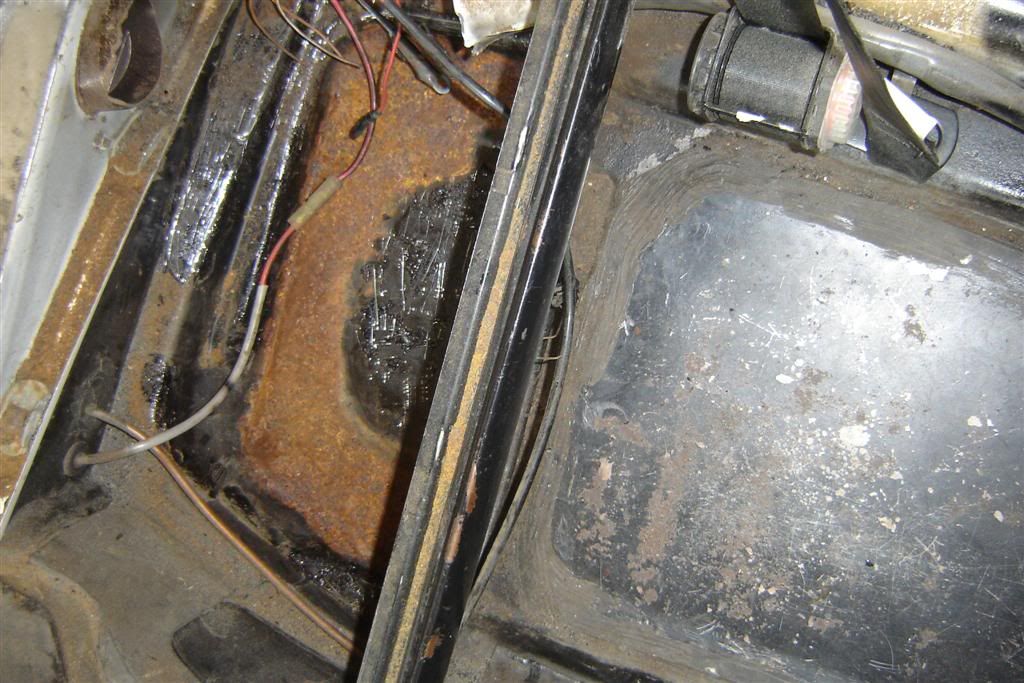
You can see in the photo that the previous owner has commissioned a fairly dodgy repair job higher up the pan, but clearly they decided it would be
best to only fix the visible bits. So much for the rest 
Anyway, whilst cleaning up I noticed that there are a number of wires that seem to have no purpose in life:
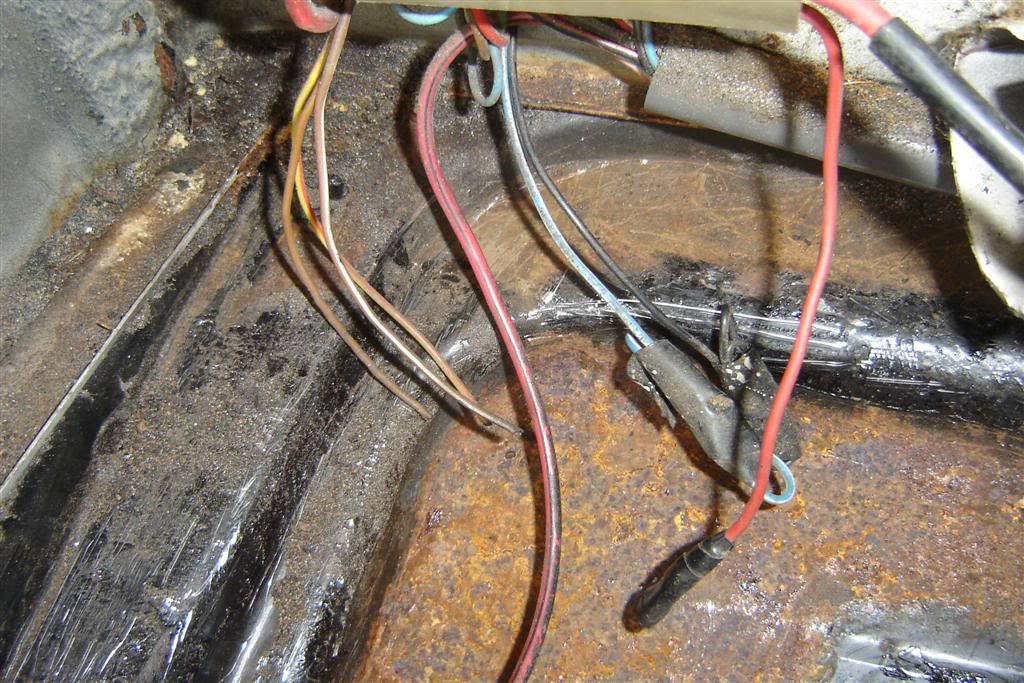
Any idea what these are supposed to be for????
Anyway, better get back to it.
Craig
1969 Beetle - June
1974 L Bug - Gwendolyn
2002 Bora V6 4Motion - Anita
|
|
|
 ian.mezz ian.mezz
Wolfsburg Elder
I never said, I could write or spell
      
Posts: 3913
Threads: 280
Registered: September 11th, 2004
Member Is Offline
Location: Newcastle
Theme: UltimaBB Pro Blue ( Default )
Mood: Happy
|
| posted on January 3rd, 2011 at 12:49 PM |
|
|
looks like wires off of a voltage regular that some beetles have under the seat.
Young JOel will know for sure 
|
|
|
 Joel Joel
Scirocco Rare
Now containing 100% E-Wang
        
Posts: 9368
Threads: 211
Registered: February 14th, 2006
Member Is Offline
Location: Northern Rivers NSW
Theme: UltimaBB Pro Purple
Mood: Tact Level 0.00
|
| posted on January 3rd, 2011 at 01:18 PM |
|
|

The bunch on the left (yellow and browns) is just part of the dealership computer diagnosis system.
Those ones went to the sensors on the battery,
all redundant now which is why someone has chopped them off.
If you find the other ends in the engine bay at the computer plug theyre great for running gauge wires to the engine.
The other ones as Ian said are the old regulator wires, obviously your bug has been fitted with a new internally regulated alternator
|
|
|
 Craig S Craig S
A.k.a.: Craig
Wolfsburg Wizard
  
Posts: 635
Threads: 83
Registered: May 26th, 2008
Member Is Offline
Location: Sunny Western Sydney
Theme: UltimaBB Pro Blue ( Default )
Mood: In the mood for change
|
| posted on January 3rd, 2011 at 01:39 PM |
|
|
Sweet  thanks guys. thanks guys.
Waiting inside now while the storm passes over.
BTW, should I be worried that the chassis number of my rego has the last digit wrong?
1969 Beetle - June
1974 L Bug - Gwendolyn
2002 Bora V6 4Motion - Anita
|
|
|
 Joel Joel
Scirocco Rare
Now containing 100% E-Wang
        
Posts: 9368
Threads: 211
Registered: February 14th, 2006
Member Is Offline
Location: Northern Rivers NSW
Theme: UltimaBB Pro Purple
Mood: Tact Level 0.00
|
| posted on January 3rd, 2011 at 04:12 PM |
|
|
I'd plead ignorance cos they will probably make you pay for an adjustment of records to change it.
My first Sbug was the same, rego papers were 1 digit off, got sorted when I blue slipped it though.
they also had the engine capacity as 181.0cc 
|
|
|
 Craig S Craig S
A.k.a.: Craig
Wolfsburg Wizard
  
Posts: 635
Threads: 83
Registered: May 26th, 2008
Member Is Offline
Location: Sunny Western Sydney
Theme: UltimaBB Pro Blue ( Default )
Mood: In the mood for change
|
| posted on January 30th, 2011 at 08:57 PM |
|
|
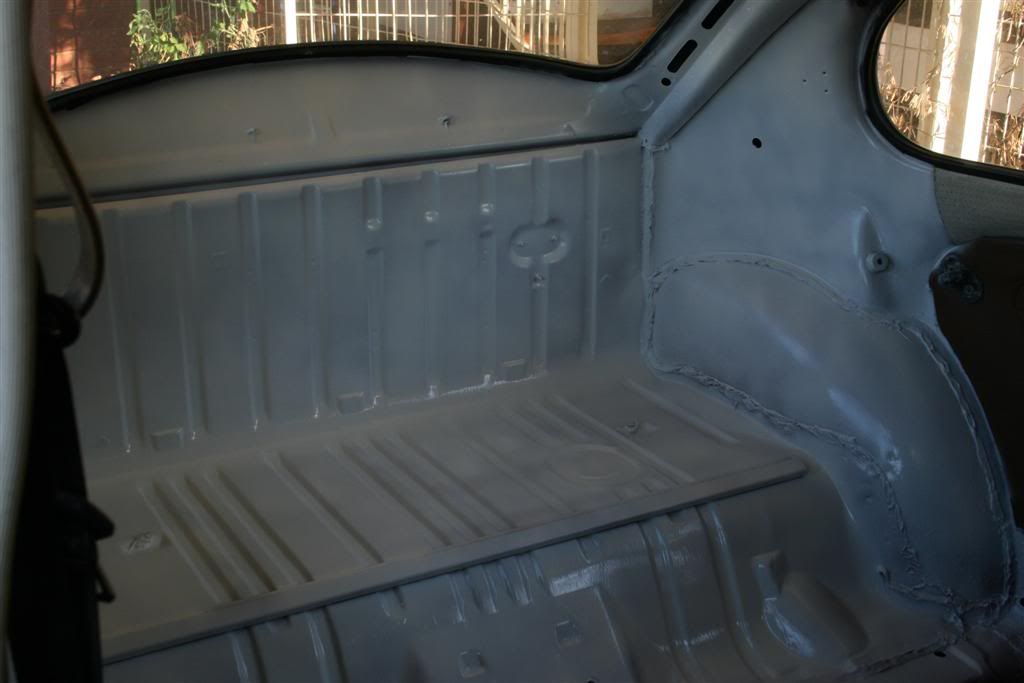
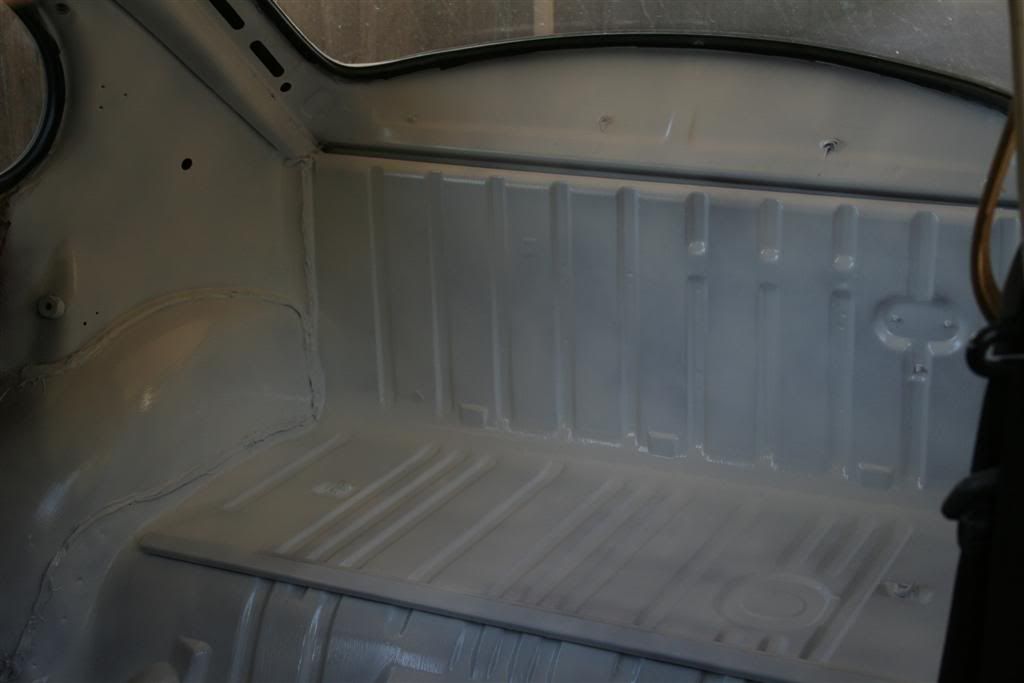
Well I've been doing stuff on the car this weekend, which has been a nice change, given that the last few Fridays something has always come up which
have all unfortunately been more important. The goods news is that this Friday only one thing popped up, and that only cost me about 3 hours. 
So, the inevitable happened, and there were some very small patches of surface rust where I had cut it back to metal  , so out came the wire wheel again and I gave it all a good tidy
up, cleaned everything back, sealed all the seams again, and then started hitting it with rust preventing primer and then a thin coat of white stuff
to make it look pretty until such time as sound deadening and a parcel shelf makes an entrance. , so out came the wire wheel again and I gave it all a good tidy
up, cleaned everything back, sealed all the seams again, and then started hitting it with rust preventing primer and then a thin coat of white stuff
to make it look pretty until such time as sound deadening and a parcel shelf makes an entrance.
So the final result is this:
While I was out there I had a look at a few other things. It's funny how getting one thing done gets you motivated, but then when you look around you
find a thousand other things that need doing, and all of sudden you're feeling down about it. The truth is that the only way to deal with rust and
all the attendant issues is to do a body off resto, but I'm afraid that until I somehow mysteriously acquire a million dollars, I'll just have to
keep doing it bit by bit. 
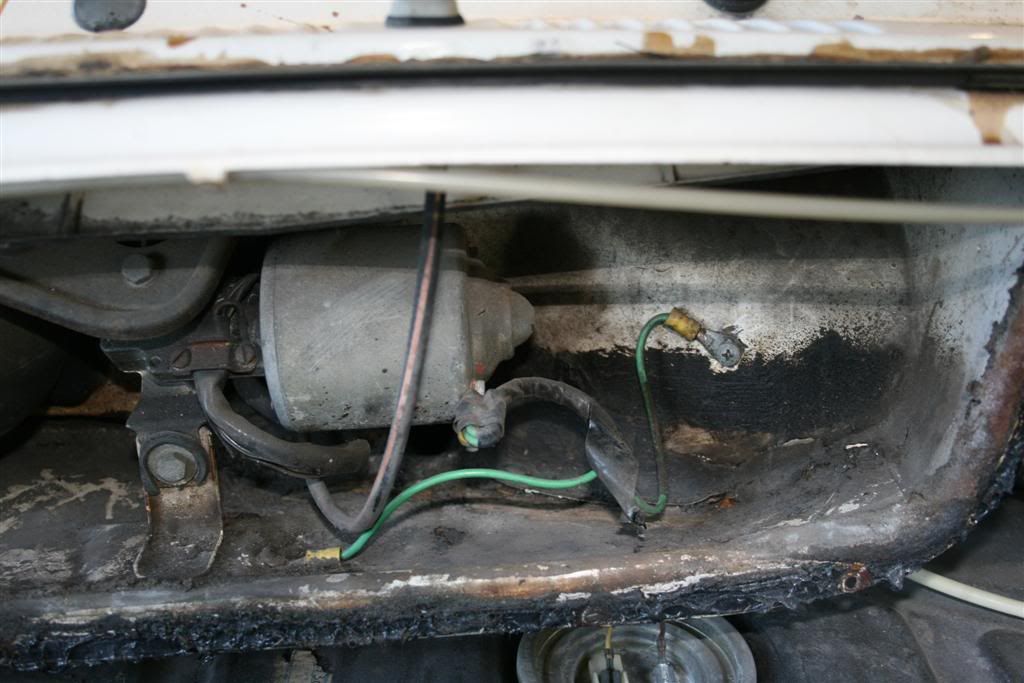
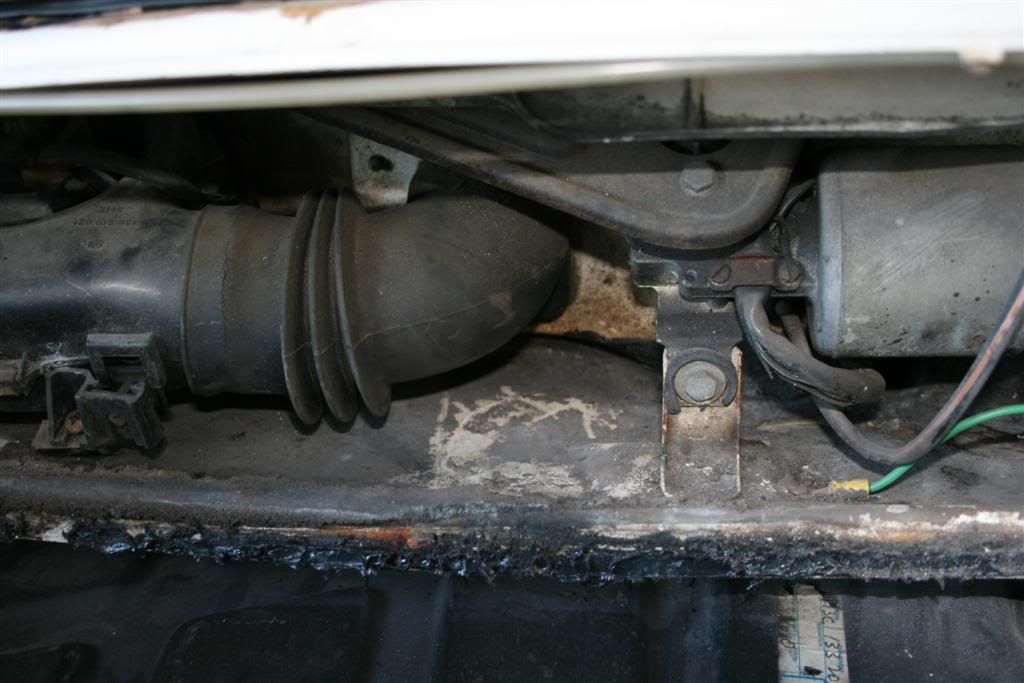
Anyway, after all the dire talk about the airboxes in 1303s, I thought I'd better take mine apart and have a squiz. As expected it was full of leaves
and gumnuts etc, which must date from before I owned it because it spends 99.9% of its parked life sitting in either my garage or the underground
carpark at work.
But, the good news is that it doesn't look too bad. Clearly I'll have to sort it at some stage, but there was nothing too horrible to contemplate
(unless of course I'm missing something, and please let me know if I have):
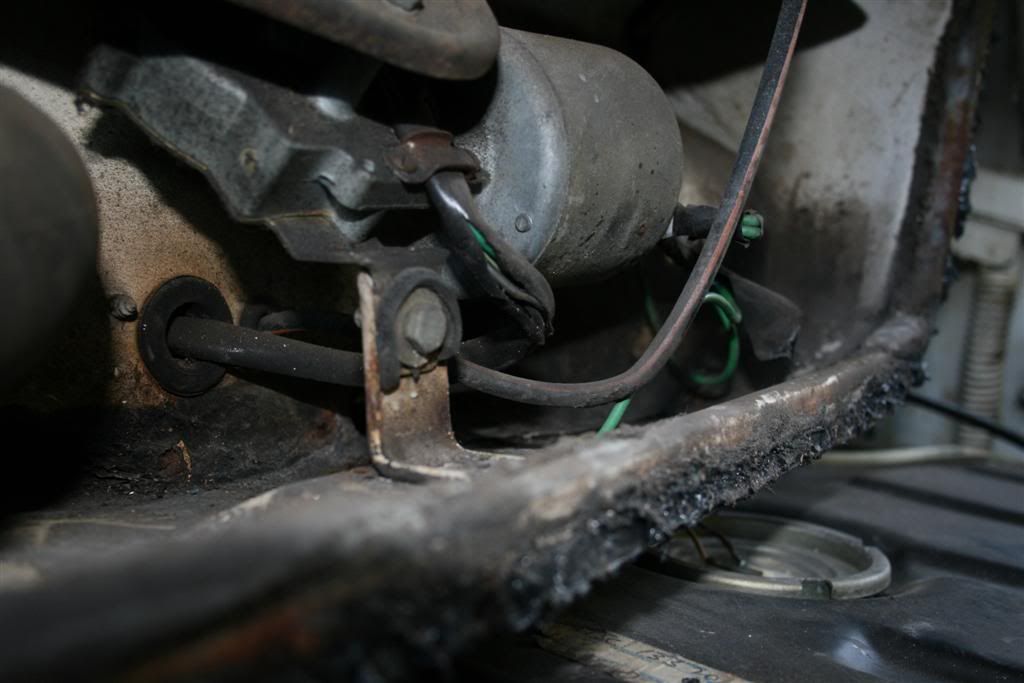
I was trying to figure out where it drains to, so after ducking my head underneath I saw a little plastic tube with a T connector on the end. Is this
where it is (supposed) to drain to, or am I barking up the wrong tree?:
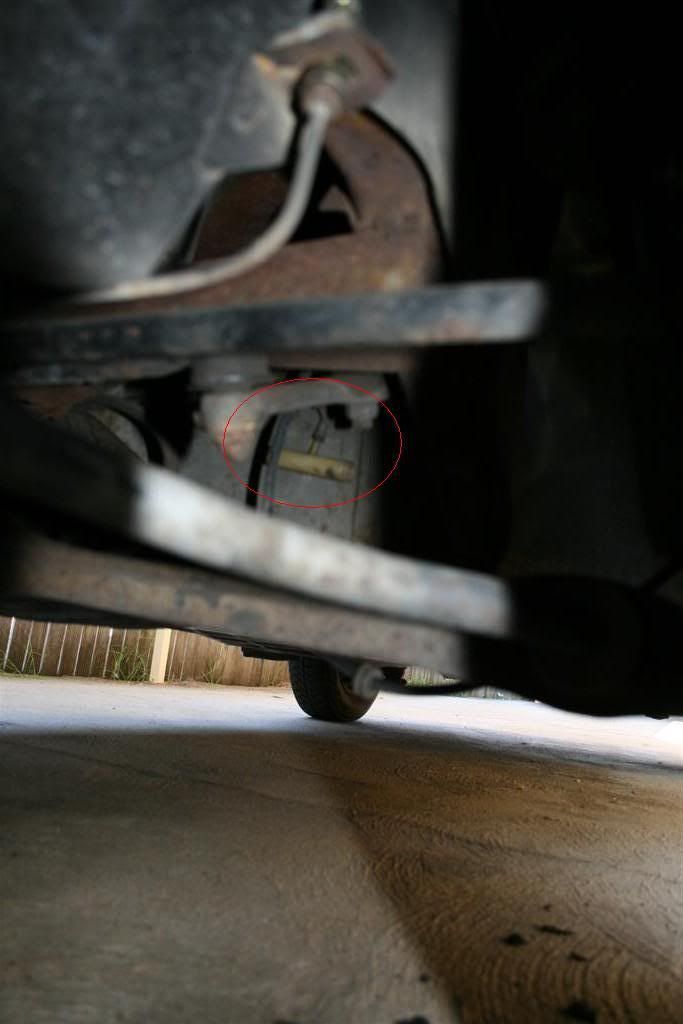
Thanks in advance for any advice (and I hope it isn't telling me what I've done wrong with my painting of the parcel shelf  ) )
Craig
1969 Beetle - June
1974 L Bug - Gwendolyn
2002 Bora V6 4Motion - Anita
|
|
|
 Bizarre Bizarre
Super Moderator
The artist formerly known as blue74l
      
Posts: 12780
Threads: 734
Registered: August 25th, 2002
Member Is Offline
Location: Abbotsford, Sydney
Theme: UltimaBB Pro Blue ( Default )
|
| posted on January 30th, 2011 at 09:16 PM |
|
|
Craig
In your air box I can see black tar paint at the join
In the 3rd pic I can see rust peeking through - not bad but If your diggng round I would dig all that black stuff off and see what is under
There was no black tar from the factory - that has been added
It is to the left of where I have marked that is the problem
It drops away from the drain
If the car is facing uphill this point is lower than the drain
Once it fills with leaves and dust, a wet mud sits at the seam and eats through
As far as I remember the drain comes out in the frame head - as such you cant see it
Shove a hose in the hole in the air box and see what happens
| Error |
| Sorry, you must be a registered user in order to download attachments. |
|
Futue te ipsum!!!
|
|
|
 Craig S Craig S
A.k.a.: Craig
Wolfsburg Wizard
  
Posts: 635
Threads: 83
Registered: May 26th, 2008
Member Is Offline
Location: Sunny Western Sydney
Theme: UltimaBB Pro Blue ( Default )
Mood: In the mood for change
|
| posted on January 30th, 2011 at 09:40 PM |
|
|
Thanks Barry,
I figured that I might have to dig around sooner rather than later. Looks like I get to pull out the wiper motor and the fan to have some fun. Anyone
want to start a book on me not getting them working again on reconnection??  
I also thought I should shove a hose down the hole and see what happens (that sounds worse than I intended    ) )
Best wait until I have someone to yell stop if it starts pouring into the cabin. 
My shopping list of things that need new metal or filling is getting longer and longer. I did sort of promise myself that I'd learn to weld and do
some basic fabrication this year, but it hasn't gotten any further than a nice idea. Perhaps I should do more than just think about that. 
1969 Beetle - June
1974 L Bug - Gwendolyn
2002 Bora V6 4Motion - Anita
|
|
|
 Joel Joel
Scirocco Rare
Now containing 100% E-Wang
        
Posts: 9368
Threads: 211
Registered: February 14th, 2006
Member Is Offline
Location: Northern Rivers NSW
Theme: UltimaBB Pro Purple
Mood: Tact Level 0.00
|
| posted on January 31st, 2011 at 06:12 AM |
|
|
| Quote: | Originally
posted by Craig S
I was trying to figure out where it drains to, so after ducking my head underneath I saw a little plastic tube with a T connector on the end. Is this
where it is (supposed) to drain to, or am I barking up the wrong tree?:
|
Wrong tree, thats the breather hose off the fuel tank.
You cant actually see the end of the drain hose, it comes out just behind the steering damper right in the center of the car.
|
|
|
 Craig S Craig S
A.k.a.: Craig
Wolfsburg Wizard
  
Posts: 635
Threads: 83
Registered: May 26th, 2008
Member Is Offline
Location: Sunny Western Sydney
Theme: UltimaBB Pro Blue ( Default )
Mood: In the mood for change
|
| posted on January 31st, 2011 at 06:53 AM |
|
|
Thanks Joel 
1969 Beetle - June
1974 L Bug - Gwendolyn
2002 Bora V6 4Motion - Anita
|
|
|
 pete wood pete wood
A.k.a.: figure itout
23 Windows of Awesome
       
Posts: 6828
Threads: 389
Registered: January 15th, 2004
Member Is Offline
Location: Nth Nth StMarys, Sydney
Theme: UltimaBB Pro White
Mood: upgrades = jackstands
|
| posted on February 2nd, 2011 at 04:55 PM |
|
|
wow, looks like you got all inspired. well done mate.
BTW, if you want to borrow a grinder and a flapper disc next time, just give me a call. wire wheels are good for some stuff. but the grinder is SOOO
much faster. 
|
|
|
 Craig S Craig S
A.k.a.: Craig
Wolfsburg Wizard
  
Posts: 635
Threads: 83
Registered: May 26th, 2008
Member Is Offline
Location: Sunny Western Sydney
Theme: UltimaBB Pro Blue ( Default )
Mood: In the mood for change
|
| posted on April 2nd, 2011 at 02:53 PM |
|
|
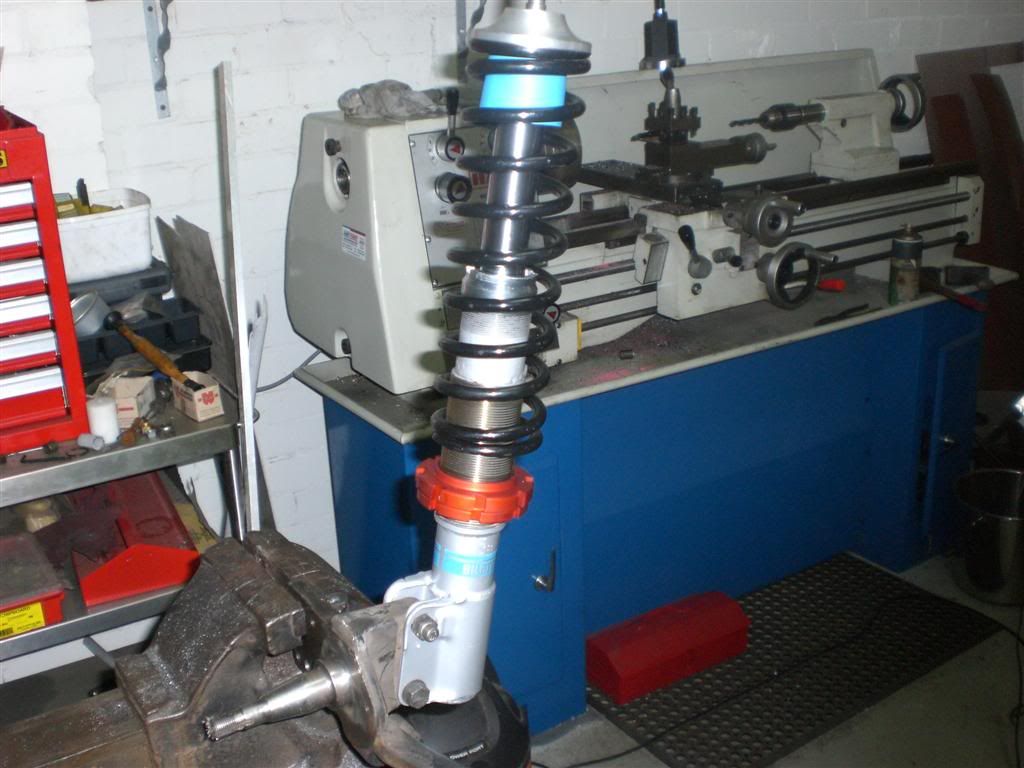
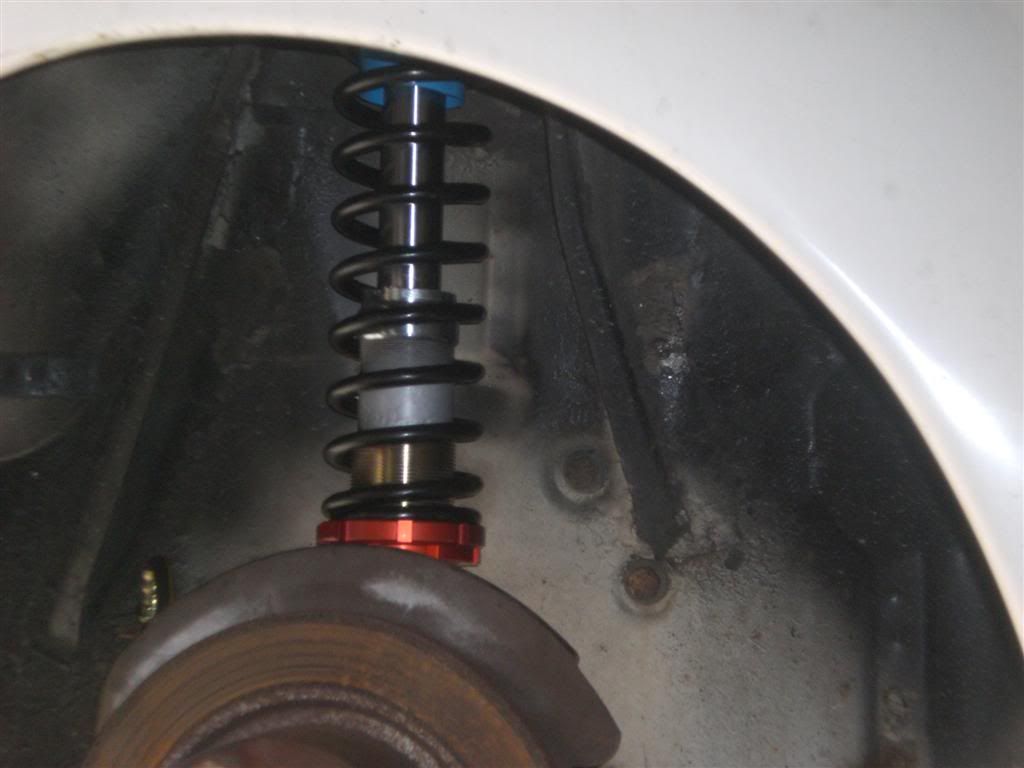
As part of my plan for world domination Gwendolyn is currently in the workshop having some major surgery done.
The surgery basically involves all the suspension, steering and brakes, as well as some other handling things like a kamei style air dam and a strut
brace. Also the shift rod bushing is being done, and my Recaro seats are going in.
So all in all it should be significantly more German Look than previously, but more importantly it should ride and handle much, much better.
Unfortunately funds don't extend to the engine side of things, so I'll continue to potter around in the wheezy 1600 until I can save more funds.
Anyway, enough talk, everyone likes photos, so here are a few of the work in progress:
New Seat frame
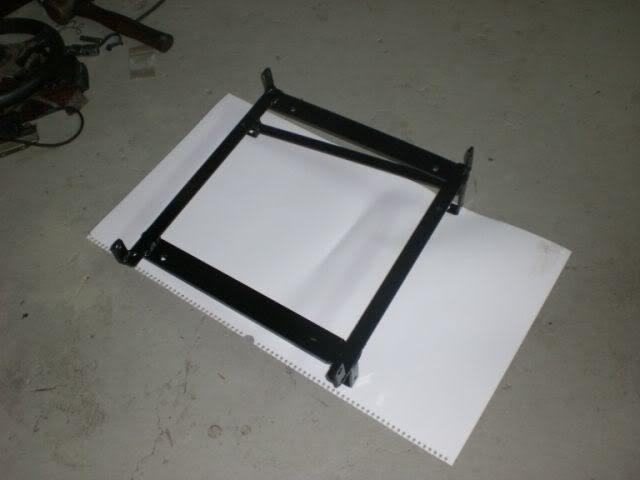
The back end
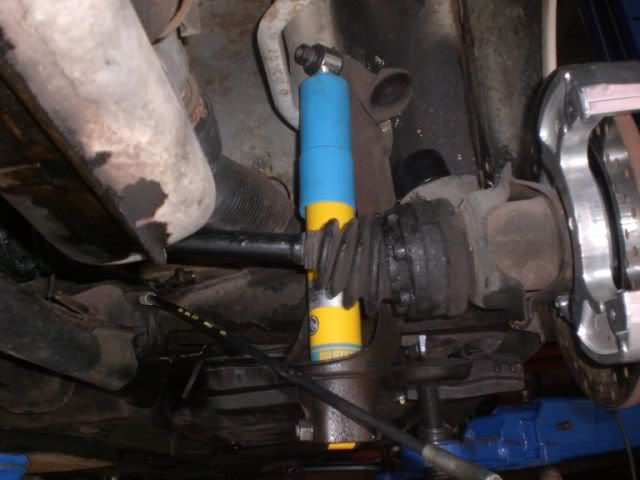
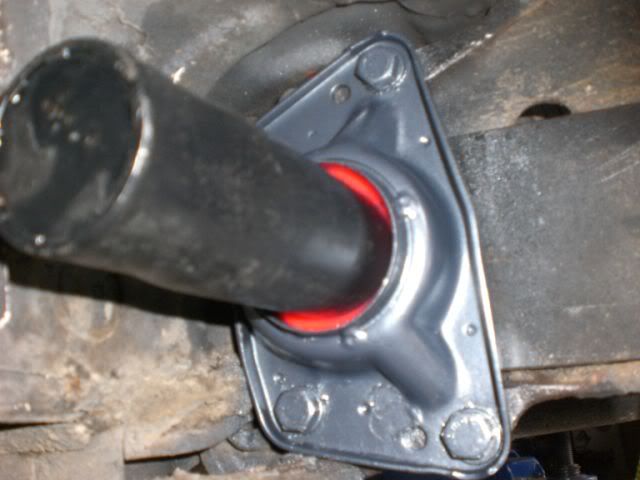
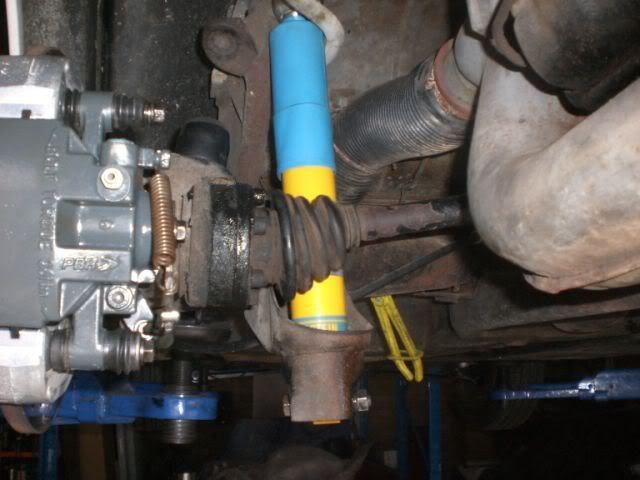
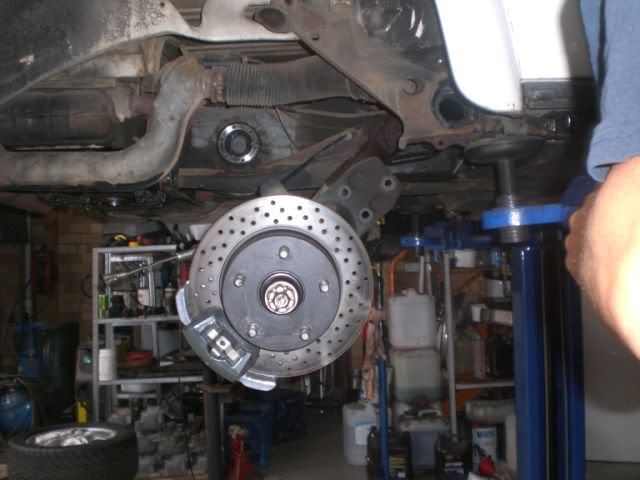
The front end
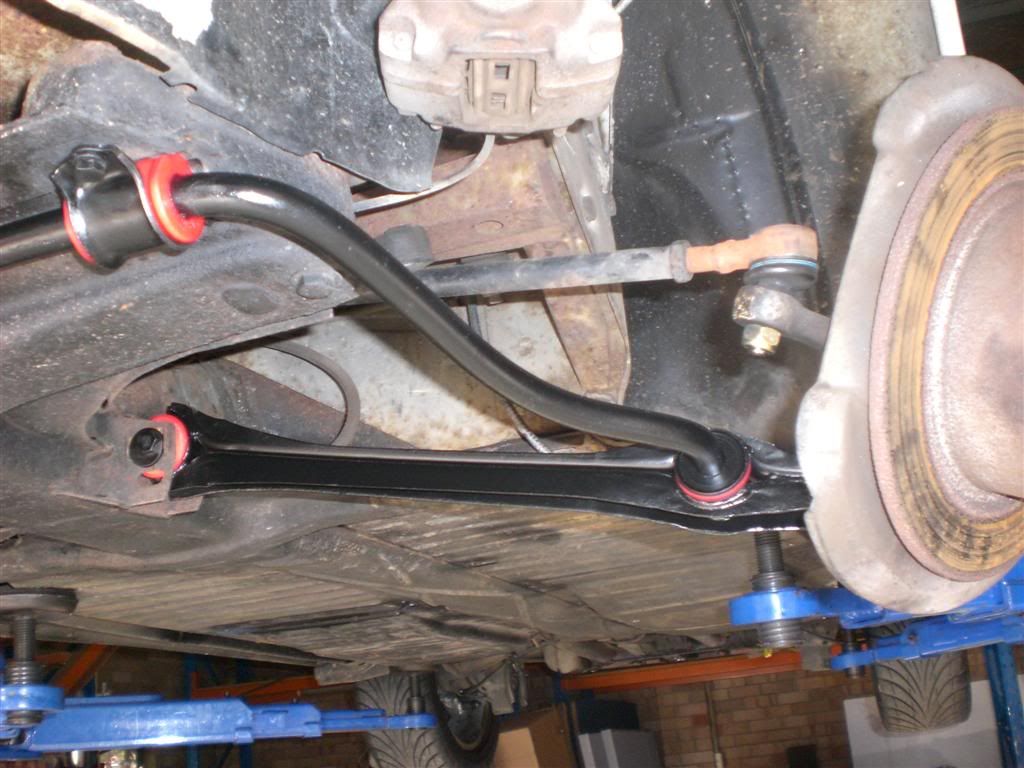
Hopefully more photos aren't too far away, plus some before and after photos of the new look and feel
Cheers
Craig
1969 Beetle - June
1974 L Bug - Gwendolyn
2002 Bora V6 4Motion - Anita
|
|
|
| Pages: 1 2 3 |