| [ Total Views: 4038 | Total Replies: 55 | Thread Id: 73650 ] |
| Pages: 1 2 |
|
|
 nils nils
Fahrvergnugen
   
Posts: 971
Threads: 65
Registered: January 11th, 2008
Member Is Offline
Location: central coast
Theme: UltimaBB Pro Blue ( Default )
|
| posted on January 24th, 2009 at 01:43 PM |
|
|
^^^^^^^^^
why is half of the last reply missing?
Quit calling rust patina
|
|
|
 dangerous dangerous
A.k.a.: Dave Butler Muffin Man
23 Windows of Awesome
       
Posts: 5901
Threads: 178
Registered: January 6th, 2005
Member Is Offline
Location: Gold Coast
Theme: UltimaBB Pro Blue ( Default )
Mood: 591
|
| posted on January 24th, 2009 at 04:05 PM |
|
|
Hi Nils,
not quite sure what you are doing there,
but it may help to know if you are measuring with metric or imperial tools.
To get any sort of accuracy you must use a micrometer.
Digital verniers will not be close enough,
other than seeing if the bearings are the correct ones for the crank ,and case machine work.
If the line bore is 1.25mm,
then 1.5mm backed bearings are too large.
One thou is only 0.0254mm so 0.25mm is too much crush.
Once you have determined the correct bearings,
and made sure there is no dirt, corrosion or dents on the bearings (and case tunnel),
the next step will be to mount the bearings-only in the case
and see how much clearance you have on the crank shaft journals.
If you are confident of the case tunnel being straight,
then any tightness wil reveal its self in a lack of correct oil clearance,
or the radius of the crank machining, ight be binding on the corner of one or more bearings.
Check also that the crank is straight,
by laying it in one half of the case with a bearing shell on the FW and one on the gear main,
and running a dial indicator on the centre main journal,
and then on the nose main as well (pulley end).
I like to run a fresh stanley knife blade over the bearing tunnels on the case
to pick up high spots that are common around the dowel holes.
| Quote: | Originally
posted by westi
That's mad Alan.
|
|
|
|
 nils nils
Fahrvergnugen
   
Posts: 971
Threads: 65
Registered: January 11th, 2008
Member Is Offline
Location: central coast
Theme: UltimaBB Pro Blue ( Default )
|
| posted on January 25th, 2009 at 09:44 AM |
|
|
yeah i was just using old measuring tools of questionable condition, for some reason half of my last reply was deleted. i actully went out and bought
a new micrometer and dial bore
The problem was that they messed up the grind on the front two bearings of the crankshaft, even left them out and torqued it up and.. . . . .
.surprise! it spins! the only reason i didn't check the crank was it was covered in that red gunk, (you know what they say about assumtion)
am trying to work in metric here but, everybody keeps refering me the imp measurements, so i have this horrible half half thing goin on.
BUT, found the problem, wasn't me (turns out, am not as dumb as i look)
so back to it next week
will check to straightness when i get it back, suppose to have done that too, but seeing as how they messed up the grind will be more concisous
Quit calling rust patina
|
|
|
 dangerous dangerous
A.k.a.: Dave Butler Muffin Man
23 Windows of Awesome
       
Posts: 5901
Threads: 178
Registered: January 6th, 2005
Member Is Offline
Location: Gold Coast
Theme: UltimaBB Pro Blue ( Default )
Mood: 591
|
| posted on January 25th, 2009 at 03:42 PM |
|
|
Good to see you sorted out the problem.
That red preservative is common toonly a couple of businesses I know,
so yes, check their work!!
Make sure you clean all that red gunk off the crank before assembly.
Cleanliness is next to godliness.
The parts can never be too clean.
I work in both metric and imperial,
but try too keep within one unit of measurement on each job.
| Quote: | Originally
posted by westi
That's mad Alan.
|
|
|
|
 nils nils
Fahrvergnugen
   
Posts: 971
Threads: 65
Registered: January 11th, 2008
Member Is Offline
Location: central coast
Theme: UltimaBB Pro Blue ( Default )
|
| posted on February 12th, 2009 at 06:05 PM |
|
|
finally got my crank back (again) and had my case checked again after being told that the bore maybe too small. which the guy said it wasn't, but
strangly the surfaces have been touched up. . . . . . . . . . have now put in the crank and bearings, torqued them down and, HOORAY! perfect smooth,
easy turn
now the downers. .. . .. . . the case guy wanted the bearings in the case and the crank to check against, long story short only came back with 4 dowel
pins
so won't have that till the weekend. bum
Quit calling rust patina
|
|
|
 eraser eraser
Fahrvergnugen
   
Posts: 970
Threads: 128
Registered: March 11th, 2005
Member Is Offline
Location: Adelaide
Theme: UltimaBB Pro Powder
|
| posted on February 12th, 2009 at 07:00 PM |
|
|
keep the info and the pics coming. i got all my stuff ground etc but havent even thought about putting it back together yet 
|
|
|
 nils nils
Fahrvergnugen
   
Posts: 971
Threads: 65
Registered: January 11th, 2008
Member Is Offline
Location: central coast
Theme: UltimaBB Pro Blue ( Default )
|
| posted on February 16th, 2009 at 07:51 PM |
|
|
OK! got all the parts and i know for sure it all fits now! How long ago was it that i started this?
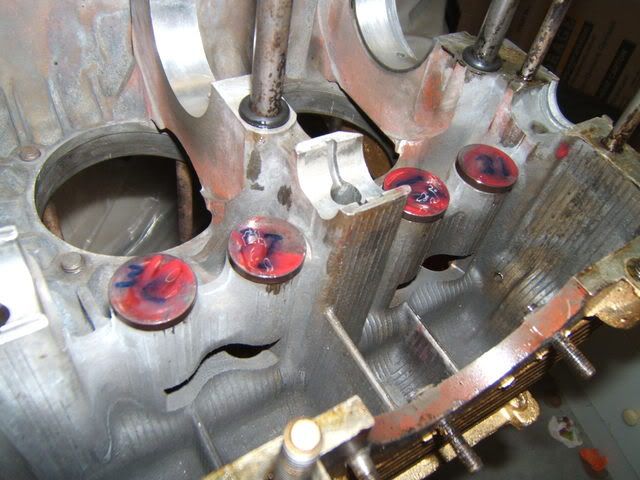
lifters in, (yes i know the lifters are numbered wrong, i picked that up staight after i took these photos)
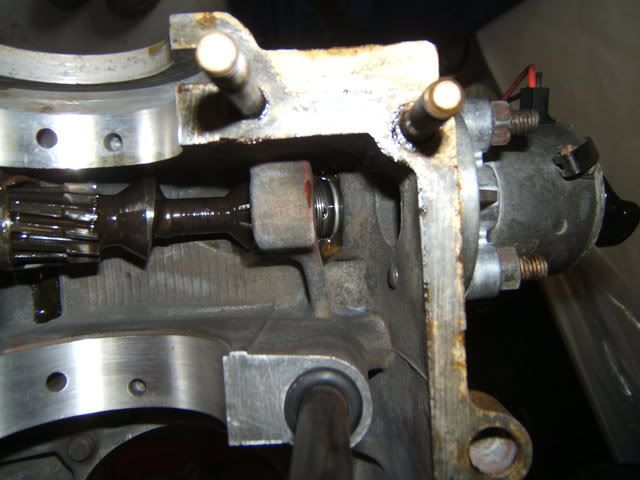
dizzy and drive
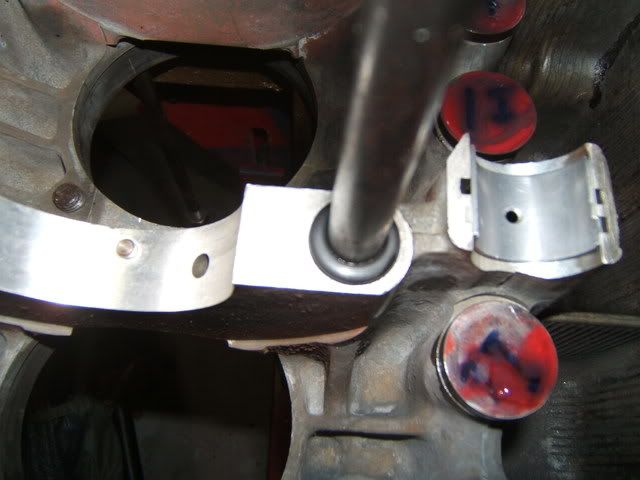
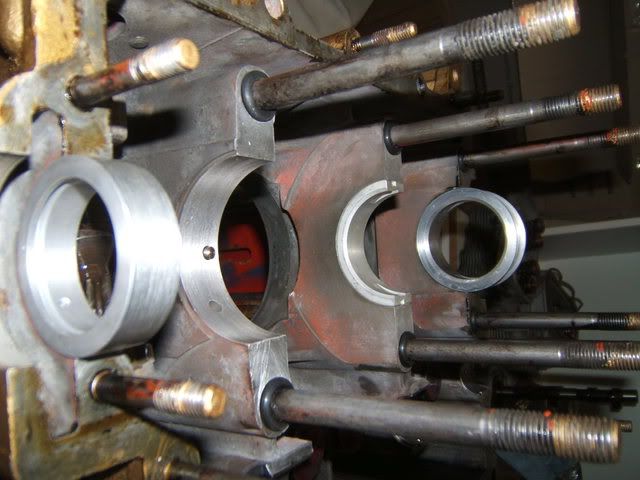
bearings seated and MARKED 
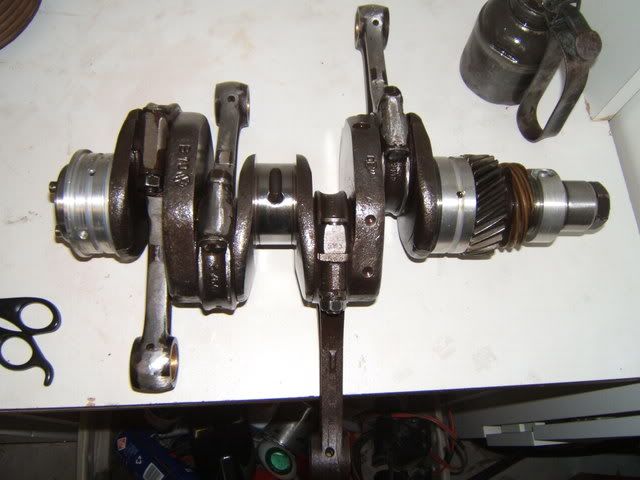
crank assembled
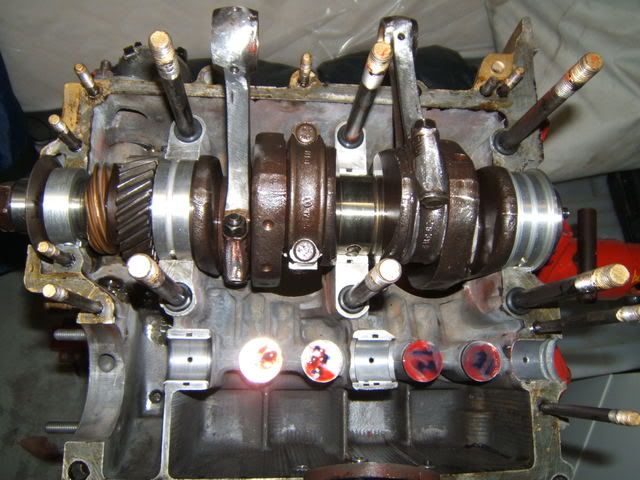
crank in
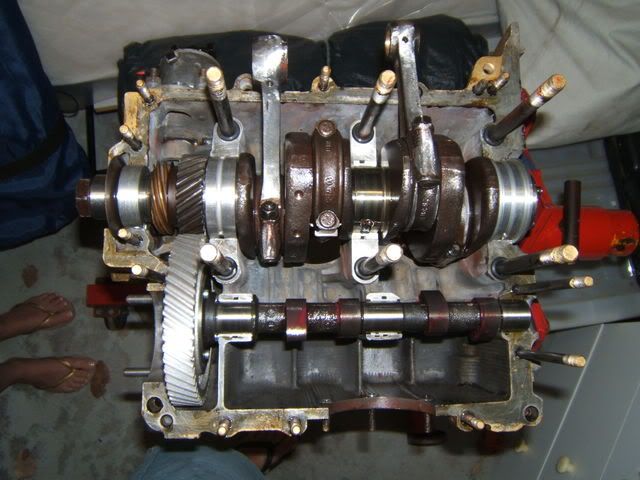
cam in on the marks (torqued the other half at this piont to check fee spin again - IS GOOD!)
I know that the cam plug, other half lifters and the surge plate are still to go in, but anything else you lot can pick up before i close up tomorrow?
Quit calling rust patina
|
|
|
 hellbugged hellbugged
A.k.a.: Daimo Pell
23 Windows of Awesome
48's and straight cuts
       
Posts: 5080
Threads: 116
Registered: April 17th, 2003
Member Is Offline
Location: Nambucca Valley NSW
Theme: UltimaBB Psyche Blue
Mood: Couldn't care less
|
| posted on February 16th, 2009 at 09:05 PM |
|
|
dizzy doesn't look to be down far enough/engaged properly........... and turn it round so the oiling slot is in the window there where you can see
it
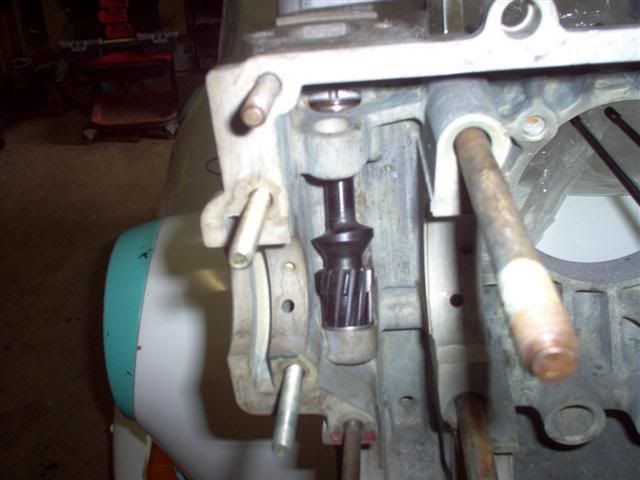
and your friends nail , second toe on the left foot needs some TLC
|
|
|
 matberry matberry
Super Moderator
Go hard or go home
      
Posts: 8114
Threads: 134
Registered: March 7th, 2006
Member Is Offline
Location: Cooroy Qld
Theme: UltimaBB Pro Blue
Mood: enjoying waving at all my Kombi buddies from my T3
|
| posted on February 16th, 2009 at 09:29 PM |
|
|
Sealing area (case joint) clean enough? Hard to tell in photo's.
Oh, and well done on the eagle eye to Daimo......the manicure king 
Matt Berry Motorsports...air cooled advice, repairs and mods Ph 0408 704 662
OFF-ROAD,CIRCUIT,DRAG,STREET,ENDURANCE
 |
|
|
 nils nils
Fahrvergnugen
   
Posts: 971
Threads: 65
Registered: January 11th, 2008
Member Is Offline
Location: central coast
Theme: UltimaBB Pro Blue ( Default )
|
| posted on February 17th, 2009 at 05:50 PM |
|
|
Diamo was right! the dizzy wasn't far enough down - nice pick up
And Matt you're right too i had't cleaned the surfaces yet. thought i had some metho, turns out i didn't. picked some up on the way home
(can't put anything past you guys!) - THANKS
and Matt, is it technically a peticure? probably due to my 2 left feet standing on them on the weekend (are my girls feet, was taking the photo as she came down and ask if i was coming up for dinner) (are my girls feet, was taking the photo as she came down and ask if i was coming up for dinner)
- sorry again about not catching up with you at dubs/ totally spaced
Aside from those small indiscretions it went together today no drama (might still put a bit of permatex around the the main bolts now that i think of
it)
Tomorrow - rings (maybe get the piston and barrels on too, see when i finish work)
Quit calling rust patina
|
|
|
 nils nils
Fahrvergnugen
   
Posts: 971
Threads: 65
Registered: January 11th, 2008
Member Is Offline
Location: central coast
Theme: UltimaBB Pro Blue ( Default )
|
| posted on February 22nd, 2009 at 08:47 PM |
|
|
Finally got some time to get somethings done on the engine this afternoon, (been on the gold coast, from friday)
The rings checked out ok, definatly be the last time that the pistons/barrels are used. Not sure what it will do to the longevity of the motor,
because the pistons were right on the end of the wear limit my ring gaps all came up between 0.45-0.5 (specifications say .25-.45 with .9 as a
limit,
still better than my old rings! think this is why it blew oil?
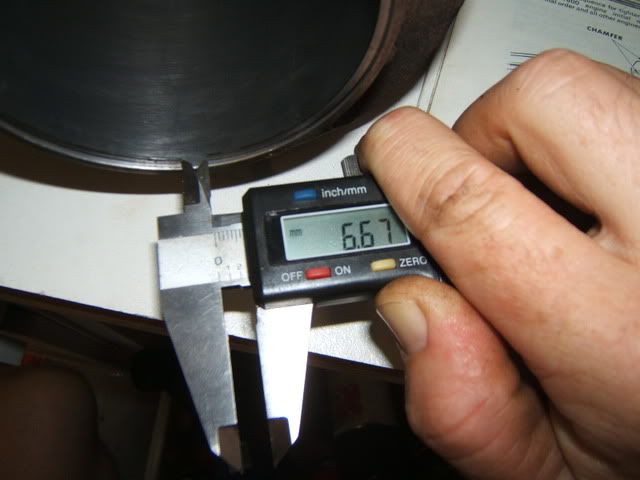
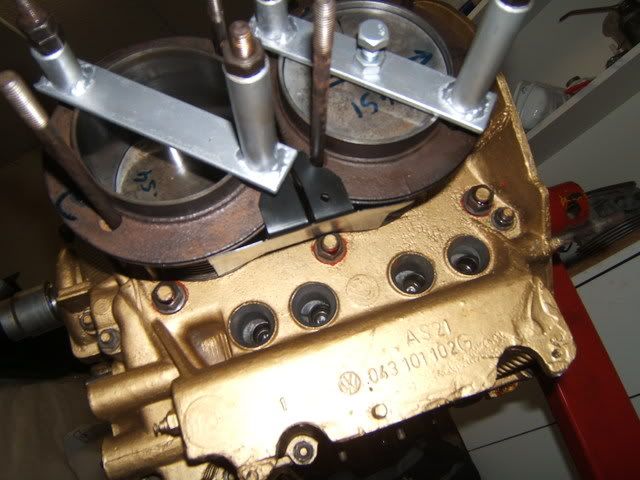
didn't have too much time but have the barrels on now and new deflector tins (old ones rusted and fell off a while back)
and for those who worry about the cleanliness of my work space, here its is
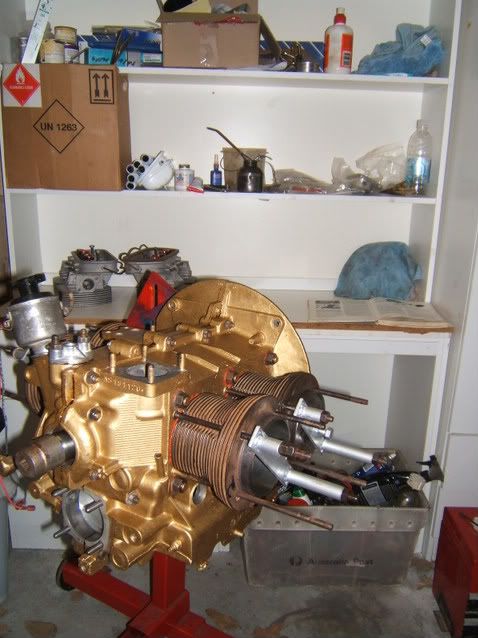
Quit calling rust patina
|
|
|
 eraser eraser
Fahrvergnugen
   
Posts: 970
Threads: 128
Registered: March 11th, 2005
Member Is Offline
Location: Adelaide
Theme: UltimaBB Pro Powder
|
| posted on February 22nd, 2009 at 09:22 PM |
|
|
Keep up the good work.
|
|
|
 vwsteve vwsteve
A.k.a.: steve
Veteran Volks Folk
karmann crazy
    
Posts: 2087
Threads: 200
Registered: July 25th, 2006
Member Is Offline
Location: Redcliffe QLD
Theme: UltimaBB Pro Navy
Mood: Busy!
|
| posted on February 23rd, 2009 at 09:03 AM |
|
|
.
i think i can see a little dust down on the left hand far corner under the cupboard there nills, you may need to give it a little sweep up
1 1963 356b porsche coupe
2 1960 karmann ghia cab
1 1965 karmann ghia cab
1 1966 karmann cab
1 1961 split ute
1 1967 split p/van
1 1952 standard bug
1 1963 ragtop
1 1960 ragtop
2 1954 ovals
1 1956 oval baja project
1 1957 oval flying flea
|
|
|
 Boozo Boozo
Officially Full-On Dubber
Back in the bug
  
Posts: 359
Threads: 34
Registered: September 9th, 2007
Member Is Offline
Location: Morayfield Queensland
Theme: UltimaBB Pro Black
Mood: cruisy
|
| posted on February 23rd, 2009 at 03:30 PM |
|
|
i think steves right, i see it too :p
[size=4] '59 or Kombi?....feeling confused [/size]
'59 bug
'68 bug
'82 import T3 BUS. aircooled
|
|
|
 nils nils
Fahrvergnugen
   
Posts: 971
Threads: 65
Registered: January 11th, 2008
Member Is Offline
Location: central coast
Theme: UltimaBB Pro Blue ( Default )
|
| posted on February 24th, 2009 at 07:34 PM |
|
|
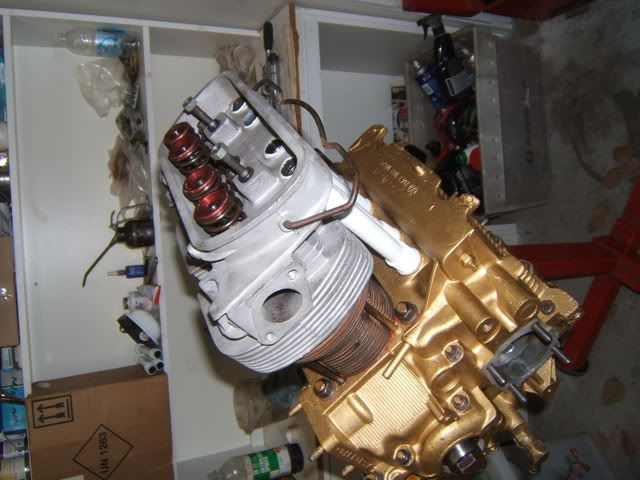
got locked out of the house today. BUT, gave me a chance to work on the engine in the garage!
Checking the deck hieght and TDC seemed a little over the top for and engine that is pretty much stock. Besides it is the same parts, in the same
places as last time and took a beating! So once it all went around and the arrows where all pionting the right direction, glued and fastened then
down.
Stretched the tubes, new seals and put the heads on. easy. checked the push rods for straightness and put them back where they came from.
Then looked at the rockers (still the stockers) are quite warn on the feet and even the shims could use a bit use a bit of attention. So a few
questions, can i get decent quality feet and shims? - am not game enough to put empi or scat parts in my engine
Or, am i better off spending some coin on some after market rockers to get rid of those silly clips?
Any suggestions? (keeping in mind this is for a baja, torque over HP)
Quit calling rust patina
|
|
|
 nils nils
Fahrvergnugen
   
Posts: 971
Threads: 65
Registered: January 11th, 2008
Member Is Offline
Location: central coast
Theme: UltimaBB Pro Blue ( Default )
|
| posted on March 6th, 2009 at 06:14 PM |
|
|
have the rocker gear sorted now and am just waiting for it to show up, matt hooked me up with some swivel feet adjusters and a rocker shaft kit to get
rid of those clips.
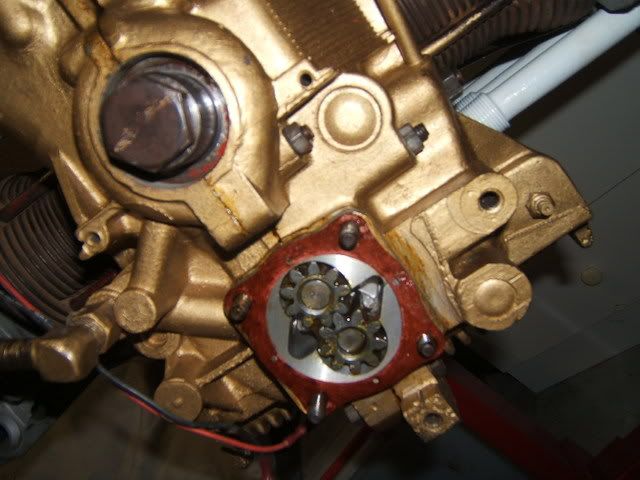
In the mean time have been putting on a few of the other bits like the oil cooler and new oil pump. Went for a 26mm pump this time arround because
of the starvation that i got at continued high revs (really sucks when you are in a really boggy situation and you have to stop and get bogged so that
your engine doesn't blow up!) anybody want a 30mm?
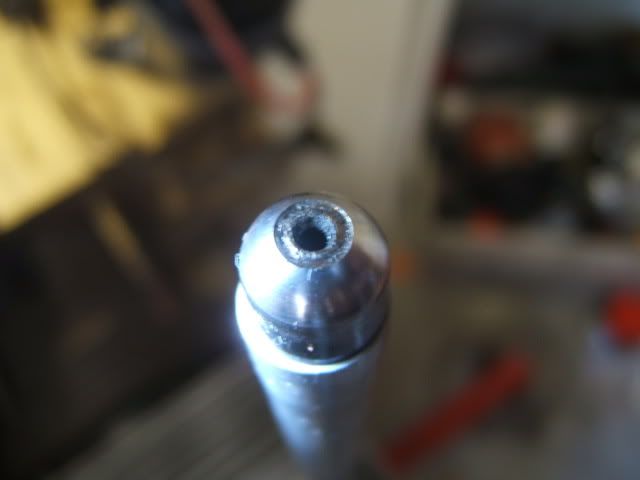
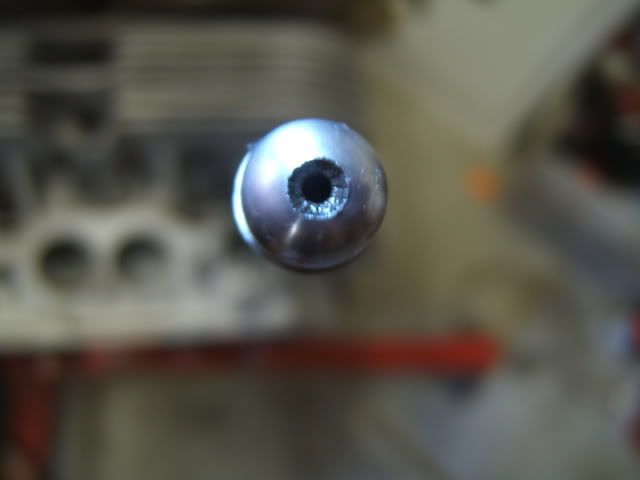
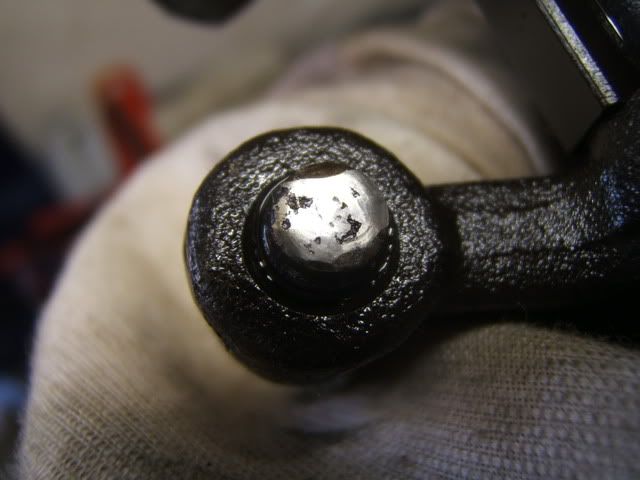
Did a good measure up and look over the rocker gear that i have, This is what worn out push rods and adjusters look like?
Quit calling rust patina
|
|
|
 eraser eraser
Fahrvergnugen
   
Posts: 970
Threads: 128
Registered: March 11th, 2005
Member Is Offline
Location: Adelaide
Theme: UltimaBB Pro Powder
|
| posted on March 7th, 2009 at 09:36 PM |
|
|
wow cool thanks for the update.. and now i know what the worn stuff looks liek :P
|
|
|
 nils nils
Fahrvergnugen
   
Posts: 971
Threads: 65
Registered: January 11th, 2008
Member Is Offline
Location: central coast
Theme: UltimaBB Pro Blue ( Default )
|
| posted on March 9th, 2009 at 07:58 PM |
|
|
Actually had no idea push rods could wear out, or more to the piont beak down. so i thought it was interesting 
have this ever growing list of little things that i need -
- sand sealed pulley kit, nobody seems to know if the kit that you can buy are any good
- 6 of those thick washers that hold the heads down
- woodruff key for the front of the crank, crank came back without it after the second grind (knew i should have popped it out myself ) )
hey matt, any news on that rocker gear?
Quit calling rust patina
|
|
|
 nils nils
Fahrvergnugen
   
Posts: 971
Threads: 65
Registered: January 11th, 2008
Member Is Offline
Location: central coast
Theme: UltimaBB Pro Blue ( Default )
|
| posted on May 6th, 2009 at 08:20 PM |
|
|
Jeez, its been awhile. . . . . . . . .been working on the baja that this thing goes in. The engine has taken a bit of a back seat seeing as how
without a car to put it in is no real piont having an engine.
Got those silly washers i've been chasing so the heads are finally bolted down, and now that i have them bolted down am concidering taking them
apart again. Have been looking at the match, or rather the mismatch of the porting of the head to manifold. Is it really worth grinding the ports with
such a mild engine? what kind of gains can i expect? and it is as easy as just taking the valves out and getting in there with a bur and flapper on a
die grinder?
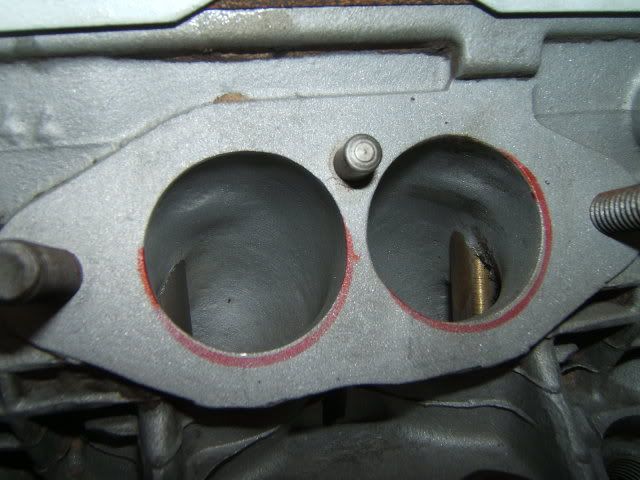
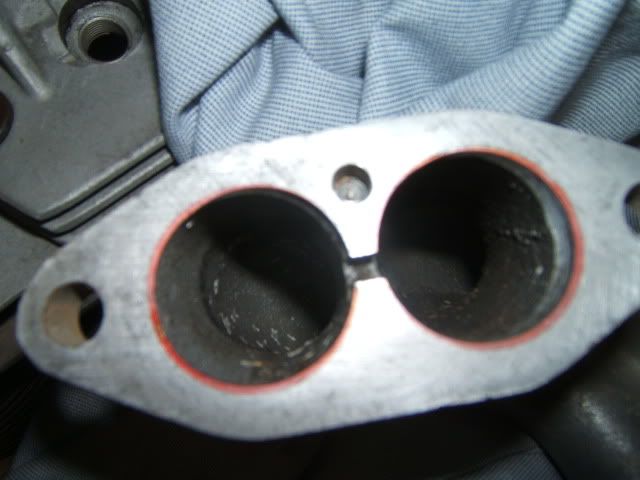
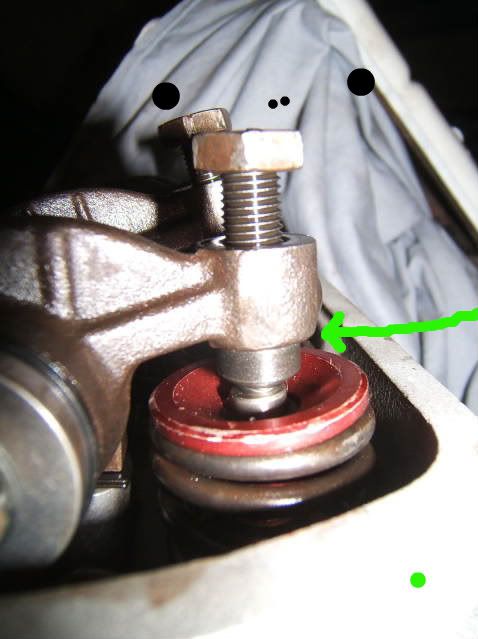
Got my rocker gear, and have had a bit of a fiddle trying to work out the geometery and get my head around the whole concept. With the swivel feet,
being alot bigger i have been told that i have to grind the bottoms of the rocker arms,
This little step here right?
Lastly, in the solid rocker shaft kit there are 2 washers with cutouts in them, thoughts? i got nothing
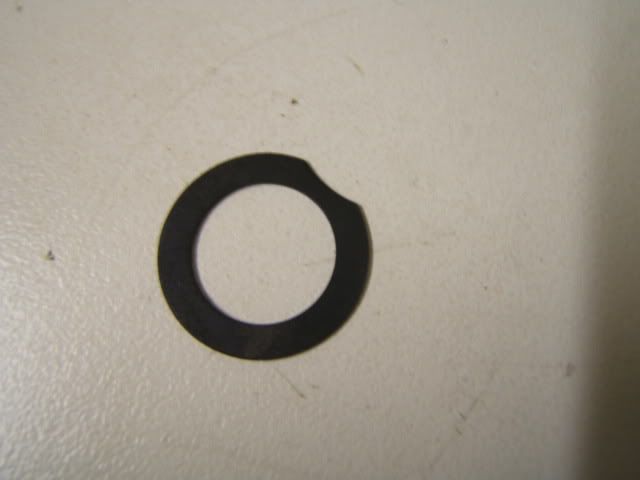
Quit calling rust patina
|
|
|
 matberry matberry
Super Moderator
Go hard or go home
      
Posts: 8114
Threads: 134
Registered: March 7th, 2006
Member Is Offline
Location: Cooroy Qld
Theme: UltimaBB Pro Blue
Mood: enjoying waving at all my Kombi buddies from my T3
|
| posted on May 6th, 2009 at 10:19 PM |
|
|
The notch on the shim goes where there is interference with the rocker stand.
Porting?.....mmmm any gain is worth it, but now it's all together I probably would leave it alone this time.
Matt Berry Motorsports...air cooled advice, repairs and mods Ph 0408 704 662
OFF-ROAD,CIRCUIT,DRAG,STREET,ENDURANCE
 |
|
|
 vwsteve vwsteve
A.k.a.: steve
Veteran Volks Folk
karmann crazy
    
Posts: 2087
Threads: 200
Registered: July 25th, 2006
Member Is Offline
Location: Redcliffe QLD
Theme: UltimaBB Pro Navy
Mood: Busy!
|
| posted on May 7th, 2009 at 06:21 AM |
|
|
.
I bought swivel feet adjusters once too and had the same problem, could not get a gap so i sent them back, stuff it!
1 1963 356b porsche coupe
2 1960 karmann ghia cab
1 1965 karmann ghia cab
1 1966 karmann cab
1 1961 split ute
1 1967 split p/van
1 1952 standard bug
1 1963 ragtop
1 1960 ragtop
2 1954 ovals
1 1956 oval baja project
1 1957 oval flying flea
|
|
|
 nils nils
Fahrvergnugen
   
Posts: 971
Threads: 65
Registered: January 11th, 2008
Member Is Offline
Location: central coast
Theme: UltimaBB Pro Blue ( Default )
|
| posted on May 11th, 2009 at 09:16 PM |
|
|
cut down the rockers this weekend so it all fits, i would like to have made it all fit without the spacers on the studs. I would think that with
standard rockers and valves the whole thing would not have to move. but i have not measured the mid point and angles yet so time will tell. I can't
cut anymore off the arms, because i am already worried about the oiling hole in the swivel adjuster not lining up. I cut off a total of 2.5mm of each,
as you can see was barely enough on some.
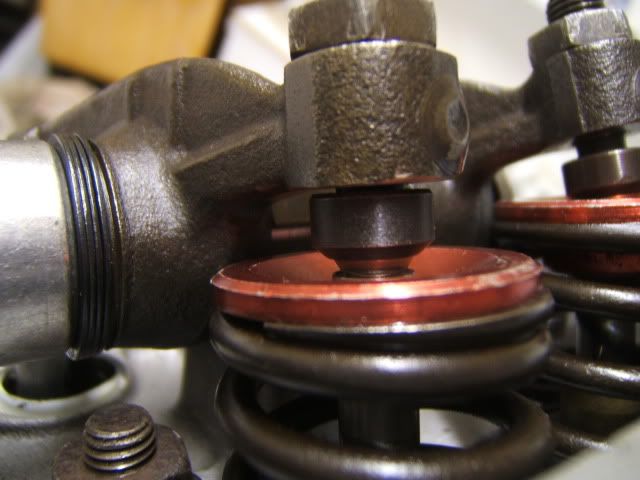
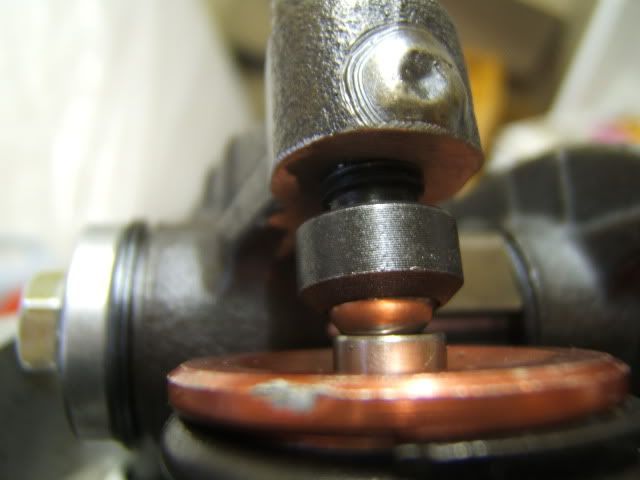
and yes steve, they don't bolt straight up. The heads of the adjusters are HUGE that space needs to come from somewhere 
Quit calling rust patina
|
|
|
 Boozo Boozo
Officially Full-On Dubber
Back in the bug
  
Posts: 359
Threads: 34
Registered: September 9th, 2007
Member Is Offline
Location: Morayfield Queensland
Theme: UltimaBB Pro Black
Mood: cruisy
|
| posted on May 11th, 2009 at 09:56 PM |
|
|
wow, ive got swivel feet on mine too but never noticed the arms needed to be shaved to make it fit, what a stupid idea, how hard would it have been to
make them right in the first place??
or am i missing something here?
[size=4] '59 or Kombi?....feeling confused [/size]
'59 bug
'68 bug
'82 import T3 BUS. aircooled
|
|
|
 nils nils
Fahrvergnugen
   
Posts: 971
Threads: 65
Registered: January 11th, 2008
Member Is Offline
Location: central coast
Theme: UltimaBB Pro Blue ( Default )
|
| posted on May 12th, 2009 at 05:50 AM |
|
|
no silly you have ratio rockers that where build correct in the first place, these are just modified original rockers
Quit calling rust patina
|
|
|
 Boozo Boozo
Officially Full-On Dubber
Back in the bug
  
Posts: 359
Threads: 34
Registered: September 9th, 2007
Member Is Offline
Location: Morayfield Queensland
Theme: UltimaBB Pro Black
Mood: cruisy
|
| posted on May 12th, 2009 at 11:56 AM |
|
|
oh i see, cheapskate 
[size=4] '59 or Kombi?....feeling confused [/size]
'59 bug
'68 bug
'82 import T3 BUS. aircooled
|
|
|
 nils nils
Fahrvergnugen
   
Posts: 971
Threads: 65
Registered: January 11th, 2008
Member Is Offline
Location: central coast
Theme: UltimaBB Pro Blue ( Default )
|
| posted on May 26th, 2009 at 04:14 PM |
|
|
been playing with the rockers a bit of late, have 2 shims under the rockers and these are the best photos i could get of them at half lift. think i am
close, what do you guys think?
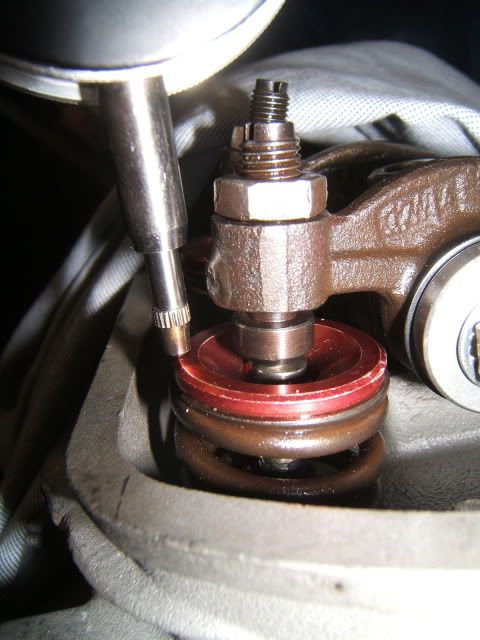
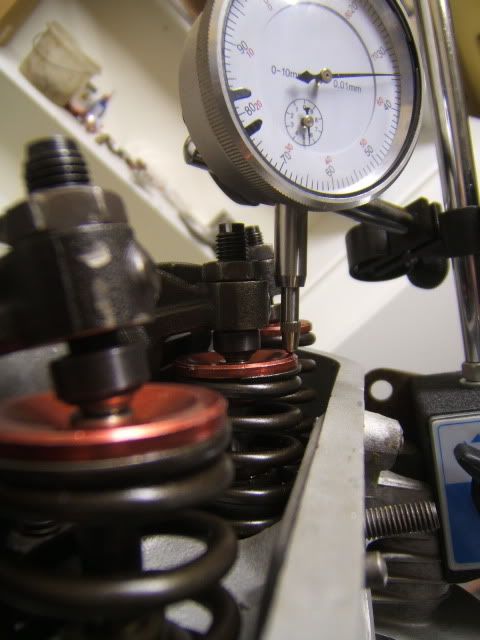
Quit calling rust patina
|
|
|
| Pages: 1 2 |