| [ Total Views: 2194 | Total Replies: 73 | Thread Id: 90980 ] |
| Pages: 1 2 3 |
|
|
 Luke Luke
Slammed & Awesome Dubber
 
Posts: 78
Threads: 9
Registered: June 21st, 2010
Member Is Offline
Theme: UltimaBB Pro Blue ( Default )
|
| posted on September 12th, 2010 at 07:07 PM |
|
|
Out with the old pans and getting ready for the new which I picked up over the weekend. Someone has welded a big lumpy bead right over the spot welds
where the pan meets the chassis. Taking forever to grind off. Being careful not to grind the lip where the pan sits.
| Error |
| Sorry, you must be a registered user in order to download attachments. |
|
| Error |
| Sorry, you must be a registered user in order to download attachments. |
|
| Error |
| Sorry, you must be a registered user in order to download attachments. |
|
|
|
|
 Luke Luke
Slammed & Awesome Dubber
 
Posts: 78
Threads: 9
Registered: June 21st, 2010
Member Is Offline
Theme: UltimaBB Pro Blue ( Default )
|
| posted on September 21st, 2010 at 07:22 PM |
|
|
Finished grinding out the old pans. The left was welded along the trunk and took a shit load of grinding. Added a little primer to stop the surface
rust, only temporay until it is blasted off. I don't know if it is the right thing to do, but when I take the rear axle assembly off I am going to
degrease the whole lot then hit it with a gurney. There is just so much crap inside of it and I am anal so I want it clean.
Trial fitting the new pans. They go in okay. A little bit of panel beating to seat the rear in. There is a gap between the pan and the lip it sits
on. Ill sort that before it is tacked in.
| Error |
| Sorry, you must be a registered user in order to download attachments. |
|
| Error |
| Sorry, you must be a registered user in order to download attachments. |
|
| Error |
| Sorry, you must be a registered user in order to download attachments. |
|
|
|
|
 Luke Luke
Slammed & Awesome Dubber
 
Posts: 78
Threads: 9
Registered: June 21st, 2010
Member Is Offline
Theme: UltimaBB Pro Blue ( Default )
|
| posted on September 21st, 2010 at 07:26 PM |
|
|
My new welder. It's awsome.
| Error |
| Sorry, you must be a registered user in order to download attachments. |
|
|
|
|
 t_tuffnut t_tuffnut
Wolfsburg Wizard
  
Posts: 425
Threads: 70
Registered: June 14th, 2009
Member Is Offline
Location: NSW Central Coast
Theme: UltimaBB Streamlined2
Mood: Rust free for 12 months
|
| posted on October 3rd, 2010 at 07:44 AM |
|
|
Great looking welder set up!
I ended up hiring one for the small amount of welding I needed done in the end.
how did you get your pedals that clean? Was it just the sand blasting or did you polish them up as well?
Great build progress!
|
|
|
 Luke Luke
Slammed & Awesome Dubber
 
Posts: 78
Threads: 9
Registered: June 21st, 2010
Member Is Offline
Theme: UltimaBB Pro Blue ( Default )
|
| posted on October 3rd, 2010 at 07:08 PM |
|
|
Hi mate.
Hit the pedals with wire brush on drill set up in a vice. That took all the rubbery black paint coating them off. Then used different grades of wet
and dry over a file. I originally intended to plate them but now just going to powder them. The body should be back from the blasters next week then
it's the chassis turn. I'll post some more progress picks. 
|
|
|
 Luke Luke
Slammed & Awesome Dubber
 
Posts: 78
Threads: 9
Registered: June 21st, 2010
Member Is Offline
Theme: UltimaBB Pro Blue ( Default )
|
| posted on October 16th, 2010 at 06:24 PM |
|
|
Some updates.
| Error |
| Sorry, you must be a registered user in order to download attachments. |
|
| Error |
| Sorry, you must be a registered user in order to download attachments. |
|
| Error |
| Sorry, you must be a registered user in order to download attachments. |
|
| Error |
| Sorry, you must be a registered user in order to download attachments. |
|
|
|
|
 Luke Luke
Slammed & Awesome Dubber
 
Posts: 78
Threads: 9
Registered: June 21st, 2010
Member Is Offline
Theme: UltimaBB Pro Blue ( Default )
|
| posted on October 16th, 2010 at 07:04 PM |
|
|
Man uploading pics is a drama. Anyway back from the sandblaster. Few suprises but pretty happy.
|
|
|
 Barnabie Barnabie
Officially Full-On Dubber
  
Posts: 257
Threads: 17
Registered: June 28th, 2010
Member Is Offline
Theme: UltimaBB Psyche Red
|
| posted on October 17th, 2010 at 08:20 AM |
|
|
Looking awesome Luke, great thread so far 
Kris
|
|
|
 Luke Luke
Slammed & Awesome Dubber
 
Posts: 78
Threads: 9
Registered: June 21st, 2010
Member Is Offline
Theme: UltimaBB Pro Blue ( Default )
|
| posted on October 17th, 2010 at 11:05 AM |
|
|
Hey thanks Kris. Tried to load a heap of pics but it just won't let me put them on. The chassis is at the blasters now. Should have it back next week
then I'll start to put the pans on. The body has a bit of impact damage. I'll wait for my mate who's a panel beater to give me a hand with that.
We are going to have to make sure it's all aligned and straight before I go and start putting the heater channels in. There is still a heap I can do
on the body. I have started to weld up all the holes drilled in the dash. Tried to post some pics of that but couldn't. Anyway progress. If i can
sort the pic issue Ill keep them coming.:
|
|
|
 donn donn
Wolfsburg Elder
      
Posts: 3515
Threads: 428
Registered: November 30th, 2005
Member Is Offline
Location: NEWCASTLE NSW
Theme: UltimaBB Pro Blue
Mood: LAID BACK AND CONFUSED
|
| posted on October 17th, 2010 at 05:27 PM |
|
|
looking good, yeah seems to be a rash of people with troubles posting pics. 
I dream of a day when a chicken can cross a road without being asked for it's motive!
|
|
|
 Luke Luke
Slammed & Awesome Dubber
 
Posts: 78
Threads: 9
Registered: June 21st, 2010
Member Is Offline
Theme: UltimaBB Pro Blue ( Default )
|
| posted on October 23rd, 2010 at 07:50 PM |
|
|
Welding up holes under my dash.
[img] [/img] [/img]
[img] [/img] [/img]

|
|
|
 Luke Luke
Slammed & Awesome Dubber
 
Posts: 78
Threads: 9
Registered: June 21st, 2010
Member Is Offline
Theme: UltimaBB Pro Blue ( Default )
|
| posted on October 23rd, 2010 at 07:54 PM |
|
|
Its good practice for me. I hammer and dolly all the low spots up and file it down. Chucked some primer on there for protection until I finish a
heap of other work.
[img] [/img] [/img]

|
|
|
 1971dubber 1971dubber
Casual Dubber

Posts: 26
Threads: 1
Registered: October 21st, 2010
Member Is Offline
Location: Western Victoria.
Theme: UltimaBB Pro Blue
Mood: Always happy =)
|
| posted on October 23rd, 2010 at 08:06 PM |
|
|
fANTASTIC WORK, YOU ARE VERY TALENTED!
|
|
|
 Luke Luke
Slammed & Awesome Dubber
 
Posts: 78
Threads: 9
Registered: June 21st, 2010
Member Is Offline
Theme: UltimaBB Pro Blue ( Default )
|
| posted on October 23rd, 2010 at 08:22 PM |
|
|
Lol. Thanks.This would be simple stuff to you guys. I will post up a heap of pics tomorrow how I fixed up the cig lighter hole. Kind of a step by step
thing. Like I said it's good practice getting used to the mig. Working out the best settings. Planishing the welds as you go. So when I move onto
bigger stuff I should be getting progressively better. I hope
|
|
|
 Paulc1964au Paulc1964au
Custom Title Time!
    
Posts: 1627
Threads: 59
Registered: March 5th, 2010
Member Is Offline
Location: Sydney, NSW
Theme: UltimaBB Pro Blue ( Default )
|
| posted on October 23rd, 2010 at 09:05 PM |
|
|
Keep up the great work looking forward to seeing more of your progress
|
|
|
 Luke Luke
Slammed & Awesome Dubber
 
Posts: 78
Threads: 9
Registered: June 21st, 2010
Member Is Offline
Theme: UltimaBB Pro Blue ( Default )
|
| posted on October 24th, 2010 at 06:43 PM |
|
|
Hi. Here are some progress pics of fixing the cig lighter hole. It was all jagged and roughly cut, so I thought I might as well fix it. This is by
no means a tutorial or how to as it is probably all wrong, but it worked the hole is nice and even, the dash is nice and flat and I wont have to use
any bog.
[img] [/img] [/img]
[img] [/img] [/img]
[IMG]
http://i478.photobucket.com/albums/rr143/lukecatt/cighole3.jpg[/IMG]
[img] [/img] [/img]
|
|
|
 Luke Luke
Slammed & Awesome Dubber
 
Posts: 78
Threads: 9
Registered: June 21st, 2010
Member Is Offline
Theme: UltimaBB Pro Blue ( Default )
|
| posted on October 24th, 2010 at 06:45 PM |
|
|
part II
[img] [/img] [/img]
[img] [/img] [/img]
[img] [/img] [/img]
[img] [/img] [/img]
|
|
|
 Luke Luke
Slammed & Awesome Dubber
 
Posts: 78
Threads: 9
Registered: June 21st, 2010
Member Is Offline
Theme: UltimaBB Pro Blue ( Default )
|
| posted on October 24th, 2010 at 06:47 PM |
|
|
Part III


[img] [/img] [/img]
|
|
|
 cam070 cam070
Custom Title Time!
    
Posts: 1332
Threads: 53
Registered: July 25th, 2009
Member Is Offline
Location: Sydney
Theme: UltimaBB Pro Blue ( Default )
Mood: Getting hands dirty stripping the bug down
|
| posted on October 24th, 2010 at 09:41 PM |
|
|
Nice work. Project is coming along nicely.
|
|
|
 Luke Luke
Slammed & Awesome Dubber
 
Posts: 78
Threads: 9
Registered: June 21st, 2010
Member Is Offline
Theme: UltimaBB Pro Blue ( Default )
|
| posted on October 25th, 2010 at 02:09 PM |
|
|
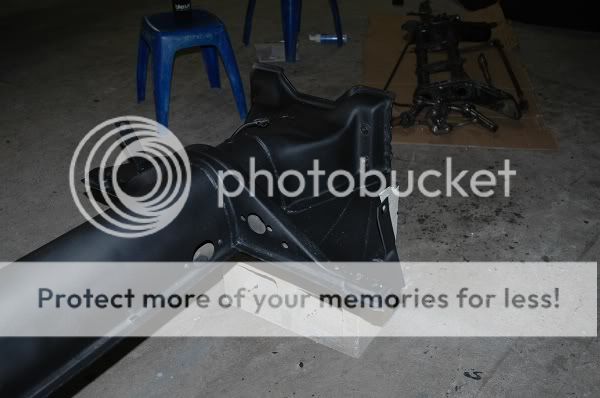
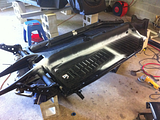
Here are some pics of the freshly blasted chassis. Its been etch primed and is going to get one last clean before I start to put the pans in. Been
fitting the pans and I'll tack them in this week. Ive lost my measurements I took for the right side so I'll be lifting the body on and off make
sure its right.
[img] [/img] [/img]
[img] [/img] [/img]
[img] [/img] [/img]
[img] [/img] [/img]
|
|
|
 Luke Luke
Slammed & Awesome Dubber
 
Posts: 78
Threads: 9
Registered: June 21st, 2010
Member Is Offline
Theme: UltimaBB Pro Blue ( Default )
|
| posted on October 25th, 2010 at 02:11 PM |
|
|
part II
[img] [/img] [/img]
[img] [/img] [/img]
[img] [/img] [/img]
[img] [/img] [/img]
|
|
|
 zayus zayus
A.k.a.: Bryce
Wolfsburg Wizard
  
Posts: 437
Threads: 26
Registered: September 8th, 2002
Member Is Offline
Location: North of the Bridge
Theme: UltimaBB Pro Blue ( Default )
|
| posted on October 25th, 2010 at 07:23 PM |
|
|
Hey Hey Luke,
Thanks for the updates.
Great to see what is involved in tearing down a Beetle, and restoring it.
The black finish on the body & pan etc, is that a result of the blasting?
Cheers.
|
|
|
 Luke Luke
Slammed & Awesome Dubber
 
Posts: 78
Threads: 9
Registered: June 21st, 2010
Member Is Offline
Theme: UltimaBB Pro Blue ( Default )
|
| posted on October 25th, 2010 at 07:50 PM |
|
|
Hi. Yep. The black is the etch primer. I'll be priming and painting the chassis when the pans go in. I don't want a shiny finish. Trying to get a
smooth satin look. I'm going to do a bit of prep work on the chassis. I know you won't see it but It will be sitting there annoying me if I don't.

|
|
|
 Luke Luke
Slammed & Awesome Dubber
 
Posts: 78
Threads: 9
Registered: June 21st, 2010
Member Is Offline
Theme: UltimaBB Pro Blue ( Default )
|
| posted on February 10th, 2011 at 03:26 PM |
|
|
Hi Guys. Been awhile but still going just havent been updating the thread.
Ive been cutting out the rust and replacing it with metal. There are little and big patches everywhere. There were rust patches and pin holes under
the rubber retainer around the bonnet so I decided to take it all off and fix the rust. Some requried small patches others just drilled out the rust
holes and migged them back up. It need doing as the rust was basically hidden under the seal and would have only needed doing in the long run.


|
|
|
 Luke Luke
Slammed & Awesome Dubber
 
Posts: 78
Threads: 9
Registered: June 21st, 2010
Member Is Offline
Theme: UltimaBB Pro Blue ( Default )
|
| posted on February 10th, 2011 at 03:30 PM |
|
|
I also took out the luggage shelf, There are crackes under the guard area and rust behind the shelf where I couldnt get too, so taking it out and
doing the rust repairs. Im starting to fabricate some metal parts, but these take time as its trial and error stuff.


|
|
|
 Luke Luke
Slammed & Awesome Dubber
 
Posts: 78
Threads: 9
Registered: June 21st, 2010
Member Is Offline
Theme: UltimaBB Pro Blue ( Default )
|
| posted on February 10th, 2011 at 04:09 PM |
|
|
Here is some damage found and it looks like someone has tried a repair on it. The metal is really thin bellow the crack at the bottom fold. Its been
ground right down. So I am going to cut the crack out and aound the bottom and make a new piece. I gave the crack a weld and it looked ok but of
could get in behind it. So now the luggage shel is out I can fix it up. This is going to be my first fabricated piece.


|
|
|
 Luke Luke
Slammed & Awesome Dubber
 
Posts: 78
Threads: 9
Registered: June 21st, 2010
Member Is Offline
Theme: UltimaBB Pro Blue ( Default )
|
| posted on February 10th, 2011 at 04:13 PM |
|
|
Undoing all the spot welds.

You can see the crack and down the left bottom where it has been ground thin.


Underneath where the crack goes.

|
|
|
 Super1302 Super1302
Officially Full-On Dubber
  
Posts: 361
Threads: 76
Registered: July 31st, 2008
Member Is Offline
Theme: UltimaBB Pro Blue ( Default )
|
| posted on February 20th, 2011 at 06:24 AM |
|
|
great work, this is where i like to be..........
nothing better than working in the shed on ya beetle

|
|
|
 Luke Luke
Slammed & Awesome Dubber
 
Posts: 78
Threads: 9
Registered: June 21st, 2010
Member Is Offline
Theme: UltimaBB Pro Blue ( Default )
|
| posted on May 6th, 2011 at 04:16 AM |
|
|
Hi guys. A few updates. Still working on the chassis and a little body work. I have the pans fully plug welded in now. Lot of work. Getting everything
lined up etc. Plus had to take off the incorrect seat rail tidy up that area. Get the old accelerator plate of the old pans clean it up. Then assemble
the accelerator to position the plate prior to welding. Other small details like taking off one of the jack points as it was incorrectly positioned.
Re weld it. Coming along nicely. After the seat rail is on then it's ready to paint. However I will leave it as is for the time being as the next job
is the heater channels and I don't want to damage the paint.
Also been sorting through the huge amount of parts. Got some stuff powder coated in a nice satin black. Lots of cleaning blasting preparing but
getting there.
I plan on getting a plating kit to plate my bolts and parts. Then I can start putting a few things back together.


|
|
|
 Luke Luke
Slammed & Awesome Dubber
 
Posts: 78
Threads: 9
Registered: June 21st, 2010
Member Is Offline
Theme: UltimaBB Pro Blue ( Default )
|
| posted on June 11th, 2011 at 09:50 PM |
|
|
Updates
Been doing a heap of work lately. Lots of little jobs. Sorting all the nuts and bolts, lights etc. Seeing what I am keeping and what needs replacing.
Basically I'm going to try and use most things except perishables. I think alot of the things can be fixed and with some paint come up like new.
Here is the cracked section welded back in. Bit of etch to protect it a bit. Came out alright.

Just about finished up the chassis nearly ready for paint. However I'll wait until the heaters are in as I'll need to put the body on and off, so it
will probably get knocked around. Just got to source the correct seat rails. Nearly got a handle on some here. Then it's finished. So in the mean
time started doing some more rust repairs. As it turns out there is small patches of rust all through the back that I can't leave.


There was rust right along the top and back of the luggage shelf. It came out to be replaced. Then I found more rust along where it was attached. The
pics don't really show the extent of it however it is really thin and pitted and would only rust out in the long run. So might as well fix things the
right way now. I'm getting more confident with my welding so I don't mind cutting out bad metal and replacing it. Easy if you can get to the
backside and if the patch piece is a real nice fit. So I spend a bit of time doing accurate cuts. I'll post some pics up soon. Been working on the
drip rail as there was some rust. When I cut out a section of the roof found it to be rotten right through to the engine compartment. There's three
layers of steel. The body. Section that comes out and rolls up to hold the roof down. Took me a while to work out how it work and how I was going to
fix it. So I made a real tight fitting patch piece and put it in. Welled in real easy and hardly and grinding.


New piece in.


Came up nice. Next is the piece that forms the drip rail Thingy. There was enough left to tack it back to the new section. I'll weld it fully the
make a new setion and butt join it. You'll never know it was separated. Then make the roof section prime it and weld it up.

I'll post the rest up soon.
Few of the other parts that i have fixed up instead of replacing. Making the little curved section and welding this in the headlight was a little
difficult but came up nice. I'm going to cad plate these.


|
|
|
| Pages: 1 2 3 |