| [ Total Views: 272799 | Total Replies: 705 | Thread Id: 77027 ] |
| Pages: 1 2 3 4 5 6 .. 24 |
|
|
 Joel Joel
Scirocco Rare
Now containing 100% E-Wang
        
Posts: 9368
Threads: 211
Registered: February 14th, 2006
Member Is Offline
Location: Northern Rivers NSW
Theme: UltimaBB Pro Purple
Mood: Tact Level 0.00
|
| posted on September 20th, 2009 at 08:38 PM |
|
|
Throttle body inverter......Take 2
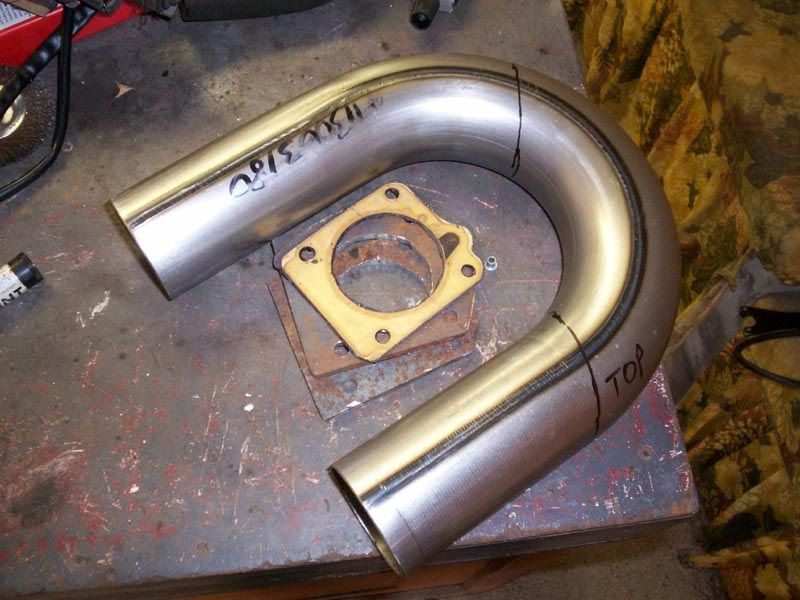
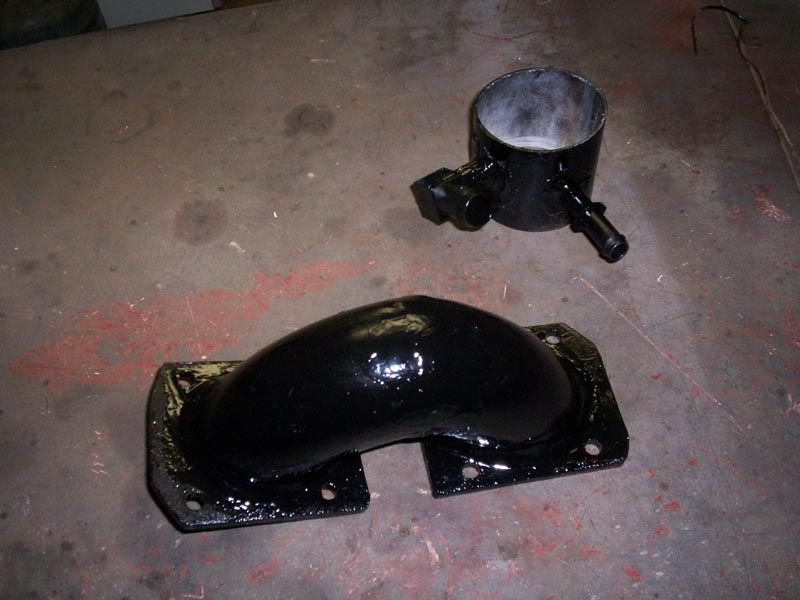
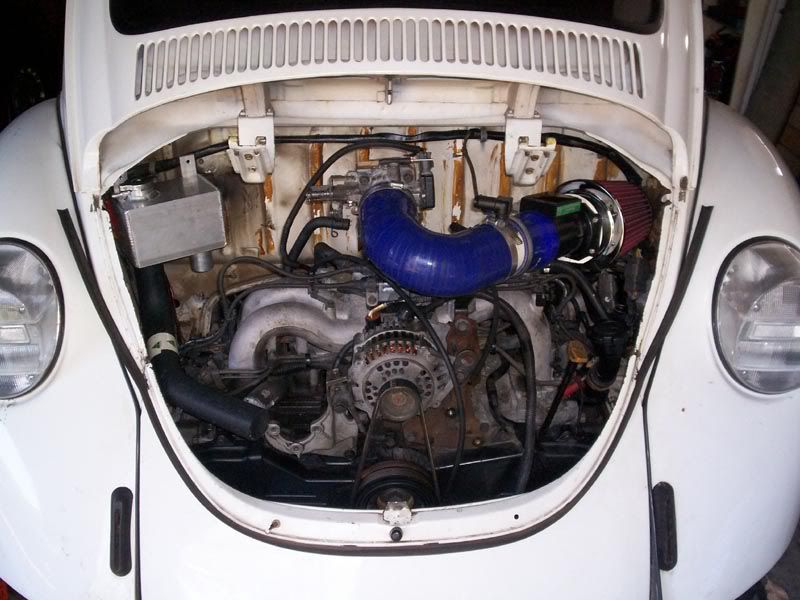
i guess noone spied the f@@k up with my first one
all was fine and dandy till i removed my decklid stand offs and put the decklid back on stock
and the blooddy thing wouldnt open far enough cos it was hitting the intake hose 
would be fine if i owned a baja
the new one i made is pretty much exactly what custom veedub sell
save yourself the hassle and just get one of theres.
welding pipe to flanges sucks especially when they have such tight bends with limited access
definatley not a pretty as my first one but ah welll it can hardly be seen and has no leaks thats the main thing
all fits up nicely now and i can have a decklid spring again.... nothing like holding a decklid up with your head trying to adjust twin webers 
i also made a new joiner piece with the spigots for the IACV and case PCV hoses as the 45degree one i cut from the subi donkey dick was the wrong
angle now and i needed a straight
the engine wont run without these so ive made up a bodgy short term solution
i need it running so i can back it in and out of the shed. my driveways to steep to push it
its just 3" PCV down pipe with some home irrigation fittings epoxied in
i need to get some 3" exhaust pipe that i can solder some brass barbs into for the final product
|
|
|
 Joel Joel
Scirocco Rare
Now containing 100% E-Wang
        
Posts: 9368
Threads: 211
Registered: February 14th, 2006
Member Is Offline
Location: Northern Rivers NSW
Theme: UltimaBB Pro Purple
Mood: Tact Level 0.00
|
| posted on September 22nd, 2009 at 07:40 PM |
|
|
DUB74L now availble in powered form
had a couple of hours spare this arvo so decided to hack my valance around abit
im not real keen on the idea of just cutting a big hole and glueing in some boy racer mesh as the valance loses alot of strength doing that and very
rarely does it look good
for one of the rare instances were it does look good check out what Steve did to Davids bug when it was painted
for those that dont really know superbeetles, in the US air conditioning was a very common dealer fitted accessory so all superbeetles bound for the
US market left the factory with valances that had vents for the A/C condensor like so:

Steve fitted one of these valances to his yellow bug and it cooled very well but at the moment i just couldnt face unpicking another valance as the
front is alot more involved than the back so i figured i'd have a stab at making one similar, i had nothing to lose
gotta thank Gerrelt for the tip
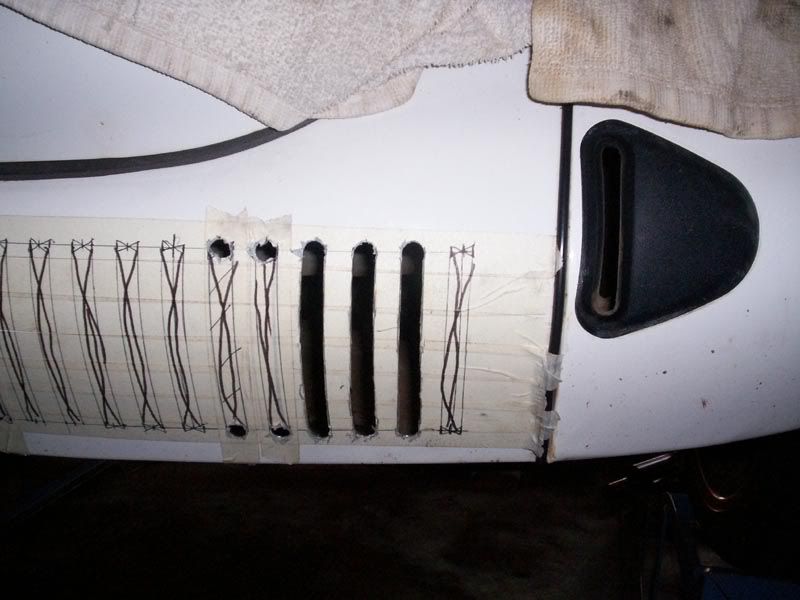
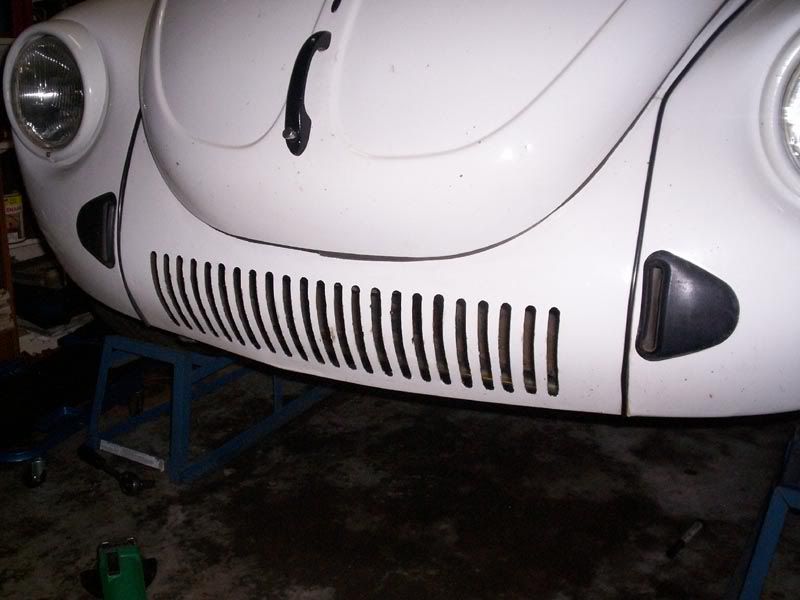
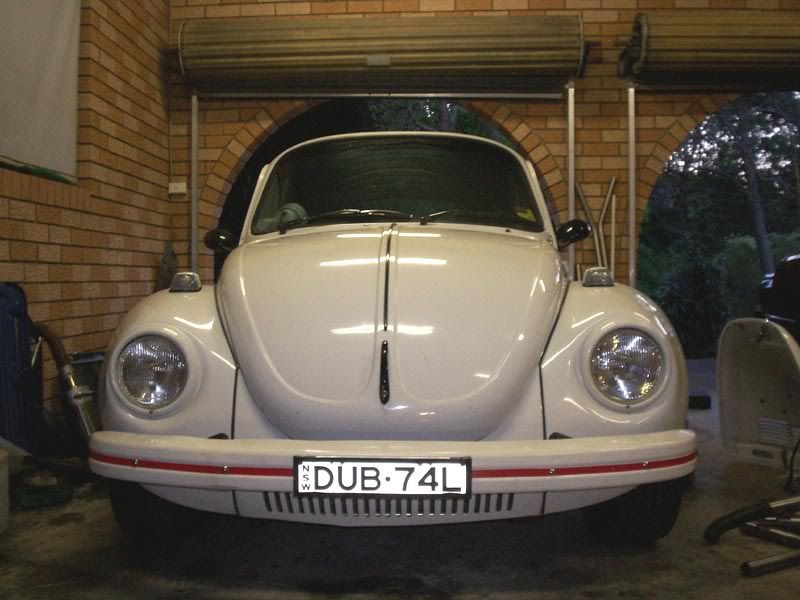
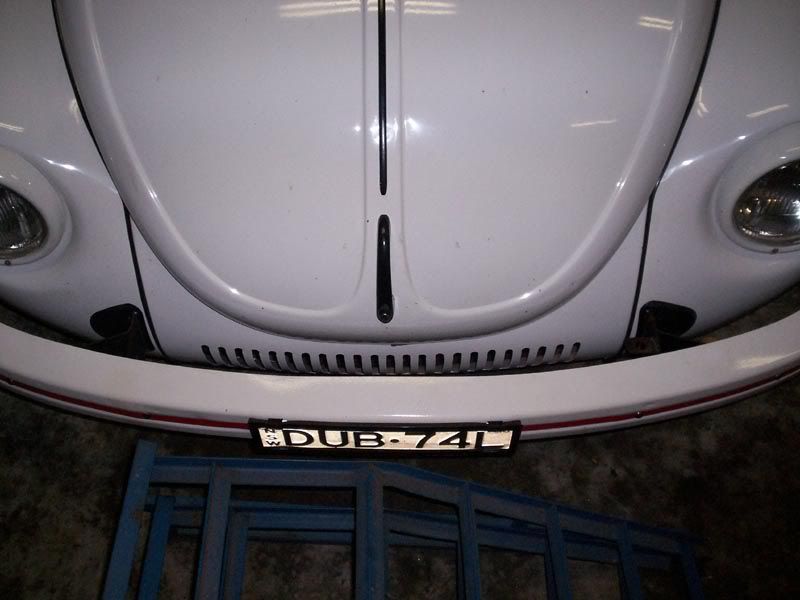
all in all it worked out ok, with the bars still there the valance hasnt lost any strength.
ill eventually put my Kamei spoiler back on once i sort out what to do with it so it will be covered up anyway but it will do for now
luckily i still have abit of crystal white left so i gave it a quick spray job to stop the raw metal edges rusting
now i just have to brace myself and cut the rest of the wheel well out
|
|
|
 ian.mezz ian.mezz
Wolfsburg Elder
I never said, I could write or spell
      
Posts: 3913
Threads: 280
Registered: September 11th, 2004
Member Is Offline
Location: Newcastle
Theme: UltimaBB Pro Blue ( Default )
Mood: Happy
|
| posted on September 22nd, 2009 at 08:18 PM |
|
|
I started doing that only to find my valance was 1cm thick bog
sso I went with the big hole.
|
|
|
 Joel Joel
Scirocco Rare
Now containing 100% E-Wang
        
Posts: 9368
Threads: 211
Registered: February 14th, 2006
Member Is Offline
Location: Northern Rivers NSW
Theme: UltimaBB Pro Purple
Mood: Tact Level 0.00
|
| posted on September 22nd, 2009 at 08:22 PM |
|
|
my front valance was one of the straightest panel on the car when i got it till i barrelled a possum the size of a large dog hence the ripple in the
bottom
they're normally the first panels to get crumpled
funny most yanks would give anything for a smooth valance like these and yets heres me turning mine into one like theirs 
|
|
|
 colonel mustard colonel mustard
Son of Jim - Creator of Good
     
Posts: 2829
Threads: 51
Registered: February 27th, 2009
Member Is Offline
Theme: UltimaBB Pro Black
|
| posted on September 22nd, 2009 at 11:42 PM |
|
|
I do like the idea of this for an external oil cooler.... kinda like hellbugged's setup.... just the oil change would be a killer. looks great
though Joel. keep up the good work 
|
|
|
 DaveCarter DaveCarter
Officially Full-On Dubber
  
Posts: 285
Threads: 16
Registered: August 3rd, 2009
Member Is Offline
Location: Sydney
Theme: UltimaBB Pro Blue
Mood: has the super bug
|
| posted on September 22nd, 2009 at 11:55 PM |
|
|
we just chucked one in mine colonel. No pics up yet but have a squiz at warwick
|
|
|
 colonel mustard colonel mustard
Son of Jim - Creator of Good
     
Posts: 2829
Threads: 51
Registered: February 27th, 2009
Member Is Offline
Theme: UltimaBB Pro Black
|
| posted on September 23rd, 2009 at 12:06 AM |
|
|
mate, im gonna look at, take photo;s of, lay underneath.... your car at warwick. and most likely pester you and your dad for a few hours in
conversational topics... 
|
|
|
 gerrelt gerrelt
Slammed & Awesome Dubber
 
Posts: 88
Threads: 3
Registered: May 13th, 2005
Member Is Offline
Theme: UltimaBB Pro Blue ( Default )
|
| posted on September 23rd, 2009 at 04:28 AM |
|
|
Looks very good Joel!
I'm glad I could help a little! 
|
|
|
 71-BEETLE-SEDAN 71-BEETLE-SEDAN
Custom Title Time!
AKA Josh
    
Posts: 1058
Threads: 108
Registered: March 25th, 2009
Member Is Offline
Location: Mittagong NSW
Theme: UltimaBB Pro White
|
| posted on September 23rd, 2009 at 09:38 AM |
|
|
another question
The guys that did you wiring harness, where are they based and how much did it cost.
|
|
|
 Joel Joel
Scirocco Rare
Now containing 100% E-Wang
        
Posts: 9368
Threads: 211
Registered: February 14th, 2006
Member Is Offline
Location: Northern Rivers NSW
Theme: UltimaBB Pro Purple
Mood: Tact Level 0.00
|
| posted on September 23rd, 2009 at 09:14 PM |
|
|
that would be Al and Miles at AMauto - amauto.com.au
when i stopped for lunch today mr courier man had left a nice present for me
these things truely are a work of art
alot better than anything i could have made
just look at how short they are
i couldnt see a thing i was doing down the paddock cos of the dust so i spent the rest of the arvo in the garage and finish sorting the engine bay
wiring out
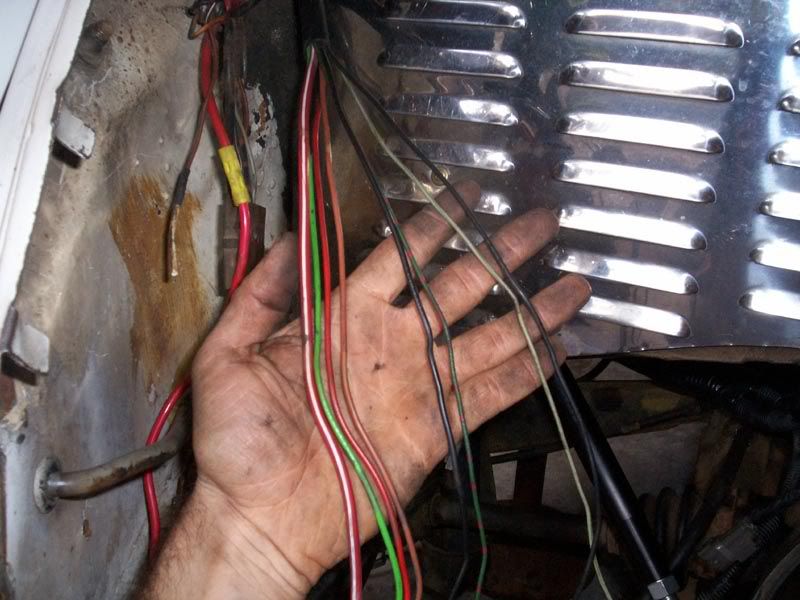
this is the standard bug engine bay wiring with the outter shield removed
being a 74 it has the externally regulated alternator which is the stuff on the left
coil power and oil light wiring in the middle
and the 2 on the right are part of the dealership plug in computer diagonosis system which is all now redundant
i had used them as wires for my tacho and oil pressure gauge
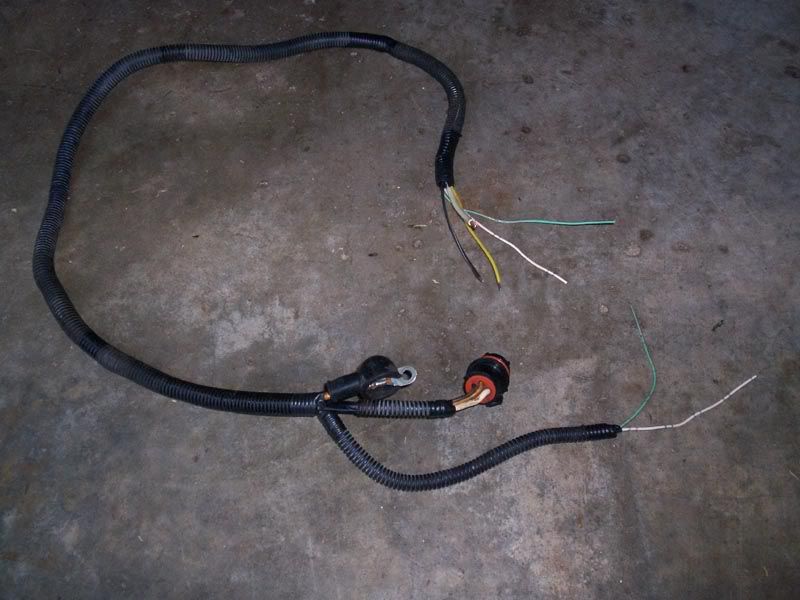
all the wiring for the EJ22 is part of the subi loom with the exception of the alternator which needs to be spliced into the vw loom
im sure i showed the alternator plugs earlier in this thread but its very simple
theres a main B+ (white) out same as VW, a warning light (Black/white) and a wire which needs ignition power (yellow), this turns on the internal
regulator
without this it wont charge and connected to always live power will flatten the battery
i made up a new loom with the EJ alternator wires and connectors
i also ran 2 others, one for the oil pressure switch and another will be for my oil pressure gauge sender when i get around to fitting it
now rather than cutting and joining these wires to the VW loom i chose to mount a terminal strip on the fire wall instead
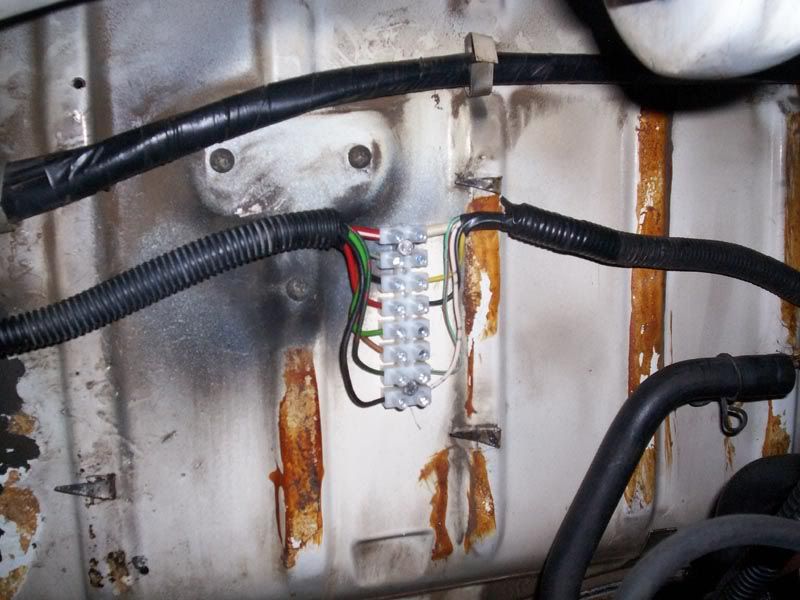
a few reasons for this
its so much easier than soldering wires together, allows for easier changes and finally if for some unknown reason i need to put a vw engine back in
all i have to do is connect up this
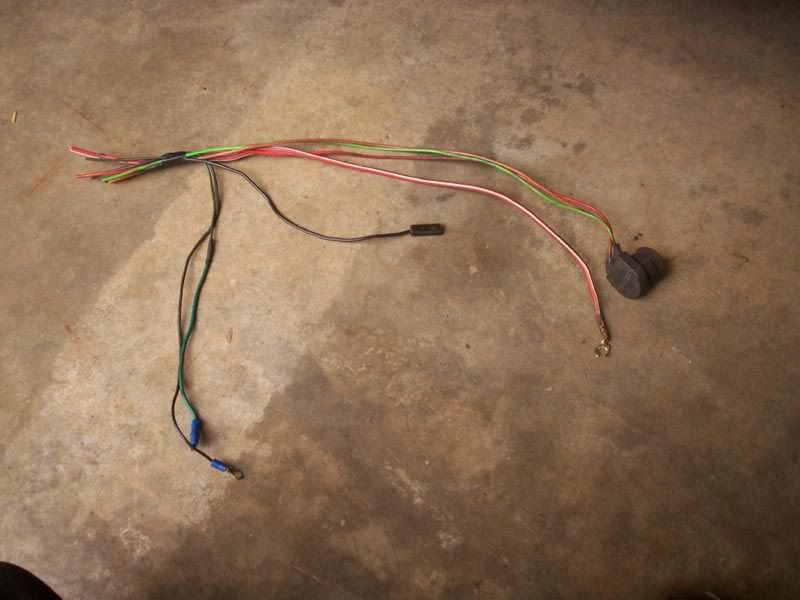
connections are very simple. theres 2 big white B+ wires that come off the alternator, these need to be joined together and connected to the VW B+
which is the big red/white wire
for the regulator wire i just connected it to the old coil power supply
and the warning light i connect to the small red D+ wire as this goes straight to the speedo charge light
generator equiped VWs would be slightly different but if your undertaking the work yourself you should really know what the differences are anyway
oh yeah and the oil light and pressure gauge sender wires just connected as well
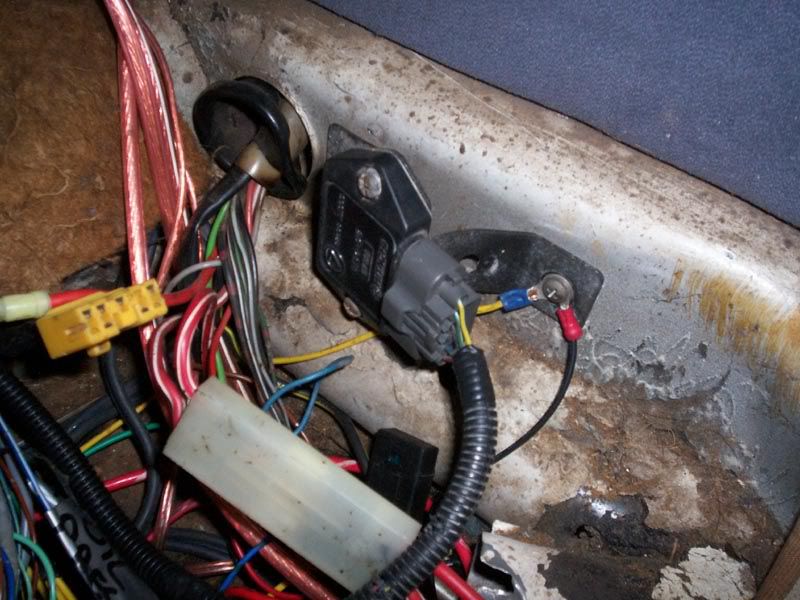
other thing i did while electrically speaking is the bracket for the ignitor with a little bending bolted up beautifully to the old regulator mount
the other thing i did the other day was hook up the throttle cable
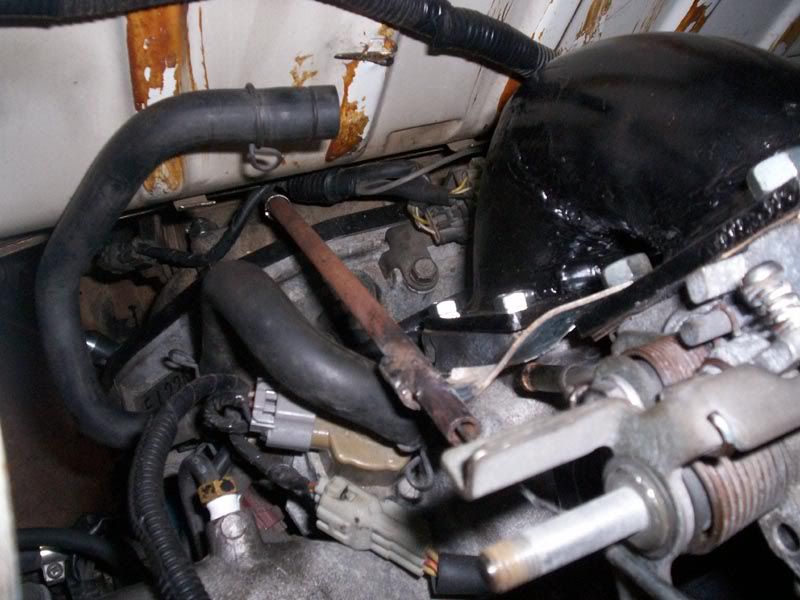
i was determined to make this engine use the standard beetle throttle cable as i had an aftermarket cable for the dellorto on the supercharger and it
was forever being a problem child
i used some thick walled 3/8" tube i had laying around to replace the guide tube that goes through the fan housing
it had to be thick walled as welding the stock vw one would have only blown holes in it as its paper thin
i bent up a bracket to weld to it that picked up one of the throttle body mount bolts
looks ugly as but its very sturdy
all the cruise control linkages of my throttle body went missing a while ago but it still has the pin that held the springs which was in the way
it was only a press fit and pulled straight out with some vice grips
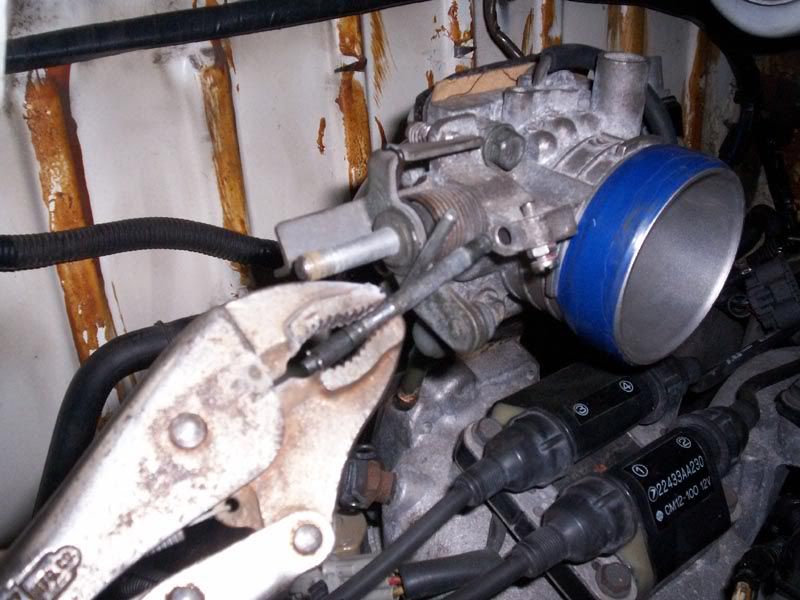
now to use the standard vw barrel clamp holder thingy was simple, i just folded over a piece of 16 gauge sheetmetal, drilled a hole through it for the
barrel to fit then silver soldered it to the throttle body arm
again looks ugly but it works
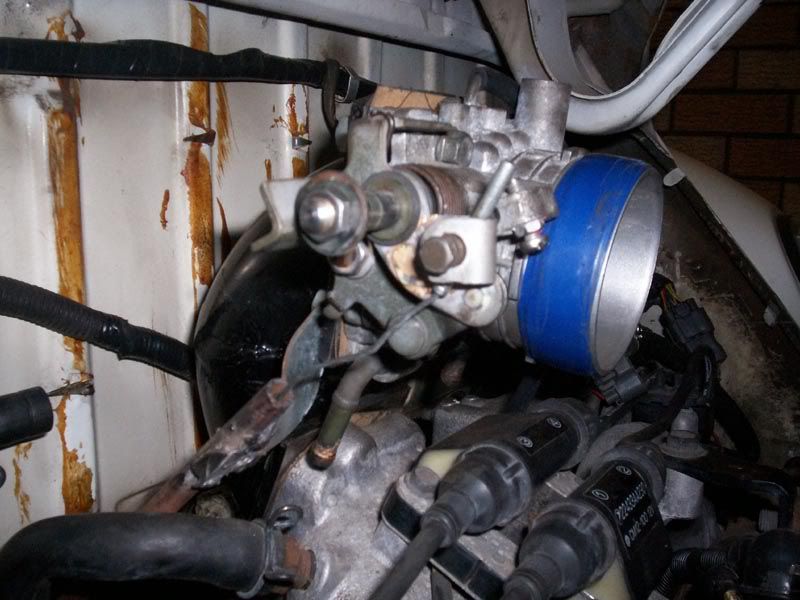
a few important steps when doing this
firstly is to get the pivot point measurement the same as a vw carb
a 34pict3 had a 24mm distance from the center of the butterfly shaft to the center of the barrel clamp so i had to set it up the same
if you have this measurement smaller then the pedal will only go down about half way before the butterfly is wide open
and on the other hand to big and the pedal will go flat before it fully opens so u wont get WOT (wide open throttle)
this is important for a few reasons other than performance
Now when Joel gets impatient and decides and nail it to overtake 3 cars and 1 truck right before a blind bend , the TPS senses WOT and kills the A/C
if its running and sends the computer into closed loop mode for max power and also WOT when starting sends the ECU into flood clear mode
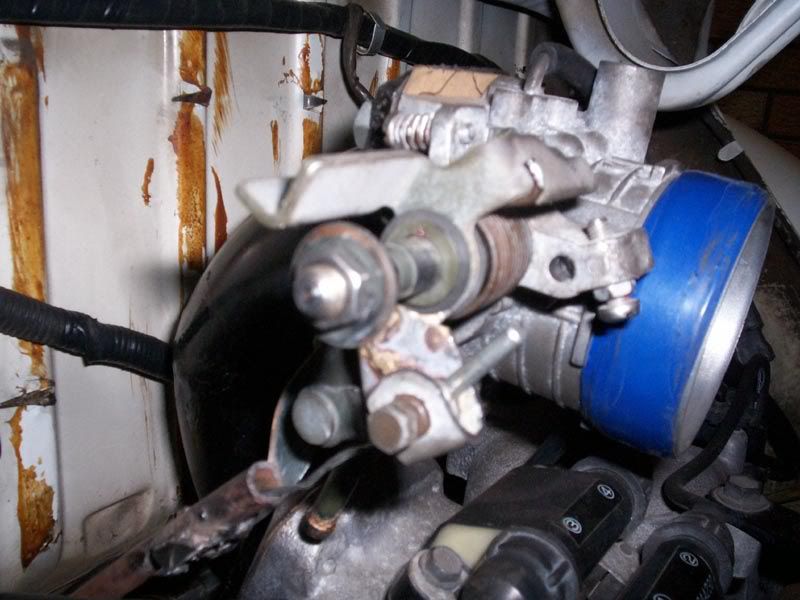
and secondly the angle needs to be just right so it pulls evenly from fully closed to wide open
if its pulling on to much of an angle at any point it only places excess stress on the cable and linakges
anyway it all worked out well, theres less effort required on the noise pedal than a vw carb even though the subi throttle has 2 springs
i just need to tweak with my cable where the barrel clamps it as can be seen here im not quite hitting the WOT stop screw
ive made a little bit of a start on the cooling system
heres a sneak peak
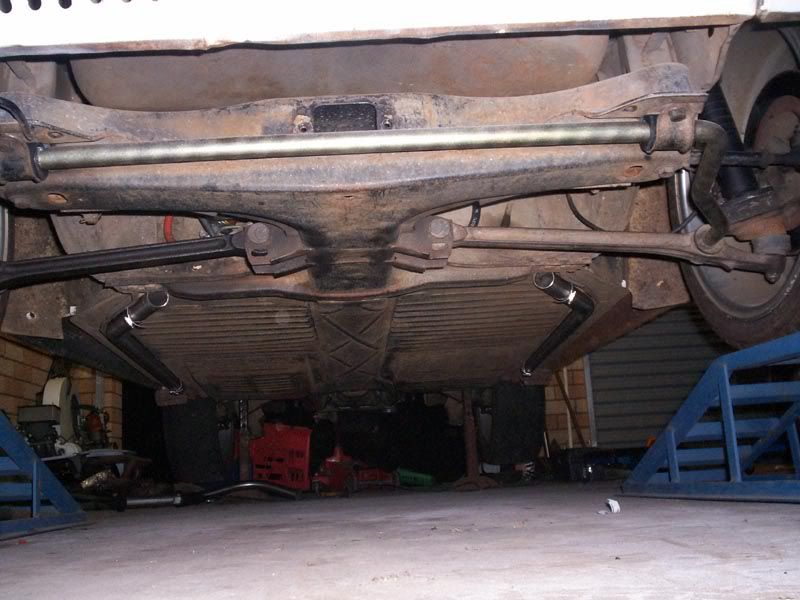
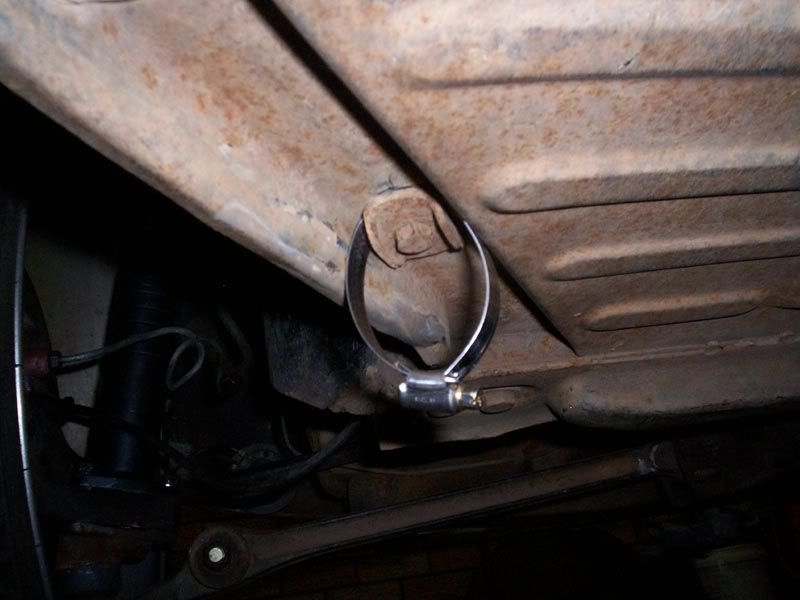
im using hose clamps tucked under the body mounting bolts to hold the pipework up along the sills
mighten't be the pretty solution but it worked well for over 10 years on my black beetle
|
|
|
 71-BEETLE-SEDAN 71-BEETLE-SEDAN
Custom Title Time!
AKA Josh
    
Posts: 1058
Threads: 108
Registered: March 25th, 2009
Member Is Offline
Location: Mittagong NSW
Theme: UltimaBB Pro White
|
| posted on September 24th, 2009 at 06:04 PM |
|
|
I see the firewall is back on, or did you take them pics out of order?
|
|
|
 Joel Joel
Scirocco Rare
Now containing 100% E-Wang
        
Posts: 9368
Threads: 211
Registered: February 14th, 2006
Member Is Offline
Location: Northern Rivers NSW
Theme: UltimaBB Pro Purple
Mood: Tact Level 0.00
|
| posted on September 24th, 2009 at 07:46 PM |
|
|
nah its off for good
once its all done im going to detail my engine bay and repaint the firewall
alot of this thread is all out of order, i just add bits and pieces to it as i sort through the pics
|
|
|
 71-BEETLE-SEDAN 71-BEETLE-SEDAN
Custom Title Time!
AKA Josh
    
Posts: 1058
Threads: 108
Registered: March 25th, 2009
Member Is Offline
Location: Mittagong NSW
Theme: UltimaBB Pro White
|
| posted on September 24th, 2009 at 07:49 PM |
|
|
okoay yeah thought so, just re read and would have needed wiring to get engine error codes duhh
|
|
|
 ian.mezz ian.mezz
Wolfsburg Elder
I never said, I could write or spell
      
Posts: 3913
Threads: 280
Registered: September 11th, 2004
Member Is Offline
Location: Newcastle
Theme: UltimaBB Pro Blue ( Default )
Mood: Happy
|
| posted on September 24th, 2009 at 08:14 PM |
|
|
that don't look rite all neat and tidy 
|
|
|
 Joel Joel
Scirocco Rare
Now containing 100% E-Wang
        
Posts: 9368
Threads: 211
Registered: February 14th, 2006
Member Is Offline
Location: Northern Rivers NSW
Theme: UltimaBB Pro Purple
Mood: Tact Level 0.00
|
| posted on September 24th, 2009 at 08:15 PM |
|
|
well i cant out class you with power 
|
|
|
 ian.mezz ian.mezz
Wolfsburg Elder
I never said, I could write or spell
      
Posts: 3913
Threads: 280
Registered: September 11th, 2004
Member Is Offline
Location: Newcastle
Theme: UltimaBB Pro Blue ( Default )
Mood: Happy
|
| posted on September 24th, 2009 at 08:27 PM |
|
|
| Quote: | Originally
posted by Joel
well i cant out class you with power 
|
yeah i've been driving it around for 12 months now. And I thought i'd give it a treat with some subaru upper engine cleaner and it feels like it's
got an exta 20hp  So it realy does do something So it realy does do something 
|
|
|
 Joel Joel
Scirocco Rare
Now containing 100% E-Wang
        
Posts: 9368
Threads: 211
Registered: February 14th, 2006
Member Is Offline
Location: Northern Rivers NSW
Theme: UltimaBB Pro Purple
Mood: Tact Level 0.00
|
| posted on September 24th, 2009 at 08:40 PM |
|
|
just put 2 more bottles in then and youll have more HP than josh
|
|
|
 colonel mustard colonel mustard
Son of Jim - Creator of Good
     
Posts: 2829
Threads: 51
Registered: February 27th, 2009
Member Is Offline
Theme: UltimaBB Pro Black
|
| posted on September 24th, 2009 at 08:45 PM |
|
|
a clean engine is a happy engine. looks good Joel. can't wait to see it. 
|
|
|
 Joel Joel
Scirocco Rare
Now containing 100% E-Wang
        
Posts: 9368
Threads: 211
Registered: February 14th, 2006
Member Is Offline
Location: Northern Rivers NSW
Theme: UltimaBB Pro Purple
Mood: Tact Level 0.00
|
| posted on September 27th, 2009 at 09:42 PM |
|
|
got its first genuine part this weekend
there was only one coolant hose left that hadnt been replaced, the waterpump return line and being the original hose it felt pretty crispy when it was
squeezed
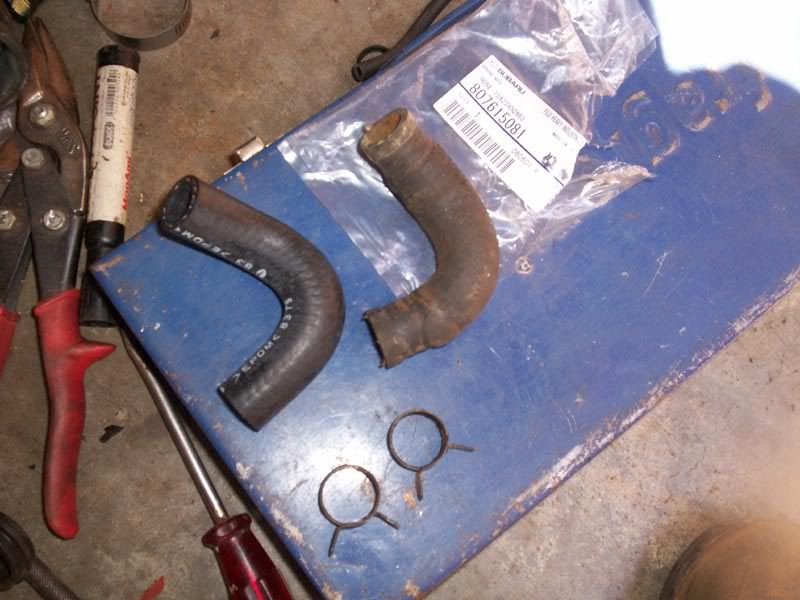
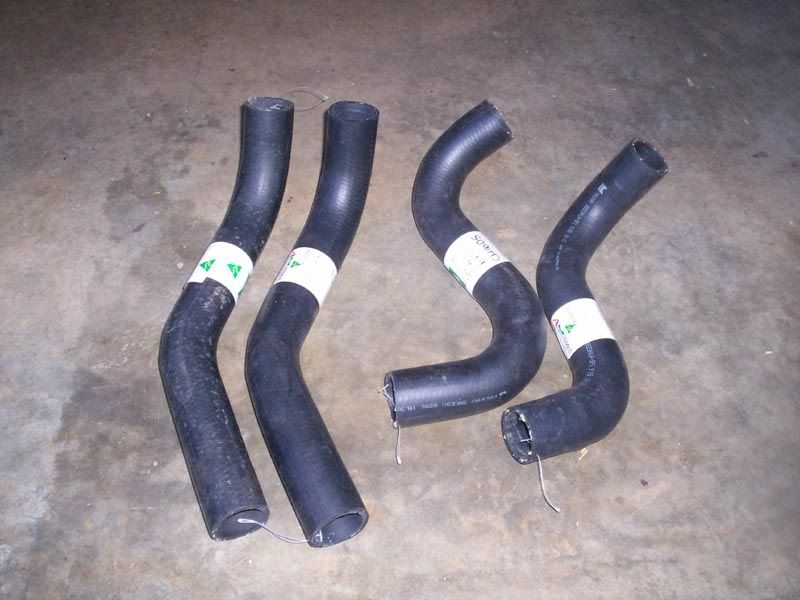
speaking of , for all the flexible rubber hoses i picked up some really common ones so that if i ever get caught out the back of whoop whoop needing a
hose chances are the local redneck garage might have half a chance of helping
giving my poor bug a bogan element are 2 early commodore top hoses for my header tank in and out
an EA-ED falcon top hose and a bottom hose from a XG falcon ute/panno
i mounted my header tank first so i knew where the hoses had to run too
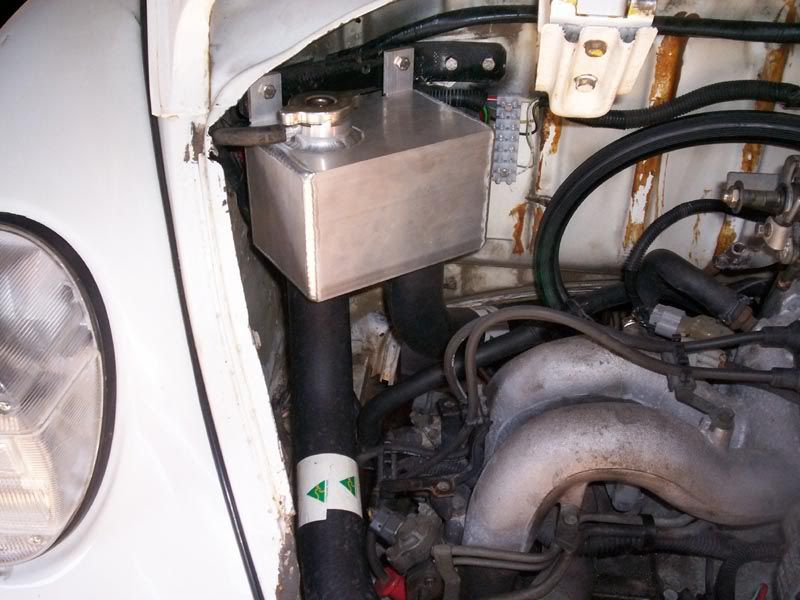
i mounted it on an angle as it makes for easier hose routing but also it puts the cap in a nice easily accessable place
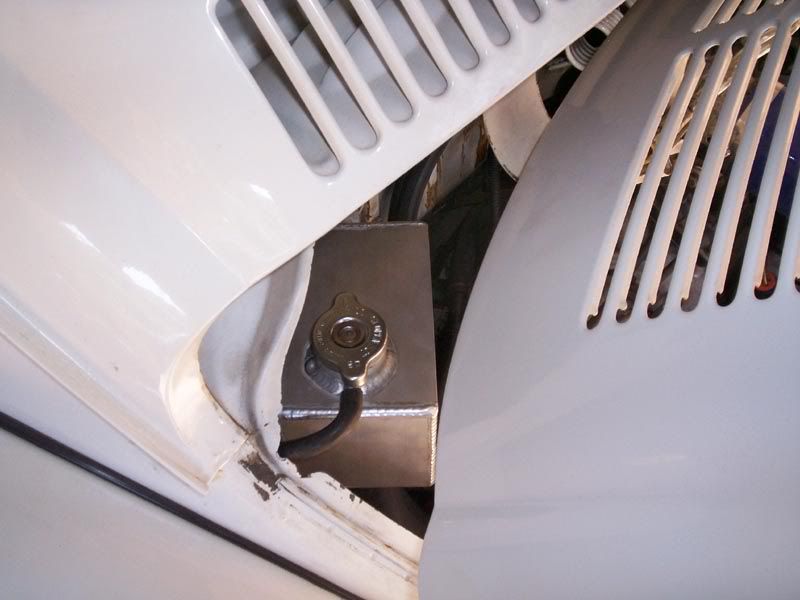
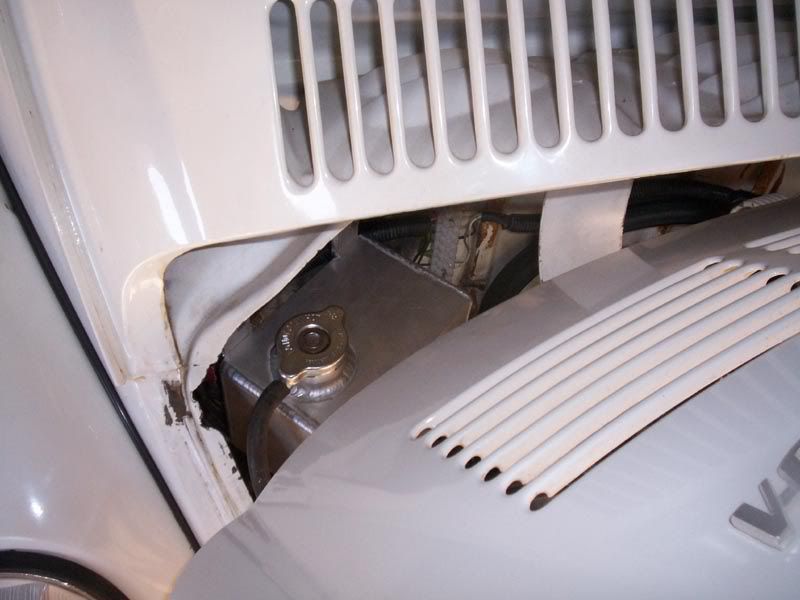
ive welded up the stainless solid lines as far back as the gearbox.
the supply side just needs a 45 degree bend to go from the chassis fork up over the axle to the rubber hose to finish it off
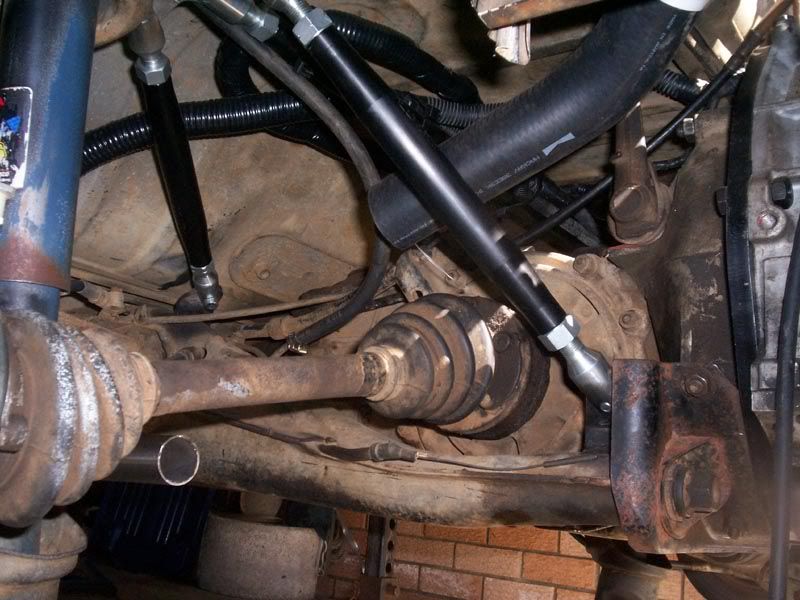
and the return side its a similar situation execpt it needs a dogleg bent up to come out around the exhaust manifold and into the thermostat
housing
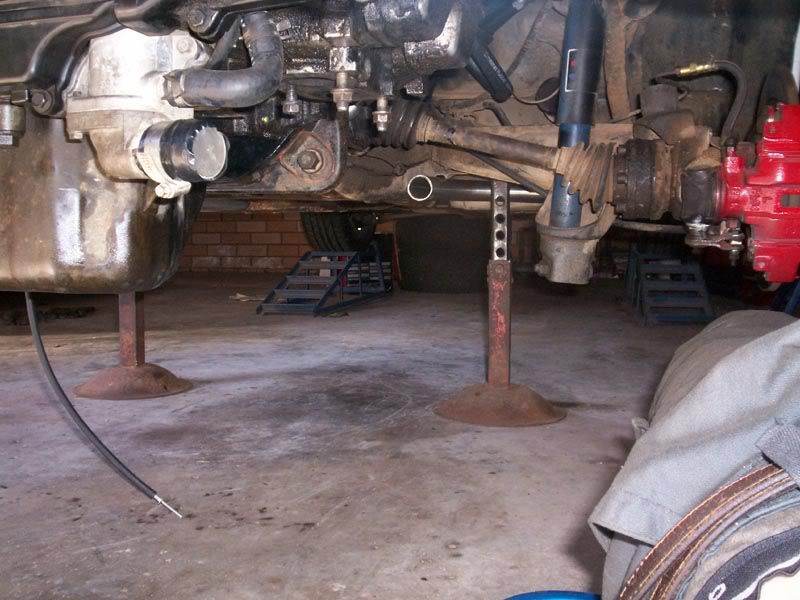
im pretty stoked with how the hardlines worked out
at the back i havent lost any ground clearance at all as they actually sit higher than what the floor pans do
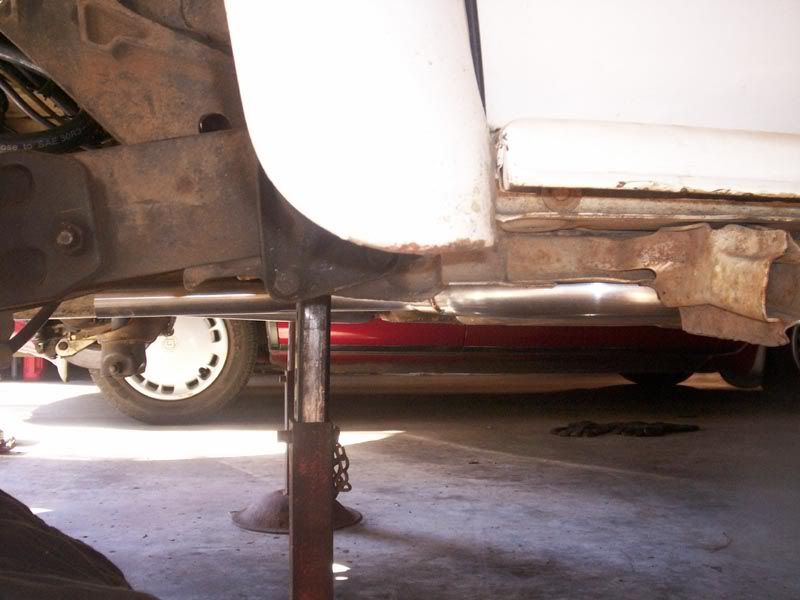
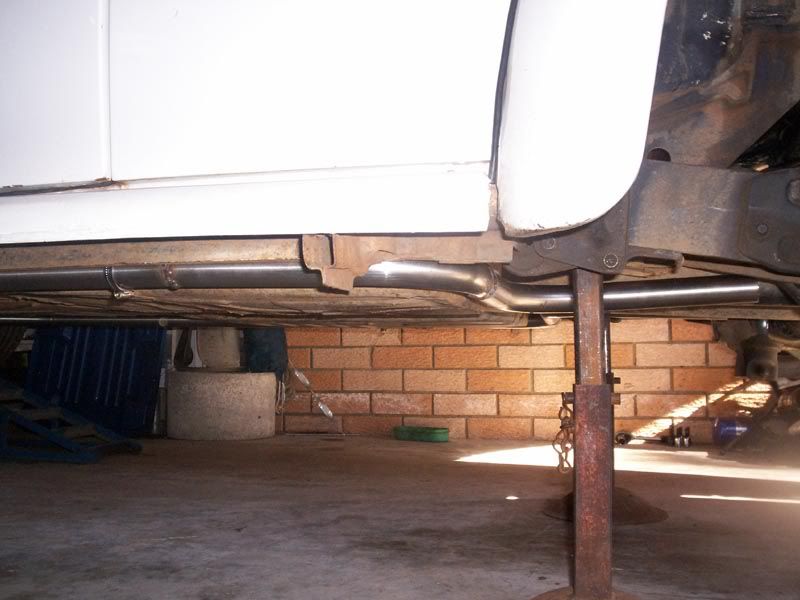
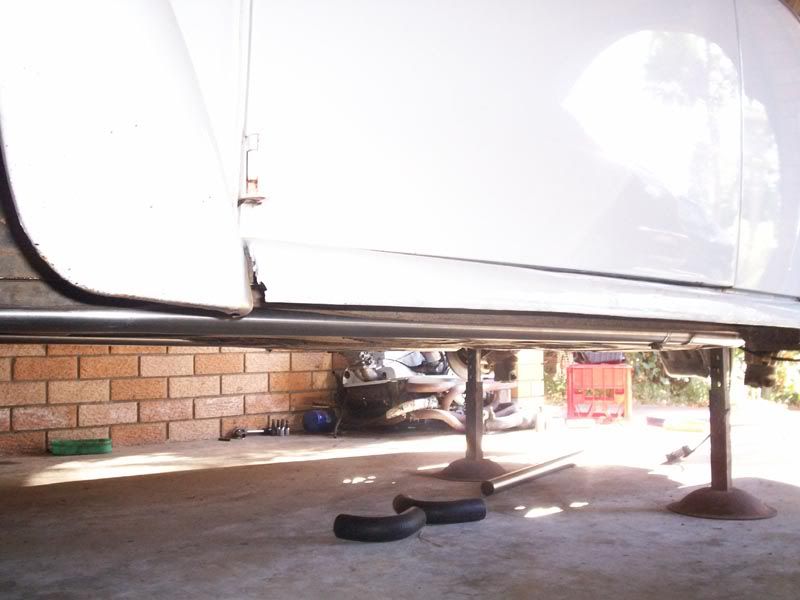
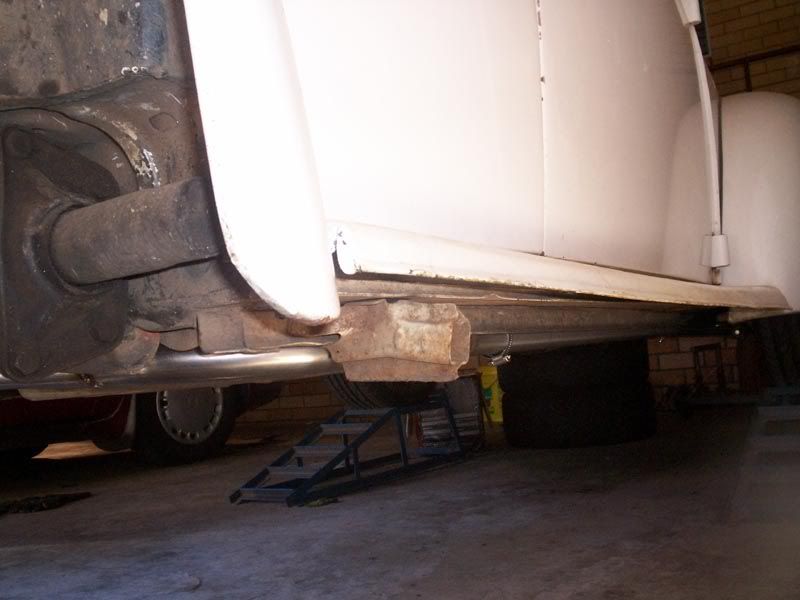
even down the sills theres no risk of them hitting anything as they hang down about half and inch lower than the floor pan rails
at the front is where theres usally clearance problems especially when it comes to superbeetles
theres the control arms, tierods and center rod to get passed as the radiator is mounted in front of these
most people go underneath all that which is fine if you have 4WD ride height status as they need to hang low enough that the suspension on full droop
is no where near hitting them
that guy in NZ with the white EJ25 powered SBug in one of the VWMA runs his underneath and had a mishap where his rubber hose hit the road and it
dumped all its coolant
ive got topline maxx struts on my bug which are already on the highest setting so unfortunately theres no way of getting it any higher than it already
is so playing it safe ive decided to take another route and go over all the suspension instead
heres were the falcon top hose came in
cut in half it made for 2 nice elbows that are just a fraz past 90degrees which was needed as i put a small kick down on the pipe to get it under the
bulk head
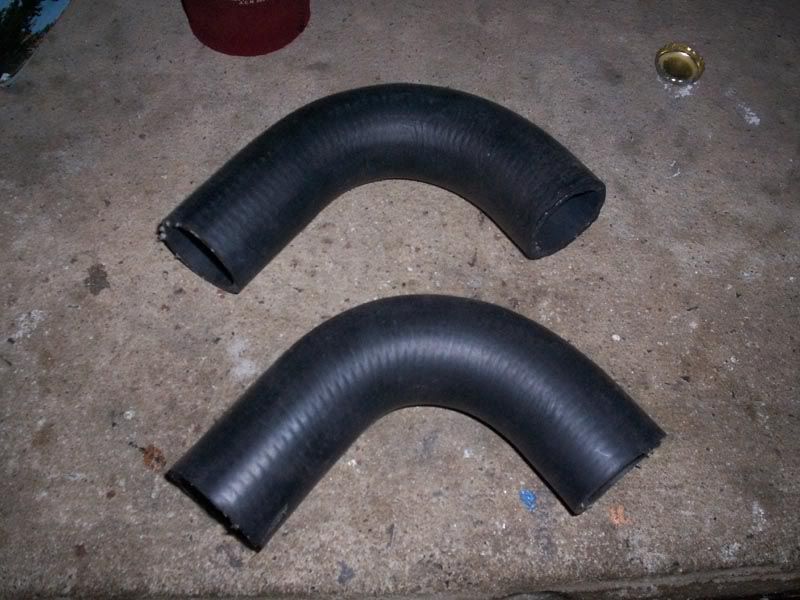
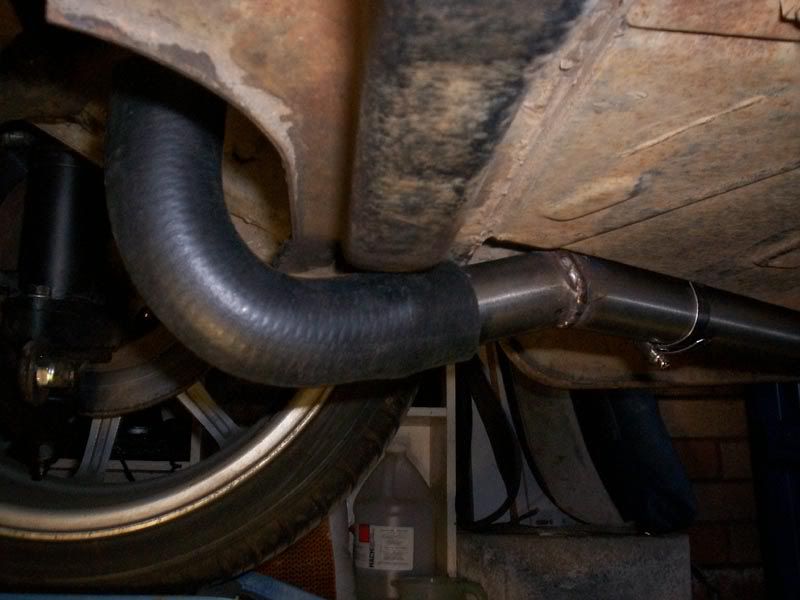
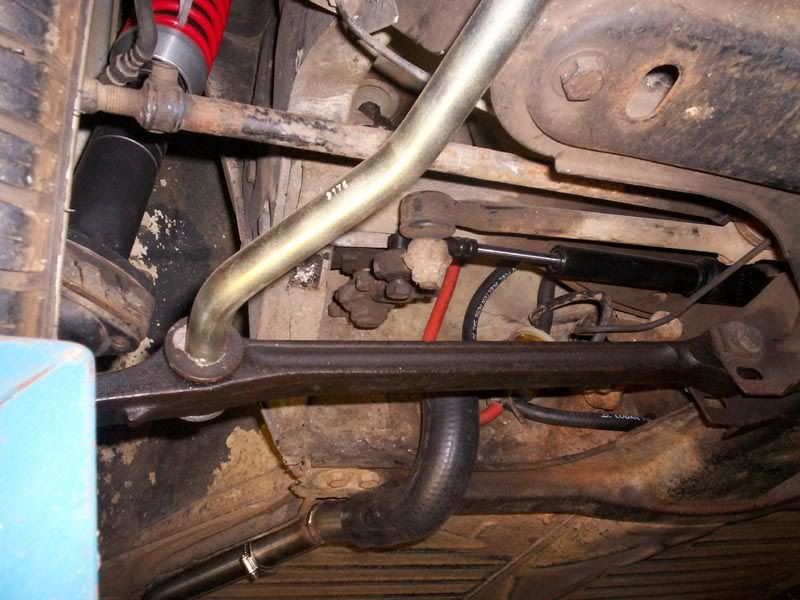
the 2 elbows are only hanging down about half an inch lower than the center of the floor pan bulk head but because they're inline with the wheels
there no chance of them hitting anything
from there they will run up and across the bottom of the wheel well to the radiator
|
|
|
 Joel Joel
Scirocco Rare
Now containing 100% E-Wang
        
Posts: 9368
Threads: 211
Registered: February 14th, 2006
Member Is Offline
Location: Northern Rivers NSW
Theme: UltimaBB Pro Purple
Mood: Tact Level 0.00
|
| posted on September 27th, 2009 at 10:06 PM |
|
|
oh yeah a couple of other jobs i got done
the speed sensor is finished and mounted
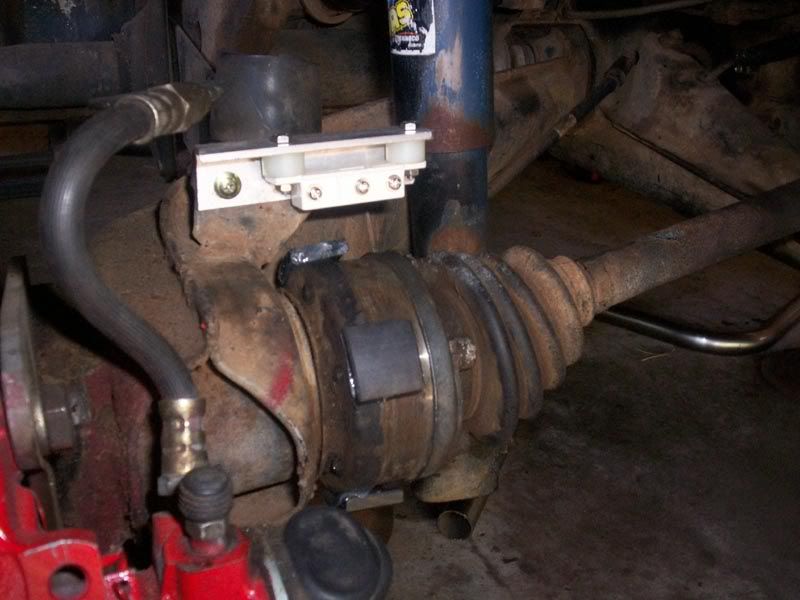
and ive made up the permanant IAC intake adapter thingy
1 scrap of 3" exhaust
1 19mm brass barb
and 1 12mm spray boom fitting thats been rattling around in my ash tray for months
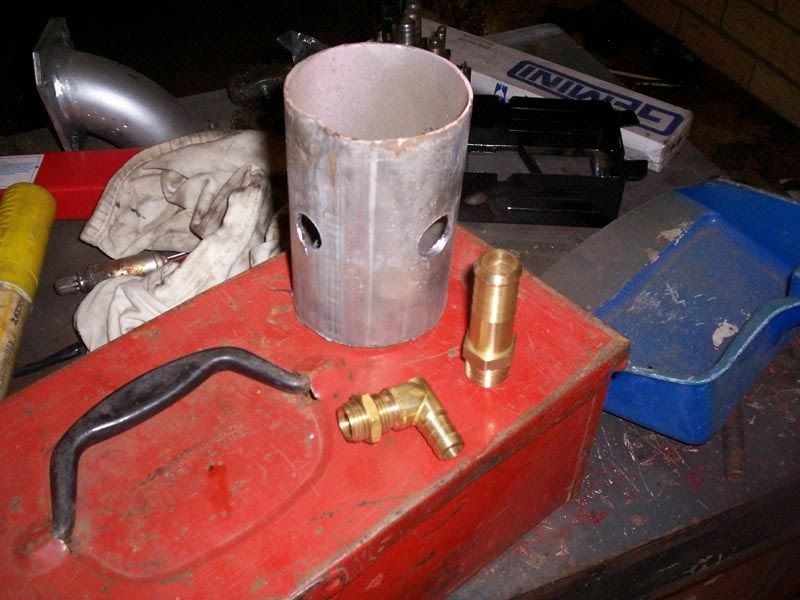
all silver soldered together
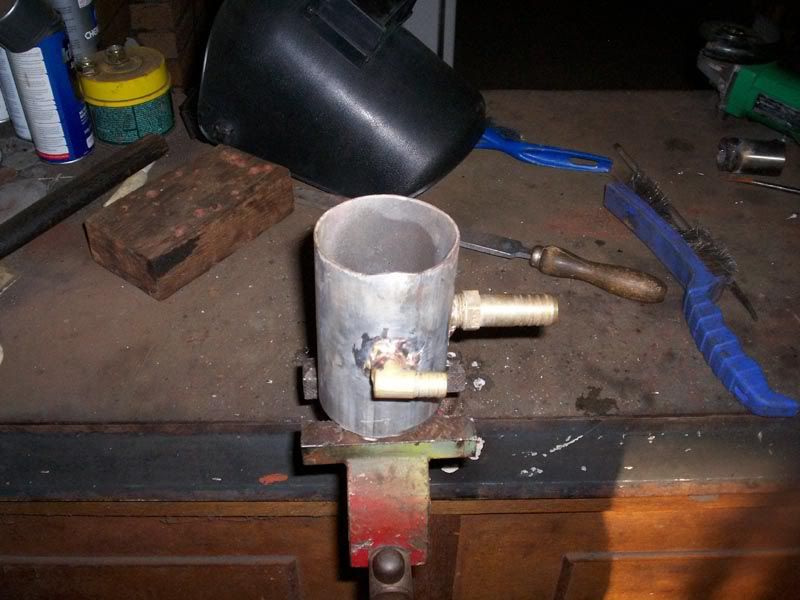
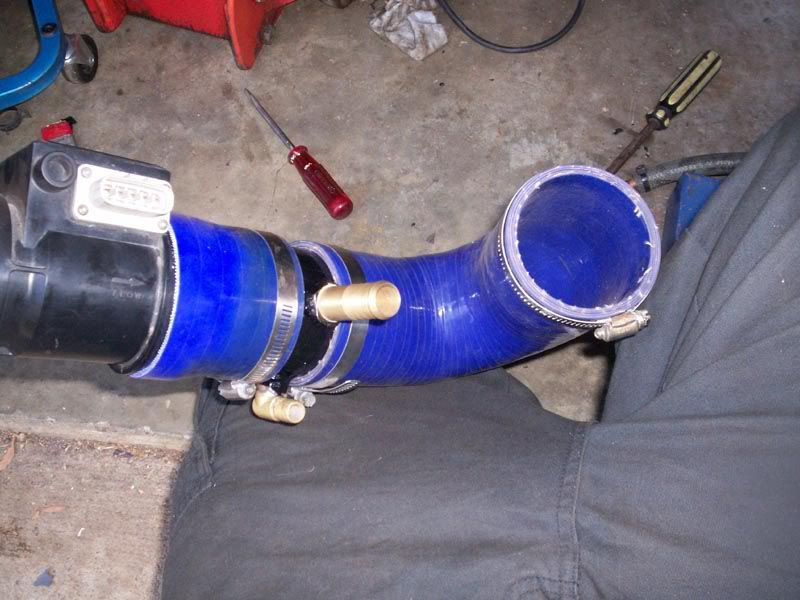
painted and installed
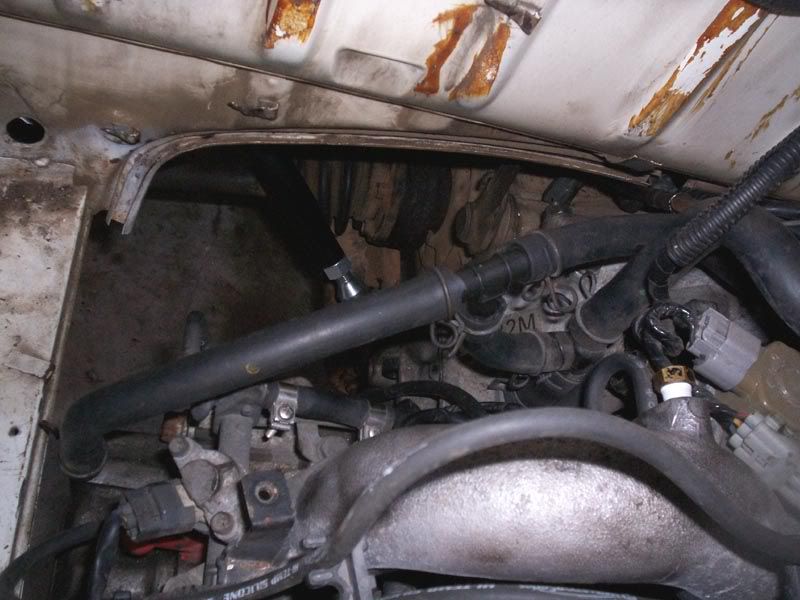
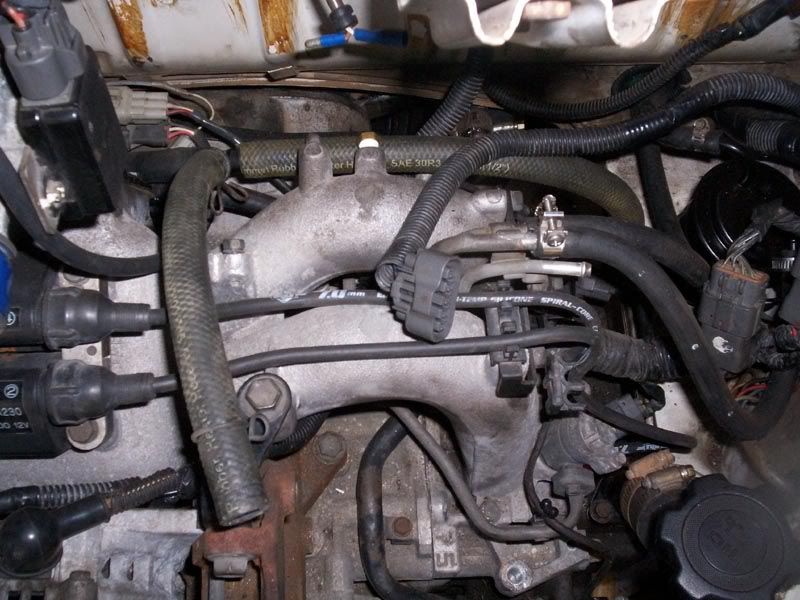
and finally all the PCV hoses needed hooking up
its alot like the aftermarket breather kit setups for vws
the 2 rocker covers are ported, they're connected together and also the case PCV is Tee'd into the hose as well then into the air intake
|
|
|
 Klaus Klaus
Custom Title Time!
    
Posts: 1439
Threads: 100
Registered: August 25th, 2004
Member Is Offline
Location: Wollongong
Theme: UltimaBB Pro Blue ( Default )
Mood: Heavily modified
|
| posted on September 28th, 2009 at 02:23 PM |
|
|
nice one with the coolant lines . I've got 9 flex joints  in the
wagon in the
wagon
|
|
|
 ian.mezz ian.mezz
Wolfsburg Elder
I never said, I could write or spell
      
Posts: 3913
Threads: 280
Registered: September 11th, 2004
Member Is Offline
Location: Newcastle
Theme: UltimaBB Pro Blue ( Default )
Mood: Happy
|
| posted on September 28th, 2009 at 04:41 PM |
|
|
thats the easy part getting the coolant lines to the front, now you have to get em past the moving suspension.
|
|
|
 STIDUB STIDUB
Custom Title Time!
Over it.
    
Posts: 1497
Threads: 57
Registered: June 23rd, 2008
Member Is Offline
Location: Where else but QLD :)
Theme: UltimaBB Pro Blue
Mood: Worn out, for no benefit.
|
| posted on September 28th, 2009 at 05:04 PM |
|
|
pull ye finger out & get it drivable before the weekend, you spend way too much time on here/msn etc
Volkswagen Drivers Club of Queensland - member 
STIDUB - yep its still a work in progress
Vwdcq club car racing/ and crashing while my bug isn't finished.
The above are personal views, no more, no less |
|
|
 colonel mustard colonel mustard
Son of Jim - Creator of Good
     
Posts: 2829
Threads: 51
Registered: February 27th, 2009
Member Is Offline
Theme: UltimaBB Pro Black
|
| posted on September 28th, 2009 at 06:10 PM |
|
|
| Quote: | Originally
posted by STIDUB
pull ye finger out & get it drivable before the weekend, you spend way too much time on here/msn etc
|
Irony.....
|
|
|
 Joel Joel
Scirocco Rare
Now containing 100% E-Wang
        
Posts: 9368
Threads: 211
Registered: February 14th, 2006
Member Is Offline
Location: Northern Rivers NSW
Theme: UltimaBB Pro Purple
Mood: Tact Level 0.00
|
| posted on September 28th, 2009 at 09:12 PM |
|
|
| Quote: | Originally
posted by STIDUB
pull ye finger out & get it drivable before the weekend, you spend way too much time on here/msn etc
|
that aint gonna happen and you know why
klaus, i was trying to make as minimal joints as possible but still have a system that has some flexibilty
we'll see if it works out
the other thing ive been doing when welding up the solid lines is putting a couple of spotwelds on the ends
this will stop the hoses blowing off by giving the hose clamps something to tension against
| Error |
| Sorry, you must be a registered user in order to download attachments. |
|
|
|
|
 ElusiveStranger ElusiveStranger
Officially Full-On Dubber
  
Posts: 330
Threads: 30
Registered: May 28th, 2006
Member Is Offline
Location: Kent. England
Theme: UltimaBB Pro Blue ( Default )
|
| posted on September 29th, 2009 at 03:32 AM |
|
|
Nice work Joel
You might want to look at a WRX 'stat housing. It's inlet is 90 out compared to a NA motor so it faces the front (of the dub)
|
|
|
 Joel Joel
Scirocco Rare
Now containing 100% E-Wang
        
Posts: 9368
Threads: 211
Registered: February 14th, 2006
Member Is Offline
Location: Northern Rivers NSW
Theme: UltimaBB Pro Purple
Mood: Tact Level 0.00
|
| posted on September 29th, 2009 at 08:33 PM |
|
|
cheers for the tip Balders, i remember Jorg doing that with his 22 only problem with mine is that points it straight at my exhaust manifold
ive actually already got the hardlines finished and im halfway through mounting the rad.
im hoping it will self bleed as theres no high points in my system except for the 2 caps which will let any air out
|
|
|
 Joel Joel
Scirocco Rare
Now containing 100% E-Wang
        
Posts: 9368
Threads: 211
Registered: February 14th, 2006
Member Is Offline
Location: Northern Rivers NSW
Theme: UltimaBB Pro Purple
Mood: Tact Level 0.00
|
| posted on October 8th, 2009 at 06:53 PM |
|
|
ok apologies to people who have been following this, i will update it soon just at the moment im night spraying which really screws around my body
clock up bigtime and makes me not a nice person,
people who know me know to stay clear 
but just quick minutes for those who are interested
it is up and running, it didnt make warwick due to a minor issue which the concerned party happily rectified, the tuesday after warwick....... 
i;ve only been for a quick 5 min run out the road mainly due to the fact i havent finished enclosing my radiator
a rubber floor mat over it may work fine in ians bug but in mine i could nearly cook an egg on the fuel tank by the time i got back 
what are people using to close in their rads? ive made an RHS frame that i can screw whatever too but i wanna make it fairly non conductive and not to
heavy
im thinking exterior ply maybe or fibreglass
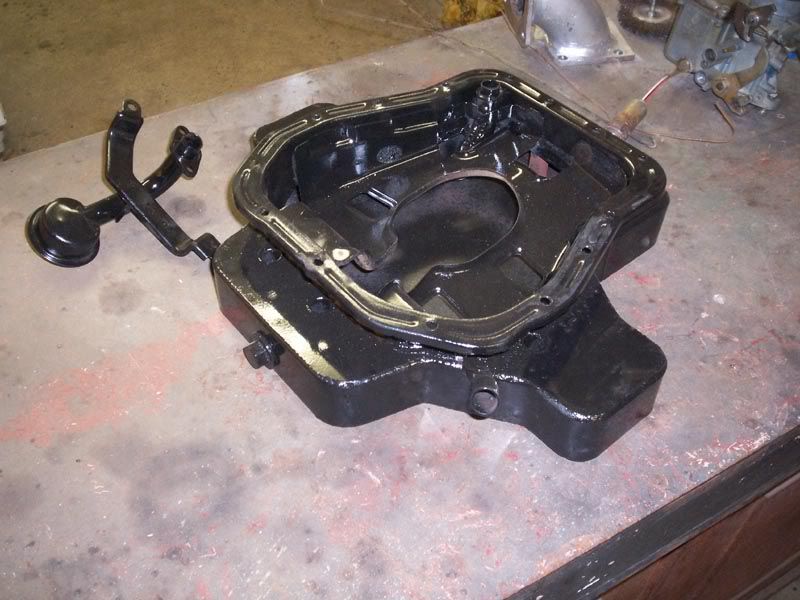
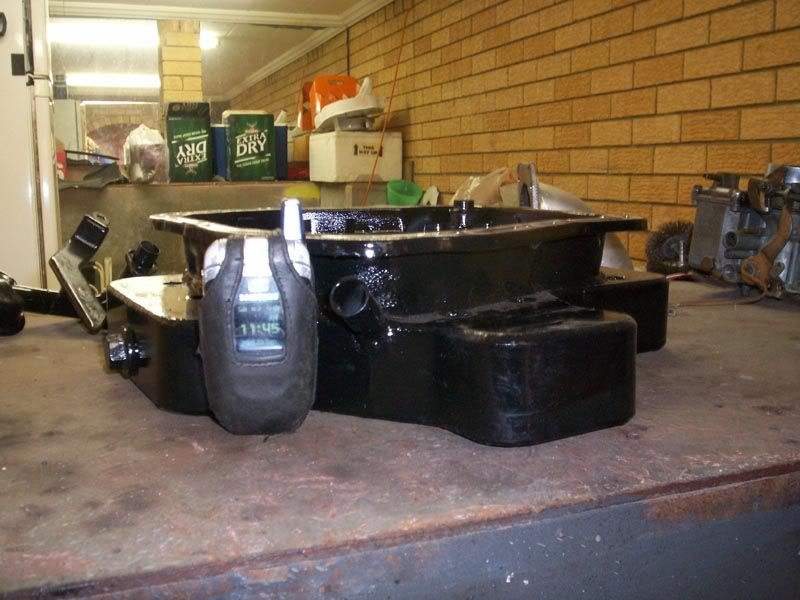
anyway heres a sneak peak of the sump and rad
ground clearance is better than a vw engine with a deep sump and the header hangs down lower so if anythings gonna hit it will be it which im already
used to anyway
| Error |
| Sorry, you must be a registered user in order to download attachments. |
|
| Error |
| Sorry, you must be a registered user in order to download attachments. |
|
|
|
|
 ian.mezz ian.mezz
Wolfsburg Elder
I never said, I could write or spell
      
Posts: 3913
Threads: 280
Registered: September 11th, 2004
Member Is Offline
Location: Newcastle
Theme: UltimaBB Pro Blue ( Default )
Mood: Happy
|
| posted on October 8th, 2009 at 07:13 PM |
|
|
I have a couple of old street 60km/h signs that go over my rubber mat, they are made of alloy and easy to bend and not hard to find some as they are
ever where you look   
your radiator sits really high.
and I dont think you can have two overflow recovery radiator caps,
youll have to get one of those none recovery caps like they have on V6 toyata Camry's
ps the rubber mat makes it easy to check it over, in the running in period  
|
|
|
 Joel Joel
Scirocco Rare
Now containing 100% E-Wang
        
Posts: 9368
Threads: 211
Registered: February 14th, 2006
Member Is Offline
Location: Northern Rivers NSW
Theme: UltimaBB Pro Purple
Mood: Tact Level 0.00
|
| posted on October 8th, 2009 at 08:46 PM |
|
|
might have to go on a good old roadsign adoption missiom, mmm that takes me back 
overflow hose on the rad is just plugged off, only using the one on the header tank
|
|
|
| Pages: 1 2 3 4 5 6 .. 24 |