| [ Total Views: 228347 | Total Replies: 437 | Thread Id: 75812 ] |
| Pages: 1 .. 3 4 5 6 7 .. 15 |
|
|
 ricola ricola
Wolfsburg Wizard
  
Posts: 437
Threads: 9
Registered: February 5th, 2003
Member Is Offline
Location: UK
Theme: UltimaBB Pro Blue ( Default )
|
| posted on November 2nd, 2009 at 05:02 AM |
|
|
Right side wing welds now ground down and left wing all tacked together. I also tried on the stock rear bumper to check for fit, it just needs spacing
back about 30mm..
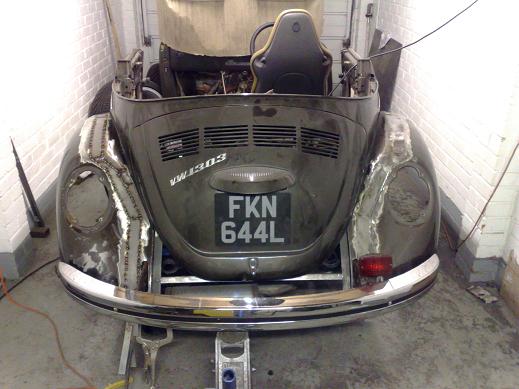
It is lowered but not sure how much, I've lost most references! Final ride height will be set by having hardly any air visible between top of tyre
and wing...
|
|
|
 Flintstones Flintstones
Custom Title Time!
    
Posts: 1077
Threads: 69
Registered: August 27th, 2002
Member Is Offline
Location: Sydney
Theme: UltimaBB Psyche Blue
|
| posted on November 2nd, 2009 at 10:05 PM |
|
|
Its getting there Rich.
how long did each guard take you from start to finish?
|
|
|
 ricola ricola
Wolfsburg Wizard
  
Posts: 437
Threads: 9
Registered: February 5th, 2003
Member Is Offline
Location: UK
Theme: UltimaBB Pro Blue ( Default )
|
| posted on November 2nd, 2009 at 10:41 PM |
|
|
Neither of them are finished, will need to finish off both return lips and them filler work. I think I have about 3 hours in the left wing so far so
not too bad... Will finish weld and grind tonight hopefully.
I also now have bits to make up new front strut mounts as I want to tune camber/caster angles for new ride height.
|
|
|
 Mick058 Mick058
Custom Title Time!
    
Posts: 1580
Threads: 109
Registered: January 29th, 2008
Member Is Offline
Location: Sydney
Theme: UltimaBB Pro Blue ( Default )
|
| posted on November 3rd, 2009 at 06:48 AM |
|
|
frig me thats a lot of work - well done. One question though, would widened fiberglass guards be available?
|
|
|
 ricola ricola
Wolfsburg Wizard
  
Posts: 437
Threads: 9
Registered: February 5th, 2003
Member Is Offline
Location: UK
Theme: UltimaBB Pro Blue ( Default )
|
| posted on November 3rd, 2009 at 06:56 AM |
|
|
Fibreglass ones are available but not cheap and in limited widths. I want the minimum additional width possible (I need 45mm which isn't a common
width). There's also the problem of how long they would take and I also want to put in an air intake to the passenger side to have an enclosed cold
air supply.
|
|
|
 Mick058 Mick058
Custom Title Time!
    
Posts: 1580
Threads: 109
Registered: January 29th, 2008
Member Is Offline
Location: Sydney
Theme: UltimaBB Pro Blue ( Default )
|
| posted on November 3rd, 2009 at 07:05 AM |
|
|
cool, makes sense. loving the progress 
|
|
|
 ricola ricola
Wolfsburg Wizard
  
Posts: 437
Threads: 9
Registered: February 5th, 2003
Member Is Offline
Location: UK
Theme: UltimaBB Pro Blue ( Default )
|
| posted on November 8th, 2009 at 02:57 AM |
|
|
Rolled it out to get a better appreciation of how it will all look. I was able to manually pull the stock front wing out slightly to cover the front
wheels once I had moved the top strut mount inboards and adjusted the suspension arm as short as it would go.
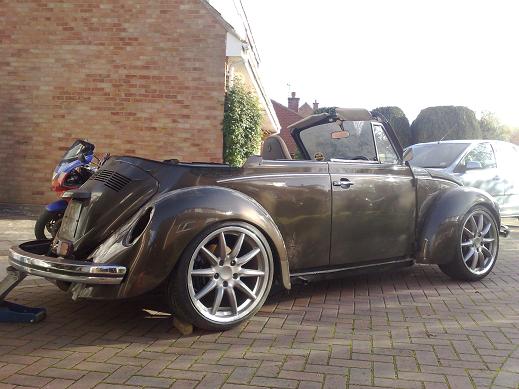
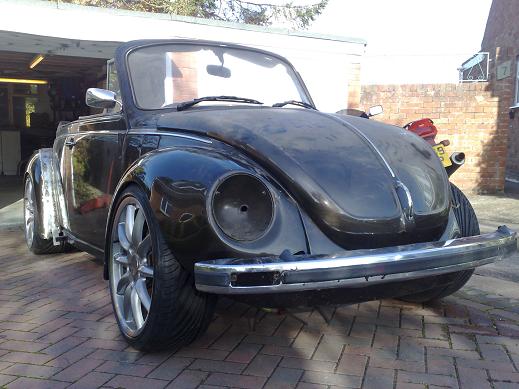
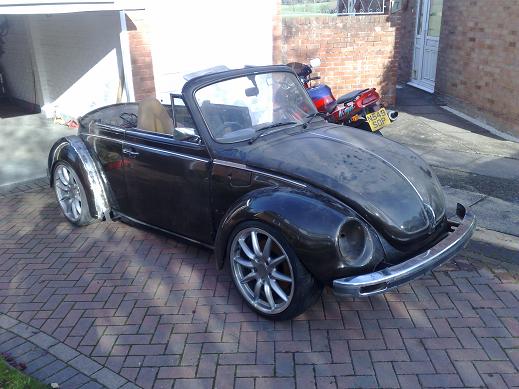
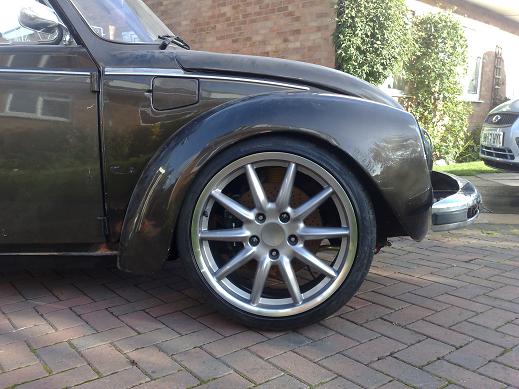
My problem now is that the tyre rubs the wing at the back and I also need more caster. I have two options:
1: move the anti-roll bar mounts forwards to centralise the wheel in the wing
2: re-shape the rear of the wing, this would give more clearance everywhere
Has anybody else come across this problem before? I've seen some biased bushes for sale that push the bar forwards but it doesn't look like they
would be enough for me..
|
|
|
 STIDUB STIDUB
Custom Title Time!
Over it.
    
Posts: 1497
Threads: 57
Registered: June 23rd, 2008
Member Is Offline
Location: Where else but QLD :)
Theme: UltimaBB Pro Blue
Mood: Worn out, for no benefit.
|
| posted on November 8th, 2009 at 05:06 AM |
|
|
cant hurt to try, bushings are pretty cheap...
perhaps a guard roller could help, dont know how it would go on bug guards though but the jap car crowd seem to love them...
looking good though, will chat to you soon 
Volkswagen Drivers Club of Queensland - member 
STIDUB - yep its still a work in progress
Vwdcq club car racing/ and crashing while my bug isn't finished.
The above are personal views, no more, no less |
|
|
 ricola ricola
Wolfsburg Wizard
  
Posts: 437
Threads: 9
Registered: February 5th, 2003
Member Is Offline
Location: UK
Theme: UltimaBB Pro Blue ( Default )
|
| posted on November 8th, 2009 at 06:11 AM |
|
|
Nah, roller wouldn't work, the lip actually overlaps the tyre at the back and would also give a problem in bump with much of a steering angle. Think
I'll try unbolting the bar brackets and moving it forwards to see how much it needs moving and if that fixes the problem. I'm thinking about an inch
would do it...
|
|
|
 Flintstones Flintstones
Custom Title Time!
    
Posts: 1077
Threads: 69
Registered: August 27th, 2002
Member Is Offline
Location: Sydney
Theme: UltimaBB Psyche Blue
|
| posted on November 8th, 2009 at 08:50 PM |
|
|
Rich,
The reason why the back of the front guard now rubs, is because you pulled the centre of the arch outwards, which forced the rear part to move
inwards, thus giving you the problem you have now.
If you have the flexibility in being able to move the suspension forward do that as it's going to be an easier/cheaper method, other wise widening
the guard in similar fashion to the rears I think would be better, as the shape of the guards are different front to rear. (rears go up and then curve
inwards to the body where the fronts are sort of diagonal from the tyre with a flat curve to the body)
One thing that really bothers me now is the look of the front bar in relation to the position of the guards (I know its all standard fitment) but the
rear bar looks so nice shaped to the widen rear guards.
Personally I'd have to cut'n'shut the front bar so that it resembles the rear arrangement as I like the way the rear bar doesn't interrupt the
lines of the guards flowing onto the rear apron.
On another note, I was studying your wheels and if you painted them black, and polished up just the crest of each of the spokes as well as the rim, it
would like like a modern big diameter Porsche gas burner rim!
Looking great by the way
Cheers
D
|
|
|
 1303Steve 1303Steve
A.k.a.: Steve Carter
Scirocco Rare
        
Posts: 8650
Threads: 564
Registered: August 27th, 2002
Member Is Offline
Location: Sydney, NSW
Theme: UltimaBB Pro Blue ( Default )
Mood: Parrot Heading
|
| posted on November 8th, 2009 at 10:43 PM |
|
|
Hi Rich
Inspiring post as usual. When you move the wheel forward you need to watch the tyre touching the headlight bucket, I had this issue with my yellow
bug.
Can you get a front sway bar with adjustable caster over there? It might be a case of adjustable front sway bar and moving the strut tops around to
get it where you want it.
Steve
|
|
|
 ricola ricola
Wolfsburg Wizard
  
Posts: 437
Threads: 9
Registered: February 5th, 2003
Member Is Offline
Location: UK
Theme: UltimaBB Pro Blue ( Default )
|
| posted on November 9th, 2009 at 02:38 AM |
|
|
D: I'll try moving the ARB first, I know what you are saying about the p;ullking about moving the rear but I haven't moved things that much, all by
hand, not real brute force... What do you mean by the bar? Bumper? I'll be running the rims as they are for a while, it isn't that noticeable but
the rims are polished wiht the centres silver, should show up nicely in sunlight.
Steve: Not checked bucket clearance but will do. I haven't seen adjustable ARBs here for caster, think I have seen 'lowered' versions which are a
bit shorter. I was all set to make up the new top mounts but will obviously play around with it all now until I get where I need to be...
|
|
|
 1303Steve 1303Steve
A.k.a.: Steve Carter
Scirocco Rare
        
Posts: 8650
Threads: 564
Registered: August 27th, 2002
Member Is Offline
Location: Sydney, NSW
Theme: UltimaBB Pro Blue ( Default )
Mood: Parrot Heading
|
| posted on November 9th, 2009 at 07:57 AM |
|
|
Hi Rich
I had one on my yellow 1302 which I will reuse on my 1303, they were made by Whiteline, the straight shank part that goes through the control arm is
longer in as it allows the control arm to be moved forward further, it then adjusted with shims.
Whiteline stopped making the adjustable caster front bars but they are now made by these people http://www.selbys.com.au/
I've seen caster adjustment setups on other makes of cars, they used an adjustable section where the sway bar bolts to the front point of the
chassis.
Steve
|
|
|
 ricola ricola
Wolfsburg Wizard
  
Posts: 437
Threads: 9
Registered: February 5th, 2003
Member Is Offline
Location: UK
Theme: UltimaBB Pro Blue ( Default )
|
| posted on November 9th, 2009 at 08:12 AM |
|
|
Cheers for info Steve, but I've already spent the cash on an uprated bar, I'll just work with what I've already got or costs will spiral, lol!
I just went out and made up a simple 20mm spacer and it pushes the wheel forwards to exactly the right position, lucky guess! Really good clearance to
wing at all steering angles and plenty of space to the headlight bucket (maybe it's just sloping headlight buckets which have clearance problems?
|
|
|
 VWFREAK VWFREAK
A.k.a.: Peter / Bones
Son of Jim - Creator of Good
VWFREAK
     
Posts: 2577
Threads: 264
Registered: May 11th, 2004
Member Is Offline
Location: ACT
Theme: UltimaBB Pro Blue ( Default )
Mood: FREAKY
|
| posted on November 9th, 2009 at 05:11 PM |
|
|
Coming along nicely and awesome work on the guards
|
|
|
 Flintstones Flintstones
Custom Title Time!
    
Posts: 1077
Threads: 69
Registered: August 27th, 2002
Member Is Offline
Location: Sydney
Theme: UltimaBB Psyche Blue
|
| posted on November 9th, 2009 at 11:52 PM |
|
|
| Quote: | Originally
posted by ricolaWhat do you mean by the bar? Bumper?
|
Yep, the bumper bars.
Sorry about the slang
Cheers
|
|
|
 ricola ricola
Wolfsburg Wizard
  
Posts: 437
Threads: 9
Registered: February 5th, 2003
Member Is Offline
Location: UK
Theme: UltimaBB Pro Blue ( Default )
|
| posted on November 16th, 2009 at 06:56 AM |
|
|
Had a spare hour or so today so welded in the air intake to the rear wing. It will feed a panel filter within a custom airbox built in to the inner
wing
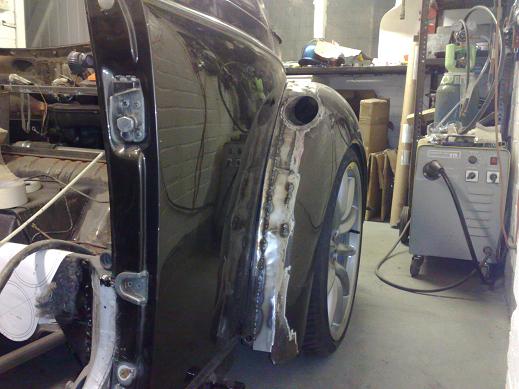
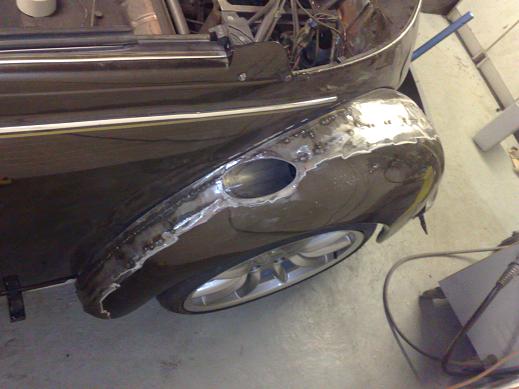
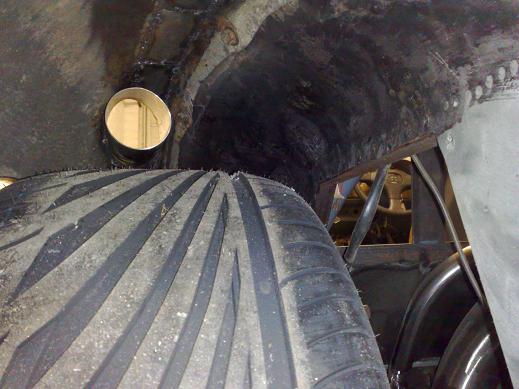
|
|
|
 Flintstones Flintstones
Custom Title Time!
    
Posts: 1077
Threads: 69
Registered: August 27th, 2002
Member Is Offline
Location: Sydney
Theme: UltimaBB Psyche Blue
|
| posted on November 16th, 2009 at 07:31 AM |
|
|
Looks sweet!!
How much clearance have you got between the intake and the tyre?
Cheers
D
|
|
|
 ricola ricola
Wolfsburg Wizard
  
Posts: 437
Threads: 9
Registered: February 5th, 2003
Member Is Offline
Location: UK
Theme: UltimaBB Pro Blue ( Default )
|
| posted on November 16th, 2009 at 07:36 AM |
|
|
I didn't measuree, but probably at least 3" at ride height? If I went any higher the intake would have got too big with the curvature of the wing...
|
|
|
 ricola ricola
Wolfsburg Wizard
  
Posts: 437
Threads: 9
Registered: February 5th, 2003
Member Is Offline
Location: UK
Theme: UltimaBB Pro Blue ( Default )
|
| posted on November 26th, 2009 at 07:32 AM |
|
|
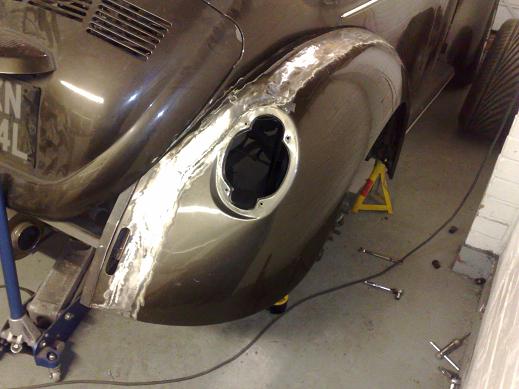
Been busy improving my CV lately but did get a chance to do some more work on one of the wings, return lips remade and lots of metal-bashing to get
the panels as close to the final shape as possible to absolutely minimise the amount of filler required. Hard to see in this pic but the flat in-fill
strip now has a nice amount of curvature to it and blends with the other halves of the wing.
|
|
|
 Flintstones Flintstones
Custom Title Time!
    
Posts: 1077
Threads: 69
Registered: August 27th, 2002
Member Is Offline
Location: Sydney
Theme: UltimaBB Psyche Blue
|
| posted on November 26th, 2009 at 09:48 PM |
|
|
one more to go 
reminds me of the effort I went through for mine, but I did all four!!
Cheers
|
|
|
 ricola ricola
Wolfsburg Wizard
  
Posts: 437
Threads: 9
Registered: February 5th, 2003
Member Is Offline
Location: UK
Theme: UltimaBB Pro Blue ( Default )
|
| posted on December 15th, 2009 at 04:58 AM |
|
|
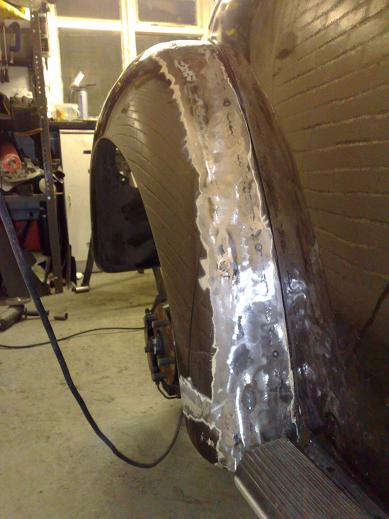
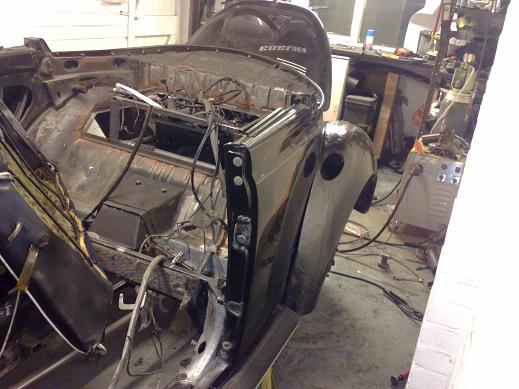
I had to shorten the outside section of the rear wings to line up vertically with the bottom of the running boards. I'll be splicing a long thin
triangle to make the running board fit like stock to hide the extra width a bit.
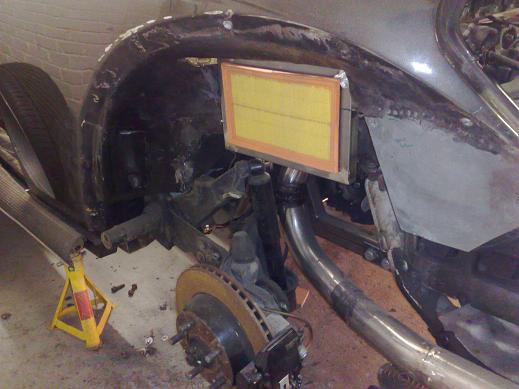
Inner wing cut away to make space for the panel air filter
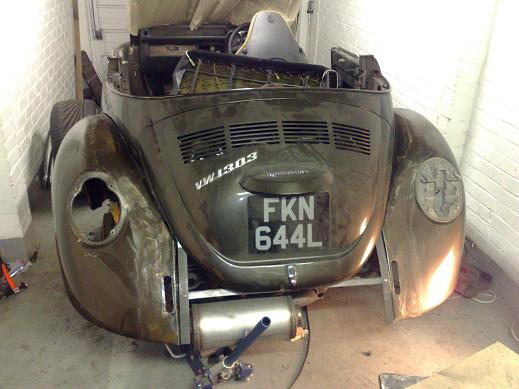
Both wings now done apart from final paint prep which I'll do in the summer, bit of paint on them to stop rusting
|
|
|
 Flintstones Flintstones
Custom Title Time!
    
Posts: 1077
Threads: 69
Registered: August 27th, 2002
Member Is Offline
Location: Sydney
Theme: UltimaBB Psyche Blue
|
| posted on December 15th, 2009 at 09:58 AM |
|
|
now it's really starting to look complete.
How are you going to close in the filter panel opening to the guard intake, fibreglass?
That dub's rear end looks nice!!
Cheers
|
|
|
 Jak Rizzo Jak Rizzo
Insano Dub Head
   
Posts: 837
Threads: 67
Registered: April 26th, 2004
Member Is Offline
Location: Central Coast
Theme: UltimaBB Pro Blue ( Default )
Mood: Pastizzi eating
|
| posted on December 15th, 2009 at 10:03 AM |
|
|
That air intake looks familiar Rich, awesome job, makes mine look like a stocker.
Thanks for the updates, even though we on the other side of the world, we all appreciatte your work.
regards
Jak
|
|
|
 colonel mustard colonel mustard
Son of Jim - Creator of Good
     
Posts: 2829
Threads: 51
Registered: February 27th, 2009
Member Is Offline
Theme: UltimaBB Pro Black
|
| posted on December 15th, 2009 at 10:09 AM |
|
|
Looks awesome man. having an air intake on both sides??
|
|
|
 ricola ricola
Wolfsburg Wizard
  
Posts: 437
Threads: 9
Registered: February 5th, 2003
Member Is Offline
Location: UK
Theme: UltimaBB Pro Blue ( Default )
|
| posted on December 15th, 2009 at 10:41 PM |
|
|
Cheers guys, will be making a load of progress now as I've finished work for the year!
I'm making closing panels around the filter on both sides out of steel, bought a beadroller so will probably put some small features in them too  I'm just going with the one side intake, I thought about two but not sure
what to use it for on the other side and I hate dummy features. Besides, it will make people do a double take! I'm just going with the one side intake, I thought about two but not sure
what to use it for on the other side and I hate dummy features. Besides, it will make people do a double take!
|
|
|
 Jak Rizzo Jak Rizzo
Insano Dub Head
   
Posts: 837
Threads: 67
Registered: April 26th, 2004
Member Is Offline
Location: Central Coast
Theme: UltimaBB Pro Blue ( Default )
Mood: Pastizzi eating
|
| posted on December 16th, 2009 at 04:50 AM |
|
|
my spray painter wanted to put a sticker on mine that said no junk mail.......
Jak
|
|
|
 ricola ricola
Wolfsburg Wizard
  
Posts: 437
Threads: 9
Registered: February 5th, 2003
Member Is Offline
Location: UK
Theme: UltimaBB Pro Blue ( Default )
|
| posted on December 16th, 2009 at 05:39 AM |
|
|
lol, I'll be putting a mesh shield at the back of the intake tube to stop people poking stuff down it. Out of interest, how does your cope with rain
Jak? I was wondering about a water drain but don't want to lose all that ram air..
|
|
|
 Jak Rizzo Jak Rizzo
Insano Dub Head
   
Posts: 837
Threads: 67
Registered: April 26th, 2004
Member Is Offline
Location: Central Coast
Theme: UltimaBB Pro Blue ( Default )
Mood: Pastizzi eating
|
| posted on December 16th, 2009 at 01:34 PM |
|
|
I too was worried about people putting rubbish in there, but as yet it's never happened & my car is driven & left everywhere, ie: school,
shopping centre carparks etc. I think that most people don't even see it, especially being a dark colur, it blends in quite nicely.
As for the rain, i had to keep reminding myself to put some drain holes in my duct for rain & after all this time I still havn't done it & I
have driven through some terrential rain. it's never been a problem.
regards
Jak
|
|
|
 ricola ricola
Wolfsburg Wizard
  
Posts: 437
Threads: 9
Registered: February 5th, 2003
Member Is Offline
Location: UK
Theme: UltimaBB Pro Blue ( Default )
|
| posted on December 17th, 2009 at 03:14 AM |
|
|
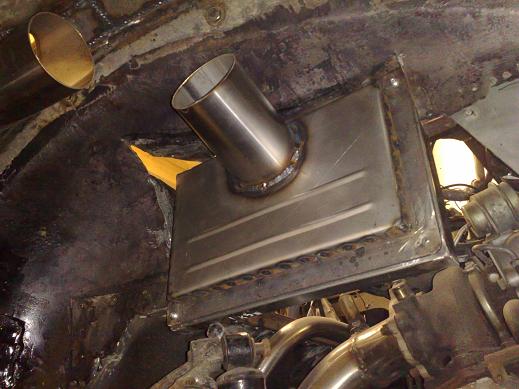
Filter housing to wing intake made up of angle for the framework which compresses the panel filter perimeter seal, then some beadrolled sheet metal to
fill in the gaps. Just need a 90 degree silicone bend now to join them up.
|
|
|
| Pages: 1 .. 3 4 5 6 7 .. 15 |