| [ Total Views: 26674 | Total Replies: 197 | Thread Id: 101415 ] |
| Pages: 1 2 3 .. 7 |
|
|
 roverv8bay roverv8bay
Officially Full-On Dubber
  
Posts: 250
Threads: 32
Registered: January 30th, 2013
Member Is Offline
Theme: UltimaBB Pro Blue ( Default )
|
| posted on March 31st, 2013 at 11:17 AM |
|
|
2bays 2 different builds 1will be 4x4
G'day all. just a kick off my daughter bought her husband a 74 bay as a surprise xmas present then she bought her dad a76 bay the son in law's is
gong to be a resto but running ej18 it was originally a 1600 they have bought a 1963 caravan to resto to go behind it. It has minimal rust & minor
ding's. Mine is a different type of build it has had the rear gaurd's cut & rolled to baja style by previous owner it has been in a shed since
rego ran out in 05 so body is pretty good. my plans are for a baja bus but not in usual style. I have sopent many hour's laying under a photo taking
to find 4x4 spindles that could possibly fit the front end after a lot of measuring closest is rodeo. The drive train is 3.5 ltr rover v8 behind front
seat backed up with a hiace alloy case 5speed same shape as supra but side shift linkage's this is then connected to a 720 Nissan transfer case which
is divorced from trans by a short shaft made up of kombi cv joint a drive flange of kombi box & shaft machined to have the hiace gearbox yoke
welded to it the diff's are vt v6 auto commodore the rear drive shaft is pretty short so I am using a late model 180b half shaft as a tail shaft as
it bolts to transfer case need to modify the rear flange for diff joint but not an issue the front shaft is a combination of commodore wagon &
180b half shaft to allow for slide. the whole drive train will be mounted on to a separate 10cm x 5 cm boxed frame bolted to inner kombi rails. to get
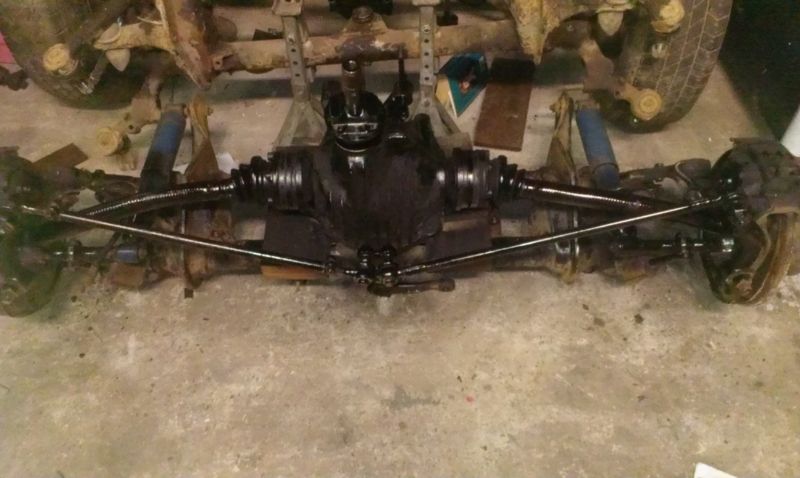
clearance for front diff I have moved the centre steering arm to the bottom of the beam instead of thru the middle unlike the factory built mules for
testing the syncro running gear. the shifter is hiace remote but using marine style control cables instead of bar type linkages to clear the motor the
engineer doing my machining has assured me he can cut & shut the drive shaft's to take kombi outer's for the rear & rodeo front's to
commodore shafts with out any worries so that's the biggest expense out of the way. I am tossing up wether to use straight lpg twin carby manifold
I have or stay with the injection. pics to follow
ernie
|
|
|
 roverv8bay roverv8bay
Officially Full-On Dubber
  
Posts: 250
Threads: 32
Registered: January 30th, 2013
Member Is Offline
Theme: UltimaBB Pro Blue ( Default )
|
| posted on April 1st, 2013 at 03:31 PM |
|
|
G'day ian. yes it's called a syncro of which a mate has 3 2 for part's to keep his ej20 turbo on the road which after 4 gearbox's it's sitting in
his shed unreg as he is sick of doing his money on trans repairs he is saving up to do a subaru gears conversion we have sorted out mount's etc for
it with it you have to spend thousnd's to get a decoupler to drop awd then the same for lockerdiff ho freewheeling hub's available so even with
decoupler the front diff still drags the weight of the tailshaft. I had planned to buy the better body but prefer the bay shape
ernie
|
|
|
 roverv8bay roverv8bay
Officially Full-On Dubber
  
Posts: 250
Threads: 32
Registered: January 30th, 2013
Member Is Offline
Theme: UltimaBB Pro Blue ( Default )
|
| posted on April 5th, 2013 at 08:44 AM |
|
|
G'day all sent intermediate shaft between gear box & transfer case to be built using kombi halfshaft machined to have the bolt on flange of the
nissan case machined out to a press fit & welded on. On the gearbox side of the cv joint will be done the same to take the toyota input yoke this
will give flex & front rear movement between them & gives me an extra 75 mm's in length of everything. I bought a davis craig electric water
pump & remote oil cooler filter setup this will give me An extre 100 mm's. Tried to fit extractors but no joy don't want to make the hole for
motor any bigger so using p6b manifold nice fit snug to block. piking up the radiator & gear box on monday so should be able to start building the
frame to mount everything on it will be set up hopefully so the motor gearbox transfer can be liffted out thru side door in 1 piece. 1 good things is
it's all aluminium cased so not much weight in the centre. Can anyone tell me can I fit rear facing seats behind the front seat's as i would like to
pu buckets on both sides of the engine box there's enough room. All for now
Ernie.
|
|
|
 roverv8bay roverv8bay
Officially Full-On Dubber
  
Posts: 250
Threads: 32
Registered: January 30th, 2013
Member Is Offline
Theme: UltimaBB Pro Blue ( Default )
|
| posted on April 13th, 2013 at 07:26 PM |
|
|

|
|
|
 roverv8bay roverv8bay
Officially Full-On Dubber
  
Posts: 250
Threads: 32
Registered: January 30th, 2013
Member Is Offline
Theme: UltimaBB Pro Blue ( Default )
|
| posted on April 13th, 2013 at 07:27 PM |
|
|

|
|
|
 roverv8bay roverv8bay
Officially Full-On Dubber
  
Posts: 250
Threads: 32
Registered: January 30th, 2013
Member Is Offline
Theme: UltimaBB Pro Blue ( Default )
|
| posted on April 15th, 2013 at 08:45 PM |
|
|
G'day all. picked up 5 speed today a wash & rattlecan rebuild


|
|
|
 roverv8bay roverv8bay
Officially Full-On Dubber
  
Posts: 250
Threads: 32
Registered: January 30th, 2013
Member Is Offline
Theme: UltimaBB Pro Blue ( Default )
|
| posted on April 16th, 2013 at 09:02 AM |
|
|
G'day all. The ej18 had blue silicone smeared under heads between block took it back got another 1 of the floor when i started stripping &
cleaning it found it's an ej22 bonus for $250.00 including complete harness & computer. some pics of stuff for my 4x4 project the LED lights are
park & blinker I plan on filling in the front vent & blinker holes & recessing lights into front
|
|
|
 Doug Sweetman Doug Sweetman
Veteran Volks Folk
Nil Bastardo Carborundum
    
Posts: 2128
Threads: 58
Registered: September 23rd, 2002
Member Is Offline
Location: Perth, W.A
Theme: UltimaBB Pro Blue ( Default )
Mood: sweeeeet 
|
| posted on April 16th, 2013 at 11:07 AM |
|
|
Neat project - very cool stuff !
|
|
|
 roverv8bay roverv8bay
Officially Full-On Dubber
  
Posts: 250
Threads: 32
Registered: January 30th, 2013
Member Is Offline
Theme: UltimaBB Pro Blue ( Default )
|
| posted on April 19th, 2013 at 12:01 AM |
|
|
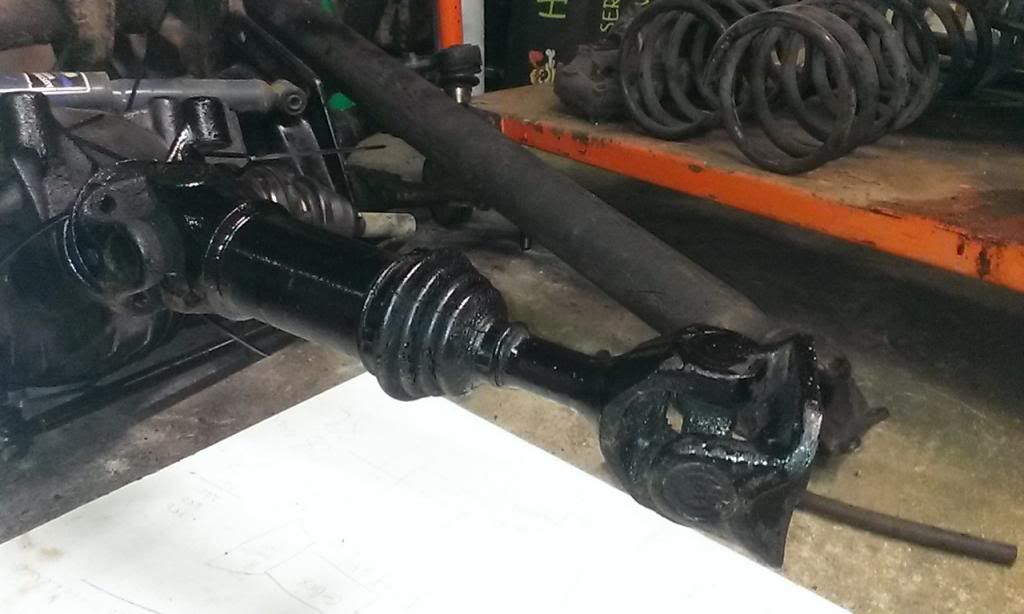
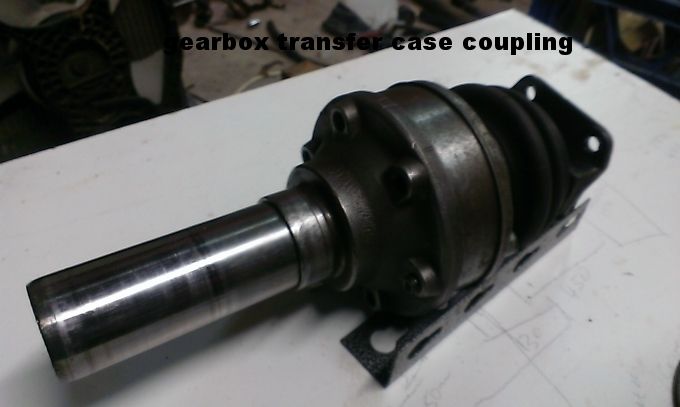
G'day all. Intermediate shaft also the standard nissan shaft I could havs had it shortened but still tight for space. the kombi drive flange has to
have the spline removed to a press fit tolerance for the toyota slip yoke to go into the other end is a kombi axle also press fit into flange of
transfer case
| Error |
| Sorry, you must be a registered user in order to download attachments. |
|
| Error |
| Sorry, you must be a registered user in order to download attachments. |
|
| Error |
| Sorry, you must be a registered user in order to download attachments. |
|
|
|
|
 roverv8bay roverv8bay
Officially Full-On Dubber
  
Posts: 250
Threads: 32
Registered: January 30th, 2013
Member Is Offline
Theme: UltimaBB Pro Blue ( Default )
|
| posted on April 19th, 2013 at 12:22 AM |
|
|
G'day all. More of the shaft insitu. I used this similar set up when the lj50 & 80 suzuki 4x4 were getting corolla & 120y motors fitted in
the same type of position the companies doing the full fitting kits supplied a solid yoke that bolted to the transfer case & was unfogiving if you
didn't have everything lined up spot on I found it allowed movement bach & forth up & down but was compact.
| Error |
| Sorry, you must be a registered user in order to download attachments. |
|
| Error |
| Sorry, you must be a registered user in order to download attachments. |
|
|
|
|
 matberry matberry
Super Moderator
Go hard or go home
      
Posts: 8114
Threads: 134
Registered: March 7th, 2006
Member Is Offline
Location: Cooroy Qld
Theme: UltimaBB Pro Blue
Mood: enjoying waving at all my Kombi buddies from my T3
|
| posted on April 19th, 2013 at 09:32 AM |
|
|
Now that IS S-H-O-R-T
Matt Berry Motorsports...air cooled advice, repairs and mods Ph 0408 704 662
OFF-ROAD,CIRCUIT,DRAG,STREET,ENDURANCE
 |
|
|
 roverv8bay roverv8bay
Officially Full-On Dubber
  
Posts: 250
Threads: 32
Registered: January 30th, 2013
Member Is Offline
Theme: UltimaBB Pro Blue ( Default )
|
| posted on April 19th, 2013 at 09:59 PM |
|
|
G'day Matt. good to have a quick catch up the other day. that shaft is between the transmission & the transfer case just in case people may
confuse it for the rear tail shaft. I spent a little time today just setting front diff up to bay beam to check for axle alignment and clearance on
steering arm. I should be able to fit the commodore diff rear mount into area between beams & bend up a 5cm tube xmember to bolt between chassis
rails & bolt to top drive shaft flange


[img]
http://i1273.photobucket.com/albums/y406/roverv8kombi/027_zpsd6d41382.jpg[/img]
|
|
|
 helbus helbus
A.k.a.: Pete S
Super Administrator
Mad fabricator, paint and body
        
Posts: 7386
Threads: 312
Registered: September 1st, 2002
Member Is Offline
Location: In the garage chopping cars into bits
Theme: UltimaBB Pro Blue
Mood: In the thinking chair
|
| posted on April 20th, 2013 at 07:58 PM |
|
|
Good work, keep at it
|
|
|
 roverv8bay roverv8bay
Officially Full-On Dubber
  
Posts: 250
Threads: 32
Registered: January 30th, 2013
Member Is Offline
Theme: UltimaBB Pro Blue ( Default )
|
| posted on April 21st, 2013 at 09:40 AM |
|
|
G'day all. thanks helbus that's a compliment coming from people that are well VW land by known by their name. Just 2 pics today spent a 1/2 hour
today just setting diff into place on a complete beam along with bent axles they are hose just to sort out clearance issues. The front mount will be
the original commodore mounted to a gusseted 90deg angle of the lower beam. If you look at the pinion flange you will see the Nissan tailshaft flange
it has the same size locator as the commodore so just have to drill 4 holes for the rear Nissan drive shaft to bolt up that made my day I envisaged
all sorts of oddball to bolt them together. Note the clearance on the relocated center arm I know the tierods are loose but still plenty of room.t
the spindle should be ready on Monday to test fit. more then


|
|
|
 Doug Sweetman Doug Sweetman
Veteran Volks Folk
Nil Bastardo Carborundum
    
Posts: 2128
Threads: 58
Registered: September 23rd, 2002
Member Is Offline
Location: Perth, W.A
Theme: UltimaBB Pro Blue ( Default )
Mood: sweeeeet 
|
| posted on April 21st, 2013 at 11:07 AM |
|
|
Mate that's just brilliant ! Would never have thought it possible to graft a diff to a beam front end !
|
|
|
 roverv8bay roverv8bay
Officially Full-On Dubber
  
Posts: 250
Threads: 32
Registered: January 30th, 2013
Member Is Offline
Theme: UltimaBB Pro Blue ( Default )
|
| posted on April 23rd, 2013 at 07:02 PM |
|
|
G'day Doug. the JEG is something to look at it's basically copying off but modernised a bit. here are some body & under floor pics pretty tidy
note the speedo don't know how many times or any history if anyone recognises it please let me know it was from NSW. the guards were cut & rolled
when I bought it. the roof is the worst for brown stuff but only surface the flares are from volks conversions makes the rear look finished
|
|
|
 roverv8bay roverv8bay
Officially Full-On Dubber
  
Posts: 250
Threads: 32
Registered: January 30th, 2013
Member Is Offline
Theme: UltimaBB Pro Blue ( Default )
|
| posted on April 27th, 2013 at 02:32 PM |
|
|
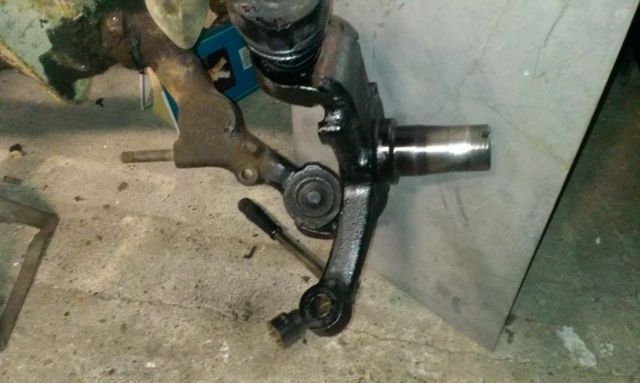
G'day all just fitted spindle bit of a problem so back to engineers he has to move the bottom ball joint hole to get enough adjustment on camber. I
will also have to spread the beams by about 5 cm's so I will get new plates watercut out of 13mm plate with the body mount holes set to provide 50mm
lift as well. Any thoughts or opinions gratefully received on the plare size as it will replace the pressed metal beam support set ups
ernie

|
|
|
 Doug Sweetman Doug Sweetman
Veteran Volks Folk
Nil Bastardo Carborundum
    
Posts: 2128
Threads: 58
Registered: September 23rd, 2002
Member Is Offline
Location: Perth, W.A
Theme: UltimaBB Pro Blue ( Default )
Mood: sweeeeet 
|
| posted on April 27th, 2013 at 03:26 PM |
|
|
Ernie, half inch plate I would think is fine, assuming you are talking about standard structural grade plate (250MPa yield). If you are worried, you
could try and find some boiler plate cut offs (430 - 460MPa yield) which will give you a bit more strength.
|
|
|
 roverv8bay roverv8bay
Officially Full-On Dubber
  
Posts: 250
Threads: 32
Registered: January 30th, 2013
Member Is Offline
Theme: UltimaBB Pro Blue ( Default )
|
| posted on April 27th, 2013 at 08:24 PM |
|
|
G'day Doug. Thanks for the information. Went back to shed this arvo and spent time with a tape measure & found that the lower arm is approx. 15mm
longer than the bottom. If the bottom torsion bars are the same as the top by using top arms on the bottom I will get the adjustment just have to
figure out lower shock mounts for the arms. So tomorrow will be spent stripping the font beams out to check out if it will do what I think.
ernie
|
|
|
 roverv8bay roverv8bay
Officially Full-On Dubber
  
Posts: 250
Threads: 32
Registered: January 30th, 2013
Member Is Offline
Theme: UltimaBB Pro Blue ( Default )
|
| posted on May 12th, 2013 at 07:28 PM |
|
|
G'day all. picked up Datsun 1600 halfshafts today $20.00 for 2 cheap. compared to custom built tailshaft the rear 1 will be used complete as is &
the other will have the fixed uni joint end machined off then inserted into front shaft 
|
|
|
 Doug Sweetman Doug Sweetman
Veteran Volks Folk
Nil Bastardo Carborundum
    
Posts: 2128
Threads: 58
Registered: September 23rd, 2002
Member Is Offline
Location: Perth, W.A
Theme: UltimaBB Pro Blue ( Default )
Mood: sweeeeet 
|
| posted on May 12th, 2013 at 10:16 PM |
|
|
Love this thread... Real mad scientist stuff !
|
|
|
 helbus helbus
A.k.a.: Pete S
Super Administrator
Mad fabricator, paint and body
        
Posts: 7386
Threads: 312
Registered: September 1st, 2002
Member Is Offline
Location: In the garage chopping cars into bits
Theme: UltimaBB Pro Blue
Mood: In the thinking chair
|
| posted on May 12th, 2013 at 10:54 PM |
|
|
Awesome work. Thinking outside the mainstream. And then making it happen
|
|
|
 nils nils
Fahrvergnugen
   
Posts: 971
Threads: 65
Registered: January 11th, 2008
Member Is Offline
Location: central coast
Theme: UltimaBB Pro Blue ( Default )
|
| posted on May 13th, 2013 at 05:51 AM |
|
|
I was wondering how you where going to make the arm/spindle combo fit together, seeing as the rodeo has quite a different spacing between the joints.
Any idea how spreading the beam will effect caster?
Keep up the good work, very egger to see how this turns out
Quit calling rust patina
|
|
|
 roverv8bay roverv8bay
Officially Full-On Dubber
  
Posts: 250
Threads: 32
Registered: January 30th, 2013
Member Is Offline
Theme: UltimaBB Pro Blue ( Default )
|
| posted on May 13th, 2013 at 12:54 PM |
|
|
G'day Nils. yes to splitting beam if I don't it puts a load on the balljoint angles. the caster should be the same as kombi stubs as I'm still
using top adjuster if I need more I will get another adjuster cone put into bottom joint. here are some pics of intermediate shaft now finished just
have to press Toyota gearbox joke into kombi gearbox cv flange then get engineer to weld for me my welding is okay for general mounts & frame work
but they will have torque going thru them


|
|
|
 roverv8bay roverv8bay
Officially Full-On Dubber
  
Posts: 250
Threads: 32
Registered: January 30th, 2013
Member Is Offline
Theme: UltimaBB Pro Blue ( Default )
|
| posted on May 14th, 2013 at 08:23 AM |
|
|
Gday all. shaft assembled just have to get it welded


|
|
|
 roverv8bay roverv8bay
Officially Full-On Dubber
  
Posts: 250
Threads: 32
Registered: January 30th, 2013
Member Is Offline
Theme: UltimaBB Pro Blue ( Default )
|
| posted on May 15th, 2013 at 11:01 AM |
|
|
G'day all just picked up freebie seats for rear pajero. Started to locate the rear diff should have the height etc sorted this arvo so can do
drawings & form templates for mounting brackets pics


|
|
|
 roverv8bay roverv8bay
Officially Full-On Dubber
  
Posts: 250
Threads: 32
Registered: January 30th, 2013
Member Is Offline
Theme: UltimaBB Pro Blue ( Default )
|
| posted on May 21st, 2013 at 12:13 PM |
|
|
G'day all spoke to Engineer this morning he cant see any problems with the 4x4 in kombi. Ihave a meeting with him on Monday morning to view pics
& tell me what he expects me to do & how to do it so fingers crossed. thanks to Matt Berry for your advice spoke to the shaftman & he is
going to look at it to see what is best.
ernie
|
|
|
 OZ Towdster OZ Towdster
A.k.a.: Andrew Westwood
Custom Title Time!
Keen to finish some projects
    
Posts: 1921
Threads: 132
Registered: December 7th, 2003
Member Is Offline
Location: Alexandra Hills Brisbane QLD
Theme: UltimaBB Pro Yellow
Mood: Having fun in our great land
|
| posted on May 21st, 2013 at 05:27 PM |
|
|
Ernie the seat to use for the rear if you really wanted a 3 seater is the mitsubishi delica L300 model rear seat as that is what i have mounted in my
baja bay and it is a nice comfy seat , plus has a 60 40 rear split which folds over on top of the seat swab which if mounted at the right height
becomes a extension of the high floor area in the rear and hence becomes a great bed base .
The other nice feature of the seat is that it also folds foward when folded over which creats a nice storage area under the seat base
Don't let body work get in the way of real suspension travel
|
|
|
 matberry matberry
Super Moderator
Go hard or go home
      
Posts: 8114
Threads: 134
Registered: March 7th, 2006
Member Is Offline
Location: Cooroy Qld
Theme: UltimaBB Pro Blue
Mood: enjoying waving at all my Kombi buddies from my T3
|
| posted on May 21st, 2013 at 06:52 PM |
|
|
 
Matt Berry Motorsports...air cooled advice, repairs and mods Ph 0408 704 662
OFF-ROAD,CIRCUIT,DRAG,STREET,ENDURANCE
 |
|
|
 roverv8bay roverv8bay
Officially Full-On Dubber
  
Posts: 250
Threads: 32
Registered: January 30th, 2013
Member Is Offline
Theme: UltimaBB Pro Blue ( Default )
|
| posted on May 21st, 2013 at 07:11 PM |
|
|
G'day Andrew & Matt. The seats II have were super cheap the rear seat does the same it has 3 set ups to it. I have been working on the engine
mounting for petes bay with the ej 22 I have rotated the inlet moved the alternator over to the side cut down the mounting brackt to clear the
manifold & cut a plate to bolt on where the belt idler pully mounted then welded a tube to it this will bolt onto the original 1600 crossmember
using the bay rubber mounts
| Error |
| Sorry, you must be a registered user in order to download attachments. |
|
| Error |
| Sorry, you must be a registered user in order to download attachments. |
|
|
|
|
| Pages: 1 2 3 .. 7 |