| [ Total Views: 18283 | Total Replies: 114 | Thread Id: 104200 ] |
| Pages: 1 2 3 4 |
|
|
 Scottkombi Scottkombi
Officially Full-On Dubber
  
Posts: 358
Threads: 11
Registered: December 24th, 2008
Member Is Offline
Location: Terrigal NSW
Theme: UltimaBB Pro Blue ( Default )
Mood: Sick of Work
|
| posted on March 3rd, 2016 at 09:06 PM |
|
|
Awesome detail in your work.
This engine should last a long time.
Hope the gearbox can handle it and last as long.
Did you get a speed sensor worked out from the dash pod speed sensor?
Cheers,
Scott
88 Caravelle Syncro Camper
89 Caravelle GL microbus - 5 speed
69 Microbus
05 Mk5 Golf 1.9 TDi DSG
|
|
|
 mackaymanx mackaymanx
A.k.a.: Brent
Custom Title Time!
    
Posts: 1611
Threads: 97
Registered: January 12th, 2006
Member Is Offline
Location: Mackay.QLD
Theme: UltimaBB Pro Blue
Mood: Brad'ed Off 
|
| posted on March 4th, 2016 at 09:04 PM |
|
|
Looking into trying to use a Subaru gauge cluster this time around, so the speedo sensor is not the best option for this one. Have trialed the Subaru
cluster in my Red Caravelle and it is working well. Ordered a SmallCar sensor which I mount my own way up high away from the road grim.
Quote of the week
"Do I wish to send them to you again, nope, no interest can't be bothered really, to much hassle for little or no return."
 |
|
|
 mackaymanx mackaymanx
A.k.a.: Brent
Custom Title Time!
    
Posts: 1611
Threads: 97
Registered: January 12th, 2006
Member Is Offline
Location: Mackay.QLD
Theme: UltimaBB Pro Blue
Mood: Brad'ed Off 
|
| posted on April 17th, 2016 at 11:46 AM |
|
|
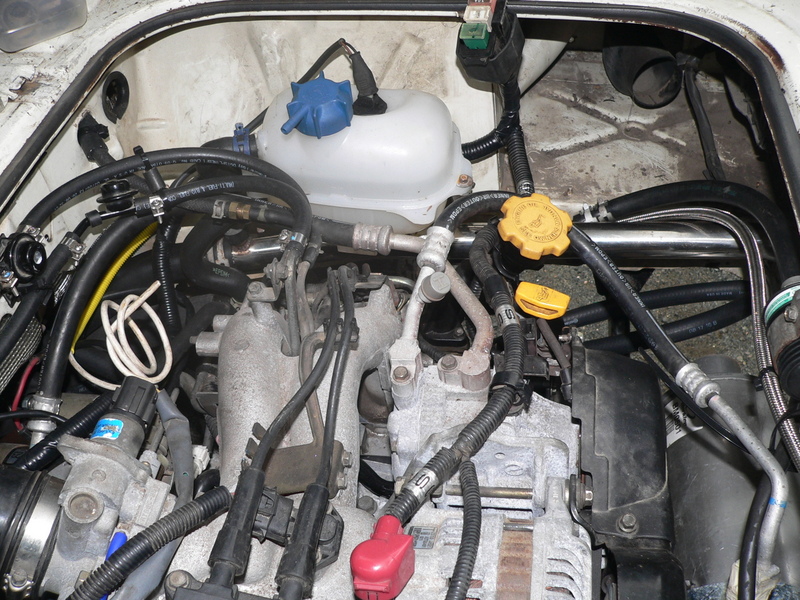
We I've managed to get a bit done, engine and gearbox are in.
Yeah what a mess! But this ran like this, well a least it did after I remembered to earth the main relay.

Now looks like this, still more work to do but I can see the light at the end of the tunnel.



Quote of the week
"Do I wish to send them to you again, nope, no interest can't be bothered really, to much hassle for little or no return."
 |
|
|
 mackaymanx mackaymanx
A.k.a.: Brent
Custom Title Time!
    
Posts: 1611
Threads: 97
Registered: January 12th, 2006
Member Is Offline
Location: Mackay.QLD
Theme: UltimaBB Pro Blue
Mood: Brad'ed Off 
|
| posted on April 21st, 2016 at 07:46 PM |
|
|
Well my BMW E30 brake booster arrived this morning, here is a comparison to the stock booster. Note the BMW booster is thicker between where the
master cylinder mounts and where the booster mounts to the frame.

M9x1.0 thread on the VW booster

M10x1.5 thread on the BMW booster.

Comparison of the clevises, BMW on top.

This is the felt seal/filter from the VW booster.

This is the BMW booster, there should be a filter here but has disintergrated with age. As the booster works, air flows through here and eventually
ends up at the intake manifold.
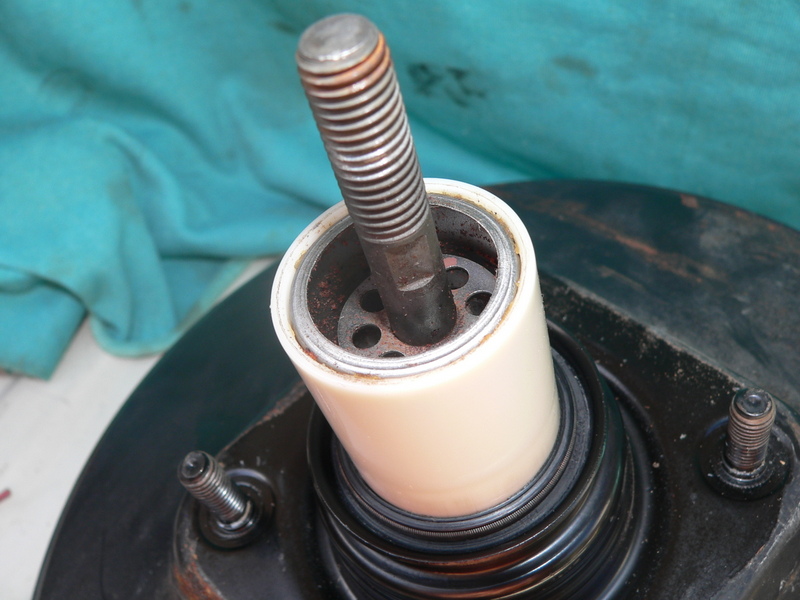
The VW filter installed in the BMW booster, section removed to let it fit.

Quote of the week
"Do I wish to send them to you again, nope, no interest can't be bothered really, to much hassle for little or no return."
 |
|
|
 mackaymanx mackaymanx
A.k.a.: Brent
Custom Title Time!
    
Posts: 1611
Threads: 97
Registered: January 12th, 2006
Member Is Offline
Location: Mackay.QLD
Theme: UltimaBB Pro Blue
Mood: Brad'ed Off 
|
| posted on April 22nd, 2016 at 10:18 AM |
|
|
This is the VW clevis tapped out to the M10x1.5 BMW size and trial fitted, rod will need to be trimmed back as it will interfere with the brake
pedal.

Clevis fitted, rod trimmed and adjusted to the correct length. That is the prep on the booster finished, install later.

Quote of the week
"Do I wish to send them to you again, nope, no interest can't be bothered really, to much hassle for little or no return."
 |
|
|
 rocknrob rocknrob
A.k.a.: Rob
Insano Dub Head
   
Posts: 844
Threads: 90
Registered: December 18th, 2003
Member Is Offline
Location: Gold Coast
Theme: UltimaBB Pro Black
Mood: mystic
|
| posted on April 23rd, 2016 at 07:21 PM |
|
|
Nice! i have to do something similar...I have BA ford front brakes but the booster lets me down...maybe i'll cheat and copy you!
|
|
|
 mackaymanx mackaymanx
A.k.a.: Brent
Custom Title Time!
    
Posts: 1611
Threads: 97
Registered: January 12th, 2006
Member Is Offline
Location: Mackay.QLD
Theme: UltimaBB Pro Blue
Mood: Brad'ed Off 
|
| posted on April 24th, 2016 at 09:46 AM |
|
|
I went the Audi/G60 route.


Quote of the week
"Do I wish to send them to you again, nope, no interest can't be bothered really, to much hassle for little or no return."
 |
|
|
 mackaymanx mackaymanx
A.k.a.: Brent
Custom Title Time!
    
Posts: 1611
Threads: 97
Registered: January 12th, 2006
Member Is Offline
Location: Mackay.QLD
Theme: UltimaBB Pro Blue
Mood: Brad'ed Off 
|
| posted on May 2nd, 2016 at 04:04 PM |
|
|
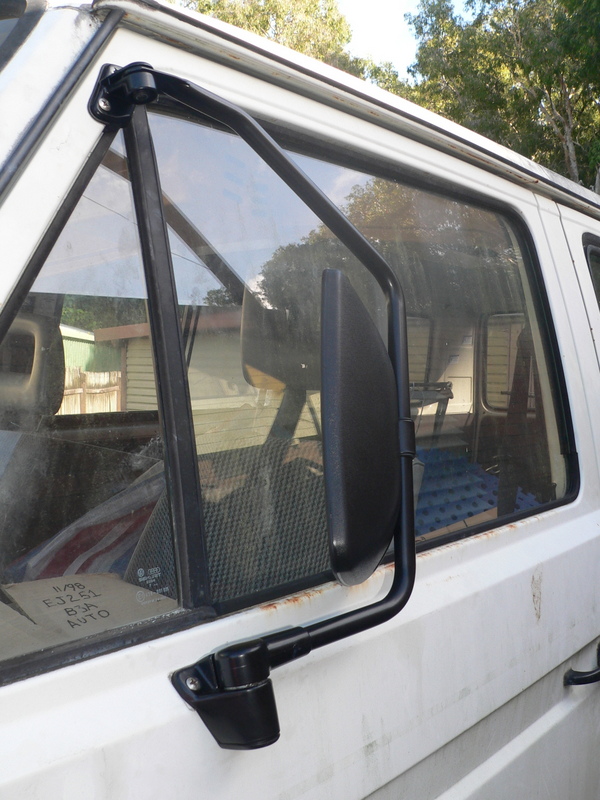
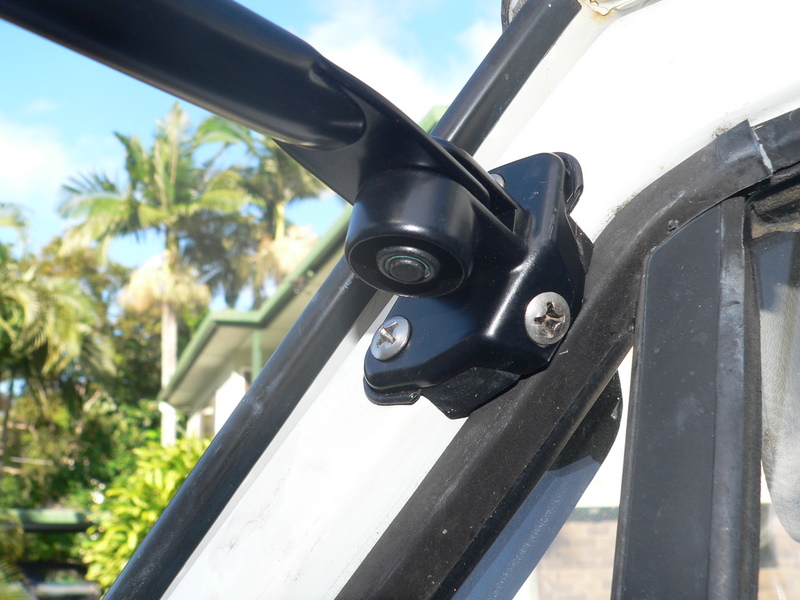
Got one of my LT mirrors installed, run out of rivnuts/nutserts so the other side will have to wait. Plus I've run out of the correct screws.

This is the mirroer folded back(not the best angle to show how flat it goes)
Quote of the week
"Do I wish to send them to you again, nope, no interest can't be bothered really, to much hassle for little or no return."
 |
|
|
 Scottkombi Scottkombi
Officially Full-On Dubber
  
Posts: 358
Threads: 11
Registered: December 24th, 2008
Member Is Offline
Location: Terrigal NSW
Theme: UltimaBB Pro Blue ( Default )
Mood: Sick of Work
|
| posted on May 9th, 2016 at 07:52 PM |
|
|
Very nice work and great detail for others to try and follow your conversion leads.
Such as me 
88 Caravelle Syncro Camper
89 Caravelle GL microbus - 5 speed
69 Microbus
05 Mk5 Golf 1.9 TDi DSG
|
|
|
 mackaymanx mackaymanx
A.k.a.: Brent
Custom Title Time!
    
Posts: 1611
Threads: 97
Registered: January 12th, 2006
Member Is Offline
Location: Mackay.QLD
Theme: UltimaBB Pro Blue
Mood: Brad'ed Off 
|
| posted on May 12th, 2016 at 08:17 PM |
|
|
These are some of the parts used-
Power steering resevoir - VS Commodore(and similar)
Hose power steering resevoir to pump - Mackay CH3291 - OEM 92075417
Hose power steering return pipe to resevoir - Mackay CH4045 - OEM 92050721 - VT Commodore
Hose coolant manifold to radiator supply - Mackay CH944 - OEM 2812269 - HQ etc V8 bottom hose.
Hose radiator to thermostat housing - Dayco 71035 - Gates 21201 - Chevy/GMC - ordered from eBay are they are from an American vehicle.
Air cleaner is Commodore mixture of VN,VS. Joiner is modified Commode air flow meter. Intake pipe is from 1990 to 1994 Liberty.
Fuse holder is from early Mitsubishi Pajero(at battery terminal), this goes between the alternator and to starter terminal/B+

Modify to this and upgrade the fuses to suit the alternator you have(120 amp for this install), 30 amp supply to ECU etc and supply to air con system.
This style holder can also be found on earlier Toyota Camry etc.

Quote of the week
"Do I wish to send them to you again, nope, no interest can't be bothered really, to much hassle for little or no return."
 |
|
|
 mackaymanx mackaymanx
A.k.a.: Brent
Custom Title Time!
    
Posts: 1611
Threads: 97
Registered: January 12th, 2006
Member Is Offline
Location: Mackay.QLD
Theme: UltimaBB Pro Blue
Mood: Brad'ed Off 
|
| posted on May 12th, 2016 at 09:09 PM |
|
|
This is the SmallCar VSS mocked up on the transaxle while it was out.

Set up a bit better.

And installed.

Quote of the week
"Do I wish to send them to you again, nope, no interest can't be bothered really, to much hassle for little or no return."
 |
|
|
 mackaymanx mackaymanx
A.k.a.: Brent
Custom Title Time!
    
Posts: 1611
Threads: 97
Registered: January 12th, 2006
Member Is Offline
Location: Mackay.QLD
Theme: UltimaBB Pro Blue
Mood: Brad'ed Off 
|
| posted on May 17th, 2016 at 06:05 PM |
|
|
These are the clutch mods I am making on this.
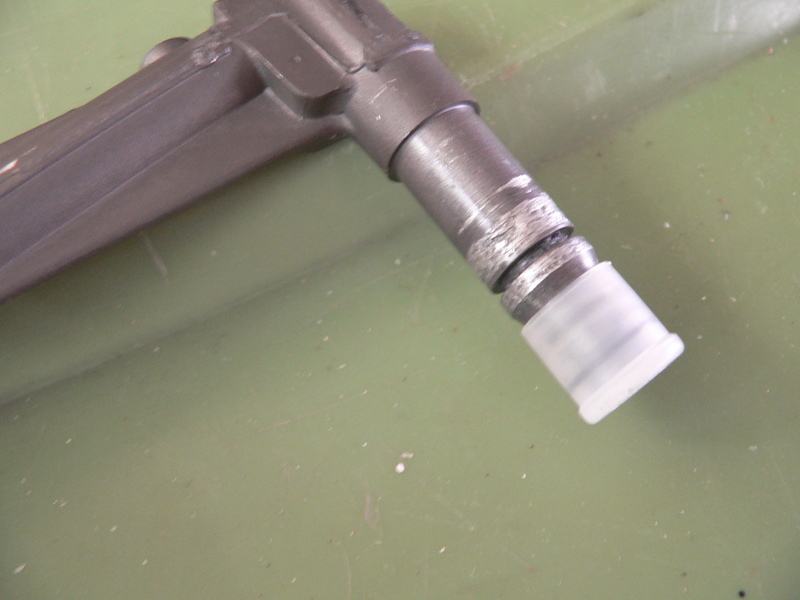
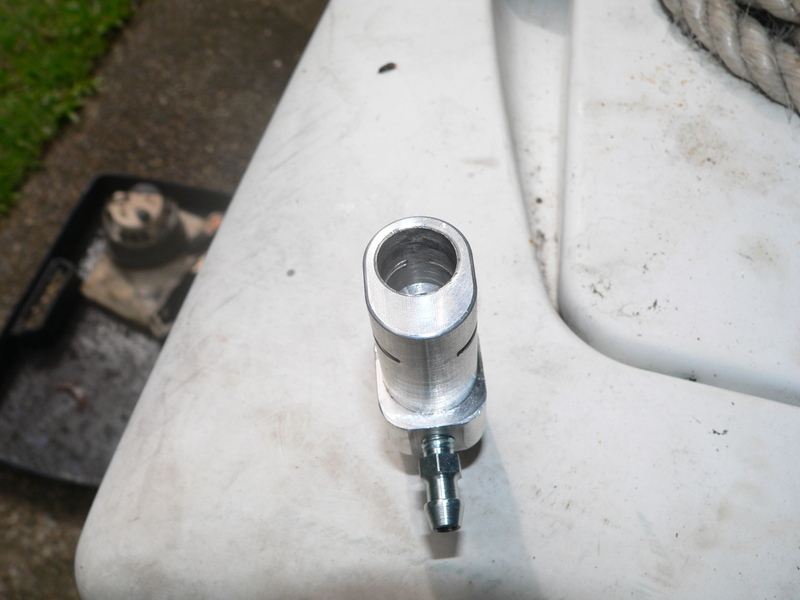
This the plastic supply line which has to be shortened by about 50mm, use a heat gun to form a new bend in the line. Go for gentle bend this is a bit
sharp but will be ok. Salvage the banjo fitting, use the heat gun to soften the end of the line and push it in.

Got caught out here, just a little tight going together and it picked up on me. Was not expecting trouble with a new genuine vw slave cylinder, but it
cleaned up ok after some cursing and swearing.
Quote of the week
"Do I wish to send them to you again, nope, no interest can't be bothered really, to much hassle for little or no return."
 |
|
|
 mackaymanx mackaymanx
A.k.a.: Brent
Custom Title Time!
    
Posts: 1611
Threads: 97
Registered: January 12th, 2006
Member Is Offline
Location: Mackay.QLD
Theme: UltimaBB Pro Blue
Mood: Brad'ed Off 
|
| posted on May 17th, 2016 at 06:35 PM |
|
|
Pedal mods are a bit more involved. The clutch slave is designed to have a 16mm(5/8") master cylinder but the T3 master is 19mm(3/4"), unmodified
this can result in over extension of the slave cylinder leading to failure of the cylinder. There a three solutions to this-
1) resleeve the T3 master 5/8" - too much work and you end up with a one off part which is expensive and hard to replace.
2) spacer on the push rod to limit travel - this is what SmallCar supplies, cheap and nasty(not very happy with how it works)
3) change the pivot length on the pedal which limits the stroke on the master cylinder - one off mod which lets you use an unmodified master
cylinder(easy to replace)
I have gone with the third option.
This is the pivot arm in it's original position already clearenced to be moved back.

Moved back about 10mm

Spacers under the master, about 11mm.

Quote of the week
"Do I wish to send them to you again, nope, no interest can't be bothered really, to much hassle for little or no return."
 |
|
|
 mackaymanx mackaymanx
A.k.a.: Brent
Custom Title Time!
    
Posts: 1611
Threads: 97
Registered: January 12th, 2006
Member Is Offline
Location: Mackay.QLD
Theme: UltimaBB Pro Blue
Mood: Brad'ed Off 
|
| posted on May 17th, 2016 at 06:43 PM |
|
|
All together, extra spring is there to keep the pedal pulled back against the cruise control switch.


There was a little wear in the pedal/clevis so I went up to a 3/8" (9.5) clevis pin from the stock 8mm.

Quote of the week
"Do I wish to send them to you again, nope, no interest can't be bothered really, to much hassle for little or no return."
 |
|
|
 mackaymanx mackaymanx
A.k.a.: Brent
Custom Title Time!
    
Posts: 1611
Threads: 97
Registered: January 12th, 2006
Member Is Offline
Location: Mackay.QLD
Theme: UltimaBB Pro Blue
Mood: Brad'ed Off 
|
| posted on June 23rd, 2016 at 12:44 PM |
|
|
This is where the booster has clearence problems with the top bracket.

Here is the paint transfer off the bracket.

This is after some cutting and hammering, this tweeked the bracket slightly which of course made the bolts hard to get back in.

Back together with the steering column brace modified to miss the brake hard line.

Quote of the week
"Do I wish to send them to you again, nope, no interest can't be bothered really, to much hassle for little or no return."
 |
|
|
 mackaymanx mackaymanx
A.k.a.: Brent
Custom Title Time!
    
Posts: 1611
Threads: 97
Registered: January 12th, 2006
Member Is Offline
Location: Mackay.QLD
Theme: UltimaBB Pro Blue
Mood: Brad'ed Off 
|
| posted on June 23rd, 2016 at 12:55 PM |
|
|
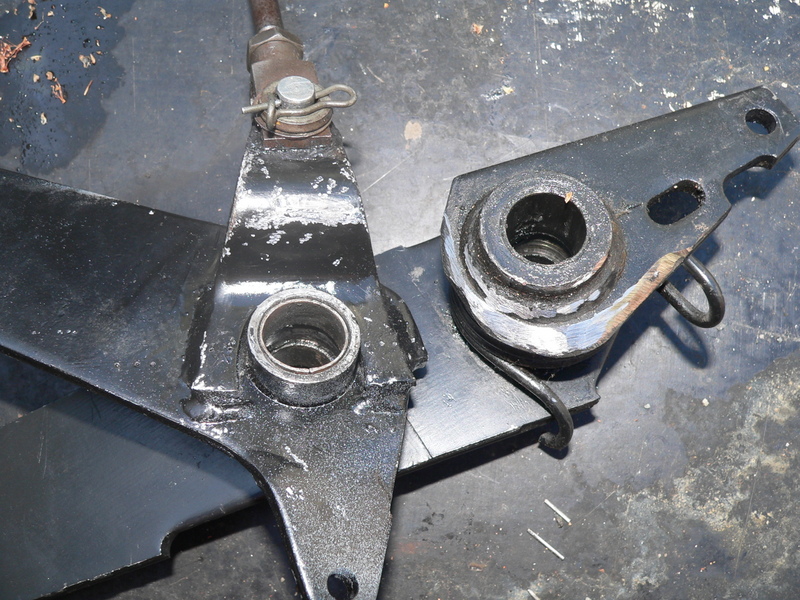
This is the rest of the clutch pedal modification. Push rod had to be shortened a little.

Had to do some clearancing here on the brake pedal boss as the repositioned clutch pivot arm was rubbing on it. Note this has nothing to do with the
brake booster conversion just the clutch mods.
Quote of the week
"Do I wish to send them to you again, nope, no interest can't be bothered really, to much hassle for little or no return."
 |
|
|
 Scottkombi Scottkombi
Officially Full-On Dubber
  
Posts: 358
Threads: 11
Registered: December 24th, 2008
Member Is Offline
Location: Terrigal NSW
Theme: UltimaBB Pro Blue ( Default )
Mood: Sick of Work
|
| posted on June 23rd, 2016 at 01:15 PM |
|
|
It seems like a fair amount of work here for this mod.
I heard there was some bloke in the USA that had another mod that Small Car were also looking into to eliminate the clutch throw issue - I just
couldn't find what it was on theSamba.com.
88 Caravelle Syncro Camper
89 Caravelle GL microbus - 5 speed
69 Microbus
05 Mk5 Golf 1.9 TDi DSG
|
|
|
 mackaymanx mackaymanx
A.k.a.: Brent
Custom Title Time!
    
Posts: 1611
Threads: 97
Registered: January 12th, 2006
Member Is Offline
Location: Mackay.QLD
Theme: UltimaBB Pro Blue
Mood: Brad'ed Off 
|
| posted on June 23rd, 2016 at 01:38 PM |
|
|
Once you have done one and know what has to be done it is not that involved. Most difficult part is pulling the pedal assembly and getting it back in.
Quote of the week
"Do I wish to send them to you again, nope, no interest can't be bothered really, to much hassle for little or no return."
 |
|
|
 mackaymanx mackaymanx
A.k.a.: Brent
Custom Title Time!
    
Posts: 1611
Threads: 97
Registered: January 12th, 2006
Member Is Offline
Location: Mackay.QLD
Theme: UltimaBB Pro Blue
Mood: Brad'ed Off 
|
| posted on January 28th, 2017 at 09:23 PM |
|
|
Here is the RH snorkle modified to fit on the LH side. Remove the original lugs with a knike to break the heat weld and fit to the opposite side.
Riveted and Sikaflex.
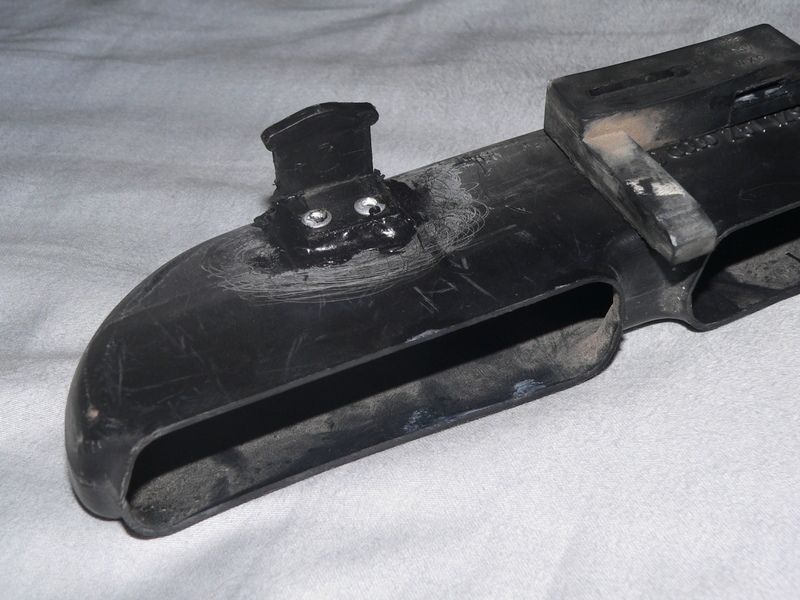
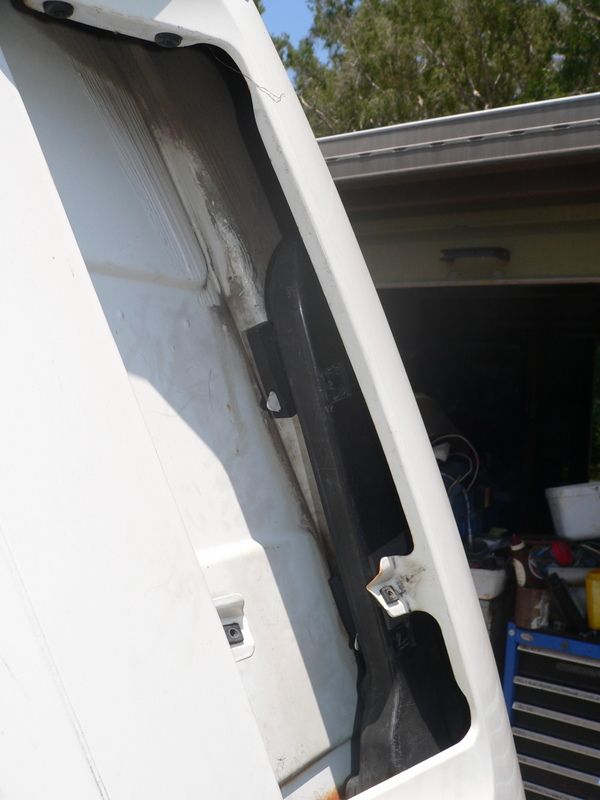
Both the lugs with the rubber mounts attached. As the snorkle is designed for the RH side it ends up at a slightly different angle and lower down so
it can fit. There is also some self adhesive foam in several places where it is up against the body.
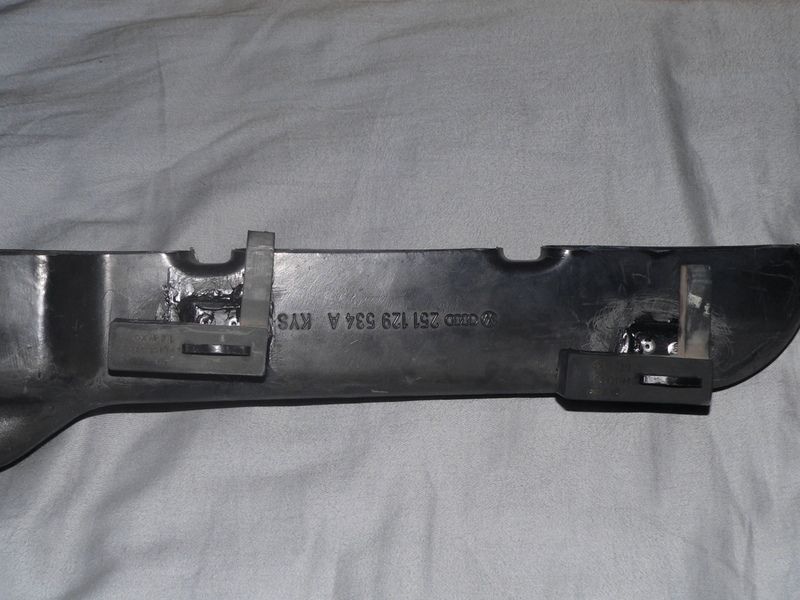
Fitted to the body, the tabs are at different heights on the body Rh to LH side. This is because they use the same rubber mount RH and LH sides but it
is offset one way.
Quote of the week
"Do I wish to send them to you again, nope, no interest can't be bothered really, to much hassle for little or no return."
 |
|
|
 mackaymanx mackaymanx
A.k.a.: Brent
Custom Title Time!
    
Posts: 1611
Threads: 97
Registered: January 12th, 2006
Member Is Offline
Location: Mackay.QLD
Theme: UltimaBB Pro Blue
Mood: Brad'ed Off 
|
| posted on January 29th, 2017 at 12:50 PM |
|
|
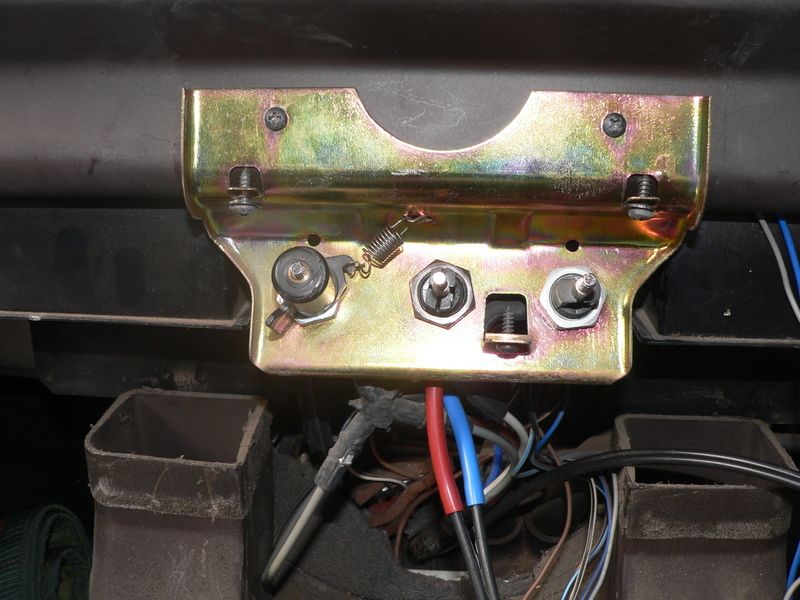
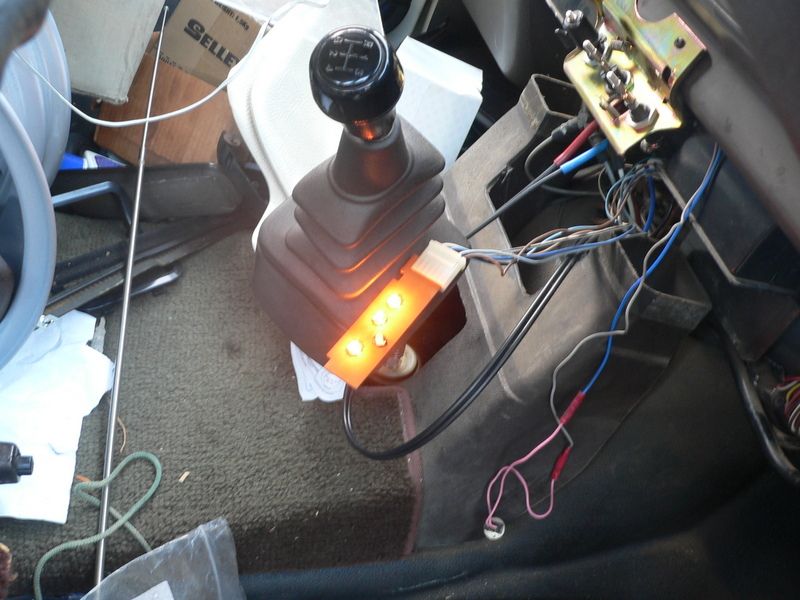
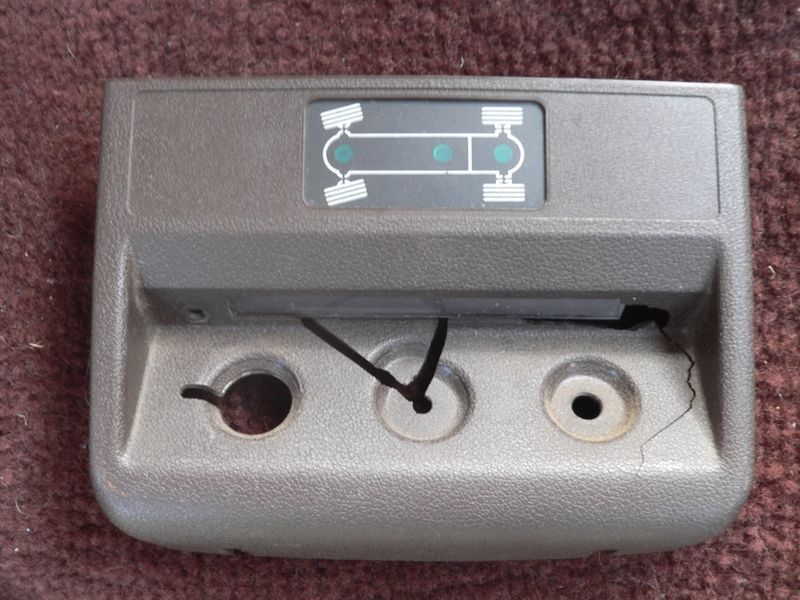
Finally got the plumbing for the decoupler finished and the switch installed.
All the lights working with the diff locks and decoupler engaged.
But this is going to need a lot more work, this is so brittle I doubt I will be able to salvage it.
Quote of the week
"Do I wish to send them to you again, nope, no interest can't be bothered really, to much hassle for little or no return."
 |
|
|
 nils nils
Fahrvergnugen
   
Posts: 971
Threads: 65
Registered: January 11th, 2008
Member Is Offline
Location: central coast
Theme: UltimaBB Pro Blue ( Default )
|
| posted on January 30th, 2017 at 06:27 AM |
|
|
Great to see this moving ahead again, I really like that you took the time and effort to move the snorkel to the other side for the subi motor
Quit calling rust patina
|
|
|
 Scottkombi Scottkombi
Officially Full-On Dubber
  
Posts: 358
Threads: 11
Registered: December 24th, 2008
Member Is Offline
Location: Terrigal NSW
Theme: UltimaBB Pro Blue ( Default )
Mood: Sick of Work
|
| posted on January 30th, 2017 at 01:51 PM |
|
|
Some plastic welding and some vinyl paint will make that locker panel come up like new.
Judging by your work to date - I am sure you have the skills.
You cant beat 3 knobs - I only have 2.
Hence, I have knob envy 
88 Caravelle Syncro Camper
89 Caravelle GL microbus - 5 speed
69 Microbus
05 Mk5 Golf 1.9 TDi DSG
|
|
|
 mackaymanx mackaymanx
A.k.a.: Brent
Custom Title Time!
    
Posts: 1611
Threads: 97
Registered: January 12th, 2006
Member Is Offline
Location: Mackay.QLD
Theme: UltimaBB Pro Blue
Mood: Brad'ed Off 
|
| posted on January 31st, 2017 at 01:12 PM |
|
|
| Quote: | Originally
posted by nils
Great to see this moving ahead again, I really like that you took the time and effort to move the snorkel to the other side for the subi motor
|
I'd been trying to work out the snorkle for awhile and decided to try and get a diesel one form overseas as the diesel uses the lefthand air channel.
Then I found a post on theSamba where they had modified the RH one to the LH side.
I then used that idea and did it a slightly different way. Photos show how they did it.
| Error |
| Sorry, you must be a registered user in order to download attachments. |
|
| Error |
| Sorry, you must be a registered user in order to download attachments. |
|
Quote of the week
"Do I wish to send them to you again, nope, no interest can't be bothered really, to much hassle for little or no return."
 |
|
|
 nils nils
Fahrvergnugen
   
Posts: 971
Threads: 65
Registered: January 11th, 2008
Member Is Offline
Location: central coast
Theme: UltimaBB Pro Blue ( Default )
|
| posted on January 31st, 2017 at 08:02 PM |
|
|
| Quote: | Originally
posted by Scottkombi
Some plastic welding and some vinyl paint will make that locker panel come up like new.
Judging by your work to date - I am sure you have the skills.
You cant beat 3 knobs - I only have 2.
Hence, I have knob envy 
|
I think Scott is right... not enough knobs
I mean about the locker panel. All the interior parts are ABS, welding with some acetone slurry may get you 90% there
Quit calling rust patina
|
|
|
 mackaymanx mackaymanx
A.k.a.: Brent
Custom Title Time!
    
Posts: 1611
Threads: 97
Registered: January 12th, 2006
Member Is Offline
Location: Mackay.QLD
Theme: UltimaBB Pro Blue
Mood: Brad'ed Off 
|
| posted on February 6th, 2017 at 07:09 PM |
|
|
Managed to finally get my engine to run sweet today, always used to stumbled and stalled on startup the first few times but would then run ok. Check
engine light was always on but I couldn't read any codes.
Had a spare Impreza loom for an EJ201 tucked away so I broke it out and stripped it down. Swapped over my ECU, Immobilzer etc and wired it into van.
After I chased down a missing earth it now runs smooth as. Starts properly and no codes.
This of course means I've stuffed up somewhere and have to strip the loom I have installed out and find where I went wrong.
Quote of the week
"Do I wish to send them to you again, nope, no interest can't be bothered really, to much hassle for little or no return."
 |
|
|
 Scottkombi Scottkombi
Officially Full-On Dubber
  
Posts: 358
Threads: 11
Registered: December 24th, 2008
Member Is Offline
Location: Terrigal NSW
Theme: UltimaBB Pro Blue ( Default )
Mood: Sick of Work
|
| posted on February 9th, 2017 at 03:20 PM |
|
|
Nice work on the snorkel.
I quite like this version of a snorkel from Sebastian who lives in the red centre of Australia and clearly needs the dust extracting ability of this
version of a snorkel:

88 Caravelle Syncro Camper
89 Caravelle GL microbus - 5 speed
69 Microbus
05 Mk5 Golf 1.9 TDi DSG
|
|
|
 mackaymanx mackaymanx
A.k.a.: Brent
Custom Title Time!
    
Posts: 1611
Threads: 97
Registered: January 12th, 2006
Member Is Offline
Location: Mackay.QLD
Theme: UltimaBB Pro Blue
Mood: Brad'ed Off 
|
| posted on February 9th, 2017 at 05:37 PM |
|
|
The old faithful Donaldson Pre-Cleaner, cleaned my share of those when I worked underground.
Had some success with my wiring, turned out to be a missing earth which told the ecu it was a manual and made the diagnostic plugs work. Hence the
fault code and my inability to read them. Test it out tomorrow.
Quote of the week
"Do I wish to send them to you again, nope, no interest can't be bothered really, to much hassle for little or no return."
 |
|
|
 mackaymanx mackaymanx
A.k.a.: Brent
Custom Title Time!
    
Posts: 1611
Threads: 97
Registered: January 12th, 2006
Member Is Offline
Location: Mackay.QLD
Theme: UltimaBB Pro Blue
Mood: Brad'ed Off 
|
| posted on February 11th, 2017 at 05:00 PM |
|
|
Did my test today but still had the starter signal and the Inhibitor/neutral mixed up. Things you get when you swap an automatic loom to manual.
All good now starts up and purrs (OK it's a bit of a growl with the exhaust on it at the moment.)
Quote of the week
"Do I wish to send them to you again, nope, no interest can't be bothered really, to much hassle for little or no return."
 |
|
|
 Scottkombi Scottkombi
Officially Full-On Dubber
  
Posts: 358
Threads: 11
Registered: December 24th, 2008
Member Is Offline
Location: Terrigal NSW
Theme: UltimaBB Pro Blue ( Default )
Mood: Sick of Work
|
| posted on February 12th, 2017 at 05:00 PM |
|
|
Great stuff.
That wiring loom is a nightmare - there is no way i would have attempted to shorten it by myself.
Just hooking it all up to the right places was a big task that worried me until it was all done.
I still get a code from my computer looking for the auto signal input - cant work that one out.
What air filter box did you use?
88 Caravelle Syncro Camper
89 Caravelle GL microbus - 5 speed
69 Microbus
05 Mk5 Golf 1.9 TDi DSG
|
|
|
 mackaymanx mackaymanx
A.k.a.: Brent
Custom Title Time!
    
Posts: 1611
Threads: 97
Registered: January 12th, 2006
Member Is Offline
Location: Mackay.QLD
Theme: UltimaBB Pro Blue
Mood: Brad'ed Off 
|
| posted on February 12th, 2017 at 05:16 PM |
|
|
Air filter box is from a VS or similar Commodore, they use the same element that the earlier Libertys. Find an earlier box as the later one have an
air temp sensor in them, you either have to leave it there or plastic weld the hole up.
Quote of the week
"Do I wish to send them to you again, nope, no interest can't be bothered really, to much hassle for little or no return."
 |
|
|
| Pages: 1 2 3 4 |