| [ Total Views: 6054 | Total Replies: 83 | Thread Id: 46537 ] |
| Pages: 1 2 3 |
|
|
 58SPLIT 58SPLIT
Seriously Crusin Dubber
 
Posts: 148
Threads: 15
Registered: May 7th, 2004
Member Is Offline
Location: Coffs Harbour
Theme: UltimaBB Pro Blue ( Default )
Mood: schwiiiiiing!
|
| posted on December 1st, 2005 at 08:52 PM |
|
|
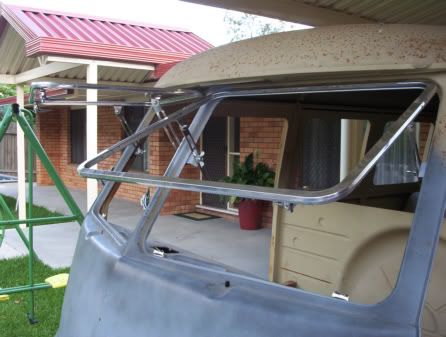
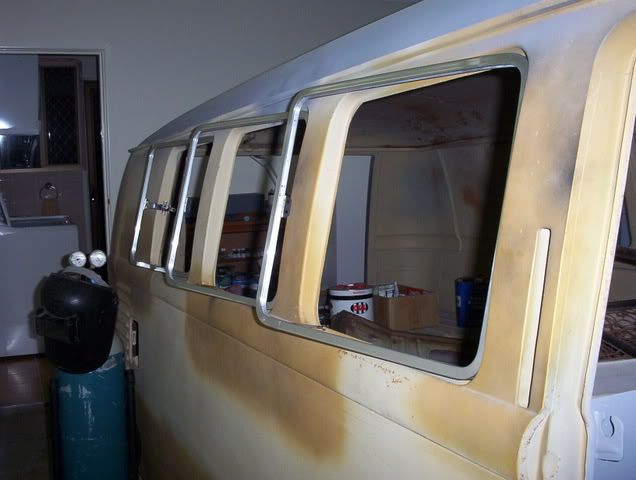
Some pics of where im at with my Splitty!
Creative Safari windows and 6 popouts installed...
|
|
|
 58SPLIT 58SPLIT
Seriously Crusin Dubber
 
Posts: 148
Threads: 15
Registered: May 7th, 2004
Member Is Offline
Location: Coffs Harbour
Theme: UltimaBB Pro Blue ( Default )
Mood: schwiiiiiing!
|
| posted on December 1st, 2005 at 08:54 PM |
|
|
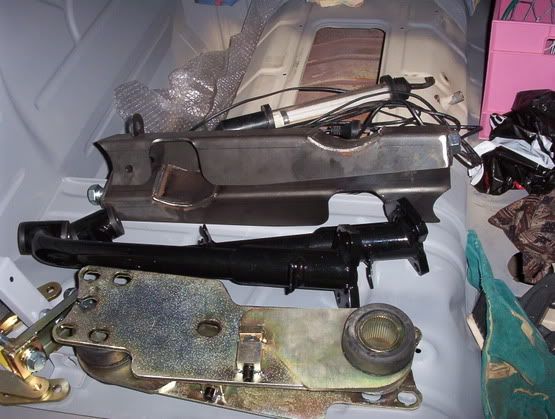
mmmmmm!
creative IRS kit ready to be installed....
|
|
|
 58SPLIT 58SPLIT
Seriously Crusin Dubber
 
Posts: 148
Threads: 15
Registered: May 7th, 2004
Member Is Offline
Location: Coffs Harbour
Theme: UltimaBB Pro Blue ( Default )
Mood: schwiiiiiing!
|
| posted on December 1st, 2005 at 08:55 PM |
|
|
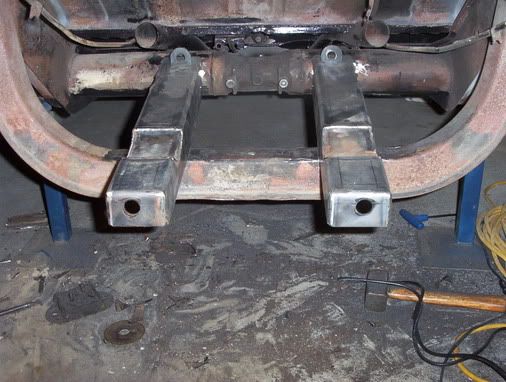
engine horns removed
engine horns removed , ready for welding in new ones.

|
|
|
 58SPLIT 58SPLIT
Seriously Crusin Dubber
 
Posts: 148
Threads: 15
Registered: May 7th, 2004
Member Is Offline
Location: Coffs Harbour
Theme: UltimaBB Pro Blue ( Default )
Mood: schwiiiiiing!
|
| posted on December 1st, 2005 at 08:56 PM |
|
|

|
|
|
 58SPLIT 58SPLIT
Seriously Crusin Dubber
 
Posts: 148
Threads: 15
Registered: May 7th, 2004
Member Is Offline
Location: Coffs Harbour
Theme: UltimaBB Pro Blue ( Default )
Mood: schwiiiiiing!
|
| posted on December 1st, 2005 at 08:58 PM |
|
|
ooops...sorry about the double up...
[img]http://img.photobucket.com/albums/v365/deca000/080205109.jpg [/img]
|
|
|
 58SPLIT 58SPLIT
Seriously Crusin Dubber
 
Posts: 148
Threads: 15
Registered: May 7th, 2004
Member Is Offline
Location: Coffs Harbour
Theme: UltimaBB Pro Blue ( Default )
Mood: schwiiiiiing!
|
| posted on December 1st, 2005 at 08:58 PM |
|
|
|
|
|
 58SPLIT 58SPLIT
Seriously Crusin Dubber
 
Posts: 148
Threads: 15
Registered: May 7th, 2004
Member Is Offline
Location: Coffs Harbour
Theme: UltimaBB Pro Blue ( Default )
Mood: schwiiiiiing!
|
| posted on December 1st, 2005 at 09:00 PM |
|
|
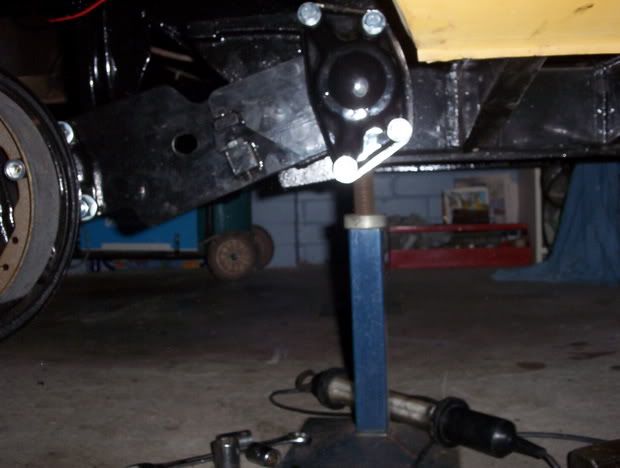
IRS INSTALLED
IRS installed and painted with POR15
|
|
|
 58SPLIT 58SPLIT
Seriously Crusin Dubber
 
Posts: 148
Threads: 15
Registered: May 7th, 2004
Member Is Offline
Location: Coffs Harbour
Theme: UltimaBB Pro Blue ( Default )
Mood: schwiiiiiing!
|
| posted on December 1st, 2005 at 09:01 PM |
|
|
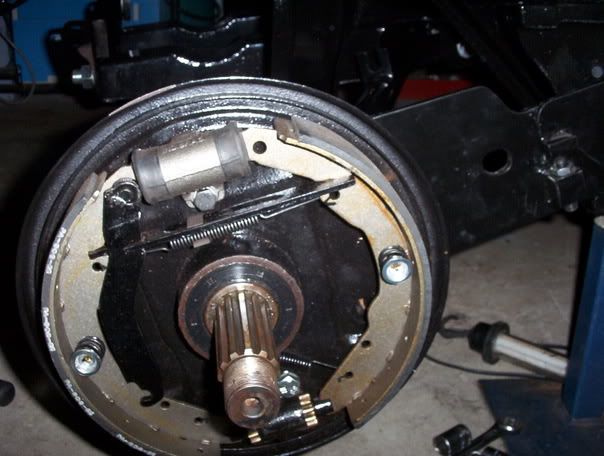
Rear brakes from 1969 restored, new axle bearings seals ect...
|
|
|
 58SPLIT 58SPLIT
Seriously Crusin Dubber
 
Posts: 148
Threads: 15
Registered: May 7th, 2004
Member Is Offline
Location: Coffs Harbour
Theme: UltimaBB Pro Blue ( Default )
Mood: schwiiiiiing!
|
| posted on December 1st, 2005 at 09:02 PM |
|
|
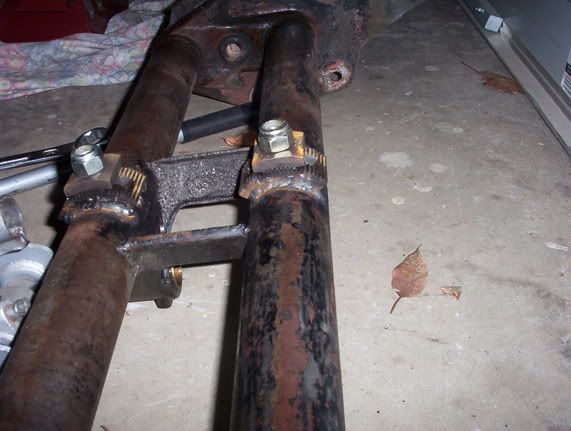
adjusters installed in front beam
|
|
|
 58SPLIT 58SPLIT
Seriously Crusin Dubber
 
Posts: 148
Threads: 15
Registered: May 7th, 2004
Member Is Offline
Location: Coffs Harbour
Theme: UltimaBB Pro Blue ( Default )
Mood: schwiiiiiing!
|
| posted on December 1st, 2005 at 09:05 PM |
|
|
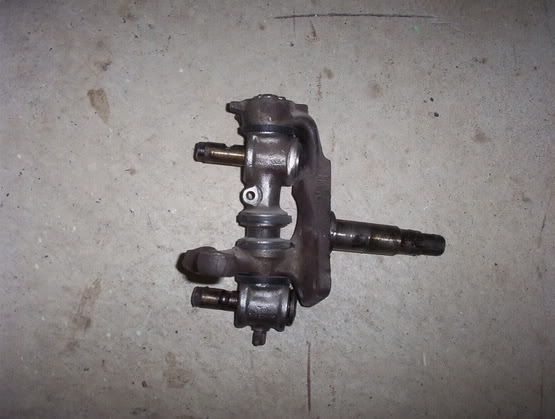
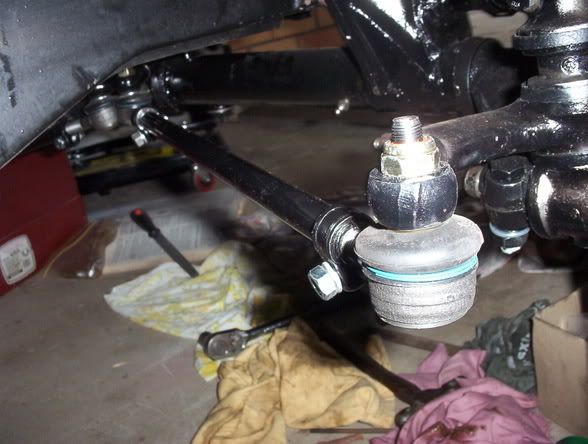
reversed link pins. I had an engineer machine and make up new os brass bushes. Also reversed tappered tie rod ends to fit later type.
|
|
|
 58SPLIT 58SPLIT
Seriously Crusin Dubber
 
Posts: 148
Threads: 15
Registered: May 7th, 2004
Member Is Offline
Location: Coffs Harbour
Theme: UltimaBB Pro Blue ( Default )
Mood: schwiiiiiing!
|
| posted on December 1st, 2005 at 09:07 PM |
|
|
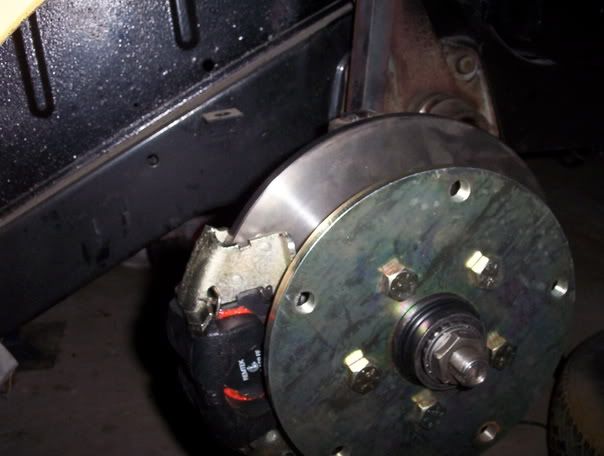
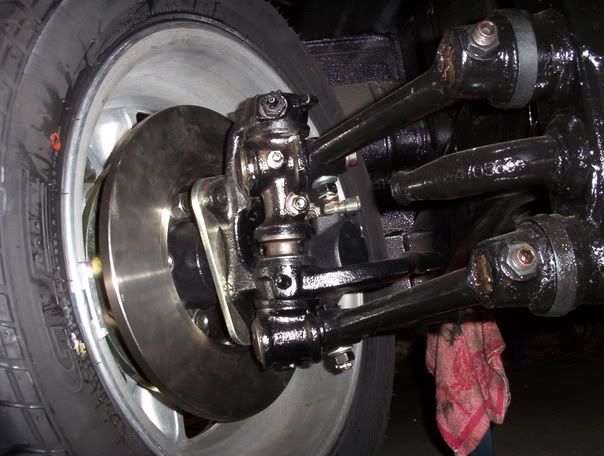 wide five with link and disc brakes.... wide five with link and disc brakes....
|
|
|
 58SPLIT 58SPLIT
Seriously Crusin Dubber
 
Posts: 148
Threads: 15
Registered: May 7th, 2004
Member Is Offline
Location: Coffs Harbour
Theme: UltimaBB Pro Blue ( Default )
Mood: schwiiiiiing!
|
| posted on December 1st, 2005 at 09:10 PM |
|
|
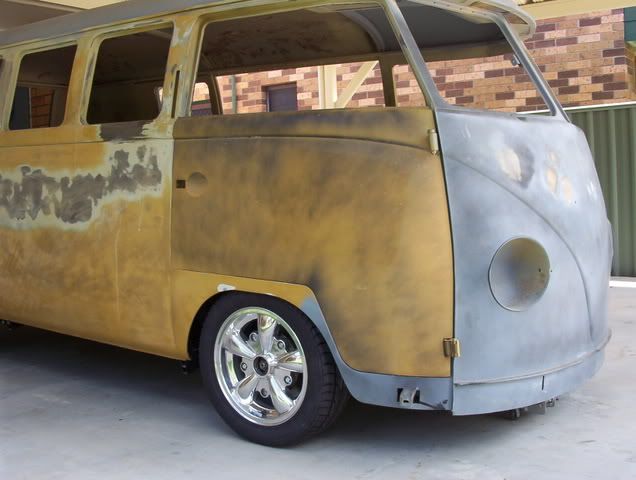
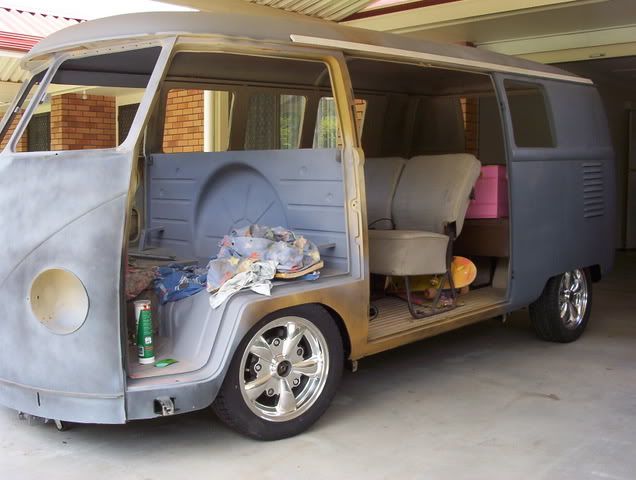
bus is finally on its own wheels and rolling. Time for body work...!.tyres are 185 55, had to do some minor guard rolling to clear the rears.
|
|
|
 hellbugged hellbugged
A.k.a.: Daimo Pell
23 Windows of Awesome
48's and straight cuts
       
Posts: 5080
Threads: 116
Registered: April 17th, 2003
Member Is Offline
Location: Nambucca Valley NSW
Theme: UltimaBB Psyche Blue
Mood: Couldn't care less
|
| posted on December 1st, 2005 at 09:27 PM |
|
|
great stuff!:thumb
|
|
|
 byronbus byronbus
Compulsive Aussie Vee Dubber
dsk
      
Posts: 4204
Threads: 119
Registered: July 16th, 2003
Member Is Offline
Location: Byron Bay
Theme: UltimaBB Pro Blue ( Default )
Mood: dsk founder
|
| posted on December 1st, 2005 at 09:33 PM |
|
|
Nice, looking sweet
|
|
|
 helbus helbus
A.k.a.: Pete S
Super Administrator
Mad fabricator, paint and body
        
Posts: 7386
Threads: 312
Registered: September 1st, 2002
Member Is Offline
Location: In the garage chopping cars into bits
Theme: UltimaBB Pro Blue
Mood: In the thinking chair
|
| posted on December 1st, 2005 at 10:30 PM |
|
|
Hey that is going to be a real sweet ride, good on ya for putting in the effort to do a top job.
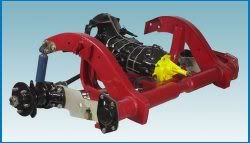
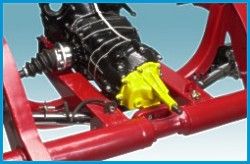
Questions, I am not familiar with splits. The picture with the two small square chassis beams. Is that the motor/ gearbox area and what conversion is
it for? If any? I am just curious as that is the kind of work I love to see.
I have a great respect for any mechanical engineering work.
|
|
|
 58SPLIT 58SPLIT
Seriously Crusin Dubber
 
Posts: 148
Threads: 15
Registered: May 7th, 2004
Member Is Offline
Location: Coffs Harbour
Theme: UltimaBB Pro Blue ( Default )
Mood: schwiiiiiing!
|
| posted on December 2nd, 2005 at 04:54 AM |
|
|
With the Creative Engineering IRS kit, you have to replace the engine/gearbox horns to fit the swing arms. The concept is that it gives you full
suspension travel like a bay set up. Alsothere is clearance for the cv joints. The hardest part of this mod is to make sure all your measurements are
correct before welding.
|
|
|
 beerdoc beerdoc
A.k.a.: Doc
Insano Dub Head
   
Posts: 838
Threads: 42
Registered: July 27th, 2004
Member Is Offline
Location: Geelong Vic
Theme: UltimaBB Pro Blue ( Default )
Mood: Its all good
|
 posted on December 2nd, 2005 at 06:08 AM posted on December 2nd, 2005 at 06:08 AM |
|
|
That looks awesome 58 and got me inspired
I am doing same to 66 panel as we speak but still in pull down stage
Using all the same brands too
Keep the pics coming
Cheers Doc
reVOLKS at Fyansford Geelong
20th OCT 2007 STAY TUNED FOR DETAILS
 |
|
|
 lohoon lohoon
Wolfsburg Wizard
  
Posts: 466
Threads: 67
Registered: September 5th, 2002
Member Is Offline
Location: muswellbrook
Theme: UltimaBB Pro Yellow
|
| posted on December 2nd, 2005 at 06:54 AM |
|
|
looking good.Waht front brakes are those?
|
|
|
 58SPLIT 58SPLIT
Seriously Crusin Dubber
 
Posts: 148
Threads: 15
Registered: May 7th, 2004
Member Is Offline
Location: Coffs Harbour
Theme: UltimaBB Pro Blue ( Default )
Mood: schwiiiiiing!
|
| posted on December 2nd, 2005 at 07:03 AM |
|
|
Front brakes are kit from Volks Conversions
Very happy with the set up and quality.I think its worth spending the money and having it done right the first time.
|
|
|
 PrettyBlueBug PrettyBlueBug
A.k.a.: P.B.B....
Veteran Volks Folk
Almost over it...
    
Posts: 2032
Threads: 70
Registered: May 8th, 2005
Member Is Offline
Location: Melbourne, Australia.
Theme: UltimaBB Pro Purple
Mood: 
|
| posted on December 2nd, 2005 at 07:35 AM |
|
|
That's going to look awesome when finished!  Definitely love all those pop-outs.... want to get mine in now!! :P
|
|
|
 frenzix frenzix
Son of Jim - Creator of Good
     
Posts: 2742
Threads: 195
Registered: December 8th, 2003
Member Is Offline
Theme: UltimaBB Pro Blue ( Default )
|
| posted on December 2nd, 2005 at 07:37 AM |
|
|
nice mate, keep the piccys rolling
|
|
|
 vsleepy vsleepy
Officially Full-On Dubber
  
Posts: 228
Threads: 31
Registered: July 30th, 2005
Member Is Offline
Location: Perth
Theme: UltimaBB Pro Blue ( Default )
Mood: Resto Haze
|
| posted on December 2nd, 2005 at 02:06 PM |
|
|
Hi, im currently doing a '58 bus.
I'm currently exploring lowering options, what tranny did you end up using? What are the options with the creative kit?
Can you point me to some more info for what you did with your front spindles?
cheers,
James
|
|
|
 kombi_kid kombi_kid
Super Moderator
Good Kid too many projects
      
Posts: 124
Threads: 341
Registered: August 27th, 2002
Member Is Offline
Location: brisvegas
Theme: UltimaBB Pro Blue ( Default )
|
| posted on December 2nd, 2005 at 09:03 PM |
|
|
great stuff derek!!! come along way since i last talked to u!! so she going to be done by chrissy?? come on mate 3 weeks left get it oner and
cruise!!
cheers
rhys
it aint just cool its aircool'd
|
|
|
 58SPLIT 58SPLIT
Seriously Crusin Dubber
 
Posts: 148
Threads: 15
Registered: May 7th, 2004
Member Is Offline
Location: Coffs Harbour
Theme: UltimaBB Pro Blue ( Default )
Mood: schwiiiiiing!
|
| posted on December 2nd, 2005 at 09:04 PM |
|
|
With the IRS conversion I have a single side plate gearbox out of a 71 beetle. These gearbox's have a better top end ratio.
The engineering and quality of the Creative Kit is awsome.Well worth doing.The options you have with this kit is you can run either standard late
spring plates or do what i did and run with the supplied adjustable ones. You still need to run beetle gearbox with a combination of beetle CV joints
and Bay bus shafts and CV joints . I chose to run rear hubs and drums from a 69 model because i wanted to keep the wide five stud pattern. You can run
later brakes and 4 stud patten if you wish.
Front spindles. I used a press from work to press them apart. You need to find an engineer shop to do the required machining to reverse the link pins.
I had them machine the shafts and make up oversize brass bushes. You have to clearance the centre pin against the stub axle .(enough to fit 5 - 6
shims) Some people weld a gusset on the other side for strength. I dont think you need to, as the link pins are heavy duty and good quality steel.
This gives you 2.5" drop without changing any of the steering geomerty. I reverse the taper on the ball joints. Honed them out to fit bay window ball
joints, so they clear the chassis. I also installed adjusters.
|
|
|
 58SPLIT 58SPLIT
Seriously Crusin Dubber
 
Posts: 148
Threads: 15
Registered: May 7th, 2004
Member Is Offline
Location: Coffs Harbour
Theme: UltimaBB Pro Blue ( Default )
Mood: schwiiiiiing!
|
| posted on December 2nd, 2005 at 09:08 PM |
|
|
3 weeks! im chewing up the funds real quick....
should be painted before winter. then it will be a down hill run form there.. i just got all the rules and regs today on installing seat belts.. will
post some pictures as i go ...
|
|
|
 58SPLIT 58SPLIT
Seriously Crusin Dubber
 
Posts: 148
Threads: 15
Registered: May 7th, 2004
Member Is Offline
Location: Coffs Harbour
Theme: UltimaBB Pro Blue ( Default )
Mood: schwiiiiiing!
|
| posted on December 3rd, 2005 at 09:24 AM |
|
|
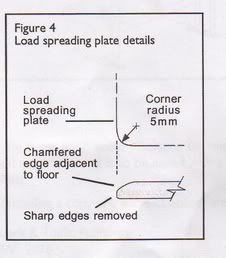
Installation of aftermarket seat belts. Required by RTA (Vehicle inspectors bulletin 49)
* An engineer's certificate must certify the fitment of the seat belts.
*Load speading plates (mounting plates under floor ect.)should have a minimum area 3750mm squared. (75mmX50mm)
*Thickness should be no less than 3mm
*All corners should have minimum radii of 5mm
*Edges adjacent to the floor are to be chamfered (this is so the mounting plate wont wear through the fLoor.)
|
|
|
 58SPLIT 58SPLIT
Seriously Crusin Dubber
 
Posts: 148
Threads: 15
Registered: May 7th, 2004
Member Is Offline
Location: Coffs Harbour
Theme: UltimaBB Pro Blue ( Default )
Mood: schwiiiiiing!
|
| posted on December 4th, 2005 at 04:22 PM |
|
|
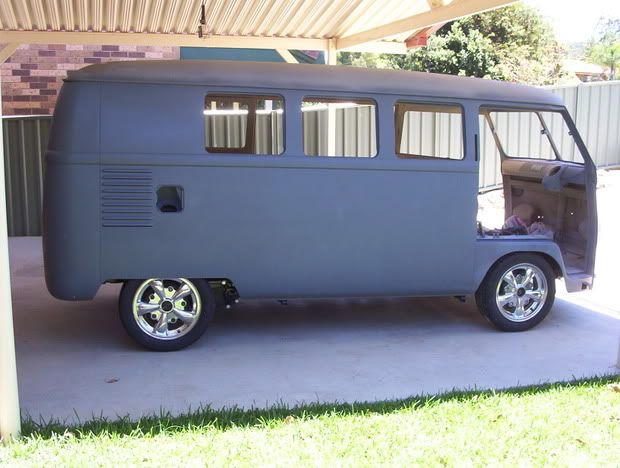
Sprayed etch primer today on RH side. Love that fresh clean painted look. Also welded up fuel tank guage hole in dash. Were these gauges fitted by the
selling dealers. ?(They always look out of place on the dash. )
This bus has only minor rust repairs done to it.The panels are straight as they come. The bus still had the original shocks fitted to it, and the foor
sections have not one single dent in them. I dont think this bus has done much work in its life.
Nice to have a good canvas to work on.
|
|
|
 58SPLIT 58SPLIT
Seriously Crusin Dubber
 
Posts: 148
Threads: 15
Registered: May 7th, 2004
Member Is Offline
Location: Coffs Harbour
Theme: UltimaBB Pro Blue ( Default )
Mood: schwiiiiiing!
|
| posted on December 5th, 2005 at 09:00 PM |
|
|
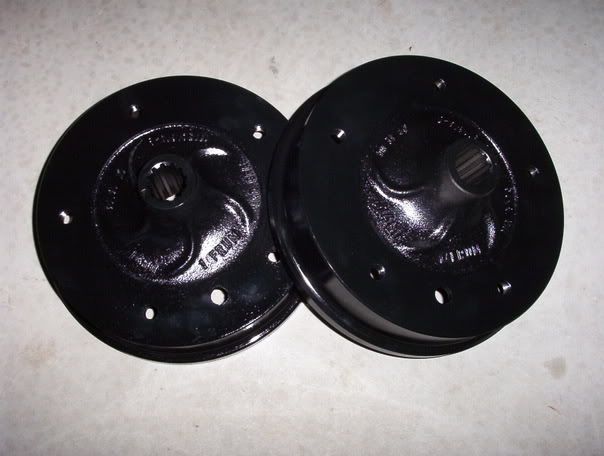
recieved my new rear brake drums toady. That makes everything in the brake department brand new. Want this bus to stop as fast as it will go. Couldnt
help myself, gfave them a coast of hi temp gloss black to protect them....
|
|
|
 58SPLIT 58SPLIT
Seriously Crusin Dubber
 
Posts: 148
Threads: 15
Registered: May 7th, 2004
Member Is Offline
Location: Coffs Harbour
Theme: UltimaBB Pro Blue ( Default )
Mood: schwiiiiiing!
|
| posted on December 5th, 2005 at 09:06 PM |
|
|
started on my seat belt mount plates but got destracted by this....
then back to more of this......
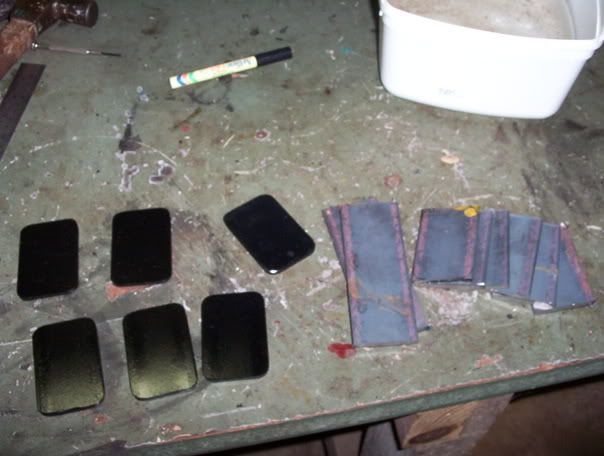
six done, six to go ,then drill and weld nuts on them. plus 2 for the sash part of the seat belt.I used 5mm flat bar , the min says 3mm.Felt it safer
for the uupper part of the fron belt mount as it will be 30mm wide and not 50mm.keep a bucket of cool water when rounding corners on the bench
grinder, these peices get real hot to hold, fast......
|
|
|
 ClassicVW(pacific) ClassicVW(pacific)
Banned
Posts: 1627
Threads: 141
Registered: July 23rd, 2004
Member Is Offline
Location: Gold Coast Australia
Theme: UltimaBB Pro Blue ( Default )
|
| posted on December 5th, 2005 at 09:21 PM |
|
|
#! Message No Longer Available !#
|
|
|
| Pages: 1 2 3 |