| [ Total Views: 1027 | Total Replies: 19 | Thread Id: 75072 ] |
|
|
 MattY-64 MattY-64
Seriously Crusin Dubber
 
Posts: 189
Threads: 49
Registered: October 4th, 2004
Member Is Offline
Location: Ipswich
Theme: UltimaBB Pro Blue ( Default )
|
| posted on March 2nd, 2009 at 09:02 PM |
|
|
engine install
Hi all,
Well i have finally got a 'get me by' engine together and attempted to install it on the weekend.
After three and a half hours of poking a prodding the sod of a thing i was still no futher at having it installed then when i started. (I am a first
timer after all).
I have read the idiot's guide and the mechanical manual and i understand the principles but still had no success.
I am wondering if there are any pointers that could be passed over, from all those shed mechanics that have done this a couple of times.
i am installing a 1600tp onto a 1964 1200sp gearbox. Is there anything special that i need to know other than the flywheel clearance that needs to be
accounted for, i.e. are the splines different, for the clutch plate? or maybe i don't have enough clearance for the flyweel. The 1200sp that i pulled
out had a larger flywheel i think as there are some adjustments made to the gear box housing.
is it easier to install the engine without the fan shroud & alternator?
Just after some pointers so i can finally get the engine in an start it up to hear her run again, after the odd 7yrs  ..... .....
cheers,
Matt.
|
|
|
 Anthiron Anthiron
A.k.a.: Nicko McKay
Compulsive Aussie Vee Dubber
The Baja Rejuvenation Begins
      
Posts: 4936
Threads: 310
Registered: October 1st, 2003
Member Is Offline
Location: Buderim QLD
Theme: UltimaBB Pro Blue ( Default )
Mood: Hell hath no fury like a womans scorn for sega.
|
| posted on March 2nd, 2009 at 09:08 PM |
|
|
you will see grinding marks if your bell housing has been clearanced.
the splines on the gearbox shaft will match (you might have to turn the engine over by hand slightly to get the splines to slide in)
you will however need a 12 volt starter and starter ring gear if you are using a 12 v flywheel as the 6v one will not match.
just use a trolly jack to bring the engine up to level with the bolt holes etc and slide it back on the gearbox shaft. helps if you have a mate to
help (and if you cut the back off your car and make a baja)
62/60 model bug eye baja bug, (Full Build in Progress)
1974 Chevrolet Luv
1970 MK2 Ford Cortina GT
1979 Yamaha RX125 Two Stroke tracker project.
2004 Harley Davidson Sportster XL Custom
|
|
|
 oval TOFU oval TOFU
Son of Jim - Creator of Good
Bitte, ein Bit!
     
Posts: 2946
Threads: 234
Registered: July 10th, 2003
Member Is Offline
Location: Pt Cookie, Melburg
Theme: UltimaBB Pro Grey
Mood: :booM
|
| posted on March 2nd, 2009 at 09:15 PM |
|
|
Your clutch should be a 200mm version on the 1600. A 1200 gearbox will only fit a 180mm clutch. I think you'll be able to grind away at the gearbox
bell housing to fit the 200mm clutch though... I'm not sure if there's any specific special way to do this - is the gearbox aluminium or magnesium?
I'm not sure if the splines on the input shaft are different as well...
If you have the clutch sorted, and you still cant get the engine it because the ancilaries like the fan shroud etc are in the way, then save yourself
the trouble and strip it down to the oil cooler - but don't use the oil cooler as a load-bearing member! IE: don't use it to rock the engine into
place! You can end up tearing it off!
Another issue (there's always another one), is that the rear tinwear might not fit... hell, even the front tinware might not fit, so don't be
suprised!
Good luck!
...and Robert's ya father's brother...
|
|
|
 eraser eraser
Fahrvergnugen
   
Posts: 970
Threads: 128
Registered: March 11th, 2005
Member Is Offline
Location: Adelaide
Theme: UltimaBB Pro Powder
|
| posted on March 2nd, 2009 at 09:16 PM |
|
|
yeppas jack the car up, stick the engine under (i like to take the muffler off for clearance (i also took the rear apron off {bad idea}), jack the
engine up and when in line push backwards, but as anthiron said you need a 12V starter and adapted starting gear.
|
|
|
 grumble grumble
Son of Jim - Creator of Good
     
Posts: 2671
Threads: 53
Registered: June 10th, 2008
Member Is Offline
Location: Taree
Theme: UltimaBB Pro Blue ( Default )
Mood: happy all the time
|
| posted on March 3rd, 2009 at 08:54 PM |
|
|
After all of this and assuming the clutch plate has been lined up,when fitting the motor as the clutch shaft enters the clutch plate select 4th gear
and pull the handbrake on. This effectively holds the spigot shaft from turning as you turn the crank which will then make the splines easier to align
and let the engine slide home.Good luck.
|
|
|
 vw54 vw54
Super Administrator
Always Waiting 4 Friday
        
Posts: 16723
Threads: 378
Registered: August 26th, 2002
Member Is Offline
Location: Sunny Sydney
Theme: UltimaBB Pro Blue ( Default )
Mood: Oval resto ongoing
|
| posted on March 4th, 2009 at 05:55 AM |
|
|
as per above is the clutch plate line up and yr trying to fit a 12v flywheel into a 6v bell housing it will hit in 4 places so these have to be
clearanced
the heater box will also hit on the body work and the body work has to be cut away slightly and if the origional heater boxes are fitted one has to
be cut away to get it under the rear fire wall section
|
|
|
 MattY-64 MattY-64
Seriously Crusin Dubber
 
Posts: 189
Threads: 49
Registered: October 4th, 2004
Member Is Offline
Location: Ipswich
Theme: UltimaBB Pro Blue ( Default )
|
| posted on March 4th, 2009 at 07:54 AM |
|
|
Thanks everyone for the pointers.
I have checked the clutch plate and it fits the splines so all good there.
I am not running heater boxes, so shouldn't have any problems there either.
I am going to have to do more work on the clearance though as i think that this could be my issue.
Also checked the started and i am not sure if it is 6 or 12V. the previous owner had changed over the electricals to a 12v alternator but i think he
may have left the starter as a 6 volt. will check that today.
got to put the bush in before i can install the engine i suppose.
cheers,
Matt.
|
|
|
 MattY-64 MattY-64
Seriously Crusin Dubber
 
Posts: 189
Threads: 49
Registered: October 4th, 2004
Member Is Offline
Location: Ipswich
Theme: UltimaBB Pro Blue ( Default )
|
| posted on March 8th, 2009 at 08:54 PM |
|
|
hi all,
another uneventfull weekend 
i can get the engine nearly on, but it just doesn't seem to want to slide all the way on.
the splines all line up, etc. it almost like i have not clearanced enough. but i can fit a spare 12v flywheel, clutch and plate inside and rotate with
no problems.
i am going to clearance a little more but i don't want to take too much out.
anyone got any idea on what could be stopping it from sliding on completely?
cheers,
matt.
|
|
|
 Anthiron Anthiron
A.k.a.: Nicko McKay
Compulsive Aussie Vee Dubber
The Baja Rejuvenation Begins
      
Posts: 4936
Threads: 310
Registered: October 1st, 2003
Member Is Offline
Location: Buderim QLD
Theme: UltimaBB Pro Blue ( Default )
Mood: Hell hath no fury like a womans scorn for sega.
|
| posted on March 8th, 2009 at 09:27 PM |
|
|
make sure its a 12 volt starter before u put the engine in, otherwise its useless anyway.
are you sure your engine is on the same angle as the gearbox? so the bolts slide straight on? is your clutch centered properly so that the spline on
the input shaft will slide straight on?
62/60 model bug eye baja bug, (Full Build in Progress)
1974 Chevrolet Luv
1970 MK2 Ford Cortina GT
1979 Yamaha RX125 Two Stroke tracker project.
2004 Harley Davidson Sportster XL Custom
|
|
|
 greedy53 greedy53
Bishop of Volkswagenism
     
Posts: 3062
Threads: 468
Registered: March 4th, 2006
Member Is Offline
Location: camden nsw 2570
Theme: UltimaBB Pro Grey
Mood: strung out
|
| posted on March 9th, 2009 at 06:16 AM |
|
|
just an idea you did use a spline align tool on the clutch
|
|
|
 matberry matberry
Super Moderator
Go hard or go home
      
Posts: 8114
Threads: 134
Registered: March 7th, 2006
Member Is Offline
Location: Cooroy Qld
Theme: UltimaBB Pro Blue
Mood: enjoying waving at all my Kombi buddies from my T3
|
| posted on March 9th, 2009 at 09:04 AM |
|
|
When nearly in all the way, look at the gap between the bell hsing and the engine from underneath and the side and make sure it's all straight, then
if it doesn't go in rotate the engine and if you have clearance issues you will hear the ring gear grind the bell housing, this will highlight where
you need to clearance.
Matt Berry Motorsports...air cooled advice, repairs and mods Ph 0408 704 662
OFF-ROAD,CIRCUIT,DRAG,STREET,ENDURANCE
 |
|
|
 hellbugged hellbugged
A.k.a.: Daimo Pell
23 Windows of Awesome
48's and straight cuts
       
Posts: 5080
Threads: 116
Registered: April 17th, 2003
Member Is Offline
Location: Nambucca Valley NSW
Theme: UltimaBB Psyche Blue
Mood: Couldn't care less
|
| posted on March 9th, 2009 at 11:54 AM |
|
|
i'm no expert, just an experienced wacka with a camera  ....... .......
loosen the clutch adjusting wing nut right off.
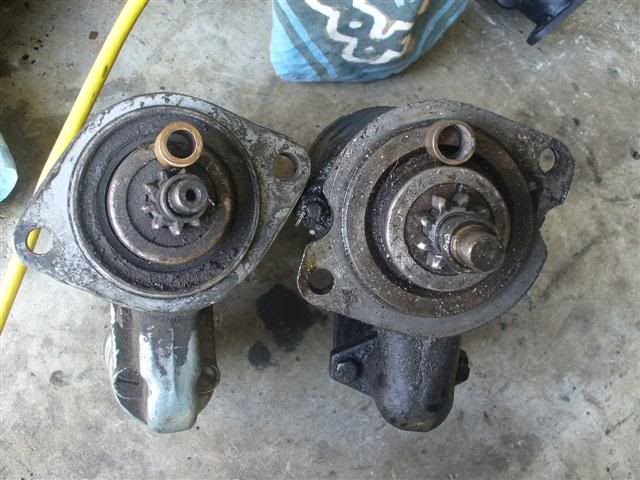
you'll need a special "adapter" starter motor bush to run the 12v starter in the early gearbox
make sure the pressure plate matches your thrust bearing ie colllar present for early style thrust bearing, no collar for late bearing
early thrust bearing..........matches pressure plate with collar on!!
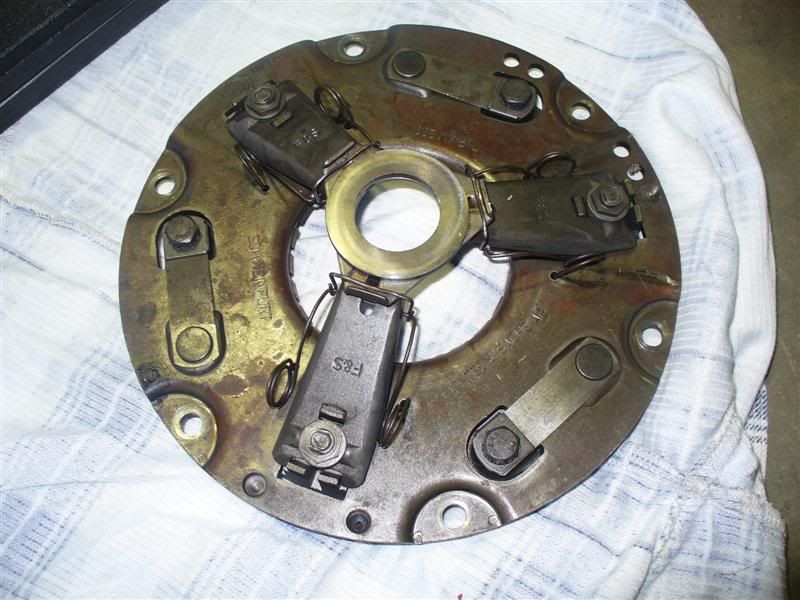
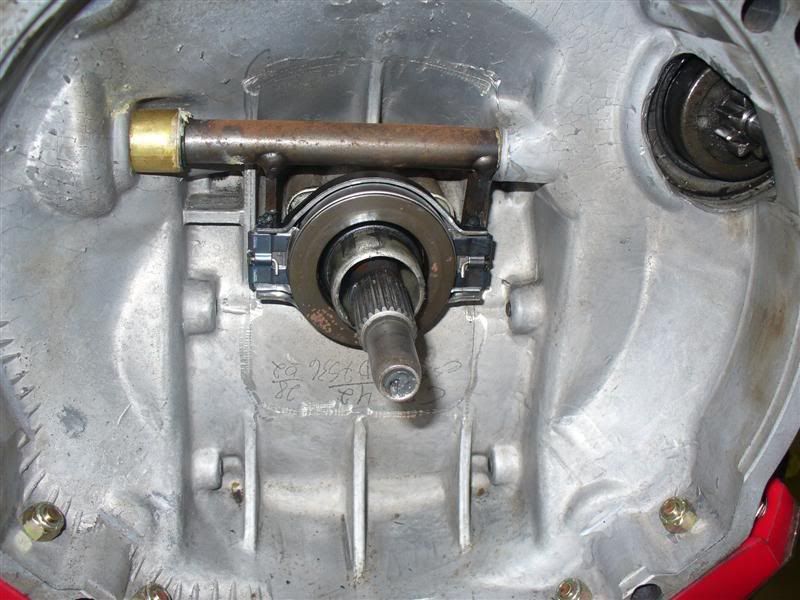
late thrust bearing (with guide tube on box via 3 bolts)matches pressure plate with collar removed........
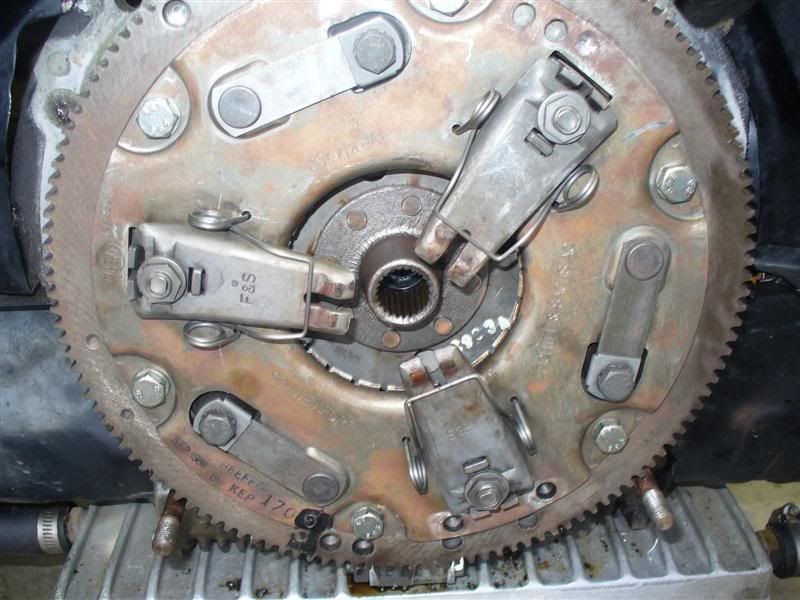
an old short block with 12 volt flywheel is real handy.
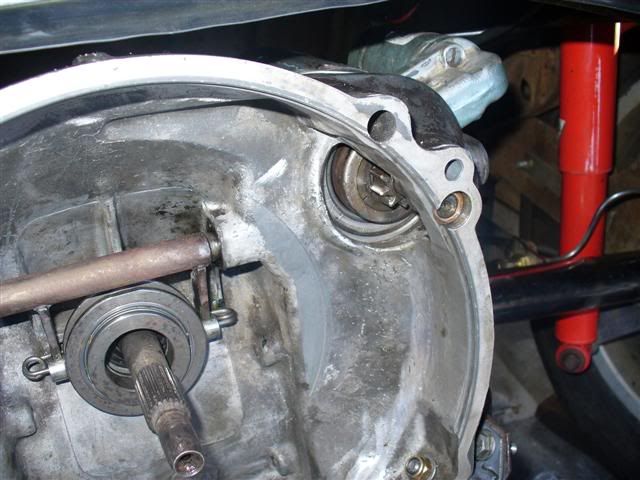
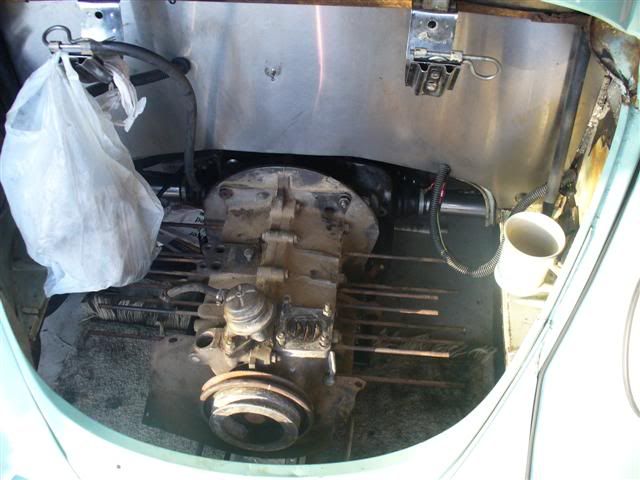
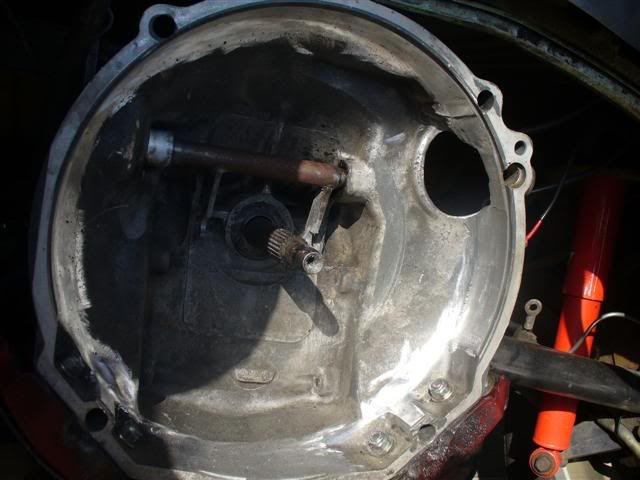
sneaking it in with the nuts a 1/2 turn at a time , turn the engine over with a bar and socket by hand, those sharp flywheel teeth make short work of
the soft magnesium/alloy tranny.........
it actually cuts to a fairly nice finish.......
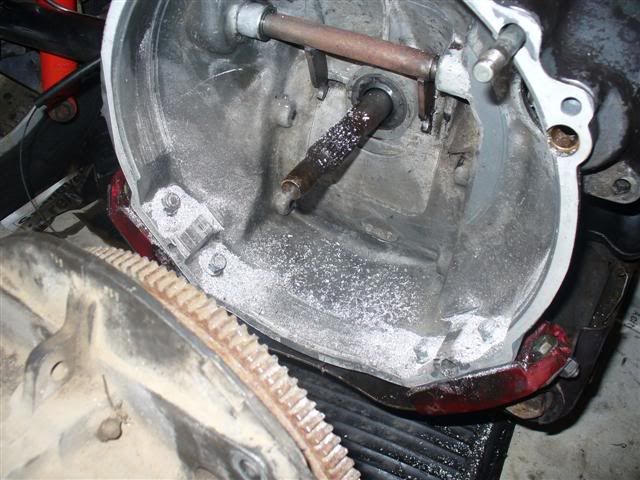
a look around the points that need to be clearanced......
.......these shots were taken a few mm before the engine/gearbox went fully flush, so a little more came out than whats shown. same points, just a
'lil deeper.........
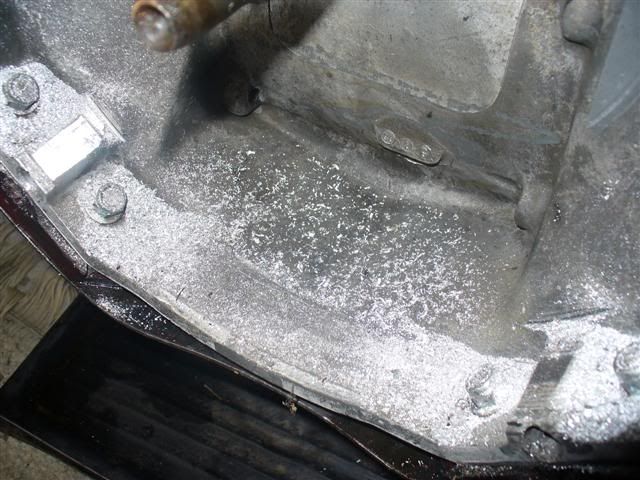
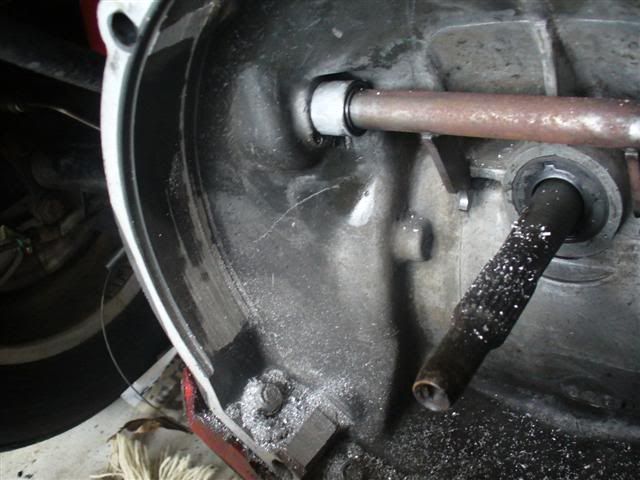
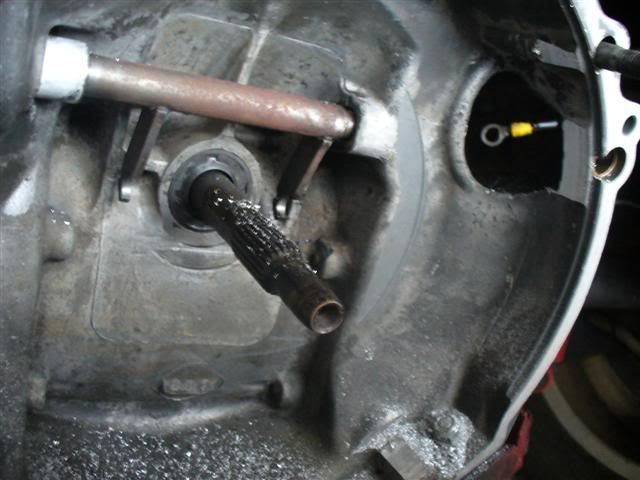
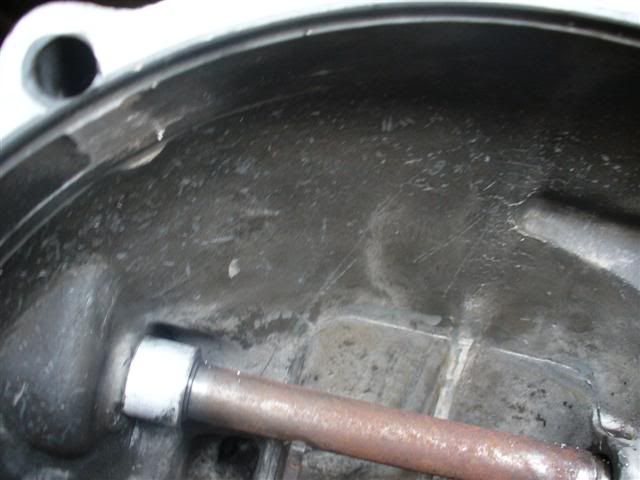
under the starter bush, is a place to keep a regular check on!!!!!
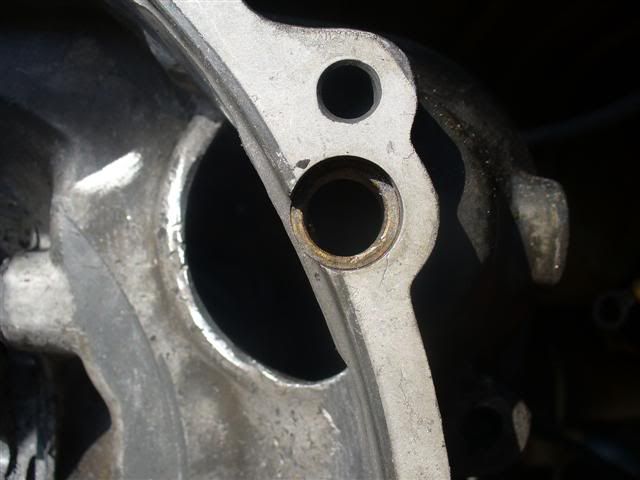
after marking, i took a fraction more off with a carbide burr, then came back through with the flapper to take out any stress edges..........
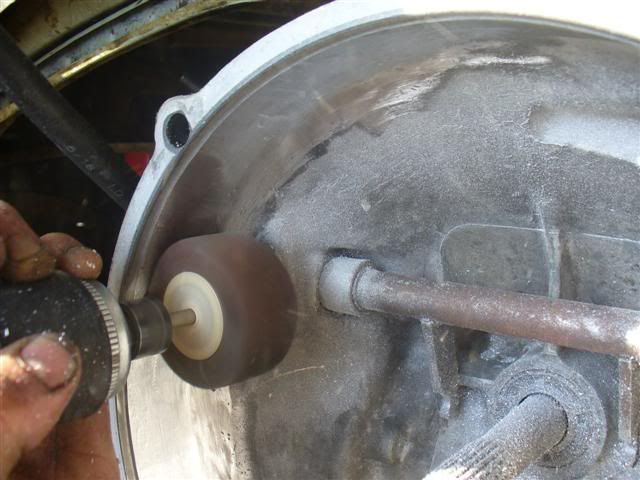
another job done!!
|
|
|
 MattY-64 MattY-64
Seriously Crusin Dubber
 
Posts: 189
Threads: 49
Registered: October 4th, 2004
Member Is Offline
Location: Ipswich
Theme: UltimaBB Pro Blue ( Default )
|
| posted on March 9th, 2009 at 01:12 PM |
|
|
Thanks everyone,
hellbug: i have been using your thread as an example already.
just so everyone doesn't think i am completely hopeless.....
i haven't got the starter installed as i know i have to purchase a 12V (still in process).
I have swapped the bush over already. I have clearanced the housing, my method was a little different to hellbugged. i used a spare flywheel, cluch
and clutch plate. then turned it by hand to cut away the housing. it took a while and i still had to clean up using a dremel. used this method as i
dont have a spare short block...
i have been doing the clutch plate install but eye and with a screw driver to move it around to dead center, as i don't have a tool. so this may be
the problem, i will re-check tonight and have another crack at it.
i am using a sachs 12 spring clutch pressure plate (i think that same that is used in the kombi) and an old trow out bearing, so my installation is
alittle different to hellbugged.
cheers,
matt.
|
|
|
 matberry matberry
Super Moderator
Go hard or go home
      
Posts: 8114
Threads: 134
Registered: March 7th, 2006
Member Is Offline
Location: Cooroy Qld
Theme: UltimaBB Pro Blue
Mood: enjoying waving at all my Kombi buddies from my T3
|
| posted on March 9th, 2009 at 01:43 PM |
|
|
| Quote: | Originally
posted by MattY-64
i have been doing the clutch plate install but eye and with a screw driver to move it around to dead center, as i don't have a tool. so this may be
the problem, i will re-check tonight and have another crack at it.
|
There's the prob, got to get this perfect,
and Daimo ....your the man, but you didn't show us what a diaphram clutch looks like, they are the more common ones these days you know 
Matt Berry Motorsports...air cooled advice, repairs and mods Ph 0408 704 662
OFF-ROAD,CIRCUIT,DRAG,STREET,ENDURANCE
 |
|
|
 hellbugged hellbugged
A.k.a.: Daimo Pell
23 Windows of Awesome
48's and straight cuts
       
Posts: 5080
Threads: 116
Registered: April 17th, 2003
Member Is Offline
Location: Nambucca Valley NSW
Theme: UltimaBB Psyche Blue
Mood: Couldn't care less
|
| posted on March 9th, 2009 at 05:00 PM |
|
|
| Quote: | Originally
posted by matberry
but you didn't show us what a diaphram clutch looks like, they are the more common ones these days you know 
|
yeah, next time Matt........oh and for the record, i have removed AND reinstalled the collar from the diaphram type as well (some say it's not
possible)
|
|
|
 Anthiron Anthiron
A.k.a.: Nicko McKay
Compulsive Aussie Vee Dubber
The Baja Rejuvenation Begins
      
Posts: 4936
Threads: 310
Registered: October 1st, 2003
Member Is Offline
Location: Buderim QLD
Theme: UltimaBB Pro Blue ( Default )
Mood: Hell hath no fury like a womans scorn for sega.
|
| posted on March 9th, 2009 at 06:04 PM |
|
|
i have aligned the clutch splines before using the end of a socket wrench. and going by eye and its worked every time, so it is possible.
62/60 model bug eye baja bug, (Full Build in Progress)
1974 Chevrolet Luv
1970 MK2 Ford Cortina GT
1979 Yamaha RX125 Two Stroke tracker project.
2004 Harley Davidson Sportster XL Custom
|
|
|
 MattY-64 MattY-64
Seriously Crusin Dubber
 
Posts: 189
Threads: 49
Registered: October 4th, 2004
Member Is Offline
Location: Ipswich
Theme: UltimaBB Pro Blue ( Default )
|
| posted on March 9th, 2009 at 09:13 PM |
|
|
As it seems my eye was a bit out the first time.
I have used a socket rench end and a second attempt at my eye.
Fits up a dream, only thing is i have to do a little more clearancing with the dremel. not quite a smooth rotation.
Bit late now to start the dremel up, so hopefully it will be all in tomorrow night.
Once again, thanks all for your insight.
Cheers,
Matt.
|
|
|
 geodon geodon
Wolfsburg Wizard
  
Posts: 478
Threads: 63
Registered: August 28th, 2002
Member Is Offline
Location: geelong
Theme: UltimaBB Pro Blue ( Default )
Mood: stumbling
|
| posted on March 23rd, 2009 at 03:29 PM |
|
|
Years ago, I made my own clutch alignment tool for my daughter's MG Midget using an steel rod (sized to fit the flywheel bush) onto which I wound
1-2inch wide masking tape not too tightly until it was thicker than the splined hole in the clutch friction plate.
I then got the friction plate & worked it backwards & forward (well greased) along the taped section & it formed its own splines in the
masking tape. They weren't perfect but enough to keep the friction plate dead centre while I did up the clutch pressure plate bolts with the
improvised tool in place in the flywheel.
|
|
|
 oval TOFU oval TOFU
Son of Jim - Creator of Good
Bitte, ein Bit!
     
Posts: 2946
Threads: 234
Registered: July 10th, 2003
Member Is Offline
Location: Pt Cookie, Melburg
Theme: UltimaBB Pro Grey
Mood: :booM
|
| posted on March 25th, 2009 at 10:21 AM |
|
|
| Quote: | Originally
posted by geodon
Years ago, I made my own clutch alignment tool for my daughter's MG Midget using an steel rod (sized to fit the flywheel bush) onto which I wound
1-2inch wide masking tape not too tightly until it was thicker than the splined hole in the clutch friction plate.
I then got the friction plate & worked it backwards & forward (well greased) along the taped section & it formed its own splines in the
masking tape. They weren't perfect but enough to keep the friction plate dead centre while I did up the clutch pressure plate bolts with the
improvised tool in place in the flywheel.
|
I did that too - I used a 1/2" wratchet extension and wrapped duct tape around it to match the diameter of the clutch plate. Worked a treat!
...and Robert's ya father's brother...
|
|
|
 colonel mustard colonel mustard
Son of Jim - Creator of Good
     
Posts: 2829
Threads: 51
Registered: February 27th, 2009
Member Is Offline
Theme: UltimaBB Pro Black
|
| posted on April 4th, 2009 at 02:10 PM |
|
|
Did you get it working Matt?
|
|
|