| [ Total Views: 109754 | Total Replies: 437 | Thread Id: 75812 ] |
| Pages: 1 2 3 4 .. 15 |
|
|
 ricola ricola
Wolfsburg Wizard
  
Posts: 437
Threads: 9
Registered: February 5th, 2003
Member Is Offline
Location: UK
Theme: UltimaBB Pro Blue ( Default )
|
| posted on April 24th, 2009 at 11:31 PM |
|
|
Thought it might be! 
|
|
|
 ricola ricola
Wolfsburg Wizard
  
Posts: 437
Threads: 9
Registered: February 5th, 2003
Member Is Offline
Location: UK
Theme: UltimaBB Pro Blue ( Default )
|
| posted on May 3rd, 2009 at 12:14 AM |
|
|
Bit more done...
Cut rust out of chassis:
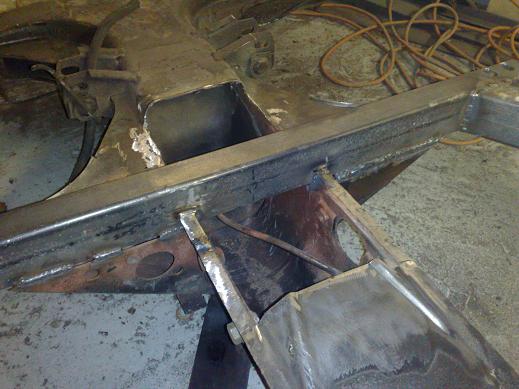
Then fabricate new panels and weld them in, took a bit of beating to get the right shape with that thick steel!
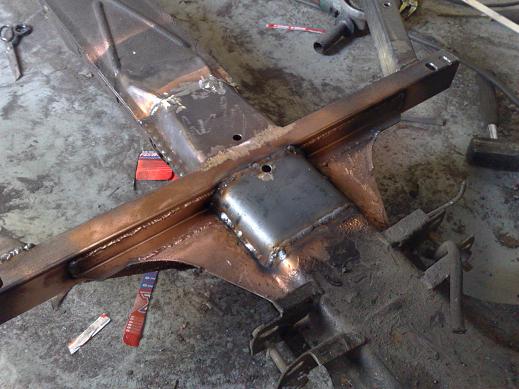
Added some drain holes to help prevent problems in the future too...
|
|
|
 ricola ricola
Wolfsburg Wizard
  
Posts: 437
Threads: 9
Registered: February 5th, 2003
Member Is Offline
Location: UK
Theme: UltimaBB Pro Blue ( Default )
|
| posted on May 14th, 2009 at 07:29 AM |
|
|
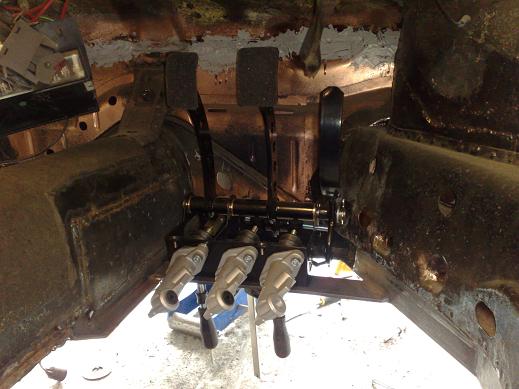
The need to convert to a hydraulic clutch gave me the excuse to splash out on this pedal box...
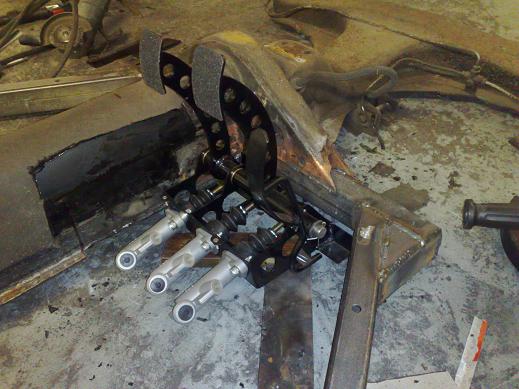
I'm going to try and fit the pedals less offset than original and will also sink them to the bottom of the chassis tubes so the new floor won't
change too much, while covering the master cylinders.
|
|
|
 subaruboxer subaruboxer
Officially Full-On Dubber
  
Posts: 292
Threads: 20
Registered: January 1st, 2005
Member Is Offline
Location: North Germany
Theme: UltimaBB Pro Blue ( Default )
|
| posted on June 21st, 2009 at 06:45 PM |
|
|
Hi Rich,
you are at it again big time!! Great job!!
All I can say is that you are doing it right again!!
Cheers,
Jörg
|
|
|
 ricola ricola
Wolfsburg Wizard
  
Posts: 437
Threads: 9
Registered: February 5th, 2003
Member Is Offline
Location: UK
Theme: UltimaBB Pro Blue ( Default )
|
| posted on June 21st, 2009 at 08:09 PM |
|
|
Done a bit more, progress has been a bit slower recently. Put my back out flipping the chassis yesterday so I think that will slow me down for a
couple of weeks too unfortunately...
I have remade the front pedal area for the new set-up, including locally lowering the floor to compensate for the raised floor over the master
cylinders:
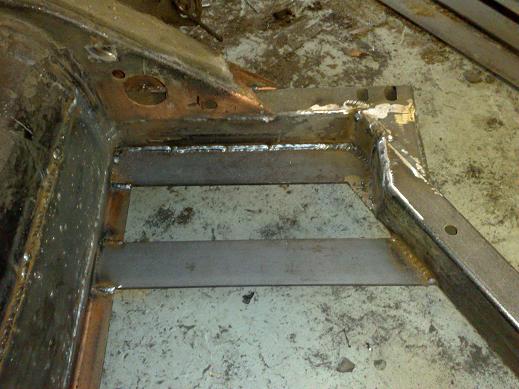
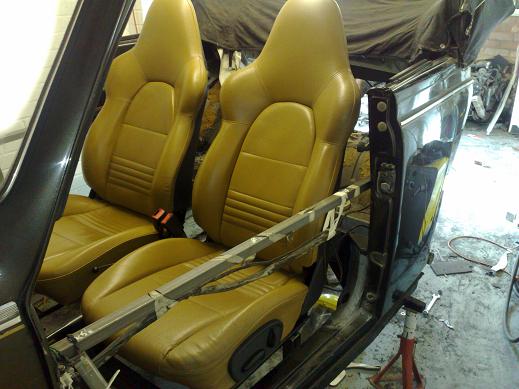
Got the seat mounts in:
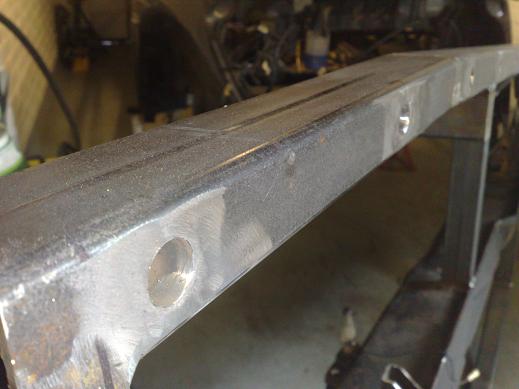
Next I'm welding in tubing to the main rails at the bolt positions so stop water getting inside and to make them neater/stronger.
|
|
|
 pete wood pete wood
A.k.a.: figure itout
23 Windows of Awesome
       
Posts: 6828
Threads: 389
Registered: January 15th, 2004
Member Is Offline
Location: Nth Nth StMarys, Sydney
Theme: UltimaBB Pro White
Mood: upgrades = jackstands
|
| posted on June 22nd, 2009 at 11:19 AM |
|
|
as always, a great job there mate. 
|
|
|
 crsedge crsedge
Wolfsburg Wizard
  
Posts: 687
Threads: 84
Registered: January 4th, 2005
Member Is Offline
Theme: UltimaBB Pro Blue ( Default )
Mood: Cheery
|
| posted on July 2nd, 2009 at 08:49 PM |
|
|
Great job so far, well done!
... and anyone in Australia who wants a 1303 Cab to start their own VWRX Karmann, here is one I prepared earlier  : :
http://forums.aussieveedubbers.com/viewtopic.php?tid=75389
It certainly isn't in the same shape you started with Rich, very straight with floors already done, and would make a great base!
Look forward to continuing to read the thread on this build.
Cheers
Craig
May '55 Oval
|
|
|
 ricola ricola
Wolfsburg Wizard
  
Posts: 437
Threads: 9
Registered: February 5th, 2003
Member Is Offline
Location: UK
Theme: UltimaBB Pro Blue ( Default )
|
| posted on July 13th, 2009 at 05:49 AM |
|
|
Well, I've been making bits of progress here and there...
For all body bolt locations going through the chassis I got out the hole saw and welded in sections of tube. Looks a LOT neater and will keep out the
elements.
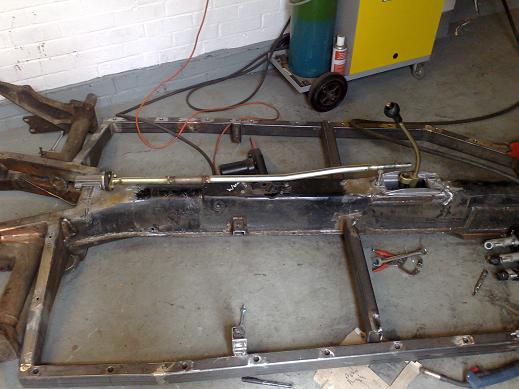
Sorted the gear linkage and shifter position
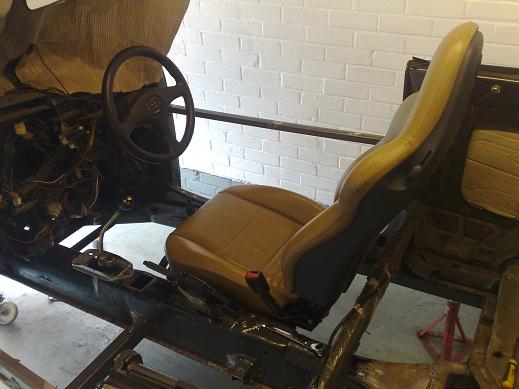
extended the shift rod and modifed the tunnel for the 911 shifter
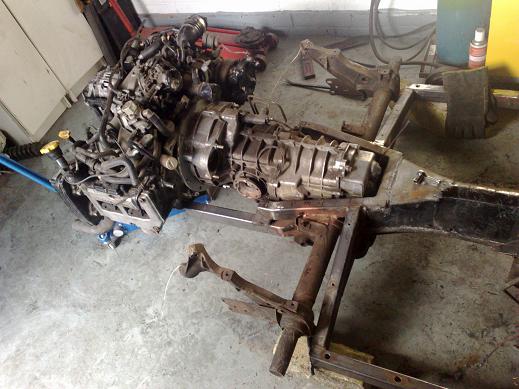
got the engine into position
 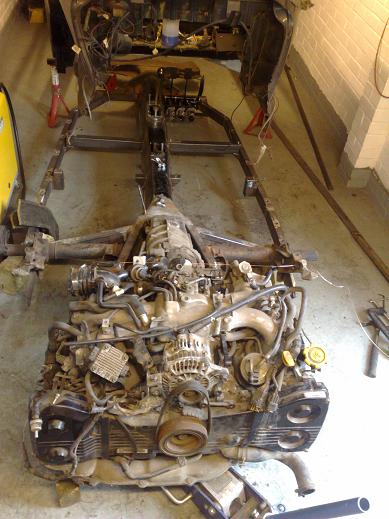
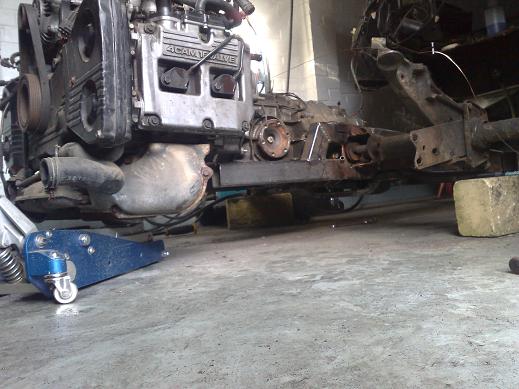
Now time to make up some engine mounts
|
|
|
 1303Steve 1303Steve
A.k.a.: Steve Carter
Scirocco Rare
        
Posts: 8621
Threads: 556
Registered: August 27th, 2002
Member Is Offline
Location: Sydney, NSW
Theme: UltimaBB Pro Blue ( Default )
Mood: Parrot Heading
|
| posted on July 13th, 2009 at 03:51 PM |
|
|
Hi
Looking good, cant wait to get back to mine.
Steve
|
|
|
 Flintstones Flintstones
Custom Title Time!
    
Posts: 1077
Threads: 69
Registered: August 27th, 2002
Member Is Offline
Location: Sydney
Theme: UltimaBB Psyche Blue
|
| posted on July 13th, 2009 at 11:19 PM |
|
|
Like what you did with the tubes for the body mounting positions Rich. Looks really nice.
At the top of the tubes how did you close those off (hope I've explained that well?)
Cheers
|
|
|
 ricola ricola
Wolfsburg Wizard
  
Posts: 437
Threads: 9
Registered: February 5th, 2003
Member Is Offline
Location: UK
Theme: UltimaBB Pro Blue ( Default )
|
| posted on July 14th, 2009 at 12:06 AM |
|
|
Not really sure what you mean...
I've drilled the top and bottom of the main 'rails' and welded in lengths of tube all the way through, so a constant diameter. Obviously the body
seal will sit on the top side and on the bottom I will use oversize washers with button head stainless bolts going up into the heater channels. My
rails are the same depth as the cabrio sill strengtheners so unfortunately the heads may get the odd scrape, but worst case I can cut the heads off
and unthread the remains.
If I remember right you drilled bigger holes in the bottom of your tubes and then planned on rubber plugs? I just wanted to make sure that no elements
could get inside the tubes. Also, with the pattern heater channels the accuracy of the captive nuts isn't that great so oversize holes allows for
that too.. In a perfect world a stepped tube welded in woul dbe the ideal so the bolt heads could be recessed up from the bottom but I don't have a
lathe..
|
|
|
 1303Steve 1303Steve
A.k.a.: Steve Carter
Scirocco Rare
        
Posts: 8621
Threads: 556
Registered: August 27th, 2002
Member Is Offline
Location: Sydney, NSW
Theme: UltimaBB Pro Blue ( Default )
Mood: Parrot Heading
|
| posted on July 14th, 2009 at 03:32 PM |
|
|
Hi Rich
I saw this hardware for pan stiffeners at aircooled.net, he wont sell them separately unfortunately.
Steve
| Error |
| Sorry, you must be a registered user in order to download attachments. |
|
| Error |
| Sorry, you must be a registered user in order to download attachments. |
|
|
|
|
 ricola ricola
Wolfsburg Wizard
  
Posts: 437
Threads: 9
Registered: February 5th, 2003
Member Is Offline
Location: UK
Theme: UltimaBB Pro Blue ( Default )
|
| posted on July 14th, 2009 at 05:48 PM |
|
|
It would be a similar thing to that but recessed inside the chassis tube fully, I think those ones still protrude out of the bottom? I'm happy enough
with how mine has turned out, button heads aren't exactly going to decrease my ground clearance much..
|
|
|
 Flintstones Flintstones
Custom Title Time!
    
Posts: 1077
Threads: 69
Registered: August 27th, 2002
Member Is Offline
Location: Sydney
Theme: UltimaBB Psyche Blue
|
| posted on July 14th, 2009 at 10:34 PM |
|
|
I'm with you now. They are going to be long bolts then.
My reasoning was to get the bolt as short as possible to eliminate any "flex" as I've planned for serious power to be put through the chassis as
you know.
Yes an going to put rubber grommets to seal the bigger holes underneath, but I will fish oil inside the box section first for protection.
Cheers
D
|
|
|
 ricola ricola
Wolfsburg Wizard
  
Posts: 437
Threads: 9
Registered: February 5th, 2003
Member Is Offline
Location: UK
Theme: UltimaBB Pro Blue ( Default )
|
| posted on July 19th, 2009 at 07:05 AM |
|
|
Well as long as you have a foam gasket it is never going to be that stiff as an assembly...
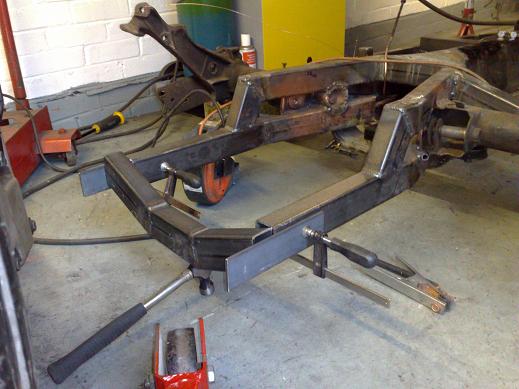
Done a bit more today, started making up the engine cradle
|
|
|
 ricola ricola
Wolfsburg Wizard
  
Posts: 437
Threads: 9
Registered: February 5th, 2003
Member Is Offline
Location: UK
Theme: UltimaBB Pro Blue ( Default )
|
| posted on July 20th, 2009 at 05:48 AM |
|
|
Tubes welded through the framehorns for the bolts and then the ends capped.
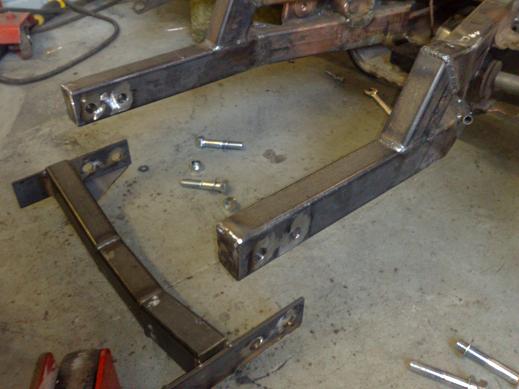
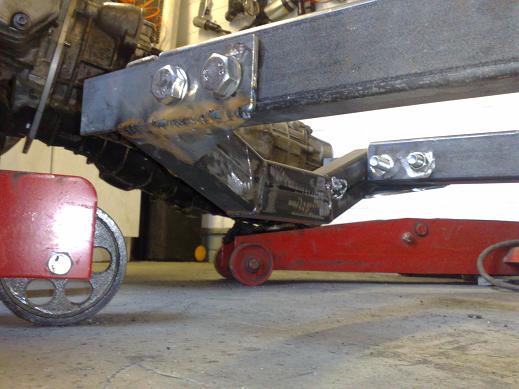
Couple of M16 bolts on each side hold it together nicely, rest of the mount will be done with body on chassis to make sure everything has suitable
clearances and I can maximise ground clearance
|
|
|
 1303Steve 1303Steve
A.k.a.: Steve Carter
Scirocco Rare
        
Posts: 8621
Threads: 556
Registered: August 27th, 2002
Member Is Offline
Location: Sydney, NSW
Theme: UltimaBB Pro Blue ( Default )
Mood: Parrot Heading
|
| posted on July 20th, 2009 at 10:16 AM |
|
|
Nice work
|
|
|
 Flintstones Flintstones
Custom Title Time!
    
Posts: 1077
Threads: 69
Registered: August 27th, 2002
Member Is Offline
Location: Sydney
Theme: UltimaBB Psyche Blue
|
| posted on July 20th, 2009 at 09:23 PM |
|
|
there's no way your going to break those frame horns and cradle
How much ground clearance you got there? Is that set at ride height?
Cheers
|
|
|
 ricola ricola
Wolfsburg Wizard
  
Posts: 437
Threads: 9
Registered: February 5th, 2003
Member Is Offline
Location: UK
Theme: UltimaBB Pro Blue ( Default )
|
| posted on July 20th, 2009 at 10:12 PM |
|
|
lol, I'm future proofing for silly amounts of horsepower 
As for ground clearance, I don't think it is too far off as the chassis stands, but I may well trim the bottom off the cradle if I think it is too
low, having said that I think it would be good to have it level with the sump so act a bit like a guard..
Next job will be to make a bit more space around the shift rod linkage so I can get to it all from underneath (very fiddly at the moment) and then
join chassis/body before starting to cut the body for the trans nose and then finish off the engine mounts.
|
|
|
 ricola ricola
Wolfsburg Wizard
  
Posts: 437
Threads: 9
Registered: February 5th, 2003
Member Is Offline
Location: UK
Theme: UltimaBB Pro Blue ( Default )
|
| posted on July 21st, 2009 at 07:13 AM |
|
|
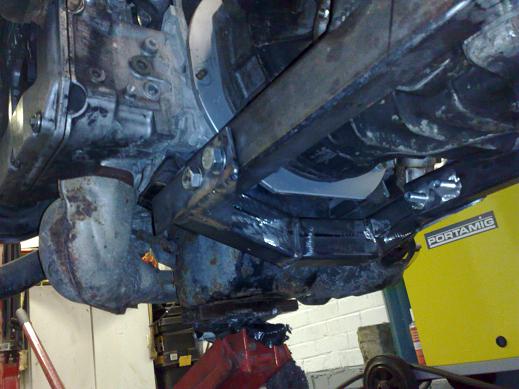
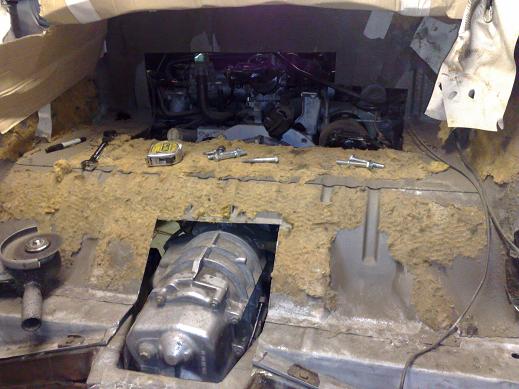
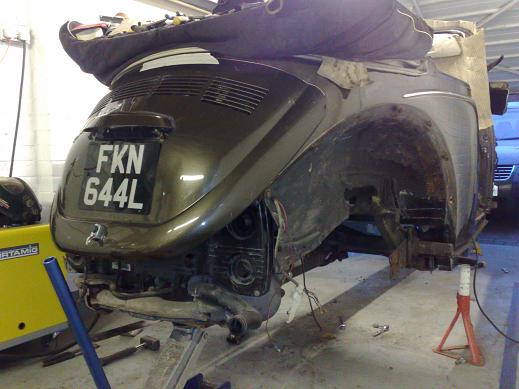
Got the engine and trans in position in the chassis with body mounted, time to do some more fabrication!
|
|
|
 Flintstones Flintstones
Custom Title Time!
    
Posts: 1077
Threads: 69
Registered: August 27th, 2002
Member Is Offline
Location: Sydney
Theme: UltimaBB Psyche Blue
|
| posted on July 21st, 2009 at 08:53 PM |
|
|
Looks like it was meant to be there.
Sheet metal work over the gearbox will be minimal as well.
Looking great
|
|
|
 1303Steve 1303Steve
A.k.a.: Steve Carter
Scirocco Rare
        
Posts: 8621
Threads: 556
Registered: August 27th, 2002
Member Is Offline
Location: Sydney, NSW
Theme: UltimaBB Pro Blue ( Default )
Mood: Parrot Heading
|
| posted on July 21st, 2009 at 11:29 PM |
|
|
Hi Rich
I just noticed your number plates, do they say what I thought they say?
Steve
|
|
|
 ricola ricola
Wolfsburg Wizard
  
Posts: 437
Threads: 9
Registered: February 5th, 2003
Member Is Offline
Location: UK
Theme: UltimaBB Pro Blue ( Default )
|
| posted on July 22nd, 2009 at 03:59 AM |
|
|
lol, I'd never noticed that!
|
|
|
 ricola ricola
Wolfsburg Wizard
  
Posts: 437
Threads: 9
Registered: February 5th, 2003
Member Is Offline
Location: UK
Theme: UltimaBB Pro Blue ( Default )
|
| posted on July 22nd, 2009 at 07:07 AM |
|
|
Engine is now in place on its own 
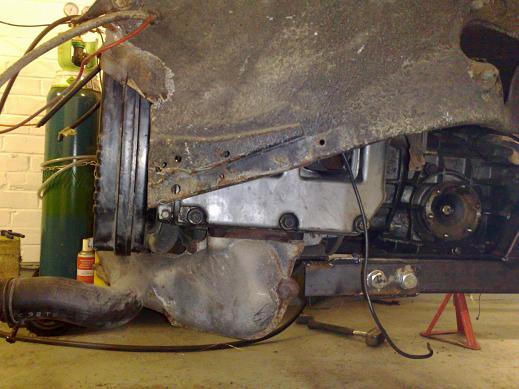
Really happy with its final position, it looks like I have been able to raise the engine a good 2 inches and push it forwards by only an inch, helped
in the end by mounting the trans at a slight angle. Other bonus is that the car isn't trying to do wheelies on the rear axle stands (sitting on
jacking points) so once all front/rear suspension, seats, fuel tank, doors etc are in place the overall weight distribution won't be too bad.
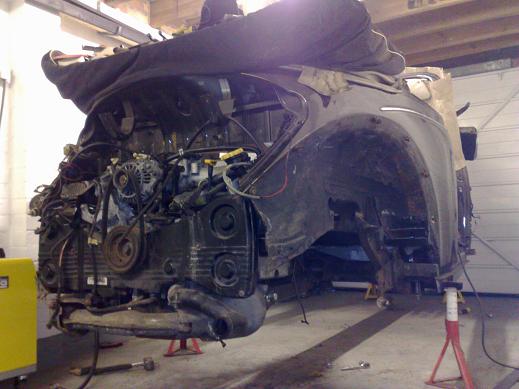
I'll finish off the engine cradle properly tomorrow and post pics...
|
|
|
 ricola ricola
Wolfsburg Wizard
  
Posts: 437
Threads: 9
Registered: February 5th, 2003
Member Is Offline
Location: UK
Theme: UltimaBB Pro Blue ( Default )
|
| posted on July 25th, 2009 at 06:43 AM |
|
|
Engine mount cradle finished off...
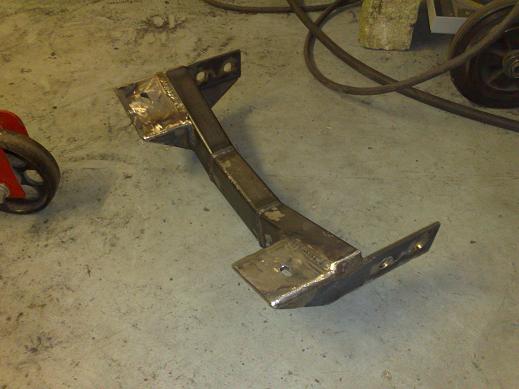
I also hooked up the shifter again, it was rubbing a bit on the bottom of the tunnel before but all good now, in fact VERY good! 
Made up a removable brace to go underneath the trans
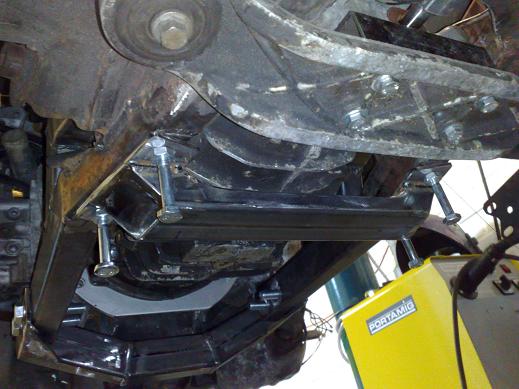
|
|
|
 Flintstones Flintstones
Custom Title Time!
    
Posts: 1077
Threads: 69
Registered: August 27th, 2002
Member Is Offline
Location: Sydney
Theme: UltimaBB Psyche Blue
|
| posted on July 25th, 2009 at 09:16 AM |
|
|
This has got to be the best EJ20T/G50 conversions Rich. 
|
|
|
 ricola ricola
Wolfsburg Wizard
  
Posts: 437
Threads: 9
Registered: February 5th, 2003
Member Is Offline
Location: UK
Theme: UltimaBB Pro Blue ( Default )
|
| posted on July 25th, 2009 at 06:28 PM |
|
|
 I've had a few others to learn and pinch ideas from I've had a few others to learn and pinch ideas from

What's the status with your bug? That has to be one of my all time favourites, can't wait to see that one done!
|
|
|
 Flintstones Flintstones
Custom Title Time!
    
Posts: 1077
Threads: 69
Registered: August 27th, 2002
Member Is Offline
Location: Sydney
Theme: UltimaBB Psyche Blue
|
| posted on July 25th, 2009 at 08:17 PM |
|
|
 Thanks mate, Thanks mate,
Haven't touched it for over a year now.
My wife and I added twins to our family (4 kids all up) as well as selling my house to get into a bigger house.
Now I've got to build a garage/workshop/carport before I can even think about starting on the GTO......when will it ever end
|
|
|
 ricola ricola
Wolfsburg Wizard
  
Posts: 437
Threads: 9
Registered: February 5th, 2003
Member Is Offline
Location: UK
Theme: UltimaBB Pro Blue ( Default )
|
| posted on July 26th, 2009 at 04:49 AM |
|
|
Not surprised you've slowed down with 4 kids! I'm ploughing on while my 2 are away 
Chassis modified with a steel tube hoop over the nose of the gearbox and a transmission tunnel built in to the body, I used the edge flange from the
old crossmembers to preserve a factory appearance and also left a small gap for the body gasket.
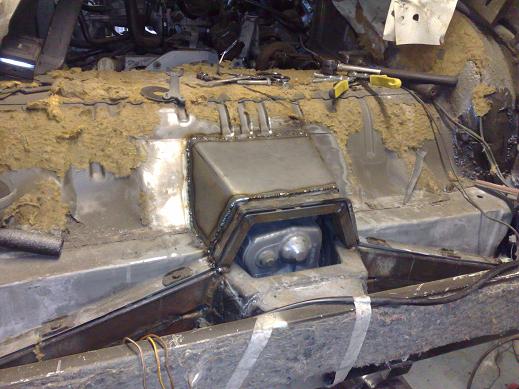
|
|
|
 Flintstones Flintstones
Custom Title Time!
    
Posts: 1077
Threads: 69
Registered: August 27th, 2002
Member Is Offline
Location: Sydney
Theme: UltimaBB Psyche Blue
|
| posted on July 26th, 2009 at 10:16 AM |
|
|
Looking good.
I'm guessing the opening that's left now will just be sheeted over.
What are you going to do for rear seating? 2 buckets...
|
|
|
| Pages: 1 2 3 4 .. 15 |