| [ Total Views: 109925 | Total Replies: 437 | Thread Id: 75812 ] |
| Pages: 1 .. 5 6 7 8 9 .. 15 |
|
|
 ricola ricola
Wolfsburg Wizard
  
Posts: 437
Threads: 9
Registered: February 5th, 2003
Member Is Offline
Location: UK
Theme: UltimaBB Pro Blue ( Default )
|
| posted on February 3rd, 2010 at 07:36 AM |
|
|
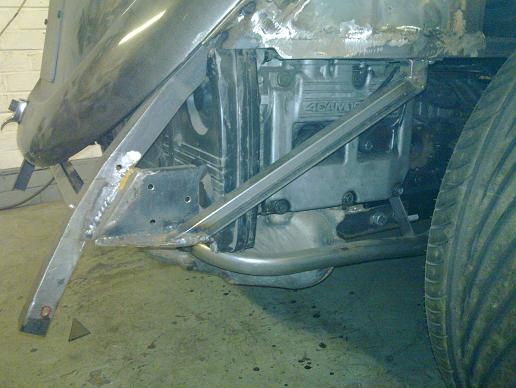
Additional brace to support the rear bumper mount. It is now strong enough that I can lift the body off the chassis with no flexing but still unbolts
to aid engine removal.
|
|
|
 ricola ricola
Wolfsburg Wizard
  
Posts: 437
Threads: 9
Registered: February 5th, 2003
Member Is Offline
Location: UK
Theme: UltimaBB Pro Blue ( Default )
|
| posted on February 8th, 2010 at 07:28 AM |
|
|
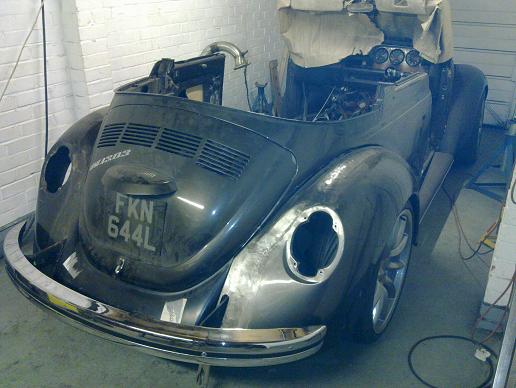
Rear bumper mounts needed to be extended by 35mm to clear wider wings
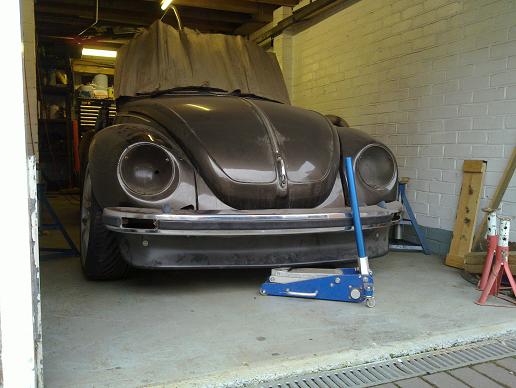
Now everything is at ride height and, a quick mock-up of the kamei spoiler to my set ground clearance. I will trim this back to the bottom of the
valance/wings and flush mount it, this will make it much more subtle and less 'plasticy' and keep the radiator intake clear.
|
|
|
 STIDUB STIDUB
Custom Title Time!
Over it.
    
Posts: 1496
Threads: 57
Registered: June 23rd, 2008
Member Is Offline
Location: Where else but QLD :)
Theme: UltimaBB Pro Blue
Mood: Worn out, for no benefit.
|
| posted on February 8th, 2010 at 05:24 PM |
|
|
lookin gooood 
Volkswagen Drivers Club of Queensland - member 
STIDUB - yep its still a work in progress
Vwdcq club car racing/ and crashing while my bug isn't finished.
The above are personal views, no more, no less |
|
|
 Bugaru03 Bugaru03
Commited Dubber
 
Posts: 70
Threads: 5
Registered: March 9th, 2008
Member Is Offline
Location: Athens, Greece
Theme: UltimaBB Pro Blue ( Default )
|
| posted on February 8th, 2010 at 08:47 PM |
|
|
Very nice!
|
|
|
 ricola ricola
Wolfsburg Wizard
  
Posts: 437
Threads: 9
Registered: February 5th, 2003
Member Is Offline
Location: UK
Theme: UltimaBB Pro Blue ( Default )
|
| posted on February 15th, 2010 at 07:44 AM |
|
|
Some more progress:
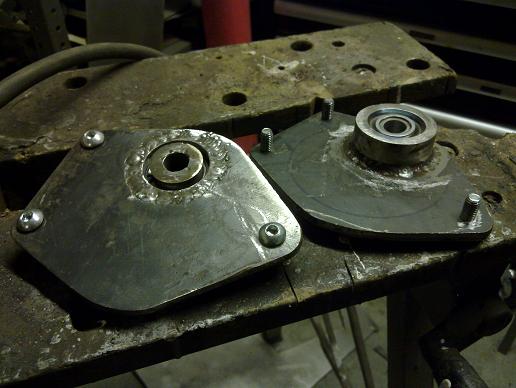
Decided to make up my own spherical top strut mounts.
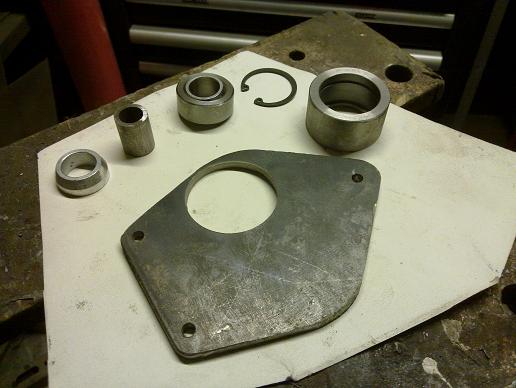
Mocked up to check the positioning
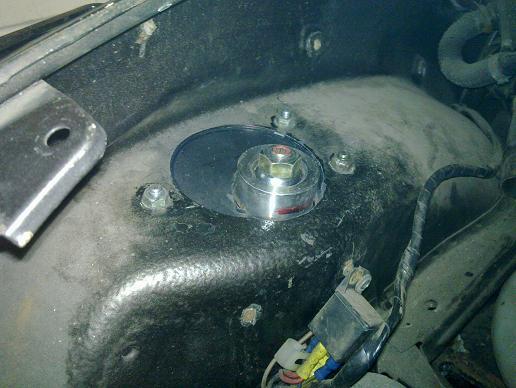
All welded up
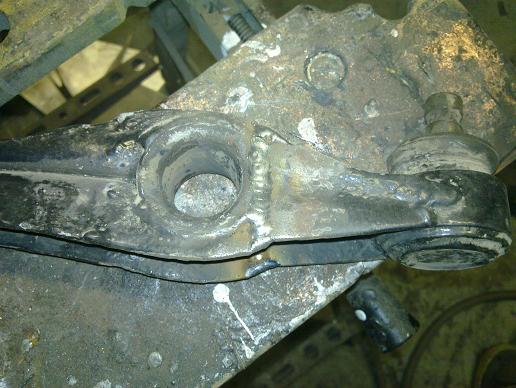
Suspension arm narrowed 15mm to help pull the big front wheels under stock wings (I'll add some more bracing to the join later on)
Another mock-up of spoiler showing better how the wing intake looks
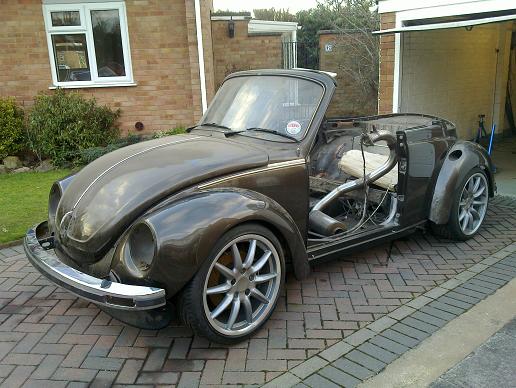
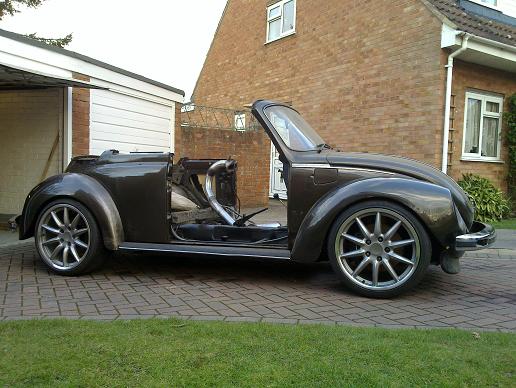
Spoiler now trimmed to fit and roughly clamped to bottom of body panels. This gives me 120mm of ground clearance which is about level with my lowest
chasssis point. I'm happy with this as a final ride height too.
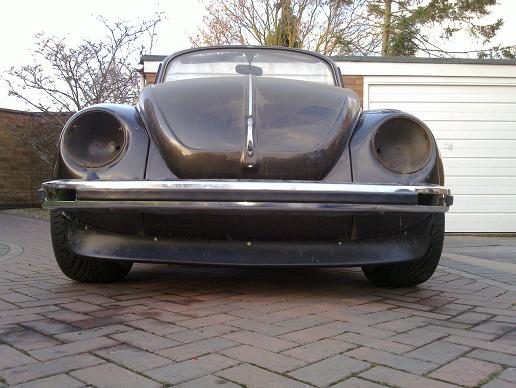
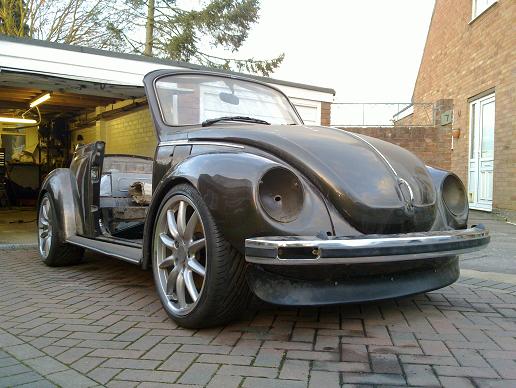
It tucks back much more than it would as standard (which is bolted to the underside of the bumper) and looks much less like it's doing an impression
of a snow-plough!
|
|
|
 Flintstones Flintstones
Custom Title Time!
    
Posts: 1077
Threads: 69
Registered: August 27th, 2002
Member Is Offline
Location: Sydney
Theme: UltimaBB Psyche Blue
|
| posted on February 15th, 2010 at 08:50 AM |
|
|
really starting to come together now Rich.
It's funny when you start modifying you can't stop. Those top mounts look good.
Cutting and shutting the suspension parts wouldn't even get a look in here on OZ. Our local engineers would walk away. What's the go up your way
when it comes to registering a modified car, do you have to go through the drama's we have to and consult engineers?
| Quote: | Originally
posted by ricola

|
question, how handy are you with fiberglass?
Reason I ask, is that I think the front will look much nicer if you can continue the spoiler line into the wing edge so that it gets rid of that void
where you can see the tyre.
Plus it will look more integrated.
i hope I've explained that well enough.
Cheers
D
|
|
|
 ricola ricola
Wolfsburg Wizard
  
Posts: 437
Threads: 9
Registered: February 5th, 2003
Member Is Offline
Location: UK
Theme: UltimaBB Pro Blue ( Default )
|
| posted on February 15th, 2010 at 09:12 AM |
|
|
I've done a fair bit of fibreglass before
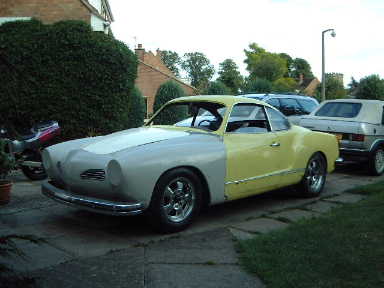
The spoiler is plastic but it has been repaired before with a bit of fibreglass paste which seems to have stuck, so I'll see about a bit of blending
later on when the body is off the chassis.
It is fairly easy to modify cars here but it is getting harder. We have Individual Vehicle Approval (IVA, used to be SVA) if the car is too heavily
modified from stock.
|
|
|
 STIDUB STIDUB
Custom Title Time!
Over it.
    
Posts: 1496
Threads: 57
Registered: June 23rd, 2008
Member Is Offline
Location: Where else but QLD :)
Theme: UltimaBB Pro Blue
Mood: Worn out, for no benefit.
|
| posted on February 15th, 2010 at 10:32 AM |
|
|
i was about to say precisely what flintstones said about the kamei 
offers still there to come finish mine while im at work 
Volkswagen Drivers Club of Queensland - member 
STIDUB - yep its still a work in progress
Vwdcq club car racing/ and crashing while my bug isn't finished.
The above are personal views, no more, no less |
|
|
 ricola ricola
Wolfsburg Wizard
  
Posts: 437
Threads: 9
Registered: February 5th, 2003
Member Is Offline
Location: UK
Theme: UltimaBB Pro Blue ( Default )
|
| posted on March 1st, 2010 at 07:16 AM |
|
|
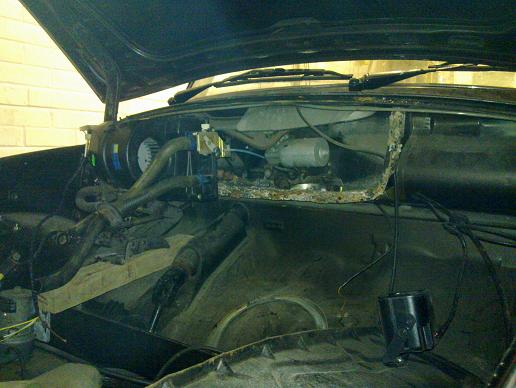
Idle air control valve return pipe uses cut down standard pipe.
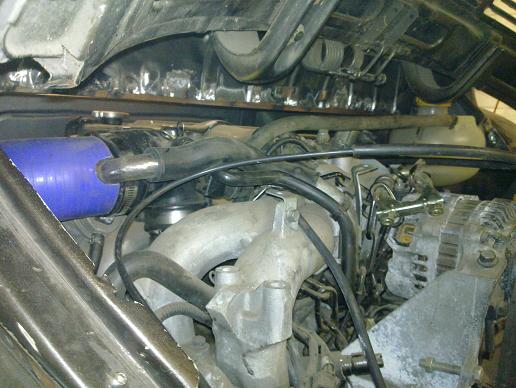
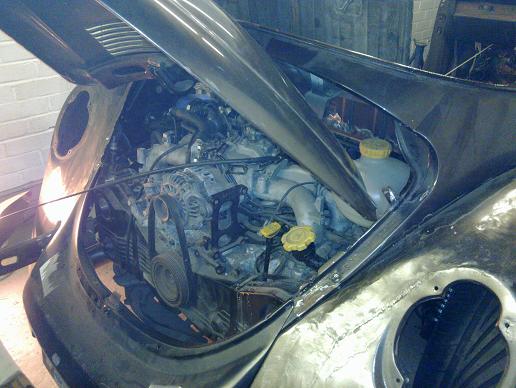
Header tank is from a Vauxhall Corsa/Tigra as it had the right connections. I didn't like the subaru system as it is based on an external overflow
tank. An aftermarket one would have been solid aluminium so levels are not so easy to check. I welded on a couple of brackets to the body to support
the standard fitting points on the tank
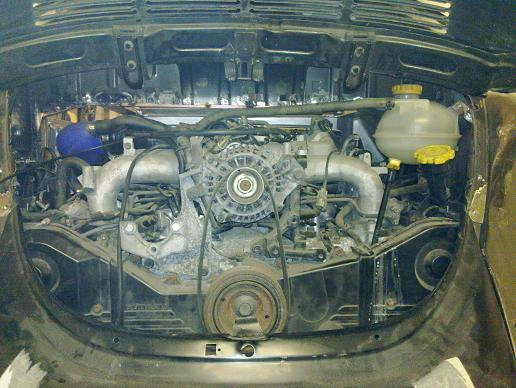
Fill point is accessable when the decklid is open.
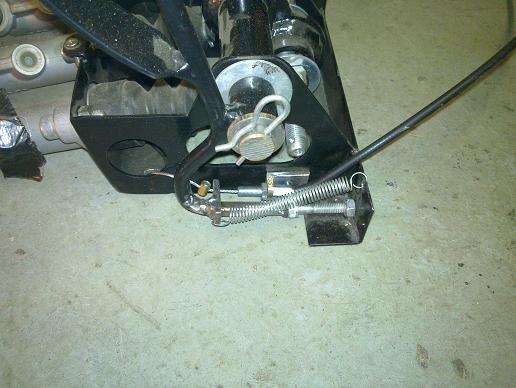
The OBP pedal box had no provision for the throttle cable so this is what I came up with. I also made up the cable from a universal kit using the
subaru fittings/adjuster on the engine end. It feeds through the standard tube in the chassis tunnel.
VW polo heater matrix/blower fan will be mounted to access panel and will blow in to the existing ducting behind the dash. I will fabricate an intake
for the fan so it draws in air from the scuttle grill.
|
|
|
 ricola ricola
Wolfsburg Wizard
  
Posts: 437
Threads: 9
Registered: February 5th, 2003
Member Is Offline
Location: UK
Theme: UltimaBB Pro Blue ( Default )
|
| posted on March 21st, 2010 at 07:48 AM |
|
|
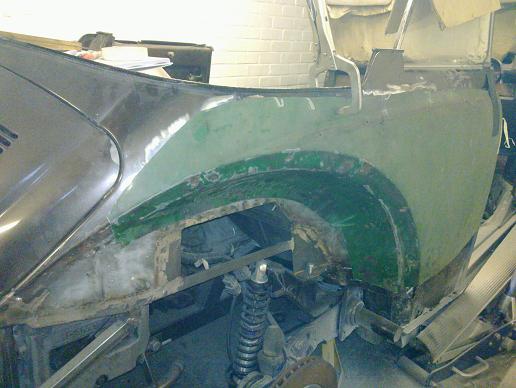
I thought the body line above the trim didn't look quite right and this is what I found under all the filler! NOS VW 1/4 panels are no longer
available so I went down to my local VW breakers, angle grinder in hand!
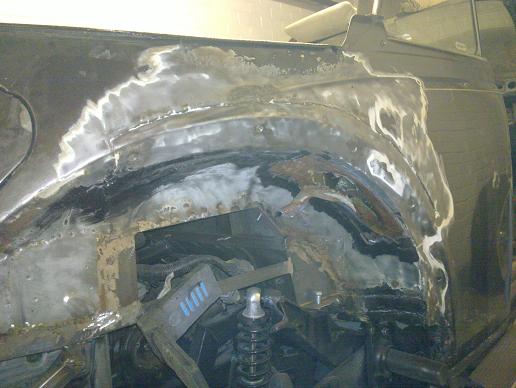
This is what was left after cutting out all the bodged repairs of the past
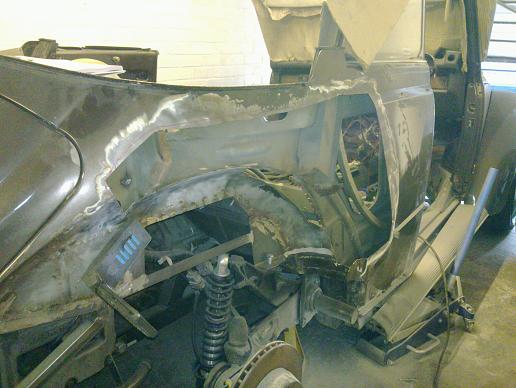
Donor section clamped roughly in place, it took a bit of searching to find one this good as it is a common rust area, unfortunately it was balanced on
top of another car and was full of suspension parts!
|
|
|
 71-BEETLE-SEDAN 71-BEETLE-SEDAN
Custom Title Time!
AKA Josh
    
Posts: 1058
Threads: 108
Registered: March 25th, 2009
Member Is Offline
Location: Mittagong NSW
Theme: UltimaBB Pro White
|
| posted on March 21st, 2010 at 07:59 AM |
|
|
wow i thought you were nearly finished
|
|
|
 ricola ricola
Wolfsburg Wizard
  
Posts: 437
Threads: 9
Registered: February 5th, 2003
Member Is Offline
Location: UK
Theme: UltimaBB Pro Blue ( Default )
|
| posted on March 21st, 2010 at 08:01 AM |
|
|
lol, well I have a few months until the weather is warm enough for paint and this was really bugging me. I'd have really regretted not sorting it out
properly...
|
|
|
 71-BEETLE-SEDAN 71-BEETLE-SEDAN
Custom Title Time!
AKA Josh
    
Posts: 1058
Threads: 108
Registered: March 25th, 2009
Member Is Offline
Location: Mittagong NSW
Theme: UltimaBB Pro White
|
| posted on March 21st, 2010 at 08:08 AM |
|
|
okay, thats cool then, its looking really good.
|
|
|
 ricola ricola
Wolfsburg Wizard
  
Posts: 437
Threads: 9
Registered: February 5th, 2003
Member Is Offline
Location: UK
Theme: UltimaBB Pro Blue ( Default )
|
| posted on April 6th, 2010 at 05:23 AM |
|
|
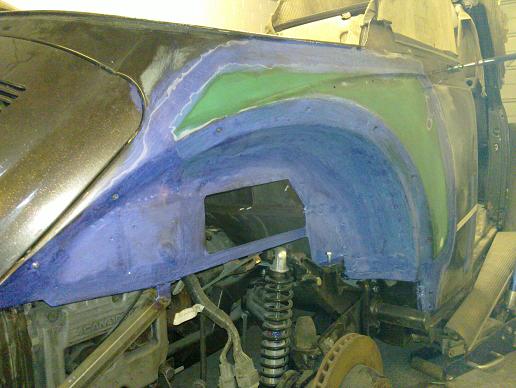
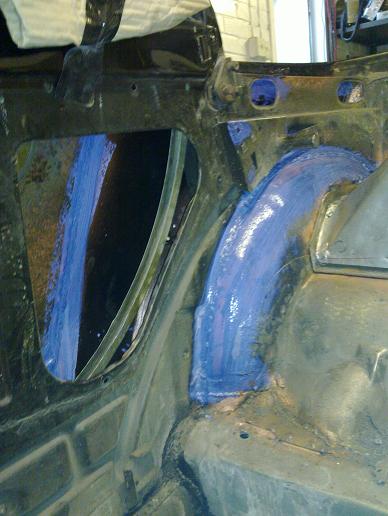
Had a good couple of days on the rear 1/4 panel...
All hidden areas were treated with Bilt Hamber Hydrate 80, then painted, weld areas were taken back to fresh metal and Roberlo weld through copper
primer used.
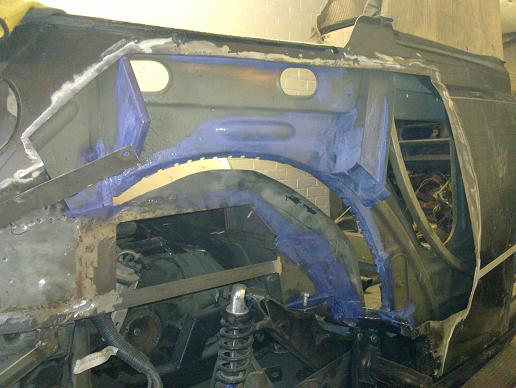
Tacked in...
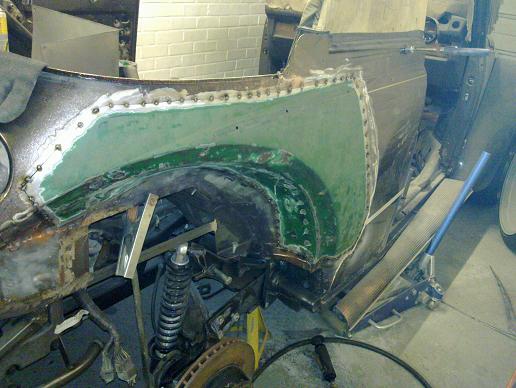
Fully welded...
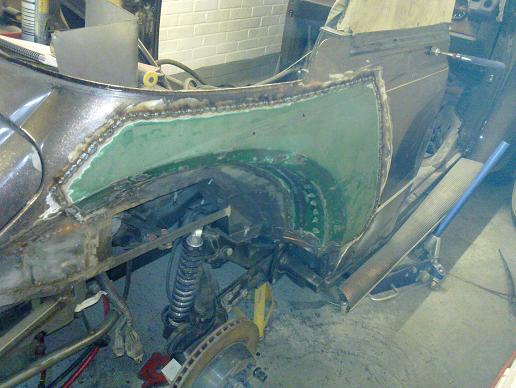
all welds ground down
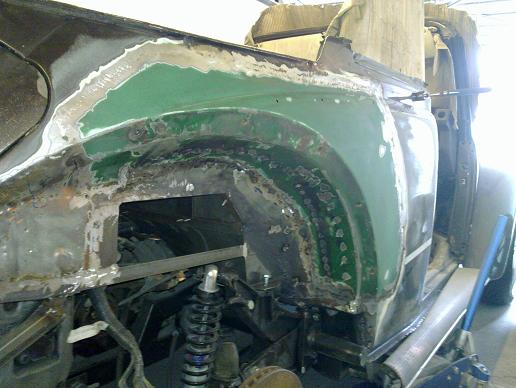
couple of coats of Hydrate 80 to protect the fresh metal before I get to paint, it will only need a very small amount of filler at the weld seams..
|
|
|
 ricola ricola
Wolfsburg Wizard
  
Posts: 437
Threads: 9
Registered: February 5th, 2003
Member Is Offline
Location: UK
Theme: UltimaBB Pro Blue ( Default )
|
| posted on April 17th, 2010 at 05:13 AM |
|
|
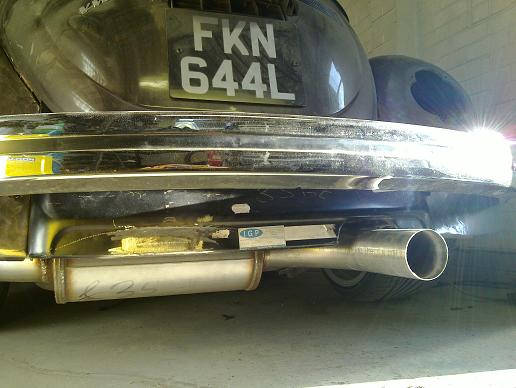
Bit more done today, sorted the exhaust tip and modified the rear valance to match. Left cutout was filled with section from old panel. I got the
panelbeating hammers out and widened the right cutout to match the 3" exhaust..
|
|
|
 Flintstones Flintstones
Custom Title Time!
    
Posts: 1077
Threads: 69
Registered: August 27th, 2002
Member Is Offline
Location: Sydney
Theme: UltimaBB Psyche Blue
|
| posted on April 17th, 2010 at 09:29 PM |
|
|
what, your not going with the stock pea shooters
looks like you had fun with the rear qtr panel, she's come up good
Cheers
|
|
|
 ricola ricola
Wolfsburg Wizard
  
Posts: 437
Threads: 9
Registered: February 5th, 2003
Member Is Offline
Location: UK
Theme: UltimaBB Pro Blue ( Default )
|
| posted on April 20th, 2010 at 05:23 AM |
|
|
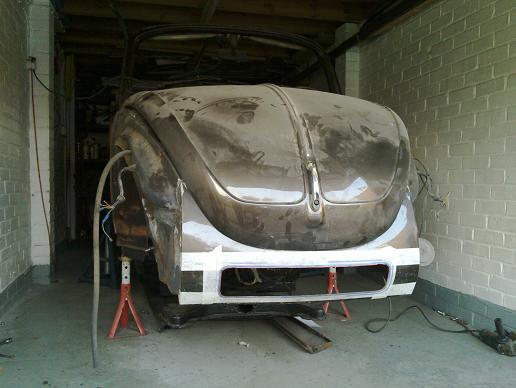
Yet more bodgery! Bumper repair panels poorly welded over rusted edges, overlapping the strut reinforcements and internally the bumper mounts have
been stuck on with what can only be descibed as pidgeon shit to the reinforcements. It will all be cut out and done properly, I'm hopefull of being
able to re-use the repair panels as there is so much overlap.
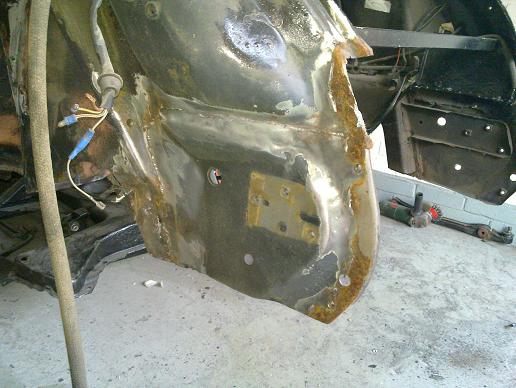
Finally on to the radiator intake! I cut the valance off and cut out this hole (same size as the license plate). I've shaped a bar hoop the same
shape but a bit bigger and will tack weld that on the back side, I will then hammer form a nice rolled edge to keep it looking 'right' and will also
weld on some captive studs so I can fit some mesh. I'm also considering bonding some letters to the mesh so it can be the numberplate and not
restrict air flow.
|
|
|
 STIDUB STIDUB
Custom Title Time!
Over it.
    
Posts: 1496
Threads: 57
Registered: June 23rd, 2008
Member Is Offline
Location: Where else but QLD :)
Theme: UltimaBB Pro Blue
Mood: Worn out, for no benefit.
|
| posted on April 20th, 2010 at 09:07 PM |
|
|
nice looking radiator hole  bout time someone did one thats not just
hacked into it, will be curious how it turns out, what are the po-po going to think about the bonded/sprayed on numberplate? bout time someone did one thats not just
hacked into it, will be curious how it turns out, what are the po-po going to think about the bonded/sprayed on numberplate?
Volkswagen Drivers Club of Queensland - member 
STIDUB - yep its still a work in progress
Vwdcq club car racing/ and crashing while my bug isn't finished.
The above are personal views, no more, no less |
|
|
 Joel Joel
Scirocco Rare
Now containing 100% E-Wang
        
Posts: 9368
Threads: 211
Registered: February 14th, 2006
Member Is Offline
Location: Northern Rivers NSW
Theme: UltimaBB Pro Purple
Mood: Tact Level 0.00
|
| posted on April 20th, 2010 at 09:17 PM |
|
|
common trick in the UK 
sorry for the hi-jack
x2, looks good Rich 


|
|
|
 ricola ricola
Wolfsburg Wizard
  
Posts: 437
Threads: 9
Registered: February 5th, 2003
Member Is Offline
Location: UK
Theme: UltimaBB Pro Blue ( Default )
|
| posted on April 20th, 2010 at 09:48 PM |
|
|
I'm not certain of using it as the number plate yet as it may be a bit too hidden to get away with it. Once the bumper is on and the car is on the
ground it is going to be fairly well out of view...
I did consider a US style valance but hear the repro ones aren't too good and fancied experimenting with this one first, I like the way it is turning
out.
|
|
|
 ricola ricola
Wolfsburg Wizard
  
Posts: 437
Threads: 9
Registered: February 5th, 2003
Member Is Offline
Location: UK
Theme: UltimaBB Pro Blue ( Default )
|
| posted on April 21st, 2010 at 07:51 AM |
|
|
Here's the bar tacked on to the back of the panel after bare-metalling both parts and applying some weld through primer.
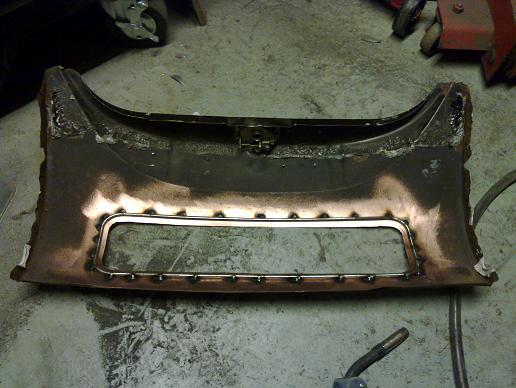
I then hammered the metal around the bar, it has created a really rigid panel now and looks much better than a plain cut edge.
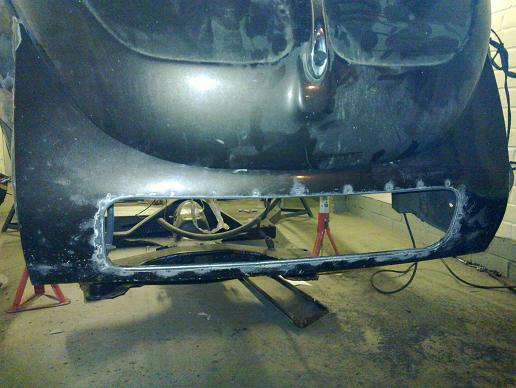
|
|
|
 ElusiveStranger ElusiveStranger
Officially Full-On Dubber
  
Posts: 330
Threads: 30
Registered: May 28th, 2006
Member Is Offline
Location: Kent. England
Theme: UltimaBB Pro Blue ( Default )
|
| posted on April 21st, 2010 at 08:46 AM |
|
|
Really nice work Rich.
When you welded in the rear quarter, roughly how much did the weld line pull in? I've just done my van's rear arch and it pulled in approx 6mm.
Using mig I tacked every 5" or so, allowed to cool, tacked again - took ages.
Rear corner I did stitch back with a tig and dressed the weld - almost perfect.
Seeing your shot has made me wonder what/where I went wrong with my arch
|
|
|
 ricola ricola
Wolfsburg Wizard
  
Posts: 437
Threads: 9
Registered: February 5th, 2003
Member Is Offline
Location: UK
Theme: UltimaBB Pro Blue ( Default )
|
| posted on April 21st, 2010 at 04:48 PM |
|
|
It did pull in a bit, but it only took a minute or so to work it back out with hammer/dolly
|
|
|
 ElusiveStranger ElusiveStranger
Officially Full-On Dubber
  
Posts: 330
Threads: 30
Registered: May 28th, 2006
Member Is Offline
Location: Kent. England
Theme: UltimaBB Pro Blue ( Default )
|
| posted on April 23rd, 2010 at 08:04 AM |
|
|
Thanks Rich. I think I have the normal "small" amount by the sounds of it. I can't get access to the back so I'm going to tack some washers on
& dress it out
|
|
|
 ricola ricola
Wolfsburg Wizard
  
Posts: 437
Threads: 9
Registered: February 5th, 2003
Member Is Offline
Location: UK
Theme: UltimaBB Pro Blue ( Default )
|
| posted on April 26th, 2010 at 06:05 AM |
|
|
Made a start on the bumper mount panels, they were a mess!
This is what was under the 'repair' panels...
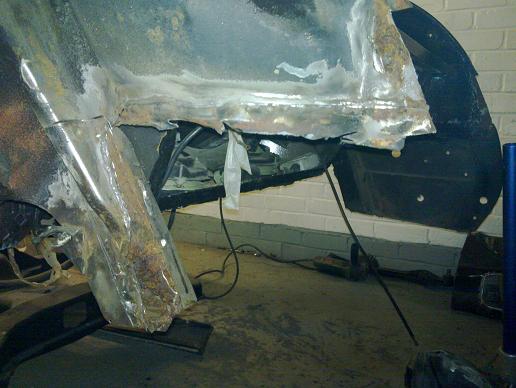
Small repair done on the 'leg' and the jagged edge trimmed back
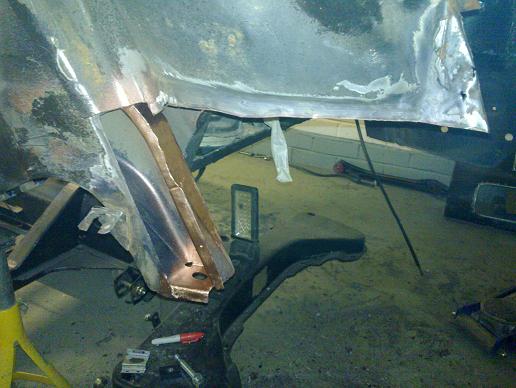
Body captive plate needed re-making
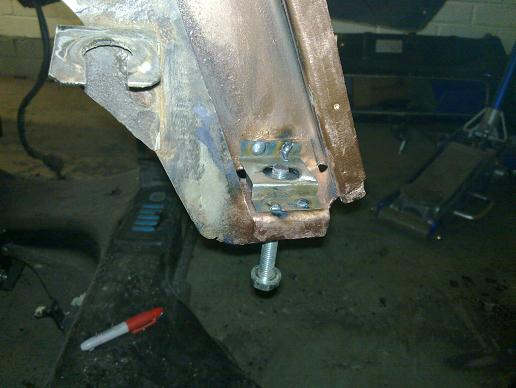
|
|
|
 STIDUB STIDUB
Custom Title Time!
Over it.
    
Posts: 1496
Threads: 57
Registered: June 23rd, 2008
Member Is Offline
Location: Where else but QLD :)
Theme: UltimaBB Pro Blue
Mood: Worn out, for no benefit.
|
| posted on April 26th, 2010 at 01:21 PM |
|
|
looks like your lucky you fixed it 
Volkswagen Drivers Club of Queensland - member 
STIDUB - yep its still a work in progress
Vwdcq club car racing/ and crashing while my bug isn't finished.
The above are personal views, no more, no less |
|
|
 ricola ricola
Wolfsburg Wizard
  
Posts: 437
Threads: 9
Registered: February 5th, 2003
Member Is Offline
Location: UK
Theme: UltimaBB Pro Blue ( Default )
|
| posted on May 16th, 2010 at 06:50 AM |
|
|
I had just about finished both bumper mount panel repairs but then my powerfile sander belt broke and threw a piece of metal straight in the centre of
my eye! I was wearing safety glasses but they obviously weren't good enough for that sort of angle.
So, last few weeks I have been in and out of the eye surgery and it still hasn't healed properly. My plan was to paint late july but will have to
wait and see how my recovery goes as the last thing I need is to get crap in an unhealed eye wound!
Here are some pics of where I got to though:
Main and chargecooler radiator mocked up to finalise mounting.
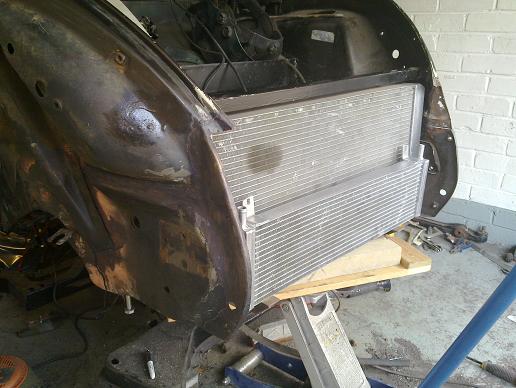
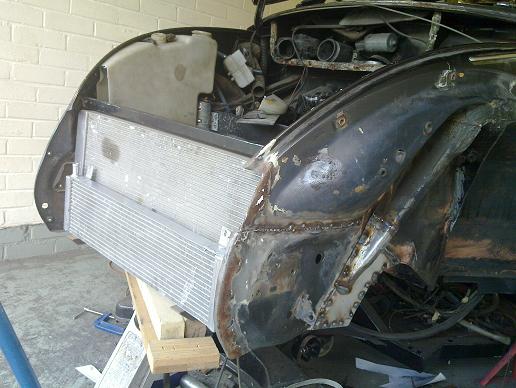
small section still needs repairing on near side...
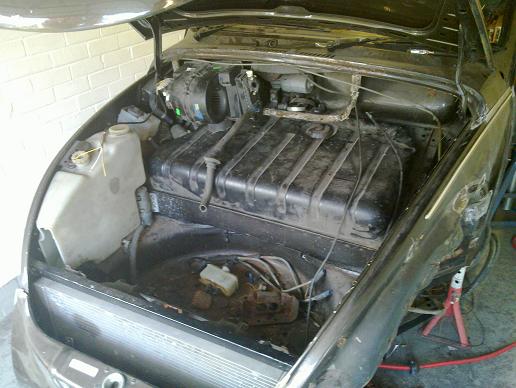
I've also decided to redo the bodywork I did a while back over the back of the radiator. Also trying to come up with a nice compact way of ducting
hot air flow into the stock ventilation system in the dash. That's a stock polo matrix/blower but I may just use the matrix and the stock bug blower.
I also have to cut down the headlight washer reservoir to clear the radiator.
|
|
|
 Flintstones Flintstones
Custom Title Time!
    
Posts: 1077
Threads: 69
Registered: August 27th, 2002
Member Is Offline
Location: Sydney
Theme: UltimaBB Psyche Blue
|
| posted on May 16th, 2010 at 09:47 AM |
|
|
looks real nice Rich, like OEM
Shame about the eye, hope it doesn't take to long to heal.
Can you still fit a spare wheel?
Cheers
D
|
|
|
 ElusiveStranger ElusiveStranger
Officially Full-On Dubber
  
Posts: 330
Threads: 30
Registered: May 28th, 2006
Member Is Offline
Location: Kent. England
Theme: UltimaBB Pro Blue ( Default )
|
| posted on May 16th, 2010 at 11:45 AM |
|
|
| Quote: | Originally
posted by ricolathrew a piece of metal straight in the centre of my eye! I was wearing safety glasses but they obviously weren't good enough for
that sort of angle.
|
Shit mate, you ok now?
I've had splinters & weld splatter removed on more than 1 occasion
Bolle blast goggles or Sperian seem to be good IMHO. Comfy and don't steam up that much
My worst episode was being allergic to the cream they gobbed in my eye. That was worse than then shrapnel, looked like I'd done 3 rounds with Tyson.
|
|
|
 ricola ricola
Wolfsburg Wizard
  
Posts: 437
Threads: 9
Registered: February 5th, 2003
Member Is Offline
Location: UK
Theme: UltimaBB Pro Blue ( Default )
|
| posted on May 16th, 2010 at 05:48 PM |
|
|
I've had bits removed a couple of times before so wasn't too concerned at the time. The problem this time is that the A&E doctor I saw first
couldn't get it all out as it was too deep and the eye went and healed over it by the time I got to see somebody in the eye clinic so the 'scraping
was made much worse. I've had 4 different doctors scraping so far and am now on steroids to reduce the swelling on the back of the lense which is
causing bad light sensitivity. Got to go back again on friday and the steroids seem to be working so I do feel like I'm on the mend now.
Thanks for those recommendations elusive, I've been pouring over the catalogues trying to find some better ones but going by pictures isn't that
helpful..
I'm happy with how the rads are turning out. I plan to weld in a round tube to mount the chargecooler off and something that it slots in to at the
base to locate the bottom...
|
|
|
| Pages: 1 .. 5 6 7 8 9 .. 15 |