| [ Total Views: 150332 | Total Replies: 102 | Thread Id: 46532 ] |
| Pages: 1 2 3 4 |
|
|
 71EJVan 71EJVan
Officially Full-On Dubber
  
Posts: 352
Threads: 23
Registered: August 19th, 2005
Member Is Offline
Location: Central Coast NSW, Australia
Theme: UltimaBB Pro White
|
| posted on December 1st, 2005 at 07:29 PM |
|
|
VanRex The surf and swoosh project. Pics 21/03/08 It Runs!
I’ve decided that here in Engine Conversions is the best location for my project. Here is an abbreviated story to get you all up to date.
This was my first post as 71EJVan. Some of you will know me as GL1972 (Green German Look Super with 2110 and 17s). That car was originally bought to
do up for my daughter's first car but I got carried away. Well I have decided to honour my commitment to her so I will be changing it by installing
steel wheels and a standard 1600 twin port motor (she'll have the coolest car in school!). The motor is currently up for sale in the spare parts
forum if anyone is interested in looking.
The project I have decided to do for myself will be a 1971 Bay Panel Van with a Subaru EJ20T conversion (another one to the dark and wet side!), rear
disc brake conversion and total sleeper look. I purchased the van and brought it home in late August It is quite solid but needs some TLC.
The idea of a van is to get to the beach without having to tie my boards on the roof and also have some go to raise some eyebrows at the lights.....
Surf and Swoosh!
The will be no metallic paint or plush interior going anywhere near this Van. Waterproof ply and carpet for lining.
22/08/2005
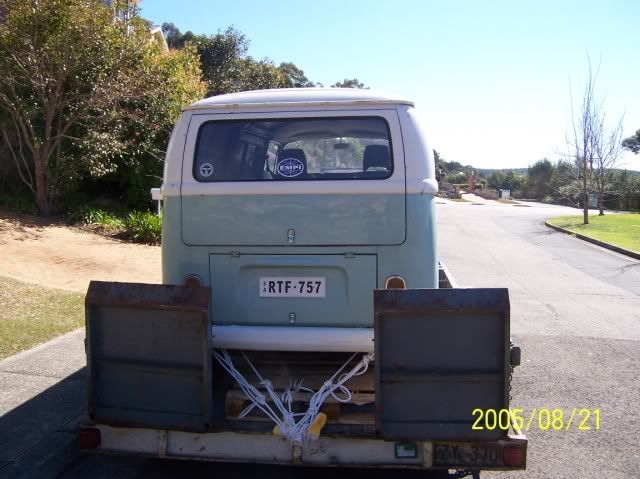
Finally got it home yesterday after a 215 klm round trip.
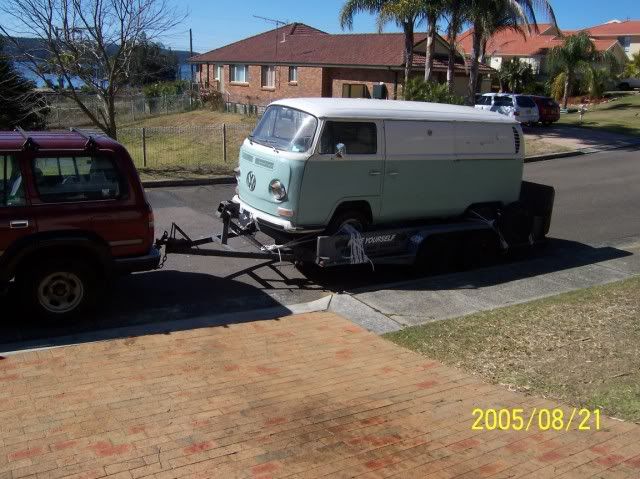
Its quite solid and straight however there is some rust to fix in the front floor, under the battery and the left A pillar.
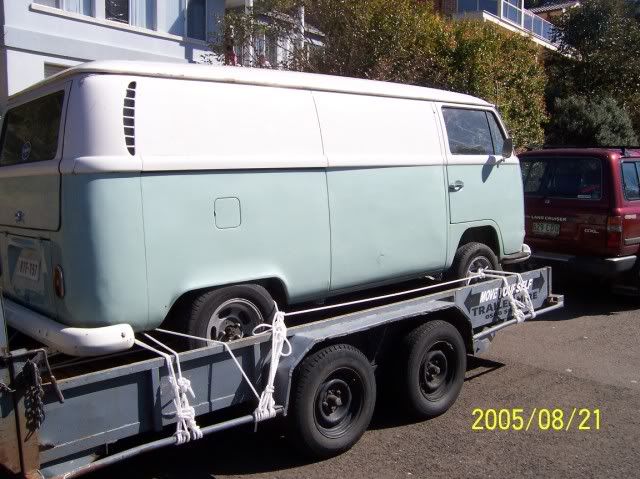
Love the lowlight look. I must have been ok at tieing it on..never moved an inch.
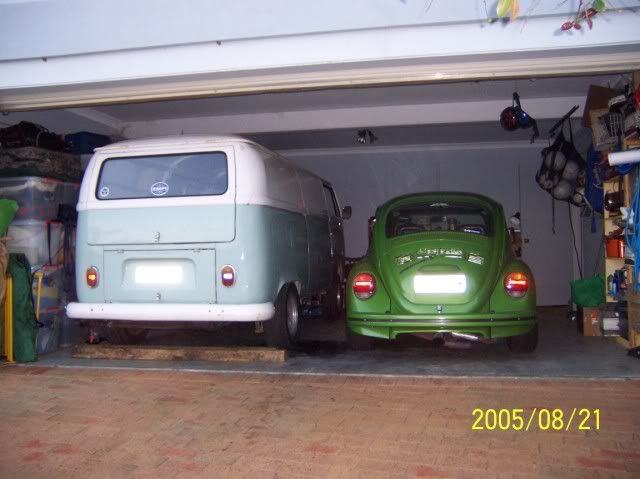
What everyone's garage should look like!
24/08/2005
Well I have a motor! EJ20T WRX with only 70,000Ks good compression on all 4 pots. Came with ECU, Loom and Intercooler. I may even hook up the AC at a
later date. It arrives Saturday.
Bodywork starts this weekend with the removal of all non paintable bits (lights indicators etc).
Removed bumpers, grilles, lights, indicators. Pulled engine and fuel tank. Pulled back wiring (this will be shortened back to a junction point near
the ECU and new loom for connection). Removed sound deadening in engine bay.
29/08/2005
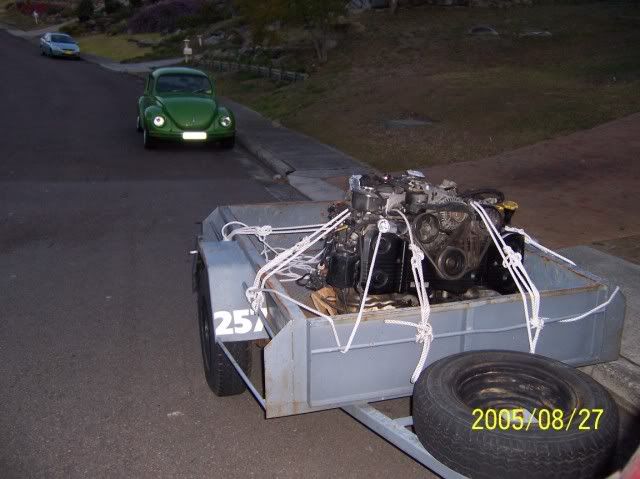
Bringing the WRX motor home. Note the envious look on the bug parked behind the trailer!
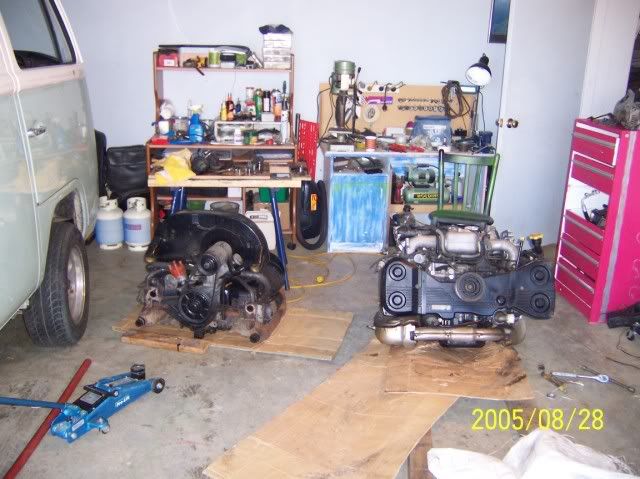
The old and the new!
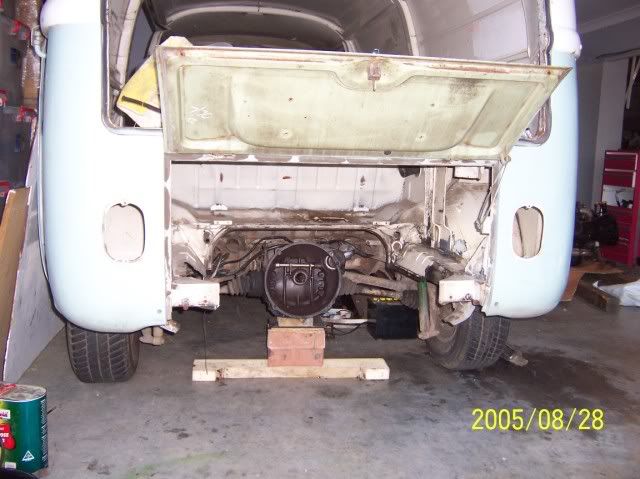
Fuel tank removed also, ready to start modifying to fit the EJ20T. (modifying sounds better than cutting).
[ Edited on 13-12-2005 by 71EJVan ]
[ Edited on 27-4-2006 by 71EJVan ]
[ Edited on 29-5-2006 by 71EJVan ]
[ Edited on 25-8-2006 by 71EJVan ]
[ Edited on 4-9-2006 by 71EJVan ]
[ Edited on 8-1-2007 by 71EJVan ]
A VW for everyone!!
1972 1302 German Look
1971 Bay Panel with Subaru EJ20T
1970 Type 3 squareback in progress
1971 Type 3 notchback in progress

|
|
|
 71EJVan 71EJVan
Officially Full-On Dubber
  
Posts: 352
Threads: 23
Registered: August 19th, 2005
Member Is Offline
Location: Central Coast NSW, Australia
Theme: UltimaBB Pro White
|
| posted on December 13th, 2005 at 09:35 PM |
|
|
I looked up a ratio calculator and with the 215/45/17 wheels I was going to install it would be super fast in the lower gears but rev too high for my
liking at 110/120 kmh. Works out a lot better with 60 series tyres (don't know how available they are in 17 inch though). Would be worth changing the
R&P at a latter date.
Changed my mind on all this and decided to look for a 091 box. Will also fit some 15 or 16 inch steel wheels also.
01/09/2005
Well I've got hold of a 091 gearbox. Exchange plus cash.
Decided to go with a 200mm flywheel and buy a Kennedy off the shelf clutch 1700 or 2100lbs.
I will stay with the old 002 belhousing and starter so that I can use the 200mm off the shelf clutch. This will also mean that I could throw this
engine in a dub if I desire without too much cost.
Made a list of all parts including steel and ally sheeting I will need to complete the job. Woah! lots of bits. I will post it here for criticism on
the weekend.
02/09/2005
I'll try posting this long list. Still some things to add.

08/09/2005
Picked up the 091 gearbox a couple of days ago. On changing the bell housing I inspected the crown wheel. No real discernable wear marks on the teeth
and very little play. Looks in good condition. My 002 was in good condition also, would have made a great addition to an offroader with big wheels.
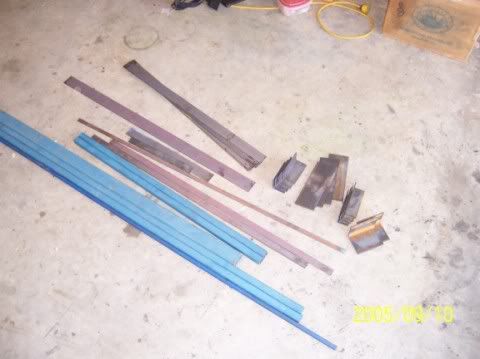
Picked up all the steel for the cross member, fuel tank enclosure and radiator mounts. Took a list down to Metalcorp which included all the small cut
lengths, came to $86 cut (who would use a hacksaw for those prices!!)
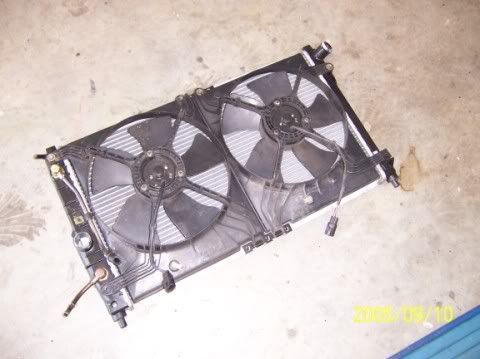
Also picked up a alloy core sealed unit radiator with twin thermatic fans for the right price.
All the metal is now cut out of the back of the Kombi to fit the engine (most of the engine seal apron and fuel tank shelf is now gone. Cleaned and
painted the area ready for installation.
Engine is now cleaned ready for test fitting.
[ Edited on 13-12-2005 by 71EJVan ]
A VW for everyone!!
1972 1302 German Look
1971 Bay Panel with Subaru EJ20T
1970 Type 3 squareback in progress
1971 Type 3 notchback in progress

|
|
|
 71EJVan 71EJVan
Officially Full-On Dubber
  
Posts: 352
Threads: 23
Registered: August 19th, 2005
Member Is Offline
Location: Central Coast NSW, Australia
Theme: UltimaBB Pro White
|
| posted on December 13th, 2005 at 09:37 PM |
|
|
12/09/2005
Cleaned out the cargo area and found that the previous Signwritter owner was not too worried about spilling paint everywhere under the chipboard.
She's had a hard life and has carried some serious weight over the years.
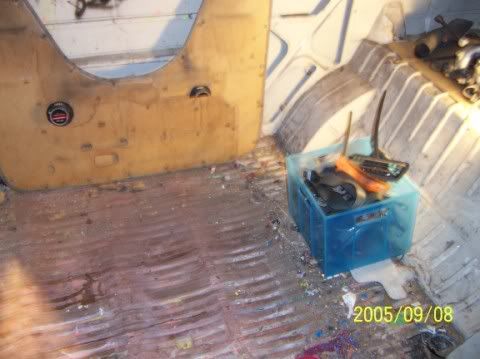
Picked up a near new alluminium core radiator complete with fans for $180 shhhh it’s a Deawoo Leganza unit!.
Steel to make the new engine cross member, radiator mounts and fuel tank, battery and ECU/wiring enclosure. I still have got to submit a drawing of
the cross member to my Engineer for approval before starting to build it.
Will be picking up new intake gaskets, exhaust gaskets, injector to manifold seals and rear main seal from Ryde Subaru this week. Easy guys to deal
with. Want to make sure there is no air or oil leaks when I install this engine. Also as it is a MY95 engine the seals may have gone hard.
Have to also go back to engine supplier to pick up the Mass Air Flow Sensor that was missing. Jeremy from Tweakit was apologetic and rang back with 30
minutes to say that he had it there. Will pick up a air to water intercooler and circulating pump this week from SSS.
12/09/2005
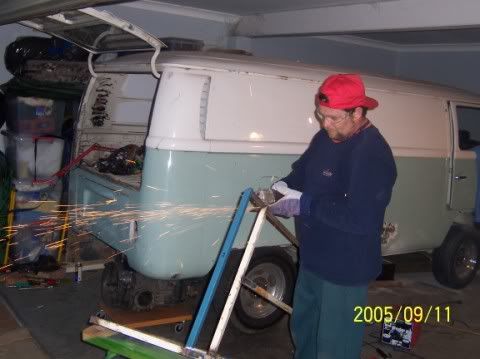
A man and his grinder! This is me building the enclosure and mounts for the fuel tank and battery relocation and ECU and wiring. The unit will be
aluminium or tin lined and also have space for a surge tank, pumps and even a jack and wheel brace. This will get a lot of weight forward and lower.
Should assist in the handling.
[ Edited on 13-12-2005 by 71EJVan ]
A VW for everyone!!
1972 1302 German Look
1971 Bay Panel with Subaru EJ20T
1970 Type 3 squareback in progress
1971 Type 3 notchback in progress

|
|
|
 71EJVan 71EJVan
Officially Full-On Dubber
  
Posts: 352
Threads: 23
Registered: August 19th, 2005
Member Is Offline
Location: Central Coast NSW, Australia
Theme: UltimaBB Pro White
|
| posted on December 13th, 2005 at 09:39 PM |
|
|
13/09/2005
The main cross member that mounts between the chassis rails and picks up the Subaru engine mounts and will also have a support attaching to the lower
4 gearbox bel housing bolts. Was going to make a brace between the shock mount towers above the bel housing and create a tranny strap but this would
foul the intercooler
27/09/2005
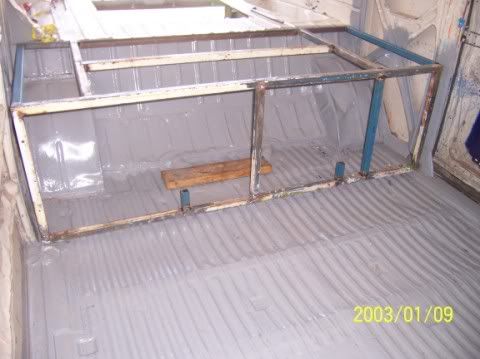
I finally got approval from my engineer for the cross member design and the adaptor kit turned up. The main framework for the tank enclosure is mostly
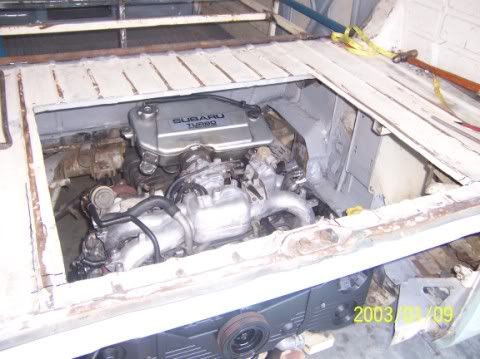
made. Cut out for the engine hatch (big access!). Fitted the adaptor plate after a small amount of trimming and mated the gearbox. Fitted the old
front mount to the 091 box and trimmed the studs as they fouled the torsion housing. Sat the engine/box in place and bolted up the front mount.
Chocked the back for level and centre (checked this many times).
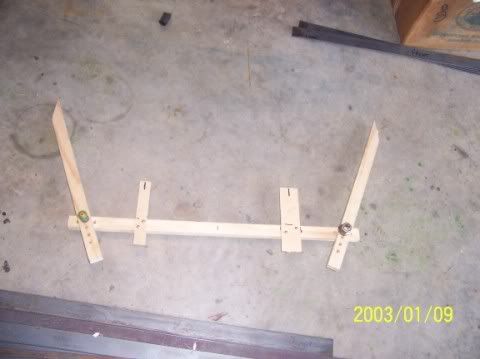
On the weekend I made a big timber adjustable cross member. Set it in place and set angles whilst checking for clearance. Transferred these angles and
all my other measurements to the concrete floor. The next job was to cut all the steel to match the angles drawn and started welding. After a couple
of test fits the cross member is almost complete.
Here is some pictures of the progress.
Motor and box in place with front mount bolted up. Plenty of room in there without the tank.
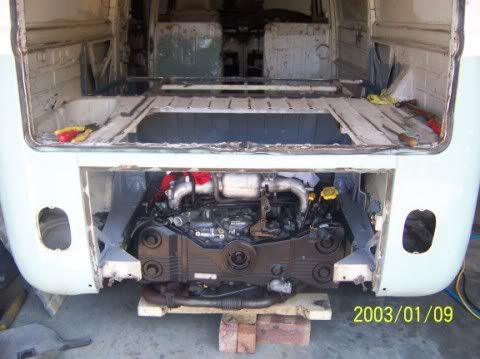
Another view showing intercooler clearance and space around engine.
Fuel tank framework almost complete. Just need to weld in tank and battery supports.
Dummy timber adjustable cross member used to work out angles.
Took an extra day off for the long weekend intending to put some serious hours in on the van. Fortunately (or unfortunately) got some surfing in but
didn't get everything finished.
The cross member is now complete and the radiator mount is halfway there.
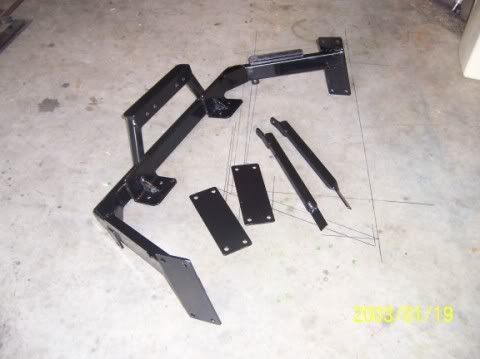
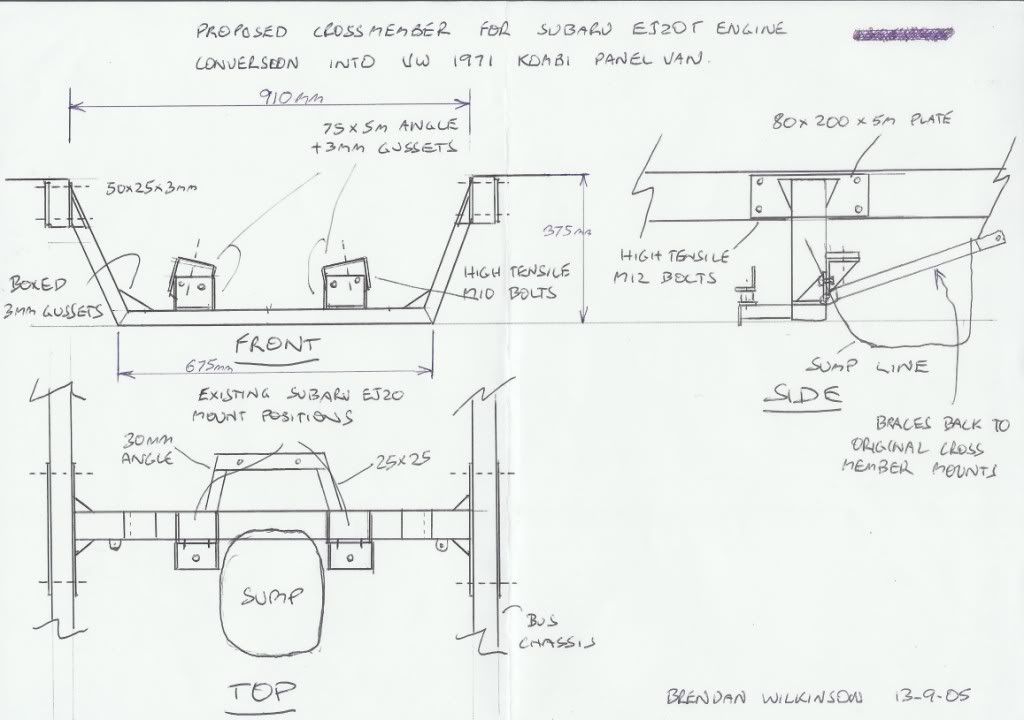
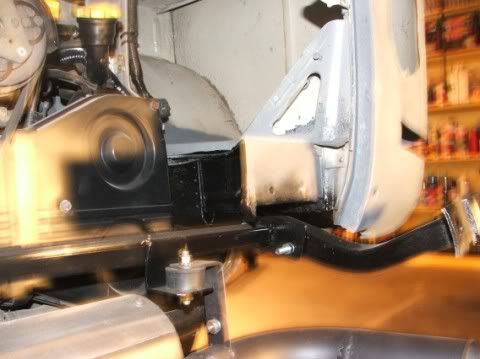
Here is the completed cross member. It picks up the existing WRX engine mounts and also has a frame to connect to the 4 bottom bel housing to gearbox
bolts via 2 rubber mounts. The tabs on the sides and the 25x25mm sections will bolt up to the original cross member hangers at the back of the engine
bay. This will assist in reducing any twist at the bottom of the frame under acceleration. You can also see in the picture the transferred
measurements on the floor.
Here is the cross member plans for those interested in welding and grinding until they hate Tim The Toolman Taylor. The cross member is fitted in
front of the tappet covers by 30mm.
The width may vary a little between chassis rails.
A VW for everyone!!
1972 1302 German Look
1971 Bay Panel with Subaru EJ20T
1970 Type 3 squareback in progress
1971 Type 3 notchback in progress

|
|
|
 71EJVan 71EJVan
Officially Full-On Dubber
  
Posts: 352
Threads: 23
Registered: August 19th, 2005
Member Is Offline
Location: Central Coast NSW, Australia
Theme: UltimaBB Pro White
|
| posted on December 13th, 2005 at 09:41 PM |
|
|
01/12/2005
Here is a pic of the completed fuel tank, battery, electrics, fuel pumps, storage housing. The tank will sit on timber mounts on the two rails in the
centre and be held down by steel straps (I'm re-using the old ones). The fuel tank area will be sheeted in 0.4mm steel and be sealed with both up and
down ventilation to the outside (40mm pipe). the rest will be sheeted in ply and be trimmed in waterproof carpet. There will be 4 accessible
enclosures. 2 for wiring and electronics, 1 for battery (you can see the frame on the lower right hand side) and 1 for tool storage (might put a
second battery in here).
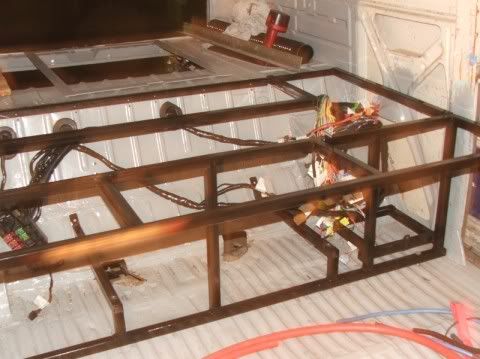
The wiring harness in pretty much complete and in.
I'm going to re-use the fuse blocks and relays from the original car. Going to feed the front of the van from this. I have identified all of the AC
wiring and left it in the loom as I will AC the van at a latter date. All I have to do is take a feed to the front to pick up the original fuse box,
have the ignition switch control a relay at the back for the starter (40Amp) and rerun the rear lights.
The looms took 4 nights and one day to identify, rehash, shorten, remove unused, and recover.
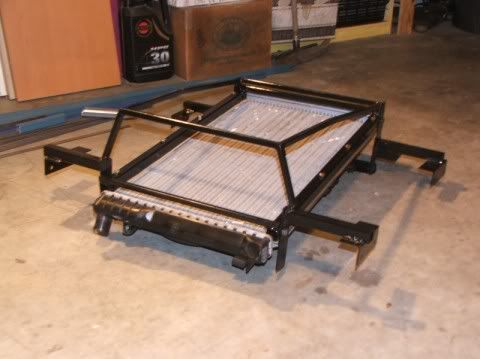
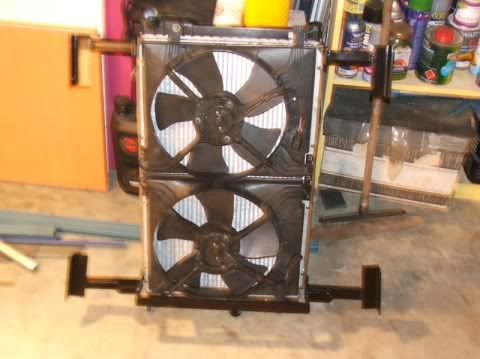
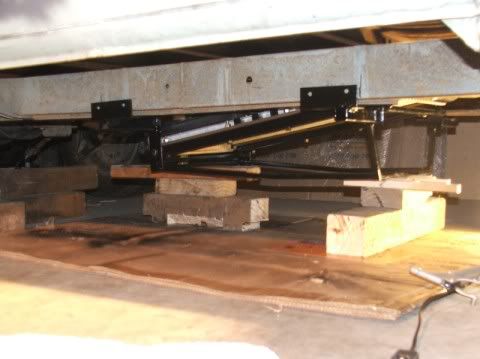
After much measuring cutting welding and grinding the radiator mount is complete. Here is three pics of the completed mount. The last one is a test
fit under the van chassis. I will make some modifications the rear of frame to raise it a little. The scoop will be sheeted in 0.4mm and there will
sheeting in front of the scoop under the floor to smooth the airflow out a little.
A VW for everyone!!
1972 1302 German Look
1971 Bay Panel with Subaru EJ20T
1970 Type 3 squareback in progress
1971 Type 3 notchback in progress

|
|
|
 71EJVan 71EJVan
Officially Full-On Dubber
  
Posts: 352
Threads: 23
Registered: August 19th, 2005
Member Is Offline
Location: Central Coast NSW, Australia
Theme: UltimaBB Pro White
|
| posted on December 13th, 2005 at 09:56 PM |
|
|
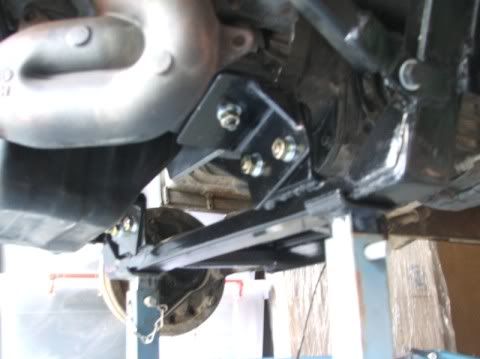
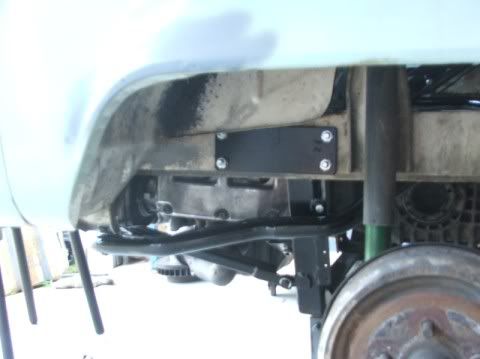
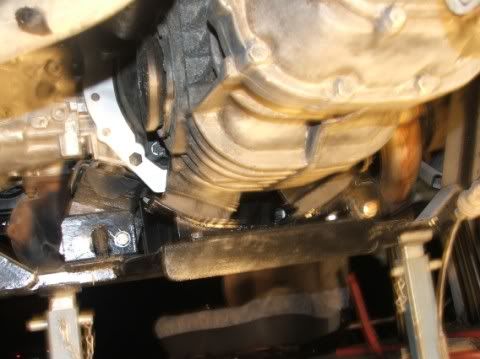
Here is some pictures of the motor mounted on the cross member. Still have to complete the gearbox mounting.
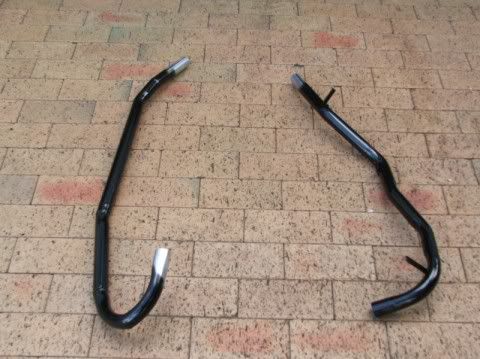
Got some pipework bent up for the radiator pipes. As I could not take the car to the bender I bent up some wire and took it to the exhaust shop. Got
it pretty close and only had to make sone minor adjustments with the oxy. Big thanks to Erina Mufflers for this work.
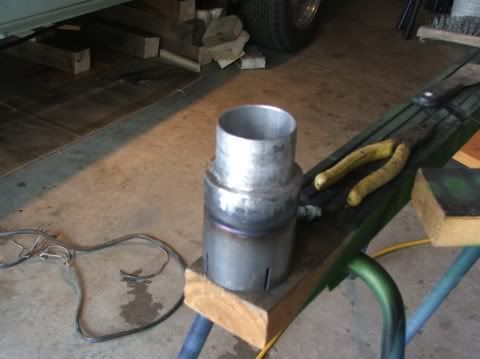
Also made a reducer from a flared peice of exhaust pipe and a truck exhaust coupler. I still have to cut out a V ans re-weld to angle it more towards
the MAF sensor so the 80mm flexible hose doesn't have such a bend in a short distance.
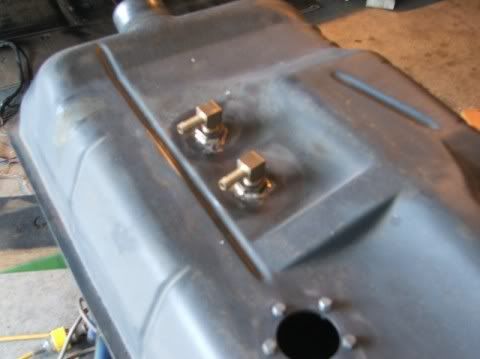
Changed the bottom fuel line fitting from a 1/4 to a 5/16 by cutting the old one out and silver soldering a threaded base in with the new fitting.
Could change this easily for a 3/8 fitting at a latter date if I need to. also added a fuel return and another vent for the tank using the same
fittings.
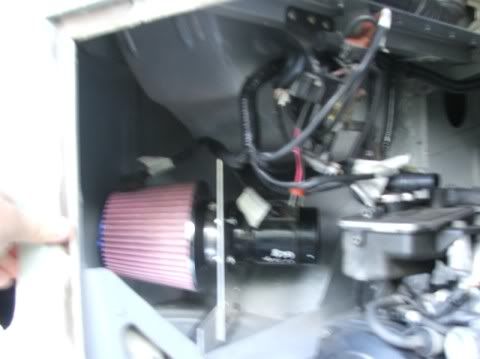
Mounted the MAF and a douf douf pod filter under the spare wheel in the fresh air compartment this will be sheeted in to create a cold air box.
Charcoal canister will also sit in this area.
Regards
Brendan
A VW for everyone!!
1972 1302 German Look
1971 Bay Panel with Subaru EJ20T
1970 Type 3 squareback in progress
1971 Type 3 notchback in progress

|
|
|
 crewcabconnection crewcabconnection
Custom Title Time!
Being Sid James
    
Posts: 1922
Threads: 293
Registered: April 22nd, 2003
Member Is Offline
Theme: UltimaBB Pro Blue ( Default )
Mood: Looking forward to week 10
|
| posted on December 13th, 2005 at 10:04 PM |
|
|
don't be so modest, this would cost ya massive bucks if it wasn't in yer garage....fantastics read, good onya.
Loves a lolcat
|
|
|
 richbaker78 richbaker78
Casual Dubber

Posts: 38
Threads: 5
Registered: October 18th, 2005
Member Is Offline
Location: Wiltshire, UK
Theme: UltimaBB Pro Blue ( Default )
|
| posted on December 13th, 2005 at 11:22 PM |
|
|
wow your really forging ahead!! I just catch up and you go and do some more!!!
what radiator did you use - it looks bigger thanvthe std impreza/legacy? im thinking of junking my std one for more capacity.
keep it up.
Rich
|
|
|
 71EJVan 71EJVan
Officially Full-On Dubber
  
Posts: 352
Threads: 23
Registered: August 19th, 2005
Member Is Offline
Location: Central Coast NSW, Australia
Theme: UltimaBB Pro White
|
| posted on December 14th, 2005 at 07:03 AM |
|
|
Rich,
The radiator is from a Deawoo Leganza. Was in very good condition (still shiny inside the end tanks) complete with fans for $180.
Brendan
A VW for everyone!!
1972 1302 German Look
1971 Bay Panel with Subaru EJ20T
1970 Type 3 squareback in progress
1971 Type 3 notchback in progress

|
|
|
 kroozzn63 kroozzn63
Bishop of Volkswagenism
     
Posts: 3005
Threads: 317
Registered: January 31st, 2004
Member Is Offline
Location: sydney
Theme: UltimaBB Pro Yellow
Mood: mmm coffee
|
| posted on December 14th, 2005 at 07:10 AM |
|
|
so wats next? have u got an approximate date of completion? "Man its coming along great" are you gunna dump it?
show us your gates
|
|
|
 squizy squizy
A.k.a.: Paul
Compulsive Aussie Vee Dubber
Thinking about another dub...maybe
      
Posts: 4082
Threads: 243
Registered: December 17th, 2002
Member Is Offline
Location: Thornleigh
Theme: UltimaBB Pro Blue
|
| posted on December 14th, 2005 at 08:57 AM |
|
|
Work of art Brendan. I'll try and pop in before Christmas. Will give you a call. Got some new stickers for you!
|
|
|
 71EJVan 71EJVan
Officially Full-On Dubber
  
Posts: 352
Threads: 23
Registered: August 19th, 2005
Member Is Offline
Location: Central Coast NSW, Australia
Theme: UltimaBB Pro White
|
| posted on December 14th, 2005 at 05:03 PM |
|
|
Brendon,
The only time I'll dump is when I get out of it and walk to a toilet. No this one will be near stock height. s l e e p e r...
Might lower the front 2 inches to get a good looking stance.
I plan to have it registered before the Nats.
Squiz,
I'll have the beers waiting cold for you!
Regards
Brendan
A VW for everyone!!
1972 1302 German Look
1971 Bay Panel with Subaru EJ20T
1970 Type 3 squareback in progress
1971 Type 3 notchback in progress

|
|
|
 Dero Dero
Officially Full-On Dubber
  
Posts: 227
Threads: 15
Registered: May 21st, 2005
Member Is Offline
Location: Perth, WA
Theme: UltimaBB Pro Black
Mood: Ratty
|
| posted on December 14th, 2005 at 05:38 PM |
|
|
Thats some sweet work so far, look pretty much exactly what i am planning though for me it a Splitty, which is currently a swinger... :thumb
Question...
How do you plan on bleeding your radiator/ coling setup? I probably dont know what i am talking about but you could get problems with air pockets in
the lines...
Thanks for the detailed picks they are going to be handy for my design, I have some holidays soon so i plan to get started... 
|
|
|
 1303 1303
Officially Full-On Dubber
  
Posts: 250
Threads: 42
Registered: September 29th, 2003
Member Is Offline
Location: Central Coast NSW
Theme: UltimaBB Pro Blue ( Default )
|
| posted on December 14th, 2005 at 09:24 PM |
|
|
Great work Brendan, mods look quality, love the engine cross member and sub frame in the van. Good place for the Air Filter too, it will get plenty of
free cold air.
I cant wait to race you to the beach in mine!!
Cheers Paul.
|
|
|
 71EJVan 71EJVan
Officially Full-On Dubber
  
Posts: 352
Threads: 23
Registered: August 19th, 2005
Member Is Offline
Location: Central Coast NSW, Australia
Theme: UltimaBB Pro White
|
| posted on December 16th, 2005 at 07:09 AM |
|
|
Paul,
We should all catch up before or over the xmas break to look at each other's handywork and generally talk the BS that we do.
Brendan
A VW for everyone!!
1972 1302 German Look
1971 Bay Panel with Subaru EJ20T
1970 Type 3 squareback in progress
1971 Type 3 notchback in progress

|
|
|
 1303 1303
Officially Full-On Dubber
  
Posts: 250
Threads: 42
Registered: September 29th, 2003
Member Is Offline
Location: Central Coast NSW
Theme: UltimaBB Pro Blue ( Default )
|
| posted on December 16th, 2005 at 06:09 PM |
|
|
Sounds good Bredan, my car has been waiting in line to be dynoed for the final tune. I'll bring it round when I get it back.
Cheers Paul.
|
|
|
 GeorgeL GeorgeL
Officially Full-On Dubber
  
Posts: 231
Threads: 11
Registered: February 5th, 2006
Member Is Offline
Location: 7200 miles off the Queensland coast
Theme: UltimaBB Pro Blue ( Default )
|
| posted on April 19th, 2006 at 01:10 PM |
|
|
four months have gone by! How is progress?
George
|
|
|
 vwtyp2 vwtyp2
Son of Jim - Creator of Good
     
Posts: 2504
Threads: 160
Registered: September 18th, 2003
Member Is Offline
Location: Hillcrest S.A.
Theme: UltimaBB Pro Blue ( Default )
Mood: over it
|
| posted on April 19th, 2006 at 10:22 PM |
|
|
also keen to see, as a previous owner of this van, and now a ej20t powered van owner.
Most people seem normal, till you get to know them.
|
|
|
 71EJVan 71EJVan
Officially Full-On Dubber
  
Posts: 352
Threads: 23
Registered: August 19th, 2005
Member Is Offline
Location: Central Coast NSW, Australia
Theme: UltimaBB Pro White
|
| posted on April 20th, 2006 at 10:31 AM |
|
|
I promise. More pictures of progress this weekend.
Brendan
A VW for everyone!!
1972 1302 German Look
1971 Bay Panel with Subaru EJ20T
1970 Type 3 squareback in progress
1971 Type 3 notchback in progress

|
|
|
 71EJVan 71EJVan
Officially Full-On Dubber
  
Posts: 352
Threads: 23
Registered: August 19th, 2005
Member Is Offline
Location: Central Coast NSW, Australia
Theme: UltimaBB Pro White
|
| posted on April 25th, 2006 at 09:35 PM |
|
|
I promised so here is an update.
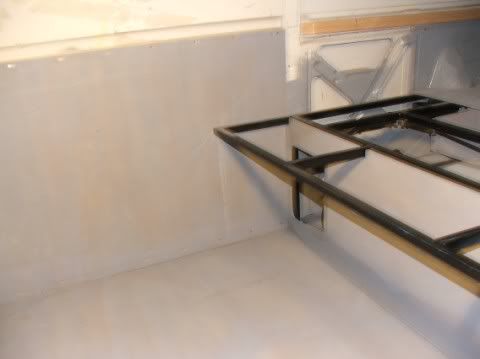
A lot of time has been taken up with sheeting the floor and over engine fuel tank area. Tank is in place for the last time with hoses plumbed up.
Still need to mount fuel pumps and swirl pot. Before final sheeting I will line the enclosure with 0,5 aluminium sheet for fireproofing.
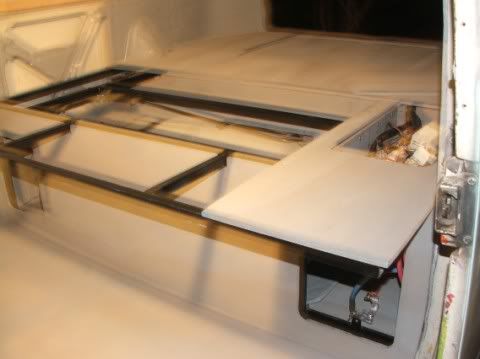
Floor is built up with two layers of ply, ply packing and dense foam for good support right across. Van will be carpeted up to the waist line.
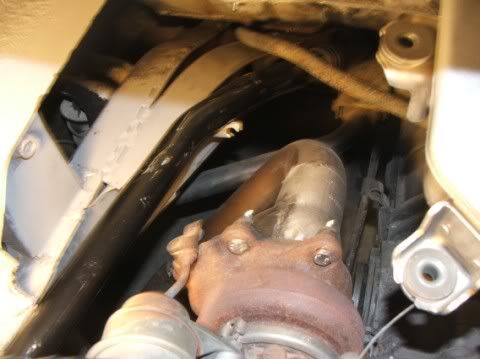
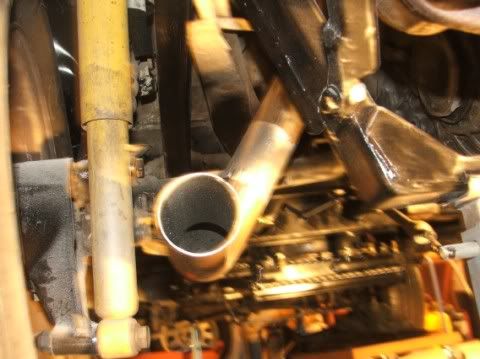
Started fabricating the exhaust. 2.5 inch mandrel bends and a custom made down pipe flange and collector. Just tacked together at the moment. Will
pick up the Cat and muffler on Saturday to finish the fitting.
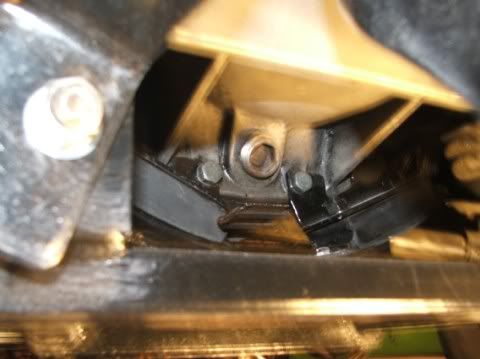
Made a gearbox mount from some angle, flat bar, a couple of type one mounts and a couple of bolts. Turned out pretty well. This will allow me to
remove the motor and the gearbox will stay in place.
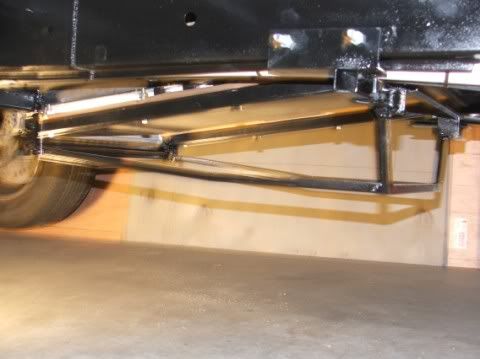
Reworked the radiator mount for more ground clearance. Now mounted in place with pipework 80% complete.
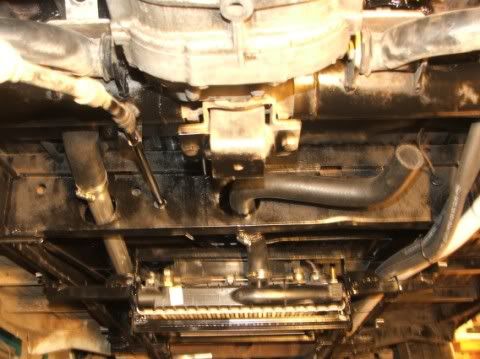
You can see the hose routing. Will make nylon escution panels to locate the hoses/pipes through the chassis.
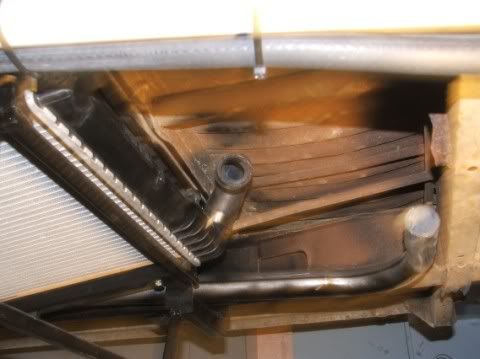
Still need to make a small reducer and connect these hoses.
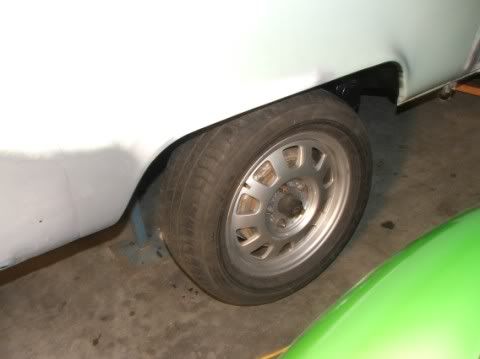
Picked up a set of Audi A3 mags for the van. Just what I wanted. A bit of style without any bling. Spell S L E E P E R.
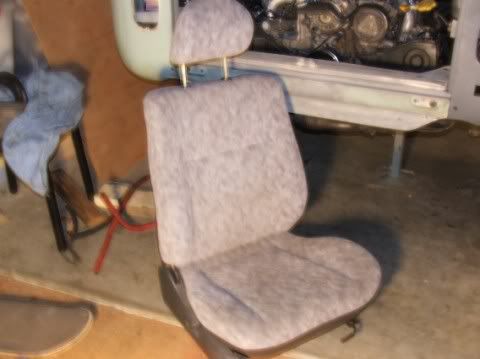
Got to be comfortable as well. Will graft these buckets into it.
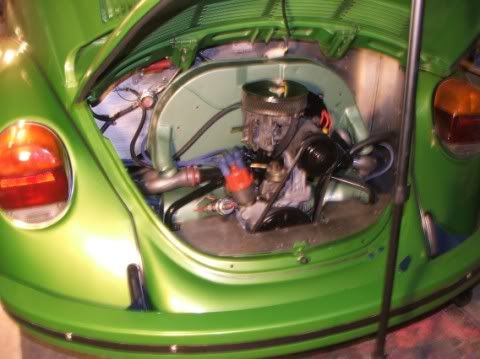
Been a little busy as well building a 1600TP for the green 1302 for my daughter. Jak Rizo came round on Good Friday and we swapped the 2110 for the
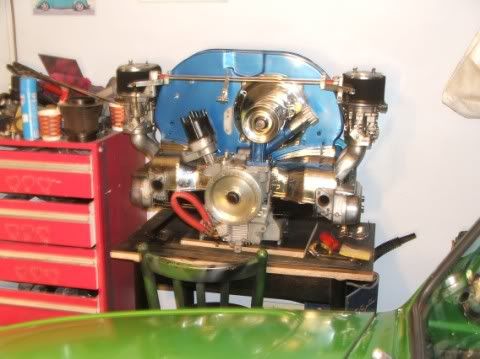
1600. 100 hp to 50 hp what a difference!
2110 out and ready for sale.
Also ran heater hoses and new cable conduit to the front (old pipe was rusted badly). Will have quite a lot of rust repairs to do at the front as I
found more other than the two floor panels I already knew about. Removed the windscreen and no suprise..rust. Under the bumper underneath rust all the
way across. I will buy replacement panels to save time here. Want to get it completed for Valla. Still have to decide about the rear disc brakes. EA
or Kit or other?
Brendan
A VW for everyone!!
1972 1302 German Look
1971 Bay Panel with Subaru EJ20T
1970 Type 3 squareback in progress
1971 Type 3 notchback in progress

|
|
|
 pete wood pete wood
A.k.a.: figure itout
23 Windows of Awesome
       
Posts: 6828
Threads: 389
Registered: January 15th, 2004
Member Is Offline
Location: Nth Nth StMarys, Sydney
Theme: UltimaBB Pro White
Mood: upgrades = jackstands
|
| posted on April 28th, 2006 at 11:03 AM |
|
|
Nice, shame about the rust, but still, fix it now, don't have to worry later on. Will it get a respray as well?
|
|
|
 71EJVan 71EJVan
Officially Full-On Dubber
  
Posts: 352
Threads: 23
Registered: August 19th, 2005
Member Is Offline
Location: Central Coast NSW, Australia
Theme: UltimaBB Pro White
|
| posted on April 28th, 2006 at 02:51 PM |
|
|
I will fix all the rust sections but may not spray it before rego. Want to have it on the road before Valla so if I painted it I don't think I would
make it in time.
Brendan
A VW for everyone!!
1972 1302 German Look
1971 Bay Panel with Subaru EJ20T
1970 Type 3 squareback in progress
1971 Type 3 notchback in progress

|
|
|
 RENNWAGEN RENNWAGEN
A.k.a.: shane
Seriously Crusin Dubber
 
Posts: 158
Threads: 43
Registered: September 9th, 2003
Member Is Offline
Location: Sydney's Nthn Beaches
Theme: UltimaBB Pro Blue ( Default )
|
| posted on April 28th, 2006 at 10:14 PM |
|
|
What did your radiator come from? It looks like a good fit.
|
|
|
 rocknrob rocknrob
A.k.a.: Rob
Insano Dub Head
   
Posts: 844
Threads: 90
Registered: December 18th, 2003
Member Is Offline
Location: Gold Coast
Theme: UltimaBB Pro Black
Mood: mystic
|
| posted on April 29th, 2006 at 07:15 AM |
|
|
how much clearance do you have under the sump Brendan?:duh....any plans on shortening it?....Rob
|
|
|
 71EJVan 71EJVan
Officially Full-On Dubber
  
Posts: 352
Threads: 23
Registered: August 19th, 2005
Member Is Offline
Location: Central Coast NSW, Australia
Theme: UltimaBB Pro White
|
| posted on April 29th, 2006 at 08:40 AM |
|
|
Renwagen
The radiatior and twin fan assembly came out of a Deawoo Leganza. The fans sit quite low to the radiator allowing me to introduce the slant up into
the chassis area. I have yet to do the sheeting of the scoop and the surrounding areas. I bought some 0.7mm alluminium sheet but thing it would blow
out at speed so I'll be changing to tin plate instead. There will be sheeting in front of the radiator to smooth out the airflow and also the side
areas will be sealed in to create a suction from the back.
Rob
This van will be kept at near to stock height (I may lower the front a little to get a slight rake). There is plenty of clearance of about 180mm. I
made the crossmember so that it sits lower than the sump by 5mm so if I scrape anything it will be the cross member. I may also add a little bash
plate to the crossmember under the sump for extra protection. I could lower the van a fair bit and it would still be ok.
Brendan
A VW for everyone!!
1972 1302 German Look
1971 Bay Panel with Subaru EJ20T
1970 Type 3 squareback in progress
1971 Type 3 notchback in progress

|
|
|
 brendan24688 brendan24688
Commited Dubber
 
Posts: 50
Threads: 15
Registered: May 15th, 2005
Member Is Offline
Theme: UltimaBB Pro Blue ( Default )
|
| posted on May 16th, 2006 at 08:27 PM |
|
|
G'day Brendan hows the van coming along now. Must be getting close by now 
Brendan
[ Edited on 15/05/2005 by brendan24688 ]
|
|
|
 h h
A.k.a.: Towely BuMpEr KING! ILLegal ALIEN on a roadtrip
Scirocco Rare
fractals - an ever changing lifestyle
        
Posts: 7671
Threads: 375
Registered: February 3rd, 2005
Member Is Offline
Location: noosa hillbilly 'yee har'
Theme: XMBX Pro Green
Mood: A T3 is not a Kombi - stop waving at me
|
| posted on May 17th, 2006 at 06:15 PM |
|
|
yeah lookin cool more pics pls..
|
|
|
 71EJVan 71EJVan
Officially Full-On Dubber
  
Posts: 352
Threads: 23
Registered: August 19th, 2005
Member Is Offline
Location: Central Coast NSW, Australia
Theme: UltimaBB Pro White
|
| posted on May 17th, 2006 at 08:08 PM |
|
|
Finished the exhaust sustem. All painted up with some swish mounts and heat sheild.
The front nose has now been removed as well as the drivers abd passengers floor panels. Awaiting delivery of the new panels.
Doing little jobs at the moment like hooking up the charcoal canister, vacume hoses and fuel tank vent hoses. About to start on sheeting in the left
hand air entry rear indicator area with aluminium sheeting for a cold air box. Also getting back onto the radiator pipework. Had some reducers made to
match the radiator hose diameter. Will weld those on and complete the pipe mounting brackets this weekend. Also sectioned and rewelded the turbo
intake reducer so the flexible hose doesn't have such a tight bend onto the MAF sensor.
I need to take photos during daylight hours as there is not enough light at night for good exposure. Pics this weekend I promise.
Brendan
A VW for everyone!!
1972 1302 German Look
1971 Bay Panel with Subaru EJ20T
1970 Type 3 squareback in progress
1971 Type 3 notchback in progress

|
|
|
 71EJVan 71EJVan
Officially Full-On Dubber
  
Posts: 352
Threads: 23
Registered: August 19th, 2005
Member Is Offline
Location: Central Coast NSW, Australia
Theme: UltimaBB Pro White
|
| posted on May 29th, 2006 at 09:23 PM |
|
|
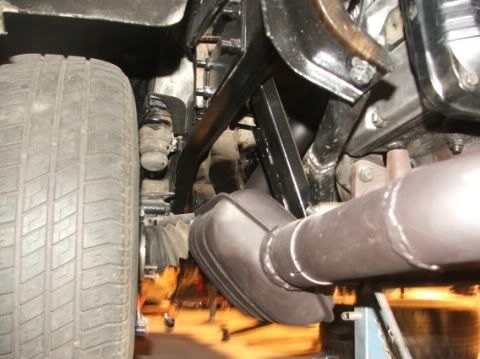
Here are a few pictures of the completed exhaust system. I'm pretty happy with how the mounting system turned out. The O2 sensor was pretty close on
the original make so I did some alterations to give it some clearance away from the cat converter.
Brendan
Tucks up under there pretty good. Outlet pipe sits one inch below the rear bumper.
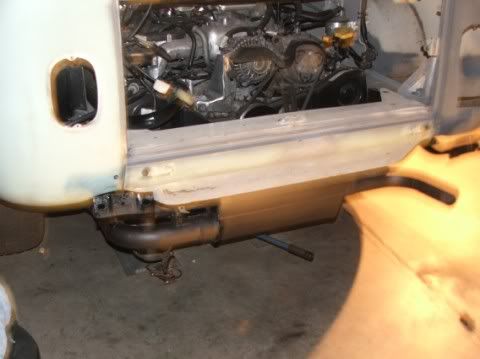
More detail with the valance removed.
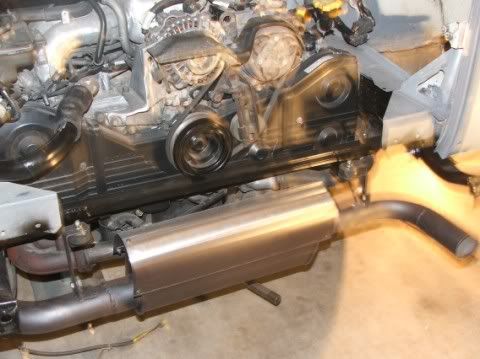
Left side suspension bracket (rubber mounted) and also heat sheild which bolts to the muffler.
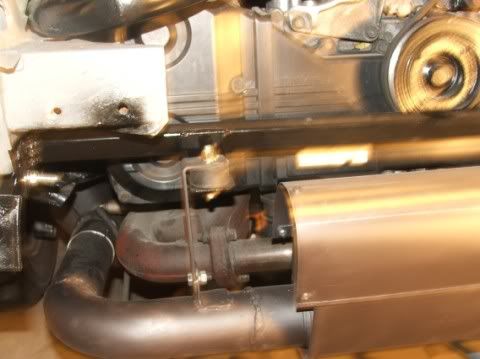
Cat converter. You can just see the top of the O2 sensor here. I also welded a section into the crossmember support brace to create a small kink for
extra clearance from both the sensor and LH exhaust manifold.
Muffler suspension bar mounts between the rear bumper brackets.
A VW for everyone!!
1972 1302 German Look
1971 Bay Panel with Subaru EJ20T
1970 Type 3 squareback in progress
1971 Type 3 notchback in progress

|
|
|
 squizy squizy
A.k.a.: Paul
Compulsive Aussie Vee Dubber
Thinking about another dub...maybe
      
Posts: 4082
Threads: 243
Registered: December 17th, 2002
Member Is Offline
Location: Thornleigh
Theme: UltimaBB Pro Blue
|
| posted on May 29th, 2006 at 10:22 PM |
|
|
Brendan you are one skilled dude. I've got to ifnd some time this weekend to have a look.
|
|
|
| Pages: 1 2 3 4 |