| [ Total Views: 4073 | Total Replies: 32 | Thread Id: 67475 ] |
| Pages: 1 2 |
|
|
 Flintstones Flintstones
Custom Title Time!
    
Posts: 1077
Threads: 69
Registered: August 27th, 2002
Member Is Offline
Location: Sydney
Theme: UltimaBB Psyche Blue
|
| posted on February 10th, 2008 at 10:13 PM |
|
|
Project GTO
Hi All,
Though it about time to post my Oval after following closely some awesome builds that have been shown here ie. Dasdubbers ex63 ragtop, nbturbo's
yellow oval etc.
A fair few of you all would have seen my oval in the latest issue of VWMA under "Censored - Bare Metal Oval" so I though I'd share with you in
detail the build up.
I'll start with the pics of what I started out with all those years ago. It isn't pretty, in fact it was pretty rough. So rough in fact that if I
had build another oval again, I would've walked right past it and kept looking for a better body. The whole lower part of the car has been replaced
now. The pan halves were classic Flintstones style. If you were to have stepped into the car, you'd be standing on the garage floor again as the pan
was so badly rusted there literally was no floor to the car. Not that it really mattered for me as I had other plans.
And for those of you wondering what the relevance of GTO is, it stands for Grand Touring Oval
Caio for now
Cheers
| Error |
| Sorry, you must be a registered user in order to download attachments. |
|
| Error |
| Sorry, you must be a registered user in order to download attachments. |
|
| Error |
| Sorry, you must be a registered user in order to download attachments. |
|
|
|
|
 1303Steve 1303Steve
A.k.a.: Steve Carter
Scirocco Rare
        
Posts: 8650
Threads: 564
Registered: August 27th, 2002
Member Is Offline
Location: Sydney, NSW
Theme: UltimaBB Pro Blue ( Default )
Mood: Parrot Heading
|
| posted on February 10th, 2008 at 11:08 PM |
|
|
Hi
You have been a busy boy. The car looks great, cant wait to see it finished.
Steve
|
|
|
 Dasdubber Dasdubber
A.k.a.: Alan Agyik
23 Windows of Awesome
DAS Resto Haus
       
Posts: 5746
Threads: 289
Registered: August 26th, 2002
Member Is Offline
Location: Gold Coast
Theme: UltimaBB Pro Blue
Mood: feeling fine...
|
| posted on February 11th, 2008 at 08:56 AM |
|
|
Hey mate, I'm looking forward to seeing the progress shots you've taken thus far! The article in VWMA certainly whetted my appetite to learn and see
more about some of the mods you have done - full credit to you so far for what has been achieved.
All the best with the remainder of the build - keep those pics coming!
Alan
|
|
|
 Turbo54 Turbo54
Veteran Volks Folk
    
Posts: 2220
Threads: 268
Registered: July 13th, 2004
Member Is Offline
Theme: UltimaBB Pro Blue ( Default )
Mood: Boost'n
|
| posted on February 11th, 2008 at 11:09 AM |
|
|
As above.
T54
C'mon kids gather round,
there's a new sensation hitting town,
It's moving straight, low to the ground,
it'll pick you up when your feeling down.
|
|
|
 Flintstones Flintstones
Custom Title Time!
    
Posts: 1077
Threads: 69
Registered: August 27th, 2002
Member Is Offline
Location: Sydney
Theme: UltimaBB Psyche Blue
|
| posted on February 11th, 2008 at 11:32 PM |
|
|
Thanks Guys,
I'll start from the bottom, being the Pan.
I knew from the start that I wanted some serious power for this Dub, so I set about creating a strong chassis that didn't have to rely on the heater
channels for strength. I used 50 x 50 box section for the main perimeter of the pan as well as 3mm angle iron and boy didn't just that alone add huge
amounts of strength and this was without the actual flooring being welded in!!!
For the flooring, (this gave me no end of grief) I spent soo long in trying to find anyone that could fab ribbed paneled sheets. When I thought I had
found what I needed it was always too thin......In the end I went to the wreckers to see what I could salvage from something that was made in the
masses. After a few hours I eventually found what I needed. I walked out with 5 x XE station wagon rear seat backrests.
The backrest was made from approx 1mm ribbed sheet which was perfect. The reason for 5 x Backrests is because the original XE seat has a lever to to
allow you to fold the seat down to increase the luggage area. It's quite a large piece that needs to be welded in and the 5th piece was cut down to
suit the area so that it was consistence with the rest of the flooring.
While I was at it I pushed the gearbox forward as well as making my own inboard front gearbox mount as well as permanent sway bar mounts. The reason
for these is apparently the sway bar mounts that are supplied in the kit rotate over time, which is really useless especially if you going hard
through turns etc......
Any way enough ramblings for me I'm sure the pics can tell you more. In the first pic you'll see the massive jig I used
for the foundation of my floor  hehehe hehehe
Anyways, it's late, I'm tired, and need to get to bed. Enjoy!
Cheers
D
| Error |
| Sorry, you must be a registered user in order to download attachments. |
|
| Error |
| Sorry, you must be a registered user in order to download attachments. |
|
| Error |
| Sorry, you must be a registered user in order to download attachments. |
|
|
|
|
 nbturbo nbturbo
Veteran Volks Folk
    
Posts: 2171
Threads: 89
Registered: December 19th, 2002
Member Is Offline
Location: Whyalla Sth.Aust.
Theme: UltimaBB Powder
|
| posted on February 15th, 2008 at 07:26 PM |
|
|
C'mon Dino-you've had a couple of sleeps-more please.
|
|
|
 Flintstones Flintstones
Custom Title Time!
    
Posts: 1077
Threads: 69
Registered: August 27th, 2002
Member Is Offline
Location: Sydney
Theme: UltimaBB Psyche Blue
|
| posted on February 16th, 2008 at 10:51 PM |
|
|
Hi Gary, just got a few things on at the moment, after tonight prolly won't be on for a couple of weeks as my wife is due to give birth to twins!!
Following on, I fitted a heavy duty gearbox cradle but turned it around 180 degrees to push the gearbox forward to allow extra room at the rear of the
car.
In the next pic is how I've finished off the 40 x 40 RHS at the head of the chassis. From here I will make chassis stiffeners (similar to a VW Thing)
to tie it in with the bottom of the BJ beam .
You will also notice that I have stitch welded the top and lower half of the spine together. I also stitched welded the gearbox forks as well.
With the RHS I have drilled these to accept the chassis bolts on the top side but bigger on the bottom side to allow the washer to fit through as well
as a socket to tighten it to the body. Once bolted I will fit grommets to seal it from the elements.
I've tried to replicate the original style of the floor with the dropped down section for the rear half of the pan. I have created new seat mounts
for the front, and also battery mounts in the usual spot.
I painted the chassis in POR15 but to be honest, I don't think it's that good unfortunately. Considering the cost I haven't been happy with the
finish, it now looks dull and it's never been out in the direct sunlight!!
The grey colour I went with, I found out after the fact it comes in different shades which I wasn't told about at the time when I needed to purchase
more.
I'm going to strip it down and repaint it in the traditional manner to achieve the look I'm after.
Anyone powder coated a chassis before? If yes, can you give us your thoughts on how it has handled the the weather, road conditions etc
Cheers
D
| Error |
| Sorry, you must be a registered user in order to download attachments. |
|
| Error |
| Sorry, you must be a registered user in order to download attachments. |
|
| Error |
| Sorry, you must be a registered user in order to download attachments. |
|
|
|
|
 Flintstones Flintstones
Custom Title Time!
    
Posts: 1077
Threads: 69
Registered: August 27th, 2002
Member Is Offline
Location: Sydney
Theme: UltimaBB Psyche Blue
|
| posted on February 16th, 2008 at 11:00 PM |
|
|
The underside
| Error |
| Sorry, you must be a registered user in order to download attachments. |
|
|
|
|
 StenGuns StenGuns
Veteran Volks Folk
    
Posts: 2147
Threads: 236
Registered: March 1st, 2004
Member Is Offline
Location: Sydney, Australia
Theme: UltimaBB Pro Blue ( Default )
|
| posted on February 17th, 2008 at 09:01 AM |
|
|
Powdercoating is the way to go mate.. I had my pan blasted, etchprimed and powder coated for under 1000 last year.. Pity about the por15.. I bought
the same stuff and have never opened the can so can't give a comment on it.. I was much happier with the durability, coverage and seal that
powdercoating gives..
The place i used was in Padstow and I highly recommend..
Good luck with your project


|
|
|
 nbturbo nbturbo
Veteran Volks Folk
    
Posts: 2171
Threads: 89
Registered: December 19th, 2002
Member Is Offline
Location: Whyalla Sth.Aust.
Theme: UltimaBB Powder
|
| posted on February 17th, 2008 at 08:35 PM |
|
|
Dino,all the best to you both and hope all goes well with the births.
|
|
|
 Dasdubber Dasdubber
A.k.a.: Alan Agyik
23 Windows of Awesome
DAS Resto Haus
       
Posts: 5746
Threads: 289
Registered: August 26th, 2002
Member Is Offline
Location: Gold Coast
Theme: UltimaBB Pro Blue
Mood: feeling fine...
|
| posted on February 18th, 2008 at 10:12 AM |
|
|
All the best for you, your wife, your bubs.....and your dub (whenever you get the time to work on it again may be a different story!).
I too painted my ragtop pan with por15 and despite the distributor's assurances (I checked 3 times) that it could be applied over the etch primer
after the pan was blasted, it flaked off easily. So I had to strip it down back to bare metal and start again. Next time I will just paint it in two
pack. I thought about powdercoating (nice and easy and looks great) but was worried about A) potential for big flakes coming off if hit hard enough
(worry may not be justified but thats just me), and B) difficulty to patch if I had to do any work to the pan (eg. weld brackets on etc).
Alan
|
|
|
 Flintstones Flintstones
Custom Title Time!
    
Posts: 1077
Threads: 69
Registered: August 27th, 2002
Member Is Offline
Location: Sydney
Theme: UltimaBB Psyche Blue
|
| posted on May 11th, 2008 at 08:55 AM |
|
|
Thanks guys, appreciate the support.
Well my twins have joined us and it’s been great. We have a healthy baby boy and we now have a daughter as well :o)
They are a lot of work but the good far outweighs the bad. Soon I’ll get back into the GTO, but in the meantime I’ll keep posting.
Thanks for the input regarding the powder coating guys. Think I’ll go down the 2Pac route for the chassis just in case I have some further mods
Going forward you’ll see what I’ve had to do to get the GTO in respectable shape.
Firstly I sourced a replacement front clip, as well as heater channels, A pillar bases and lower rear qtr panels.
I replaced the front clip as the original suffered a hit in its lifetime.
I made some inner guard replacement panels also. When it came time to replace the heater channels, I did both at the same time and braced the body to
make sure the door openings didn’t “close up”
For those of you that haven’t seen inside the A pillar have a close look at the below pic.
This will give you guys some idea of why restoration places charge so much to do rust work, let alone modification and fabrication work.
Cheers
| Error |
| Sorry, you must be a registered user in order to download attachments. |
|
| Error |
| Sorry, you must be a registered user in order to download attachments. |
|
| Error |
| Sorry, you must be a registered user in order to download attachments. |
|
|
|
|
 Flintstones Flintstones
Custom Title Time!
    
Posts: 1077
Threads: 69
Registered: August 27th, 2002
Member Is Offline
Location: Sydney
Theme: UltimaBB Psyche Blue
|
| posted on May 11th, 2008 at 08:59 AM |
|
|
.
| Error |
| Sorry, you must be a registered user in order to download attachments. |
|
| Error |
| Sorry, you must be a registered user in order to download attachments. |
|
| Error |
| Sorry, you must be a registered user in order to download attachments. |
|
|
|
|
 Flintstones Flintstones
Custom Title Time!
    
Posts: 1077
Threads: 69
Registered: August 27th, 2002
Member Is Offline
Location: Sydney
Theme: UltimaBB Psyche Blue
|
| posted on January 2nd, 2010 at 12:40 AM |
|
|
Boy has the time flown or what, didn't realize that it was this long since my last post!!!!
Anyway here's a few more progress shots of the body.
I initially moved the firewall forward to provide clearance for the throttle bodies and linkages as I moved the engine/gearbox forward. Also I raised
the floor section of the luggage area again for clearance.
All closed up.
| Error |
| Sorry, you must be a registered user in order to download attachments. |
|
| Error |
| Sorry, you must be a registered user in order to download attachments. |
|
|
|
|
 Flintstones Flintstones
Custom Title Time!
    
Posts: 1077
Threads: 69
Registered: August 27th, 2002
Member Is Offline
Location: Sydney
Theme: UltimaBB Psyche Blue
|
| posted on January 2nd, 2010 at 12:44 AM |
|
|
.
| Error |
| Sorry, you must be a registered user in order to download attachments. |
|
|
|
|
 Flintstones Flintstones
Custom Title Time!
    
Posts: 1077
Threads: 69
Registered: August 27th, 2002
Member Is Offline
Location: Sydney
Theme: UltimaBB Psyche Blue
|
| posted on January 2nd, 2010 at 01:24 AM |
|
|
Then project's direction changed half way through as I decided that I wanted to go turbo which sounds simple enough.
The amount of extra work that was involved and that includes everything from planning (and I really mean forward planning to the point of catering for
the cars general service once it was complete) took a lot of time.
Then there's the fabrication work.
Here I've mocked up the basic shape so that I can get base measurements of the structure but also for other items such as the soon to come roll cage
as well as seat belt mounting points
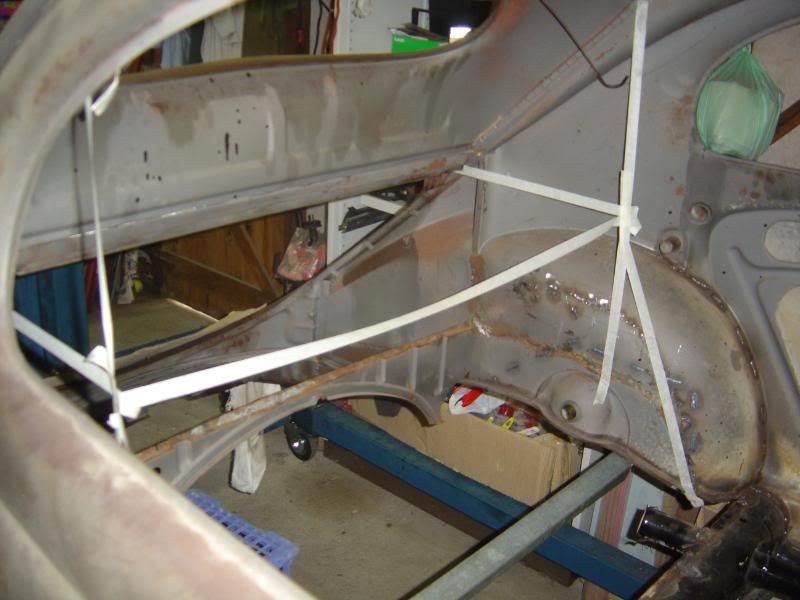
Here you can see the new framework installed as well as the infill panels that are spot welded onto the side of the frame down to the wheel tubs
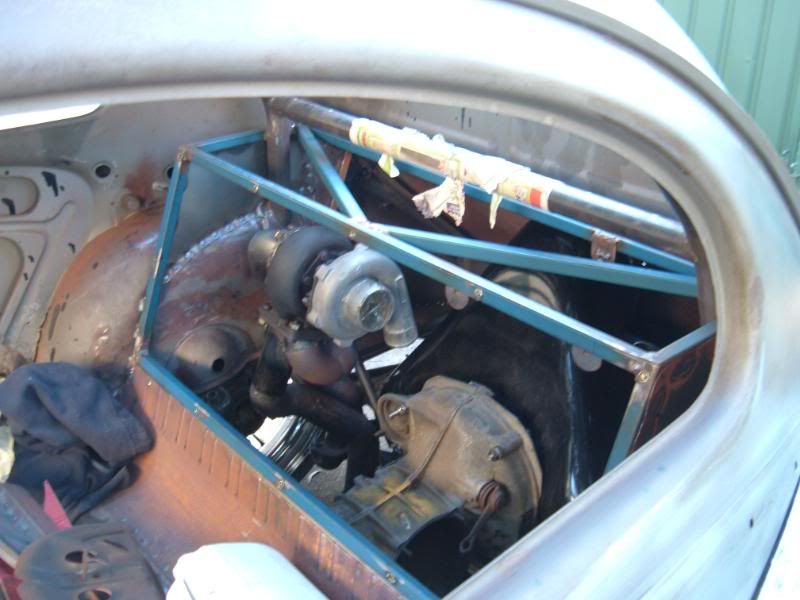
And finally the bracing for the chassis fork connecting the the roll cage frame.
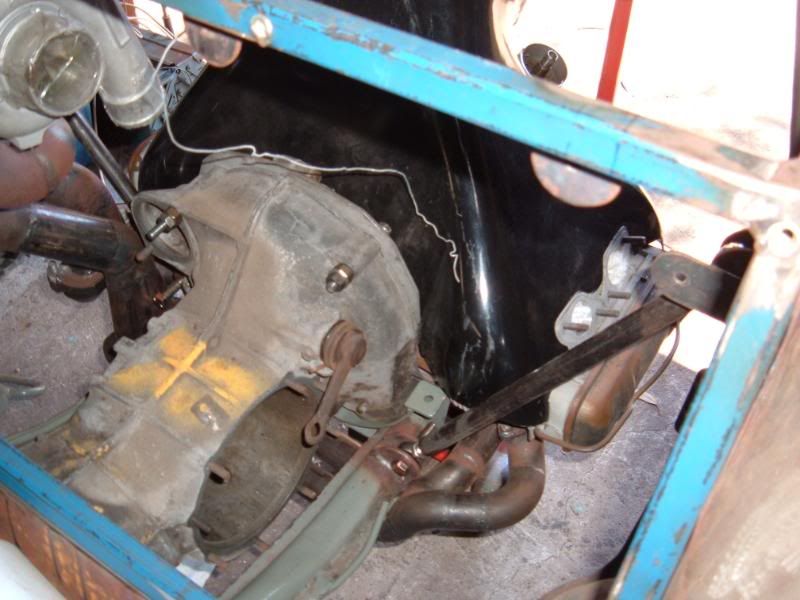
Cheers
D
|
|
|
 ricola ricola
Wolfsburg Wizard
  
Posts: 437
Threads: 9
Registered: February 5th, 2003
Member Is Offline
Location: UK
Theme: UltimaBB Pro Blue ( Default )
|
| posted on January 2nd, 2010 at 07:47 AM |
|
|
Nice to see some of the fab work, let's see some more!
|
|
|
 baja burley baja burley
Officially Full-On Dubber
  
Posts: 325
Threads: 54
Registered: September 11th, 2008
Member Is Offline
Location: ipswich, QLD
Theme: UltimaBB Psyche Grey
|
| posted on January 2nd, 2010 at 02:09 PM |
|
|
what engine has it got in it? looks vw but with porche shroud?
There are three types of people in this world - people who can count and people who can't....
|
|
|
 nbturbo nbturbo
Veteran Volks Folk
    
Posts: 2171
Threads: 89
Registered: December 19th, 2002
Member Is Offline
Location: Whyalla Sth.Aust.
Theme: UltimaBB Powder
|
| posted on January 2nd, 2010 at 03:10 PM |
|
|
Welcome back Dino-the floor raise turned out really neat-good job.Looking forward to some good stories and pics.
|
|
|
 matberry matberry
Super Moderator
Go hard or go home
      
Posts: 8114
Threads: 134
Registered: March 7th, 2006
Member Is Offline
Location: Cooroy Qld
Theme: UltimaBB Pro Blue
Mood: enjoying waving at all my Kombi buddies from my T3
|
| posted on January 2nd, 2010 at 04:15 PM |
|
|
| Quote: | Originally
posted by baja burley
what engine has it got in it? looks vw but with porche shroud?
|
Mmmm turbo type IV, big exhaust too 
Top job.
Matt Berry Motorsports...air cooled advice, repairs and mods Ph 0408 704 662
OFF-ROAD,CIRCUIT,DRAG,STREET,ENDURANCE
 |
|
|
 66deluxe 66deluxe
Custom Title Time!
    
Posts: 1593
Threads: 139
Registered: August 16th, 2005
Member Is Offline
Location: Murrumba Downs, Brisbane.
Theme: XMBX Pro Green
|
| posted on January 2nd, 2010 at 04:42 PM |
|
|
What size type 4 you building, i know that if your going with stock 2 litre a 2 litre subaru wrx turbocharger is the perfect size for it and you'll
get around 300hp too.
This is my Volkswagen, there are many like it, but this one is mine. Without me my Volkswagen is useless, without my Volkswagen, I am useless.
61 Karmann Ghia 2110cc type1 w Los Panchito's
66 Deluxe Beetle 2270 type 4
10 Subaru WRX Impreza
|
|
|
 Flintstones Flintstones
Custom Title Time!
    
Posts: 1077
Threads: 69
Registered: August 27th, 2002
Member Is Offline
Location: Sydney
Theme: UltimaBB Psyche Blue
|
| posted on January 5th, 2010 at 12:25 AM |
|
|
Project GTO - Fabrication - Body
Many thanks guys, and will try to get the pics on here more regularly.
10 points to matberry for guessing the engine config
66deluxe, I'm running a TO4 for this puppy with an external wastegate.
Some more progress pics for you all.
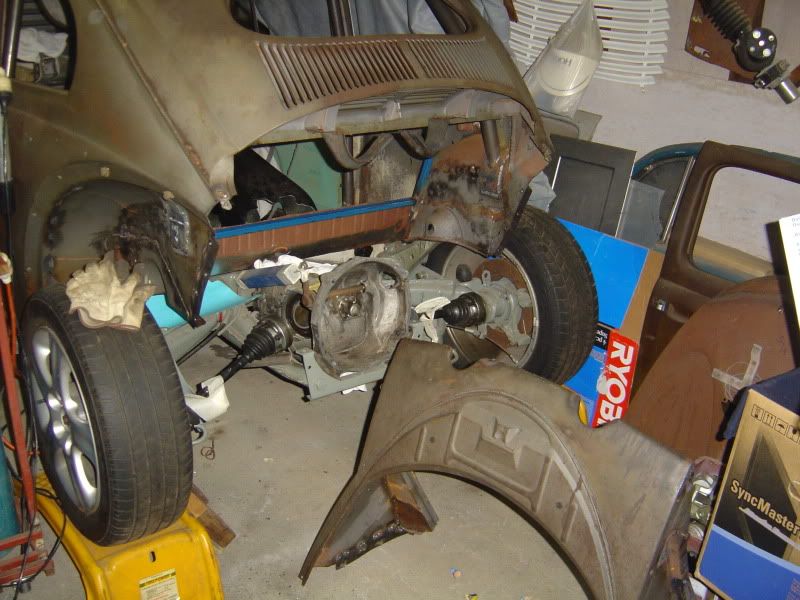
Now that I decided I was definately going to turbo the dub, I had to make life a little easier for myself for when it came time to install/remove the
motor.
This entailed that I cut the rear of the car off. This is the time to be brave but seeing as I already put a hole in the roof, it made it a lot less
painful. (I'll cover off the hole in the roof later on  ) )
Firstly I had to make sure that where I put the cut, I could replace the strength of the car as it had to hold the weight of the rear clip as well as
the rear bar and for the unplanned muffler (I'll cover this off later)
What I ended up doing after I marked out where I was going to cut, was to make 4 tabs and these tabs went just under the top corners and also in the
gutter rails underneath.
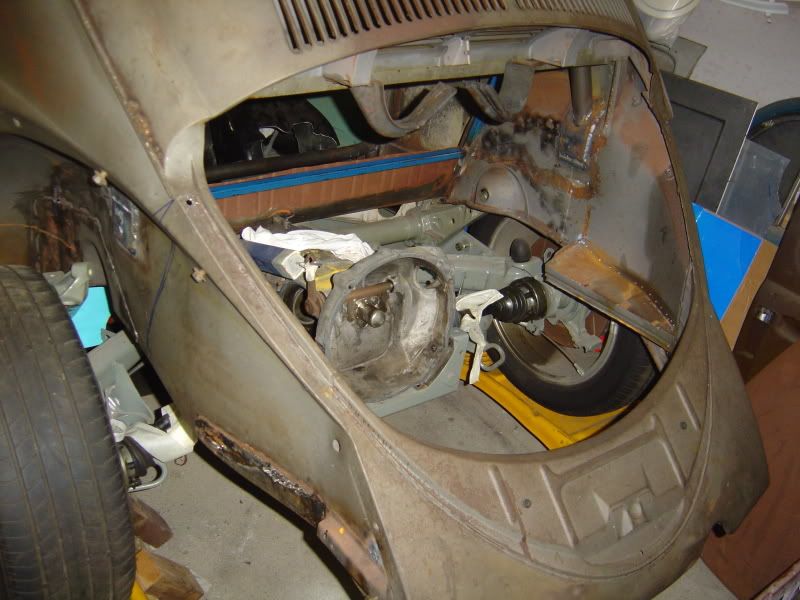
Now when I did cut, I only cut down from the top a couple of inches under the guard line and stopped. I then welded in the prefabbed tab and bolted
the clip section to it.
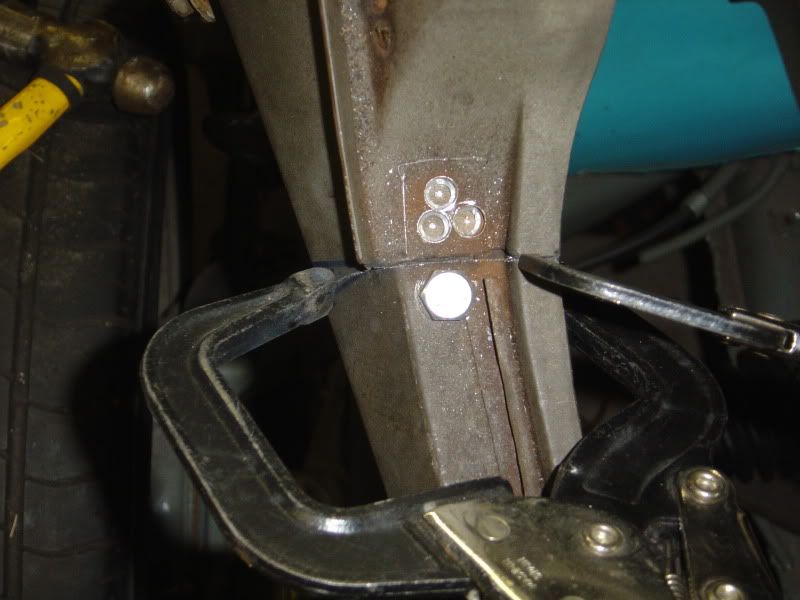
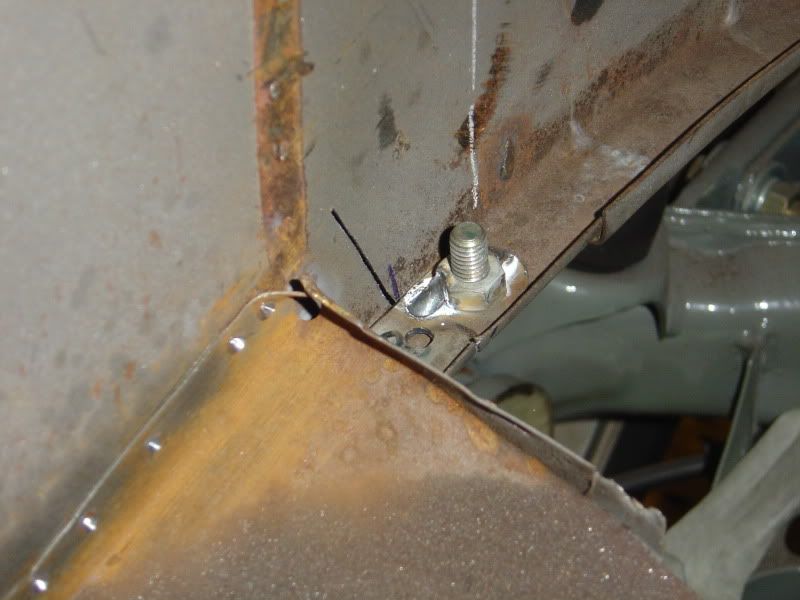
Next I started at the bottom and cut up a couple of inches and stopped. Now I welded in the tab in gutter section so that it could be bolted up. You
will notice that the bolt comes up from below, this was so that I can get to it as there was no chance I'd be able to get my hand in from the topside
once an engine was all bolted in place.
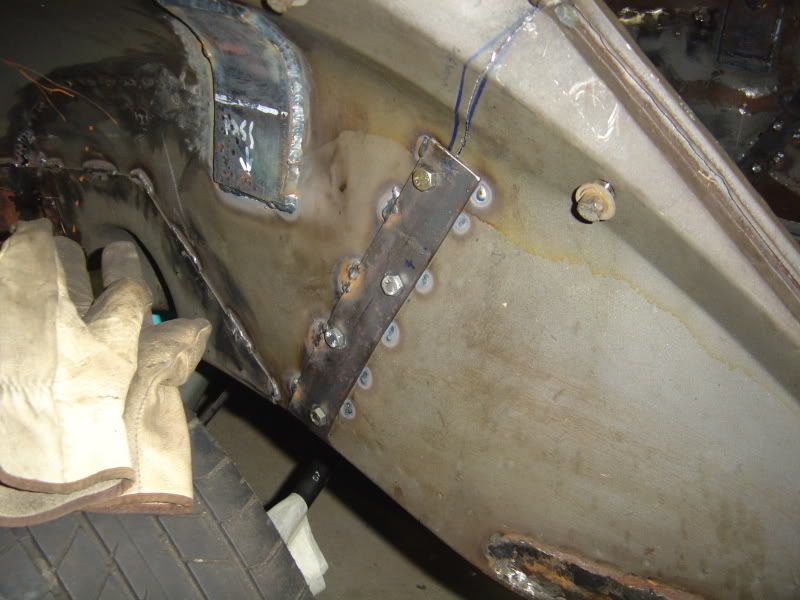
Once top and bottom were secure on both sides, I then proceeded to cut the remaining middle bit out. It is pretty flimsy at this stage so I reinforced
the area with 2 bits of 3mm thick strap on either side of the panel with 4 bolts.
These straps are also stitch welded to the panels for strength but also for when it comes time for assembly.
Once it is all bolted up, there is no loss of strength at all.
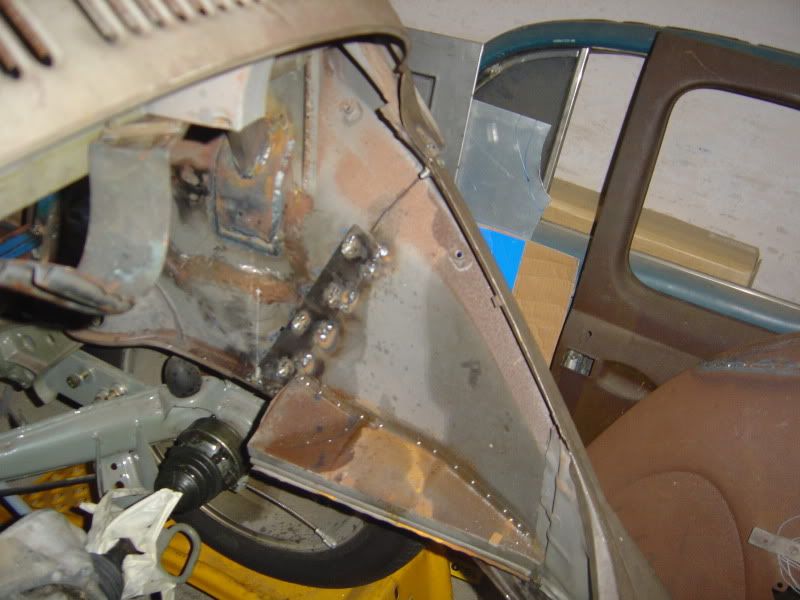
And there you have it, one removeable rear clip.
you will see that 2 of the 3mm straps are welded onto the inside panel of the clip, and the other 2 straps are welded onto the outside of the cars
panel. I did it this way so that it made fitting easier.
By the way, the holes on the outer straps are the size of the bolts so you can push the bolt through and the inner straps had nuts welded to them.
Again so that you have access to it for assembly later on.
Any way I just noticed the time and I'm hitting the sack as it's extremely late and I need to get up in 4.5 hours time for work !!!!
Cheers
D
|
|
|
 cam070 cam070
Custom Title Time!
    
Posts: 1332
Threads: 53
Registered: July 25th, 2009
Member Is Offline
Location: Sydney
Theme: UltimaBB Pro Blue ( Default )
Mood: Getting hands dirty stripping the bug down
|
| posted on January 5th, 2010 at 12:59 AM |
|
|
Clever stuff, like your work!
|
|
|
 Gringo_54_oval Gringo_54_oval
Officially Full-On Dubber
  
Posts: 240
Threads: 3
Registered: January 18th, 2009
Member Is Offline
Location: Earth
Theme: UltimaBB Pro Blue ( Default )
Mood: TOP-COAT electrostatic painter
|
| posted on January 5th, 2010 at 08:44 PM |
|
|
how funny the other day i was in my place of calm & relaxation & silence (toilet) reading my old magazine and came across this bug in vwma and
thought "hmmm i wonder how that bug is going "and look here it is.
I like what your doing mate,brings back good slash bad memories of when i chopped up my oval.
good job 
Alex
|
|
|
 Flintstones Flintstones
Custom Title Time!
    
Posts: 1077
Threads: 69
Registered: August 27th, 2002
Member Is Offline
Location: Sydney
Theme: UltimaBB Psyche Blue
|
| posted on January 9th, 2010 at 09:34 PM |
|
|
Thanks Cam.
Alex, I had enough grief shaving the body seam near the hinges, you went the whole hog and shaved all the gutters as well!!!! Looks good though.
Following on from above, I wasn't happy with the look of the cut outer panel (between the rear guard and the gutter) It kept bugging me (no pun
intended) to the point where I'd say to myself "there's no way an OEM, would manufacture a car with a cut panels especially on an edge"
So I made a couple of "C" pieces that are now welded to the panels and clip.
I also added a dowel to the left and right side of the clip. These now help located the clip to the body so that they are in the same location no
matter how many times the clip gets detached and re-attached.
Once located then a Bolt is used to secure the clip to the body. There is from memory an approx gap of 1mm between the clip and the body. This was
done so that a seal is used to ensure that there is no rubbing between panels to damage the paint work.
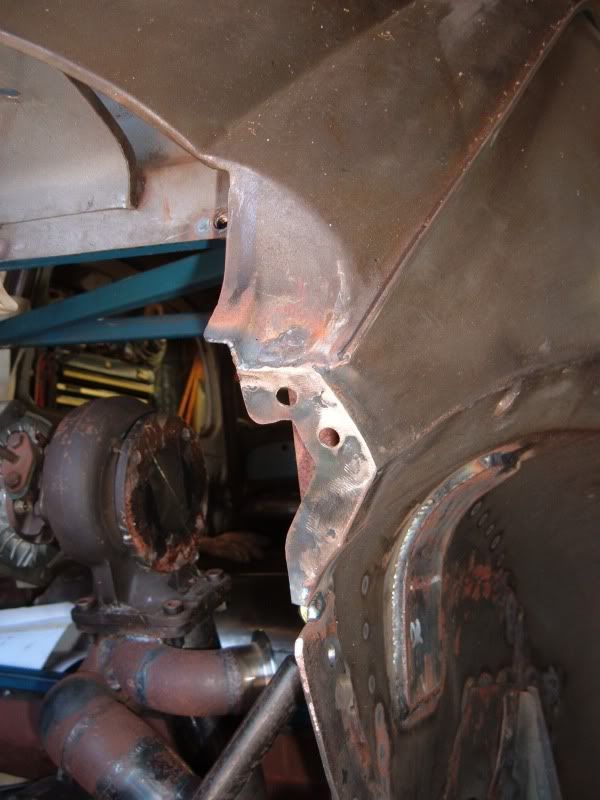
In doing this I removed the top tabs, which also got rid of the bolt that was used where the decklid seal is.
This firmed up the cut edge and when all bolted together looks much nicer.
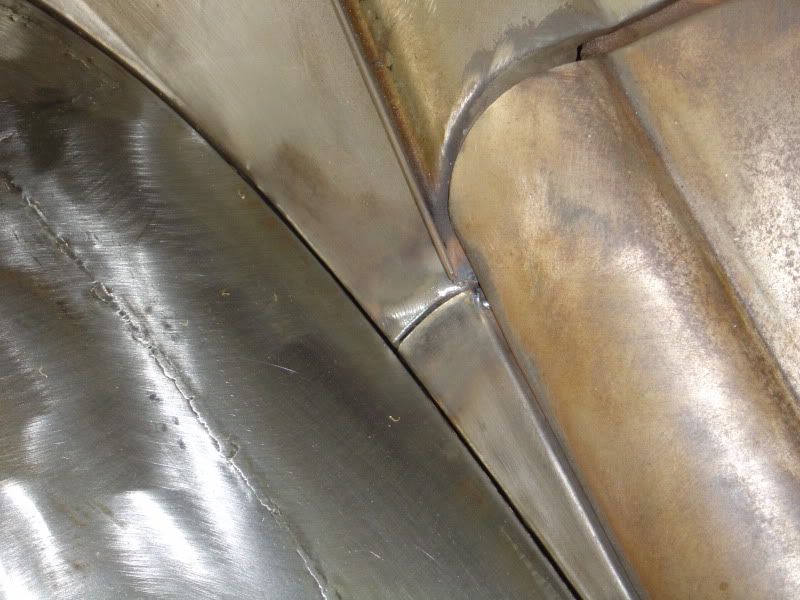 . .
Cheers
D
|
|
|
 reub reub
Veteran Volks Folk
VWRX is gone...
    
Posts: 2054
Threads: 160
Registered: September 2nd, 2002
Member Is Offline
Theme: UltimaBB Pro Blue
|
| posted on January 9th, 2010 at 10:58 PM |
|
|
Nice work dude... gonna be a sweet car.
The removable rear tidy up at the bottom of the drip rail is pretty much exactly what I did too.
I used a 2-3mm compressible rubber foam between the panels to prevent rubbing as you mentioned, which from memory was self adhesive on one side.
| Error |
| Sorry, you must be a registered user in order to download attachments. |
|
Reub
|
|
|
 Dc13 Dc13
Learner Dubber

Posts: 1
Threads: 0
Registered: February 4th, 2009
Member Is Offline
Theme: UltimaBB Pro Blue ( Default )
|
| posted on January 20th, 2010 at 07:59 AM |
|
|
| Quote: | Originally
posted by reub
Nice work dude... gonna be a sweet car.
|
It's allready done, sort of -> click here
Too bad we didn't get more progress shots, should have been very interesting! |
|
|
 DieSchnelleKafer DieSchnelleKafer
Officially Full-On Dubber
  
Posts: 296
Threads: 22
Registered: July 7th, 2010
Member Is Offline
Location: Bunbury, western australia
Theme: UltimaBB Pro Brown
Mood: hungry for metal
|
| posted on January 12th, 2011 at 05:00 PM |
|
|
this is great stuff man, this is what custom is about. this if going to be a real winner once finished
i will keep watching this thread for sure
|
|
|
 Flintstones Flintstones
Custom Title Time!
    
Posts: 1077
Threads: 69
Registered: August 27th, 2002
Member Is Offline
Location: Sydney
Theme: UltimaBB Psyche Blue
|
| posted on January 12th, 2011 at 10:29 PM |
|
|
Can't believe another year has past, man does time fly
Thanks for the positive comments Blair.
Will have to dig out the photo's from my old PC and continue posting soon.
Cheers
D
|
|
|
 Scarab Scarab
Wolfsburg Wizard
  
Posts: 646
Threads: 8
Registered: July 26th, 2009
Member Is Offline
Location: Brahma Lodge,South Australia
Theme: UltimaBB Pro Blue
|
| posted on January 13th, 2011 at 10:00 AM |
|
|
Love the fab work on this....nice work!!
would definitely love to see more of the build up please! 
Thanks,
Scarab (aka: Paul)
|
|
|
| Pages: 1 2 |