| [ Total Views: 15480 | Total Replies: 154 | Thread Id: 85938 ] |
| Pages: 1 .. 3 4 5 6 |
|
|
 General_Failure General_Failure
A.k.a.: Tristan
Custom Title Time!
Use your head, don't abuse it!
    
Posts: 1036
Threads: 107
Registered: June 15th, 2004
Member Is Offline
Location: Peaceful Finley, NSW
Theme: UltimaBB Streamlined2
Mood: Not too bad. Thanks for asking!
|
| posted on May 13th, 2011 at 06:09 PM |
|
|
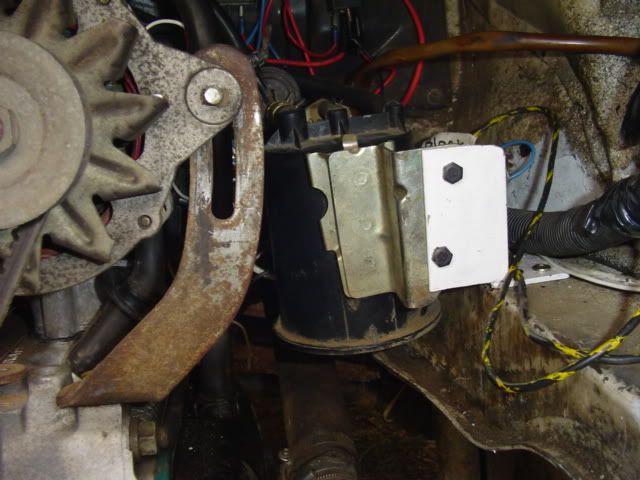
I finished the charcoal canister bracket. My first attempt looked good but i couldn't physically attach it because the engine got in the way of every
drill I had. So I lopped it in half and welded it together at a right angle. Worked pretty well and as a bonus it works to hold all those stray wires
in place. Wire cleanup comes last.
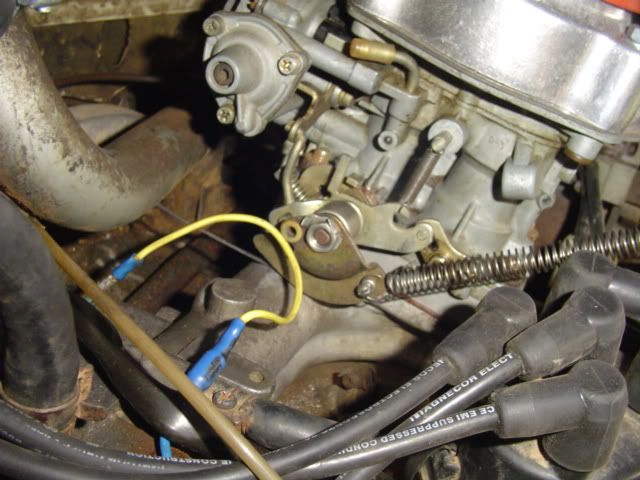
Here's the throttle linkage. I might drill another hole for the spring to go in. the linkage came from a nissan carb or something like that which was
underslung already, but had to be flipped backwards to fit on this Holley. The casting flash on the manifold had to be filed away to ensure the
linkage didn't foul. I also had to drill a hole in the end of the linkage so I could use a small barrel bolt to feed the cable through instead of one
of those cable end tab things.
Still more work to do, but things are being crossed off the list slowly. Next up will either be fitting the second thermo fan which will take a little
finesse because the clutch cable tube is in the way, or maybe fixing the mount for the fuel pump then giving it a hard line.
If at first you don't succeed. Build, build again.
Vehicle: 1975 Special order delivery walkthrough panel based LCA pop-top camper. Motor: Nippon 1.8L Single port Wasserboxer, Transmission: 3 rib 002.
|
|
|
 General_Failure General_Failure
A.k.a.: Tristan
Custom Title Time!
Use your head, don't abuse it!
    
Posts: 1036
Threads: 107
Registered: June 15th, 2004
Member Is Offline
Location: Peaceful Finley, NSW
Theme: UltimaBB Streamlined2
Mood: Not too bad. Thanks for asking!
|
| posted on May 23rd, 2011 at 09:52 AM |
|
|
I replumbed the charcoal canister because I messed up where the diaphragm should have been connected. It's on the vac advance line now.
A couple of days ago I tried rerouting the coolant lines above the beam and failed. Looks like I need to hack up my nice industrial oil lines and put
a couple of bent tubes or something in the middle to go over the torsion tube and under the rearmost floor support before the crossmember.
What else... Tweaked the clutch a little. Also flipped the knockoff facet pump so it was on the correct 45* instead of the inverse. My understanding
it it is to avoid cavitation. It got a rubber block put between it and the bulkhead. Still noisy as all hell. Can't win them all.
it's running reasonably well. It is still in dire need of a new air filter element. it still has the one that was in the air cleaner when I bought it
from the wrecker. It could be used as a quit smoking campaign ad. I'm not even going to bother doing the idle until that is replaced.
I really have to get this to registerable condition soon. Shortly I'll be doing a pointless two night a week commute to 100km away where my other
half is starting a TAFE course. She doesn't have a license so I'm going to be stuck there for 6 hours a night. I want this so I can sleep / do some
software development stuff to try and get back into the industry somehow and become at least partially self sufficient again.
If you were stuck somewhere regularly and had nowhere to go and essentially no funding, what would you do? I'd rather not sit on a chair in a
draughty hallway for six hours. It'd send me mad.
If at first you don't succeed. Build, build again.
Vehicle: 1975 Special order delivery walkthrough panel based LCA pop-top camper. Motor: Nippon 1.8L Single port Wasserboxer, Transmission: 3 rib 002.
|
|
|
 General_Failure General_Failure
A.k.a.: Tristan
Custom Title Time!
Use your head, don't abuse it!
    
Posts: 1036
Threads: 107
Registered: June 15th, 2004
Member Is Offline
Location: Peaceful Finley, NSW
Theme: UltimaBB Streamlined2
Mood: Not too bad. Thanks for asking!
|
| posted on May 26th, 2011 at 07:30 PM |
|
|
Altered the rear fuse block a little. Removed a blank feed from the tach relay and reused the fuse for the thermo fan. Removed the glass fuse and
replaced it with an inline blade fuse for the aux battery to cabin feed.
Straightened the drivers side kick panel with a water pump spray bottle. The plastic is too shrunken and distorted. May use cloth backed vinyl on that
side.
Ziptied on the door vents as they are made from unobtainium and I don't one one to fall off somewhere as they are wont to do.
Tidied some cables, replaced the air filter element. Still need to retune carb.
Did a test fit on an accelerator spring with some clear pvc tube on it for a surface to anchor zipties to for a wire bridge between the side of the
engine bay and the ignition. There is a big gap now.
getting closer to being blue slippable again.
If at first you don't succeed. Build, build again.
Vehicle: 1975 Special order delivery walkthrough panel based LCA pop-top camper. Motor: Nippon 1.8L Single port Wasserboxer, Transmission: 3 rib 002.
|
|
|
 General_Failure General_Failure
A.k.a.: Tristan
Custom Title Time!
Use your head, don't abuse it!
    
Posts: 1036
Threads: 107
Registered: June 15th, 2004
Member Is Offline
Location: Peaceful Finley, NSW
Theme: UltimaBB Streamlined2
Mood: Not too bad. Thanks for asking!
|
| posted on May 27th, 2011 at 02:45 PM |
|
|
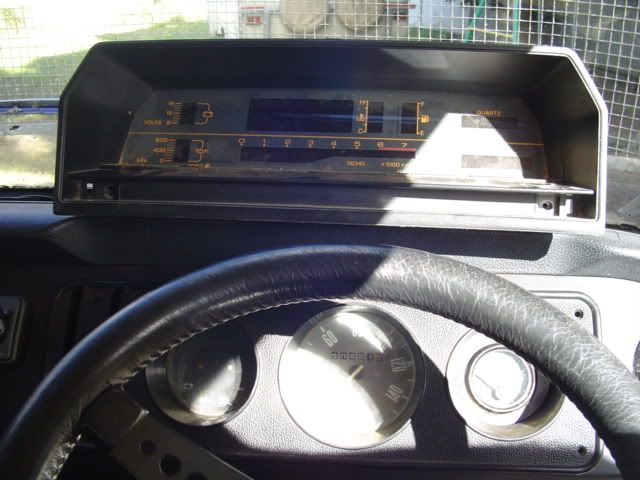
Should I?
I'd need a speed sensor. But if I had that I could retrofit cruise too
If at first you don't succeed. Build, build again.
Vehicle: 1975 Special order delivery walkthrough panel based LCA pop-top camper. Motor: Nippon 1.8L Single port Wasserboxer, Transmission: 3 rib 002.
|
|
|
 Ben386 Ben386
Officially Full-On Dubber
  
Posts: 244
Threads: 26
Registered: April 2nd, 2010
Member Is Offline
Location: Sydney
Theme: UltimaBB Pro Blue ( Default )
Mood: Never had a bad day
|
| posted on May 28th, 2011 at 10:49 PM |
|
|
Dont do it!
http://www.rjes.com/html/vss.html
|
|
|
 Ben386 Ben386
Officially Full-On Dubber
  
Posts: 244
Threads: 26
Registered: April 2nd, 2010
Member Is Offline
Location: Sydney
Theme: UltimaBB Pro Blue ( Default )
Mood: Never had a bad day
|
| posted on May 29th, 2011 at 12:16 AM |
|
|
Sorry,know more about your engine now.
I still say dont do it!The cruise control that is.
|
|
|
 General_Failure General_Failure
A.k.a.: Tristan
Custom Title Time!
Use your head, don't abuse it!
    
Posts: 1036
Threads: 107
Registered: June 15th, 2004
Member Is Offline
Location: Peaceful Finley, NSW
Theme: UltimaBB Streamlined2
Mood: Not too bad. Thanks for asking!
|
| posted on May 29th, 2011 at 12:23 PM |
|
|
| Quote: | Originally
posted by Ben386
Sorry,know more about your engine now.
I still say dont do it!The cruise control that is.
|
I have all the bits bar the VSS, and I know it's a little extra effort, but may I ask your reasoning?
If at first you don't succeed. Build, build again.
Vehicle: 1975 Special order delivery walkthrough panel based LCA pop-top camper. Motor: Nippon 1.8L Single port Wasserboxer, Transmission: 3 rib 002.
|
|
|
 Ben386 Ben386
Officially Full-On Dubber
  
Posts: 244
Threads: 26
Registered: April 2nd, 2010
Member Is Offline
Location: Sydney
Theme: UltimaBB Pro Blue ( Default )
Mood: Never had a bad day
|
| posted on May 29th, 2011 at 02:08 PM |
|
|
Not a fan of CC.And I dont like the look of the cluster.
|
|
|
 General_Failure General_Failure
A.k.a.: Tristan
Custom Title Time!
Use your head, don't abuse it!
    
Posts: 1036
Threads: 107
Registered: June 15th, 2004
Member Is Offline
Location: Peaceful Finley, NSW
Theme: UltimaBB Streamlined2
Mood: Not too bad. Thanks for asking!
|
| posted on May 29th, 2011 at 04:26 PM |
|
|
I never used to like cruise control either. Now I live on the plains and it's wonderful so I am giving it some thought. I liked the cluster when it
was in the Magna. Not sure how I'd feel in the VW. It's an easy, reversible mod by my standards so if I do cruise it'd be fun to try.
If at first you don't succeed. Build, build again.
Vehicle: 1975 Special order delivery walkthrough panel based LCA pop-top camper. Motor: Nippon 1.8L Single port Wasserboxer, Transmission: 3 rib 002.
|
|
|
 General_Failure General_Failure
A.k.a.: Tristan
Custom Title Time!
Use your head, don't abuse it!
    
Posts: 1036
Threads: 107
Registered: June 15th, 2004
Member Is Offline
Location: Peaceful Finley, NSW
Theme: UltimaBB Streamlined2
Mood: Not too bad. Thanks for asking!
|
| posted on May 29th, 2011 at 04:50 PM |
|
|
Anyway I made a thread for that stuff. Today I cleaned up the wiring some more and one of the hoses, and fixed its idle up after all my alterations so
now it hums again.
I swear people that have trouble with Webers bogging are doing something wrong. Both on the type 4 and on the subie motor, before and after rejetting
it's still comes in full force instantly.
If at first you don't succeed. Build, build again.
Vehicle: 1975 Special order delivery walkthrough panel based LCA pop-top camper. Motor: Nippon 1.8L Single port Wasserboxer, Transmission: 3 rib 002.
|
|
|
 General_Failure General_Failure
A.k.a.: Tristan
Custom Title Time!
Use your head, don't abuse it!
    
Posts: 1036
Threads: 107
Registered: June 15th, 2004
Member Is Offline
Location: Peaceful Finley, NSW
Theme: UltimaBB Streamlined2
Mood: Not too bad. Thanks for asking!
|
| posted on May 30th, 2011 at 06:31 PM |
|
|
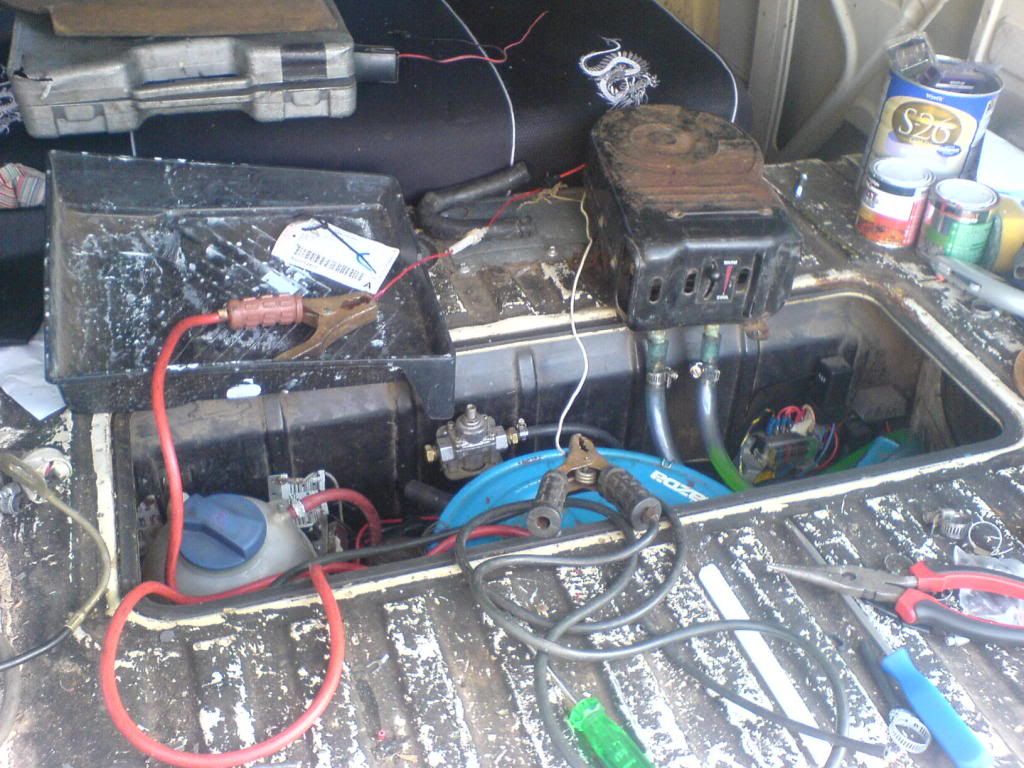
I got the cruiser under seat heater today. Connected it up and after a few failed, very leaky attempts managed to do a successful test. I originally
bought it with the intention of putting up the back because of the short hose run needed, and later thought I might be able to put it up front. Now I
see it in person it's just too damn big. Once I got the hoses sealed enough i left it to idle for a little bit with the inspection hatch sitting the
best I could manage to test warmth. It was nice and toasty in there in short order. Still really should put something up front for demist at least.
If at first you don't succeed. Build, build again.
Vehicle: 1975 Special order delivery walkthrough panel based LCA pop-top camper. Motor: Nippon 1.8L Single port Wasserboxer, Transmission: 3 rib 002.
|
|
|
 General_Failure General_Failure
A.k.a.: Tristan
Custom Title Time!
Use your head, don't abuse it!
    
Posts: 1036
Threads: 107
Registered: June 15th, 2004
Member Is Offline
Location: Peaceful Finley, NSW
Theme: UltimaBB Streamlined2
Mood: Not too bad. Thanks for asking!
|
| posted on May 31st, 2011 at 10:12 AM |
|
|
Having a right bastard of a time finding a replacement length of brake line that I need. I think it's the one going from the MC to the front
splitter. Nobody has bubble flare except repco who want an arm and a leg for it.
Just had a chat to the RTA. They couldn't care less if I put the gauge cluster in. I'd just need to contact the dept. of fair trading and report the
odometer change. that's funny. Like the VW odometer says how far it's been. who knows how many laps it's done.
If at first you don't succeed. Build, build again.
Vehicle: 1975 Special order delivery walkthrough panel based LCA pop-top camper. Motor: Nippon 1.8L Single port Wasserboxer, Transmission: 3 rib 002.
|
|
|
 Fastie Fastie
Officially Full-On Dubber
  
Posts: 217
Threads: 53
Registered: April 30th, 2010
Member Is Offline
Theme: UltimaBB Pro Blue ( Default )
|
| posted on May 31st, 2011 at 10:23 AM |
|
|
Brake line. Build it with no.8 wire/coathanger and take to a brake shop.. for about $20 I got all my pieces made.
|
|
|
 General_Failure General_Failure
A.k.a.: Tristan
Custom Title Time!
Use your head, don't abuse it!
    
Posts: 1036
Threads: 107
Registered: June 15th, 2004
Member Is Offline
Location: Peaceful Finley, NSW
Theme: UltimaBB Streamlined2
Mood: Not too bad. Thanks for asking!
|
| posted on May 31st, 2011 at 10:44 AM |
|
|
yeah, um I called the brake place a few towns over. nope.
The local mechanic said they could do the ends for about $50 but I forgot to mention it was bubble flare, so I have an awful feeling it would be a no.
If at first you don't succeed. Build, build again.
Vehicle: 1975 Special order delivery walkthrough panel based LCA pop-top camper. Motor: Nippon 1.8L Single port Wasserboxer, Transmission: 3 rib 002.
|
|
|
 Joel Joel
Scirocco Rare
Now containing 100% E-Wang
        
Posts: 9368
Threads: 211
Registered: February 14th, 2006
Member Is Offline
Location: Northern Rivers NSW
Theme: UltimaBB Pro Purple
Mood: Tact Level 0.00
|
| posted on May 31st, 2011 at 12:27 PM |
|
|
Ha that holley regulator looks familiar.
I wouldn't even worry about the odo change, they don't care about old cars that only go to 99k and it's only an issue come selling time when people
like to jump up and down they've been ripped off buying a "low KM" car when it really isnt.
It turns up anyway if you bother to do a REVs check first.
|
|
|
 General_Failure General_Failure
A.k.a.: Tristan
Custom Title Time!
Use your head, don't abuse it!
    
Posts: 1036
Threads: 107
Registered: June 15th, 2004
Member Is Offline
Location: Peaceful Finley, NSW
Theme: UltimaBB Streamlined2
Mood: Not too bad. Thanks for asking!
|
| posted on May 31st, 2011 at 02:36 PM |
|
|
Yeah, I couldn't really be bothered with it.
Today I took the heater up to about 80 odd *C, but this time with the header cap on. No leaks. I got bored. the system started to pressurize. that was
good enough for me. So that's good. Still have to figure out where to mount it though. The extra vent holes make it a little problematic. As for
plumbing, that's easy. I'll probably just use some high pressure oil hose because I can get it easily, and two big brass barbed elbows under where
the heater will be mounted. The heater connections on the motor are low enough that hoses can clear the firewall easily.
If the Magna has a center lap belt in the rear I have answered my burnt seatbelt issue. The lap sash that i incinerated was questionable at best as
the shoulder mount was very dodge. Kids will be using a 3 or 4 point harness anyway. the securing points are easy to put on the parcel shelf.
If at first you don't succeed. Build, build again.
Vehicle: 1975 Special order delivery walkthrough panel based LCA pop-top camper. Motor: Nippon 1.8L Single port Wasserboxer, Transmission: 3 rib 002.
|
|
|
 General_Failure General_Failure
A.k.a.: Tristan
Custom Title Time!
Use your head, don't abuse it!
    
Posts: 1036
Threads: 107
Registered: June 15th, 2004
Member Is Offline
Location: Peaceful Finley, NSW
Theme: UltimaBB Streamlined2
Mood: Not too bad. Thanks for asking!
|
| posted on June 2nd, 2011 at 10:37 AM |
|
|
I've got a rough idea where I want to fit the 'cruiser heater now. The only thing stopping me from physically mounting it is I have no idea what to
make the holes in the floor with. It'd either be a huge drillbit, wider than any chuck I have, or a really tiny hole saw. The heater seems to have
been designed so only the pipes protrude through into the cabin as the core sits flush with the floor.
If at first you don't succeed. Build, build again.
Vehicle: 1975 Special order delivery walkthrough panel based LCA pop-top camper. Motor: Nippon 1.8L Single port Wasserboxer, Transmission: 3 rib 002.
|
|
|
 General_Failure General_Failure
A.k.a.: Tristan
Custom Title Time!
Use your head, don't abuse it!
    
Posts: 1036
Threads: 107
Registered: June 15th, 2004
Member Is Offline
Location: Peaceful Finley, NSW
Theme: UltimaBB Streamlined2
Mood: Not too bad. Thanks for asking!
|
| posted on June 9th, 2011 at 06:22 PM |
|
|
I made a place for the heater today, put it in and installed the plumbing. just needs to be bolted down using bolts with nuts as a stand off, and some
kind of fan switch. To test heat output I dug up a salvaged bit of wiring with a cig lighter socket and gator clips on it and plugged it into the aux
battery outlet. First test not a drop leaked. It wouldn't want to. It's an ultra heavy duty setup. I used mostly 1/2" Premo Flex 315 PSI hose with
a little 5/8" for the motor connection, 1/2" and 5/8" (x2 each) male and female brass barb fittings to make a stepdown to the 1/2" line and a
couple of 1/2" solid as brass elbows. I think not only will that outlast the bay, it'll probably be around when I'm dead. Exxy as hell but works
perfectly.
edit: forgot to say the cruiser heater is mounted under the folding bed with the nose part with the vents sticking out through a cut hole in the ply
front.
If at first you don't succeed. Build, build again.
Vehicle: 1975 Special order delivery walkthrough panel based LCA pop-top camper. Motor: Nippon 1.8L Single port Wasserboxer, Transmission: 3 rib 002.
|
|
|
 General_Failure General_Failure
A.k.a.: Tristan
Custom Title Time!
Use your head, don't abuse it!
    
Posts: 1036
Threads: 107
Registered: June 15th, 2004
Member Is Offline
Location: Peaceful Finley, NSW
Theme: UltimaBB Streamlined2
Mood: Not too bad. Thanks for asking!
|
| posted on June 10th, 2011 at 04:48 PM |
|
|
I'm lazy. Here's a lightly edited copypaste from elsewhere.
I'll just add I looked under there today and there was a sign of a very slow leak. Either from the hose to core connection or from the core itself. I
tightened everything and will give it a while to settle in before I go ripping things apart again.
Today, apart from actually mounting the heater I finished it.
As with most good ideas I have, it came to me in my sleep. Reuse the booster fan relay to run the heater fan. The beauty of it is that I only need to
run one short wire and don't even need a switch!
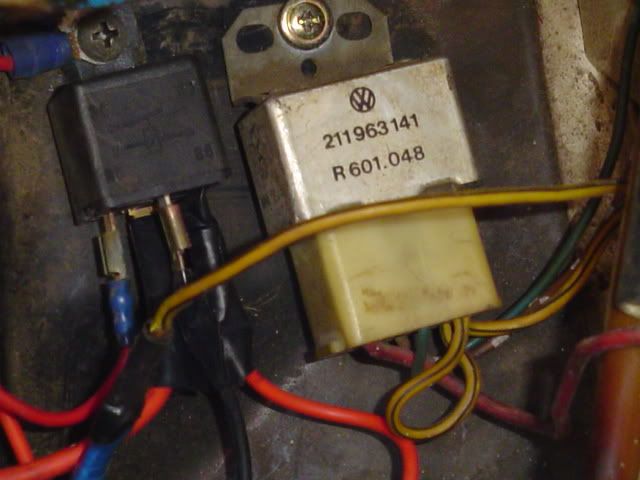
There's the blower relay with what I think is the thermo fan relay next to it. no, that's the dual battery one ...maybe.
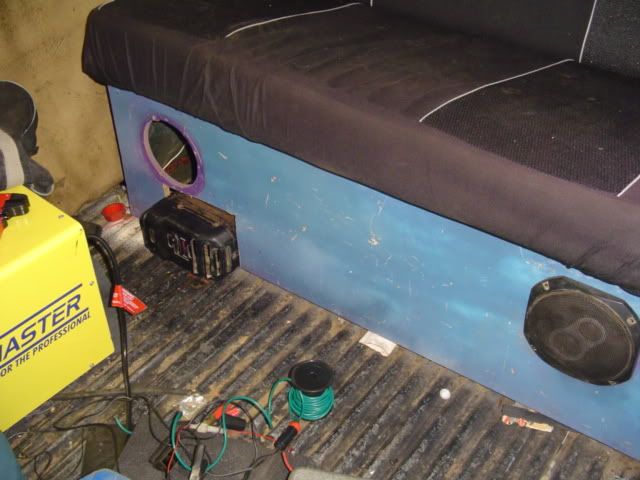
Here's where the heater is situated. As you can see I'm not done. The ply will probably covered in the carpet from the boot/trunk of the Magna. No
point in putting the speaker back.
The heater hole is cut further up because the heater will go up when it is mounted / the camper floor is made and installed.
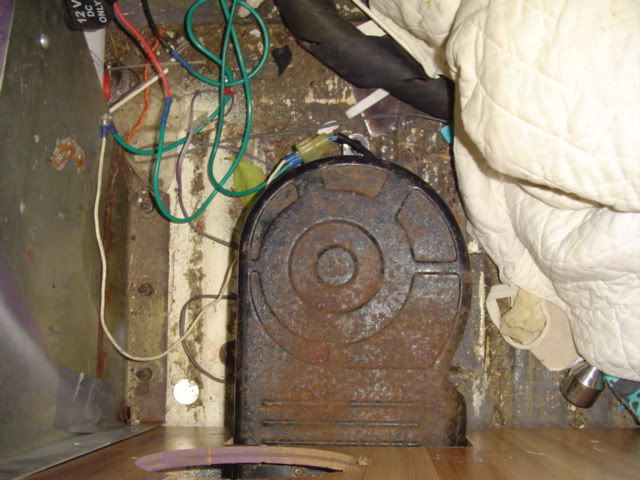
Here's the plumbing:
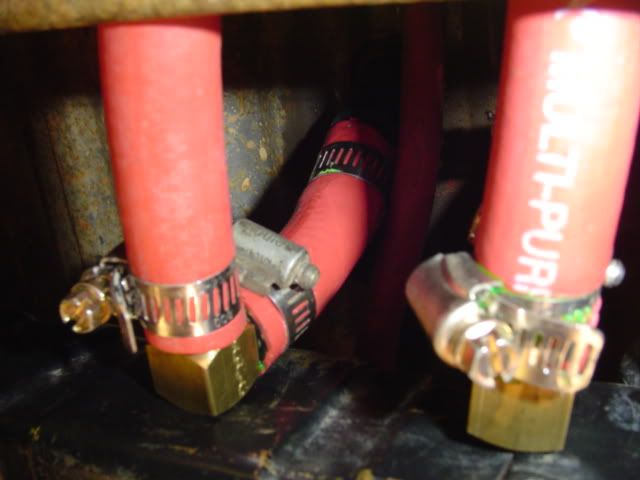
Elbows near heater core.
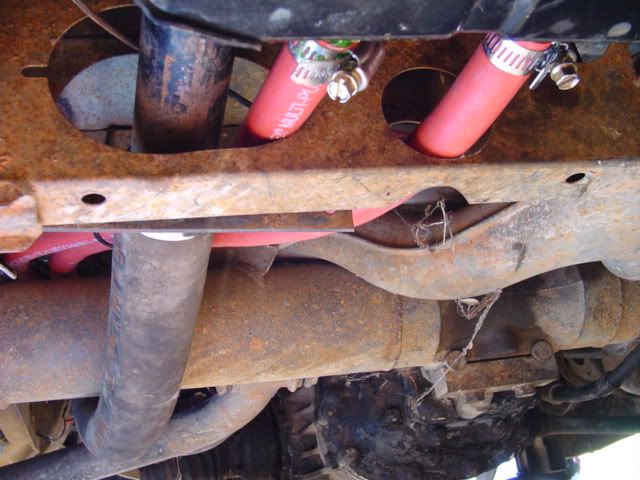
From elbows looking back.
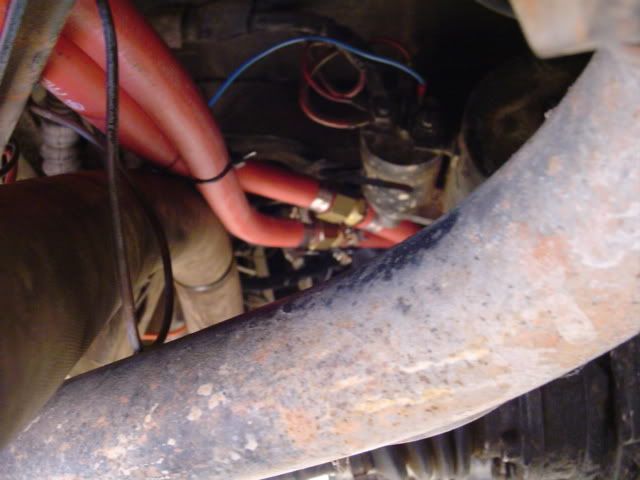
The rest of the plumbing going back to the adapters and bigger hose at the motor.
Everything seems to work. As a bonus because I used the OE relay for the heater the fan only comes on when the motor is running and the alternator
light is not lit.
My suspected vacuum leak wasn't. The weather is getting colder and the accelerator cable was a little tight. I guess mild steel expands slightly more
than stainless in heat. Anyway I gave it a mm or two of slack and the idling issue disappeared. It's still far too rich over about 2000rpm, but
that's something for a later date.
If at first you don't succeed. Build, build again.
Vehicle: 1975 Special order delivery walkthrough panel based LCA pop-top camper. Motor: Nippon 1.8L Single port Wasserboxer, Transmission: 3 rib 002.
|
|
|
 General_Failure General_Failure
A.k.a.: Tristan
Custom Title Time!
Use your head, don't abuse it!
    
Posts: 1036
Threads: 107
Registered: June 15th, 2004
Member Is Offline
Location: Peaceful Finley, NSW
Theme: UltimaBB Streamlined2
Mood: Not too bad. Thanks for asking!
|
| posted on June 11th, 2011 at 11:14 PM |
|
|
Anyone have a valve spring tool that works with the head in situ? Stupid stem seals *grumble*
If at first you don't succeed. Build, build again.
Vehicle: 1975 Special order delivery walkthrough panel based LCA pop-top camper. Motor: Nippon 1.8L Single port Wasserboxer, Transmission: 3 rib 002.
|
|
|
 General_Failure General_Failure
A.k.a.: Tristan
Custom Title Time!
Use your head, don't abuse it!
    
Posts: 1036
Threads: 107
Registered: June 15th, 2004
Member Is Offline
Location: Peaceful Finley, NSW
Theme: UltimaBB Streamlined2
Mood: Not too bad. Thanks for asking!
|
| posted on July 7th, 2011 at 04:01 PM |
|
|
I got the stem seal tool last week.
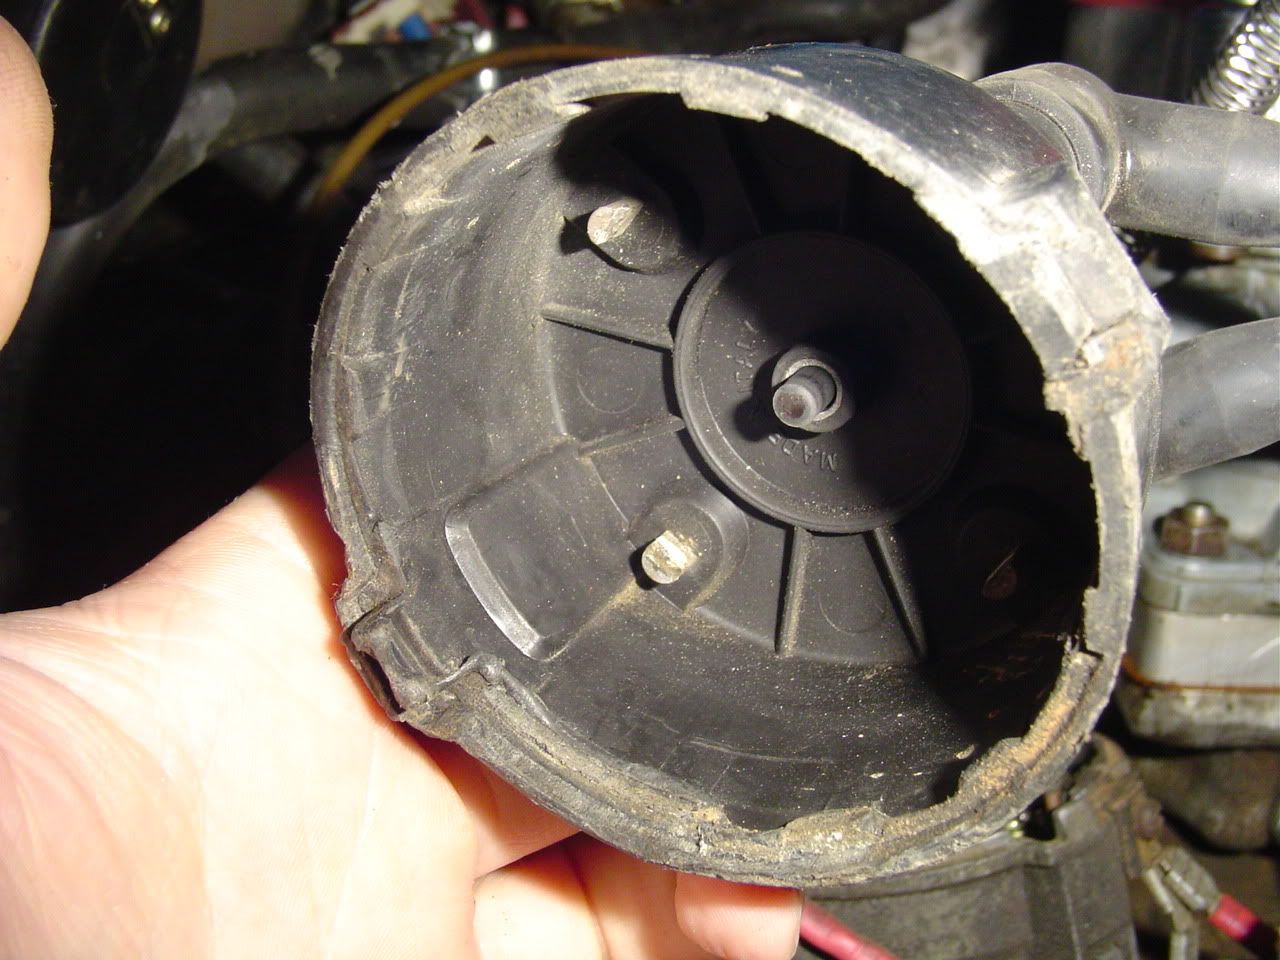
So anyway does anyone have a spare EA81 that they are just using as a door stop / to drop on mice or whatever? To add to the chamber of horrors I just
noticed that half of the base of the distributor cap has melted, and cause the cap to kind of sink crooked. What the hell. I replaced the points and
rotor but not the cap. Never really thought to look at the base of it. This thing has another nasty surprise waiting for me every time I look at
it!
If at first you don't succeed. Build, build again.
Vehicle: 1975 Special order delivery walkthrough panel based LCA pop-top camper. Motor: Nippon 1.8L Single port Wasserboxer, Transmission: 3 rib 002.
|
|
|
 General_Failure General_Failure
A.k.a.: Tristan
Custom Title Time!
Use your head, don't abuse it!
    
Posts: 1036
Threads: 107
Registered: June 15th, 2004
Member Is Offline
Location: Peaceful Finley, NSW
Theme: UltimaBB Streamlined2
Mood: Not too bad. Thanks for asking!
|
| posted on September 1st, 2011 at 02:36 PM |
|
|
Okay, I haven't touched the stem seals. Couldn't get them and gave up for the time being to pursue more productive avenues.
Super extreme summery here. I installed an electronic distributor and have been having maddening intermittent running issues.
The carburettor has been re-jetted today and the minimum float setting tweaked because I suspected it was sticking.
I tried to install the new shift coupler cage and bushes today too. The head is sheared off the set screw so I couldn't do it. I settled for just the
bushings which were a nice tight fit so I'm happy about that.
Yesterday I was abroad and took the opportunity to get a replacement section of brake line made to replace the damaged section near the MC. When I get
a chance I'll bend and install it.
I got a quote on having the towbar repaired. looking at about $100 and that's not including a new tongue. Bugger. Truth be told I think the towbar is
really well built but if I had a chance I'd install the sort which replaces the back bumper too so I'd have a bit of clearance to do a hinged jerry
can and spare tyre mount.
Another good bit of news was I finally got the correct helmet for my MIG and a good chunk of scrap plate steel so I can start on the rear bumper /
towbar mount frame rail repairs.
If at first you don't succeed. Build, build again.
Vehicle: 1975 Special order delivery walkthrough panel based LCA pop-top camper. Motor: Nippon 1.8L Single port Wasserboxer, Transmission: 3 rib 002.
|
|
|
 General_Failure General_Failure
A.k.a.: Tristan
Custom Title Time!
Use your head, don't abuse it!
    
Posts: 1036
Threads: 107
Registered: June 15th, 2004
Member Is Offline
Location: Peaceful Finley, NSW
Theme: UltimaBB Streamlined2
Mood: Not too bad. Thanks for asking!
|
| posted on September 3rd, 2011 at 08:32 AM |
|
|
Bit of an update. The magnet in the distributor for the electronic distributor is badly broken. This is most probably what is causing the issue.
If at first you don't succeed. Build, build again.
Vehicle: 1975 Special order delivery walkthrough panel based LCA pop-top camper. Motor: Nippon 1.8L Single port Wasserboxer, Transmission: 3 rib 002.
|
|
|
 General_Failure General_Failure
A.k.a.: Tristan
Custom Title Time!
Use your head, don't abuse it!
    
Posts: 1036
Threads: 107
Registered: June 15th, 2004
Member Is Offline
Location: Peaceful Finley, NSW
Theme: UltimaBB Streamlined2
Mood: Not too bad. Thanks for asking!
|
| posted on October 2nd, 2011 at 09:51 AM |
|
|
I have to do a photo roundup one day. Scattered between 3 cameras and 2 computers.
Recently I made up some small plates from the scrap plate I got to go over where the emancipated rear bumper nuts were. 2 on one side 1 on the other.
My welding looked awful but it held. After some adjusting to fix some fitment issues I bolted everything in after a fair bit of messing around trying
to get the plates to sit where I want. As I torqued it down it felt kind of funny. To my surprise the plate steel had bent severely. After a bit of
thinking it made sense. The frame rail was kind of pulled back at the bolt hole on one side making wrinkles. Sort of like if you stick a spoon into
soup skin and pull it back a bit. Or something. The other side had a mysterious blob of weld under the frame rail that I never figured out and
completely forgot about. I have to wonder if it was the friend of the gigantic lump of weld on one of the frame rails that I had to grind off to fit
the radiator. What a strange life this beast had.
I haven't welded in the plates yet because I'm a bit unsure what course of action to take. If I weld them in in their distorted state I have to
wonder how easy it will be to bolt the bumper back on, but at the same time I want to be able to seal the sides of the rails for extra strength.
While on a welding rampage I tried patching the exhaust. It had a few pinholes at welds and a couple on the muffler where spot welds had broken.
All of these were horrible to fix. Every time I tried the one near the head I could see daylight after I ground back some metal. Now it's thick
enough to be bulletproof but I bet the hole is just barely closed.
The next fun weld was between the pipes where they merged just before the muffler. Because it's all welded together I can't do it from the inside.
So the only course of action I could see was to keep trying to weld in between the pipes and build it up enough that I could weld all the way between.
After a lot of messing around and a blowthrough it worked... more or less. There is a barely perceivable zephyr blowing from there if I cram something
in the end of the exhaust so I'm calling it good enough.
The muffler. Well I knew it wouldn't end well but I still tried. the broken spot welds and small associated tears are now fixed and the metal more or
less flush. What should have been the size of a pea is now about the size of a 50c coin as my weld spread further out fixing blowthroughs. I don't
know what to paint the muffler with to stop rusting where I welded it.
I went back to the mechanical distributor for now. I needed to move the camper when the gas men arrived. It ran for me then thankfully but didn't
after that. So I filled the dissy with penetrating oil and spun it with my fingers until it felt normal again. Still need to dump some normal oil into
it. I have no idea what was up with it. It didn't feel metal on metal grindy. Just kind of resistance-y. It hasn't gone into thermal meltdown since
at least.
It needed a good run after all the rains. After I jump started it (parasitic drain. Forgot to isolate the battery) I let it run for a while. Most of
which with a rock on the pedal to get it a bit over 1000rpm. No traces of smoke. I just don't get this engine at all. It's either been burning off
carbon since I rejetted it, an over engorged charcoal canister or ???
When the holesaw arrives at the store, hopefully within a month, I'll be fitting the random assortment of gauges in the dash between the stereo and
the ashtray. That'll be nice. I don't like the thought of cutting the dash, but these stray gauges are bothering me. besides being ugly I've bumped
the wires more than once and caused issues. The temp gauge will be staying in the clock blank hole as I feel it to be the most important gauge and
deserving pride of place.
My list of "Must be fixed" is growing short and I'll be able to focus on the "Should be done" list and the "would be nice" one.
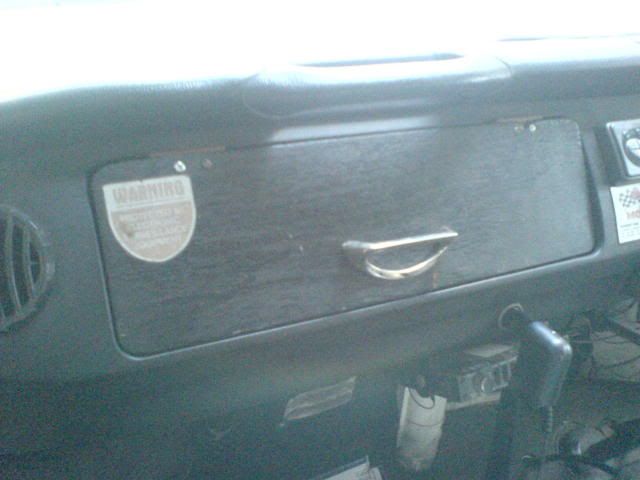
Some other minor things were done like the glovebox.
I found some ancient flooring urethane in the shed and used it to paint what remains of my pressboard glovebox after massaging it back to something
approximating it's original shape with water and the glovebox lid jammed in it. Some goopy P-V-A glue later (Mr. Maker AAARGH!) and it was adequate
for my needs.
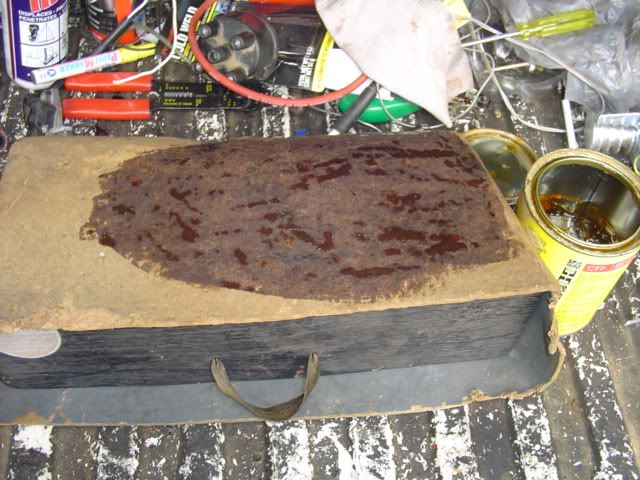
When reinstalling I substituted the gyprock screw at the bottom of the strap with a more suitably sized one so the box wasn't sitting way forward
with a huge gap. Putting it in the right way up helped to no end too.
The "original" black ply lid was then refitted although it feels a little weird. may have messed up the hinge alignment a little. Oh well.
I found a cupboard handle in a rusty old toolbox of bits and pieces I got from an op shop. As I though the holes in the lid which had a ribbon though
them for a handle previously were a perfect match for a cupboard handle.
A while back I also modified the coil mount from the Magna so I could have a way of mounting the special coil. the whole electronic ignition thing
fell through but as luck would have it the coil mount holes were in just the right place for the GT40 bracket holes.
The bracket is mounted to a couple of M10 holes in the head. Possibly for an aircon or P/S pump originally. The bracket puts the coil on an angle
facing towards the distributor. it looks pretty neat. Need to take a pic.
If at first you don't succeed. Build, build again.
Vehicle: 1975 Special order delivery walkthrough panel based LCA pop-top camper. Motor: Nippon 1.8L Single port Wasserboxer, Transmission: 3 rib 002.
|
|
|
 General_Failure General_Failure
A.k.a.: Tristan
Custom Title Time!
Use your head, don't abuse it!
    
Posts: 1036
Threads: 107
Registered: June 15th, 2004
Member Is Offline
Location: Peaceful Finley, NSW
Theme: UltimaBB Streamlined2
Mood: Not too bad. Thanks for asking!
|
| posted on October 18th, 2011 at 07:14 AM |
|
|
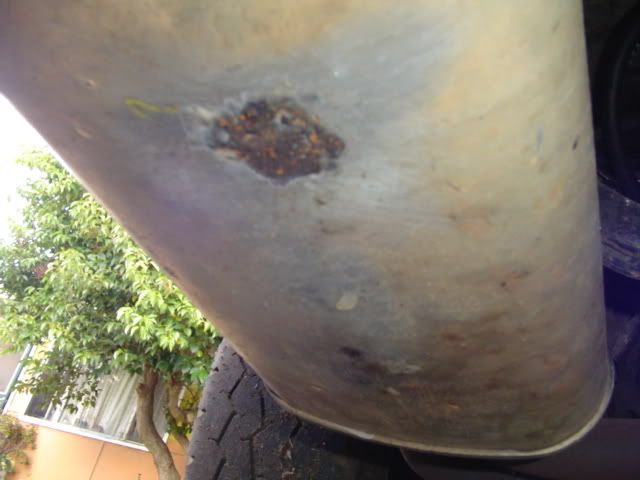
Welded muffler. Can't see the other weld on it, the collector and near the manifold. Seems to be sealed well enough now.
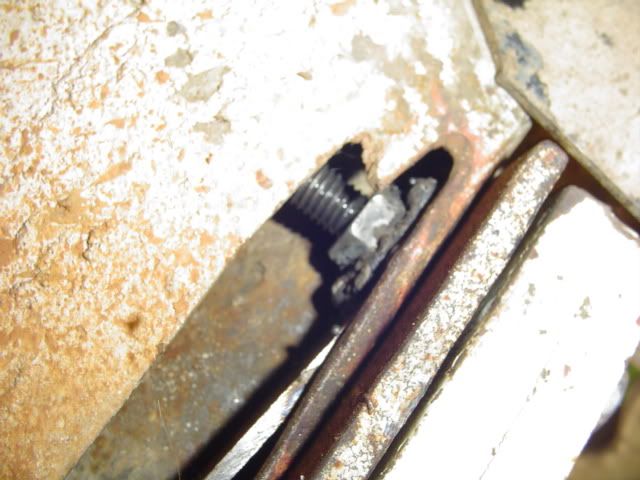
Part of the repair for the rear bumper / towbar. Yes that cut hole is very old. Don't know who did it or when.
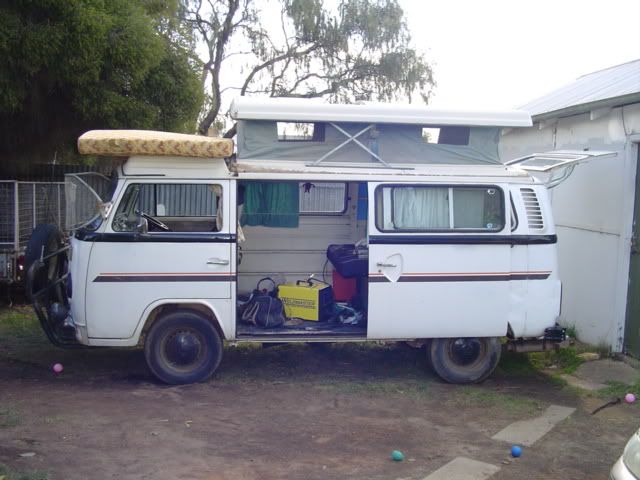
Current outside shot. The mattress doesn't belong to it. That's from the caravan. Stupid thing had a big leak and drenched the bed.
I'm kind of stalled out at the moment. Crossing small things off my list at a fair rate but the big ones are untouched. I'm at the point of parts
and tools again. Been waiting on the hole saw blade to arrive at the shop for ages now. Can't get any flooring for the camper bit until I fix the
trailer. I've been stuck on that because I need a 2m long bit of box section, which I need the trailer to go get. Found a way around it. I had a
couple of bits of 25x 50? mm rectangular which I'm welding together to make it long enough. Shame I used one for trying to find the right power
settings on the welder. But it's better than nothing. I'd rather a bit of metal with some holes in it than having the trailer relying on the tips of
the A frame and the sheet metal to hold it together. No i haven't been using it like that. As soon as I discovered what happened I parked it and
refused to move it until I fixed it.
I think the subie motor has stopped smoking. Hard to say why. Could either be residual carbon burned off after re-jetting the weber. It could also be
that a lot of the excess fuel in the charcoal canister burned off. Or it could be the evil substances I dumped in the oil and the coolant. The less
said about them the better honestly.
Don't think I said but I finally got the type 4 out from under the tree I left it under a year ago and put it in the shed (very full of crap garage).
I dragged it along on the pallet using a couple of tie down straps tied to the bay's roo bar. had to do it a meter at a time or so, hopping out to
readjust or unsnag the pallet. Even got bogged once on the flat, dry driveway. Not really sue how that happens. So I dragged it through the yard,
around the driveway, out the gate and across to the garage. Had to pull it up and in there by hand. that was pretty miserable.
Really wish I could take it for a test drive but that would be naughty. Being naughty isn't advisable with a police station a block away and what
seems to be a police officer who takes their vehicle home living across the road now. It used to be an ambulance. Career change? Who knows.
I learned something. Vulcoflex hoses can be had far cheaper at Supercheap. Bought one in case it didn't fit. If it does I'll try to get over there
again some time this year to do the other. I need to drop the radiator again anyway to somehow fit the other fan. I may shift the mounts forward so
they are lower and put up with partial occlusion by the radiator end tank.
I want the vulcoflex hoses so I can route the rad lines over the beam. Currently they go below the beam but above the trailing arms. A setup I'm not
crazy about. As it is I know I'll end up ripping the radiator off somewhere.
Unless someone has a spare interior nearby I'll be cutting up some old cupboards to make an interior, and getting some water resistant flooring and
some plastic for a vapour barrier and fitting that somehow. Mostly so it doesn't look totally awful for blue slip. I'm shooting for before February
because I'm going to be stuck a long way from home for long hours regularly. I'll use it as a portable office for software development /
sleeping.
Someone mentioned that having the spare wheel sticking out the front may be an issue. this concerns me. Would it be more legal to shift the back
bumper back further, fill the gap and make a swinging spare tyre / jerrycan bracket?
If at first you don't succeed. Build, build again.
Vehicle: 1975 Special order delivery walkthrough panel based LCA pop-top camper. Motor: Nippon 1.8L Single port Wasserboxer, Transmission: 3 rib 002.
|
|
|
 General_Failure General_Failure
A.k.a.: Tristan
Custom Title Time!
Use your head, don't abuse it!
    
Posts: 1036
Threads: 107
Registered: June 15th, 2004
Member Is Offline
Location: Peaceful Finley, NSW
Theme: UltimaBB Streamlined2
Mood: Not too bad. Thanks for asking!
|
| posted on October 22nd, 2011 at 12:12 PM |
|
|
I found a place that stocks Gates hoses and other such things in town. The place I buy most of my bits and pieces including tools from. Looks like I
just talked to the wrong person before. Would have saved me a lot of trouble.
Cutting up the big oil hose being used as rad hoses has made me a bit squeamish. Don't want to damage them just in case. As luck would have it I
realised the old awning posts for the back door are the correct diameter. they may be old but they are still thick wall tubing so I doubt they'd have
any unpleasant failures. When I get around to it I'll do one side of the cooling system. It's a busy time of year here.
I realised that half of my gauges having no backlights may be a sticking point so I finally bit the bullet and ordered some wheat grain LED bulb
replacements, some 9mm bayonet ones to be bodged in to the back of the aftermarket gauges with generic sockets and a PWM LED brightness controller.
When they arrive and are installed I realised it will obsolete the brightness control on the headlight knob. Fine by me!
the gauges will be illuminated green. While I like blue best, there is just something that has always appealed to me about green gauges... except the
pov pack Falcons. Blergh.
I also grabbed a blue for high beam and a red for oil light. No I will not be replacing the alternator light. I'm not that silly. Still
waiting on the correct holesaw blade to cut the gauge holes between the stereo and the ash tray.
This project may be geological in timespan but it's pretty much no budget and very low parts availability so it's a challenge. But that's alright.
I like a challenge.
If at first you don't succeed. Build, build again.
Vehicle: 1975 Special order delivery walkthrough panel based LCA pop-top camper. Motor: Nippon 1.8L Single port Wasserboxer, Transmission: 3 rib 002.
|
|
|
 General_Failure General_Failure
A.k.a.: Tristan
Custom Title Time!
Use your head, don't abuse it!
    
Posts: 1036
Threads: 107
Registered: June 15th, 2004
Member Is Offline
Location: Peaceful Finley, NSW
Theme: UltimaBB Streamlined2
Mood: Not too bad. Thanks for asking!
|
| posted on November 1st, 2011 at 10:33 PM |
|
|
In pursuit of getting it roadworthy I bought another set of type 4 heads. I'm a sucker for punishment. They'll be for the Plan A part of Plan B.
They are actually in really good nick and only really need a good cleanup and some TLC. Possibly a quick splat with a TIG but that's something I need
to investigate.
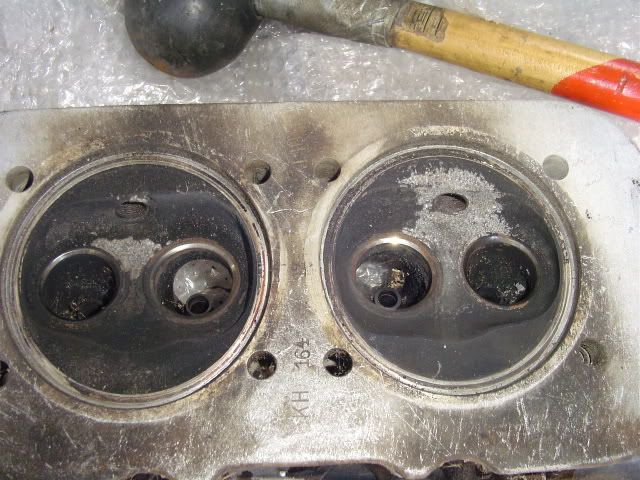
Still waiting on those LEDs 
I noodled the frame rails and will be making a blockoff plate for behind the rad when I get a chance. There is a lot of more important maintenance
that needs to be done around here so time is pretty slim.
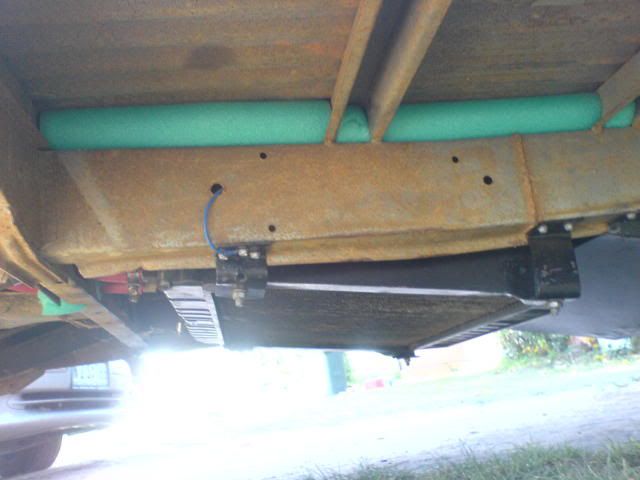
Went to give it a run today. Out of petrol again. Weird. Cap hasn't been tampered and it's not in the sump. Actually the oil smells neutral.
Amazing. Who knows. Anyway put some juice in and after a good crank she ran perfectly. just went back and forth in the small space I have,slamming on
the brakes hard, sending stuff flying inside. Don't want the brakes to seize after the rain, do we.
If at first you don't succeed. Build, build again.
Vehicle: 1975 Special order delivery walkthrough panel based LCA pop-top camper. Motor: Nippon 1.8L Single port Wasserboxer, Transmission: 3 rib 002.
|
|
|
 General_Failure General_Failure
A.k.a.: Tristan
Custom Title Time!
Use your head, don't abuse it!
    
Posts: 1036
Threads: 107
Registered: June 15th, 2004
Member Is Offline
Location: Peaceful Finley, NSW
Theme: UltimaBB Streamlined2
Mood: Not too bad. Thanks for asking!
|
| posted on November 10th, 2011 at 06:52 AM |
|
|
Recently I made a crude current limited regulated power supply for the fuel gauge I pulled from a truck. The range is wrong but it has always given me
a rough indication of what is in there,
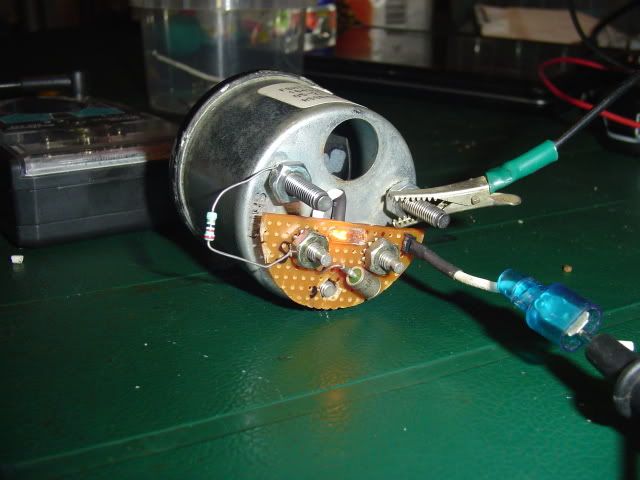
That's what a stray chunk of stripboard, a small bulb, and a zener can make. I used high quality fabrication methods and tools to make the curved
board. It involved a tree stump, a stanley knife, a hand crank drill from an op shop and a half round bastard file  Real low effort attempt. Still it did the job. Real low effort attempt. Still it did the job.
Surprisingly the gauge still read about 2/3 after putting it back in. That's where I would have expected the level to be after the latest jerrycan I
dumped in,as opposed to about 1/5 which the dry pumping indicated. The sender still works. I drove back and forth slamming on the brakes and saw the
gauge needle do the slosh wobble. It is a mystery!
The resistor in the photo is a fake sender. I didn't have any pots in the right range and ordering one from HK would made everything take slightly
longer.
If at first you don't succeed. Build, build again.
Vehicle: 1975 Special order delivery walkthrough panel based LCA pop-top camper. Motor: Nippon 1.8L Single port Wasserboxer, Transmission: 3 rib 002.
|
|
|
 General_Failure General_Failure
A.k.a.: Tristan
Custom Title Time!
Use your head, don't abuse it!
    
Posts: 1036
Threads: 107
Registered: June 15th, 2004
Member Is Offline
Location: Peaceful Finley, NSW
Theme: UltimaBB Streamlined2
Mood: Not too bad. Thanks for asking!
|
| posted on November 21st, 2011 at 04:13 PM |
|
|
Where am I at now... Up on ramps, radiator hoses off, trying to figure out a better way of doing it. Looking at the radiator fan and feeling dismay
again because I can't fit a second because of the clutch cable tube.
Been trying to order a 52mm hole saw blade for over 3 months now. Apparently the store got two 51mm in a row. Well that's no good for 52mm gauges, is
it? I'm not making a mess filing out 1mm.
I'm kind of feeling a bit burned out right now. Can't get hold of radiator hoses or anything else I'm after. Bit of a bummer really.
If at first you don't succeed. Build, build again.
Vehicle: 1975 Special order delivery walkthrough panel based LCA pop-top camper. Motor: Nippon 1.8L Single port Wasserboxer, Transmission: 3 rib 002.
|
|
|
 General_Failure General_Failure
A.k.a.: Tristan
Custom Title Time!
Use your head, don't abuse it!
    
Posts: 1036
Threads: 107
Registered: June 15th, 2004
Member Is Offline
Location: Peaceful Finley, NSW
Theme: UltimaBB Streamlined2
Mood: Not too bad. Thanks for asking!
|
| posted on November 25th, 2011 at 07:12 AM |
|
|
The hole saw blade is now here. Woo!
To burn a few minutes I stripped down the type 4 heads again that I got recently with intent to clean. I spotted a tiny bend in one of the valve
stems. Bugger. A few other problems but all minor compared to the other heads. Might try to loot a compatible valve off one of them and do the
world's most tedious hand lap to even things out.
The hoses are back on, coolant is back in and it's off the ramps again for now. Couldn't do anything. This is so infuriating. Need hoses and / or
pipes but getting them is a massive hassle. I could probably fit one of those larger diameter low profile thermo fans that supercheap has, but once
again big hassle. They are over an hour away.
Anyone living in Melbourne feel like picking up a dismantled camper interior for me? I'm having a terrible time with unavoidable commitments over the
next couple of weeks. Been trying to find something that resembles an interior for quite a few years now. Feels like a cruel tease.
I started to think some more about the random severe smoking of the EA81, and the fact that it has great compression and the bit of clear tubing that
I'm temporarily using as a tube from the T to the manifold is still transparent. Perhaps the motor is a smoothbore special. could be the bores are a
little worn and new rings were put in without honing and end gap being set at some point so they are a bit prone to lining up and letting oil dump
through. Well, it's a theory. I don't know 
Stupid... everything.
If at first you don't succeed. Build, build again.
Vehicle: 1975 Special order delivery walkthrough panel based LCA pop-top camper. Motor: Nippon 1.8L Single port Wasserboxer, Transmission: 3 rib 002.
|
|
|
| Pages: 1 .. 3 4 5 6 |