| [ Total Views: 14575 | Total Replies: 32 | Thread Id: 50478 ] |
| Pages: 1 2 |
|
|
 ctefeh ctefeh
Wolfsburg Wizard
  
Posts: 479
Threads: 30
Registered: April 23rd, 2005
Member Is Offline
Location: SiddaKnee nowadayz
Theme: UltimaBB Pro Blue ( Default )
Mood: grimly determined
|
| posted on April 1st, 2006 at 11:20 PM |
|
|
Alternator conversion on Klaus
Here’s a typical alternator conversion kit. This is one that’s advertised all over and a basic kit. Others will have more parts (like a belt, or
breather tower, or 12 volt bulbs etc). You can also just buy the alternator itself in various flavours like polished or not, 55/75/95 Amp versions,
USA/Brazil new or reco’d. Your basic kit generally has a 55 Amp alternator as standard.
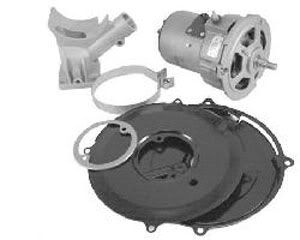
For the record, mine is a 55 Amp, unpolished, reco in Brazil alternator that included stand, new pulley, strap, tinware and a crimp on blade type
terminal.
What else do you need? Well, certainly a lot more and after reading this you may jump to the same conclusion I did. Read on……
I’ve started by tarting up the bits ‘n’ pieces except for the strap…
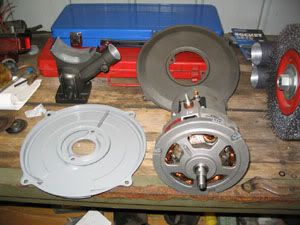
An important note here!
Before I really got into it I did a lot of reading on how it’s done. A few people have said that it all can be done without disturbing the shroud
PROVIDED the generator tinware is attached with at least two 10mm bolts in the lower holes. Unluckily for me I had normal screws so I have to lift the
shroud.
|
|
|
 ctefeh ctefeh
Wolfsburg Wizard
  
Posts: 479
Threads: 30
Registered: April 23rd, 2005
Member Is Offline
Location: SiddaKnee nowadayz
Theme: UltimaBB Pro Blue ( Default )
Mood: grimly determined
|
| posted on April 1st, 2006 at 11:24 PM |
|
|
Beginning
Starting underneath
First up, the thermostat gets disconnected. Under the engine remove the cover plate screws and undo the 13 mm bolt from the thermostat and then the 13
mm nut from the bracket. Unscrew the thermostat from the connector rod and set it all aside safely.
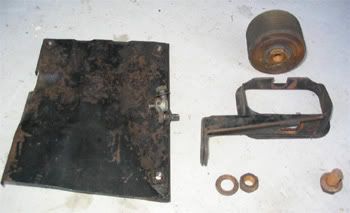
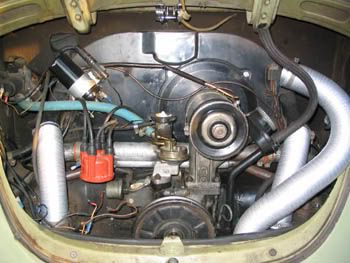
This is the donk in “Klaus”. It’s a stock 1600 twinport, and eagle eyed readers will note that it’s a semi-auto, runs preheat, the vac
advance pipe should have a loop in it, an oilbath aircleaner, and I’ve got the lower pulley tin, generator pulley and fan belt all off already.
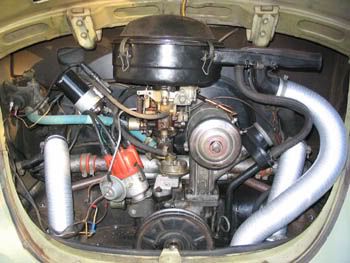
Moving right along and to the topside, I’ve undone the aircleaner preheat hoseclamp, pulled the breather line and whipped off the aircleaner,
followed by disconnecting and plugging the fuel lines. I then pulled the wires that feed the carb solenoid and choke heating element, the distributor
to coil wire, coil to dissy high tension lead, oil pressure sender wire and the to/from wires for the semi-auto control valve solenoid.
After that it’s loosen the dissy clamp and out with the distributor and in with a clean rag ( I had made sure it was already at TDC for No 1
cylinder) so I can remove the carb with only a little struggle. Next up I undid the throttle cable barrel clamp and the two 13 mm nuts from the carby
base . Off it came and a clean rag was stuffed down the intake.
Just in case you’re wondering, what looks like some wires up near the top of the preheat hose are wires for a hard start relay.
[ Edited on 2/4/2006 by ctefeh ]
|
|
|
 ctefeh ctefeh
Wolfsburg Wizard
  
Posts: 479
Threads: 30
Registered: April 23rd, 2005
Member Is Offline
Location: SiddaKnee nowadayz
Theme: UltimaBB Pro Blue ( Default )
Mood: grimly determined
|
| posted on April 1st, 2006 at 11:28 PM |
|
|
Roll on...
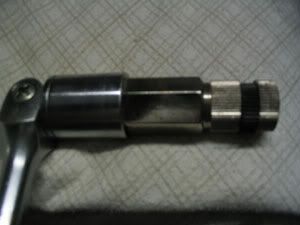
To remove the breather/oil filler from the generator stand I went directly to the heavy duty tool. This is known as a 1 inch internal pipe wrench.
After you’ve cleaned the internal gland nut of all greasy, oily crap you insert it into the gland nut so that the moving part is below the top
surface, but not too deep as you may score the tunnel in the generator stand. Turn it anticlockwise until it grips, and then start applying more
force. It’s important to keep it more or less centred in the gland nut. That’s a 75 cm breaker bar attached to it. Just keep the force steady,
don’t go overboard trying to rip it out immediately. It will start to undo with steady force applied to it.
At this point I have removed the fresh air hoses, pre-heat hose, breather hose, the fuel pump, the oil filler/breather internal gland nut, the gasket
between the oil filler/breather and generator stand, and I have also undone (but not removed) the two screws on the sides of the shroud. The left hand
one in the pic is a royal pain, more so because mine is a semi-automatic. I’ve also disconnected the 3 wires attached to the generator and removed
the screw holding the hard start relay from the shroud. I just set them all to the side out of harms way.
I removed the engine pulley to fit a Bling pulley.
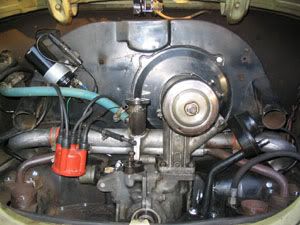
I will be swapping the lower two for 10mm bolts so I can pull the alternator and backing plate assembly out without having to raise the shroud. I will
of course be testing this.
|
|
|
 ctefeh ctefeh
Wolfsburg Wizard
  
Posts: 479
Threads: 30
Registered: April 23rd, 2005
Member Is Offline
Location: SiddaKnee nowadayz
Theme: UltimaBB Pro Blue ( Default )
Mood: grimly determined
|
| posted on April 1st, 2006 at 11:38 PM |
|
|
Articulated joints
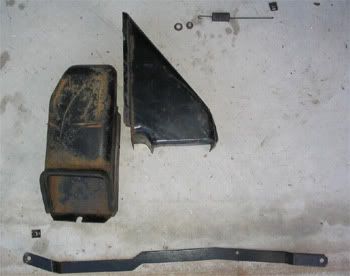
Now the need for triple jointed arms becomes apparent. This all has to be removed from the rear of the shroud. It may not be necessary but I figured
better safe than sorry. To start with undo the 10 mm nut holding the upper air duct onto the shroud and remove it. This let’s you access the 10mm
bolt holding the lower duct on. I loosened it and removed the duct but left the bolt/washer on there.At the bottom of the oil cooler is one last 10mm
bolt. Undo and remove this or your shroud isn’t going anywhere. Unhook the two spring clips holding the link arm to the vent flaps. Careful here or
you may hear the PTANG-tinkle-tinkle sound as one escapes your grip leaving you with a difficult search. Ask me how I know. Remove the spring from the
shroud and then take out the link arm.
From the front, remove the accelerator cable guide tube and I am now ready to raise the shroud.
Last thing I removed was the generator strap bolt, and with some 25mm high blocks of scrap wood handy, raised the right hand side of the shroud and
put the blocks underneath the generator and between the inlet manifold end casting and the shroud.
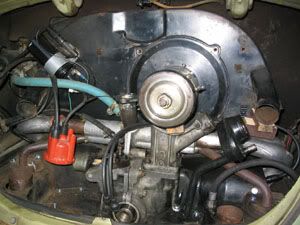
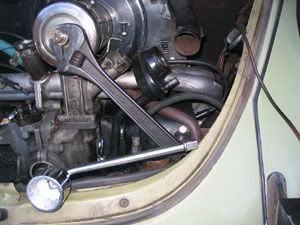
Now it’s time to undo the generator fan nut. Here’s a shifter on the pulley rear section and a ½ “ drive 36mm socket on a short bar. I put a 30
cm length of pipe over the bar and from the rear attached it to the nut, slid the pipe up until it was resting against the decklid bracket and then
using the shifter I turned the pulley half anticlockwise to undo the nut.
Keep an eye on the shroud as you don’t want to twist everything up while applying some force to the shifter!
After about two full turns I took everything off and undid the fan nut by hand.
In hindsight I really should have undone this earlier!!!!
|
|
|
 ctefeh ctefeh
Wolfsburg Wizard
  
Posts: 479
Threads: 30
Registered: April 23rd, 2005
Member Is Offline
Location: SiddaKnee nowadayz
Theme: UltimaBB Pro Blue ( Default )
Mood: grimly determined
|
| posted on April 1st, 2006 at 11:43 PM |
|
|
Still dismantling
I found the plug wires to #1 and #2 were going to interfere with my efforts so I removed them. You can now remove the generator backing plate screws
and take off the fan nut and waved washer. Lift off and move away the fan from the fan hub. From the front, you can now gently withdraw and lift out
the generator and backing plates assembly. Carefully here as the fan hub may have shims on it. Once it’s out the fan can be taken out of the shroud.
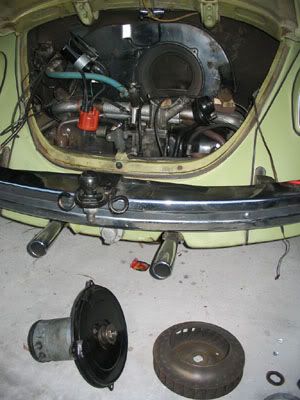
What Do I Keep??
I’m using a two arm puller on the generator rear pulley and fan hub. Carefully!!! If the pulley flexes or the fan hub wants to be a stubborn sod,
soak it in penetrine for a day or two, apply heat and try again.
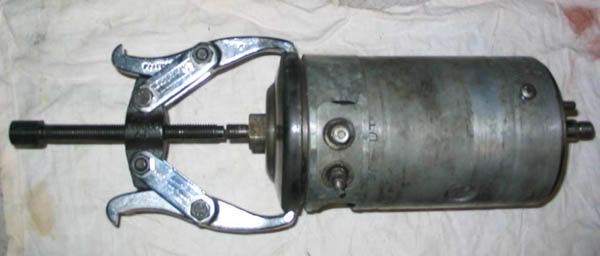
It is then time to take stock of what to reuse.
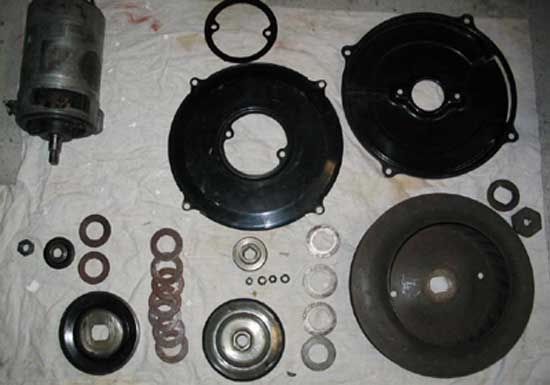
Essentially, the lot except for the generator body itself. I’ll explain.
While the alternator kit may come with tinware, it may or may not come with the two 10mm nuts and washers that hold the backing plate tin on. It may
or may not come with woodruff keys. It doesn’t come with shims. The pulley I got was so out-of round it wouldn’t fly straight as I hurled it into
the scrap steel pile. You don’t get a fan hub, fan, waved washer or fan nut in the basic kit either.
You don’t get the pulley nut or cupped spacer/washer as well.
8mm nut to retain the heavy charge wire?? No, better save that too.
As for the tin? The stuff that was supplied is rice paper thin (except for the spacer ring!) and has a hole in it for a plug wire holder, which
you’ll need to plug or have a spare plug wire holder handy!
That’s my kit. If you are contemplating one, think long and hard before buying.
After another tart up session with bits I save from the generator I assembled everything and checked fan to tinware clearance. I also found some 8mm
nuts with an inbuilt claw washer so I will use a pair to secure the heavy red/white wire.
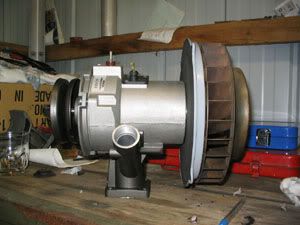
|
|
|
 ctefeh ctefeh
Wolfsburg Wizard
  
Posts: 479
Threads: 30
Registered: April 23rd, 2005
Member Is Offline
Location: SiddaKnee nowadayz
Theme: UltimaBB Pro Blue ( Default )
Mood: grimly determined
|
| posted on April 1st, 2006 at 11:47 PM |
|
|
Last thing off and start of electricals
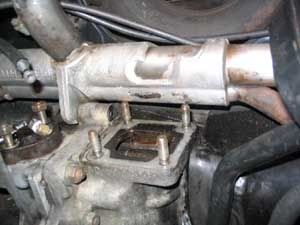
On my spare engine, the generator and alternator stands went on and off with no interference. Not so on Klaus.
The first two careful attempts had me reaching for the medicinal vodka at the thought of having to get the breast tin off and loosening all the inlet
manifold fittings. But a pop-eyed grunt and heave had it off and you can see in the pic where it just caught the inlet manifold. I’ll tell you now
the relief was palpable!
On to the electricals!!
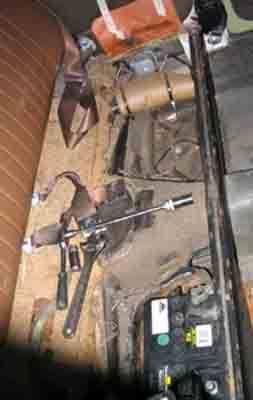
The rear seat has been removed and I have disconnected the positive and negative terminals from the battery. I got two pieces of masking tape and
taped up the flap that covers the regulator.
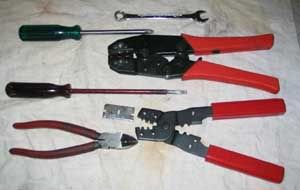
These are the tools I used. A Philips and long straight narrow blade screw driver, 13mm ring spanner for the terminals (and earth strap which I took
off), Ratchet Crimper, Crimper for non-insulated terminals, safety razor and sidecutters.
|
|
|
 ctefeh ctefeh
Wolfsburg Wizard
  
Posts: 479
Threads: 30
Registered: April 23rd, 2005
Member Is Offline
Location: SiddaKnee nowadayz
Theme: UltimaBB Pro Blue ( Default )
Mood: grimly determined
|
| posted on April 1st, 2006 at 11:51 PM |
|
|
Let the sparks fly
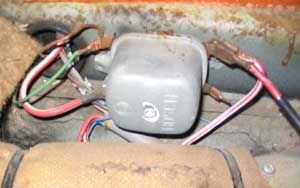
Here’s the regulator. It has the three wires from the generator coming to it. The red/white heavy wire, the green feed and brown earth wires
connecting on the left hand side. On the right is the battery wire, red/white main harness wire and the blue idiot light feed. In case you missed it,
this is a 1971 Superbug.
Gently wiggle off all wires off their terminals and undo the generator wire with a Philips head. The brown earth terminates under the regulator body
to chassis screw. Philips again to remove the two regulator mounting screws.
The simplest diagram I’ve seen so far is Speedy Jim’s. Here’s the link:
http://www.nls.net/mp/volks/schem/gen_alt.gif
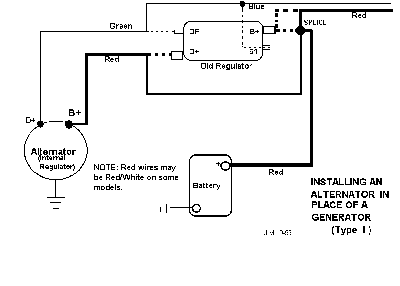
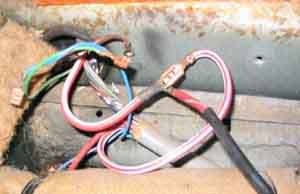
This is basically what you need to do. Hook up all three heavy heavy wires, join the green and blue together and keep or scrap the brown earth. I will
leave it to your imagination as to how you do this.
|
|
|
 ctefeh ctefeh
Wolfsburg Wizard
  
Posts: 479
Threads: 30
Registered: April 23rd, 2005
Member Is Offline
Location: SiddaKnee nowadayz
Theme: UltimaBB Pro Blue ( Default )
Mood: grimly determined
|
| posted on April 1st, 2006 at 11:54 PM |
|
|
Fabbing up
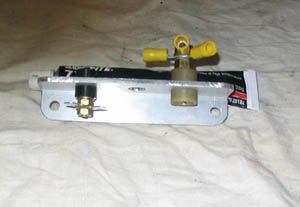
My imagination came up with this.
With a $1.00 piece of scrap 40 x 40 x 3 mm aluminium, I cut it down to 25 x 35 by 106mm long, filed some rounded corners and drilled some 12mm holes
in the upper part of the bracket. The mount holes are 94mm apart. I used a spare 3/16 brass screw/nuts/washers and a 6mm brass screw/nuts/washers to
make the posts. They are kept away from the metal by nylon bushes I made up.
I’m using 3 6mm hole yellow ring terminals as they are rated for 3mm to 6mm thick wire. On the smaller post are two single blade connectors like you
find on coils.
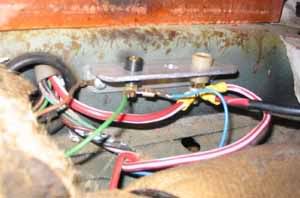
After having a test fit I wound up reversing the large post in the bracket and angling the two blade fittings. I’ve also unclipped the battery wire
from the seat rail to give it a little slack.
Having time on my hands I unpicked the 9mm female blades and ring terminal from the heavy wires, roughed them up with some wet ‘n’ dry and used
the ratchet crimp to clamp the yellow ring terminals on. I screwed the bracket to the body using the original screws and kept the brown earth. The
green and blue wires just went straight onto the twin blades and then I fitted up the three heavy wires and tightened all the post fittings.
|
|
|
 ctefeh ctefeh
Wolfsburg Wizard
  
Posts: 479
Threads: 30
Registered: April 23rd, 2005
Member Is Offline
Location: SiddaKnee nowadayz
Theme: UltimaBB Pro Blue ( Default )
Mood: grimly determined
|
| posted on April 1st, 2006 at 11:56 PM |
|
|
All over red rover
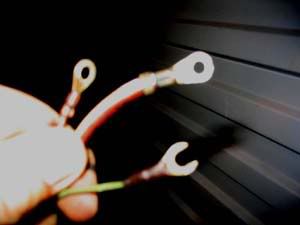
Meanwhile at the generator end, here’s what my three wires looked like. The green wire on the bottom needs a 6mm female blade connector on it to
connect to the alternator. The alternator kit had a crimp on terminal so I used that one.
The other two are good to go as is.
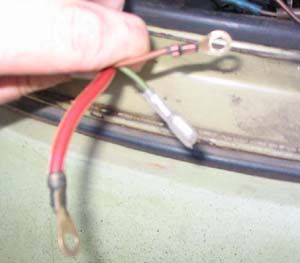
Voila. I slipped a weather shield over the crimped on new blade connector. And that’s the short and sweet of the electricals. Painless compared to
the mechanicals……
|
|
|
 ctefeh ctefeh
Wolfsburg Wizard
  
Posts: 479
Threads: 30
Registered: April 23rd, 2005
Member Is Offline
Location: SiddaKnee nowadayz
Theme: UltimaBB Pro Blue ( Default )
Mood: grimly determined
|
| posted on April 1st, 2006 at 11:59 PM |
|
|
The House of Pain - Mechanicals part 2
On my spare donk I mounted everything as it was supposed to be. Lo and behold my fuel pump fitted! I was happy enough but when I removed it I could
smell petrol. I went and checked Klaus and there were some small fuel deposits in the pump flange (or spacer block…whatever…).
Open the wallet time for a replacement.
Looking at the second pic you can see how the linkage is going to foul the alternator body. You can get carby spacers or you can attempt to flip the
linkage if you’re lucky. Spacers will make your throttle cable wear out fast and recommendations I’ve read say don’t do it.
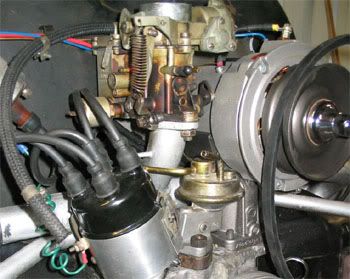
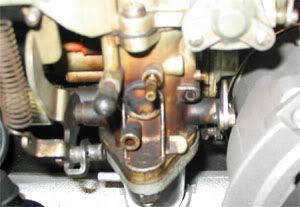
|
|
|
 ctefeh ctefeh
Wolfsburg Wizard
  
Posts: 479
Threads: 30
Registered: April 23rd, 2005
Member Is Offline
Location: SiddaKnee nowadayz
Theme: UltimaBB Pro Blue ( Default )
Mood: grimly determined
|
| posted on April 2nd, 2006 at 12:02 AM |
|
|
Flipping the linkage???
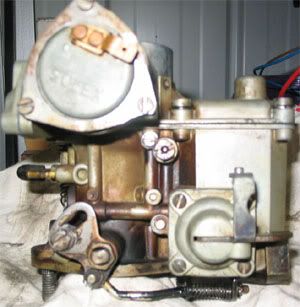
On some sites I read that it is possible to “flip the linkage” on your carb’s accelerator pump mechanism so that it doesn’t interfere with the
alternator body. So I thought I’d see if mine could be done. The shot above is the pump as it is normally.
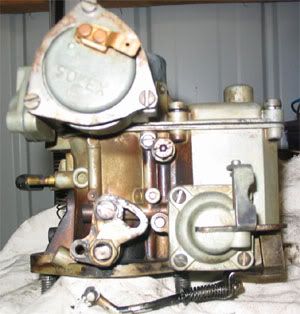
Here I’ve attempted to reverse the linkage and it’s never going to fit. The link arm simply won’t re-attach and would require some serious
bending and re-shaping to fit. I did try all manner of variations. What really screwed me up as well was that the plate the pump arm connects to had a
spigot with the bolt thread in it. Reversing it meant it was throwing the whole shebang out of whack.
As it’s a close fit with the manifold anyway in standard form I decided to quit while I still had a functioning carby.

This is a new Pierburg carby and as you can see, it’s got the correct linkage setup to fit either generator or alternator equipped cars. VW’s that
were fitted with alternators ex factory had these too. I guess I could’ve bought this linkage but I don’t even know if it’s available
separately. Scrounging an alternator equipped beetle carby would be an alternative but I couldn’t be bothered and I’d be up for a lot of
modification if it didn’t come from a semi-auto.
|
|
|
 ctefeh ctefeh
Wolfsburg Wizard
  
Posts: 479
Threads: 30
Registered: April 23rd, 2005
Member Is Offline
Location: SiddaKnee nowadayz
Theme: UltimaBB Pro Blue ( Default )
Mood: grimly determined
|
| posted on April 2nd, 2006 at 12:05 AM |
|
|
The daily grind
I have to grind clearance for the accelerator pump mechanism into the alternator.
So I marked in pencil a guesstimate of the offending area.
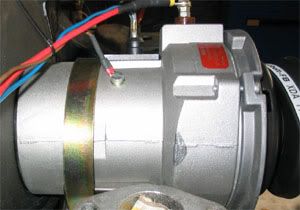
And took to it with a die grinder with a small cutoff wheel. As a fine finishing tool I had a “Tree” rotary burr mounted into my air drill. My
airline blew off the grinder just after
this shot.
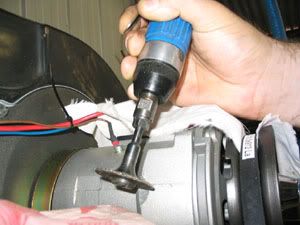
After changing my waist-down clothes and fixing up the airlines I got to here. It is bigger than originally anticipated. About 34 mm up/down, 5 mm
deep at the bottom and 20 mm left to right.
I scored an electric Dremel tool which really helped speed things up. The carb linkage swung all the way through to wide open without interference
anywhere.
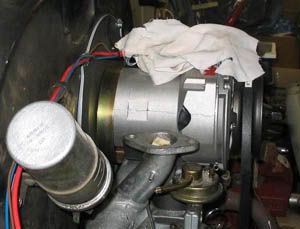
|
|
|
 ctefeh ctefeh
Wolfsburg Wizard
  
Posts: 479
Threads: 30
Registered: April 23rd, 2005
Member Is Offline
Location: SiddaKnee nowadayz
Theme: UltimaBB Pro Blue ( Default )
Mood: grimly determined
|
| posted on April 2nd, 2006 at 12:07 AM |
|
|
Pump it real good

Here’s where things get convoluted. According to information I’ve gleaned VW made at least 9 fuel pump types, not including aftermarket variations
and 3 different fuel pump pushrod lengths. Here’s a wide selection of pumps for your enjoyment. Why is this important? Because some generator pumps
will fit with an alternator and some don’t. If you look at the last two pumps in the pic, the left hand pump may fit with an alternator, but
requires a generator fuel pump pushrod. Giveaway’s are base thickness and the height of the pivot pin. The right hand one is definitely an
alternator pump. They are both tilted away from vertical. The interference with an alternator comes from the top part of the pumps. I’d say the
generator pump that’s third from the right would fit because of its design and it resembles the one on Klaus, but a later variation.
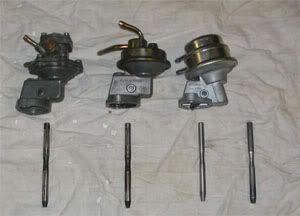
These are what I eventually wound up with. The spare fuel pump on the left didn’t fit with the Alternator. It’s a rebuildable type one with 4
screws holding the top hat on, I have no idea of the vintage. The second one was on Klaus and was a Brosol. It fitted with an Alternator! But alas,
upon examination I found it was beginning to leak so I bought the Alternator fuel pump. The last rod is one of the rarer rods (104mm). A generator
type push rod is about 108mm long, an alternator rod is about 100mm long and apparently VW had to make a 104mm one at some stage. I was supplied with
a generator push rod, so a quick session on the lathe had it all trimmed to its proper length.
The alternator fuel pump has a tang that sits about 2mm below the base.
If you don’t use the correct length rod you will destroy the alternator pump in record time!
|
|
|
 ctefeh ctefeh
Wolfsburg Wizard
  
Posts: 479
Threads: 30
Registered: April 23rd, 2005
Member Is Offline
Location: SiddaKnee nowadayz
Theme: UltimaBB Pro Blue ( Default )
Mood: grimly determined
|
| posted on April 2nd, 2006 at 12:10 AM |
|
|
Whacking it all back together
I thought I had most of everything sorted, so it was time to start re-assembling. I’d read that painting where alternator sits on the stand is a bad
idea due to the skinny brown wire would have to provide the earth for all those amps. I hadn’t done it on mine but when I thought about it, I
decided to strip the paint away from where the nuts and washers hold it to the case.
On Rob and Dave’s site http://www.vw-resource.com there is a discussion regarding
the quality of stands supplied with kits and their tendency to crack. The one I got was as soft as melted mozzarella. So thanks to AVD member Dave
(Menangler) I scored a genuine VW alternator stand and tarted it up.
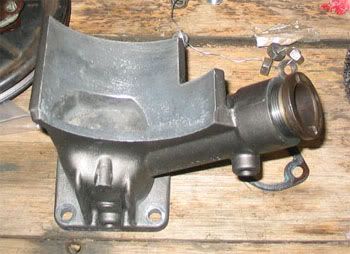
Time to replace the gaskets for the stand. It goes paper gasket, metal gasket (marked TOP) and paper gasket. I used some Permatex No 3 around the
outer edge of the bottom and top faces of the paper gaskets only since I reckon the metal gasket would seal pretty well when crushed.
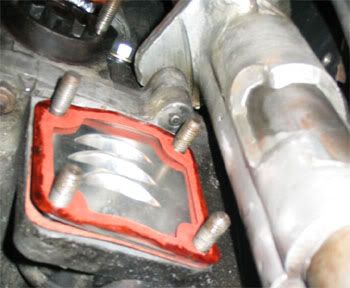
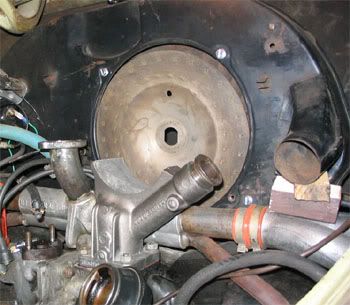
With a gently persuasive hit from a rubber mallet, the stand was on and I slipped the fan back into the shroud. I haven’t done the stand up tight as
it may need a small wiggle when the alternator is dropped in.
|
|
|
 ctefeh ctefeh
Wolfsburg Wizard
  
Posts: 479
Threads: 30
Registered: April 23rd, 2005
Member Is Offline
Location: SiddaKnee nowadayz
Theme: UltimaBB Pro Blue ( Default )
Mood: grimly determined
|
| posted on April 2nd, 2006 at 12:12 AM |
|
|
Are we there yet dad?
I put a tiny smear of grease on the two fan hub shims so they wouldn’t go anywhere and lifted the assembled alternator and tinware up where I could
guide the fan hub into the fan and slid a block of wood between the alternator and stand.
Put in the two screws for the top of the fan tin and reaching around the back seated the fan on the hub and put on the waved washer and fan nut finger
tight. All pretty smooth thus far until it came time to put the two 10mm bolts in the lower holes. The right hand one was easy but the left hand one
induced a near psychotic episode. On the fifth attempt it was in and finger tight via a 10mm spanner. I need triple jointed pianist’s fingers.
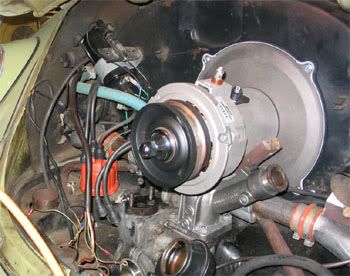
Now it’s just remove the blocks of wood and carefully guide the right hand side of the shroud into the lower tin and check that the alternator stand
and body line up and are seated properly.
At this point I did the stand base nuts up evenly.
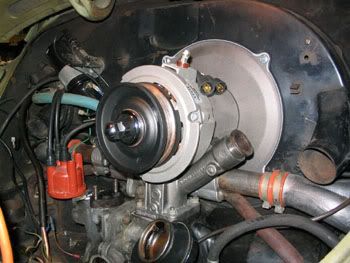
Next up I bunged on the oil filler gasket, oil filler, internal gland nut to the stand and fitted a shroud hose to check the breather hose clearance.
I used a fabbed tool to do the gland nut up tight. I’ve also slipped the old generator strap into place and tightened it because it is “pre
formed” into shape. The new strap will be consigned to the spares bucket.
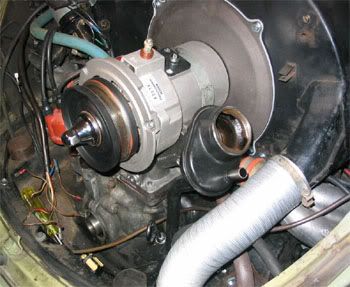
|
|
|
 ctefeh ctefeh
Wolfsburg Wizard
  
Posts: 479
Threads: 30
Registered: April 23rd, 2005
Member Is Offline
Location: SiddaKnee nowadayz
Theme: UltimaBB Pro Blue ( Default )
Mood: grimly determined
|
| posted on April 2nd, 2006 at 12:16 AM |
|
|
Nailed to the tree of woe
Time for BLING! I slipped in an Aluminium pulley I bought ages ago and……………..
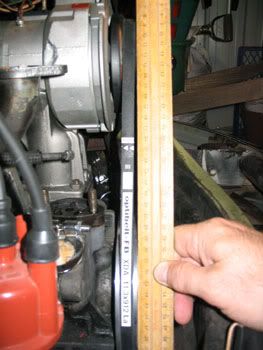
Out by a lot. WTF? I had test fitted this one on the spare donk. As is turned out I had two problems, not one…But only after I woke up after some
medicinal vodka did I twig to the first.
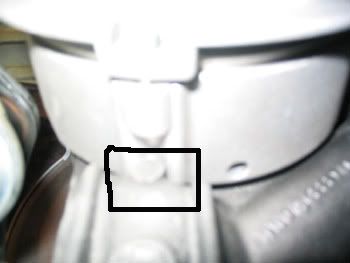
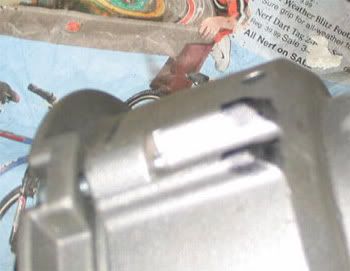
My alternator was catching the stand by the two ribs underneath.
Here’s where I decided to test whether or not this can truly be done with the shroud in place.
The answer is yes, pretty painless taking it out.
So I whipped it all off again and marked and cut the ribs back 5mm with a grinder and going lightly to minimize heat and finished off with a file to
smooth it.
|
|
|
 ctefeh ctefeh
Wolfsburg Wizard
  
Posts: 479
Threads: 30
Registered: April 23rd, 2005
Member Is Offline
Location: SiddaKnee nowadayz
Theme: UltimaBB Pro Blue ( Default )
Mood: grimly determined
|
| posted on April 2nd, 2006 at 12:19 AM |
|
|
The way forward
So when I put it all back together I found my BLING pulley had jammed up against the lower tin. Naturally the test donk didn’t have tin when I trial
fitted, so after some thought….
I needed a volunteer…….you in the middle………….
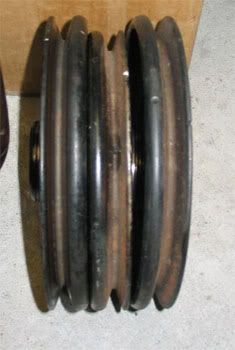
Meet thy fate……………
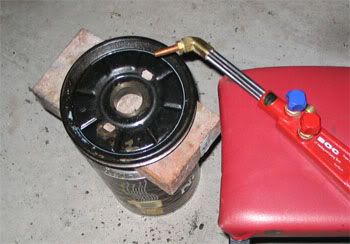
|
|
|
 ctefeh ctefeh
Wolfsburg Wizard
  
Posts: 479
Threads: 30
Registered: April 23rd, 2005
Member Is Offline
Location: SiddaKnee nowadayz
Theme: UltimaBB Pro Blue ( Default )
Mood: grimly determined
|
| posted on April 2nd, 2006 at 12:23 AM |
|
|
Getting it on
I’d measured that I’d need a shim 2mm thick to get the pulleys aligned and off the lower tin.
So I cut the center out of that small pulley, whipped it into the lathe and machined up a spacer from the long end. I also took a cut from the inside
diameter to let it go on and off the crank snout easily in case I stuffed up.
The result………
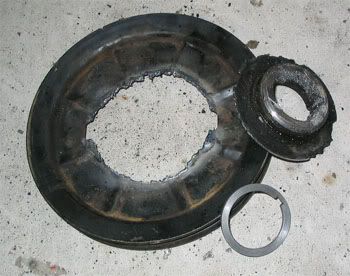
And after extracting the pulley, putting the shim in and buttoning it all up again I’m back in action again. Doing up the lower two 10 mm tinware
bolts brought on symptoms of dementia.
It may look wonky but it’s my digicam lens and stupid angle I had to take the shot at.
I actually found that the alternator belt fitted much better into the Bling pulley than the standard
Pulley. The alternator belt in the standard pulley rode really high in the V groove and I actually couldn’t do the alternator pulley up properly, so
I chose the Bling.
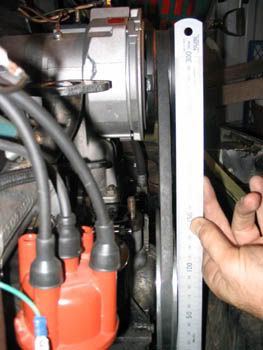
Here’s where I called it a night. I've fitted up all stuff I took off the rear of the shroud. The lower oil cooler/shroud 10mm bolt was another one
that tried to reduce me to a drooling simpleton.Pump on after checking how many gaskets I’d need (2), wires onto the alternator. Note the fuel hose
goes to the top. In Portugese the box said “Entrada de combustivel” or some such, which translates into “Fuel pump entry” for the top fitting.
I’ll check it properly later.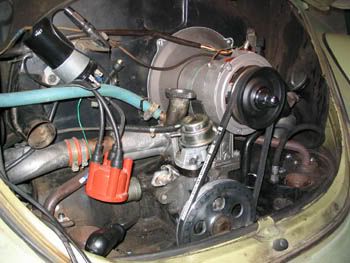
[ Edited on 1/4/2006 by ctefeh ]
[ Edited on 2/4/2006 by ctefeh ]
|
|
|
 ctefeh ctefeh
Wolfsburg Wizard
  
Posts: 479
Threads: 30
Registered: April 23rd, 2005
Member Is Offline
Location: SiddaKnee nowadayz
Theme: UltimaBB Pro Blue ( Default )
Mood: grimly determined
|
| posted on April 2nd, 2006 at 12:26 AM |
|
|
Will this ever end??
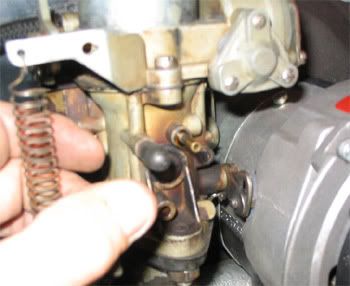
Here I’m using a shifter and torque wrench to tighten the fan nut after all my current fun and games have ended. 47 Ft/Lbs is the figure.
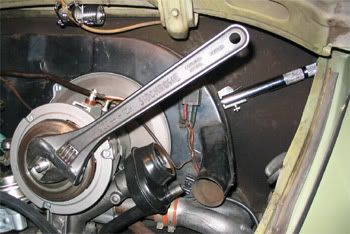
Test fitted the carby and it’s going to need a bit more grinding action. I marked the current area with a black texta and let the accelerator pump
linkage do it’s worst.
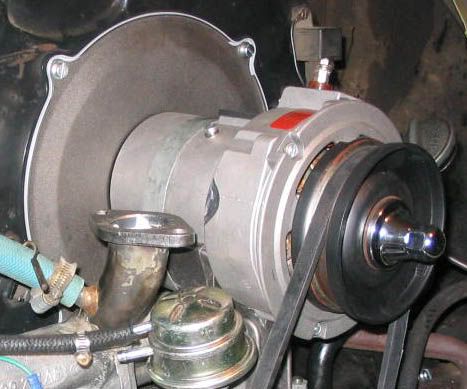
Dremel grinder fitted with a carbide cutter time. After covering everything with rags so no particles would find their way into the intake or any
other opening. And a test fit of the carb yet again. At last! No interference!
|
|
|
 ctefeh ctefeh
Wolfsburg Wizard
  
Posts: 479
Threads: 30
Registered: April 23rd, 2005
Member Is Offline
Location: SiddaKnee nowadayz
Theme: UltimaBB Pro Blue ( Default )
Mood: grimly determined
|
| posted on April 2nd, 2006 at 12:30 AM |
|
|
Actually yes. Right here!
So now that everything is hunky dory once again it’s on with the re-assembly. All the electrical leads in their proper position, Engine at 7.5 BTDC,
distributor put back in, vacuum hoses routed and put back on, spark plug leads routed and hooked up, solenoid/choke wire on, dissy wire hooked up,
pulley cover tin on and all torqued to specs.
Coffee, ciggie and bed time.
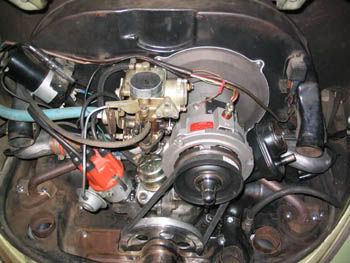
I’ll make mention here I’m a real fanatic when it comes to using antiseize on anything exposed to heat or the elements. I’ve just prepped the
thermostat bolt and nut prior to fitting it back up.
Remember to re-adjust it to spec’s when you put it back up.
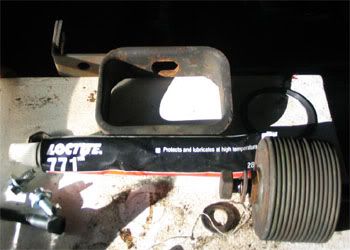
More re-fitting everything I took off which at this point is the shroud hoses, oil cap and then taking some time to check all nuts and bolts etc. I
decided to clean up some daggy wires for the tach and oil sender as well.
I finally reconnected the battery at this point and did a smell and visual check to make sure something wasn’t toasting itself. Looked OK so I
primed the carb with some dribbles of fuel and after two stutter starts it fired and ran like a watch. I stopped it and hooked up the aircleaner,
breather hose shortened by 40mm and finally the preheat hose. While I was at it I hooked a timing light up and re-started Klaus. My static timing
guesstimate was spot on so I let the engine continue, blipping the throttle and listening for any hideous and expensive sounds. I let it go a few more
minutes to check the thermostat and choke were working and they did their respective jobs……so its pack the tools away and drop the engine lid
down.
Last pic of the engine going.
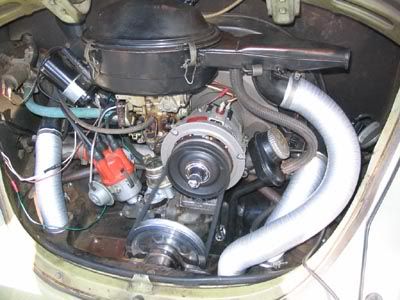
THAT’S A WRAP!
I know I could have done a few or a 1000 things differently now but hindsight is always 100% accurate. I wanted to see if I could do it the way others
reckon it can be done without virtually dropping the engine. Looking at that last sentence reminds me of Michael Palin’s character in Monty Python
and the Holy Grail explaining to Herbert why he built his castle in a swamp.
Grab a mate and get the engine lid off. It isn’t necessary but helps access hard to get areas. As well as that, it halves the time taken for some
tasks!
The lessons I think learnt from this is that what works for some on their donk, might not work for you on yours.
As always, you get what you pay for.
I’d pick and choose my components rather than take a punt on a kit if I had to do it again.
My best advice for doing this swap is try everything yourself on your engine and find out what fit’s and what doesn’t. Give yourself plenty time
and access to spares before you hook into this if your car is a DD.
Hope this is useful.
Ctefeh
|
|
|
 ruckus ruckus
Veteran Volks Folk
    
Posts: 2118
Threads: 165
Registered: June 19th, 2004
Member Is Offline
Location: Osaka, Japan
Theme: UltimaBB Pro Blue ( Default )
Mood: Pretty strong for a chalk-pusher
|
| posted on April 2nd, 2006 at 08:57 AM |
|
|
Thanks that's awesome!
|
|
|
 empi empi
A.k.a.: Empstar
Compulsive Aussie Vee Dubber
      
Posts: 4131
Threads: 178
Registered: August 27th, 2002
Member Is Offline
Location: melbourne
Theme: UltimaBB Pro Blue ( Default )
Mood: thunderous
|
| posted on April 2nd, 2006 at 01:17 PM |
|
|
is that davross??
"If at first you don't succeed, skydiving is not for you." - Anonymous  |
|
|
 ctefeh ctefeh
Wolfsburg Wizard
  
Posts: 479
Threads: 30
Registered: April 23rd, 2005
Member Is Offline
Location: SiddaKnee nowadayz
Theme: UltimaBB Pro Blue ( Default )
Mood: grimly determined
|
| posted on April 2nd, 2006 at 06:44 PM |
|
|
Avatar
Yep. I reckon after burning the candle at both ends I'm starting to resemble him.
|
|
|
 Joel Joel
Scirocco Rare
Now containing 100% E-Wang
        
Posts: 9368
Threads: 211
Registered: February 14th, 2006
Member Is Offline
Location: Northern Rivers NSW
Theme: UltimaBB Pro Purple
Mood: Tact Level 0.00
|
| posted on April 2nd, 2006 at 11:07 PM |
|
|
hiya
i only just posted this on another post somewhere else acupl of days ago
ive got a spare engine that is a bitsa
it has a factory 50a alternator but a carb and bolt together style fuel pump from a genny engine to make it work though i had to heat the linkage and
bend it abit to clear the alt also just a tiny shave off the alt as i didnt know how far i could go with it
as u can see there is about 5mm clearnce btwn the pump and the alt it all works fine
Joel

|
|
|
 ctefeh ctefeh
Wolfsburg Wizard
  
Posts: 479
Threads: 30
Registered: April 23rd, 2005
Member Is Offline
Location: SiddaKnee nowadayz
Theme: UltimaBB Pro Blue ( Default )
Mood: grimly determined
|
| posted on April 2nd, 2006 at 11:52 PM |
|
|
Saw that post....
DUB74L,
Yes, I saw your pic in PBB's thread.
I considered bending the plates, but it came down to the choice of stuffing the alternator and having a gennie I could fit back on, or stuffing the
carb and no spare.
Since my carb is semi-auto specific I chickened out.
I seriously couldn't bend the linkage arm around enough to fit.
Was yours a 34 Pict-3?
And I notice there's a three pin prong on top of the alternator, it was externally regulated?
Makes me think an OE VW alternator wasn't as porky as the Bosch one marketed now. Your fuel pump also fits with the OE alternator.
Might measure one if I find it and see......
Regards
Ctefeh
[ Edited on 2/4/2006 by ctefeh ]
[ Edited on 2/4/2006 by ctefeh ]
[ Edited on 2/4/2006 by ctefeh ]
|
|
|
 oval TOFU oval TOFU
Son of Jim - Creator of Good
Bitte, ein Bit!
     
Posts: 2946
Threads: 234
Registered: July 10th, 2003
Member Is Offline
Location: Pt Cookie, Melburg
Theme: UltimaBB Pro Grey
Mood: :booM
|
| posted on April 3rd, 2006 at 12:53 AM |
|
|
Great tech sheet ctefeh! but you've scared me off getting a alternator in the short term now.. but that's a good thing - you'll have saved me a lot
of tears and swearing... for now...
...and Robert's ya father's brother...
|
|
|
 Joel Joel
Scirocco Rare
Now containing 100% E-Wang
        
Posts: 9368
Threads: 211
Registered: February 14th, 2006
Member Is Offline
Location: Northern Rivers NSW
Theme: UltimaBB Pro Purple
Mood: Tact Level 0.00
|
| posted on April 3rd, 2006 at 07:48 PM |
|
|
yeah thats the standard 74-75 externally regulator style oem alternator
ur probably right, the later after market ones being larger than stock
yep thats just a 1600 34 pict3 carb i just heated up the linkage with the hot axe and bent it over a bit and ground abit of the alternator housing
as far as i remeber the semi auto carbs are no different to manuals they may have one extra 1/4" vacuum line the main diff is in the manifold for
the main suction line
as u can see in my pic that one is off a semi auto Lbug just with a piece of hose blocking it, i think kombi ones are the same for the brake booster
hose
i just bite the bullet and butcher things like that i would say i have nearly 5 of every beetle part shoved under the house lol
Joel
|
|
|
 PrettyBlueBug PrettyBlueBug
A.k.a.: P.B.B....
Veteran Volks Folk
Almost over it...
    
Posts: 2032
Threads: 70
Registered: May 8th, 2005
Member Is Offline
Location: Melbourne, Australia.
Theme: UltimaBB Pro Purple
Mood: 
|
| posted on April 18th, 2006 at 02:49 PM |
|
|
Wow.... lots involved but you did a great job!
I'd still like an alternator in my PBB.... but I think I'll let my mechanic do it! LOL 
|
|
|
 ctefeh ctefeh
Wolfsburg Wizard
  
Posts: 479
Threads: 30
Registered: April 23rd, 2005
Member Is Offline
Location: SiddaKnee nowadayz
Theme: UltimaBB Pro Blue ( Default )
Mood: grimly determined
|
| posted on April 18th, 2006 at 04:45 PM |
|
|
The least pain involved....
PBB,
In your case, since his time will be your money, I'd get the alternator, stand and carby linkage purchased/sorted before you hand the PBB over
for fettling.
If the fuel pump is an issue, it will be relatively simple for him (her?) to sort out.
My choice of a bling pulley caused most of my dramas, but if you retain your current setup I'd reckon you won't have the same mess.
Lloyd (Beerboy) offloaded a 34 Pict 3 and one of my tasks with it is to fabricate/modify the acc pump plates that will allow linkage reversal and
retrofit that onto Klaus.
Enjoy
Ctefeh
|
|
|
 Klaus Klaus
Custom Title Time!
    
Posts: 1439
Threads: 100
Registered: August 25th, 2004
Member Is Offline
Location: Wollongong
Theme: UltimaBB Pro Blue ( Default )
Mood: Heavily modified
|
| posted on May 2nd, 2006 at 05:03 PM |
|
|
Never had a car named after me before (tear ) feel honoured. (sniff)
|
|
|
| Pages: 1 2 |